
Leaderboard


Popular Content
Showing content with the highest reputation on 06/08/18 in all areas
-
Soviet patrol anti-submarine aircraft.29 points
-
After the WWII in the Soviet Union, there were a lot of flying boats PBN-1 Nomad obtained through lend-lease, on many of them engines were replaced with Soviet engines AШ-82. After the plane was named KM-2 (Catalina modified - 2). The KM-2s served mostly in the aviation of the Soviet Northern Fleet, as they arrived in the part of the Be-6 flying boats and after the removal from the PBN-1 armament, they were transferred to the Polar Aviation Department, where they flew until the early 1960s.27 points
-
Howdy Everyone, Just put the finishing touches on my latest effort so I thought I`d share some pic`s My attempt at Eduards boxing of Hasegawas 1/48 F-8 Crusader Kit Finished in the markings of `The Stinger` of VMF(AW)232, while based at Da Nang 1966-67 Chose this scheme to complement my `Red Devils` Phantom you might remember from a while back, as I was a bit disappointed with the selection that came with the kit The rest is pretty much from the box contents, just added some brake pipes from some wire, the MER`s and bombs came from a Has` A-7 Corsair kit and the RBF Tags from Revell Skyraider. Managed to use most of the Resin and Photo Etch, but kept the kit wheels as they painted up better and the resin nose wheel looked too small to my eyes Decals came from Microscale sheet AC48-0054 which are for a later incarnation of the same plane, only difference being the tip of the fin which I modified to suit These aircraft didn`t seem to be as dirty as the `Death Angels` airframes but a bit grubby nevertheless. Hope you enjoy, thanks for looking Cheers Russ25 points
-
Well it had to be done. Everyone else has one. Don't you? Have to fish out the typhoon and tempest out the roof sometime for a family portrait. Just need a MkII tempest and I'd be a very happy camper. Enough has been said about the Airfix Sea Fury, so I wont repeat details. I enlarged the cowling by putting a 15 thou plastic card shim on each side. That just about makes it fit. I added a gun sight from an Eduard Spitfire that I had spare (not that you can really see it). The decals are from an AeroMaster sheet as I wanted one with the black and white stripes. The photos show a couple of areas I need to touch up. Oh well. Its not like I have other kits to build 😉 Enough waffle, on with the pics. Tim25 points
-
This is my 1/48 Brewster B339 Buffalo which I started as a practise model. I had two periods working on it over two years. The only real challenge with this one was the cutting of the canopy. I know the Green camouflage is the wrong colour, but it was too late to change it and I had other things to learn. Still it looks good in my cabinet. so I'm happy.22 points
-
Finally going to call this one finished. Hope you like the final photos.16 points
-
Thanks Chris - you're welcome (more below) Thanks John Recorded and watched the first section with the Compton Abbas fly in. Great programme (available here if you can see it) Thanks Keith A tentacle tool? Is there such a thing? I must get one... No Butler, sadly, had to let him go when I retired The show was good, as usual. I'm not a great one for looking at other people's models (makes me envious of their skills) but the traders let me restock all of the things I was short on. There's a new Cafe too; at least I think it's new. One sad thing for me - Sphere were there and had some free little brush stands to keep wet brushes off the bench. Great idea, but I lost mine somewhere 😢 Thanks Johnny I guess you're right, although not much will be seen when she's closed up Engine assembled and given a coat of Mr Metal Iron around the cylinders. I then looked up the reference shots and saw that the housing was glossy black. Rats. Poked around with small brush: Tip: Paint the housing before you assemble the rod thingies. Duh.14 points
-
I am declaring this model complete. It is my interpretation of:- Gloster Sea Gladiator N5517/6*A 813(F) NAS, HMS Eagle Mediterranean Jul '40 Flown by Commander CL Keighly-Peach RN This aircraft was involved in the destruction of a number of enemy aircraft; 11.07.40 S79 Destroyed 13.07.40 SM79 & S79 Destroyed 17.07.40 S79 Destroyed 31.08.40 Z506B Destroyed. This model has had a long gestation period. It started well in August '16 but for some reason I just lost mojo with it and it went and sat on the shelf. Going back to the kit in July '17, after building a Seafire, I had a lot of trouble mounting the upper mainplane and managed to break several struts, back it went onto the shelf of doom awaiting its fate. Two weeks ago, having completed my Hellcat build for the Carriers Ahoy GB and not wanting to start my next aeroplane (Pacific War GB), I decided to have another crack. I replaced broken Cabane struts with brass tubing and steel pins and as they say Robert is you mothers brother. I am still happy to get this off the bench and some of the finishing could have been better but I think if a spend any longer on this model I'll break it again. In fact I was in such a hurry to get the pictures done that the PVE on the canopy hasn't dried completely clear yet... In reality it is a good kit and would reward someone with better skills than myself. At some point I will return to Biplanes, I want to build a Swordfish and Albacore for my collection but I have a number of fighter types to do first. Oh and a representation of the 64th (2nd London) Division in the Eleventh Hour GB - Me and figurines - gawd help us all.... Thank you to everyone I questioned as to codes, no codes, IFF Black/white etc for you advice and guidance. I have considered it all and have taken a path, and yes some of the details are debatable but as more research goes on - one day I will revisit my subject. Now for a couple of pictures.. Now for the arty, atmospheric shots, Thanks for stopping by..12 points
-
Hi Guys This is the TAMIYA F-16 block 60 with the Wolfpack conversion added and Aires under carriage bays, along with after market decals, not sure on the make. enjoy Mike12 points
-
This is my latest from the workbench. I found the Airfix kit excellent and right up there with the best in the market at a fraction of the cost. It also gives you the option of three different "Emils" including the one flown by Adolf Galland. (This subject has probably been built to death but I still like finishing models in the colour schemes of famous aces.) For painting I used a combination of Humbrol and Revell Acrylics. Weathering was done with an oil wash of Burnt Umber as well as some grinded chalk pastel and silver pencils and paints. I know it is not 100% correct as it is missing the swastika on the tail but I am still waiting for the aftermarket decal in the post. This is basically an OOB build as it stands Kudos to Airfix for a wonderful kit, highly recommended.12 points
-
Revell F-86D ( early ) in the colors of the 75th FIS, Suffolk Country in August 1953. Build some years ago completely out of the box. Great kit with a good fit and lovely details. The windscreen had a slight accident but anyway. For the paint work i have used metal shades from Humbrol. Not as good as Alclad but good to work with. Hope you like it.11 points
-
Buccaneer S2A, XV339, afternoon of Friday 6th October 1972, before a test flight out of RNAY/RAF Sydenham, Belfast, during which it crashed. The crash was non-fatal but XV339 was totally destroyed. Yours truly witnessed the canopy being blown off, the two seats ejecting and the Bucc disappearing down behind the buildings. By the time I had run the 1/2 mile to the crash site the RUC had already cordoned it off.11 points
-
Hi folks i just finished this yesterday. The new Revell Mustang. OOB only for Eduard belts and After market decals to depict Passion Wagon. Gunze and Tamiya lacquer paints all around. nice kit. rgds11 points
-
A well done resin kit, finished today. At the end of the photos, the last Mustang type, P-51H, with the last P-40 type, and then the first large production P-40B with the P-40Q.11 points
-
I already posted photos of this build at HyperScale, but I hope people will forgive my posting them here as well -- I figured it being a British subject ... Anyway, I've had the Tamiya kit for a long time and wanted to build it as a nightfighter using decals from a Techmod sheet covering several planes, most of them serving with RAF Polish 307 Sqn. X8005 had non-dihedral tail planes, so I used a Red Roo resin set. Other aftermarket items include parts from a True Details resin cockpit as well as Ultracast seats, wheels and hedgehog exhaust stacks. The starboard wing vertical plane radar dipoles are pieces of .017 guitar string with the teardrop fairing carved/cut from a piece of sprue. Paints are Model Master enamels and various Alclad shades for the exhaust collectors and stacks. Cheers, Pip10 points
-
Just completed this Academy 1/72 Me-163. Great little kit! Painted with MRP paint & Badger Sotar and added seat belts, armored glass braces, gunsight, and canopy limiting strap. Thanks for looking! Rich10 points
-
Dornier Do J Wal, USSR N-233 Polar Aviation, summer 1942.9 points
-
This morning's post is bought to you by the colour Yellow. But first: some last-minute colour research. With @keefr22 quite correctly pointing out a page or so back that I'd forgotten to add the Arctic Red panels to the painting guide I wanted to be sure that whatever I was doing to the wings matched the best available evidence. T.O. 1-1-4 differs from the actual aircraft in regard to these wings areas, something which so shows how you even have to be circumspect matching USAF's own technical documentation to the operational reality - definitive is as definitive does.... Regrettably no 20ft+ high photographers have ever seen fit to take clear colour shots of the top of Pelican 9 or her sisters (merely in passing I proffer this as evidence that 'Intelligent Design' is the utter bilge it seems to be), so the clearest source I could find was aerial shots from the 'Catch a Falling Star' USAF documentary over on Youtruth. A number of things need to be noted when looking through such footage for evidence of what to build/paint: Like much filmmaking this one was probably constructed from a range of separate elements - actual footage of a capsule recovery (the crew rigging the recovery lines and the capsule being snagged) edited together with scenes shot later on (take off sequence, aerial exteriors, crew chief) in order to produce a narrative timeline. In other words - the illusion of continuity required to tell a story. You can't be sure that exterior shots of the aircraft in flight match any of the aircraft seen on take-off, or indeed the capsule recovery interiors and so forth. We could indeed be looking at three different aircraft, but either way, the markings and paint job are consistent with the 6593d Test Squadron used in operations of this period. It seems likely USAF would have shot the original on 16mm colour stock. The poor quality of the copy online (inaccurate colours and blurry) therefore indicates this to be a 'god-knows-how-many' generation removed optical print form the original master. No doubt this is one of many copies sent around USAF and Govt. circles at that time to screen to personnel involved. The blurriness of the footage is a problem when trying to identify detailed areas, with the image top left (in the image above) being the clearest. Let's take a closer look: The upper image is the original untouched frame, the lower a version washed through unsharp masking and edge detection algorithms to try and identify colour/linear features on the upper surfaces of the wings a bit better. It seems evident that the coloured wing panels have weathered away quite substantially in places under the Pacific sun! More importantly, it serves to indicate that the contemporary paint job on the wings matches that on the restored version in the USAF museum (albeit a different colour used in the restoration). There's a few new shots (to me) indicating this on the underside of both wings in this 'scraped' page here: https://hiveminer.com/Tags/518037 With no way of knowing the state of 51-8037's wing colours I'm not going to be foolish enough to invent any spurious heavy weathering of this kind, but will attempt to give a sense of sun and salt fade. First then, to work on sketching-out the boundaries to the various colour panels: The yellow here is about a 60/40 mix with flat white, thinned 50/50: As I prefer doing 'the 'working-out' on the aircraft, these give me rough boundaries to work inside freehand now: At this point I found I'd doolishly tipped the airbrush up and back too far so that the thinned yellow had run back inside as far as the air valve, so the quickest thing to do seemed to be strip it for a quick deep bath in airbrush cleaner: Actually, looking at the colour of the cleaner afterwards it was probably overdue a good soak.... Crisis averted, I then moved on to sketching in yellow variations over the base black, stroking downward with the brush as close as possible to the surface: Then, it was just a case of proceeding around the airframe in an orderly manner: In areas like this below I'm trying to lay down a colour base to later on let me suggest the kind of plausible fading along the upper surfaces caused by the sun beating down: Along broad area of colour on the wings I also wanted to have a sense of fading and structure, in order to express a non-uniform response of the paint pigment to extremes of heat and light: That level of contrast will of course be considerable diminished under the Artic Red. Pleased with that start though memo to self: stop testing airbrush on forearm. In case you're wondering, sharp boundaries will be introduced to those colour areas once I've finished with red and move on to - trying at least - to develop a dark-but-varied base for the Alclad to go over. Might be more tonight but if not then later in the week as I'm in Dublin all day tomorrow with Mrs. B and my mother - the National Gallery followed by a pitstop at Ikea on the way home. There was some debate recently over on Ced's Lizzie thread about the cooked breakfast - oddly enough the National Gallery in Dublin does an excellent one so guess where I'm headed first. Snorkers! Good-oh! Tony9 points
-
Hi all, Latest one to get finished on the bench is Hobby Boss' very nice 1/48 F4F-4 Wildcat. I've built this as part of the excellent Mediterranean Theatre GB which you really should check out as there are some truly excellent builds going on and some really good finished ones in the gallery. The model was built OOTB with the exception of some seat belts and aftermarket decals from Superscale which performed excellently and I used both Vallejo and Lifecolor paints. Here are the pics; Hope you like her and thanks for looking in, all comments and criticisms are gratefully received. And for anyone interested here is the link to the WIP; Craig.8 points
-
I recently completed this model and its construction appeared in Aircraft Work In Progress here on Britmodeller. This is what I started with. A challenging but enjoyable build. The only transparency that I replaced was the dorsal turret which came from my spares. I scratchbuilt a flight deck and sanded and polished the kit's glazing. All brush painted in Revell and Humbrol enamels. The kit's decals were superb. BMW badges between the lower engine cylinders Thank you for looking. regards, adey8 points
-
Another cheap kit from the Bay to practice with an airbrush. The tooling dates back to the 90s and did present some challenges but it built up reasonably well so I decided to add it to my Finnish Air Force collection. This one of the original Ju88s delivered to the Finnish Air Force and survived long enough to be repainted from the original Luftwaffe splinter camouflage into Finnish war paint, black/olive over light blue. The Hakaristi were changed from white to subdued blue over grey. About a month after the end of the Continuation War, JK260 crash-landed in a lake near St Petersburg. Regrettably, talks over salvaging the aircraft came to nothing so it is assumed the wreck still lies at the bottom of the lake.8 points
-
The Clan Portrait grows! Ta Chris. The dilemma is: two or three sausages? 😄 That sounds almost Zen Simon! ☺️ Ommmmm: I am the paint............. 🖌️🖌️🖌️🖌️🖌️🖌️ Well spotted Number One! Extra Cocoa for you on watch tonight. After some lunch and a read earlier - currently skimming through Norman Franks' Air Battle for Dunkirk (factually thorough so good as a reference but rather like a dry piece of bread otherwise) I couldn't stay away from the rouge so headed back in to the brush again. I've been calling it Arctic Red but apparently I shouldn't have been: https://www.tapatalk.com/groups/hyperscale/arctic-red-insignia-red-t180969.html Be that as it may, USAF designate it as: -so I'm rolling with that. It's a kind of not red in a way quite unlike orange if you consider it from a yellow point of view in fact. To try and get to that stage I mixed some flat red with a zinc chromate by eye, a drop (exactly one drop) of flat blue, 50/50 with thinner and then misting on over the previous yellow base. First pass: Second pass: And so on and so forth - you see where this is going: If memory serves that's about five almost translucent coats on over the top of the yellow now: Still needs plenty of refinement but this is I feel heading in the right direction. More importantly it gives me a sense of control over building up to an approximately 'right' (i.e., 'acceptable', 'close to', 'like' &etc.) colour. Yeah, I know the underside needs a prime still. I discovered a nasty seam line - only visible in strongly oblique light but enough that I couldn't live with it - when the Alclad primer went down. I'll fix that when doing the bases for the metallics. Here's a coiuple of close-ups so that you can see how the colour is starting to build but still has a way to go in order to diminish the contrast levels: ...and also to compare how it looks under the bench LED: - - with (overcast) natural daylight: Lastly, compared to an colour chip for FS12197: Work in progess.... That really is it for today now. Tony8 points
-
I have recently finished this Hurricane but found it more time consuming than the Italeri Mustang. Some of the parts did not fit very well. The lower wing section needed the best part of an inch taken off and to be filled. It was not until after I purchased it that I realized the kit is known to be problematic. This is my first attempt at weathering as I thought it would look odd to see a clean looking Hurricane! Italeri Hurricane Mk 1 Trop 1/48 SAAF No 3 Sqn Capt John Frost, Jigigga, Abyssinia, 1941.8 points
-
Thanks for confirming that Ced. The SVG property should be standard imo - limiting import formats is a low trick to raise revenue. I don't personally think that the extra features offered by the upgrades actually warrant their pricing; the cutter is brilliant though so I'm not complaining too vociferously. 🙂 Chris: Honestly it isn't a technical process getting those last steps done. It's really does just come down to patience and perseverance in the end (looking @ you @Pete in Lincs ). Did I mention I'm a stubborn git who doesn't like to be beat by problems? I'm charitably supposing it was entering the holiday period and that qualified staff were all on holiday. In all three shops.... Njet comrade. All three art shops specializing in selling art stuff for artists making the art. Except tempera artists obviously. No wonder that modern church architecture is so dull these days without big nude men splashed across the walls. Somebody who builds models of such delicacy as yours Bill would pick it up in an afternoon. And of course you've friends on here who would be happy to help with any problems. Bank Holiday here today and I'll be up in Dublin all day tomorrow Bill so won't get a chance to get to the post office until Wednesday. Keep an eye on your letterbox next week so. 😉 It just keeps giving Keith! Having switched to using vinyl film now (at Giorgio and Ced's prompting) it avoids any fibrous tearing on small corners that you can get sometimes with Washi sheets. It cuts to sub-millitmetre levels with ease: I reckon that you wouldn't really have a problem until getting down to 0.2 or 0.3mm dimensions, and only then because of trying to pick pieces up afterwards in the tweezers. I'll run a test when I get a chance and post the results for people to see. Tsk tsk! You're starting to sound like err - -speak of the devil: It's possible I may be a frustrated tailor...8 points
-
Just started another F-4 PHANTOM, this one has the pilots in the cockpit Mike So just adding some more WIP, this shows the tail with its moulded rivets, which is ok, but I want it to be better than that. this pic shows the re drilled rivets, some sr done some are not, but you get the way these are going to pop, its not for every one ,so I=I am just shearing my preferred method. And here is the finished result, its especially good if you have a big decal on the tail, this way you don't loose the detail.7 points
-
7 points
-
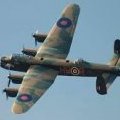
Hey youuuu guyyyys! Back at Spadgent towers at last. 😀 It seems like ages since I’ve been at the old bench. The hols were great and I even managed to fit in a visit to the fleet air arm museum. 😎 I even managed to find a silly hat. Can you spot the boy? Their decals are well scruffy though. 😜 Even managed a go in a Vampire. Quite roomy really. 🦇 Any way enough of this, let’s get back to the task at hand eh. Tis decal time. now I don’t usually have decal woes but these swines have been nothing but trouble right from the start. I have to use the Tamiya ones and some Extradecal ones to convert her to PA474. Initially I lost a bit and couldn’t figure out where it had gone until. 😅 Then It seems that the Tamiya ones don’t react to micro sol. So I used daco. Strong to begin with but it ate my decal. Luckily there were extras for other schemes so I put them into action 😲 By the way does any one know why there are holes in my wings? PA474 Doesn’t seem to have them so I might cover them up, any info would be greatly appreciated. More problems as the walk lines didn’t reach the roundels. so more extras. Micro sol settled the exradecal (larger) roundels well. Different codes on each side so some cutting was in order, freehand was easier. These went on well but I’m learning that the bigger they are the more tricky to slide into place aaaaand all the little errors show up more easily. Im super happy with the similarity between the pic in my ref book and the one on the bench.☺️ That was it for Saturday. Sunday we are off to see Dippy in Brum. Here he is. Great day out, We even had a little supprise. Earlier this year the museum acquired some of my old computer equipment I used to Dev on plus some sketch books for use in an exhibition. looks like they used some of it for the Local History Exhibition. how old do I feel? 🧓 (sorry for the diversion, I thought it was pretty cool.) Back to the bench once we got back. A quick warning, don’t use Daco strong on Extradecal decals. it ate the colour. 😫 now I know I said Sol worked on these ones but I forgot which fluid worked on which set of decals. 🤦♂️ Not to worry, I mixed up some paint as near as damn it as I could and fixed the fade. The other codes went on. Along with the nose art. I’m going to let all those dry and do an update. (And what an update!!) maybe I’ll get the under lines on later on. thanks for looking in, hope you’re still enjoying the super long build. Tale care and as alway. Happy Modelling. Johnny old man.7 points
-
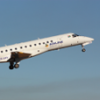
VMA-311 on the Nellis AFB Transient Ramp in 1980. BuNo 158168 158194 158427 The same jet, 148427, a year later Thanks for Looking, Sven6 points
-
Hi For the first time in goodness knows how many years, I left my Nikon full-frame digital SLRs at home and experimented with the new bridge camera that my wife bought me as a birthday present to take with me on a work trip to the USA next month. I must say that first impressions were very good, but I am bemused by the "bending" of some of the spinning props! Thanks for looking.6 points
-
This was all in all a good fun build. The engineering is rather strange - but then again it's a rather strange aircraft - so fair dos. There's a fairly short WIP thread on this here for those who want it. Kit was painted with rattle cans and brush for interiors and details. Hairspray weathering using - well, hairspray - followed by Citadel white spray primer. This and the decals were all unified with a brushed on layer of Vallejo satin varnish at a 50/50 varnish to water ratio. Thanks for looking! Bruce6 points
-
After another tedious (I do hate the fiddle faddle of self imposed duty) round of detail adding I have the pitot and nose gear doors added as are the tiny rad alt antennae under the tailplanes with the coat hanger antenna that sits under the port bomb bay door I need to add the main gear doors (awaiting a coat of Colourcoats RAF BG) that I made to suit the openings I cut out and then add the stores pylons Starb'd pylon gets the baggage carrier and the port one gets its own little Palouste, it'ld be a sin not to add one after the input I've had from the local Naviators so I will OK? I notice from many of the colour photos we have had accessed that Paloustes can be White or Sky Ive gone for White, right We were talking about the Gannet, here she is with her tail on the ground awaiting the resolution to the tail draggation situation I intended filling some of her nose area with the tiny lead pieces from Prestige Products but if that isnt enough you will note that the tail hook is still to be added, this may provide a decent solution to the dilemma We'll see As you will see the long wave/HF wire aerial needs adding too, to the masts located all around the airframe Fun huh? So weight needs adding inside, I am dribbling the little shot into the jetpipes And catching it where it comes out of the front intake area, I didnt sufficiently 'blind' the fore end when I was planning this Chicanery and shenanigans were needed pronto, so I dabbed Cockpit glue in and around the intake area and brushed water in to catch the errant weighty masses and wash the glue into the spaces viola! Behold - she sits Now I need to finish tidying the prop paint jobs and decide where to set the blades Then glue 'em in So, a kind of ground level look under her The coat rail thingy does miss the nose wheel door when it opens , phew So until the main gear doors go on and the long wire antenna gets added I cant put the stores on This is where they will go Time to begin tidying the Buccaneers now... Ciao baby6 points
-
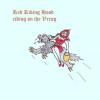
While on the subject of Wildcats, check out this wonderfully bad Polish FROG boxing... The artwork is so bad it's brilliant. Collectors are weird. Tony.6 points
-
Hi all I have been beavering away on this little beauty of a kit. It went together very well. Here is a short WIP Model is mostly OOB with the addition of cables for rudder and elevators and levers on the side for the elevators. Slightly weathered with oils as I read these could get a bit dirty and some powders for the exhaust staining. That is about it. Thanks for looking, hope you enjoyed them. I enjoyed putting this little Airfix Gem together. All the best Chris6 points
-
These two models were finished a few months back, but I have only recently got around to photographing them for your inspection. Hawker Sea Hawk FB.3, 898 Squadron 1954. This is based on the very good HobbyBoss kit. It is virtually out of the box with only the ejection seat replaced by one from my treasured hoard of Aeroclub seats. I was quite a straightforward build with the only real problem being the bifurcated jet exhaust. I thought I had lined everything up to get a good fit, but later found one of the fairings around the exhaust was not quite right and needed a bit of work to achieve hid the joint. Apart from that there will no real problems, despite the forward fuselage and wings being moulded as horizontally mated halves. The stores fit was gleaned from the 4+ guide which also gave a clue as to about the Squadron aircraft in 1954. More help came from a British Pathe film about deck landing which featured 898. The decals were a mix of kit, a very old Modeldecal sheet (No 1) and some generic serial sheets. The paints used were acrylic, the main airframe colours being Xtracrylix and finished with a mix of Vallejo gloss and satin varnish. Hawker Hunter F.6 63 Sqn, 1957. This model comes from the very good Revell kit with replacement wheels from Freightdog (memo to self, must get some more form Colin at SMW). A painless build with some fiddling around the air intakes to create some walls, I know an intake set is available somewhere, but you really cannot see that much. A bit of filler was needed around the wing to fuselage join, but not much else. Paint work was as the Sea Hawk in terms of type and finish, apart from the undersides which was Vallejo MetalColor White Aluminium sprayed directly onto grey Primer. I find that doing it like that tones the colour down a bit compared to using gloss black primer and is more suitable for models in 1/72nd scale, but that is just my take on it. The decals come from the kit and an Xtradecal sheet. Whip aerials etc. on both kits were from fine beading wire and bits plastic rod etc I am quite pleased with the pair and thank you for looking6 points
-
well it's been nearly a year since my last post. The rigging on this was getting the better of me, so I switched my attention to my railway, this has involved lots of wiring, scenery making & buildings - none of these look like they'll ever fly. Today I decided it was time to finish this one off - hell the stash has grown quite considerably. So the majority of the rigging was completed - just the elevator control wire on the port side, and the wires that go to the vents on the engine cowl (I have no idea what they are for). After that there are just a few minor details to add, clean up & final matt coat.6 points
-
The K-5 aircraft were the basis of the USSR's civilian passenger fleet in the 1930s. Sometimes they were used as agitation, sanitary, transport or even military transport. This USSR L-607 was mobilized in 1939. This machine was used during the Soviet-Finnish conflict to transport ammunition and evacuate the wounded. During the service in the VVS RKKA over the civilian registration numbers were painted red stars.5 points
-
Recently finished this one. Not a bad kit really, decals were the worst part of the build, they broke up all over the place and I barely managed to salvage them. Sorry for the poor photos but I was trying out settings to depict an aircraft in the seventies.5 points
-
I know AdrianMF has already built and submitted an example of this kit, but I don’t think there’s anything in the GB rules to prevent duplicates. I doubt I will be able to match Adrian’s cockpit detailing skills, but I’ll be lifting borrowing ideas from his build. The Whirlwind just fits neatly into my 1940 obsession, too, so you can guess which transfer option I shall be using. The only nod to modernity will be a set of resin wheels that are more accurate than the rather skinny Airfix ones. My box dates to 1997. I can’t see any flash or moulding issues. I was rather perturbed to find the single transparency rattling round inside the box. These were the days when the box was shrinkwrapped, rather than the contents bagged. There’s no obvious damage to the transparency, so I think we’ve got away with it. The 1978 stamp is hidden away, almost as if Airfix was ashamed of it! Modernised instructions cover the relatively straightforward construction sequence. Internal paint details are called out, which is helpful. I quite like the fact the yellow propeller blade tip yellow is quoted as 1.41mm I shall be finishing my model as a Whirlwind MkI of No 263 Squadron, RAF Fighter Command, Exeter, December 1940. The transfer sheet seems clean, still with its protective sheet in place. I shall risk using these, as it seems the aftermarket doesn’t cover the poor old Whirlwind. The resin main wheels. I'm actually looking forward to starting this model. The build may be a little protracted, as I really have to get on with the paying work in the coming week, but we'll see how we do.5 points
-
Hu Guys this is straight out the box, apart from some Eduard cockpit plaques enjoy Mike5 points
-
I did this kit two years ago, but didn't make photographs until this spring. Is a Borgward IV demolition vehicle, painted with a camo as other vehicles from a regiment in Crimea in 1944. I bought this kit in a street market and decided my unbuilt stashes couldn't grow more, so I built it on a weekend along my brother. It's a fine kit, and what is best, it includes a mini figure which I think is unusual for Dragon. Hope you like it.5 points
-
Well - I'm ashamed to say that this has sat for a year The Fairmile has sat front of stage (not to mention the Nagmachon - that currently also sits in a holding pattern) I've kept it back partly to get my hand in finishing and weathering. An omen was going to the Avon show yesterday and picking up another RAF ASR launch for the very princely sum of £9 The twin Lewis guns are added as are the guardrail stanchions . I needed to respray the inner wheelhouse and confess that this build has not had the love shown to it, that it deserves and is a bit shoddy in places. Lesson learnt. I completed the hull weathering using oils - always a slightly fraught process and it was so warm that the oils dried far quicker than normal. "Loose" abandon is the key... I only use 4 oils of which the most useful are the industrial earth and the faded gray. The plan is now to finish this and then the Fairmile B. Thanks for looking Rob5 points
-
A fair bit of progress, forwards and backwards, over the weekend. The very hot weather at the moment meant that a coat of paint or a bit of glueing dried very quickly on the window sill. The part built kit got hit with a couple of coats of Hi Grade Enamel in preparation for the UK option decals. Once dry, the second kit got a coat or two of Humbrol Glossy Sea Blue. Despite me saying here more than once about clear coating old decals, I ignored my own advice and paid the penalty when one of the US wing decals exploded. Bugger. They were first issue decals, rather thick and very glossy. I looked hard under a magnifier and could see no cracking at all. Wrong! Not to worry, another set were found in my spares box and with a bit of clear coating, went on fine. The blue of the stars and bars was a bit on the bright side though. Nothing a bit of careful paintwork cant cover up though. The second kit got its Brit cammo applied and a few Extraset decals substituted the dodgy kit ones. The USN one is currently sitting in the sun, waiting for the touch up paint around the stars and bars to dry. The Buffalo is getting a bit of attention as well, but sadly falls outside this GB on account of being nearly completed. More as it happens.5 points
-
Hi, Martin! This is almost two different aircraft - the GST is very much differentiated by the contours and shape of the hull, engines and other things. But the GST is also a very beautiful aircraft. Here is a photo Evgeny aka Barbara by model:5 points
-
There are aftermarket Bristol Pegasus kits available, but I decided to just titivate what was in the box. The engine plates are basic, but of their time, and also a little under size to fit properly into the cowlings. I cemented some thin styrene strip around each of them, then sanded back to be a nice tight fit in the cowling, seating correctly on the step inside the collector rings. The engines themselves were given a little relief by applying some stretched sprue. It's not correct, but it added a bit of extra depth to otherwise bland mouldings. I carefully scribed the exhaust collector rings into the front of the cowlings. I drilled out the exhaust stubs, and fitted the Airwaves cooling gills. I forgot to take pics of the internal details once they were painted. These things happen when you get carried away with something! Time for some honesty. The old Airfix Hampden builds into something that looks right. It captures the essence of the "Flying Suitcase" well. The parts, though, show their age - the kit first appeared on the model shop shelves before Neil Armstrong and Buzz Aldrin stepped on to the surface of the Moon, after all. Detailing sets, perhaps replacement vac-form transparencies, some attention with styrene strip and rod and so on, do help to make a half decent model, even allowing for its idiosyncracies. It was time to deal with the transparencies. For a fifty-year-old kit, the clear parts weren’t all that bad. A bit thick, but usable in my opinion. Of course, there are aftermarket vacuum formed transparencies available, but I’ve had indifferent results with some of those in the past. I decided to work with what I had. Some of the frame lines didn’t quite match with photos of the real thing, and the nose part needed a little slimming to fit neatly. A few minutes with sanding sticks and polishing got it looking respectable. The rear upper gunner position had a choice of open and closed clamshell parts. (Is it a clamshell or a lobster tail? I’m going with clams, I think.) Both open and closed parts needed slots carefully opening to take the machine guns - the upper guns are not actually stowed inboard, an obvious thing in photos of the real thing. I thought about using the open clamshell, and was also going to modify the frames to represent the earlier version, but in the end went for the closed shell. It would be easier to paint, as the transparency acted as a mask. While I was about it, the PE set included new parts for the sliding cockpit hood. I carefully sliced the hood from the windscreen using a fine razor saw, retaining the hood for masking purposes. I hoped a solution might reveal itself for thin clear transparency material so I could use the detail set, but it didn’t. In the end, I decided to mask the hood and show it closed. It made sense to fit the various machine guns in place in the clear parts, as they can’t be fitted once the glazing is fitted. The upper clear panel behind the cockpit really didn’t fit at all, and needed some styrene strip to fill some gaps. The lower gun position had clear parts that have to be fitted before the fuselage halves go together, so they were masked after the fact. I spent a happy hour or so masking all the transparent parts, then attached them to the model using Kristal Klear. Subsequently, I masked the cockpit hood as well. I am not sure of the play value of floppy undercarriage. As the doors don’t operate, it seemed a bit pointless to be able to retract the wheels, but there you are. To ensure the legs sat more or less in the right orientation, rather than raked forward, I used some strip styrene to act as bolsters in the front. With the rest of the oleo parts and doors installed, it was all nice and firm. Undercarriage fitted. Anyone who remembers building this model back in the day may remember the fiddly oleo detail parts. I was worried I might break them before I got them glued in place. Detail painting would have to wait until the main paint job was done. I wanted the bomb bay doors posed open. The kit parts are very thick, so I thinned the visible edges to give a better impression of sheet metal. With better references, it should be possible to add internal ribs and so on. I’m not planning on displaying this model on a mirror, so I was content with the somewhat rudimentary weapons bay. I used spare 250lb bombs from my various Blenheim builds to replace the original kit parts. Of course, I forgot I also needed to shave back the mounting lugs and upper edge of each door to leave room to install the ordnance after painting. Happily, a sharp No10 curved blade in my scalpel handle did the trick. I considered the PE door pistons. Like a lot of the extra details, I decided to leave them out as patience can sometimes run out. They were also definitely flat, and might have been better represented by confections of brass rod and tube, but without references I left it well alone. I masked the fronts of the engines, and glued them to the nacelles. I brush painted the exhaust collector rings later. It was now down to fiddly details, like venturi, DF loop (fabricated from some 0.7mm diameter brass wire and the PE etched top), radio mast and so on. For the wireless antenna locations on the fins, I drilled a little way in the leading edges and fitted short lengths of 1mm OD brass tube. The mast will be very vulnerable, so I had to keep my wits about me until the build was finished. In rather shorter time than I thought, I got a coat of primer on the plane. Time for some camo colours. I tend to prefer Xtracrylics for most models these days. The base coat - I usually start with the earth brown - was just blatted all over from the airbrush. Acrylics dry pretty quickly, so I went ahead and used masking tape of various widths to mask for the green. I couldn’t get quite the fine edge shape I would like, so I had to do a bit of brushwork to tidy things up and fill in where I missed areas, such as the fuselage sides under the wings. Masking is something I have to practice: I have a sacrificial airframe I knocked up for just this purpose in order to try different methods of masking. Since this model, I’ve experimented with the Blue Tack sausages method, and I’m very pleased with the way it worked. Rather than faff about with more masking tape, I elected to brush paint the night black undersides. With care, I can get an adequate finish with a brush. An airbrushed coat of Humbrol Clear was followed by the transfers - there’s a tale! - and a matt varnish top coat to seal things. The transfers are from a company called Avalon. I chose one of the options on the sheet to give me a Hampden of No 7 Squadron at Finningley in April 1940. It was a curious hybrid of pre- and early-War markings, and I am yet to be convinced by the squadron letter codes. They may be correct for official sizes, but I haven’t found any references that show such large letters used on the slim end of a Hampden. That doesn’t mean it never happened, just I haven’t found anything to show it did. I’ll live with the odd appearance for this model. It’s a talking point if nothing else! Final detail painting for the exhaust collector rings, a spot of weathering, tidying up the undercarriage paint, removing the masking from the transparencies, and a bit of judicious weathering and my “Flying Suitcase” would be ready for its official portraits and the display cabinet. I enjoyed this build. It brought back some happy memories of building the Hampden many years ago. This was my first proper attempt at sanding back the rivets and scribing panel lines. It's not perfect, but I learned some new techniques. Considering the age of the tool, the finished product captures the essence of the Flying Suitcase. It would be nice for a new tool at some stage, especially as there's a full size plane being reconstructed up at the Michael Beetham Conservation Centre at the RAF Cosford Museum. Anyway, I hope you enjoyed this little journey. With the new tool Airfix Wellington in the stash, the Whitley already built, and a Blenheim MkIVB ready to build, all I need now is a decent Fairey Battle to complete my 1940 Bomber Command fleet. Incidentally, I found an online resource with some useful close photos of Hampdens. http://www.wwiivehicles.com/great-britain/aircraft/bomber/handley-page-hampden-bomber.asp It was useful for the cockpit detailing (as well as highlighting just how much detail is possible if you really want to push the boat out), and helped with locating and fitting the rear gun restrictors that are in the Airwaves etch. Thanks for looking!5 points
-
Started painting today. The aluminium is AK Extreme Metal, over Mr Surfacer grey primer, which I had polished up using micro mesh. Seems to have come out well - I'll be using it again. thanks for looking Z5 points
-
Finally, after some battles with the paintwork the Barge is done. Overall an enjoyable build and research project and just in time for the imminent release by Italeri of the Escort Mk2 in 'that' iconic scheme. Link to WIP https://www.britmodeller.com/forums/index.php?/topic/235034804-ford-transit-mk2-lwb-van-conversion/4 points
-
Hi guys this is the first of my resin rail guns from 5 star models in poland It is a french gun that was captured when the Germans overran France and was then used by them. I have finished it the french three colour camo as it makes a change to grey. Not a bad build for resin but had make new handrails as resin ones are to thick and throw away the tracks,figures are milcast and are great.4 points
-
This is the ancient 1/72 Heller kit of the Curtiss 75 in French service. Despite the age of the kit and the fact that I think a mouse has tried to make a home in the box at some point in its history it went together really well. Paints are by Sovereign so at least the colours are correct and despite my reservations the decals worksed just fine despite their age. I decided to paint this aircraft in Vichy colours, which when you look at the Work in Progress you will see, was a decision I regretted, still happy with how it eventually turned out. cheers Pat4 points
-
Rich/Mottlemaster, a truly decently led GB and everyone really mucked in to this one. Great tips and encouragement and thanks to the comments for keeping everyone going, and to Ozzy for helping me out of a jam. I’ve learned about the Me262 and glad I have one in the build portfolio and feel my rattlecan spray painting went well, when I move house I think I might upgrade to an airbrush. Lucifer will be getting made into yellow 13 today and consigned to the back of the shelf. Thanks for hosting and some great pieces in the gallery4 points
-
Been thinking Dangerous I reckon my soldering is not going to stand up to working with, Boom contact area 0.5mm So I came up with a cunning plan ... Before I go there I thought a couple of tips for those thinking of soldering up masts and yards on there warships. First off for this job I've been using Carrs 179 'No clean solder cream'. For joints this size you only need a tiny amount, were talking the tip of a cocktail stick. To taper rods I use this simple gizmo. Just a piece of softwood. Cut a line, then two cuts at an angle so you finish with a tapering V groove. Hold your piece in the slot and it keeps it steady as you run your file up the piece HTH On the left the original. Centre - boom has a small turn down at the end, The gaff is formed with a V. This gives a much greater soldering area.. Right hand - to help disguise the anomaly. Boom a small boom table added plus boom jaws. Gaff/topsail spar - a touch of filler and gaff jaws added. Thanks for stopping by Kev4 points
.thumb.jpg.d17ff607fc7e89ed057e63fcb6f2a888.jpg)


.thumb.jpg.0bac681e0da8e4ed7557610e98fda908.jpg)


.thumb.jpg.b4a5069fd2c2dd5708ce1694345c5b11.jpg)


This leaderboard is set to London/GMT+01:00