
Leaderboard


Popular Content
Showing content with the highest reputation on 29/06/18 in all areas
-
Xtracolor upper camouflage sprayed freehand with Paasche V.Jr. Xtradecals Tape belts.36 points
-
As I was getting ready to add the aerial mast, I suddenly realised that I hadn't drilled a tiny hole in the canopy to accept the tiny wire that I added to the bottom of the mast. So I set to drilling the hole whilst visions of the canopy popping off again kept flashing through what's left of my brain. But, no nasties this time, and the hole was ready quickly. I typically will pin the aerial mast like this as it sometimes takes some extra pressure when drawing the aerial wire taut. The it was just a matter of a whole bunch of fiddly stuff, especially fiddly were the photoetch trim tab actuators on the ailerons and rudder, photoetch aileron hinges, photoetch gunsight, the aerial wires, etc. Sometimes I wonder if modelling all that stuff in this scale is some kind of modern self-flagellation sans the whip... So let's take a poll...am I done yet? I vote to stick it in the display case and go build something else. Looks like an Anson to me. Cheers, Bill PS. RFI coming... PPS. Hmm, now that I look at it - I forgot something.20 points
-
Hi mates, Ever have one of those projects that just doesn't want to be built? Here's my latest, and I'm happy to say that I won this battle - the model is finished! There were several times during this journey that I expected this to be a bin bunny - first, I left it where it could be reached by an inquiring two-year old. He decided to take the model for a test flight, resulting in a hard landing, ground loop, and breached fuselage. After a lengthy repair in the maintenance shed, it was determined that a foul-up in the orders resulted in an airframe fit for a turret - when the subject of this build clearly didn't have one. This necessitated another trip to the maintenance shed for a major fuselage modification - after the airframe had just received a bright new coat of RAF Trainer Yellow. During this modification, the canopy decided to pop off...and the list goes on. It just didn't want to be built. But as you'll see, it got built anyway. Aside from all that, this is the Special Hobby kit of the Avro Anson Mk.I decked out in a speculative paint scheme as worn when a member of RCAF No. 8 Service Flying Training School at Moncton, New Brunswick in Autumn of 1941. I say speculative because the only photo I could find of this aircraft doesn't show the top of the wings. If you have an aversion to yellow and black stripes - don't look! Here's my usual summary: Project: Avro Anson Mk.I Kit: Special Hobby Kit No. SH72074 Scale: 1:72 Decals: Xtradecal sheet X72143 Commonwealth Trainers - the stripes are painted on. Roundels were double stacked due to transparency of the white areas. Resin: From the kit, some of it unusable but also some very nice engines and cowlings Photoetch: Supplied with the kit and including very fiddly things like aileron actuators and flap hinges and gunsight... Paint: GSI Creos Mr. Hobby Aqueous Hobby Colors H329 Yellow, N12 Flat Black, H11 Flat White, Custom mix for RAF Interior Green, H77 Tire Black, H90 Clear Red, H94 Clear Green; Tamiya XF-69 NATO Black; Alclad Aluminum, Magnesium, Steel, Clear Flat Weathering: Very subtle via pastels Improvements/Corrections Primarily in the cockpit - the resin pieces for the interior framework were pretty wonky, so these were replaced with styrene rod. It was like building a roll cage for a race car. I added the aerial wire and tailplane braces using Nitinol (Nickel-Titanium) wire 0.005" in diameter. Also, the notch for the landing light was cut out of the port wing and photoetch used for the lights. WIP can be found here. Enjoy the lousy pictures! Here's a couple of shots of the cockpit framework - if you're wondering what the paperwork is in the navigator and radio operator stations, you'll have to check out the WIP! An in-process shot of the underside: Cheers, Bill14 points
-
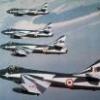
Hello all, I've been away a long time, and this is the first time this Hunter has seen the light of day on Britmodeller. This is a 1/32 Revell Hunter F.6, with the Xtradecal Black Arrows roundels applied, and hand cut cheat lines to get S/L Brian Mercer's first mount as a Blue Diamond. Paint used was Testors Blue Angels Blue, the closest I could get to the specified colour. I used the squadron emblem from the kit, as I could not find one with a green cobra that fit. as soon as I find one, I will replace it. Next one up to complete a set of aerobatic team Large Bore (Avon 200) Hunters is the Swiss Team. looking for ward to your thoughts on the build. TW10 points
-
I'm calling this done, finally! Not a kit to love I'm afraid but at least it's given me some room in the stash cupboard... Of course it doesn't fit in the photo booth either, really: So it got rushed outside to the garden table in the sun: Huge. Difficult to photograph, especially with my limited photography skills. No RFI for me then... Some more detailed shots... The worth-the-money refuelling probe: Oooh look, you can see the crew (just): At least now I'll have some bench space: As Keith suggested (thanks Keith), she'll look good in a wing over at the top of a steep climb out: Thanks as always to everyone for their help, support and companionship during this build. Not the best of kits but hey, it's a Vulcan and, what's more, the last flying one that I saw on her last flight. Right, back to the Cessna.10 points
-
Hi everyone! I've finally finished Modelsvit's 1:72 Mirage 4000.9 points
-
This is the second in a series depicting McCudden SE5a of 23 Sep 1917. It's the second in the box from Eduard SE5a Dual Combo. More details of "I" on this site at As ever all comments welcome. Sweaty8 points
-
Hiya Folks, Well I`ve finally finished the Mk.VIII,...... although the pitot went missing en route to the porch to photograph the model!! So the Mk.IX is next and I have quite a nice scheme lined up! Cheers Tony8 points
-
Thanks CC - Why not a brunette at the controls? There will be, just not a female! It's supposed to be 'younger me' Thanks Johnny - PM sent! I used to feel bad about 'figure surgery' but now I just chop bits off... do you think I should see a Shrink? Thanks tempestfan, especially for the kind offer of the figures I think the new set is going to be OK, even if I can't fiddle the passenger (fnaar! Sorry, couldn't resist and it's expected now...) This morning has been spent enjoying the sun (unusual) and trying to plan the sequence of assembly (normal). Before I can do much more I need to paint the pilot, and before I do that I need to attach the arm. Hmmm. Is BluTak a good method of holing the arm while posing? Seems OK. Pose the pilot, wiggle the arms (tricky), carefully remove and apply TET. Ah, I forgot that TET's capillary action will suck it all over the shoulder. Ho hum. No major damage done. Very carefully remove the figure and squish the joins, then re-insert to double check the position: I'll sort the flash and fill the joins before painting.7 points
-
After a half a year struggle, its completed! Dunno why I took so long, but I can say since this is a raise panel line kit, rescribing and designing the new panel lines maybe took 30% of the construction time. Another 20% should be dedicated to the Splinter camo masking... Earlier I did mention the Mig-37 having a strange design, but after seeing it completed, the design has grown on me and I think it's quite a sexy bird! Unfortunately the same can't be said for the underside... Without further ado, here come the pics! For some reason it looks great with the two mickey mouse air brakes. Closed, it a bit unnatural. Nothing says it more like the 80's with that funny trapezoidal exhaust. The gold triangle is supposed to be a laser range finder or something, painted it to resemble the F-35's EOTS. Tons of stencils and good looking decals, but Italeri's decals are really translucent to the point of tranparency. Screwed up a bit in the cockpit with the sparse detail. In hindsight I really should have put in more detail in there, never knew the canopy work would be so clear! I managed to avoid the canopy residue problems that plagued me for the last two builds by not using Future at all! It seems the root cause of it was the incompatibility between the acrylic future and the lacquer paints. More screwups abound on the underside... wrong color for the internals (not everything is interior green blue) and the two missiles are fixed in shittily due to me not calculating properly if they can fit inside. But not really worried about it since they are on the underside of the build. As always, larger pics and more images can be seen here: http://www.flickr.com/photos/df0084/ Thank you for looking.!6 points
-
This was a huge challenge to my modelling skills. From modifying each brace to modifying the landing gear struts the challenges abounded. The end result was painted with Vallejo Olive drab and Tamiya Rattle can "Camel Yellow" (decanted) Used Steel wire rigging and wish I could have done better Definitely a different concept than a 1/72nd Tamiya P-51. Thanks for Looking Comments are Welcome Cheers Bill6 points
-
Thanks, Stew. What's missing is not obvious unless you're looking specifically for it. The answer to this mystery shall be revealed further down in this post. Thanks - I had to read that out loud to understand what you meant. I thought it was Japanese at first. Man, I'm getting old. Thanks Roger. After all was said and done, I probably should have left the turret in and painted her green and brown. But you guys were so persuasive with your desire for stripes! I blame it on the Martian. Thanks so much. She may be loud, but she's definitely got soul. There are not many aircraft from that time period with such a long production run. I think the last one rolled off the line in 1952 - and she was designed in the early 30s. Thanks Ced. It's not my best work (been happening a lot lately) but I like it. As we discussed during my visit, this one just didn't want to get built at times. But those things happen, maybe if I build a Tamiya kit next instead of another Special Hobby things will fall together. Didn't I start the 1:32 Spitfire so time ago? I wonder where that box is... Wait, I still have that Black Bullet to finish. Thanks! Valiant? Did I sign up to build a Valiant? Hopefully not in overall anti-flash white! I had enough of that during my TSR.2 build. But at least I know where the box is - all three of the Airfix V bomber kits are setting on top on the file cabinet right next to my computer desk. I can reach out and touch them - and I would, but they're dusty for some reason. I must have a chat with the maid... Cheers, Bill PS. So what's missing? Just a small detail - I like to add the insulators to the aerial wire. In this scale, I can get away with a dab of white paint.6 points
-
Guys, come on this is the Rumourmonger section where I expect to hear what Airfix might be providing us with next year, not “Business Model”, Sales Performance, comparison of Airfix in the market place and general comments on how Airfix should run their business. If you want to discuss that, please set up a new discussion in the Chat or other suitable area and keep this to what we would like to see or hope Airfix produce in the coming future. Please get this back on track Thanks Rich6 points
-
Hya guys. Appologies for the lack of Lancaster goodness over the past week or so. Work has been cRaZy busy and any spare time I’ve been getting the boys bedroom converted from a 4 year olds room to a teenagers one. seems if I’m not filling and sanding in my scale world I’m doing it in the 1:1 world. 😑 🤨 combined with birthday sleep overs, another fencing comp. And more flat pack than you can shake a stick at. I have been trying to keep up with your builds as mine has taken a bit of a back seat. It’s Gemma’s Birthday this weekend and she’s away with the girls tomorrow until Sunday so with the bedroom nearly done I might get a bit of time on the Lancaster. More than this bit which is all I have managed to do over the past week or so. its a glued together substitute for the wing exhaust. Just needs cutting. Exciting huh. 🤣 I felt I had to post as it’s been a age. fingers crossed for some weekend plastic. Take care you lot and Happy Modelling. Johnny. by the way the guns arrived. 🤸♂️6 points
-
Ha. Over 3,000 ft a day was wot I said (or should have said if I didn’t say - if you see wot I mean). About 10,500 ft in 3 days now actually. Ain’t that a Munro a day? 😁 (don’t like these new smileys......when did they start?) Anyroad up - that’s more’n enough ‘going up’ for us more used to the flatness of the Vale of York cycling types..........🙂 So to stuff more important than the Fritag saddle-soreness and questionable climbing capability... Having been Whatsapp’d by Bill and caused once more to be drawn within the gravitational sphere of The Hive I feel I should apologise for inexcusable absenteeism. It’s a dispiriting truism that the older one gets the faster time passes (subjectively - before them intelligent types with physics degrees mathematically disprove my theory) and the last time I substantively engaged with BM wos about the time of Telford last year. Which by my reckoning was about last week....... So - whilst I’m just about to set off for some more cycling fun (aka torture) I promise to catch up better when back in the UK. Of course - I have no doubt that you’ve all moved the skill set of our hobby on umpty ump % whilst I’ve been AWOL - I look forward to the mortification of checking everyone’s progress....6 points
-
Hello all, Here is my recently completed 1/48 Hasegawa F/A-18E, in the markings of VFA-87 'Golden Warriors' during their Operation Inherent Resolve cruise during 2017. BuNo 168912 shot down a Syrian Su-22 on the 18th June 2017. The build thread is here Extras used included an Aires cockpit, Pavla seat, Steel Beach FOD covers, Furball decals and Steel Beach late style ECS pipes. The GBU-38s, AIM-120s and AIM-9Xs all came from an Academy F-15E kit, and the GBU-32s are from an Academy F-22. I wanted to depict the jet heavily weathered, as seen on many of the machines during the cruise. I used a number of online reference photographs to achieve the look. Beside my VFA-213 jet from the same cruise: Thanks for looking. Dave5 points
-
Hitachi ZC50C-5 Vibratory Combined Roller Hasegawa 1/35 Just finished this one from Hasegawa's construction machinery series. I picked it up mainly as I thought it would be a fun build and would provide ample opportunity for weathering, which proved to be correct on both counts. It was built straight from the box as there's nothing really that needs adding. The level of detail and parts fit are just about perfect. It's also pretty cheap too, if ordered direct from Japan. There are several other vehicles in the range (see @Kallisti 's excellent Zaxis excavator build), so I'll probably be doing more of these in the future. Thanks for looking Andy5 points
-
Howdy All, Just taken some pic`s of my latest effort so I hope you don`t mind me sharing them with you My attempt at Heller`s re-boxing of Smer`s 1/48 MiG-17 kit Completed to represent an aircraft of the 923rd Fighter Reg`, `Yen The` ( no, I don`t know what it means 🙂 ) NVAF I`ve had the decals for ages but couldn`t find any pic`s or much info` on the particular airframe so just decided to give it my best shot The camouflage is described in the instruction as `used for missions at the sea` Decals from L Decals Studio LDS 48007, the kit is mostly from the box contents Hope you enjoy, thanks for looking Enjoy the sunshine, cheers Russ5 points
-
I thought it was about time I submitted the finished build for my 1:48 scale Hawker hunter FGA.9 of 54 Squadron. Pretty much an out of the box build, and the first proper build for almost 5 years. Enjoy! DSC_1216 DSC_1217 DSC_1218 DSC_1219 DSC_1221 DSC_1223 DSC_1224 The real Hunter of 54 Squadron5 points
-
This aircraft is built for the 1/32 Eduard kit straight out of the box, only personal addition is the map in the cockpit and a set of Air Masters canons. The Messerschmitt Bf 109E fighter of Franz von Werra, shot down over England, where he was taken prisoner in January 1941. Von Werra was sent with other German prisoners to Canada, where possibly he became the only German airman to make his escape from there, returning to Germany via the still neutral U.S.A. Von Werra was also a skilled fighter pilot, although his results weren’t anywhere near those of the Luftwaffe’s top guns. He most frequently flew as a wingman of Hauptmann Erich von Selle, the commanding officer of his unit. In this role, he scored four victories during the Battle of France – a Hurrricane, two Breguet 693s and a Morane MS.406. Despite this initial success, von Werra’s tally did not advance any further during June, July and larger part of August, despite the fact that operations against the RAF were being flown almost daily. Then suddenly, on 28 August, von Werra returned from a mission claiming 9 aircraft destroyed. According to his report, he first shot down a Spitfire during a general melée, then became detached from his unit, spotted three Hurricanes on a landing circuit and destroyed them one after another. Lastly, he zoomed low over the airfield, setting additional five Hurricanes on fire. Then came the day of 5 September, when von Werra was shot down. On that occasion, II./JG 3 was flying as an escort to a bombing raid on Croydon. On the return leg of the raid the bombers were attacked by a swarm of RAF fighters. Hauptmann Von Selle, leading the thirty escorting Messerschmitts, gave the order to attack. At the exact moment when Selle rolled his aircraft to starboard to initiate a dive, another gaggle of Spitfires jumped them from behind, their guns blazing. Von Selle’s aircraft avoided the bullets. His wingman, Franz von Werra, did not have such luck; a well-placed burst damaged the engine of his Bf 109 and knocked off his radio. Without engine power, the German pilot was unable to shake off the attacker, which followed him in a dive, squirting the Messerschmitt with a series of short bursts. Ultimately, von Werra had no choice but to make a crash-landing. This he did, putting down his aircraft wheels-up but otherwise intact on a field at Loves Farm, Marden, Kent. The identity of the victorious British pilot remains the subject of debate until this day. Some researchers claim that the pilot who was responsible for the shooting was F/Lt John Terence Webster of No. 31 Squadron. Others believe it to be a shared victory by P/O George Bennions of No. 41 Squadron and P/O Basil Gerald Stapleton of No. 603 Squadron. Yet others have attributed the same achievement to F/Lt Paterson Clarence Hughes, an ace of No. 234 Squadron with a victory tally of 14. Officially, the credit originally went to ‘Stapme’ Stapleton, but Hughes final DFC citation in the London Gazette of 22 October 1940 awarded him a half credit for the same. (The spitfire site n.d.)5 points
-
Morning folk's,bit more progress all underside's painted and upper wing's have earth coat applied,so far so good!5 points
-
Here we go again...... You will all recall that Giorgio has experimented with his new toy and cut me some masks. I needed these because D-10 had all serials, "USAF" marks, Buzz number, "U.S.AIR FORCE" and star-and-bars sat within a narrow NMF border. The options were otherwise few and meant trying to get these printed on decal film and hoping the NMF (as a grey) would show through okay. These masks arrived a little while back from sunny Italy and I showed you how the others I had for the flashes, also from Giorgio, worked so well. Now it was time for the lettering etc. I started with the fin serial. My method was to determine the exact position and mark that with Tamiya tape. Then I applied the mask in the position that I believe to be correct, thus: As you can see, I followed with the Star-and-Bar on the rear fuselage. Thereafter I continued .... As you can see, they came away very cleanly. When I came to the under wing masks I hit a snag. My fault! D-10's main undercarriage doors run across the areas of the Star-and-Bar and "USAF" and so need appropriate masks. My plan is to sit these doors in place and then mask over, decal, and remove. My big error was that while I had painted the main doors I haven't yet painted the supplemental doors: So out with the airbrush and I will have to wait until the paint cures before continuing :(. Not to worry, I'm at least making progress. By the way, I haven't yet tackled the wheel wells ;). She now looks like this: I am debating in mind whether to airbrush these NMF areas or to use a "hairy stick". If I go the former (my probably route) I will clearly need to mask off the rest to avoid over run. Back again soon ....... Martin5 points
-
A long time ago I read about some guy's theory that our perception of time is based on how long we've been alive. Hence a few months of school summer vacation when we're young seems forever - but doesn't when we're an old codger (it being a much smaller percentage of our lifetime). Or, as someone once said: "People assume that time is a strict progression of cause to effect - but actually, from a non-linear, non-subjective viewpoint, it's more like a big ball of wibbly wobbly timey wimey stuff." Cheers, Bill5 points
-
Another splendid FROG Westland Wyvern FROG Wyvern built by Tony, one of our Bridlington and Wolds model club members, on display at Darlington Sword and Lance show in 2017. Whip aerial is probably from one of his cats whiskers ............5 points
-
This is my entry. Tamiya's 1/48th scale P-47D build as a D-20 from the 19th Fighter Squadron. The decals are from the very nice Thundercals sheet, Razorback of the PTO part 4. I'm going to use Ultracast wheels and seat and the excellent Vector P-47 upgrade set.4 points
-
Kawasaki Ki-61-Id Tei, s/n 4424, flown by cpt. Teruhiko Kobayashi.4 points
-
Every so often - about once a decade if I'm being honest - I complete a model that seems blessed from the outset. Good fit, no filler, paint is finished without trauma, decalling process untroubled. The Meng F-102 is one such model. Everything about it was easy and blissful. Wish they were all like this! This is completed aircraft #490 (7 aircraft, 0 ordnance, 2 vehicles for the year 2018), finished in May of 2018.4 points
-
Just a few images from a proficiency mission in September 1984. Her designation would be changed to NRF-4C to indicate permanent test modifications in 1986. Thanks for looking, Sven4 points
-
Shhh! Keep it down or everybody will want one! 😅4 points
-
Glancing thru these answers we have; No Never Yes Sometimes Always Occasionally Rarely Maybe4 points
-
Hiya Folks,...... me yet again!! Here is my 1/72nd Eduard Spitfire Mk.VIII wearing the High Altitude Fighter Scheme of Medium Sea Grey and PRU Blue and wearing the markings of the USAAF`s 308th FS, 31st FG based at Fano, Italy between 1944-45. Having previously operated Spitfire`s the unit was re equipped with P-51D`s but a number of Spitfire`s were retained as hacks, including this one. This model was built straight from the box and brush painted,... here is the WIP; And here is the model; Cheers Tony4 points
-
Hi Steve, our paints are matched to Merrick and Kiroff and the contrast tonally between them is very low P.S. if anyone is building a very large movie prop or even a fullsize restoration, email us and you can have it by the 1 litre, 2.5 litre or 5 litre. You can even have it as a 2-pack 😀4 points
-
I'll try and join in with a late model Meteor to balance all the new generation jets coming up. Probably a nightfighter NF14 Colin4 points
-
Okay. Two plain oCUPus's coming up!4 points
-
Welp, they're finally stuck together. I trimmed a few of the locating lugs to make clipping them into the shells a bit easier, and scraped away some paint before fitting everything in place with medium viscosity CA. Before doing that, I'd airbrushed a couple of coats of Alclad Klear Kote Flat on all the green bits plus the bases. A certain amount of gymnastic ability was required to hit the leg armour and not the metal parts, but I got there in the end. It doesn't make a huge difference in pictures as the lighting is so diffuse, but it's well worth doing when seen in person. I thought the larger bases might be a bit bare so I painted up some "barbed bracken" to see what it might look like. The stalks are mostly Khorne Red and Screamer Pink, and the leaves are Sybarite Green (I think) with a mix of that and Celestra Grey underneath to get some fuzziness into the leaves. I'm not totally convinced yet but it was worth a go. I'll try them on the bases when everything's properly dry, otherwise I might need to dig out some brown grass tufts which I'm sure I have *somewhere*. Cheers, Will4 points
-
Ready to close it all up...didn't forget the nose weight! And the support structure for the rear of the canopy. A test fit shows that the canopy itself fits poorly. There are big gaps that will have to be filled. --John4 points
-
Almost complete! Final photosession comming soon.4 points
-
Hello Dears, Thanks to BM... My FR IX will be easier to do since i receive this today.. More to come soon ! Sincerely. CC4 points
-
Sorry boys - I have let you all down. I finished my meeting at 4pm and then spent 30 minutes battling my way about half a mile across Edinburgh. Sat Nav got me there no problem - but I couldn't find anywhere to park the Volvo - four different 'fly-bys' in every direction and I couldn't find anywhere to park - by 5-30pm I gave up and headed for home. I had slipped a substantial amount of 'readies' in my wallet - from my 'cash stash'. You know the one - money you can spend without it being 'detected' by the model police - otherwise known as SWMBO On the moor fires front - apparently a Chinook has been buzzing about all day - but I couldn't see it from Edinburgh. I got home about 30 minutes ago - it still smells awful and many locals are using it as an excuse to wear various 'fetish face masks'. I passed another fire on the way home though - on the northern side of Manchester - at Rivington Pike - it looks worse than the one near me. We're having a heatwave - a wonderful heatwave.... Who said Manchester was famous for rain4 points
-
Ok chaps, Back in the saddle and continuing with the Mossie interior, plus had a couple of goes at the crew access door; First attempt didn't seem quite right so reduced the hinges, moved the central support and added the door jettison handle, put the locking handle in the right orientation for an open door, added the door strap, storage pocket, some colour and a suggestion of the placard and I think it'll do, just a bit of touching up required. the access ladder is going to be made from Brass tubing, I bought a 4 tube set starting at 1mm OD and the rest fit inside each other and will form the telescopic assembly quite nicely but that will have to be made to measure when the Mossie is on her pins. Added some cabling to the starboard cockpit wall, along with a couple of extra do-dads. I think I'm pretty close to buttoning it all up. Glad to be getting on with some modelling again. Cheers, Mark.4 points
-
Thanks Simon Paint the ceiling? That's DIY - ugh! Thanks Don Thanks Cherry - the Vulcan is very special eh? Thanks Håkan Good luck with your build and I hope this thread helps avoid most of the problems. Thanks Steve Yes, it's a whopper. And the Vulcan (fnaar!!) Thanks John I may have made a few whooshing sounds at times. Great story as always, keep 'em coming! Thanks Stuart Size isn't everything? Not that old chestnut! Thanks PC - that's really kind of you mate, appreciated Good decision Ian An ex Vulcan nav eh? Watch he doesn't get you lost and then fiddle with the compass to steer the autopilot. That's a story one of my old bosses told me after the pilots bet he couldn't navigate them across the pond. Thanks Simon - patience? I nearly lost it I have to admit Thanks Roger, very kind of you Thanks Timmas This was your first kit? I'm surprised it didn't put you off!3 points
-
Onwards and one side of decaling done Micro decals for the numbers, are they serious? What kind of fool would apply each one of these? This kind of fool apparently... BTW, here's the neat apply on a pool of Future tip in use from @stevehnz , I use a mix of 50/50 with distilled water ,note the snuggling down without any nerve wracking wrinkling etc. Simples. Well, my eyesight is completely shot so this evenings sundowner: Aperol Spritz wiv sum art. Good night and good supping A3 points
-
I have one or two Fujimi Sabres in my stash to keep me busy. Stuart3 points
-
I must admit I was a little confused when I read the product description, which did act like the model was actually a real-life vehicle, but like a rational human being I used the Great Power of The Internet to check this. I won't even open the can of worms which is general squeamishness around swastikas and Nazi imagery, but I would agree with the point that it's more of an issue within Germany, where they have been having a crisis concerning their whole history from unification to the end of world war two. My two cents is that whoever designed the information for the kit should have made it clear it was a sci-fi subject, although that is rather idiot-proofing it.3 points
-
Wheel house glass is now in and more weathering3 points
-
3 points
-
The fuselages closed up well. I'd reamed out the peg holes beforehand which I think helped. There was just a touch of filler required, and I sanded this carefully as the plastic is soft. The fit of the wings is good, as is the fit of wing radiators and oil cooler. I think I'll skip doing the filler at this stage: I'll see what they look like with a coat of primer, then maybe apply some wipe-on acrylic putty. I added navigation lights from scrap clear sprue Ditto from above. The wing roots are good, certainly vastly better than Airfix's 109E. As Azureglo pointed out above, the gun troughs fit a treat (along with the horizontal stabilisers and the exhausts). The cowling joint is a little bit too big, I think, but since there is a panel there on the real thing, I don't want to eliminate it. I might give it a coat of PVA which will shrink and reduce it. You can see the scratched gunsights. Getting those in took a whole evening, mainly on the grounds that to fit two I ended up making about eight, six of which were eaten by the carpet monster! Following a bit of a scrub up I'll fit the canopies and blow on some primer.3 points
-
I'm not sure what a Gosport tube is, but I think this is a T.III? Terry3 points
-
Not with those names perhaps, but if Sherwin_Williams is any example, I bet something close to colors RLM 65, 70, and 71 are available with fancier names, a la Antique Green or Sunshine Blue Our previous house was reasonably close to overall MSG with OG trim. My wife balked at the upper floor exterior in DG/OG even if the color names were different3 points
-
Adding some rust to the areas which I think are metal, the main hull was made of wood so that's not going to get any Cheers for stopping by Dan3 points


.thumb.jpg.d17ff607fc7e89ed057e63fcb6f2a888.jpg)


.thumb.jpg.0bac681e0da8e4ed7557610e98fda908.jpg)


This leaderboard is set to London/GMT+01:00