
Leaderboard


Popular Content
Showing content with the highest reputation on 25/06/18 in all areas
-
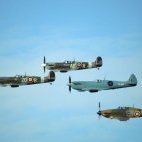
I put-off building a Malta Spitfire for a long time, wary of the disagreement about the colours, markings and weathering related to the siege - as you are probably aware, apart from a few well known photos, hard evidence is hard to come by, and eye witness accounts can sometimes seem contradictory with the passage of time. However, having picked up a Hobby Boss kit on the cheap, i decided to go ahead and build a Mk.V in the markings attributed to George Beurling in the Osprey Malta Aces book. The plane used replacement panels in places from donor aircraft in desert camo to replace damage, and after time it has been noted that the blue paint applied at some point in transit began to fade, giving glimpses if the desert camo underneath. The model is OOB except for some Barracuda resin wheels to replace the rubber ones in the kit. Insignia and markings were applied using home made masks. Weathering is by oils, some sanding with micro mesh and pastels.31 points
-
Hi... Recently finished this model... my first WnW kit and having taken the plunge, probably not my last one, either. There are a good few photos, so I'll keep the narrative to a minimum. Generally, a lovely kit to build and the company's reputation for first class and interesting model subjects is well-merited. All internal detail was excellent and the engine was a smart looking item in it's own right. All of the small transfers for the various gauges and the instrument panel went on very nicely, and the markings were very good and went on well throughout the kit, for which there are five different colour scheme options. The model was more or less built from the box; I attempted to ruin my eyesight by adding in spark plugs to the engine but not sure they came out looking as good as I'd have liked, but in my defence, even in this scale, they are very small items to work with. Care is needed with the variant you choose to model when it comes to the louvres and their placement around the forward fuselage but they shouldn't prove to be too difficult. After market seatbelts were called for when I lost one of the kit-supplied pieces to the carpet monster; turnbuckles for the rigging were sourced from GasPatch and will certainly enhance your skills in threading needles - trying to pass elasticated thread from Utschi through the eye of the turnbuckle was another visual challenge, although having started to work with them, then decided it was too much for my eyes, then trying successfully a second time to get to grips with them, it wasn't overly problematic once I got the hang of it. I suppose, as with everything in life, it's getting into the routine that can be the most off-putting aspect of trying something new. Unit and national markings, as well as the various stencils, were applied prior to the attachment of the upper wing. Optional MGs are provided - full-fat plastic or sleek and eyecatching plastic/etched brass options. I chose the full-fat variety, although I 'cheated' and added on the etched brass gun sights. The few transparent pieces offered were nice and clear, and as the lateral windows could be 'dropped' open on the real thing, I elected to leave the (L) forward window open as the fuel pipe leading into the tank under the pilot's seat was located next to this window; I also decided to leave the cowling covers off, which explains their absence from the photos. I chose to attach the external bomb load offered with the kit; the anometer on the upper (R) wing was housed in an aerodynamic fairing with a counterbalance on the opposite wing, this former item having to be hand-made as it is not accommodated within the kit pieces, but is very clearly visible in the accompanying photograph in the instruction manual, and the latter being largely guess work as the aforementioned photo doesn't clearly show how it looked. The model was finished in pale blue overall using a paintbrush, with the uppersurfaces subsequently finished in my own interpretation of the relevant colours, these having been applied by airbrush; the model was also blackwashed inside and externally as appropriate during all phases of the build. So, having been off work for a while with a (thankfully, now-improving) knee complaint, this was certainly a good way to while away the hours during my recovery at home. The model is finished in the markings of an aircraft believed to have been assigned to Kagohl II in late 1916/early 1917. I hope you enjoy, and thanks for looking in... 😉. Regards, Paul18 points
-
Shunzo Takashima, 244th Air Group, Chofu airbase, May 1945 If you like decaling this kit is for you goes together perfectly16 points
-
Hi I've got back into modelling the last couple of years and have seen some of the stunning builds. Mine aren't up to the same standard, but I'm happy with them and thought I'd share and hopefully receive some critique so I can improve. I've only done a couple of planes. The P47 is Tamiya and the P51 Meng both 1/48 ThankIan16 points
-
Just completed this Reaper. Fun, easy to assemble kit and painted with MRP and Alclad. It is a surprisingly large aircraft with a 66 foot wingspan....6 feet larger than a Do-17!14 points
-
Dear fellow Britmodellers, here's my 1/72 KORA Focke Wulf Fw-190 F9 "Panzerblitz". The kit features Eduard's plastic sprues for an A-8 (some modification on the lower wings is required), a bag of resin bombs and rockets, three small photo-etch frets and a decal sheet. The bombs and rockets are not better than the plastic parts from the Eduard F8 kit. I had a left-over weapons sprue from a F8, so they were duly replaced. A small photo-etch frame supplies seat belts and pedals, but no instrument panel. Instrument panels are provided as black/white paper print-outs only. The second frame holds the ventilators - both 12 and 14 blade are provided. The rocket rails are supplied as a photo-etch assembly on the third frame. I struggled to get everything folded straight and in line, so the rails were substituted with the Eduard plastic part as well. In the end I only used the photo-etch part for the small fairing just ahead of the rocket racks. The four decal options are very interesting, the decals themselves of very good quality. They are printed on a continuous carrier film and have to be cut out individually. I noticed that this kit was not very well received within the BM community (have a look here): I understand that the price tags of some distributors may put some modelers off. I had the chance to grab a couple of the KORA boxings at Eastern European model shows, directly from the manufacturer, sold for a price marginally above the regular Eduard kit. If you really want to have a Fw-190 F9 (and can't wait until Eduard release their version) this is the only game in town. The only other contender is the Hasegawa kit, which is already hard to find. According to my research, only a few Schlachtgeschwader used Panzerblitz weapon systems operationally in spring 1945: SG 1, SG 3, SG.10 and SG 77. My model represents a machine of one of those units. I painted with Gunze/Mr.Hobby acrylics and weathered with artist's oils. All photographs by Wolfgang Rabel. Thanks for your interest, best greetings from Vienna! Roman13 points
-
Hi. Finished this one. The build is here: https://www.britmodeller.com/forums/index.php?/topic/235037992-avia-bk534-172-eduard/&page=3 Hope you like it!13 points
-
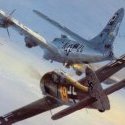
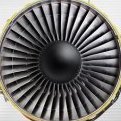
The Me 163 doesn't need much introduction: it was aerodynamically far ahead its type, the only purely rocket-powered fighter to enter regular service and actually go into combat, and a death-trap to users due to the horrendously dangerous fuels it used. The premise of course was an aircraft that could get to operating height at unheard-of speeds, then make a couple of unpowered attack passes before gliding back to earth. At this point it was highly vulnerable, unable to go around for a second try if the approach was wrong, and prone to explode if residual fuel was mixed on impact. The type scored a number of successes against enemy aircraft (16 kills), but 6 were lost to enemy action and 9 to other causes. Arguably these loss numbers are extremely low considering the novelty of almost all of the systems involved, but the impact the type had certainly didn't justify the effort made. The main beneficiaries of the design were the post-war air forces who built and operated tailless types that to a greater or lesser extent derived from the Me 163. The legendary Eric Brown flew one under power (only after signing a disclaimer stating the German ground crew acted under his orders!), reaching 32000 feet in under three minutes, an experience he described as "like being in charge of a runaway train". He found that the aircraft handled well, with "good flight characteristics", in contrast to the other tailless designs he flew, all of which were in his opinion "killers". The kit is Hobby Boss's easy-build effort, with some scratchbuilding in the cockpit plus some refinement to the trailing edges and supports of the landing skid, but otherwise out of the box. No weathering, as none of these aircraft were in service long enough to become weathered! This makes me wonder whether it's worth scratchbuilding cockpits! Underside, for reference. Rear quarter view Front view shows the wing root mounted MK108 cannons: devastatingly destructive, the short range of the cannons combined with the high speed of the Me 163 made aiming and hitting extremely difficult, From above12 points
-
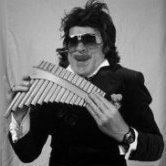
Fokker E.V 1:32 Miko Mir with Pheon Decals The parasol winged Fokker D.VIII was the last of this companies aircraft to enter service before the end of the Great War. Originally designated the Fokker E.V. it was an agile little machine with a parasol wing and rotary engine, much like some of the early machines from the start of the Great War. It might have had greater success, had it not suffered from poor manufacturing standards. After barely two weeks service in August 1918, The E.V. had to be withdrawn due to failures causing the wing to disintegrate in flight. Badly made wings and poor materials were found to be the main cause. Examination of several sets revealed such things as incorrect wing spars, and nails that secured the plywood skinning completely missing the ribs it was supposed to attach to. Redesigned wings were manufactured under more stringent quality control, and the aircraft resumed production with the new designation of Fokker D.VIII. Surviving E.V.s were retro fitted with the new wing, and it seems were also then referred to as D.VIII's. Re-entering service in October, it did not much have much time to prove itself before the 11th November armistice brought the conflict to a halt. The Mikro Mir kit is typical short run injection molded, quite buildable but inevitably you need to do a bit of fettling to get things to fit, particularly the tailplane where it sits on the rear fuselage. I didn't much fancy any of the kit colour scheme options, so purchased Pheon Decals set 32061 which gives seven options, including five from Jasta 6 with the attractive striped tail and petaled engine cowling. Not only that, but Pheon supply a superb set of assembly jigs, more of which later. (Mrs Viking, without prompting, was looking over my shoulder while I pondered which colour scheme to apply, and pointed to this one, saying it was really nice. That decided that!) The E.V is a dainty little machine, I persuaded Leutnant Wolff to nip out during his coffee break to stand alongside and lend a sense of scale; There has been a lot of discussion on the wing colours applied to the E.V / D.VIII series, originally it was thought that it was olive green top and bottom. A few years ago Dan-San Abbot researched this, and concluded that it was incorrect. It was very likely that it was treated with woodstain, in Mocha brown and True green on top, with Azure blue and Violet underneath. I decided to go with this, and try to replicate it on my model, following the drawings on the Pheon instruction sheet . I used solid base colours in lighter versions, and then used thinned oil paints over the top to produce a streaky stained affect. I wasn't sure how it was going to turn out, but I'm pretty happy with the result. If anything I might try to make it lighter If I do another one. The Pheon decal sheet comes with a brilliant pair of assembly jigs that you need to apply to thick card, and put together. They are printed on sticky back paper, making the job very simple. I can't praise them enough, that are absolutely superb and make the otherwise complex assembly of the undercarriage and wing as easy as it could be. They ensure that everything lines up precisely with the correct spacing. It gets the wing on absolutely square to the fuselage, with the correct incidence. Utterly brilliant and essential to building this kit!. Add to Pheon's superb rapid service, and excellent choice of colour schemes and really can't go wrong. I was fortunate enough to have some airfoil sectioned brass 'Strutz' material (long out of production), to replace the plastic items in the kit. The whole model is very strong. The Undercarriage assembly jig ensures you get it spot on. (note the replacement brass legs). The second jig, where you place the wing in first, and then the fuselage. You can then fashion your own struts, or fit the less substantial kit ones; I used the kit plastic 'V' struts , but had to cut them at the point of the 'V' to fit them accurately to my brass replacements; I used Wingnut Wings aftermarket 4 colour lozenge decal which I had to cut to shape, but there is also the option of Aviattic's 'Cookie Cutter' set which provides for 2 aircraft. It's been a fun project, and I'm pleased to finally have a Fokker E.V to join my line up of Wingnut Wings kits. (But why do you always spot the devil dust on the photos after you've taken them 😠) Thanks for looking, John11 points
-
11 points
-
Here's some pics of my latest completion , the 1/72 Hasegawa Mirage F1C . Apart from an Aeroclub seat & a piece of plasticard blocking off the nosewheel bay , it's built totally OOB . The decals are from Syhart , whose products I recommend most highly . Apart from the majority of the radome & a few touch-ups , the black is entirely decal . John Green Nantwich , Cheshire11 points
-
This is my Welsh Models mixed media (Resin and White metal) Jetstream T2. This was actually my first aircraft build after a very long break (maybe 35 plus years), and I completed it around 4 years ago. The kit provides all the parts you need, although I scratch built the engine pods from aluminium tubing and the undercarriage from brass and plastic rod. Underneath I added much missing detail, especially under the centre fuselage and the underwing flap actuating jack covers. I used Valejo paints with my then newly acquired Iwata airbrush. I had to use extensive masking. The cheat-line, all the wing L/E de-icing areas and the main cockpit windows were masked and airbrushed. Decals are from the kit and Modeldecal standard Royal Navy lettering and serials. The eagle eyed amongst you will notice that there should be a small 4 alphanumeric code reading CU68 (for this aircraft) at the top of the fin on each side .................... I still can't find decals small enough, so I will probably print my own someday! I was reasonably pleased with the outcome, but felt the model lacked the correct shape around the cockpit itself. You may notice that from some of the views. The pictures reveal warts and all, but please remember it is VERY small! This one gives an indication of size - standard Valejo paint: And this one outlines my comments regarding the shape of the cockpit around the upper areas. I'll do an RFI soon for the 1/144 BUA DC3 you can see behind, and also the 1/144 BEA DC3 you cant see! Thanks Terry10 points
-
Cheers John, thanks! Hopefully so, Johnny Thanks Simon I did actually enjoy the weather, and BBQ with friends, and ine, and swimming pool ... As a result, not much time was left for modelling last WE, so here's the little I did: I made a paper copy of the decals, cut out the shark mouth and test fitted it in position.... ....to determin where to spray a black area to be faired in with the actual decal which I did airbrushing Tamiya Flat Black the same Tamiya Flat Black was sprayed on the fin tops, followed by Tamiya Sky Blue Then I glued in the leading edge slats, touched them up by brush and gloss coated The camo on them needs merging with the wing surfaces, so I'll attempt a dry-brushing and see how it works. Next time though All comments welcome, as ever Ciao10 points
-
First canadian AFV in CAEN JULY 19449 points
-
Hi everyone, This is a project I did for a very good friend of mines' 50th. Well suffice to see it could also have been for his 51st as it took over a year on and off to complete! It's based on an early configuration F-15E from the 48FW at RAF Lakenheath which we have both visited many times. Happy birthday chap! PS: Build thread can be found here:9 points
-
That long ago? As she's the subject of the thread you'll all be interested to know as of yesterday she's a live airframe again with electrical power successfully applied. I would like to thank the utter gonads at Vultee who designed the ground power socket in a direct line with the hard pointy bit of the bomb bay door. My hand is a delightful shade of black today, thanks heaps.9 points
-
Now, something a bit different. Finished not long ago as part of our local forum's WWI campaign. This particular Zeppelin flew twice over Serbia in 1915. It was pretty easy build, not to many parts, Gunze and Tamiya colors are sprayed over Black Surfacer. I tried to make patchy look, so I put several in progress pictures as well.9 points
-
In 1979 I could not resist buying the recently released Airfix F27 Troopship. Airfix had reissued their old 1960s F27 Friendship as the military Troopship version which was in service with the Dutch Air Force. The kit parts had not been altered from the Friendship. Decals were provided for a choice of two aircraft, a camouflaged one and a grey and white one with dayglo areas. This is the surviving box top from 1979. It looks like the Troopship is winning the Air Race ............ On the side of the box is the colour scheme I went for. Were you a member of the Airfix Modellers' Club ? It would be about 15 years before I was settled enough to build the model. I built it initially as a Troopship in the civilian-looking Air Force scheme. It was a joy to build, going together precisely despite its vintage. I have found the following photographs I took of the model a good number of years ago. They were taken with a 35mm camera so I apologise for the quality but they are the only photos I now have of the model. In this view can be seen the added rear toilet partition which I added. Also folding troop seating visible through the front cargo door. the stairs came from an old Airfix DH Heron. I added a floor to the cabin as the model had no interior. Pilots' flying suits painted orange. One-piece cockpit canopy was beautifully clear. A few years later I repainted the model as a F27 Friendship airliner. I painted it in the same Braathens colours that Airfix had reissued the kit in during the late 1960s Newly repainted on my modelling table. Brushpainted stripes and flags and motifs as I had none of the original decals. Letraset lettering. Cockpit canopy carefully removed so I could repaint the pilots, now wearing blue uniforms. That was my Airfix Fokker F27 Troopship/Friendship. cheers, adey8 points
-
This is Dragon's 1/72 Type 95 Ha Go light-tank with two figure by Germania. It is a simple but nicely detailed kit that took five sessions over three days to complete including the base and figures. I used the kit markings. My build log can be found on the AFV Work in Progress: https://www.britmodeller.com/forums/index.php?/topic/235039949-type-95-ha-go-172-dragon/ Thanks for looking.7 points
-
Rafale must be one of the most elegant fighter of the world, may be due to this fact, it's rarely to see a dirty looking work. As far as I am concerned, there is no clean marine plane on the earth, so this is what happened...... Rafale can carry two MBDA apache like this, however it seems that uncommon showed on any loadout chart....... By the way I'm not sure whether the fuel tanks can carry like this...... I didn't glued the fuel tanks thus the pattern can be changed, but it's not very stable though="= Thanks for your watching!7 points
-
Hi all, Here's a quick Nerf gun repaint I made for my daughter's birthday. The weather here has been *awful* for pretty much all of June, and I usually use rattle cans outside for this kind of thing. I waited until last Friday and got some paint on, but it was so cold (8'C) that it wasn't the best finish. I was a bit down about the whole thing for a while, but after some touch-ups and weathering I think it's come out OK. I used the same graphics on a box and lined it with foam and satiny fabric attached with hot glue. It was still drying when I wrapped it up last thing last night... It started out as a Nerf Falconfire, which looked like this before I dismantled it and sanded off the logos: https://goo.gl/images/f7QnZw But has ended up a bit more interesting. I hope! The slide mechanism is a bit stiff owing to the paint but it's not the slickest thing even in original form. I cleaned off as much paint as I could from the slide surfaces but some of which was orange needed to be white, so it's not been possible to take it all back to bare plastic. It's painted with Tamiya and Duplicolor primers, and Molotov rattle can top coats. Oh, and I used Tamiya Gunmetal for the metal bits, followed by a Payne's Grey wash and silver Rub'n'Buff. Lettering is from an old Letraset sheet, it's not very sci-fi but the fancy looking Decadry letters I had were no longer any good. Weathering is mostly Pebeo artists' acrylics applied with a sponge and rag, plus some sponged and dry-brushed Citadel colours. I added the yellow flash by sponging Yriel Yellow through a Tamiya tape mask, and I think that really helped bring it together at the end. Weird how significant these small details can be. I also took care to put a couple of painty thumb-prints on Total time was probably about eight hours plus another couple for the box, and despite the late start it was done on time for the big day! Cheers, Will7 points
-
7 points
-
Back again with some progress. I have cleaned up the white metal bits, that took a little while and primed and started on painting them. Compared to some other Magna kits I have built (about seven, this will be number eight), the white metal was of much better quality with clearer definition and much less flash around the parts. Undercarriage legs, doors and wheels are nearly finished with a bit of touching up required and props are finished. The red-white-red tip blades are given as decals and so going to give them a go It is worth trying at any rate. The cockpit interior comes as a resin floor with seats and side consoles moulded in. Rear bulkheads, Instrument panel and control wheels are white metal. I did not add any detail as I do not think a lot will be visible through the cockpit windows. Colours came from the instruction sheet, web photos and the training aid at the aircraft museum at Doncaster. The first decal was also added, this being for the instrument panel. The decal is very thing and need careful handling but settled well with no silvering The major resin airframe components were removed from their casting blocks and cleaned up. Any large air bubbles were filled at this time. Once the cockpit interior was added as was weight (aquarium plant weights) to about 20 grams as suggested in the instructions. The fuselage had some blemishes wet sanded off and matched up and were found to be a good match. The fuselage was a bit longer on one half, but that was probably my cutting off the moulding block and not a major issue so far as I am concerned. Actual sticking together of the fuselage halves was by a combination of tacking the halves together with superglue and then filling with epoxy resin. As past experience has demonstrated that using superglue on its own does not always give a strong enough join to stop the joint splitting under the weight of wings etc. Once everything was dry I did a bit of filling (and it does need it) and then added the tail fin and ventral fin. The engines were also added to the wings to make clean up easier. More filler was added as needed and rubbed down and before the wings are added I might do a bit of priming on the fuselage and engines to see if the joints have been cleaned up to my satisfaction. Filler and some plastic card have also been used on the coaming in front of the instrument panel as the panel and fuselage was not a good fit. Holes have drilled in the tailplanes and fin to take some brass rod, fortunately some guide indentations are present. They will be added quite late on in the build to minimise breakages. The nose will be added when I can see the model will not be a tailsitter. It is solid and will stand some drilling to take weights if required. So far this kit is what I would expect of a Magna kit, not terribly sophisticated, but workable with a bit of effort. I quite like something to stretch me a bit. Next up will be the wings and nose (Tailplane will be held on with tape to see how it balances).7 points
-
This is the old Airfix 1/72 B(I)6 but with the nose replaced from the cockpit forward by one cut from the old Frog B(I)8 kit. The only other modifications I made were to shorten the bullets in the engine intakes and fit larger, more accurate tailpipes. This old Airfix kit builds up quite nicely with a bit of care gluing the fuselage halves (they need to be glued in stages to get it all aligned) and the wing/fuselage joins. In hindsight, I should have attached the nose glazing earlier and faired it in properly. Also, I didn't bother with all the possible stencils as they're a) too tedious and b) not really visible from the 6ft range that I view my models 😁 Comments and suggestions are welcome. David6 points
-
Due to summer 'distractions' this is not going to be a quick thread, but I'll try to keep you amused with occasional updates. The starting point is an Airfix 1/72 Chipmunk T.10 that I built way back in 1969, shortly after the kit was released; WK574, Cambridge UAS, c 1952 by Philip Pain, on Flickr I have never been happy with the look or accuracy of this kit, but at the time my skill only ran to doing something to correct the canopy, substituting the 'canadian option' windscreen which doesn't have an external frame at the front (it is internal on the real aircraft). WK574, Cambridge UAS, c 1952 by Philip Pain, on Flickr The model is showing its age and the transfers have yellowed. In this view it can be seen that I added the missing flap actuation hinges. WK574, Cambridge UAS, c 1952 by Philip Pain, on Flickr The main problem with the 'look' of the Airfix Chipmunk is that it doesn't have enough 'chin' at the front, also the propellor spinner is too short and bulbous. The intakes on the sides of the engine also too bulbous. WK574, Cambridge UAS, c 1952 by Philip Pain, on Flickr The other big problem is the undercarraige legs which are far too slim, and the wheels don't look right either, being too 'square'. WK574, Cambridge UAS, c 1952 by Philip Pain, on Flickr The cockpit has two seats and nothing else, so I added scratch-built instrument panels. WK574, Cambridge UAS, c 1952 by Philip Pain, on Flickr All of the raised rivets were rubbed down, not that they shouldn't be there, but they were far too prominent. I made a mistake with painting the yellow 'T-bands', they don't go on to the flaps. So I was delighted when AZ Models recently released a new 1/72 Chipmunk kit, and the box promises much; Chipmunk T.10 (1) w by Philip Pain, on Flickr Chipmunk T.10 (2) w by Philip Pain, on Flickr The contents were less inspiring, but seemed ok Chipmunk T.10 (4) w by Philip Pain, on Flickr It is a typical 'short-run' kit, a bit rough around the edges, and generally lacking mounting pins and tabs, making it hard to glue together at times. Chipmunk T.10 (7) w by Philip Pain, on Flickr It has a full cockpit interior, but a familiar problem soon became apparent - once again the canopy is wrong! External frames front and rear, don't Chipmunk mould makers ever go and look at the real thing!? The AZ Models canopy is actually worse than the original Airfix one, because the windscreen is too long with the main frame set too far back. So I've tried to disguise this fault by extending the forward instrument coaming to fill the gap. Chipmunk T.10 (8) w by Philip Pain, on Flickr So here is the basic assembly, and there were big gaps to be filled with modelling putty. Chipmunk T.10 (9) w by Philip Pain, on Flickr Also on the tail, and the spin-recovery strakes were a bitch to get right due to their small size, and vague fit. Also it should be completely flat from one tailplane to the other, but the AZ model has a raised rear fuselage in between. This took a lot of whittling down. So I was starting to lose faith with this model, so I dug out one of my un-built original Airfix kits, to compare notes and check out the differences; Chipmunk T.10 (10) w by Philip Pain, on Flickr And then I couldn't help but start making the Airfix one as well! This time using the AZ model as a guide to correct the Airfix one. Chipmunk T.10 (11) w by Philip Pain, on Flickr Added a basic interior to the Airfix one, and scratch built a pair of spin-recovery strakes for the back end. The Airfix kit also has an annoying feature at the back end, with the tailplanes split where there isn't a split on the real thing. This takes careful filling and sanding to get the required flat finish from one side to the other. But basically the Airfix main parts go together well, with smaller and better aligned gaps. Chipmunk T.10 (12) w by Philip Pain, on Flickr Using the AZ kit as a guide, the incorrect Airfix nose, spinner, and undercarraige legs were then improved using modelling putty. In this photo they still need a bit of finishing off. Chipmunk T.10 (13) w by Philip Pain, on Flickr So now there are two, roughly similar. The front instrument coaming on the Airfix Chipmunk (right) has also been extended, just to make it look better. Chipmunk T.10 (14) w by Philip Pain, on Flickr Chipmunk T.10 (15) w by Philip Pain, on Flickr Here are the two canopies, AZ on the left. Both have had the front and rear external frames filed off and re-polished. Also being made are the two prominent internal frames to go in the rear of each canopy, both absent from the kits. I'm not looking forward to gluing them in place, as there is no room for error with glue and transparencies. So that is the progress, so far.6 points
-
Morning Folk's,here's Airfix's Heinke lH6 as a KG 26 machine based in Sicily built for the MTO GB,What a cracking kit build's beautifully if you get the instruction's right which I think I didn't as I had an issue with the engine nacelles early in the build,special praise to Airfix for the superb glazing and method of fitting the fuselage window's but also a dunces hat and ten minute's in the corner for the instruction's which have the starboard codes reversed I'll be joining them there as I blindly followed them and hence they're wrong here's the build https://www.britmodeller.com/forums/index.php?/topic/235037622-airfix-heinkel-111finished/&page=1 And the build,thank's for looking in.6 points
-
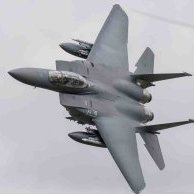
HI finished this recently, as stated 1/32 scale Revell F15E Eagle built straight out he box, painted with Humbrol enamels. Had this kit for many years it went together well no major problems in assembly, this is the kit I posted about previously when I was looking for a replacement canopy as I mucked up the original. Thankfully a fellow Britmodeller from Singapore came to my rescue and sent me a replacement, my thanks go to Kei for his assistance. Considering the age of the kit I got away with using the kit decals some did want to break up on application but I got there in the end.6 points
-
RF-4Bs from VMFP-3 at Nellis AFB. BuNo 153092 RF11, July 1980 153110 RF26, November 1980 153091 RF10, May 1981 151980 RF05 and 153103 RF20, Red Flag 84-6, August 1984 153103 RF20, Red Flag 84-6 153105 RF21, Red Flag 84-6 157980 RF08, Red Flag 84-6 Thanks for looking, Sven6 points
-
Thanks Stu From what others have said the kit is not great and it's not been that much fun to be honest. Do you think Airfix will produce a new tool? Thanks Phil Ah, the Falklands story, well worth a memorial build (but not from me!). Won't you need a LOT of Victors though?? This afternoon I bit the bullet and masked up the underside: I fondly remember meeting Robvulcan and his girlfriend at a show and her fondly recalling them spending evenings in front of the 'tele masking up a Vulcan with packets (plural) of BluTak. A fond memory, but not for me... I reckon that, including the mask designs, that took about an hour? That said the plan of spraying thinned grey around the masks didn't work - not enough difference between the thin colour and the primer - so I used thinned DG. Then I pulled off the masks and filled in the areas with solid green: Still drying in places. The method works for me so far, although 'storing' the masks is a bit of a pain: They need to go back on for the grey and I know I'm going to need to pay special attention over the bendier bits. Still faster I reckon and I'll press on...6 points
-
6 points
-
I have a stash of pre-painted decal paper. The mat grey will be used for the walkways, the black for a couple lines seen in photos on the wing, the metal hue one for inspection panels, hatches and such: Walkways prepared. They skirt the wing luggage hatches, in this plane filled with additional fuel tanks. Will not be applied until the very end, to preserve the mat finish (anti-skid): The fuel cap covers are added as decals. The one in the middle wasn't one, but there is piece of metal anyway there in photos: Some covers seen in photos close to the Pitots are punched and applied: The black lines are applied as decal strips:6 points
-
Hiya Folks,......yes m again,....and with another Spitfire! This one is the 1/48th scale Special Hobby Mk.Vc kit but re boxed by Revell and it wears the markings of the USAAF`s 307th FS 31st FG, complete with shark mouth! The model is brush painted and here is the WIP with photos of the real aeroplane; Here is the model; DSCF4312_NEW by Tony OToole, on Flickr DSCF4316_NEW by Tony OToole, on Flickr DSCF4317_NEW by Tony OToole, on Flickr DSCF4320_NEW by Tony OToole, on Flickr DSCF4311_NEW by Tony OToole, on Flickr Cheers, Tony6 points
-
Hiya Folks,.... me again!!! Here is my 1/48th scale Airfix Spitfire Mk.Vb wearing the markings of 40 Sqn SAAF in Italy, 1944. Brush painted as usual,..here is the WIP with a photo of the real aircraft; And here is the model; DSCF4298_NEW by Tony OToole, on Flickr s9 by Tony OToole, on Flickr s6 by Tony OToole, on Flickr s3 by Tony OToole, on Flickr s5 by Tony OToole, on Flickr Cheers Tony6 points
-
Thanks, Guys! Just a bit of progress to report. The gear has been weathered with oil paints and the oleos done by applying Uschi Van der Rosten chrome powder with an artist's stump the has been cut to a chisel shape. This is a very efficient way of representing this section; no masking and it is done in a few minutes. Also, it seems to represent metal more effectively than paint of foils. Apologies for the somewhat out of focus photo. I'll try for a better one. IMG_6583 I've added the exhaust stains, which can be nerve wracking since you don't want to overdo it. As a result I've understated them. She also got to try on the finished prop, which makes her look seriously more lethal. After the stains have completely dried (this takes some time since they are at least 9/1 mix of thinner/paint), I'll use some Vallejo flat coat to dull them down. This is the flattest flat on earth and perfect for the job. Engineers occasionally marked the Werk Nummer on the prop or spinner with chalk. I duplicated this with a light grey water color pencil. At the moment only one prop blade and the spinner have been "fixed" with clear flat. The additional umber on the other blade seems redundant and will be removed with a wet Q-tip. IMG_6588 IMG_6587 More soon.6 points
-
Here's one for our Antipodean members! This is my biggest model to date and one that I've been working on for quite a long time, it's another aircraft I used to see spotting at Heathrow in the late 70s and early 80s. The actual conversion isn't too difficult, I have used the Authentic Airliners Upper Deck Conversion and Bra.Z P&W engines and the rest is mainly cutting down the fuselage and chopping off the wingtips. The only tricky part is reshaping the wing leading edge/fuselage fairing. Most of my problems came from paint which badly crazed due, I think, to laying it on too thick. It's not the first time this has happened to me and is probably because I am often in too much of a rush to wait for the paint to dry between coats so just keep on spraying until it's nice and opaque. Of course in the long run it takes longer as I have to remove the paint or spend ages rubbing it back down. I might learn to take my time one of these days! The other possibilities are I didn't shake the can enough, it was Halfords White Primer, or it was too cold when I was spraying. My other paint related frustration came when I thought I'd use cling film to mask off the fuselage when I painted the wing leading edge. Big mistake as it reacted with the Klear on the white top and the NMF belly and left impressions of the creases in the cling film all over my nice smooth paintwork! As it happens this turned out to be a blessing in disguise because rather than redoing the NMF with paint I decided to use AA High Shine Metallic decal sheet which I'm very pleased with. I will be using this stuff for all my natural metal fuselage areas in the future! The cheatlines and tail are painted with the ochre being a mix of Humbrol 9 Tan and 69 Yellow. Wings are Halfords Racking Grey with Coroguard sprayed on clear decal sheet. Tail logos are from the old Microscale sheet. I was worried about them not being opaque enough so I doubled up with another sheet I bought off ebay. Considering these sheets were possibly 35+ years old they performed perfectly. I used the titles from the Microscale sheet too. Door outlines and other details like the 'City of Fremantle' titles and crest were laser printed. Cockpit and cabin windows and landing lights are, of course, from Authentic Airliners. I would like to build many more 747-200s and will definitely be converting the 747-8 again but will more than likely use the Revell Freighter as it already has the shorter upper deck. I could've built a 747-200 from the old Revell kit but I enjoy the challenge of converting kits and feel the Zvezda (and new Revell) 747-8s have the edge in shape, crispness and detail. Anyway here are some pics. Thanks for looking, hope you like it! Cheers, Ian5 points
-
Hi all, Having just joined this forum, I thought I'd share 3 builds from my youth, and the lessons learned for each of them before I start sharing current builds. Many many years ago I build the old 1/72 Airfix Albatros DV. The kit is from the 50s, originally, and has been re-boxed multiple times. I got it in this box, many of you might remember it: The plane I chose to build was a Jasta 5 crate, shown in this picture, as it looked so beautifully elegant: Things I wanted to try with this kit This was my first WWI kit I decided to: Rig - I got transparent fishing line and pulled it over a black permanent marker. Paint using masking tape - I cut the star out of tape and painted the green fuselage band around it Angle the control surfaces The model was painted without an airbrush. The completed model The lessons learned whilst building this particular kit Rigging is much less daunting than it seems and adds nicely to the finished model Masking tape works, even with brushes Angling control surfaces is a nice touch and worth the effort in 1/72 A windscreen and propeller decals for the manufacturer logo are also quick wins in terms of added realism A semi-gloss finish looks nice, especially on varnished plywood, but reveals every unevenness of the paint job 😮 A great finish using brushed enamel paint is very difficult to achieve - airbrushing might be unavoidable Best regards, Rob5 points
-
Finally got this done just before my hols. With huge thanks to Camper1 for supplying me decals 👍!!! The kit is the Academy one that was a freebie at the club a couple or so months ago. It had been started with badly applied 'baco foil' at the rear fuselage half and where it had been cut in half to display the engine! My task was to reunite the fuselage halves, get rid of the foil and put it all together! Then some begging for the decals... Anyway, here we have the end product and hope you all enjoy. That little white protrusion on port side near jet pipe is the replacement fuel dump pipe having lost the kit part and needs to be painted red. It can be seen in red in pics above thats because the photos here are not in strict sequence. The above two pics show a touch of my own is used here by way of decorating the intake and jet pipe covers with spare roundels applied to blue painted covers. The roundel decals came from a 1/72 Hobbycraft Otter as they have the correct 'silver leaf style MAole leaf, though not brilliant but does the job. It was an inspiration! The fin markings represent those specially applied for a NATO gunnery meet at which the RCAF Sabre units came out tops! The one I have modelled is 23381 of 413 'Elephant' Squadron of 3 Day Fighter Wing Zweibrucken, West Germany. ( At the time!!!???) (Actually, I note that 23381 was actually a Mk. 6 and I had really planned to do a Mk.5 due to having a hard wing with fence. I know this will offend some but a bit of artistic licence is claimed here)5 points
-
- At last my last Flogger from Trumpeter Boxart excepted no change with the previous 27 boxes mostly around the wing pylons amongst others...... https://imageshack.com/a/img923/705/ajnTGE.jpg https://imageshack.com/a/img923/8910/JgPYmT.jpg5 points
-
This aircraft is built for the 1/32 Eduard kit straight out of the box, only personal addition is the map in the cockpit and a set of Air Masters canons. The Messerschmitt Bf 109E fighter of Franz von Werra, shot down over England, where he was taken prisoner in January 1941. Von Werra was sent with other German prisoners to Canada, where possibly he became the only German airman to make his escape from there, returning to Germany via the still neutral U.S.A. Von Werra was also a skilled fighter pilot, although his results weren’t anywhere near those of the Luftwaffe’s top guns. He most frequently flew as a wingman of Hauptmann Erich von Selle, the commanding officer of his unit. In this role, he scored four victories during the Battle of France – a Hurrricane, two Breguet 693s and a Morane MS.406. Despite this initial success, von Werra’s tally did not advance any further during June, July and larger part of August, despite the fact that operations against the RAF were being flown almost daily. Then suddenly, on 28 August, von Werra returned from a mission claiming 9 aircraft destroyed. According to his report, he first shot down a Spitfire during a general melée, then became detached from his unit, spotted three Hurricanes on a landing circuit and destroyed them one after another. Lastly, he zoomed low over the airfield, setting additional five Hurricanes on fire. Then came the day of 5 September, when von Werra was shot down. On that occasion, II./JG 3 was flying as an escort to a bombing raid on Croydon. On the return leg of the raid the bombers were attacked by a swarm of RAF fighters. Hauptmann Von Selle, leading the thirty escorting Messerschmitts, gave the order to attack. At the exact moment when Selle rolled his aircraft to starboard to initiate a dive, another gaggle of Spitfires jumped them from behind, their guns blazing. Von Selle’s aircraft avoided the bullets. His wingman, Franz von Werra, did not have such luck; a well-placed burst damaged the engine of his Bf 109 and knocked off his radio. Without engine power, the German pilot was unable to shake off the attacker, which followed him in a dive, squirting the Messerschmitt with a series of short bursts. Ultimately, von Werra had no choice but to make a crash-landing. This he did, putting down his aircraft wheels-up but otherwise intact on a field at Loves Farm, Marden, Kent. The identity of the victorious British pilot remains the subject of debate until this day. Some researchers claim that the pilot who was responsible for the shooting was F/Lt John Terence Webster of No. 31 Squadron. Others believe it to be a shared victory by P/O George Bennions of No. 41 Squadron and P/O Basil Gerald Stapleton of No. 603 Squadron. Yet others have attributed the same achievement to F/Lt Paterson Clarence Hughes, an ace of No. 234 Squadron with a victory tally of 14. Officially, the credit originally went to ‘Stapme’ Stapleton, but Hughes final DFC citation in the London Gazette of 22 October 1940 awarded him a half credit for the same. (The spitfire site n.d.)5 points
-
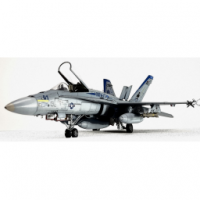
This is F/A-18F Academy 1/72 (12535) Originally VFA-103 Jolly Rogers CAG plane, ended up as VFA-32 plane (Jasmine model decals 172006). Here are some notes regarding this kit from my work in progress topic about this kit: Academy should avoid making these half breed kits. It should be either snap kit or kit for modellers. So many fine details with almost perfect fitting but with design flaws related to snap kit "features". Decals in this kit are USELESS if you want accomplish even humble, decent results. They are simply put, so bad, color is off, they don't stick, they can not be softened, they are too shiny... If you intend to buy this kit, simply count on getting another decals. 1. They were modelling parts in such way that they can be assembled without a glue (this includes canopy). I assume most of us here are using glue so they were targeting another market with this feature. There is also a cost for this, each part must have pins to be fitted into another part and some of these are seriously affecting the reality of model. For example, I had to scrape two large extensions from aim-9x missiles and fill two large holes intended for these extensions on wing tips. Leaving these parts in original form simply looks bad. Doors hinges are too big and toy like. The list goes on.. 2. This kit comes with multi colored parts (MCP). Again feature targeting another market as model painting is the crucial part of this hobby (at least I feel this way). Most of manual does not include color references because of this idea. This was actually changed with next iteration of this mold (F/A-18E, 12547), color references are now included in manual, there are no stickers (which is now bad for those who are not painting model and don't want to use decals) and decals are now Cartograf (there is no Cartograf logo on decals sheet but there is logo on box and the decals don't have that bluish tone and look very good so I assume they were printed by Cartograf. 3. This kit comes with stickers and useless decals. We don't use stickers here and included decals are so bad that it's hard to believe someone from Academy did not try these on actual model before distributing this kit. My point was: Academy should pack and mark these kits as easy fit, painting not required, decaling not required, MCP kits with stickers and make another version of same mold intended for modellers and distributed with good decals. This would be an easy task for them and with current details of this kit would probably make best super hornet (E/F/G) 1/72 version out there.5 points
-
Right, I very small update this week, only had a few hours modelling, a few things got in the way weekend just gone. But I have made a start on the wood decals on the fuselage: Looks the part, glad I had a trial run on the tail section: This is going to be a slow process, so updates will be limited to a few images. Cheers Richard5 points
-
5 points
-
After a weekend away helping eldest daughter move into their new house, the 1/48 Airfix ground crew was waiting. Ten figures to choose from: if you remember I ordered these in the hope that they'd be smaller than the Spitfire pilot. Are they? That'll be a no then. Rats. Keith was wondering if the scale was off... Allowing for a head (!!??) say 1.5 inches. 1.5 * 48 = 72" = 6' tall. Not that far out then. What about the model? 8" * 48 = 384" wingspan = 32' . Wiki says Wingspan: 33 ft 2 in (10.11 m) so the model is a bit small. Hmmm. Maybe I can use Strickers idea and mould my own, using a face from the kit? Er... Freddie Kruger or grumpy old man... watch it you lot! I shall ponder...5 points
-
This last one is a side-by-side with my earlier Hasegawa A-8: Regards J.A.5 points
-
If they released the following, all in 1/72, I certainly would (I'd also end up living in a house made of kit boxes): Avro Anson Gloster Meteor I/ III Fairey Battle Westland Lysander5 points
-
Let's see, what am I forgetting... oh, that's right, landing gear legs and wheels, engine firewalls, elevator counterbalances, tail tie-down, and hatch: Some I had already prepared but forgot to add, so now they are on: The hatch I vaguely recall throwing it away thinking that was a leftover piece of plastic. Well done, me. Another one is fashioned: Now preparations will ensue to produce the masks to apply the stab and leading edge International Orange areas. Still some way to go, in spite of appearances.5 points
-
This profile was done by my very good friend John M. Smith. Chris5 points
-
Just done some interior painting, and de-seaming of parts. before this really gets going , here are my ae as earlier Airfix Avengers. First in typical FAA scheme. Not the correct version for this scheme, I learned after the event. Overall blue US Navy scheme And a post-war FAA plane.5 points
-
No.2(Army Cooperation) Squadron, KO•I, s/n N1572. Only one was trialled and rejected. A very nice kit though I had a few problems due to the very tight fit of some of the parts. I used the AML Camouflage Masks for the sole reason that I've seen them around but have never seen them in use. They sat very well on the flat surfaces but I had a bear of a time to get the multi-piece masks to fit around the fuselage. They also wouldn't settle into panel lines or around protrusions. To avoid bleed under, I mixed the paints 50/50, turned the air pressure down to about 15psi and shot away from the mask edges and then filled in the centers. I also used Eduards mask for the canopy and turret, well worth the money spent. There was an oddity here, all the masks were 2-3 piece affairs. Colors used were Vallejo Model Color for the Sky undersurface, Tamiya RAF Green and Gunze for the Dark Earth.4 points
-
I can smell it. Not that I am a smoker. My Grandad, who is a Shetlander (now with the great I am in the sky) used to smoke Condor the hard stuff. It came in a block and he would sit there carving it into his palm. He would then rub it between his palms before stuffing it into his pipe. I hate cigarette smoke but that Condor from his pipe permeated the whole of my Grand parent's house and I loved it. He was an engineer in Hull. His work was on the large fishing boats around at that time just after WW11. The information I gleaned from the family conversation when I was a youngster found that he also chewed the stuff. When in the ship's bottom. Grandma, actually Gran, would not have allowed it in the house. Another beauty. When he died Gran and mum had a clear out of his clothes. When they got to his overcoat they searched the pockets. By chance they noticed a bulge in the lining. The old devil had had inbuilt a secret pocket in the lining. In there Gran found a pile of pound notes. Obviously, Gran was a high spender in my Grandad's view and he had taken a defensive attitude. Just love it.. Laurie4 points


.thumb.jpg.0bac681e0da8e4ed7557610e98fda908.jpg)


.thumb.JPG.3498f40362ff13ebfc4b2e45abbd545e.JPG)


This leaderboard is set to London/GMT+01:00