
Leaderboard
.thumb.jpg.87669a5ffb8b13672a3d675087a46d42.jpg)


Popular Content
Showing content with the highest reputation on 18/04/18 in all areas
-
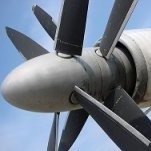
Hey All Here’s a wee project I’ve been working on for a few months now, the first of my 2 RAF Liberators. Hopefully this is fair interpretation (with a smidgen of artistic licence) of Liberator GR.V. BZ862 that flew with 354 Squadron from India between September 1943 and May 1944. The kit is the Revell boxing of a B24D, Jerk’s Natural. Additions to the base model include: · Belcher Bits belly radome · Squadron canopy. · True Details wheels. · Quickboost engines. · F.M. Halifax Bolton Paul rear turret transparency with scratchbuilt internal gubbins for the Quickboost B.P. Defiant .303 machine guns. · Lots of lead fishing weight ! I was looking for a Coastal Command Liberator wearing SEAC markings to build when I came across a photo titled ‘Geoff Tomlinson’s aircraft – Early 354’ on Ron Quirk’s website, in Jim Badgleys album ( 354 Sqn photos ). There is also a second in-flight photo of this aircraft in the album titled 'On Patrol over Bay of Bengal'. From the grainy photos I could tell that it was based on a ‘D’ variant, that it had the code letter ‘A’, and that it should make a suitable subject. With no decals available in 1/48, my subject had to be reasonably easy to model. From there I discovered: · Code letter ‘A’ belonged to Liberator GR.V. BZ862 and it was usually flown by Sgt Tomlinson (later P/O) and his crew. In June 1944 the aircraft was replaced on 354 Sqn by Liberator MK.VI. EW319, however it was transferred to 160 Sqn where in August 1945 it would go on to complete a sortie of 24hrs and 10 minutes with F/Lt Jack Muir and crew; this was a record at the time and definitely a subject worth modelling. · 354 Squadron was a general reconnaissance squadron that flew Liberators from airfields in India and Ceylon from its formation in May 1943 until disbandment in May 1945. They carried out armed patrols and convoy escort duties using Liberator Mks IIIA, V and finally VI. First, here's my attempt at recreating to pose of 862 in the photo. There was something bugging me about the roundels shown in the photo, particularly with the relatively small centre circle. I think the answer came in a recently purchased (when I started the project) copy of Eyes for the Phoenix by Geoffrey J. Thomas. The book details a period between Jun and September 1943 where the national markings evolved from the European style to the familiar SEAC two-tone blue. Apparently, when faded, the blue of the RAF Type B roundels blended into the surrounding camouflage leaving only a visible red circle that was sometimes tragically mistaken for Japanese markings. The book details the colours and measurements for the markings and after first applying roundels and fin flashes in the early trial white/blue (as they look to me in the photo), I later changed them to the later light/dark blue to better suit the timeframe. However I can’t be certain that this aircraft did actually wear this style of marking. I wanted the addition of the belly radome to be a feature of this build so I wanted to help minimise the clutter at the back end by making sure that it wasn't a tail sitter. It took a lot of lead ! And here's where it all went. Lastly, I'd bought the Belcher Bits conversion that also came with a Leigh Light. I think it's a great little addition to the CC Liberator and this is my only opportunity to use it, so I have. I'm sure no-one will notice. Thanks for looking, comments, corrections, good, bad or indifferent welcome Cheers Gaz42 points
-
Hello, My last project completed, the "15" Rde Parrot. Some pics Best Regards28 points
-
Hello from Canada! Let`s introduce some of my work with one of my last project before my temporary retirement! Here is the old Hasegawa 1/48 kit built 12 years ago! Aires engine & cockpit, True Details wheels, Eduard PE set & Eagle Cals decals. The all riveting work is made by hand with a needle & millimetric paper strips! Few scratch extras like plumbing & electrical lines in engine bay! « Mickey Mouse » from II/JG5 based at Alakurtti in Finland during spring 1944 & flown by Major Horst Carganico. Hope that you like it! Frank22 points
-
Hi, it's my first posting here so might as well go with one of my favorite USN aircraft of WW II. Bu.Aer 2106 survived Midway and finish her days as a training aircraft on lake Michigan. She was fished out of the lake and now reside at the Navy Museum. This is my most recent build and for that I used the Trumpeter kit with Black Box interior. Montex masks where used for the rondels. The chipping was done as a multi layer with the hair spray technique. It was a first for me and I must say, the results are quite pleasing! Colors are Model Master PRU blue for the top and Hataka white-gray for the bottom. So hope you'll like it. Cheers Andre19 points
-
20180417_202534 by Edward IX, on Flickr Bisley's done. Okay, fine technically I need to add the fuel dump pipes, but I've had a bit to drink and it seems risky right now, but let's call it done and leave it at that, shall we? 20180417_202621 by Edward IX, on Flickr16 points
-
After a long time I built a 1:72 model again. So here some pics of the new CASA.212-100 by Special Hobby. Built it just out of the box.15 points
-
Hello folks. Today i introduce my new model, was built in this year. Best regards. Michael.14 points
-
Hi, During last couple of months (OK, nearly half a year) I made 8 Finnish machines (Blackburn Ripon, V.L.Pyry, Morko Morane, Fokker CX, Fokker DXXI, V.L. Myrsky II , Shavrov Sh 2 and Gloster Gamecock) . With three I made within previous 45 years (Westland Lysander, Brewster Buffalo and Junkers K 43) it made all together 11. In last days I re-painted green on those old three to uniform it with what now I am using for Finnish dark green. All of them (including those three in previous too bluish green) were already in past on RFI but I hope you will find them a bit interesting brought together, espacially in uniformed colours: And two more takes of Junkers K-43 Comments welcome Cheers J-W13 points
-
Just finished this in time for the sunshine to reach this part of the world which enable me to take some outdoor photos for the first time this year It is an old boxing of the Monogram F-102 which is still a good kit but tricky to put together. The kit decals were well past their sell by date, which is the risk you take when you buy 2nd(3rd, 4th, 5th??) hand. Shame as the kit scheme was very attractive. Basically out of the box with the fuselage lights opened up and new lens put in. I used and old Repliscale sheet to produce a machine of the 431st FIS based in Zaragosa, Spain in the early 1960s. I changed the serials and Buzz numbers to portray a picture in one of my references. As always thanks for looking13 points
-
After ca. 10 years is it first kit in French colours Marcin thank you for the painting masks!12 points
-
Thanks Bill 'Tormentor' - I like it! You're right, I shouldn't get mental about these things; they will drive me mad!! "We're not all Hendie" will now be one of my mottoes (Should there really be an 'e' in that? My spell check thinks so. Hmmm) Thanks Keith - added to the handbook! Thanks Tony - I am enjoying it... repeat after me I AM enjoying it... T-Roc? No idea. Apparently the 'T' links it to the other cars in the 'family' like the Toerag and the Tigone. I think the 'Roc' is to appeal to the youngsters 'cos it's like, street, innit. I did look up 'funny car names' but no joy. They seem to focus on names that refer to rude things and oriental tipper trucks with variations on 'Dump'. Sadly they omit howlers like the 'Nova' (doesn't go in Spanish). Happy mileage? Combined nearing 60mpg for my chosen TSI? We shall see what the new test standards yield (and ignore them anyway in hilly Bath) Thanks James - I-Roc, love it! OK, no getting hung up on the gearbox; there's plenty more to mess up! Thanks Keith Always nice to see Rex. Thanks Johnny, glad to hear I'm not the only one who's things get blown away! Cheers Benedikt - they are 'unusual' colours aren't they? Spidey!!! Right, this'll do: It will be visible if I leave the doors open (as planned), as will these little bottle thingies: I've seen a worrying number of stalled builds of this one so I'm not rushing to glue things together, yet. Those bits will join these bits: Time for another look at that assembly video...12 points
-
The RAF operated the Sabre as a stop-gap measure during the early 50s until enough Hunters had been delivered, as it had become evident that the Meteor was by then obsolete as an air defence fighter. Although there was one wing in the UK, most RAF Sabres were based in Germany, and flew with cerulean blue undersides. One of the more colourful squadron markings were those of no. 4 squadron which flew the aircraft from RAF Jever.11 points
-
Completed this model a couple of weeks ago, just got round to finishing the simple base and getting some photos done; Overall Views A few closer shots11 points
-
Hi everyone This is my finished Zvezda SU-27 SM kit in 1/72 scale Kit was a great build. Took about three weeks to finish. I use the Hataka red line SU-33 paints, using UN blue and dark grey/blue for the camo. Dream model etched for cockpit and ejection seat. Kit decals were a dream to use and settled so well.11 points
-
Wingsy Kits IJN Type 96 carrier-based fighter IV A5M4 “Claude” 1/48, assembly complete.11 points
-
Hi all, To far gone for the Carrier Group build but not to be given up on, here at last is my Kinetic EA-6B Prowler with Avionix Cockpit and TwoBobs Decals. This kit gets a hard time from the internet reviewers, don't know why because I had no dramas from it apart from looking at how to tint the canopies a slight yellow colour. In the end I stood back from this idea as I found reference pictures of these aircraft with standard clear screens, happy days. I've not gone to town with weathering as its a CAG aircraft displaying all thats good about the squadron, even the Plane Captain gets a sizeable tag on a visible side of the airframe. Anyway, its yours to view.. FLY NAVY.10 points
-
Gradual progress is, I'm afraid, the order of the day - as it always is when you are dealing with little details (and especially ones which involve lots of pieces of PE!). The weapon carriers are still coming along nicely, but not worth photographing again yet, so today you will have to settle for two other areas: 1. The strake is 50% done, with the fitting of the rear section of the PE version: a major improvement to my eyes (though maybe not to yours, since I'm not sure I ever showed you what we are comparing this with!) 2. The I-Band transponder (also regularly knocked off in the past, so I have taken the opportunity to paint it rather better than before). It will be re-ftted tomorrow: Oh, and one of the rear weapon carriers with a new NO STEP transfer (upside down in this photo - it really does say NO STEP, honest!). More soon Crisp9 points
-
Thanks Stuart, Bill and Keith The plan is to have the doors and hatches open to reveal the beautiful detailing on the internals and stick it in the cabinet. That's unless the kit smacks me in the mouth, of course, which is a distinct possibility! If so they'll get closed and it'll go on the ceiling. Thanks Giorgio I'm using AK True Metal all the time now and this is 'Steel'. There'll be plenty more coming later, trust me! Thanks Simon - I can't imagine having one of those and being asked 'What do you drive?' The Japanese do come up with some great names don't they? Like the Nissan Cedric. Or perhaps I'm just biased... I'm beginning to see why there are a worrying number of incomplete builds of this kit on the 'net. Fiddly is fine if you have the patience, but re-doing things because the instructions weren't clear is just annoying. Like this: The supports need to be at an angle (unspecified). Rats. They've been carefully prised off the gearbox. As if that weren't annoying enough, if you dry fit these bits to the fuselage... Kinda fits by Ced Bufton, on Flickr ... you can see where the intake part needs to fit the gearbox AND the bulkhead AND the fuselage - glueing that when the instructions tell you to would result in much Anglo-Saxon. I've put that aside and returned to the crew. Step 5 has you glueing the arms on so that they adopt a realistic pose: Cool eh? The trouble is the arms aren't long enough: Or the pilot's sitting too high (q.v.). I've positioned the arms as best I can with the pilot making a sort of 'How am I supposed to reach that? gesture: Once they're dry I can touch them up (fnaar!)9 points
-
Quick update, since I managed to do some modelling last night. Here's the bottom fuselage joint with the tail planes after sanding/polishing Viewing from the top, port side is good Starboard not that much, a bit gappy So out came the yogurt cup 0.1mm styrene : Tracing the shape and after cutting, I put it in and glued with Tamiya Green Cap. Tidying up TBD once cured I also did a dry fit of the leading edge slats They were too wide of a good 1mm, so I had to trim their outboard edge to make them fit Then I glued the tail fins on some gaps on the joints here too That's what the pics show; what they don't show is that early this morning, before leaving home, I decided to check if the tail fins settled properly, and port one snapped off right away ... Well. I'll fix that in the next installment; that's it for now, comments welcome Ciao9 points
-
Hi all!My little Me-262 from Eduard. I have used Mr Hobby paints.8 points
-
It was very difficult to assembly at the end I give up to add more cables...8 points
-
- A small model from TARANGUS in 48 in Swedish colors- A very refreshing little kit after a bunch of screaming iron just to catch my breath .....the respite won't be long......It's size doesn't mean an easy kit. Opening canopy could be made easier with a thinner material which, as a welcome bonus, would add realism to the open parts by reducing their thickness which made them look as armoured glass doors.7 points
-
Hello Everybody ... after seeing the start of the B-25 mitchell Group build. Its killing me that i cant participate yet. The B-25 is my favorite Medium bomber of the war as it was so Versatile and adaptable. I saw a few PBJ’s started ( USMC B-25 not Peanut butter & jelly ) in the group build. I had a minor Discussion with @JOCKNEY in one of the Threads. Both the build and discussion inspired me to dig this out of storage. I did some clean-up and touch ups. I think considering it was started 24 years ago its doing ok. The seams have started popping but not to bad. I started this Monogram B-25H in 1994. I had to shelve it many times while trying to dig up info on Camouflage and markings. Pre internet era was not easy to find things out. Eventually I came across Jerry Scutts “Marine Mitchells and found this the “Magic photo” that solved my issues. Sadly that was in 2001. It would take another 18 months to ultimately finish this in 2003. Yes thats right a 9 year build up until 2014 it was my longest. Sadly now #2 to my RAAF Catalina build which is 14 and growing. Well without further talk here is my PBJ-1H from VMB-613. The business end with the 75 mm. Ive built maybe 5-6 of the Monogram Mitchells since the 1980’s. This is the last survivor and my favorite. If i can get my other obligations taken care of I will be building another for the Group build. Hopefully a Revellogram but maybe another. Dennis7 points
-
...just to pick on this in the vein hope that it might be interesting. They are not the elevators but are tailplane flaps. The whole tailplane (or stabilizer) hinges (as you have correctly portrayed) to act as the elevator control for pitch, pitch trim is also managed through further adjustment to the all moving tailplane. To give extra flap area the ailerons droop (but still act differentially to control roll) and when they do so, such as for landing, the pitch of the aircraft has to compensated for and this is done by the tailplane flaps, they only move when the ailerons are drooped. For the landing setting it is surprising at the angle that they take up. In the shot above, '35' has the tailplane flaps at a high positive angle because the ailerons are still in droop position. In this shot below the main flaps and ailerons are drooped for landing, the tailplane is angled up a bit to control the landing angle, and the tailplane flaps are in a high positive position to compensate for the drooped ailerons In this shot the tailplane has been left at a high (probably maximum) angle of attack position, but the tailplane flaps are neutral because there is no aileron droop applied Both pictures from my good friend Chris England. Superb work as usual Massimo, nice to see the taiplpane separated and the adjustment work in the fin top carried out7 points
-
Stab goes on, again, checking alignment:7 points
-
Just finished... )))6 points
-
Here is the completed model of the Barkley-Grow in its seaplane configuration. For the step-by-step building article please go to the WiP post: The kit presents only the basic shapes, you have to fabricate or provide everything else: cockpit, cabin, exterior details, decals, engines, etc. This one will surely help you develop those modeling skills! I used a set from Arctic Decals, which worked perfectly as usual. This is a nicely-shaped plane that has many possible finishing schemes, and can also be built on skis or wheels. It takes some time, but you can make a pleasant model from it. And you won't see this one around much, that's for sure!6 points
-
Yes the tailplane flaps automatically moved when the drooped ailerons were selected to the various positions, both had their own position indicators in the cockpit. Stuart, the tailplane angle is controlled completely separately from the aileron droop control. Info taken from the S.1 manual So in normal flight or generally parked, droops and tailplane flaps at 0 deg, take-off droops 10/20 deg down tailplane flap 10/20 deg up, landing 25 deg down and tailplane flap 25 deg up. Main flaps were selected separately, their respective angles being 0, 15 or 30 and 45 deg down. On top of this the tailplane angle itself could be changed for trim in pitch by an electrical actuator, so on take-off the tailplane would be pitched up a bit, before any control stick input was even made. The angles of tailplane trim were marked at the aft part of the fin top, so that deck crews could see that the right pre take-off angle had been selected by the pilot. The pic of '631' is indeed of a dead aircraft, but I choose it as it dramatically illustrates the various positions. The tailplane is probably at the maximum up trim, and with the control stick pulled right back. BTW the Sea Vixen has a similar device, what looks like an elevator at the rear of the all moving tailplane only works when the flaps are selected, ie it is not a trim tab. Gannet Mk1, 2, 4 and 5 has something similarish, the tailplane itself angles up when the flaps are operated, but is not an all moving tailplane in the true sense, having traditional elevators and separate trim tabs. I hope some of this makes sense6 points
-
Work continues on Spitfires, the 24 is nearly done and the 18 & 19 are finished. Thanks for looking.6 points
-
I imagine th Nissan Cedric is a handsome car that's admired by all.6 points
-
She's doing very well, Marriage and motherhood sorted her right out!6 points
-
More of the interior in place: The lower wing is glued in place: The other upper wing panel is glued to the center section, checking dihedral and sweptback:6 points
-
Well having almost completed my Hawker Fury I'm going for something a bit more symbolic of the RAF 100 years with a Puma. This low profile always there but never seen Helicopter has now been in service for 47 years having joined up in 1971. Destined to remain in service until 2025, only the Hercules and Canberra will have served longer. Although based on the age of individual air frames the Puma may have the edge. So despite 47 years of sterling service we still don't have a 1/48 scale kit. Another F16 anyone? To fill the void in the RAF 100 line up I shall therefore be building the venerable and hard to find Heller 1/50th scale kit. According to Scalemates the moulds date from 1967 and this is the 1986 boxing. That said and the detail is basic by todays standards but was probably OK for 1967! Lets give it a go. What you get Who remembers when the instructions were one sheet of paper, printed in French? Some massive sink holes in the tail and those exhausts look ermm....... On the plus side the cockpit glazing is very clear despite being 3mm thick! A quick raid on the parts bin yields a pair of seats, some Flightpath PE and a decent instrument panel spare from Belcher Bits Lynx. Also the doors are moulded in clear so only the windows to mask, what a great idea! I think I'll go for an early scheme as the kit has no air filters and the HC2 has too many lumps and bumps to knock off. I figure there might be enough work already but lets see. May battle commence. Colin5 points
-
Not necessarily as they can have everything straight when parked. The photo of '631' shows her as an instructional airframe so that pose may not be quite representative. @71chally will be along in a minute to explain how the gubbins works.5 points
-
5 points
-
All of Revells problems could be solved if they just released the Matchbox H.S 125. 😎 Phil5 points
-
I can't understand the negativity that this announcement has generated ! Revell has been bought by someone, meaning all fears of the company closing are gone. The new owners have no interest ? They have a lot of reasons to be interested, to be accurate they have 3.9 milion reasons to be interested ! They new owners are a private equity firm, so what ? They have purchased a profitable company and the best way for them to get a return on their investment will be to make this grow. Will they sell the company in the future ? What's the problem ? As long as they'll sell a company making good profits they'll have no problem in finding a new owner. And who says that being owned by a company specialised in model kits is a good thing anyway ? We've all seen what happened to Revell under Hobbyco ownership. What matters is that the management is valid and is in the position to make all the proper business decisions. This will result in a healthy company capable of issuing new kits every year, that is afterall what matters to us modellers5 points
-
Evening All, I have completed this one at last- my first ever attempt at a base for one of my models. This is based on contemporary photographs of the Zeppelin hangar at Seemoos Hafen, Lindau, Lake Constance where giant flying boats were built and test flown under the direction of Claudius Dornier. The turntable rotates because I mounted a small motor underneath it: the battery and switch are concealed in the rear of the display under the hangar floor. The scene depicts the launch of the Rs II in May 1917 after the engines had been fitted with cowlings. All of the features in the diorama are based on what I could see in contemporary photographs, right down to the figures of Claudius Dornier (dark suit) engineer Durr and the sailor standing by the winch shed. The furniture and boxes, etc were also present when the photographs were taken. The model aircraft build log is in the group build section of this site under Flying Boats and Floatplanes and is scratch built. The civilian figures are from Dart Castings and the naval figure from W D Models. The blank section on the side of the diorama base contains a copy of an original photograph and the following text: Zeppelin Lindau (Dornier) Rs II, Seemoos, Friedrichshafen, Lake Constance, April 1917 The Zeppelin Lindau (Dornier) Rs II (Reisenfleugzueg: giant aeroplane) is rolled out of the hangar at Seemoos for the next series of test flights after the engines have been enclosed in cowlings to try to stop them from running too cold, and to protect the valves from wind shear. Claudius Dornier (in dark grey suit), and Oberingenieur Durr watch as the machine sits on the turntable and is photographed. One of the men from the works waits by the shed to operate the winch which will let the flying boat run slowly down the slipway which had been built so that flying boats could be launched and retrieved from Lake Constance. The first of Dornier’s designs was a biplane which was wrecked in a storm before it could fly. The second was a monoplane with three Maybach engines buried in the hull driving pusher propellors via transmission shafts which started trials in May 1916. On a flight trial in July of that year the transmission shaft of the centre engine broke, severely damaging the tail boom so it was decided to rebuild the aircraft. In November 1916 the aircraft appeared from the hangar with a new hull, four engines mounted in tandem above the hull and redesigned stub wings. Originally the engines were uncovered. The model represents the aircraft as it appeared in April 1917 after engine covers had been installed. A month later the biplane elevator at the rear was replaced by simpler fins and rudders. In August 1917 the aircraft was badly damaged again during a long test flight when one of the engines backfired and shattered a propellor. A third design was close to completion by this time so this aircraft was broken up and the parts used for systematic testing, the results being applied to the design and calculation of new R planes. Thanks for looking. P4 points
-
Hi folks, I took a quick exercise on the brand new Eduard kit from "Library" edition. The kit would need few touches here and here, for instance thinning the inlet ring, exhaust nozzle, adding the front altimeter antennas, but the overall fit and level of details is very promising. I will add later the drop tanks once the "overtrees" becomes available. Cheers Libor4 points
-
A print onto ordinary copy paper has been used for this dry-fit of the cockpit framing. As can be seen in this view, the side windows are angled upwards toward the rear and so I will need to change the angle, between the front frames and the rear, to fix this. More tomorrow. Thanks for looking. Mike4 points
-
Few things I want to cover with this GB * International members that want to take part but would like to source the kit locally, then that is all good * Anyone that already has the kit in their stash and would like to take part, then that is all good too. * Aftermarket decals are fine Some people's budget or SWMBO might not warrant spending even £25-£30 on the kit, also just waiting for the given date for the GB, which might conflict if we are waiting for new releases. One idea I want to put forward. The Airfix 1/72 Ju-87B2/R2 I have seen a few times mentioned from my list. I could then see if Rus could get a couple of the 1/48 kits of the same aircraft as prizes. Making it a little theme of build a small Junkers to win a big junkers, We could be looking around £10ish per kit. It is also a great kit too The Spitfire Mk.1a I find a little restricted due to not many decal options apart from the standard dark earth dark green4 points
-
Actually I missed a good comparison here, both Buccaneers appear to have some positive tailplane up trim applied, guessing take-off position. However '35' has flaps and the aileron droops selected down, the droops putting the tailplane flaps in an up position, while '26' has neutral flaps, droops and tailplane flap4 points
-
Rocket rails are on and pitot tube mounted (so small a bore that you can hardly see it). The kit doesn't come with a pitot tube so luckily there is a brass one included with the Master cannon barrels set. I also put a 'radiator matrix' in the oil cooler opening - spotted a silver fabric bow that looked the part so I cut a strip from that. Now I'm wondering if I should / could do the same to represent screens in the carb inlets. Canopy is masked ready for paint and I've decided that the top surface EDSG on the fuselage isn't wide enough so it's back to the paint shop with a line masked further down. By the way, that hairbrush in the background is the solution to the engine exhaust outlets... I've been madly trying to get an actual picture of a Sea Fury on HMS Theseus to confirm the code letter for the tail and here it is, titled 'Snow almost covers a Sea Fury aircraft parked on the flight deck of the Light Fleet carrier HMS THESEUS in a mid-winter storm off the West Coast of Korea' This also confirms a whip aerial behind the canopy and looks like a mast below the starboard wing...and there appears to be only two rocket rails just like the Frog kit. I can't see a serial number but the aircraft looks to be '116'. In the meantime, I've started on the second kit, to be posed with undercarriage down and wings folded - wing and stabiliser sections put together and fuel tanks assembled - I'm assuming the pitot tube will be safe enough this time as the folded sections will be last to be fixed to the model.4 points
-
Thanks Cookie, Benedikt and Giorgio. After some more sanding and swearing, a coat of primer liberally brushed on. Well there are faults to rectify but getting there. I will give it a sand tonight ( I have a friend visiting this afternoon,(Yes, I have a friend)) Then see what it looks like tomorrow. All comments welcome. Simon.4 points
-
I'll help. Even if shoulder not right I can still type, albeit slowly4 points
-
Getting the decals around the airbrakes wasn't too bad, just needed careful measuring. I offered the decals up first then just used Mk.I human eyeball to judge where to cut. Time for a coffee! The Airfix Sabre is a great little kit, and fits together splendidly. Not much filling needed, and very detailed decals. With aftermarket decals available too there are so many options for different squadrons. The next photos should be in the RFI section ...4 points
-
Some progress is made with the interior: One upper wing panel is glued to the center section:4 points
-
Where was I ..... Right, interior and wings. Let's see: So here it is the Amodel wing separated from the sprue, while I started painting the interior components: Half-wings separated, center section discarded, wings re-contoured to match plans: New angle cut on the wing panels: Dry-fit. Now I can start to pin the panels to the center section:4 points
-
"My" Gannet Pics by me, posted by my thieving offspring4 points
-
Hi Guys, Finally this is done.. thanks for viewing..cheers.. 1/72 Italeri Harrier Gr3 , Falkland War4 points


This leaderboard is set to London/GMT+01:00