
Leaderboard


.thumb.jpg.0bac681e0da8e4ed7557610e98fda908.jpg)
Popular Content
Showing content with the highest reputation on 02/04/18 in all areas
-
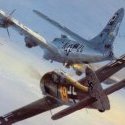
Hi all, This is the third old skool Airfix RAF bomber i've built over the last few years - others being a Wellington and Halifax - for some odd reason I love doing these old kits and my modelling budget wont stretch to kits such as the Italeri Stirling anyway. This was built OOB apart from a bit of scratch detail in the cockpit. Unfortunately snapped off one of the front turret guns doing the decals so need to repair that! Painted by airbrush in Revell aqua colour dark Earth/bronze green over matt black. Cheers Simon And the lovely old box art!44 points
-
Another F-104 Starfighter, this time an Italian example belonging to 28 Gruppo Stormo, Villafranca, circa 1992. Markings were from Tauro, Sky decal and for the squadron markings stencils were made using a Silhouette Portrait cutter. The Daco improvement set provided the chaff dispensers and the internal camera bay. Andrew37 points
-
Morning all This little Thunderbolt was supposed to be a fun build, but in the later stages fought back tenaciously. You'll notice a missing undercarriage door, which actually dropped into jar of liquid cement when i was trying to stick it on. I couldn't get it out so I had to watch it gradually dissolve! The pitot tube was taken by the carpet monster, as was the landing light lense (both to be replaced at some stage..). Paints are Tamiya and AK Interactive Dull Aluminium. Markings, of course, are the famous 'Pengie V', flown by Captain Boleslaw Gladych of 61st Fighter Squadron, 56th Fighter Group, Eighth Air Force. Unfortunately the Techmod decals I bought specifically for this project proved very difficult to use, tearing or folding up on themselves at the drop of a hat, so I had to fall back on some of the kit items. I also had some silvering issues despite polishing the surface and using microsol. I didn't bother with any weathering as by the end I was just glad to get it finished! Besides, I think these aircraft were kept pretty clean and tidy. Anyway, here she is in what is definitely one of the more striking Thunderbolt schemes. Thanks. Ian25 points
-
Hi! Finished another one yesterday. It´s the new tooling Airfix Hurricane. I did everything OOB except for fishing line (0,10mm) for the antenna wire. I´m not sure if I got the wire right... I used War Scenic enamels (that´s a brazilian brand of paints). There are some good things here in Brazil but most of the time it´s just a crap country. I forgot to do the navigation lights early in the build so I left them unpainted. Don´t hesitate in giving me feedback.25 points
-
Hiya Folks, This is the Academy kit, re released by Eduard with the addition of some etched brass and RAF SEAC decals. Using DK Decals it was instead built as RCAF 3742 which served with 10 (BR) Sqn at Torbay in Newfoundland before transferring to the Eastern Air Command Met. Flight at Yarmouth, Nova Scotia in the summer of 1945. Having started off with a shark mouth, the full `monster face' was added in Spring 1945, prior to transferring to Yarmouth in the Summer. I built this model alongside a SEAC Liberator and the WIP is here; This is the real aircraft,..... other pics can be seen on the WIP; and other photos, including some in its earlier form can be seen in the excellent and highly recommended book `Canada`s Wings 2- The Liberator and Fortress' by Carl Vincent. And here is the model, which was painted using rattle can white and yellow with the rest brush painted, the camouflaged uppers being Aeromaster acrylic Dark Slate Grey and Humbrol enamel Extra Dark Sea Grey. The decal sheet is excellent, however I thought that the code letter `A`s' were too tall and narrow, so I clipped the top off the `A`s' to try and make them look slightly better and also the serial number appears to be grey in the photos too, whereas the decals depict them as black; DSCF2794 by Tony OToole, on Flickr DSCF2797 by Tony OToole, on Flickr DSCF2795 by Tony OToole, on Flickr DSCF2796 by Tony OToole, on Flickr DSCF2808 by Tony OToole, on Flickr DSCF2812 by Tony OToole, on Flickr DSCF2810 by Tony OToole, on Flickr DSCF2814 by Tony OToole, on Flickr DSCF2811 by Tony OToole, on Flickr DSCF2798 by Tony OToole, on Flickr DSCF2798 by Tony OToole, on Flickr I`m still working out whether to add some small pitot masts to the side of the nose behind the windows or not,..... but for now I`m calling it finished. Yes,...it is a tail sitter, but the undercarriage couldn`t handle extra weight so as most RAF Liberator`s seem to have had a handy box near to the tail skid,....then I`m sure the RCAF were no different! The resin radar dustbin came from the Czechmaster RAF/RCAF Liberator conversion set and the wheels were also resin from True Details. Cheers, Tony24 points
-
My effort at an ancient Airfix kit from 1965 and in places it shows. Not too difficult to build although the bomb doors weren't a great fit. Took a fair bit of weight to sit properly. I modified it to represent the Enola Gay as it was in 1945. This involved removing the four remote gun turrets and using a Superscale sheet for the markings. Sprayed using Vallejo silver and aluminum. 20180401_192711_edit by dereknferguson, on Flickr 20180401_192650_edit by dereknferguson, on Flickr 20180401_192639_edit by dereknferguson, on Flickr 20180401_192624_edit by dereknferguson, on Flickr19 points
-
Hi all Just finished my latest venture which is the QinetiQ Alpha Jet by Kinetic. Cheers Mick17 points
-
Hello britmodellers. This is my Airfix 1:72 Avro Vulcan that I completed a while ago. I used Wolfpack seamless intakes and their detail set. The raised panel lines were sanded off and rescribed. Paints are Humbrol enamels. Weathering was done with a 6B pencil, artist oil and pigments, but I guess the panel line weathering is a bit on the strong side. Decals are from the exhaustive fundekal sheet. cheers Stefan17 points
-
Watching the work in progress by Olivier de St Raph on the Missouri Aramada, I was compelled to start working on the Blue nosed P51-D from Airfix. The high quality work and information in that thread kept my enthusiasm going long enough to actually finish the kit. Starting with the interior; Left and right drop tanks don't make sense, so the right gas cap was filled and re-scribe d on the left. The panel lines on the wing were filled and the wheel wells painted. First time using a rivet tool also the elevator counter-balance was etched. Charlie in the foreground as Isis sees all. Enough you say? On with the show. Vallejo White Aluminum for the body and Dull Aluminum for the wings. Unfortunately the Testors flat clear lacquer reacted with the floor polish used for the transfers causing fine cracks and an instant war-weary look. Rivets on the flaps are an absolute must. Thanks for looking. Garry c16 points
-
Morning, egg people. Hope you’re all having a lovely few day orf. I’m headed for a dog walk in a sec but I thought I’d do an update beforehand. Before I can start closing things up I need to get those Wells together soooooo this bit needs some attention. as you might have guessed there’s PE for this. it consists of detail strips and wires, that need holding in place with expensive clamp technology. next up the legs get assembled and dry fitted. Not a bad fit. I need to pop on some more PE so out with the clamps, this time in a Salvador Dali esque arrangement. While fitting the last touches I noticed this schoolboy error. yes you got it. The strut is on upside down. so in with some TET and a few panicked moments later and we’re all the right way up. Here are the twins with the extra struts added and awaiting brake lines and primer. Now this PE part looks like it goes here but the wing shape is different in the instructions. I’ve looked at the Eduard site and it looks like they fit here. so I built them, very fiddly. I then set about making pie for dinner. skipping forward to today I woke early with the hound and settled down to some lazy modelling. Nurse, nurse we have a hole into the engine area!! The kit gets you to add the fire wall only if you fit the open engines so in Easter mode I fashioned some eggs! and bunged ‘em in. After this I stuck in the final PE added the brake lines and got ready for primer. The old area needed a tidy, bits all over the shop. soooooo a quick ten minute put away and we are ready for smelly Tamiya primer. And here we are. well bases. inner fire wall. and a nice pair o’ legs. i ended up not using the Eduard brake lines as they were flat so I made my own from wire. these will now get painted before assembly into the wings and I can start thinking about getting this beautiful bird onto the next step. Thanks for your lovely comments, hopefully I’ll get some more done on this rather wet bank holiday. take care y’all. Johnny.16 points
-
Dear all, Completed a couple of days ago, the WNW Albatros dva completed in the markings of Josef Mai, Jasta 5 late 1917/early 1918. As always, built OOB, brush painted - wood work simulated using artist oils over acrylic base coat of ochre. Rigged mostly using Uschi fine elastic thread with exception of undercarriage where fine (monofilament) mending thread used to give strength in a very weak area - the model will quite literally freely wooble if elastic thread used here. Probably the best kit in the WNW range with great decals. The only issues with decals (if you can call it that) is the lozenge is not printed to shape of wings so must be cut in individual sections then trimmed to wing profile once dry. You then have the tedious task of applying individual rib tapes ........... The biggest issue though is the decal representing the crescent and start motif is out of proportion and printed oversize - something you don't notice until you apply them. Admit this is not my best work but is also far from my worst. Photos kindly taken by my son on his decent camera. Constructive feedbackcomments welcomed. Regards Dave15 points
-
In October 2015 I fancied a quick straight from the box build and I selected this Heller Ouragan from my unbuilt collection. It had well-moulded parts with raised panel line detailing. As with many Heller kits it did not need anything adding to it really as it contained a well equipped cockpit tub, convincing ejector seat, gunsight. jet intake splitter fairing, scale jet pipe and well detailed undercarriage. All I added was a pilot, ejector seat handle, nosewheel brake piping and a whip aerial. I also sawed the canopy so I could pose it open. It was a quick and satisfying build with excellent fitting parts. I sprayed the model with Halfords Acrylic Aluminium spray and then brush painted Vallejo Aluminium over the top of it. The red areas are brush painted Humbrol enamel. I used the kit's decals except for the tricolour on the tail which I brush painted. I modelled the French Air Force option, an aircraft of EC 1/12 at Cambrai in 1954. I deliberately restrained the amount of red painted areas to the wing tip tanks only. I love Heller kits. This is the box of the one that I built with parts moulded in a yellow brown colour. On a goodwill visit to a Royal Air Force station, final runway checks and clearance from the runway controller. I hope you have enjoyed looking at my Heller M.D. 450 Ouragan. adey14 points
-
Hiya Folks, Another Lib,... but my first Hasegawa kit, this model was built from the Eduard Overtree`s for their latest release which includes both noses for either the early Mk.III (B-24D) or the later variants with a nose turret. I have always fancied doing a model of this particular aircraft which had been used by 220 Sqn for maritime duties from India before the unit was re numbered to become 8 Sqn and re roled as a long range Special Duties unit, flying agents and supplies and parachuting them into Burma, Malaya, French Indo China and as far afield as Borneo on missions lasting between 12 and 24 hours. In order to carry out these long range sorties the mid upper turret was removed, the nose guns were also removed (and often the waist guns too) and long range tanks were fitted in the bomb bay. Thankfully DK Decals included this aircraft on their RAF & Commonwealth Liberator`s sheet, which is highly recommended if you can find one, as it was a short run set which proved very popular,... and I believe that they have another one in the works. Here is the WIP,.... which also includes an Academy kit built as a RCAF Liberator which is not as yet quite finished; And here is the model,...... I`ve added Eduard Brassin resin wheels as they matched the cross tread pattern of those seen on the subject aircraft, a set of Rebecca antenna on the side of the nose came from an old Revell Havoc kit (which were thinned down) and although the white areas were painted using rattle can, the rest was brush painted; DSCF2772 by Tony OToole, on Flickr DSCF2774 by Tony OToole, on Flickr DSCF2767 by Tony OToole, on Flickr DSCF2774 by Tony OToole, on Flickr DSCF2770 by Tony OToole, on Flickr DSCF2786 by Tony OToole, on Flickr DSCF2784 by Tony OToole, on Flickr DSCF2783 by Tony OToole, on Flickr DSCF2779 by Tony OToole, on Flickr DSCF2785 by Tony OToole, on Flickr DSCF2792 by Tony OToole, on Flickr OK,...I know that it is a tail sitter,.....despite `lots' of lead added to the nose,..... but as most RAF Liberator`s had a box placed under the tail skid at some point when they were on the ground, then I can live with that! Cheers Tony Edit,....here are some pics of the real aircraft; liberator_lg by Tony OToole, on Flickr lib Winnimae right side SEA0271 by Tony OToole, on Flickr 8 sqn charlton by Tony OToole, on Flickr13 points
-
Hello everyone ... Well im calling it done. Geronimo is all finished and presented to you. A link to the WIP log. http://www.britmodeller.com/forums/index.php?/topic/235034795-“geronimo”/ I hope Geronimo meets with your approval. Please feel free to comment. Dennis13 points
-
XR725 first flew as F Mk3, later converted to F Mk6. C/No. 95208. Squadron Leader Ed Durham flew this aircraft non-stop to Goose Bay, Canada on 27 August 1968. There it was zapped by the Canadians. I used Xtradecal sheet (72091) and they list it as EE (BAC) Lightning F.6, XR725/A, 23 Sqdn, RAF Leuchars, September 1968.12 points
-
For my 3rd (but not necessarily final) Sea Fury I decided to go Dutch. This one belongs to the Dutch Navy's 860 squadron and was part of the Aerobats display team in the mid '50s.. Pretty much straight from the box again but this time I used one of Aerocraft's new Sea Fury cowlings. I found it easy to use and it fitted nicely. Decals are modified from the Xtradecal sheet for foreign Sea Furies. Thanks for looking. 20180402_170403 20180402_17042911 points
-
This thread will document the construction of my 1:48 Tamiya Mosquito B. IV. I will build this aircraft as a member of the Pathfinder Force, from no. 109 squadron. Pathfinder mosquitoes utilized specialized electronics, like the Oboe transponder in order to navigate to target areas where they would precisely (in 1940s terms) drop their fire bombs and flares, lighting up target areas, and marking them for the main bomber stream that would follow. The particular aircraft I'm going to build is this. The project will be right out of the box. I have always loved the Mosquito. My favorite being the NF II version. However, I chose the pathfinder for this build, as I think it better commemorates the immense contributions made by the RAF, and the scientists and engineers it employed, to electronic warfare, avionics technology.10 points
-
This my attempt at the Anigrand 1/72 XF-12/XR-12 Rainbow, one of the most beautiful aircraft ever built and the epitome of piston-engined aircraft design. Flown in 1946, the XF-12 was capable of 400mph at 40000ft. Only two were flown before the project was cancelled. The Anigrand kit is in resin and quite heavy so the landing gear has wire inserts for extra strength. Construction was actually pretty straight forward and the fit was pretty decent. The only area I had difficulty with was the vacform cockpit parts. New ones are on order from Angrand.... An astonishing amount of weight was needed in the nose, even in the engine nacelles. I ended up by putting more weight in the nosegear bay as well. Finished in Vallejo silver and aluminium and the rather sparse markings of the first Rainbow prototype. 20180401_192851_edit by dereknferguson, on Flickr 20180401_192837_edit by dereknferguson, on Flickr 20180401_192827_edit by dereknferguson, on Flickr 20180401_192803_edit by dereknferguson, on Flickr 20180401_192758_edit by dereknferguson, on Flickr10 points
-
One has not been an idle alien over the past few days, have been mostly plodding away painting and adding lots of etched parts to the two cockpits and the ejection seats. Things were going a bit slowly until the early hours of this morning when a sudden surge of inspiration caused me get out of bed and launch into one of my famous modelling sessions "au naturelle". There is a way to go to finish the cockpit but here are the pictures of where we are at thus far. In consideration for those members of a more fragile disposition, I have omitted pictures of the Alien during the above session. Aren't I good to you Earthlings! Thanks for looking Martian10 points
-
SHERMAN II El Alamein November 194210 points
-
Lanchester 4x2 Armoured Car Copper State Model 1/35 This is CSM's new WWI era Lanchester armoured car. It's quite a simple little kit compared to some of the armour mega-kits that come from a lot of manufacturers these days. Despite the simplicity though, it really is a joy to put together. The fit is just about perfect, and the whole thing was built up and ready for paint in only 4 days. There's some really nice example of moulding to, like the front fenders which are thin enough to almost pass for being photo etched, and the wheel spokes which are remarkably thin for an injection moulded part. There are a couple of errors in the kit. The little bump on top of the turret is a socket for a flag, and it should be closer to the turret roof hatch rather than at the front edge. Also the insides of the rear wheel arches should be panelled off, instead of being open as they are here. Neither of them are big deals though and are pretty easy to fix. CSM have a photo etch set in the works for this kit, although to be honest, I don't think it's really necessary. They do have some nice figures though which should work well for a diorama. This one's painted with Gunze RLM 65 and RLM 76 in a rough representation of Admiralty light grey Thanks for looking Andy9 points
-
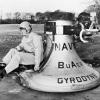
The first ship model I built was the AIRFIX 1/600 HMS Tiger which someone gave me for my eighth birthday. Being an aircraft modeller I always liked the look of full-hull ship models but they just did not have the play value on the living room carpet, the propellers would keep catching on the carpet weave. Back in the 1960s I remember Public Information programmes of only a few minutes were shown usually during school holidays in the early afternoon. I seem to remember one featuring a large Royal Navy destroyer launching a radar guided missile from a large launcher on its stern which then shot down a high flying target Canberra. Then my dad bought me a Hippo Book about missiles and the Sea Slug missile fascinated me. Put these things together and you have my growing interest and admiration for the beautiful and impressive County Class destroyers. AIRFIX first brought out their model of HMS Devonshire in 1963. In 1998 I bought a second hand one at the model show in Huddersfield which I just could not resist. During the construction I felt that something did not look right in the proportions of the superstructure of the model when compared with photos I had of the real ones. I realised what it was, the forward superstructure was too short and set too far back, the front turrets were too far apart, and the rear funnel was set too low. I decided that I wanted to make a good job of this model as it would probably be the only ship I would build now. Just in case any Moderators are watching, I built this model in 1998 and I only took three photographs during the build with my 35mm camera. I have included these build photos just to show what modifications I did to the kit. That superb AIRFIX box artwork. A Sea Slug is on its way . How the model was illustrated in my 1971 AIRFIX catalogue. Front superstructure too short and set too far back resulting in large gap behind rear turret, Rear funnel set too low and basic box represents the Sea Slug launcher on the stern. I had not noticed the forward superstructure fault at this early stage. Replacement and resited turret rings. Forward superstructure extended. White plastic card infills and modifications. Rear funnel raised. Fuse wire lattice work added to Sea Slug launcher. Replacement rotors and fuse wire undercarriage on the Wessex helicopter. Holes drilled in top of funnels. My newly completed model with the reference book from our Public Library. I was going to use this photograph to make a waterline display base as it showed the shape of the ship's wake clearly. Model was brush painted with Humbrol enamels. Close up of the Wessex and the Sea Slug launcher. Sea Cat launcher is yet to receive its missiles. Note the doors of the helicopter hangar just behind the funnel. It must have been a tricky operation to get the Wessex in and out of the hangar. A few years later I decided that the original grey paint I used was too dark and I repainted the model. I used Humbrol 127 Ghost Grey and White Ensign M19 RN Deck Green enamels. I also decided to add crew figures to the model which I made from plastic card. I made a waterline display base from paper card with a hull-shaped cut out for the model to sit in. Thank you for looking. regards, adey9 points
-
Hello Britmodellers, this April Manfred von Richthofen died 100 years ago, German Modelling Magazine ModellFan presented various planes dedicated to him ranging from WWI to present with todays JG 71 "Richthofen". This Spook is one of these... It is a Revell F with a lot of changes to look like a real spook... This Luftwaffen-Diesel greeted the crowd in Fairford 2004 Cheers, Thomas9 points
-
Yet another Messer! I'm on a break from 109's after this, as you CAN have too much of a good thing. This time, it's a Bf-109G-14/AS, of 2. Iovacko Jato, 1. Zrakoplovna Skupina (2nd Fighter Squadron, 1st Air Group) of the Air Force of the Independent State of Croatia, (ZNDH, Zrakoplovstvo Nezavisne Države Hrvatske). The pilot, Vladimir Sandtner, defected in this aircraft to Falconara in Italy in April 1945. The aircraft was captured by the Americans, who sold it to 318 Sqn (Polish) of the RAF, reputedly for the princely sum of two bottles of whisky! Revell again, with many changes/corrections/improvements. Main ones involved opening up the u/c bays, re-positioning the u/c legs and re-doing the oil cooler outlet. Others include adding small-size undercarriage bulges (since photos of the actual aircraft show these and not the extra-large ones of the main G-10 production series; narrow main wheels, a tall tail wheel, transparent head armour and a better propellor (all from the AZ Joypack). I did some scratch in the cockpit - the seat is wrong as provided. The decals came from Print Scale - and elsewhere... My experience of Print Scale to this point had been pretty flawless, but these broke the pattern - the "iron trefoils" were all the wrong sizes. I'm slightly annoyed I used them up while finding out as I'm sure I could have used them elsewhere! The codes and the Ustashe shield on the tail were PS, but the rest came from an odd sheet I bought on Ebay, which seems to include every Bf-109 ever operated by any Croatian unit. They seem like quite good decals, albeit with black and coloured bits on one sheet and white on another! The prop spiral is AZ after market. The goat's head/capricorn unit marking below the cockpit is very subtle - just as it is on the real aircraft: it's barely visible in many of the photos taken at Falconara, but is definitely present.9 points
-
Ready for inspection is my 1:72 Hawker Hurricane Mk.IIC. The aircraft is wearing the colours of No.28 (Army Cooperation) Squadron, of RAF south East Asia Command 1944. It is an out of the box build, with the exception of the white stripes which I have airbrushed rather than used decals. The kit went together really well, only a few problems with my airbrush slowed it down a little. That said, I have thoroughly enjoyed the build, and have decided I now need another Hurricane in my stash. Thanks.9 points
-
Hi, I will be starting this one, 1/72 Special Hobby Hornet F3 with kit's marking for N0.33 Sqn , RAF Butterworth (now RMAF Butterworth, near to where I stay) , Malaya. this is the first time I'm building a short run multi media kit, hopefully I will have all the Mojos to finnish this one.8 points
-
F-4E Phantom II - 111th Sq. "Panter", TuAF, 1st Main Jet Base Eskişehir, 1992 Well known Hasegawa kit, Hi-decal (No. 48-028) with some of kits own decals. Built for a collector.8 points
-
Here is my fourth completed kit of the year, the Airfix Nakajima B5N2 Kate representing E1-311 of Attack Unit 5 flying from the Imperial Japanese Navy carrier Shokaku on 7th December 1941: This is the second Airfix Kate I have built (the last was from the Dogfight Double boxing with the Grumman F4F Wildcat) and I had forgotten what a nicely engineered and beautifuly detailed kit it is. Construction took about two weeks as a sort of 'side-build' to the Mitsubushi Raiden I am currently building mainly because I wanted to test painting the national markings with Maketar masks. I added Eduard etched lap-straps to the seats and used their mask set for the canopy. I also used the leftover 250Kg bomb from my previous Kate build so the aircraft carries 2 x 250kg bombs rather than the 1 x 250kg and 3 x 60kg bombs advised by Airfix for the bomb load, as suggested by Nick Millman here. I replaced the kit pitot with some Albion Alloys brass tube and rod. The model was 'black-based' then painted overall in Colourcoats ACJ17 Nakajima Amber-Grey (Ameiro); the green mottling is ACJ03 IJN D2 Green Black (this may well not be the correct green, Airfix recommend Humbrol 116 US Dark Green) but the correct green is not documented; some Japanese sources say the mottling was green and brown but I'm not sure if conclusive evidence will ever be found now. My mottling may be too dense and too granular, I was only able to find one photograph of the original aircraft and it was a side view which didn't really give much away; also I free-handed it with my Badger 150 and I don't think I could have done it any better even if I had better reference material - as it happens I am quite pleased with the way it looks anyway. The national markings were sprayed (with mixed success) with ACJ20 Hinomaru Red, the white tailband masked and painted with Citadel acrylic Ulthuan Grey which is indistinguishable from white unless you put it next to white but has the benefit of not being brilliant white on your model. The model was then sprayed with Alclad matt varnish, the navigation lights painted in with Tamiya Clear Red and Clear Blue; the final touch was the R/T antenna wire which was added using Infini White Lycra thread (the 70 Denier one). Thanks for your attention if you made it this far Cheers, Stew8 points
-
Hello everyone Just finished off my latest build, Airfix's 1/72 Lancaster III, so here are some photos. Firstly, a little background, as posted in the Work in Progress forum: EE136 WS-R 'Spirit of Russia' of 9 Squadron, one of the 'Ton Up' Lancs. On the night of September 5th 1943, it was on an Op to Mannheim, its 22nd mission. It encountered an enemy night fighter near the target, and the combat report reads as follows: 5/6 September 1943, Mannheim. 23.32, 20,000 ft. Lancaster ‘R’ Captain P/O/McCubbin E/A sighted by R.G. (Sgt. Elliott) following Lancaster. Pilot informed and Lancaster commenced to corkscrew. E/A closed on Lancaster from port quarter and R.G. opened up with a long burst at a range of 400 yards. E/A continued on a course to attack and broke away to port quarter after firing a long burst. M.U. (Sgt. Houbert) fired a few round only before being hit and took no further part in the combat. More attacks ensued making five in all, firing long bursts in each attack and the Lancaster’s R.G. also firing long bursts. During the final attack the E/A burst into flames as shots from the rear turret hit him. He dived beneath the starboard wing, obviously on fire. This was confirmed by the flight engineer and bomb aimer. This E/A is claimed as destroyed. No searchlights or flares were seen to be connected with this attack. The Lancaster suffered considerable damage, with bullet holes being too numerous to count. M.U. Gunner – 20 rounds Rear Gunner – 3,000 rounds The rear gunner was F/Sgt. James Lindsay Elliott, of Amble, Northumberland, who was awarded the D.F.M., his award being gazetted on May 19th 1944. As I mentioned in the W.i.P. thread, this is my second Airfix Lanc., and as with the first, it proved a bit of a struggle at times, but as I've already been through this before, I knew what to expect. Anyway, on to the photos... First up, some overall views. The base is my own, made with Illustrator and Photoshop, printed on an A3 inkjet and spraymounted onto a sheet of 5mm foam board. I got the shape, design and dimensions from the surviving remains of the dispersal pens at R.A.F. Bardney on Google Earth. And some close-ups. First off, here's an Erk updating the mission log for EE136, closely watched by his Chiefy: Some interested parties looking on: The car is the Ace British 8HP Tourer Staff Car, and the figures are a mix of Milicast Pioneer Troops, Bachmann Factory Workers, Gunthwaite and CMK Warsaw Pact Mechanics. Meanwhile, on the other side, the dispersal pen is about to have some holes filled in: The bomb flat truck is the venerable Airfix Austin K6 with scratch-built flatbed and Wee Friends wheels, and the road roller is the equally venerable Hales Aveling and Porter kit, with some added detail using scrap watch parts from Ebay. The red cement mixer is scratch-built from a 1/48 U.S. 500lb bomb, plus Evergreen i-strut and plastic card. Wheels for this are pram wheels from Langley Models, and N scale cart wheels from P&D Marsh on Ebay. So, another one for the display case, and I pondering what to embark upon next... Cheers Simon7 points
-
I'm making my own RAF 100 collection of models and I thought it would be nice to join in this group build while filling some gaps in my collection. So, here's the 1930's silver biplane. The old Matchbox AW Siskin. If the kit decals hold up, then I will build the 32 Squadron aircraft, otherwise I will use the Modeldecal sheet to make a 43 Squadron a/c.7 points
-
Hiya Just one more update for today...she is on her legs! ..Nearly there now. I just need to add the antenna, nav lights and pitot and that as they say is that. The next time you see her will be in the RFI section. Cheers all Iain7 points
-
I got lucky at a local auction over the weekend and scored a few nice looking early Airfix kits. I've been after a UK issue of this one for years, but this US Airfix version will do for now... Although it's the RAF version I would have much preferred, I'm not too unhappy with the rarer BEA issue. I also managed to score the one Airfix Dogfight Double kit that has eluded me so far. The decals are missing though, does anyone have a spare set? To finish off a highly successful outing, I also picked up four more easily available kits. A very good day out!7 points
-
M4 Sherman Early Production C Coy. 756th Tank Bn, 5th Army Italy, February 1944 Kit: Tamiya TA32505 Crew: Tamiya TA32515 Build thread: http://www.britmodeller.com/forums/index.php?/topic/235034826-m4-early-production-in-148/7 points
-
PLEASE VISIT PAGE 3 FOR THE 'FINAL' FINAL PHOTOS. TAMIYA 1/35th M4A3E8 'EASY EIGHT' (lastest tooling) With scratchbuilt armour upgrade. STGB entry: 'FACE OFF' I had intended making this OOB, but @Sgt.Squarehead supplied some rather interesting photos of WWII Shermans, one of which took my fancy. This was an 'Easy Eight' with added frontal and turret 'cheek' armour. The added frontal armour consisted of almost an entire glacis, removed from a presumably 'knocked out' Sherman and bolted/welded on top of the Easy Eight's own glacis. This vehicle was present in the Bastogne region in January 45, and showed signs of having previously been whitewashed. I'd never done a 'conversion' before, but quite liked the idea. This vehicle would be an ideal start then as I thought it would be a fairly easy to replicate, simply slicing the glacis from the kit, and slipping plasticard underneath. However, carefull inspection of the photos showed that the 'donor' glacis wasn't a simple 'cut and paste' job. It had necessarily been cut inwards of its full width and the lifting rings, headlights and horn had all been repositioned slightly. Indeed, the driver's headlight had been removed (or possibly had been severely damaged by enemy fire or some accident) Anyway, only the mangled brush guard remained. So, I couldn't just slice the glacis from the kit and use that. I 'd have to do some mods to it. And then I thought that was way too much work, and risky, so best to scratch the new glacis instead, using plasticard. The cheek armour would be fairly straightforward. I was not intending to do a precise copy of this Sherman then, but something based loosely on it. And I really fancied showing this Sherman with full, but worn, winter camo. I've been meaning to do a winter diorama for ages now, and this seemed the perfect opportunity. I'd previously scratchbuilt a ruined building - which WAS going to appear in my 'Ever Evolving Diorama' - and thought this would be ideal for the winter dio. Unfortunately, I ran out of time and didn't even start the diorama. I DID use it as a backdrop for some of the Gallery entries though. So here it is, with worn winter camo. Be aware that this is not finished. I intend to add stowage to the turret rails, replace the tow cable and replace the figures. It will aslo be getting more mud/grass and snow when placed in the diorama. This was a much harder build than I thought it would be, with many trials and errors along the way, but I am reasonably happy with the added armour. It's a shame I never had time to add all of the stowage, or get the figures to the higher standard that I now aspire to, but I am very pleased with the worn winter camo and mud/grass effects. Thanks to all those who inspired me throughout the GB. Now don't forget to vote! I've already cast my vote, and no, it wasn't for my own model! There's some crackers in there and in my eyes, 3 masterpieces! It's a shame we only get one vote each. TFL Badder6 points
-
I'm making my own RAF 100 collection of models and I thought it would be nice to join in this group build while filling some gaps in my collection. It goes without saying that the Battle of Britain needs representing in the history of the RAF and I've chosen the new tool Airfix Spitfire 1a. Out of the box it will be!6 points
-
#10/2018 When the new Tamiya 109 was released my dad couldn´t help himself and had to build one. As you may expect from a new Tamiya kit, excellent quality and engineering. Was mostly built oob, PE seatbelts and main markings are from Eduard, Gunze and Tamiya acrylics, EZ Line for the antenna wires Model shows the aircraft of Major Ludwig Franzisket, I./JG27, Austria in early 1944. Build thread here DSC_0001 by Reinhard Spreitzhofer, auf Flickr DSC_0002 by Reinhard Spreitzhofer, auf Flickr DSC_0003 by Reinhard Spreitzhofer, auf Flickr DSC_0004 by Reinhard Spreitzhofer, auf Flickr DSC_0005 by Reinhard Spreitzhofer, auf Flickr DSC_0006 by Reinhard Spreitzhofer, auf Flickr DSC_0007 by Reinhard Spreitzhofer, auf Flickr DSC_0008 by Reinhard Spreitzhofer, auf Flickr DSC_0009 by Reinhard Spreitzhofer, auf Flickr DSC_0010 by Reinhard Spreitzhofer, auf Flickr DSC_0011 by Reinhard Spreitzhofer, auf Flickr DSC_0012 by Reinhard Spreitzhofer, auf Flickr DSC_0013 by Reinhard Spreitzhofer, auf Flickr DSC_0014 by Reinhard Spreitzhofer, auf Flickr DSC_0015 by Reinhard Spreitzhofer, auf Flickr DSC_0015 by Reinhard Spreitzhofer, auf Flickr DSC_0016 by Reinhard Spreitzhofer, auf Flickr DSC_0018 by Reinhard Spreitzhofer, auf Flickr6 points
-
I built this as part of the hawker gb, it went together well, no issues, painted with tamiya and laquer thinners, eduard cockpit etch but seeing as i wanted the canopy closed not a lot can be seen, otherwise simple oob, Thanks, Glynn6 points
-
After seeing @Dereknf 's lovely 1/72 Airfix Enola Gay here: I couldn't resist a dry fitting with the wings and empennage and the good news is it seems to have enough weight in the nose to not be a tail sitter. It's also pretty huge, much bigger than anything else I've ever made, either as a kid or since I returned to the hobby 18 months ago. I've got a fair bit done this weekend and the fuselage halves are nearly ready to go together. Most of the cockpit detail is done which you can see when the bit of magnetic fuselage is removed. The bomb bay is also getting there. The oxygen tank was removed from the part in the kit which can hardly be seen in its position between the bomb bay doors. I've got five more of these to patch up; the metal straps are made from aluminium tape. One thing to watch out for if you have this kit is the fit between the first row of bombs and the crew tunnel as they initially interfered with each other and prevented the two halves from shutting properly. I ended up modifying the bombs so they sat closer to the rack and now have a smidgeon of clearance to the tunnel. The crew compartment behind the bomb bay is in place with a simple paint job and no extras as it will be very difficult to see. I just need to do the same with the tail gunner, then I think (finally) she can be zipped up.6 points
-
Life has a way of getting in the way of my modeling, but I found some time this weekend to make a bit of progress. I glued the wing pieces together after installing the landing lights. I used dark aluminum to paint the bulb in the clear lens piece that Tamiya provides, then glued the lens into its recess in the lower wing. A piece of Bare Metal self adhesive chrome was placed behind the lens before gluing the upper wing in place. I also added resin detailing to the landing gear bays: Next task, which has taken up most of my time this weekend, is the Aires resin cockpit. Although the kit's detailing is very good, the resin replacements add even more eye candy. Here is a comparison between the kit's cockpit sidewalls and the corresponding Aires resin parts: And this is the assembled flight deck and instrument panel. I've added a Yahu IP instead of the PE and film from the Aires set: After some eye-watering detail painting and oil-based weathering, here is where I now stand: That's all for now!6 points
-
Back again, following several days without internet. Work on the Walrus continues;Walrus II, Z1768, 281 Sqdn, Ouston, 1942-3 (21) w by Philip Pain, on FlickrThe rear hatch of the kit comes without the glazed panels, so these were carefully opened out. Also the two missing runners were scratch built, plus the two small struts that hold the hinged part open.Walrus II, Z1768, 281 Sqdn, Ouston, 1942-3 (22) w by Philip Pain, on FlickrPainting of all the fuselage, centre section and tail completed. The Pegasus engine and prop ready for mounting. The engine in the kit is missing the exhaust system, but I couldn't figure out how to do it, so this is the main missing detail that I have left off (for now). The two mooring bollards on the nose have been scratch built and added, plus other details like the three folding steps up the centre section forward struts.Walrus II, Z1768, 281 Sqdn, Ouston, 1942-3 (23) w by Philip Pain, on FlickrThe lower wings glued on, but even when the glue was dry they wobbled alarmingly. Work also started on the main struts. On the real aircraft the rear struts are much broader than the front ones, I think to incorporate the actuating rod for the upper wing ailerons. So I made them broader by gluing some stretched sprue on the back edge, and blending it in with filler. The pitot tube has been scratch built and added to the port front strut.Walrus II, Z1768, 281 Sqdn, Ouston, 1942-3 (24) w by Philip Pain, on FlickrAnd then the disaster started! Due to my unusual construction method, I needed to first glue on the bottom halves of the upper wing. However the bottom halves don't have mounting tabs, these are only on the top halves. Everything was flopping about all over the place, but in trying to get it together, it became obvious that some of the struts were not long enough, this being due to my centre section being inclined too much at the front. Even without my unusual construction method, this problem will manifest itself only when gluing starts, and this is a nasty problem with this kit. So I took it apart and started again, this time holding the upper wing halves in place with elastic bands, and using super glue to attach the lower wing parts. The struts were left off till the lower wing halves had dried.Walrus II, Z1768, 281 Sqdn, Ouston, 1942-3 (25) w by Philip Pain, on FlickrThe struts took quite some work to lengthen them here and there, but eventually it went together, still in the upside down position shown in the photo. When thoroughly dry the two elastic band were cut off, and the two upper wing halves removed, not having encountered any glue.Walrus II, Z1768, 281 Sqdn, Ouston, 1942-3 (26) w by Philip Pain, on FlickrThe two upper wing halves have fabric surfaces where there should be the two fuel tanks. So these flat surfaces were created with filler. Also the centre section on the Walrus should be metal covered, not fabric, but I have left it as provided in the kit, complete with the four wire sling.Walrus II, Z1768, 281 Sqdn, Ouston, 1942-3 (27) w by Philip Pain, on FlickrHere is the kit still without the upper wing halves. All the 16 rigging wires (previously attached to the lower wings) have been pulled through and super glued tight.Walrus II, Z1768, 281 Sqdn, Ouston, 1942-3 (28) w by Philip Pain, on FlickrAnd finally the upper wing halves have been glued in place and the edges sanded smooth. Fuel filler caps have been scratch built. Note also the navigation lights previously scratch built onto the lower wing tips. Each of the main rigging wires have had the small aerodynamic fairings added where they join the wing surfaces (top and bottom), using filler. Not visible in this photo are the two prominent fuel pipes that have been scratch built using fuse wire, and added between the upper wing and the top of the engine.That's all for now, more to follow ..........6 points
-
M4A3 Sherman "Classy Peg" 43rd Infantry Division Luzon, Phillipines in 1945 Kit: Hobby Boss HB84803 Crew: Gaso.Line Build thread: http://www.britmodeller.com/forums/index.php?/topic/235034828-m4a3-classy-peg-in-148/6 points
-
Hello All, I just had a week of European travelling and I'm glad to get back to the bench after 1,000 miles of driving! Before I went away I stuck all the Frog Beaufort pieces together and scowled at it for a while: The problem is twofold: the fuselage profile is wrong, including the too-steep wing incidence, which makes the canopies too shallow; and the fuselage is a few millimeters too wide at the cockpit, tapering away in all directions, which Frog has depicted as a curve instead of the parallel sided real thing. So on my return I was going to scratch a new one. However, I wondered yesterday if I could cut some wedges out of the fuselage mid line and rely on sanding and bending to wrestle it into shape. And, fingers crossed, that's what I think I've done. Profile is bang on, bearing in mind I'm going to replace the tail, cut 2mm down for the cockpit sill and build up the nose a bit: Sides are now parallel and 19mm/.75"/4'6" wide over the whole "hump". I took a wedge out at the top to narrow the front, filed the sides down to take out the curvature and did some bending of the turret area. I will need a touch of filler to build out the last few millimeters of hump before the rear turret. You can see how much wider the kit canopy is, and it will be 2mm too low as well when I get the sills cut down: The observer's canopy cover will be larger than the kit part too: I took a wedge out of the front join line too, so you can see the the battery cover hole is no longer rectangular. I think having the spin-a-prop version made this work easier: Next steps are to fill in all the gaps, get the sills right and cut out the torpedo bay. Then I can start on interior detail. I'm glad I could use the Frog fuselage. I think this would have made it to the Shelf of Shame otherwise. And the Frog fuselage still has a well-shaped rear fuselage cross section, the lower fuselage bulge, a correctly marked offset torpedo bay and the very convenient raised line to show you where the topside colours should stop. Finally, this being Easter Day, I can show you where the new canopies will come from. All I have to do is eat the bunny! Thanks for looking, Adrian6 points
-
Happy Birthday Her Majesty's Royal Air Force; 100 years today! So the GB has started I guess and so I'll just post what I am going to be working on over the next few weeks. As you know from the above, this tribute will be in the form of the aircraft that most influenced me whilst growing up, the Blackburn Buccaneer. The kit is the slightly 'awkward' 1/48 Airfix kit that certainly needs some work, but I hope to manipulate the plastic enough to get a decent result out of the 24 year old kit, but there is some help by way of some after-market sets from NeoMega, Paragon, Heritage Aviation, Flightpath, Eduard and a few others as well. I really have decided to throw everything at this kit and will be using the Master Casters resin Martels as well as Xtradecals to represent a 12 Squadron aircraft. Building starts in the morning, but in the meantime, here are the 'ingredients.'6 points
-
Hi folks Finally put this to bed. Mixed feelings on the results Finised mainly oob with resin seats local casted Rgds and happy modelling brian5 points
-
My last finished model. I like it.5 points
-
Thanks Kris, I'm looking forward finishing it off Thanks Kev, I'm enjoying the build but sometimes you just want to stick bits of plastic together - I may have inadvertently started my next kit, an Academy Warrior IFV, couldn't help myself Cheers Hewy, soon hopefully. Despiet all my plans, she won't be finished by Easter! Main reason being the crew; I absolutely love Northstar figures, bit I'd forgotten how long they take to get off the base sheet without breaking them, due to my clumsiness. They're ready fro painting tho, about 60 RN crew and 30 odd dock yard workers, although they're actually a mix of US and Russian navy figures; Bow mooring lines fitted; Midship gangway; Aft mooring lines and gangway to the access steps and harbour boarding ladders stowed; And some clear acrylic gel to give the water a bit of depth; That's it for the WIP, just the crew figures to paint and the dockside cranes to go on last, otherwise I'll break 'em. Thanks to all for the comments and encouragement and more than a little help and advice along the way - very much appreciated. Next stop RFI. Cheers Nick5 points
-
Well, after an afternoon of fiddling about with the framework, I've got to this stage. Not glued to the deck yet, and still needs a little bit of tweaking, plus the last few smaller bitts will be easier to fit once the rest have been glued down. Not as bad as I thought, but had to apply some detective work as the instructions weren't the easiest to follow,5 points
-
Hmm Enquiring minds might but...... Nocturnal nudity aside (waaaaay aside, far away over th e r e ...) The cockpit looks, I was, mistakenly going to put real but of course real it is, realistic is what it is It is good that the Martian has found his "gottabuilditis" We have missed these sessions Martian5 points
-
Hi guys, Some painting progress on my Kfir. Almost of the decals were applied. I used MRP brand on this kit and they are excellent. Cheers, Pierre.5 points
-
Right oh. That’s enough of that here’s some of this. I’ll mop up the last few days and finish with today. I decided I needed to move on so I did some gluing of plastic. The nacelles went on. The fit is amazing, maybe it’s the new version but it’s ace. here is the other side. Mr Berna say hello. Still a bit annoyed about the window I’m trying to fix most other things to make me feel better. Hence. I used son of Dexter then some sanding action to get the escape hatch correct. Before I forget I decided to put the “Soul” of this big bird in her wings. Thanks CC I’ll put the rest on the base with a plaque of explanation. This part of the build is full of disparate parts just aching to come together. I can’t close the wings without fitting the UC soooo. Here’s a dry fit of the kit parts. then I remember that there’s a PE set for this. My initial thought was. I went and made a cup of tea and reminded myself that this is all about the journey and not the destination. Even though the finished thing is great to have it’s not where the fun is. Soooooo. sand, sand, sand. oooh one of three. The first parts look so much better. Here is another bulk head section. such detail. someand effort and we has. to fit in that blank space. The only negative about PE is the silly representation of round things as flat things, like the tanks. So I scratched some. mojo well and truly back. how much better does that look now? How the kit part had not detail at all is bonkerers. Here’s one for @corsaircorp the door opening photo sent by @isaneng shows the door to be too big by this much. marked out. I’ll sort it out later on. here is a pic of the Lancaster parts settled into the wings. here are the UC parts as they are before work commences tomorrow. so nice fitting these bits together. I have the fire on and an drinking my way through these now. so no more until tomoz. Thankyou once again for sticking with this. It was always going to be a sticky one but I think the wind is behind me now. Have a great evening boys. Maybe it’s the centenary or the RAF or maybe it’s the stress lack but what ever it is I’m feeling a little more positive about progress now. Take care y’all and as always brothers. Happy Modelling. Johnny lupuloid5 points


.thumb.JPG.2ce06c4ff2300a5faba93aaeacbdab25.JPG)


This leaderboard is set to London/GMT+01:00