
Leaderboard


Popular Content
Showing content with the highest reputation on 25/03/18 in all areas
-
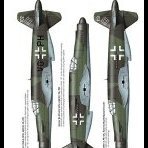
Here is my fourth completed kit of the year, the Airfix Nakajima B5N2 Kate representing E1-311 of Attack Unit 5 flying from the Imperial Japanese Navy carrier Shokaku on 7th December 1941: This is the second Airfix Kate I have built (the last was from the Dogfight Double boxing with the Grumman F4F Wildcat) and I had forgotten what a nicely engineered and beautifuly detailed kit it is. Construction took about two weeks as a sort of 'side-build' to the Mitsubushi Raiden I am currently building mainly because I wanted to test painting the national markings with Maketar masks. I added Eduard etched lap-straps to the seats and used their mask set for the canopy. I also used the leftover 250Kg bomb from my previous Kate build so the aircraft carries 2 x 250kg bombs rather than the 1 x 250kg and 3 x 60kg bombs advised by Airfix for the bomb load, as suggested by Nick Millman here. I replaced the kit pitot with some Albion Alloys brass tube and rod. The model was 'black-based' then painted overall in Colourcoats ACJ17 Nakajima Amber-Grey (Ameiro); the green mottling is ACJ03 IJN D2 Green Black (this may well not be the correct green, Airfix recommend Humbrol 116 US Dark Green) but the correct green is not documented; some Japanese sources say the mottling was green and brown but I'm not sure if conclusive evidence will ever be found now. My mottling may be too dense and too granular, I was only able to find one photograph of the original aircraft and it was a side view which didn't really give much away; also I free-handed it with my Badger 150 and I don't think I could have done it any better even if I had better reference material - as it happens I am quite pleased with the way it looks anyway. The national markings were sprayed (with mixed success) with ACJ20 Hinomaru Red, the white tailband masked and painted with Citadel acrylic Ulthuan Grey which is indistinguishable from white unless you put it next to white but has the benefit of not being brilliant white on your model. The model was then sprayed with Alclad matt varnish, the navigation lights painted in with Tamiya Clear Red and Clear Blue; the final touch was the R/T antenna wire which was added using Infini White Lycra thread (the 70 Denier one). Thanks for your attention if you made it this far Cheers, Stew21 points
-
Hi everyone! Here's my first finished build of 2018. Yeah, I'd normally have 3 or 4 finished by now, but life got in a way a bit You can find the full article and photogallery at my modelling blog.20 points
-
Huma's very nice 1/72 Arado Ar 80. Great fit of parts and sharp trailing edges, it just needed a bit of extra detail in the cockpit.19 points
-
Hi guys here is my Kinetic F-84F in the colors of the Dutch 311 squadron. This kit seems to have very deep panel lines but I did not experienced it as very problematic. In fact I liked this kit very much. Decals are from Dutch Decal and the cockpit oi from Aires. Erik19 points
-
Hi all! I would like to present my latest build. It is a quite new Arma Hobby's injection kit of Fokker E.V (Expert Set). The kit is really nice and Cartograf's decals can really do the job! This is a special build for me because Stefan Stec is known as an author of Polish white'red checker which is the official Polish aviation insignia. In 2018 it will celebrate its 100th anniversary! Time for gallery Stanley17 points
-
Hello everyone. I want introduce, my model build 2 years ago. Best regards. Michael.16 points
-
My latest completion, Airfix's new 48 Walrus. When this arrived, I just had to start it straight away, it looked so good in the box Unfortunately, it didnt turn out as good as I wanted, and sort of went off the rails during the rigging process. That the model isn't one of my better efforts is through no fault of the kit. I really think it is a stunning job by Airfix The first problem was rigging with EZ line. I just could not get the stuff to behave, as soon as it came near the superglue, it curled away. This led to a few gloops of superglue, which lead to further touchups, which led to......You get the picture The second problem was, in the original configuration I wanted to model it in, one wing folded, I had not glued the folded wing securely enough and the float touched the ground so I converted it to both wings spread, thats why the ailerons on one wing are deflected up. I could not unglue them. Spreading the folded wing led to more touch-ups,so by the end of it, I just wanted to get it off the bench Anyway, here she is Thanks for looking Bruce13 points
-
Hello, Here's my Kinetic 1/48 NF-5A in Royal Dutch Air Force markings. I started this kit in november last year, but it was put on hold for a while because I was waiting for some rocketpods that I wanted to put on the wings. Sadly, fate wouldn't let me have these, so I opted for some recycled Hasegawa Mk.82 Snakeyes instead, that I turned into inert ones. These kits came with a mold flaw in the clear parts, and the wingtip fueltanks are identical, not mirrored like the real ones. I emailed to Luckymodel, and they provided me with correct parts for a small fee. The instrument panel is not correct for a NF-5A, but who's going to notice. I did change the leading edge flap a bit, to make it more like the NF-5 ones. I used MR Paint on it, and Dutch Decal markings to make it like a 314 Squadron one, based at Eindhoven AB. The big E was applied for the 1978 Tactical Air Meet at Wildenrath. The real K-3047 later went to the Hellenic Air Force. Thanks for looking, I hope you like it.12 points
-
I have finished a Sword 1/72 AEW Gannet & Cyber Hobby 1/72 Sea Venom. Both were long term projects that I plodded away with in the back grounded whilst building other kits. The Gannet is the first short run kit I have built, it went to well surprisingly well and has a good bit of detail. The Sea Venom is also a nice kit. Feel free to leave any comments or questions and thank you for looking!12 points
-
Hello mates! In July 1978, the 393 BS, 509 BW deployed one FB-111A to the Tiger Meet 78 at Kleine-Brogel AB in Belgium. This model is from 1997, pimped with Verlinden and one of my dearest. The FB-111A 68-0247 was flown by Jake Mentz and Doug Kohlhepp. Nailing the camo-pattern and detailing the intakes took most of the time. Cheers, Thomas11 points
-
I hereby post my second build as a Britmodeller: The Tamiya A6M2b Zero, a straight OOB build. A great little kit, lovely detailed, fits together like a dream. Paints: Tamiya XF-12 IJN Grey, Vallejo Model Air Interior Green. For the aotoke in the engine(which cannot be seen in the pictures anyway), I used Sotek Green from Citadel mixed with Vallejo silver. Gloss and matt varnish from Vallejo. Micro Set for decals. Canopy is handpainted, not too happy about it. I need to find a way to mask canopies for airbrushing, really don't want to buy masks online for every build. (Got a Heinkel from Revell in my stash, the canopy is the only thing putting me off building it.) For the wash, I used light grey pastel chalk in odorless turpentine. Paint chips were done with Vallejo aluminum paint on a small sponge, powder marks with black pastels. Great cockpit deal, almost a shame to have to cover it up.. As I am new to this, I would greatly appreciate any helphul hints, tips and constructive criticism. Best wishes for a happy, paint fume filled, Easter!11 points
-
Hi !this is my last work done. Old Toko kit:10 points
-
This is my interpretation of the venerable Matchbox Hawker Fury Mk.1 courtesy of the Revell reboxing in the wonderfully bright, eye-catching livery of No.43 Squadron based at RAF Tangmere 1932. I originally intended this to be a gentle excursion and break from my Dambuster build as a contribution to the Made in Great Britain GB. Sadly, and shamefully, I ran out of time and failed to make the finish, but reincarnated it in the WIP section. Build thread is here: http://www.britmodeller.com/forums/index.php?/topic/235027219-revell-matchbox-hawker-fury-mki-172/& I believe it is Matchbox’s first kit way way back circa 1972: https://www.scalemates.com/kits/147812-matchbox-pk-1-hawker-fury The kit itself is a lovely little kit which goes together very well. Even after all these years, apart from some flash here and there, the tooling holds up quite well. It is also quite accurate with the exception of the tailfin which is a little undersize, and the undercarriage which is a tad high because it is moulded in the inflight position. That said these really are subtle nuances which are barely noticeable. Of course it has raised panel lines, the rivets are a bit OTT, as is the wing ribbing. The undercarriage is a little clumsy and toy-townish looking, but after all it is a kit from 1972. There aint much else on offer in 1/72, save the old Airfix kit and the Amodel Mk.1/2. I understand there is an MPM Production future kit in the pipeline. You’re not exactly spoilt for choice in respect of aftermarket – you can get an IP panel and some undercarriage conversions for the Spanish version, although there are plenty of decals for those tasty schemes to choose from. As for my build, well as I said above it started as a gentle OOB build, but I started adding details and ended up getting carried away, with the result that it was a proper kit bash in the end with quite a bit of scratch added and parts replaced. I sanded back the raised panel lines and re-scribed new ones. I pretty much rebuilt the entire cockpit interior, scratch building a new seat, cockpit frame, IP, gun mount, joystick, harness from take-away container foil, and other bits and bobs. The pit is pretty much Spartan as you can imagine with an early 70’s kit. You can’t see an awful lot of it, but as is the usual parlance “I know it’s there”. I trod on the windscreen and bust it so had no choice to make a new one from acetate with frames made from take-away foil. The guns were moulded on, so I cut and sanded them away and scratch built replacements from Albion Alloys tubing. Ditto the gunsight which was a bit oversize and clunky. I scratch built cross hairs and the pilot bead – quite fiddly but nice little touches I feel. I sanded back and cut out the exhausts which were moulded on. I replaced these with small sections of brass tubing, slightly squashed to replicate the oval shape. These were finished off in Humbrol Metalcote gunmetal. I left the rivets on the engine housing as I liked the effect, albeit they are a tad over scale. This was then covered in Bare Metal Foil to replicate the polished aluminium effect. The rest was finished off in Humbrol polished aluminium metalcote and HU 24 trainer yellow. The prop and wheels were finished in Tamiya NATO Black to give an off black effect. The wing ribbing was sanded back to give a more subtle effect, and I added the little actuators and counter weights. I used a little of the undercarriage but largely replaced it from flattened tube. Ditto the tail struts. I modified the wheels, spinner, tail, scratched a new tailskid and modified the radiator with little bits of mesh and a scratch built an oil cooler. The latter can barely be seen but “I know it’s there”. Made a pitot and venturi. The rigging is invisible thread. Phew! Anyroad it’s a great kit and an enjoyable build. You can build it straight OOB on a rainy Saturday afternoon like we did as kids, or go nuts like I did. Either road you’ll have fun. Thanks for looking.9 points
-
Hiya Folks, Rescued from the shelf of doom,...... I`ve finally finished this one as a Liberator GR.III from 160 Sqn based in Ceylon and India during 1944. Used mostly for long range Photo Reconnaissance, many of the units aircraft had the rear bomb bay doors modified with a pair of camera apertures, as seen on the model. These aircraft had British Boulton Paul rear turrets mounting 4 x .303in Brownings and I used the turret from the Pavla RAF Liberator conversion set. Also the gun window from the front left part of the nose was filled over and the pitots were re mounted on toe side of the nose...... but probably the hardest conversion was to try and replicate the waist gun positions by cutting up the kits waist gun covers, adding clear plastic for windows and framework behind from plastic rod,...... here is a partial WIP; The model received quite a few coats of white using a rattle can and then the Temperate Sea Scheme upper surfaces were brush painted using Polly Scale acrylic Dark Slate Grey and Humbrol enamel 123 Exta Dark Sea Grey. As some of the units Liberator`s had their rubber de icing boots overpainted with camouflage, which appears to be badly flaking away, I sought to replicate this on the model too,..... by applying Humbrol acrylic black and then sanding sections away. The model was given a brushed on coat of Polly Scale matt varnish followed by a iwatercolour wash, with exhaust staining using MiG pigment powders. Decals came from DK Decals RAF & Commonwealth Liberators sheet. Here is the model; DSCF2689 by Tony OToole, on Flickr DSCF2687 by Tony OToole, on Flickr DSCF2645 by Tony OToole, on Flickr DSCF2675 by Tony OToole, on Flickr DSCF2685 by Tony OToole, on Flickr DSCF2688 by Tony OToole, on Flickr DSCF2683 by Tony OToole, on Flickr DSCF2682 by Tony OToole, on Flickr DSCF2665 by Tony OToole, on Flickr DSCF2654 by Tony OToole, on Flickr DSCF2647 (2) by Tony OToole, on Flickr DSCF2645 by Tony OToole, on Flickr DSCF2632 by Tony OToole, on Flickr Cheers Tony8 points
-
Hi Folks Another warts and all Sea Hornet from CA.this time from 728 NAS based at Hal Far. Painted with the usual Xtracolor HSS and using the kit decals. Cheers Ian8 points
-
Aww thanks folks! Rob G that's very flattering - although I haven't really got the resources to go into the aftermarket detail industry! However I think I might do a reference thread for BM with all my discoveries and photos from the AP in one place, so others can benefit from my research without expending so much effort! The Heyford in particular is pretty well-served with references, and with the AP photos there's enough to detail most areas. Paint! I mused for a fair while as to the interior base colour for the Stranraer. The RAFM example is Interior Green throughout, however it was gutted and partly restored in the 1960s so I don't really think that's much help. All my references suggest that the pilot's cockpit at least was some kind of matte colour that isn't Alumninium, but most of my contemporary photos of the rest of the interior are less helpful. All the good quality ones I'm at least 75% sure are of the prototype. K3973. They appear to show natural metal or painted aluminium, but I'm not convinced this is representative, as I've also got one or two very poor photos of wartime aircraft that show a darker, or at least less shiny colour. In the end I had a brainwave - Supermarines famously mixed their own green colour which was lighter than standard Interior Green. This is the colour applied to Spitfire cockpits, which is arguably closer to Sky (my usual mix is 50% of each). I've not read whether this was applied to flying boats but given that the Stranraer came along only slightly prior to the early Spitfires, I've decided to go with Spitfire interior green throughout. The Heyford was done in Interior Green, largely on the evidence of the surviving throttle pedestal thingy (see last page), apart from the rear fuselage which was doped and therefore a scruffy red colour. I've never had much luck making the uneven red-stained canvas hue of doped biplanes, it just looks badly painted if I try and do it. So I went for continuous brick red, sacrificing a bit of accuracy for looking neat here is fine by me. I gave the Stranraer's structure a bit of a gentle wash, as although I shall be finishing mine as a silver machine when they were relatively new, I figured flying boats would get mucky and bashed more quickly than most aircraft. A bit of tidying up still needed here, but it looks not too bad. That's all for now! I'm off to Paris next week to talk about tropical rodents at a conference, then an Easter break in Cornwall but I should be back with more painty fun next month!8 points
-
Ugh, I'm still puttering along. Can't believe I started this three months ago. Life has sucked the marrow from these bones. Finished decalling the Blenheim I; just waiting on the resin engines and cowls -- the latter inbound from fair Poland, so it may be a tiny little wait. 20180324_165227 by Edward IX, on Flickr 20180324_165229 by Edward IX, on Flickr The Owl Decals had a misprint that omitted the central bar of the 8 in the aircraft serial number, so that it looked like 0, but I managed to cut up the serials for the second decal option and bodge up a fix. 20180324_165215 by Edward IX, on Flickr Then I really half-cheeked attaching the hedgehog exhausts to the Bisley: 20180324_165916 by Edward IX, on Flickr 20180324_165917 by Edward IX, on Flickr This is going to be one of those "perfect is the enemy of the barely adequate" jobbies, I think.8 points
-
Hi All, I received a request to repost these pics, since the ones I posted years ago disappeared in the Photobucket debacle. When Hasegawa released their new-tool 1/72 B-24s ten years ago, they boxed a glass-nose D-model and a turret-nose J. I was curious about adapting the kit to make other variants, particularly a B-24 built at the Ford plant in Willow Run, Michigan (my home state.) Something on the order of one-third of all B-24s were actually built by Ford, and they had a distinctive nose profile. The only injection-molded kit of a Ford-built Liberator is the Academy/Minicraft B-24M (when Academy and Minicraft split into separate companies, the molds for all the B-24s went with Minicraft, and have been produced under their label ever since.) When first inspecting the Hasegawa B-24 kits, I was encouraged by the fact that the forward fuselage separates at the diagonal panel line at the back edge of the cockpit, allowing them to use the same basic tooling for both the D and J. Minicraft uses the same approach with their B-24 series. As an experiment, I temporarily lashed the Minicraft B-24M nose onto a Hasegawa fuselage. I was most happy to find that it fits very well. There's a slight gap along the belly, but nothing a bit of shimming with strip styrene won't take care of. I used the Minicraft cockpit canopy in my little experiment, since the Hasegawa kits have the canopy molded integrally with the top of the forward fuselage. Even the canopy fits pretty well. Cheers! Steve7 points
-
two or three months ago I noticed that the polish paint makers hataka had introduced a new line of paints:the orange line made up from lacquer paint .of course the fingers started to itch for a try and I decided to order a set with four colours ,the polish wwII airforce colours .in a few days they arrived and all that was missing was an aeroplane to paint [I did want to expose my 1/48 mirage PZL los or karas in this experiment] so in ebay I succede in very short rtime to buy a set of four polish kits in 1/72 from polish airforce planes .I think the firm plastyk made them 1980-ies and short of seventeen euro's [16,90 postage included] I was convinced I made a good deal,in no time were on it's way to me two rwd planes [rwd five and rwd six] ,a lws czapla and ,top of the deal ,the pzl 37 "los"[all 1/72] . I decided to build the los and after a few days messing around in a building proces that gave no problems what so-ever, it was time for spraying the lacquer from hataka orange line on it. polish khaki,of course ,and the downside I airbrushed with the silver teint [which came out beautifull,even magnificent in my eyes .helas ,the photographer forgot to make pictures of it, but what I can show is how the khaki turned out.I was that happy with the result and the ease in using that lacquer paint that I immediately ordered a set with the raf colors ,which shortly will be tried out on a defiant that is almost finished at the moment I write these words . okay ,here comes a polish pzl 37 los from a polish aircraft factory and designed made by a polish engineer ,miniaturized into a kit by a polish kit making factory painted with lacquer from polish hobby paint-producer.the sun was shing on the moment my neighbour made the next three pictures of my los . and and I was not present at the photo-shoot and so I could not give any direction on how to take the pictures ,but to get an impression of how the lacquer worked out -which was my first intention-on the los it is okay I guess?7 points
-
Just a warning. Jersey new potatoes will be shipping in the next few days. All you need is a plate of Jersey Royals a smidgeon of salt and a touch of ground pepper. And that is a meal in itself.7 points
-
Just a small update, but with the delicate intricacies of the funnel interior, I thought I would post my progress. This has to be one of the most delicate parts of the build so far! Cheers, Tom7 points
-
Thanks all! TheBaron, Don't worry! Was good to meet you at Telford. At the moment I really don't get enough time to follow many other WIPs on BM, so I have no grounds to get offended! 71chally: Maybe! An instructional aid seems the most likely cause for the pedestal's retention, although I'd have though a more modern type, plus a more complete cockpit assembly would have been more useful! Tomoshenko: I'd love to, although as I currently don't have time to be a member of a model club, it'd have to be a show with a BM table. limeypilot and dogsbody: thanks for looking out interior shots, although thanks to years of trawling you might not be surprised to find I've already got them all!!!! The bottom two, of the rear fuselage and radio operator's position are from Flight in about 1933. Unfortunately the top cockpit image is the only really clear shot which is readily available, but I'm 90% certain it shows the prototype Heyford J9130: the small round porthole to the right of the bomb aimer's window don't appear on any production machines, and several bits of cockpit equipment and structure (eg the curved floor surface) are totally different to either the second, rather dark shot (probably a Heyford II or III) or to the Heyford III AP (see image further up). The differences between these two cockpit images gave me a great deal of headache until I realised that! Anyway, on with the build! A surprising amount of empty space is visible on the port side behind the pilot's bulkhead, simply by peering through the cockpit cavity. I've built a few open-cockpit biplanes, but none of this size, and the ease of spotting places where I haven't built any detail is rather unsettling (no, I can't "just ignore it"). Anyway, I ended up building the framework holding up the radios and operator's desk, along with the back and starboard sides of each radio, much as I did with the Stranraer. This was simple to make, as the ribbed floor is easy to drill through accurately! I added a couple more fittings to this compartment. The wireless operator's seat really isn't very visible, even with young eyes like mine, so I cobbled together something roughly right from an old scrapped Airfix Bofors gun and a couple of bits of plasticard. This will do fine in the gloom. The other item is a reconnaissance camera - only the Flight cutaway (25th June 1936, if you're really keen) shows this, mounted in front of the radio rack. I can't find any data showing what mark of camera was fitted, or any clear photos showing the external underside of this section, so I've no idea what kind of window arrangement existed to allow photography through the floor. There was definitely a downward ID light here, and the compilers at Flight may have got confused by this and invented a camera mounting where none existed. However it adds some substance to this otherwise conspicuously empty area, so I copied a WW2 picture of an F24 camera to pad out the space (who says I'm a perfectionist?!) As with the Stranraer, the kit had a vaguely correct instrument panel, although this one bore less relationship to the real thing. My scratchbuilt effort is above - it looks rough but primer has improved matters quite a bit. The large hole is for a compass. Not much remained to do in the forward monocoque. I noticed from the AP that part of the dual control system (the second pilot's yoke) is stowed on the starboard sidewall just aft of the second pilot's seat. Having found to my surprise that the kit proides yokes (when you do this much scratchbuilding you forget what parts are in the box!) I sanded one down to a reasonable thickness and fitted it in the right place. Further forward, I added an attachment spigot for the second pilot's control column, and that was that! On to the rear gunner's cockpit. As you can see from dogsbody's photo above, there are a *lot* of Lewis magazines (6 for each of the upper and "dustbin" gun positions), two parachute holders, plus a ladder stowed there. The odd thing that looks like a capital "N" is the framing for a folding seat which the top gunner sat on to play Solitaire while no fighter pilots were good-naturedly pretending to shoot at him from their Furies and Bulldogs. This lovely "skin off" image from the AP gives you the idea. With those prepared, it was on to primer! I'm *very* chuffed with with way everything looks under the good old grey, until you prime you can't quite be sure how many cack-handed glue runs are present, but on the whole the result looks pretty good to me. I've actually since scraped the dust and mould of months of idleness from my brushes, and done some painting, but that will have to wait until next time!7 points
-
Most of these are USAF images recovered during the A-10 Combined Test Force shut down Wish I had dates for the USAF images. Apparently you can build this jet with production or modified vertical tails... Those pods (below) are precursors to the LANTIRN system used on the F-16 and F-15E... Those pods again... Taller tails... The museum piece on display at the 1988 Edwards Open House. No seats, no engines. Waiting for the Flight Test Museum to be built... Thanks for looking, Sven6 points
-
My last finnished model It's a ACE kit ,very nice model to build ,it's small but at least a great model . I have open the door and detailled the inside ;6 points
-
Have made some solid progress on number three. Need something camo between those two silver ladies. Fuselage together with seats and remaining cockpit items drying ahead of being added and the fuselage being closed up. I weighed the nose weight this time as I had been asked previously and forgotten to do it. There is 30 grams of lead sinkers behind the rear bulkhead which will do the trick on this one. These were flattened with a hammer and super glued in place on top of and around the forward undercarriage bay. The High Planes Models 'EE Canberra Starter and Fan Set A' are being used on this one as it carried the uprated Avon engines. They need a slight trim ahead of fitting and really look the goods. I am also using the High Planes Models 'GAF Canberra Mk20 Wingtip Bombs' set. Looking forward to breaking those out and giving them a whirl. As I was trawling through Hannants recently I noticed paint masks are now available for both the B2 and T4. Also on the way are detail brass etch sets that include undercarriage door detail and flaps. Might give these a go on number four. Cheers, AGW..6 points
-
Hi folk's My entry will be this piece of modelling archeology,Frog's oldie in a seventies boxing I'm planning to do the box option new roundel's will be needed but I hope to be able to use the codes. To be honest it's not that bad a kit certainly no better or worse than Airfix's original Mitchell which I hope we'll see a couple of in this GB.6 points
-
Another great kit by Tamiya, falls together, almost. Been so long since I posted anything I'd almost forgotten how to upload the pics etc!6 points
-
Here is my first attempt at an AFV model since 1985, please be gentle with me This is the 1/72 Modelcollect T-72BA painted with AK Interactive's Real Color Modern Russian Armour set. The kit comes with the rubber band style tracks and the link length style which I decided to attempt (note to self don't glue the drive wheels until the tracks are done!). I had great fun building this one and am already looking forward to building a BMP3 at some point soon. I hope you like it. Duncan B6 points
-
Home sweet home!!! I'm under the jet leg effect and yesterday was a very busy and long day, but before going to bed, I managed to add the fertical finand tail and nose cones to the starboard fuseage half. This morning a bit of sanding , but only after I purchased some new CA glue to be used a s filler. Whe I opened the blister I noticed a familiar shape... ...and so...I cut it off and worked a bit on it until I got the shape I wanted: I tried a dry fit and I have to say I'm quite happy with it. it'll have to wait for a while, until the fuselage halves will be joined. Let's put it together with the other clear parts. Once happy with the glueing and sanding I went on with the tail cone section. Before glueing the airbrakes' system's frame it had to be painted , together with the cone's interior, which wouldn't be accessible for painting otherwise. Black first, then grey, then black wash, then lighter grey dry brushing. That's it for now, it may be a bit dark, but I'll give it another touch before I fit the airbrakes. Now it's time for dinner! Ciao Massimo6 points
-
Hi, Here is my interpretation of Wellington Mk.III HF670 'U' from 142 Squadron flying from Blida airfield during early 1943. The Trumpeter kit is an absolute joy to work with and the only criticism I can think of is that the wheels look too skinny. The decals are from the generic Xtradecal dull red and my reference was 'Wellington Squadrons in Focus' by Freer and Parry. I hope you like it, Russ6 points
-
I used the Ultracast aeroproducts spinner , decals from IPMS Canada.6 points
-
British Summer Time! Seeing the Forsythia, Japonica, Cherry, Blackthorn (not May) and Magnolia blossom, the random patches of daffodils, grape hyacinth, celandine and the first bluebells. Watching the aerobatic antics of a blue tit looking for bugs and grubs in the nooks and crannies of the dining room window. Only a week ago we had snow on the ground...6 points
-
M4A1 SHERMAN 1/35 ITALERI Hi Pals, here is the Sherman for the occasion, finally finished, not exactly as I thought at first, but IMHO, it's not bad at all ... As I mentioned in the thread of the GB, I had problems with the choice of what the kit would look like, first, U.S. Army of choice of Italeri, then U.S. Winter Camo, and finally something with a British accent ... more or less with the resources that were available ... What to say about the tracks, the ones that the kit brought, when they were already fixed and painted, ended up collapsing ... damn ...fortunately, I had the others from the same kit that I did about 1 century ago (I really did them in the last century ... lol ), and interestingly they had better quality than the most recent ... "Twilight Zone ....". If you have interest, you can see in the RFI section, a thread with all the photos of the finished kit (here I leave a link to see it), and another for the WIP section (although there is not much to see this time, sorry). Thanks for watch, cheers mates6 points
-
Blimey you lot, you get left alone for five minutes....erm (eight months) and utter mayhem breaks loose. Had a nice chips and chicken and mushroom pie from my local chippy the other day and the nearby off license does reasonably cheap booze, a selection for all tastes; but as I'm doing the building, someone's gonna have to volunteer for the chippy run. Interesting Benedikt, I confess I am much a fan of "proper" cider. That's the stuff made from real apples, not the weak imitation over-fizzy stuff loaded with synthesised ethanol and apple extract. Anyroad I offer the English custom of harvesting cider, known as Wassail or Wassailing. An old English custom of blessing apple trees to ensure a good harvest. Of course lots of drinking went on, and urm due to its probable pagan origins and relationship with fertility and harvesting, other more fruitful activities...urm I think you know what I mean. Here is a modern take on a traditional Wassailing song: Oh erm yeh where wuz I? I'm a bit like an old Ford Cortina with a dodgy choke that's a right pain to start in the winter. So it's a very brief update for to ease me back into the swing. Oh I remember now, orrid seams and sanding. Well I’ve made a start on the sanding, but first up I need to fix this orrible gappy ridge: I could leave it but it was bugging me so I decided to fix it by making a little shim of from plastic to build up the ridge. I’ve finally got round to using the profile gauge. This has been glued in place. I should then be able to sand it back to look much better than had I left it. I’ll be back much much sooner this time. Now off to cook myself a goose egg omelette. In the meantime as Spring looks to be finally here and you all will be thinking of holidays and Easter breaks, so be careful! Here's a public information film for you to watch during the interval.6 points
-
Thanks very much gents Ced, yes the Mr Metal Iron is very impressive - I used it on the Emily builds too I got the propeller unit painted and assembled: I sprayed the propeller tips yellow and masked them before spraying the Propeller Brown (if I recall correctly the actual Japanese name for this paint was 'Tea Colour' which sort of puts me off trying Japanese tea). Hasegawa do provide transfers for the yellow strip but I always prefer not to use transfers on the propellers if I can avoid it. I also fitted the clear parts, primed the aircraft with Tyre Black and sprayed the yellow for the fuselage band and the leading edge ID markings: I had to do a fair bit of sanding of the canopy centre section to get everything to fit, not sure if I made some gaffe in assembly as I haven't heard mention of any issues in other people's builds. Next I'll have to mask off the ID markings and I can start painting the undersides... Cheers, Stew6 points
-
Morning Lads and Gals: I`ve finally finished something... Mirage Pantera, 1/72 from High Planes Models, painted with Akan and Vallejo. RBF eduard, Griffing bombs AMK, Python 3 Trumpeter, ladder and chocks L`arsenal. The High Plane Models Mirage IIIE family is extraordinary... there is so much Mirage in each box that the hardest part is to choose what to build. I have build both Panteras, single and two seater and they are both superb. High quality and accurate resins, quality decals, PE set, withe metal bits... and the best thing is that you find all the bits for the other variants in each box, so many options... I`ll leave you few pictures here, I hope you like it Regards Adrian5 points
-
I reviewed this puppy a couple of days ago here thanks to @dora(of the Wings variety, not the explorer), and wanted to have a go at putting it together, as with it being a short(ish) run type of moulding, it would be useful to our members to see how it goes together. This type of moulding needs a little more care in construction than your average big-box, stack-em-high type of kit, and preparation of parts is bound to take longer, with test-fitting and fettling an essential part of the model building process. We know all that of course, but it bears repeating just in case some of us aren't familiar with the term I started with the cockpit as per instructions, and have built up a number of assemblies, scraping seams on all the parts, which transforms them and makes construction much easier. There's a shade of mould-slip on a few parts, but nothing too difficult to sort out with just a soupçon of modelling skill and patience. The nose gear bay builds up under the cockpit, so that was done too, as they'll both be interior green, as will the main gear bays etc. Those have just come out of the ultrasonic bath to remove any lingering mould release, which is more likely on short-run kits. Apologies to those that I'm teaching to suck eggs, but not everyone's familiar Anyhoo, while those bits are drying off so I can photograph them, I thought I'd show you a little off-piste non-OOB modelling I've been doing on the leading edge landing light in the port wing. There's a clear part included in the kit, but I wasn't too happy with it, so initially I cut and shaped a piece of 4mm clear acrylic sheet with a view to drilling a shallow hole to represent the light. After a bit of retrospective research on what it actually looked like, I realised the lamp is large and mounted on a flat bulkhead in a square sided enclosure. Back to the drawing board. Version 3 involved squaring off the curved edges of the aperture, building up a little 3-sided box with a recess for a 3mm self-adhesive cabochon (a what?) that's often used in dress-making for rhinestones and sparkly bits, but also looks very like a scale light that some companies sell to modellers at inflated prices I bought a few sheets off eBay in various sizes for a couple of quid for a few hundred of the little blighters. Money-saving tip of the day I also drilled a few holes in the side walls, just like the real thing. That's about the only deviation I'm planning apart from any losses or breakages, which I'll come to later! That's where we're at right now, and that little assembly will be painted up after being glued into the closed up wing (post painting of the wheel bays & their insertion). The cabochons in the foreground will be glued into the recess you can see, as I don't want to rely on the adhesive, in case it falls off later on and rattles around. I was tossing around the idea of using a clear piece of acetate or @woody37's idea of using a piece of sellotape, but as I've got to make good the curved edge, I'll use the acetate block and mask the shape of the outer cover so it looks proper. That would be tricky with tape, and could look a bit of a mess. The cockpit went together ok, apart from the control column pinging out of my tweezers, hitting my shoulder and totally disappearing. I've nabbed one from an Eduard P-39, and will cross that bridge when/if I come to it later I also lost the handle on a lever on the right of the cockpit floor, so I made up a new one from a piece of rod that I sanded to a handle-shape & glued on. I think the nose gear bay sides need a bit of fettling before I close up the fuselage, as they're holding it a little wide, and contributing to a fit issue I've discovered/made for myself on the wing root. I'll talk more about that later on when I've glued the fuselage and wings into their separate assemblies. You might remember that the intake on the spine of the aircraft was an insert, but beware - there are two in the box! Guess how I found out? Yep - fettled and glued the wrong one in! I pulled it off the next day and glued the correct one into each half of the fuselage, and for avoidance of doubt it's the one with the hole in the rear face that you put a bit of mesh over. That's fitted fairly well after a bit of fettling, and I will smooth it out properly during the fuselage closing process. The main gear bays fit inside the wings with a bit of sanding down of the mould edge flairs, but I wanted to be absolutely certain they weren't going to baulk the closure of the wings later on, so I scribbled on their backs with marker pen, then dry assembled the wings. Where the marker had transferred to the top wing I scraped off a bit of styrene with the side of a curved blade until fit was nice and loose. It's more of a precaution than anything, as I hate having to adjust parts after I've spent ages painting them. While I was test fitting the fuselage halves together, I decided to test-fit the nose insert, which has the two cannon ports in the top. Fit straight off the sprue was pretty bad in fairness, but was a bit better once I'd removed any moulding artifacts and flash. It's still going to need a blob of filler here and there, but it's far from unbuildable! I'll get that squared away once the fuselage is glued together, while I work on that wing root. I'm not 100% sure what's going on there, but once the parts aren't slopping around due to being taped together, I'll be able to get a better handle on it and formulate some sort of plan for dealing with it. Happy days! I'll take a few snaps of the cockpit, wheel bays & such once they're dry.5 points
-
M4A1 SHERMAN 1/35 ITALERI Hi Pals, here is the Sherman for the occasion, finally finished, not exactly as I thought at first, but IMHO, it's not bad at all .... As I mentioned in the thread of the GB, I had problems with the choice of what the kit would look like, first, U.S. Army of choice of Italeri, then U.S. Winter Camo, and finally something with a British accent ... more or less with the resources that were available ... What to say about the tracks, the ones that the kit brought, when they were already fixed and painted, ended up collapsing ... damn ... fortunately, I had the others from the same kit that I did about 1 century ago (I really did them in the last century ... lol), and interestingly they had better quality than the most recent ... "Twilight Zone ....". Some shots in detail... Some shots closer... Thanks for watch and comment as always, cheers mates5 points
-
Hello ! Here is my version of the Sherman E8 from the film "FURY". Kit: Italeri 1/35 M4A3E8 Sherman Figures: Bravo 6 US Army Tank Crew. Display base: Home made with materials from Eduard, Treemendous, Mini-Art and Noch.5 points
-
All finished. This is a great kit, thoroughly recommended. Everything went together really well, with only the nosecone that needed a bit of fiddling to get a good fit. Aftermarket used is Eduard PE cockpit set & canopy mask, and a NeOmega resin seat.Painted with Vallejo Metal Colours (cockpit was Hataka Blue Line), and weathered with AK Interactive pigments. Ian G-2 by ian gaskell, on Flickr Ian G-2 by ian gaskell, on Flickr Ian G-2 by ian gaskell, on Flickr Ian G-2 by ian gaskell, on Flickr Ian G-2 by ian gaskell, on Flickr Ian G-2 by ian gaskell, on Flickr Ian G-2 by ian gaskell, on Flickr Ian G-2 by ian gaskell, on Flickr Ian G-2 by ian gaskell, on Flickr Ian G-2 by ian gaskell, on FlickrIan G-2 by ian gaskell, on Flickr5 points
-
1st Bttn. Grenadier Guards. Motor Bttn of The Guards Armoured Div. NW Europe. Joy to build, but think the driver sits too low... My wife straight away was critical of the tarpaulin, but only placed on so can replace or rectify. All comments welcome..5 points
-
Eduard Lightning F1 Thanks for looking Sweaty5 points
-
I'm glad that this model was a success. And I plan to re-scale it in the near future on the 72nd scale and in the 144th.5 points
-
So my airbrush dramas continue to increase, as it would appear PTFE tape forces the needle into the cap and has bent it slightly. Because of this, last night's efforts to spray the white stripes were a disaster. My anger levels as it spluttered and spat white paint (literally everywhere) were so high that I had to stop for my own physical and mental health 😤😤😡😵. While I calmed down I watched some footage of people straightening their needles, and this morning did just that. So with the Hurricane masked I mixed my white and began to spray. This time there was no spitting or spluttering, therefore I'm guessing I fixed the bend. Obviously because of the tape I still have to adjust the cap to ensure air is flowing through, but that said I am happy with my work so far.5 points
-
Hawker Hurricane Mk. 1B 880 NAS, HMS Indomitable May 1942, and with the Yellow fin now at the Shuttleworth Collection in Bedfordshire. 1/48 Airfix Sea Hurricane, from the box with added seat belts, head rest and oil collector. Paint from Mr Color, kit decals modified and serial number home printed. Probably the first of many iterations of the New Airfix kit to appear here but well deserved as its a great kit. Parked Up at RNAS Ford prior to departure. Underside with suitable oil leaks! Build Thread here Colins Hurricane Thanks Again to Enzo for another Great Group build Colin5 points
-
At this time of the year the Blackbirds are singing their courting songs ( I can hear them now ) and that always makes me smile. John5 points
-
It had PSP under the grass. Landed 3 Vulcans there and a Comet 2 (C.2) As far as I know all the Hunters were roaded in on Queen Marys. The Sea Hawks ,Sea Vixens, Lightning were. Quite a few Hunters went back in to service with the Jordanians and Swiss Airforce in 1971/72. We also had a Twin Pioneer, Argosy T2, JPs by the bucket, Piston Provosts for elementary airframe Instruction and Marshalling. Hunter, Sea Hawks for Advanced Airframe. JPs and Canberras down the airfield. That's for 70-72. They added a couple of Sea Vixens too but were deemed too complicated for training. For Choppers we had a couple of Whirlwinds. That Twin Pin was huge (compared to what I expected it to be!) Had to do something on it but can't remember what ! The Leckies had an ex Reds Gnat to wreck .5 points
-
Thanks folks again for the comments. This is likely to be my last update in this thread before I head off on me travels yet again, however, it is a sort of milestone update - the IP is finished! Not yet fitted, but finished. As I left you the last time I was working on these four little emergency lamps which adorn the coaming/IP panel. Yup, they were a right pain in the atrium, but they were eventually beaten into submission. But before they could get fitted I had to assemble the instrument panel gauges and front plate. GS Hypo was brought into play again as it gave me time to maneuver the panels into alignment. Then you just have to hope and prey that things don't creep as you leave them to the mercy of the clamps The coaming panel was next. Mire lamps/indicators of some description were added along with some small scrap off-cuts - The underside of that coaming panel always seems to be a breeding ground for all sorts of little junctions and terminals. A length of lead wire was brought into play to represent some wiring. Then the two were brought together.... The greeblies on the underside of the coaming panel were worth the effort as I think they add another dimension to the whole assembly and stop it form looking too model like. I also added a box on the right hand side - this is for the SACRU indicator lights. A drop of clear blue and clear red were placed directly on top of the black. - It adds just a hint of the right color and is not too bright. They would only be illuminated when the SACRU was in use. After all that I had to see what it looked like in situ... and the view from outside.. Very pleased with the outcome so far, but I know I have no doubt created problems for myself further down the line when it comes to fit the windscreen/canopy, but I'll deal with that when it slaps me in the face and not before. until next time...5 points
-
I'm also not sure about the spinner. Here's the kit one: Here's one from a KP Spitfire V: Opinions welcome.5 points
-
While waiting for the Colourcoats RAF Interior Green to dry, I've been considering the wheels and exhausts and decided that I'm none too keen on either. Here's the real thing: I think these wheels, from the recent Airfix Hurricane, will be okay and these AZ Spitfire exhausts are better (although they'll need adapting because they're a little longer than the Vista ones) Any opinions would be welcome.5 points


-1-1MINIATURA.thumb.jpg.bd7a7e672869500d45ee6e80478f6f25.jpg)


This leaderboard is set to London/GMT+01:00