
Leaderboard


Popular Content
Showing content with the highest reputation on 13/03/18 in all areas
-
Grumman TBF-1C Avenger Battle of the Atlantic USS Block Island - May 1944 Here is the my final hang-over from last year which I had started for the Radial Engines Rock GB and failed to complete in time. This the 1/48 Accurate Miniatures Kit built straight from the box, and represents one of 12 Avengers flying anti-submarine duties from USS Block Island in May 1944. Aircraft from VC-55 were involved in attacks on U-Boats on May 3, 1944. Task Group 21.11 continued to harass these submarines and eventually sank U-66 on May 6. USS Block Island herself was sunk on May 20, 1944 when all of these aircraft were lost. Though these aircraft operated in harsh conditions they were maintained in top condition, which was all the excuse that I needed not to weather the model - although I would expect there to be some exhaust staining and oil leaks from that big radial, maybe later. I tried to mottle the topcoats by allowing the primer coats to show through in places, this effect shows up more on the grey but it is not quite as successful on the white. I'll try a different approach when I attempt it again. Paints Used Xtracolor X131 Dark Gull Grey Colourcoats ACUS09 Interior Green ACUS30 Bronze Green ACUS37 Insignia White Citadel Acrylics Various by John L, on Flickr by John L, on Flickr by John L, on Flickr by John L, on Flickr by John L, on Flickr by John L, on Flickr by John L, on Flickr Cheers34 points
-
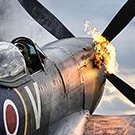
This is my latest and i'm glad to get it off my work bench as it has been a trial throughout it's build. This is the D Day special PR Mk XVI which originally was going to be finished as a B MkXVI with open bulged bombay and 4000 Lb cookie. Unfortunately the build went wrong almost from the start. Fit of parts especially the newer sprues was dreadful. Transparencies were a terrible fit and sometimes so thick to be unusable or were short shot distorted. At one point this model was definitely the filler queen! In the end I unsuccessfully tried to get replacement parts from Airfix but the model is long out of production so it was either going to take a final flight to the skip or become an Oboe equipped Mk IX with the nose transparencies painted over. The model represents LR508 an oboe equipped Mk IX of 105 squadron as recorded by MJF Bowyer ( Bombing Colours) in March 1944. It seems this aircraft went backwards and forwards between 105 and 109 until finally lost in an accident in April 1945. Hopefully a new tool two stage version will be coming soon? Mike32 points
-
Hi folks Tamiya's Il-2, the ultimate mojo restorer. Regards J A26 points
-
Proposed by Arado company in response to the Amerika Bomber project, that would capable of striking America from Germany. It has never been built, but looks futuristic and evil at the same time. The cockpit is well detailed, it is a shame that almost can't see after glued the fuselage. Thanks for your watch. I pressed enter by accident and submit article just after insert the first photo, this is so dumb.( º﹃º )24 points
-
I started the Academy B-19 about 20 years ago as a KB-19 tanker, and then about 15 or more years ago decided to use my Cutting Edge Modelworks Kong Jiang-1 Chinese AWACS conversion: I didn't do much to it until mid-2016 when I picked it up again, and then put it to one side until the past few weeks. It's rough and ready, but at least it's now done.20 points
-
Hi, Here is my interpretation of Wellington Mk.III HF670 'U' from 142 Squadron flying from Blida airfield during early 1943. The Trumpeter kit is an absolute joy to work with and the only criticism I can think of is that the wheels look too skinny. The decals are from the generic Xtradecal dull red and my reference was 'Wellington Squadrons in Focus' by Freer and Parry. I hope you like it, Russ18 points
-
De Havilland DH.104 Sea Devon C Mk.20 - 718 Sqn Fleet Air Arm - Amodel 1/72 My attempt to build at least one of everything in Ray Sturtivant's Aircraft of the Fleet Air Arm takes another step forward with this relatively obscure aircraft. The RN's Sea Devons were ex-civil machines used as VIP and light transport aircraft, based out of RNAS Culdrose in Cornwall. Definitely a short run kit, this one is very nicely formed, but needs a little care in building. The cabin windows caused me a lot of angst, but it was worth it. FredT16 points
-
More from the 64th Fighter Weapons Squadron at Nellis. S/n 74-1511, April 1981. 74-1514, April 1981. New Ghost 2 scheme. 74-1515, April 1981. Old Ghost scheme. 74-1519, April 1981. Old Ghost scheme. 74-1519, July 1984. New Ghost 1 scheme. 74-1528, April 1981. Old Lizard scheme. 74-1528, November 1981. Grey 1 scheme. 74-1531, February 1981. Grape scheme. 74-1537, May 1981. Grey 2 scheme. 74-1537, February 1984. Looks like a variation of the old Blue scheme? 74-1539, February 1981. It's grey - I don't know which one it's supposed to be! 74-1540, October 1981. Old Ghost scheme. 74-1541, April 1981. Old Ghost scheme. Thanks for looking, Sven15 points
-
YES! What the hell is up with that? It drives me crazy. I've been taking the train to school or work for 21 years now, and one of my absolute priorities is being on time. As far as I can tell, Mrs P doesn't like being on time anywhere near as much as she enjoys freaking out about NOT being on time while exacerbating the situation. But my new favourite is "Can you hold the baby? I need to shower." Then she goes and feeds her birds, eats a popsicle, and facebooks. Then, after a geological era passes, a shower that lasts a thousand years. I don't mind holding the baby*, but come on now. *Yes I do.14 points
-
Hello Everyone, This is my latest completed model of the Hellcat Mk.I in Royal Navy colours in 48th scale by Eduard. This is also my first submission on the RFI forum so I hope you like it.13 points
-
"Report back........not bring it back!!" M4A1 vignette This was my project for the M3/M4 Sherman, Single Type Group Build down in the Group Build Section. On 9th June 1944 M4A1 Sherman Tank 'Goldie' was part of the 66th Armoured Regiment that landed at Normandy. During the landing it was fitted with wading gear but this was removed shortly after it arrived. A week after arriving the 66th was part of the 2nd Armoured Regiment and took part in the 'Battle of Bloody Gulch' which took place near Carentan. The German forces in the battle were made up from the 17th SS Panzergrenadier Division and 6th Fallschirmjäger Regiment. American forces consisted of the 501st, 502nd and 506th, Parachute Infantry Regiments of the U.S. 101st Airborne Division, reinforced by the U.S. 2nd Armored Division of which 'Goldie' was a part. The German forces were decisively defeated during the battle and the American victory led to the linkup of forces from Utah and Omaha beaches, creating a secure lodgement area for further American operations. The headquarters of the German forces during the battle was a manor house in the area and the American soldiers nicknamed the road running past the manor "Bloody Gulch" after a place mentioned in a popular western movie. I have modelled my version on how 'Goldie' may have looked travelling across the countryside on it's way towards Carentan. The Vignette - One of the things that bugged me while I was making this project was that the tank commander figure seemed to be smiling - it just didn't seem to fit with the idea I originally had. So I tried to think of things that might have made him smile on the way to battle over the fields near Carentan. I have made scenes before where I have used road signs to indicate the location and then it dawned on me I could make the scene as if one of the crew had been sent to check out what the road sign on the other side of the fence said - but, rather than reading it and reporting back, he's broken it off and is carrying it back. In my head the crew member next to the Sherman is saying "He said report back...not bring it back!!...." .....anyway........ Kit: 1/35 Eduard/Tasca Paints: Humbrol, Revell, Citadel and Railmatch Acrylics all applied by brush. Extras: Tank figures set from Dragon , stowage items from AFV CLUB, Tamiya and Dragon, plus Towing Cable wire kindly supplied by @modelling minion Base: MDF, filler, Woodlands Scenics mixed turf and various tufts from Army Painter. The fencing was made from wooden coffee stirrers and the signs are from Matho Models. The puddles were made from layers of Humbrol Enamel Gloss Varnish. WIP: Here More photos of just the Sherman and base, without the background, can be found here: in the RFI section These photos below were taken on my Spitfire display base which has a sky backboard: A couple of the above in black & white: ...and finally a photo of the base before the Sherman and figures were added: This was a thoroughly enjoyable project made in a great GB. It was the first all Armour GB on Britmodeller and the hosts @Sgt.Squarehead and @Ozzy were very attentive and supportive. Thanks must also go to everyone who took the time to comment or offer advice in my thread. Kind regards, Stix11 points
-
11 points
-
#7+8/2018 Would have waited for one of the big halftracks to be released but none in sight. So my dad used the new Tamiya Hanomag tractor as a towing vehicle for the Italeri Flak 37. Both models built OOB, painted with Gunze and Tamiya acrylics. Build thread here DSC_0001 by Reinhard Spreitzhofer, auf Flickr DSC_0002 by Reinhard Spreitzhofer, auf Flickr DSC_0003 by Reinhard Spreitzhofer, auf Flickr DSC_0004 by Reinhard Spreitzhofer, auf Flickr DSC_0005 by Reinhard Spreitzhofer, auf Flickr DSC_0006 by Reinhard Spreitzhofer, auf Flickr DSC_0008 by Reinhard Spreitzhofer, auf Flickr DSC_0009 by Reinhard Spreitzhofer, auf Flickr DSC_0010 by Reinhard Spreitzhofer, auf Flickr DSC_0011 by Reinhard Spreitzhofer, auf Flickr DSC_0012 by Reinhard Spreitzhofer, auf Flickr DSC_0016 by Reinhard Spreitzhofer, auf Flickr DSC_0017 by Reinhard Spreitzhofer, auf Flickr DSC_0018 by Reinhard Spreitzhofer, auf Flickr DSC_0019 by Reinhard Spreitzhofer, auf Flickr DSC_0020 by Reinhard Spreitzhofer, auf Flickr DSC_0022 by Reinhard Spreitzhofer, auf Flickr DSC_0023 by Reinhard Spreitzhofer, auf Flickr10 points
-
With Italeri releasing the new Chinook boxing with the correct RAF bits and my son buying me one for my birthday I decided to finish the 47D I had stated with the Eduard resin and etch set to HC.2 standard using some of the specific antenna and other bits from the new kit (it will probably be finished as a CH-47F using the decals in the kit). It has been finished using CJ Aerosols NATO green with various panels picked out in the same colour by Hataka, decals are from the Model Alliance set finishing it as "Bravo November" IMG_4842 by Tony Osborne, on Flickr IMG_4840 by Tony Osborne, on Flickr IMG_4837 by Tony Osborne, on Flickr IMG_4836 by Tony Osborne, on Flickr IMG_4835 by Tony Osborne, on Flickr10 points
-
This is one I've been building for a chap who asked if my local model club could build him some aeroplanes he flew in as a teenager back at the end of the 1950s and early 1960s. I volunteered for the task. He'd already bought the kits so I had to make use of the models he provided.As you can see, the version of the Airfix Chipmunk he provided is a recent boxing and comes with markings for one of the Battle of Britain Memorial Flight examples. However, he wanted his to be specific to the one in which he flew, WK621, so I had to cobble together the markings using an aftermarket RAF roundel set and a laser printer.The kit is festooned with unrealistic and far too prominent rivets so these were all sanded away. Other than that, the kit is essentially out of the box.The real Chipmunk still survives in airworthy condition and is now flying in New Zealand.9 points
-
Thanks Ian - I have (eventually) learned my lesson, gloss before transfers! Thanks Rob - weird innit how we get trained for these things. I would guess your right handed mouse action was due to 'enforced' positioning of the mouse when you trained? Just for Bill, Daco strong applied to the roundels last night: Daco Strong rules OK by Ced Bufton, on Flickr Great stuff. Mojo required for Hawk transfers, hopefully later.9 points
-
Oh, those cards are gone. I just hope whoever found them was poorer than me, so that no, you know what, I don't care. I hope they get eaten alive by wild boars. Or whatever aggressive wildlife is convenient. Coyotes?9 points
-
Ok, Operation Gap Filling completed, mission accomplished (I think ) As anticipated, I used some 0.2mm styrene strips to fill in the bigger gaps, gluing it in with Tamiya Green Cap The strip used in the nose area was previously tapered using my scraping gizmo, to fit the "triangular" gap The remaining gaps were filled in with CA+talc mix; after much scraping, sanding, filing and polishing (using almost all the tools I have for the job: ETS, scraping gizmo, sanding block, diamond files, regular sand paper various grades and a nail polishing stick) here's the end result: no more gap starboard nor ridge same on bottom side and port side Now I just need to reinstate some panel lines that went lost in the process - albeit comparatively very few, considering the amount of plastic and filler I had to remove ... All comments welcome Ciao8 points
-
Finished up my Tamiya Dora. Fantastic little kit! I added Eduard seatbelts, metal tubing for cannons, Eagle Cal decals and used MRP paint. I liked this scheme as I wanted to do something colorful that wasn't from JV44. Also included a couple pix of my FW-190 family. Thanks for looking!8 points
-
Hi all, I have pleasure (with a liberal admixture of trepidation) in revealing this my next little project... Well I'd heard about the reputation of aModel kits for being a bit 'challenging'... The first sprue, comprising wings, tail etc: not too bad - not massively blessed with detail, a bit of flash, but it's a short run production so no great surprises there: Second sprue, comprising fuselage halves, pulpit halves, a few as yet unidentified blobs: hmmm: Third sprue, comprising... well, not entirely sure! There's the wheels, I think there's also something there vaguely reminiscent of a rotary engine block, and I'm sure one of those blobs is the prop: And finally, a clear sprue: what the... Decals? You can have any configuration you like as long as it's IRAS: At least the instructions are clear... oh, wait: So, lots of fun in store... I just haven't worked out who for, yet! Wish me luck - or just laugh insanely like I did!7 points
-
So guys it's done, my first 72nd aircraft since my teen years and the first build for over a year. Its the Airfix HAR3 converted into a RN HU5, paints are almost all MRP and I'm well and truly converted to these now. I think I've put a bit to much of a bend the Perspex rod but I quite like the angle it's at Not a bad effort for an Ex Pongo who builds AFV's Enjoy the pictures, I'll try and get more done with a better background tomorrow. Cheers for looking and commenting on the build guys It all started here http://www.britmodeller.com/forums/index.php?/topic/235023572-westland-sea-king-hu5/& Ta all Dan7 points
-
Afternoon all. So here's the Sea Fury from Aunty Airfix. A few problems fixed - like the short shot fin, daft rivets, the lack of gunsight, the solid underwing lamp apertures, fuselage foot step opened up and the headrest. But apart from some tape seat belts its "straight from the box". Decals a mix of kit and old Aeromaster to give an Aussie Sea Fury. Paints are Gunze and Tamiya acrylics for the main scheme and a 'Heinz 57' of acrylics for the details. It's a great kit, fits really well in the main and totally looks the part when done. My second is destined for a PAF scheme. All comments welcome as ever. Cheers Jonners7 points
-
Hello mates, This is the shiny second light conversion of the KP Model . Built 1995. I made the NMF with rub´n buff and Mr. Metalizer. Derived from J-6 alias MiG-19S . 3171 defected to Taiwan. Featured in one of my Koku Fan Magazines. Camera compartment and decals from scratch. Last picture is old on film. I hope you like it! Cheers, Thomas7 points
-
I managed to finish a litte dio after a long time, a G-91R/3 Luftwaffe LeKG 43 in 1969. The Meng model is not without problems, the main one is the shape of the characteristic "nose", more other things here and there. Also the model had the small tanks supplied, I replaced them with a bit of cad work and printed with my 3d printer, these are the convenience when you do this job. The decals supplied with the kit unfortunately proved bad, at least those in my box, having no other valid available I had to use the very old ones Modeldecal from the 80s, although slightly off-register and bad appearance it worked well with microsol.7 points
-
Very well James, I saw your topic and I think you did a great job!!! If I may suggest something, I 'd confirm what Bill said about moving the topic to th Walkaround section. Now back to my build.Last night I arrived to Dallas and here's a proof of it! This guy must have been back from a Rodeo, he had proper sponsorised Jacket and bag, and his hat was dirt with soil!!! I didn't dare using the flash , so ... just be happy with his shape! This morning I startd from here. As I felt nearly ready to glue the fuselage halves together, I decided to concentrare on th tail lower section, before i forget!!! I cut this door off and shaped it. Tonight I may concentrate on a bit of detail inside it. Next I drilled some hole along the mark of the tail stand and cut it through. The shape isn't quite right, so I'll have to work on it, but at least this will remindme I'm not ready to glue the fuselage halves together yet!!! Now some more research, Looking at Bill's topic, my attention got to the bomb bay, which I have always considered to be shut on my model. I'm not actually sure about the load configuration. I may be opting for missiles, but I haven't got any, or a Buddy buddy tank configuation. In both cases there's no reason for the bomb bay to be open. What other configuration could be realistic for an open bomb bay? I may consider also a loading tam and chart, but I haven't got a clue for a realistic scenario. Suggestions are very welcome!!! Ciao Massimo7 points
-
Sorry, but there isn't I'm afraid. Worse than that, I'm currently in Dallas training for a new job (Embraer 145 type rating, then an instructor course) and will be here until at least early April, then I relocate to Abu Dhabi and will be in a hotel for about 3 months while my stuff is shipped over! Consequently I can't see me getting any more modeling time in for at least that long...... I'll pop in when I can to make a nuisance of myself though! Ian7 points
-
Thanks Massimo - one of each is enough for me! Thanks Giorgio Thanks Bill Er, don't understand your banter there old boy... what? Thanks John - I hope I do as well on the other side Thanks Rob Last visit to the surgeon this morning so (good news) no more ripping of the dressings but (bad news) no more free tools. Still a bit sore but definitely on the mend, at last! Well enough to finish the transfers on the Gnat - have a look at the bottom! Getting those serials not quite in line was a pain but that's what it says on the box! I guess you want me to do another gloss coat now eh? Spray with thinned Klear or with Aqua Gloss do you think?7 points
-
M4A1 Sherman - “Goldie” 3rd Battalion, 66th Armoured Regiment, 2nd Armoured Regiment Normandy 1944 This was my project for the M3/M4 Sherman, Single Type Group Build down in the Group Build Section. On 9th June 1944 M4A1 Sherman Tank 'Goldie' was part of the 66th Armoured Regiment that landed at Normandy. During the landing it was fitted with wading gear but this was removed shortly after it arrived. A week after arriving the 66th was part of the 2nd Armoured Regiment and took part in the 'Battle of Bloody Gulch' which took place near Carentan. The German forces in the battle were made up from the 17th SS Panzergrenadier Division and 6th Fallschirmjäger Regiment. American forces consisted of the 501st, 502nd and 506th, Parachute Infantry Regiments of the U.S. 101st Airborne Division, reinforced by the U.S. 2nd Armored Division of which 'Goldie' was a part. The German forces were decisively defeated during the battle and the American victory led to the linkup of forces from Utah and Omaha beaches, creating a secure area for further American operations. The headquarters of the German forces during the battle was a manor house in the area and the American soldiers nicknamed the road running past the manor "Bloody Gulch" after a place mentioned in a popular western movie. I have modelled my version on how 'Goldie' may have looked travelling across the countryside on it's way towards Carentan. Kit: 1/35 Eduard/Tasca Paints: Humbrol, Revell, Citadel and Railmatch Acrylics all applied by brush Extras: Tank figures set from Dragon , stowage items from AFV CLUB, Tamiya and Dragon, plus Towing Cable wire kindly supplied by @modelling minion Base: MDF, filler, Woodlands Scenics mixed turf and various tufts from Army Painter. The fencing was made from wooden coffee stirrers and the signs are from Matho Models WIP: Here Vignette photos: Here Edit: The idea behind the scene: One of the things that bugged me while I was making this project was that the tank commander figure seemed to be smiling - it just didn't seem to fit with the idea I originally had. So I tried to think of things that might have made him smile on the way to battle over the fields near Carentan. I have made scenes before where I have used road signs to indicate the location and then it dawned on me I could make the scene as if one of the crew had been sent to check out what the road sign on the other side of the fence said - but, rather than reading it and reporting back, he's broken it off and is carrying it back. In my head the crew member next to the Sherman is saying "He said report back...not bring it back!!...." This was a thoroughly enjoyable project made in a great GB. It was the first all Armour GB on Britmodeller and the hosts @Sgt.Squarehead and @Ozzy were very attentive and supportive. Thanks must also go to everyone who took the time to comment or offer advice in my thread. Kind regards, Stix6 points
-
I'm calling this one done. It turned out pretty good I think, pretty happy with it. It is the venerable (old) Tamiya kit that I found on ebay just before Christmas, there is a WIP if you fancy it. It continued my happy theme of M113 variants and the IDF with their adaptions of the vehicle. The Keshet carries the 120mm mortar, I've built this with the ramp up, first of all for a change as I usually build them with the ramp down and having studied pictures of the mortar itself I realised I wasn't in the mood for scratch building it, this was more about the vehicle than the weapon. The kit itself went together very well with little clean up needed and the usual clear instructions. There is some Tamiya, Meng, Accurate Armour a little Italeri, some Bison decals and some bits and pieces from the spares box for flavour! As always it was brush painted using Humbrol enamels and finished with Winsor & Newton acrylic varnishes. I'm working on a simple base for it inside a Tamiya "C" case with a little Signomatic name plate. Some photos then; M106 - 1 by phil da greek, on Flickr The original Tamiya box, late 70's maybe. M106 - 16 by phil da greek, on Flickr M106 - 17 by phil da greek, on Flickr M106 - 18 by phil da greek, on Flickr M106 - 19 by phil da greek, on Flickr M106 - 20 by phil da greek, on Flickr M106 - 21 by phil da greek, on Flickr Thanks for looking in.6 points
-
Here is my take on ICM's very nice 1:72 scale kit of the I-5 (Early). The model was not difficult to build, but required the care often afforded to short-run kits. The fit was mediocre, especially around the cylinder housings, and the lower wing/fuselage bottom. The upper guns were difficult to fit, on account of the vague instructions. The struts were a bit flimsy, so I glued the whole thing together before painting it. The kit is finished as the personal airplane of Soviet Airforce Chief Yakov Alksnis. Alksnis; a Latvian, joined the fledgling Soviet airforce in the mid-1920s, and served initially, in an administrative role. In 1929 he received his wings and became a dedicated pilot and leader. He instilled in his officers, a keen attention to detail and alertness. He was chief of the Airforce until the 1937. Then he was rewarded for all his efforts with expulsion from the Party, accusations of setting up a "Latvian Fascist organization", and execution. I painted the model using Tamiya and Vallejo paints. The red is Tamiya Flat Red, sealed with MM Acrylic flat clear mixed 1:1 with Future/Klear. The prop was painted with Tamiya Flesh, streaked with brown artists oils, then sealed with Tamiya Clear Yellow. Everything else is Vallejo. I used EZ-Line elastic thread for the rigging. I used black thread and then painted it with a highly thinned coat of Vallejo Oily Steel. This was thinned with Liquitex Fluid Medium. Photos aren't the greatest, as I found it really difficult to color balance with the bright red. Please comment and let me know what you think.6 points
-
Hello, So here she is, nothing fancy I know. The most boring scheme ever, I know. The most boring aircraft of the Great War, I KNOW but still wanted to have one... Painted with Tamiya XF7 and artistic oils etc.6 points
-
Hi all, I believe I'm right in saying that there are a few Phantom lovers on this site? ;). Well, I've left the Thud behind for a short while and scanned a few shots taken during one of my trips around the Midwest in May 1982. The subject here is the F-4Cs of the 113rd Tactical Fighter Squadron, Indiana Air National Guard. They were based at Hulman Field, Terre Haute. Sadly the aquadron, now an "Intelligence" unit, is without aircraft. From the images below you can make out that the weather wasn't kind and therefore with Kodachrome 25 in the OM1d I struggled in the low light. Occasionally, though, the sun popped out and blessed us with a little brightness. Bright or dark, though, the subject was great and my mate and I were given free access to the active ramp. I hope you F-4 lovers like these: Apologies if I have posted any of these before. I'm losing track of what I have and what I haven't put in front this great audience. Martin6 points
-
I'm even further from my comfort zone than before, now I'm meddling with the cockpit. I copied the shape of the dashboard from the aircraft manual on plastic card: And then I formed heated plastic card on that part: Now on the instrument panel, and cleaned up a bit: The instrument panel on the cockpit floor. I might have been over-ambitious, 'cause I have to install a good quingigillion of dials and stuff on it... The seats are simply put on the floor. They're approximatively strictly identical, and far from finished. To be continued. Cheers, S.6 points
-
Thanks Rob, 'exhilarating' is one word for it! I have a few more... Thanks Giorgio I'll try that, thanks. Do you ever have one of those sessions when you approach the bench, prepare the tools and materials (including the Klear and brush!), cut the transfers into 'sides', being careful to put aside the tiny, tiny stencils and making sure you don't cut off any of the randomly placed identifying numbers: ... and then look closely at the instructions and think 'You want me to do WHAT!!!???' That's on top of Bill's warning about the shape of the door decals. My mojo vanished like a toy balloon being let go. Go on, do the noise, I did I almost wished I'd masked it now. Almost. Awaiting mojo return...6 points
-
Thank you all Before I go the better picture has arrived Looks to be the right size now Untreated other side Back a lot later, bye6 points
-
For better or worse, the hulls halves are married: Don't worry about my talk of mallets BTW, it is only that.....If I say I'm going to do something violent/destructive it's quite safe, when I mean it, I just act! PS - Based on what I'm seeing with the closed up hulls, the next six pieces of etch (two per model) will fit slightly worse than the last lot!6 points
-
Thanks Johnny Thanks Bill Ah, I thought you might mean the panel lines. They were sort of there after the MicroSol but not obvious enough. I've dobbed some Daco strong on them. Oh, I do have a new toy to help with drawing / tracing / messing about. One of these: My magic mouse rechargeable battery started playing up and these are only £10 more than a new magic mouse so I'm hoping it will help when drawing / tracing templates and masks. I just need to retrain my brain and muscles for pen rather than mouse. Old dog, new tricks.6 points
-
Hiya Folks, Rescued from the shelf of doom,...... I`ve finally finished this one as a Liberator GR.III from 160 Sqn based in Ceylon and India during 1944. Used mostly for long range Photo Reconnaissance, many of the units aircraft had the rear bomb bay doors modified with a pair of camera apertures, as seen on the model. These aircraft had British Boulton Paul rear turrets mounting 4 x .303in Brownings and I used the turret from the Pavla RAF Liberator conversion set. Also the gun window from the front left part of the nose was filled over and the pitots were re mounted on toe side of the nose...... but probably the hardest conversion was to try and replicate the waist gun positions by cutting up the kits waist gun covers, adding clear plastic for windows and framework behind from plastic rod,...... here is a partial WIP; The model received quite a few coats of white using a rattle can and then the Temperate Sea Scheme upper surfaces were brush painted using Polly Scale acrylic Dark Slate Grey and Humbrol enamel 123 Exta Dark Sea Grey. As some of the units Liberator`s had their rubber de icing boots overpainted with camouflage, which appears to be badly flaking away, I sought to replicate this on the model too,..... by applying Humbrol acrylic black and then sanding sections away. The model was given a brushed on coat of Polly Scale matt varnish followed by a iwatercolour wash, with exhaust staining using MiG pigment powders. Decals came from DK Decals RAF & Commonwealth Liberators sheet. Here is the model; DSCF2689 by Tony OToole, on Flickr DSCF2687 by Tony OToole, on Flickr DSCF2645 by Tony OToole, on Flickr DSCF2675 by Tony OToole, on Flickr DSCF2685 by Tony OToole, on Flickr DSCF2688 by Tony OToole, on Flickr DSCF2683 by Tony OToole, on Flickr DSCF2682 by Tony OToole, on Flickr DSCF2665 by Tony OToole, on Flickr DSCF2654 by Tony OToole, on Flickr DSCF2647 (2) by Tony OToole, on Flickr DSCF2645 by Tony OToole, on Flickr DSCF2632 by Tony OToole, on Flickr Cheers Tony5 points
-
Hi I attended Dunsfold Park today for the Brooklands Museum VC10 Open Day. 18 guests were allowed on board at a time and were given a briefing of the history of the airframe by volunteers, followed by a cockpit tour hosted by a former East African Airways Captain. Visitors were then permitted to explore the former passenger cabin, which still has the additional fuel tanks installed. A slow taxi run followed, using the full length of the Dunsfold runway, culminating with a couple of brakes-on high power engine runs. All in all, exceptional value for the £10 ticket! I do have some more detail shots, if anyone is interested. Thanks for looking.5 points
-
Hello there, My first publication goes for the recently finished Sophwith Camel, in 1/72th scale from Revell Models. I had added some Ammo Rigging (Uschi) for upgrade the detail... Thanks for watching! Ricardo5 points
-
Using the 1/48 Kinetic Dassault Mirage IIIE kit, this model depicts a Royal Australian Air Force Mirage IIIO. Decals came from Caracal. Andrew5 points
-
Hi Guys, Not much progress on this last week as work got in the way. I was in Vietnam all last week so no modelling time! Anyhow the Hurricane has suddenly leaped forwards over the last few days.. Final paint on over the weekend and a bit of shading plus the pre-made undercarriage tonight I painted the yellow leading edges rather than use the decals but I will use the decal for the red gun covers as this is more representative. Hook and 3 wheels on the bottom. Light panel highlights and shading added before the first coat of future. It still looks too clean! Hope to finish this in the next 2 weeks to start the 100 years RAF Group Build Spitfire. Colin5 points
-
Did this a few months ago, the 1/48 Hasegawa F-104J formed the basis of this build. The model depicts a Canadian Air Force CF-104 belonging to 441 Squadron, 1980. Decals were a mix of Belcher and Canuck. Andrew5 points
-
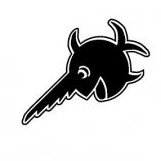
Kris and Sairou Your explanations make sense but it's still a strange looking animal. Kris, nothing too exotic on the paint job, probably a beat up Olive Drabish but not too dark to hide those rivets. Then again maybe a captured unit in German white wash with lots of mud and gunk. Haven't decided, there's still quite a bunch of fiddly little stuff to add and another track to build. Here is the wee little ferocious beastie as of this morning. One track in place, going to be fun to paint, actually I think I'll have to break it to get it off for painting. I'll leave the other side un-joined at the bottom, hindsight is 20/20. The superstructure roof is just sitting so there's a fair gap on the right side that will close up with some glue. The bogies are a bit finicky and they flop around for movable suspension but the tracks aren't indy links so that's sort of a waste and makes the solid track harder to install.5 points
-
Thanks Roger, getting there Thanks Giorgio, will do. I've just checked the directions on the bottle and it says 'do not thin' (OK) and 'DO NOT ALLOW TO DRY IN AIRBRUSH' (their capitals). What do I clean it out with please? This morning I thought 'Do I feel up to doing the stripes on the other side?'. I topped up the water in the drinking duck and watched that for a while to calm myself. Then I had a quick session with the Moody Useless Box to cheer my spirits. Check hand shake - acceptable. Off we go. The fin flash went on perfectly. Then on with the first long stripe, lining it up with the fin strip. Down, roll out excess, shifted, rats, lift and reposition. Repeat. THERE! Now align the front and RATS the back has shifted. At this point I should tell you I had used my usual 'wet with MicroSet before applying' method and I now know that it softens the transfers. If you wait too long and mess about too much then... I know one wants the 'Set to 'melt' the transfer so it settles once applied, but this is the first time I've torn one. Dammit. It took me ages to poke and prod with various instruments and get the best fix I could. It will need touching up. Needless to say I didn't apply the 'Set to the front ones, using plain water instead (maybe Klear next time, I'll have it ready) Now done, I need a lie down:5 points
-
I commend to you a little Australian horror movie called 'Razorback'. It involves wild boars. And it's comically bad. But the scary bits are genuinely scary. In its defence, it was made in the early 80s, when most movies were bad.5 points
-
I hope it helps you and yes intakes which comprises of mesh and a frame are soldered. Tried the super glue and found it a hit and miss to get it right Next up was to make the doors open on the drivers hatch Then added the mesh guards for the intakes then installed the 75 mm gun Then found a site on Facebook called "The Churchill Trust" and they are restoring a Mk 111 and Mk 1V Churchill and have loads of pictures so I see I have made a few mistakes and the Resicast engine was not correct so I have decided to make my own here is the start, so the fun begins Until next time, Regards Richard5 points
-
Thank you @stevehnz for your kind words, and @Gorby, and @Corsairfoxfouruncle for your reations. ______________________________________________________________________ Now that the giant squid alert was a false alarm, we can get back to the boat. Added a bow section, of sorts, to the cut-off stern (wider) end of the boat. Made a new plank bender which can handle medium to small curvatures. Since the hull is to be painted, I only used planking for holding the wood putty in place. Used scrap Masonite to build a two story cabin.5 points
-
...and here I go with my recently finished Corsair, from HobbyBoss. Really great model kit ( but some exaggeration in the rivets ) , and a great fit. Have added a PE set from Eduard, and some scratch for the cockpit and the tiny antennas from the nose. And for the heavy weathering I used oils. Really happy with this one Ricardo.4 points
-
Cheers Tom. On to replacing those panel lines and rivets. While sanding the dodgy aft section hull join line, I lost some of the panel lines and a couple of hundred rivets. I'd already scaled down said lines and rivets so they only needed subtly re-creating. I reformed the panel lines with filler between strips of masking tape. The rivets were created with tiny dabs of PVA glue applied with the point of a nail. The pics below tell the story. ^ Masking tape in place. ^ Filler applied. ^ Sand it down and remove the masking tape. Happy with. Onto the rivets. ^ The little dabs of PVA replicate the other scaled down rivets pretty well. Nail used and a blob of PVA on a piece of masking tape close to hand . I'm getting close to permanently fixing the decks in place so i need to fit the M4 nuts that will receive the display mounting screws. I simply epoxy the nuts in place along with a small piece of plywood for stability. More soon. Andy.4 points


.thumb.JPG.ca9d91d3c605f2ca36aeec8f5a1b648a.JPG)
This leaderboard is set to London/GMT+01:00