
Leaderboard


.thumb.jpg.d17ff607fc7e89ed057e63fcb6f2a888.jpg)
Popular Content
Showing content with the highest reputation on 06/03/18 in all areas
-
Hi mates, I've wanted a nice model of the TSR.2 in my collection for quite some time. I picked up one of the 1:72 scale Airfix kits (the one with the Stratos 4 Japanese sci-fi theme) and started collecting some aftermarket pieces. The kit, as moulded, is quite nice - but there were some areas that I felt could use some additional detail. Most of the aftermarket was from CMK, but I also used some photoetch from Eduard and a turned brass pitot from Master. As I found out, several of the CMK resin pieces could have used some aftermarket of their own, as I encountered some size and shape issues. I suspect this was due to shrinkage of the resin. Let me apologize in advance for the lousy photos. I had a devil of a time trying to get good shots of this model, and I think it was due to the overall white scheme. I tried direct and diffuse lighting, a couple of thousand different white balance/exposure compensation combinations...the list goes on. The photos here are the best ones I could get, but I'm not happy with them. Not only is overall white no fun to paint, it's no fun to photograph. No more overall white for me! I admit defeat. As usual, here is my executive summary: Project: Royal Air Force BAC TSR.2 Kits: Airfix TSR.2MS (kit number A08011) Scale: 1:72 (although the lady jockeys from the Japanese cartoon look smaller than this) Decals: From the kit, representing XR220, the ill-fated airframe that not only fell off its lorry, but was ready for its first flight on the day the programme was cancelled Resin: CMK sets 7131 Interior, 7132 Exterior, 7133 Control Surfaces, 7134 Undercarriage, and 7135 Armament (only used the bomb bay door actuators from this set); Odds & Ordnance revised fin with leading edge intake (thanks to a generous donation by a fellow Britmodeller) Photoetch: Some pieces from Eduard 73257 Vacuform: Canopy and windscreen that came with the CMK set - first time I cut out all the pieces without cocking it up! Metal: Master AM-72-102 Pitot Tube Paint: Testors 2143 RLM21 Semi-gloss White, 1180 Flat Steel; Gunze H335 Medium Sea Grey, H338 FS36495, H18, H11 Flat White, H12 Flat Black, H14 Orange, H21 Off-White, H77 Tyre Black, H89 Metallic Green, H91 Clear Yellow, H92 Clear Orange; Alclad ALC302 Grey Primer, 111 Magnesium, 112; Floquil F110015 Flat Finish Weathering: Not much, as the real aeroplane never flew and is setting in a museum. I applied a light grey wash (made from Gunze H338) to the panel lines, and toned that down with a mist of Testors 2143 RLM21 White Improvements/Corrections Accomplished with the help of the resin and photoetch sets: Lowered the main wing flaps Posed the taileron flaps Posed all four airbrakes open Posed the port avionics bay open Replaced intakes and posed auxiliary doors open Replaced the vertical fin to include leading edge intake Replaced all tyres and wheels for more detail Modified the kit's main gear struts to fix the splay angle issue Did a really bad job trying to replicate the main gear brake lines Replaced all gear/bomb bays and wheel wells for MUCH more detail Replaced kit windscreen and canopy with vacuform parts Gold coating on canopy windows made from a mix of Gunze Clear Yellow and Clear Orange Replaced cockpit and ejection seats with CMK sets Build thread: Linky So here are the lousy pictures: Some in-progress shots before the fin and canopies got in the way: I have to include this, as the metallic green tubes on the back of the seats can no longer be seen, and I thought they looked pretty cool. So here they are: Well, there she is. Unfortunately, I don't think she will fit in my display case unless I send some other models to long-term storage. Wait, I could get a bigger display case! Cheers, Bill50 points
-
Hi Everyone, At last I`ve finished my attempt at Eduards 1/48 MiG-21 and managed to get some pic`s whilst the weather cleared briefly. Built from the PFM Profipack boxing and finished to represent an aircraft of: 927th `Lam Son`, NVAF, piloted by Le Thanh Dao, 10th May 1972 Really well detailed kit that seemed to fight me right up until the end, too many almost microscopic parts for my liking which often pinged away into some other reality or were impossible to hold and file down..... ...and ended up being replaced with bits of wire and scraps of plastic. The Photo Etch, which I normally dread worked really well by comparison. The last thing that happened was the gunsight disappeared at some point after being glued to the windscreen frame right at the end of the build, so I had to cobble one together from bits and pieces....... ........then fit it after the screen and seat had been fitted. The scheme isn`t one of the kit options and is one that caught my eye in Ospreys MiG-21 Units of the Vietnam war book, Bort No`s came from the stash. Hope you enjoy, thanks for looking Cheers Russ21 points
-
Finished this one today. It´s the Hasegawa 1/48 kit with some modifications. The build is here: FW 190 A-8 WIP These are the finished pictures:19 points
-
Just finished - the excellent 1/72 scale T10-10 Flanker prototype from Modelsvit....... This really is the best yet from Modelsvit - crisp moulding with nice engraved panel detail, etched brass parts, self adhesive masks - a complete package. The anti-FOD guard on the nosewheel is realistically done - with a separate wheel and the guard in two halves - unlike the one-piece moulding on some Flanker kits. Spot the difference - first and latest Flankers - T10-10 and Su-35S........ More photos - build and finished model - here. WIP thread - here. Ken18 points
-
Hi, this is the old Monogram PBY-5A kit modified to be a CA-10 operated by the Brazilian Air Force (FAB) as cargo aircraft. This model is exposed at the TAM (today, LATAM) airlines museum, in São Carlos city, São Paulo, Brazil, along with several other models, including real airplanes (1:1). Some in-progress (low quality, sorry) images. Underwing holes filled with bits of plastic: Some interior, and openings for fuselage gun stations covered with plastic sheet. Covered and puttied opening on right fuselage. The left fuselage has a rectangular window (and a cargo door, closed - I scribed the contour only). Openings for nose turret and bombsight window also covered with plastic sheet. And the actual thing: Cheers!18 points
-
This is one of my older builds. I use kitchen foil for OMF. For me it look interesting.... I hope you like it. Thanks for watching...18 points
-
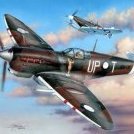
...Sometimes the world tries to knock it out of you...but I believe in Spitfire the way that some people believe in fairy tales... Sorry August Rush...I just had to correct you...Spitfire is one and only... This is Airfix 1/24 Spitfire Mk Vb...holy grail of my childhood and reason of huge row with parents ("You don't need it!"). I made this model about 10 years ago and I just had to do it again. This time with use of airbrush, Tamiya paints instead of Humbrols etc. I've used Master Hispano barrels and Eduard seat belts. And MIG oilbrushers, Tamiya paneliners and pigments and a lot of Evergreen styrene. Antenna is courtesy of my wife - she donated her own hair BTW , it's a what if. This is model of aircraft representing Zumbach's fighter , not a real one.So chipping is completely fictional I know that doors were lower when opened but I had a problem with hinge so I decided to leave it as it is. DSCN3965 by Arti Kapi, on Flickr DSCN3968 by Arti Kapi, on Flickr DSCN3969 by Arti Kapi, on Flickr DSCN3971 by Arti Kapi, on Flickr DSCN3972 by Arti Kapi, on Flickr DSCN3974 by Arti Kapi, on Flickr DSCN3975 by Arti Kapi, on Flickr DSCN3976 by Arti Kapi, on Flickr DSCN3978 by Arti Kapi, on Flickr Hope you'll like it16 points
-
This is the most recent Airfix Hawker Typhoon release in 1/72 scale. I think this is the first time since returning to the hobby about 5 years ago that I was able to achieve a worn paint look to my liking. The model was a joy to put together with terrific detail and very little seam filling required. The only seam work that was necessary were the wing roots. I elected not to fill these in because I was in a time crunch because I was trying a new paint technique for my dad, who was coming to my house to work on his monogram 1/48 typhoon the following weekend. The paint was Mr. Color, which I tried for the first time and fell in love with. I "black based" the aircraft (an technique I learned at doogsmodels) by primering the aircraft with Mr. Finishing surfacer black 1500, then marbling on Mr. color 309 (the equivalent to RAF dark green) with areas of 303 (FS3402) and 319 (light green) for the green part of the camouflage and marbling on 331 (Dark sea gray) lightened with a little 306 (FS36270) with areas of darker and lighter 331 (by adding white and black) for the gray parts of the camo. The bottom was marbled with 335 (Medium sea gray). I then went over most of the panel lines with 339 engine gray. I also marbled light gray on areas I expected to be sun weathered. When it came time to mist on the final colors, I used salt weathering: I wet the surface down with water and sprinkled on crushed up sea salt, dried it with a hair dryer on cool and misted the color on. I would then wash the salt off and repeat the process two more times. I masked the camouflage with bluetak and tamiya tape. I gloss coated the model with Alclad 2 Aqua Gloss 2 clear by hand brushing it on, then applied the decals using Mr. Mark Softener as a solvent. I did a pin-wash in selected panel lines. The engraved lines are deep enough that they really didn't need a pin wash, so I just did the ailerons, elevators and the lines running through the decals. I airbrushed decanted Dullcote on the model and used tamiya weathering pastels for exhaust and gun smoke stains. Final weathering consisted of painting paint chips on the wings and fuselage using testors chrome paint and the smallest paint brush I have. I collected a couple dozen photos of ground crew servicing the typhoon to use as reference for where to put the paint chips and how worn the aircraft got. I drybrushed the outer leading edges of the propeller blades with testors chrome paint and dotted on a few paint chips sparingly. This kit was very impressive for the cost and was a lot of fun to put together. My dad was impressed that it had more detail than his Monogram 1/48 typhoon! I highly recommend it.14 points
-
Hello modellers! Have completed another project - this time Matchbox venerable F-86A Sabre in 1/72. Actually the model was build in 1993 and since then suffered a lot of damage. There was glue on the canopy, the undercarriage was broken and the nose weight broke loose. Thought it would be a good idea to restore it and test some new ideas I had, mainly the overpainting of decals. Originally I only wanted to build a new undercarriage, do some paint touch-ups and then apply new national insignias but it turned out that the stripes on the wings were not applied symetrically in the past. So I oversprayed the whole model with Revell basic primer and sanded it as smooth as possible. As the primer dried very fast and the decals had a very good bond, it caused no problems. After several attempts to paint the stripes, I ended printing them on decal paper and apply them over a glossy white surface. Except for the national insignia, all other decals were custom printed, too. From the original undercarriage only the wheels were used. The struts were made from brass tube, nails, needles and plastic sprue. The kit comes without external fuel tanks. As I thought this looked a little boring, scratchbuilt my own gluing several layers of plastic sheet and then cutting and sanding, using the Fujimi/Hobbycraft Sabre´s tanks as references. Paints used were Humbrol polished aluminium and polished steel. The darker panels are painted with Alclad aluminium. Several coats of gauzy were applied to seal the decals. Thanks for watching Mario12 points
-
Hi folks! This is mas last completion, the really good Airfix Hurricane Mk.I in 1/72. Straight from the box. The only modification is that I vacuformed the sliding canopy. I hope you like it, althought I made several mistakes and it´s not my best kit. Best regards from Uruguay! Ignacio12 points
-
I had previously posted this model several years ago, but as I was using Photobucket to upload my images, they were unable to be seen, so as there is a forthcoming Welshmodels 1/72 kit on its way I thought I would share some of the photos on here again11 points
-
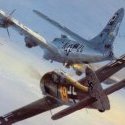
Has this been posted yet? Paul Allen has found Lady Lex. More aircraft pix on the Hyperscale thread. The F4F has four kill markings. But why does it have the Felix the Cat emblem? I don't recall VF-3 being on-board Lexington. Unless I'm wrong... Cheers, Bill11 points
-
greetings fellow modelers and what a fine day it is too. A day off work with a few hours downstairs and no-one else in the house.. except for the plumbers fitting a new water tank, and the lawnmower people delivering my mower after a service. The most expensive days modeling I've had for years... at least the water tank is done now so we can live without fear of the darn thing leaking again. It's been an action packed couple of evenings or to be more exact, and action filled evening and morning. Since the alchemists kit arrived I thought I had better get on with the instrument panel and fired up the CAD. The beauty of this (to me at least) was that since I am making the photo etch directly from this drawing, then using it for the instruments means that everything will be in exactly the right place. It took a bit longer than expected - first, finding decent photo's of actual instruments, then trying to replicate those in CAD. Slightly better resolution here and you can see how much work goes into each instrument - a bit time consuming. Then, since it was taking a lot longer than I anticipated, I thought I had better try a quick printout to see what I'm actually getting for my money.... hmnnnnn.... Not great if I am brutally honest. I tried printing them out on the same film I am using for the photo etch as it's been giving me really nice sharp prints. However, I think I am at the hairy limits of what home printing can do. I may persevere for a bit longer and see if there's any other tweaking I can do to get a better quality print. I'm not holding my breath though. Just as well I invested in some Airscale instrument decals... that I put in a safe place somewhere!. Anyways.. onwards and upwards as they say. I did get some fettling in today at long last. All in all I am quite pleased with todays efforts. First up are the cockpit seats which are fine as they come but are missing some features - see if you can guess what bits! Now that I look at this photo, the brackets seem a bit on the hefty side. Hopefully some primer will take some of the omilordy away from the seats and tone things down a bit. Next up was a bit more exciting. Collectives! Oh yes. Fly gave me this to work with - which was fine... except it was a bit bent and twisted, and had some monstrosity hanging off the side of the collective. It made me go and check my references again... nope... that's not in any photo's I have of collectives. Wossit supposed to be then? Well, I'm flummoxed - truly no idea. It's a bit of Fly's imagination, that's what it is. Flymagination. Well, let's start by copying the mounting block - that's nice and easy. Always good to start with something nice and easy. Simply cut to shape and drill a hole through it - all the while hoping that you got the angle right and the shape right or the collective could end up pointing skywards. Flippin' nora onna stick - no going back now is there? Calamity! Some time later with yet more hold-my-breath-while-I-drill-this-hole-here-and-hope-for-the-best shenanigans and with a couple of slices of tube thrown in for good measure and it's starting to look like I might be able to pull this off. But don't get too excited just yet - there's a long way to go. That little bit of wire poking up at the left hand end is the collective locking lever (if you try hard enough you can almost imagine it) During which I took almost no photo's save for this sort of finished item. I say 'sort of finished' cos it's not really finished yet. You can see Fly's offering compared to the newly assembled collective - yes there's quite a difference. I dunno what Fly were thinking. Now I just need to figure out just where it goes using this little trick - using the kit part, I drilled a small hole in the rear of the mounting block and fitted a short piece of rod with everything lining up to the best of my ability. Then I simply pressed the kit part against the bulkhead and the pin made a nice little hole in my tinfoil soundproofing just where the back end of the collective lever will go. All that was needed then was to drill through the bulkhead hoping not to cause any irreparable damage. Oops - time for a quick dry fit when I realized that I had never even tried the kit part in place for size. Well, what do you know.... it's a bit long innit? After the initial fright and panic of thinking that today's work was all down the swanee I came to the conclusion that sniping a little bit off the back end of that styrene block will allow me to position the collective slightly further back. Yipee! Like so... (yes, I know, I know, that styrene triangular sliding thingy still needs a little bit of fettling to look more in scale). I was just so excited it all worked. But will it all fit with the canopy in place? Well, it looks like I have just enough room to make it work... phew.... A final parting shot from the side shows that it's all looking much better now. Almost ergonomic it is. For a helicopter. I think the collective could do with sitting about a millimeter or so further back but considering where we were when I started all this messing about with the cockpit I feel pretty good about this. I wish now I had taken a 'before and after' shot of everything dry fitted in the cockpit just to see the difference. Too late now though. And that's my story for today. Now it's cat feeding time, dog feeding time. Dog walking time, then at long last, me feeding time. G'night all11 points
-
Hi, this is my last work... A German locomotive to put in a diorama in (very slow) progress.... Hope enjoy...9 points
-
Finally pushed this one onto the ramp! Hope you like it.9 points
-
Hello again! After completing the rocket launchers, I attempted to make the torpedo roll off racks. This work included printing out images of the rack parts on heavy weight paper, and then cutting out the shapes. I coated the cut outs with CA glue for added strength and let them dry. The parts turned out pretty good, but then I had a senior moment. I realized that to complete the racks, I would need to make very many tiny parts ... times 4! Too many tiny parts for my old eyes & fingers. So I implemented Plan 'B', & reluctantly ordered a set of 3D printed parts from Shapeways. You may remember that earlier in this thread I had a bad experience with 3D parts being damaged in shipment, due to very poor packaging. Well, I'm happy to report that I've received the 3D printed torpedo racks packaged properly & undamaged. The parts have terrific detail & are a nice addition to this build. Since I now had some free time, I was able to start building the PT boat's superstructure, incorporating the 50 cal. machine gun turrets made earlier. I used various thicknesses of Evergreen plastic sheet. The structures were challenging as they include some complex shapes and angles. Here's a couple of photos showing what I've been able to finish to date; The roofs of both the chart house & day cabin are curved. To accomplish this, I used pieces of balsa wood sanded to match the roof curvatures. I covered the shaped balsa wood with .015" thick plastic sheet, & glued them in place. And, finally the parts were placed on the deck to verify the correct fit. Next up, I'm going to focus on completing the large engine room vents & detailing the superstructures. Thanks for looking in. John9 points
-
Here's my most recent construction, a Heller MK XVIe Spitfire. A strange little kit of quite glutinous black plastic but enjoyable and a nice easy build which suited me fine. I tried to follow some help I was given regarding laying down some diluted PVA glue before applying decals and it certainly worked allowing a bit of movement but unfortunately didn't prevent the decal silvering. I painted over the whole thing after with a matt varnish. I think it looks like a late war Spit so not too disheartened as it is a bit of a learning curve for me and I took some pics to share here. I think this is my best effort to date, which is not saying much! One thing, did late war Spits really have emerald green code letters? Blimey, these close up pics really show all the flaws don't they?8 points
-
Thanks Andy Thanks Giorgio, Stuart and Cookie (great link!) BUT I've been looking at the wrong reference shots! This kit is the 50th anniversary one and I don't think I can mask and paint this: and I also don't think I could use the fin transfer and match the white, so transfers it is - sorry Thanks Cookie, Keith and Giorgio for tips on the primer. White would be OK then. I was thinking about grey to get some variation / panel detail but a ) these are the Arrows and variation would probably be polished out, lovingly and b ) the panel lines are deep enough I think to show up anyway! Thanks Roger - OOB, OOB! Thanks Johnny - the Gnat's a pretty nice, easy kit apart from the wing fit at the front and the blasted fin thing on the bottom that is almost certainly going to get bent Thanks Steve! Pleased to hear that you're enjoying the build kit bash and thanks for the extra info... good enough for the ceiling, as you say! Sanding, bit more filling, then fitting the back fins. Not only do they wobble in the slots, they just fall out. There they go again. The slots are too big so support required (Blu Tak) and the angle-of-the-dangle diagram cut out of the instructions and used as a template: I'll let that dry, check for other sticky out bits and then blast on some primer. I'm out to lunch (it's been said before) with a mate today and have some work to do for Mrs B before I go so probably not until tomorrow now.8 points
-
Built this over the Christmas holidays present from my wife, also got a Universal Carrier Mk 2 that is presently under construction. Not very good with figure faces and still got a long way to go. I've tried to make the figure slightly different and put the binoculars around his neck. I tried adding a sling to the MP 40, but it didn't look right. This is a very old kit by Tamiya, but still satisfying to make. The PC brigade got to this kit, as the Africa Corps decals had been cut out of the decal sheet. So opted for the Grossdeutschland version 1943ish ...7 points
-
Hi all, built this one out of the box, except for the Eduard cockpit instruments. i came across an article on using aluminum foil instead of painting and i was quite intrigued by it , so i decided to give it a go at it. hope you like it.7 points
-
Hi folk's,another Frog oldie,much more refined than the Typhoon but still forty odd year's old OOB and all original,again decals were poor so found a photo of a Newchurch based mahine and managed to cobble all the decal's from spares.The photo showed a rough application of black around the"F".7 points
-
A bit more on the recce fit - I knew I had this somewhere, but it took me a while to find it. Warplane No.8 by Nico Braas, on the Bucc. This photo suggests that the 1/48 resin is not bad, but the 1/72 is as we initially thought - it sticks out quite a lot at the rear, but not at the front (and it's an S1, too!) If it helps, the facing page has quite a lot about the layout of the recce pack and various options. No mention of more than one version of the whole thing - just the options for camera fit.7 points
-
Ta hendie. I bet I'd have cutted them badder than you! Where lies the boundary between modelling and voyeurism eh? Pity the nation when such skills become lost Bill. I just wish I'd learned more about engineering when a younger man - the price of following a 'liberal arts' route rather than a ship-banging and plane-wrangling path I guess... FAA. No soft stuff allowed. Standing orders I believe... Ex- Exec- Execution? I used to think the phrase 'he left the forum' just meant that somebody hadn't been on for a while: now it seems positively sinister! Ah can't get no - derderder - satisfaction... (One of those boy bands, cant remember who...) Thank you for the kind sentiments dear chap. Amen Brother: that sounded like a cruel dose sirrah, I hope the system grows stronger each day. It's honestly just practise, thst and gradually getting a feel for how the materials behave over time Benedikt. Looking back at my earliest attempts on the Barracuda I can only wince at them now. Kind of you Tomo. It seems counterintuitive but it sometimes seems that a single going-over with something heavy gives a more uniform result than lots of repeated efforts with something small... I'd go so far as to maintain that it was their most attractive livery Massimo! By contrast, the International Red and Metal finish on my version has every appearance of an over-chromed American truck... In all honesty Massimo, once you get the hang of cutting various thicknesses and getting a feel for shaping and bending, it is most forgiving material. With the skills you show working in plastic though , why would you ever need to make the transition? A busy week so unlikely to have anything to show you before Friday chaps - if I can get the rear stations shaped and mounting points added for the various hinges and what not a by then I shall feel honour redeemed somewhat. Thanks to recent results produced by Ced and Cookie I am finding it extremely hard to resist the conclusion that I need to obtain a Silhouette mask cutter - looking at the various letterings and overlays I need to produce all the necessary marking for Pelican 9...6 points
-
Finding a £10 note at the park while walking the. Then, the following day finding two £20 notes at the same park. Now, where's that Ebay thing….6 points
-
She's got a day to dry now, then I'll handpaint the green (Tamiya XF-81, I assume?), before masking the upper sides ready for spraying the silver underneath in a couple of days. I deliberately left off the tailplane at this stage as it'll be neater to spray the top and bottom halves separately. It'll also mean it's easier to paint the tailfin, which is going to be all yellow for the 245 Sqn CO's jet.6 points
-
S'true for any period really. When I stopped flying FJ's I lost over an inch from my neck and went down two shirt sizes - and the last bone dome I wore was the lighter U.S.version Been scrawny necked ever since. Don't pull a lot of 'G' as a lawyer........ Strange - I'm loving this build at at once removed........P'raps the Airfix Hawk's is just more fun when built by someone else? Nah - I did some measurements from a photo to try and fix the dimensions - all the way back at post # 35 on page 2 here. Dunno who the yoof in the photo is - I don't remember ever having been that young.............. Airfix made a bit of a mess of the whole cockpit really. Perfectly good for the ceiling tho' The pilot looks a bit to big for the seat to my eyes. His head shouldn't stick so far above the seat head box. I s'pect the answer for the ceiling is that he's leaning forward and pushing himself up out of the seat (harness unlocked) to improve his look out Onwards and upwards Ced - a Hawk on the ceiling is worth 2 on the bench.........6 points
-
That appears to work better6 points
-
Hello all Been a while since I completed something but I thought I would share my latest effort. Built to support the IPMS Car and Motorcycle SIG display at Telford this year, this is the Hasegawa 1/24 Ferrari 250TR finished in the less common white paint job with blue racing stripes as worn by chassis # 0732TR and uses the Renaissance decal sheet Tk24/267. The car was driven by Hugus and Eriksson at the 1958 LeMans and unfortunately retired at the 7th hour, so not an auspicious performance. The race was won by another 250 Testarossa (0728TR) driven by a duo including Phil Hill. That car is actually one of the subjects on the kit decal sheet, though the kit is inaccurate for that car. I had a load of fun with this build and in typical Hasegawa fashion it goes together with precision and displays a fair amount of forethought with most ejector pin marks and sprue gates being located so that they end up out of sight and covered over. Can't imagine how much, unnecessary as it turned out, cleaning up I did! I replaced the kit wheels with a set of metal rim/photo-etch spoke beauties from Hobby Design and wired both distributors, feeding the wires into the ends of a couple of copper tubes glued onto the rocker covers - a feature in photos of the real thing conspicuously absent from the kit's otherwise beautiful engine. I also added a fuel rail to the carn=bs and a couple of lengths of spring type tube which represented the corrugated fuel lines when painted yellow. I also replaced the solid intake grill with a piece of wire mesh though it can't be seen so I'll not bother so much next time! I also made good use of my Molotov Chrome Pens on rivets etc but most significantly, for the windscreen frame and rear view mirror glass. Well recommended! All in all a most enjoyable build and my thanks to those BM'ers that offered their insight into the likely colour of the tonneau cover! Anyway, enough of this rubbish, here are the pics - comments and criticism welcome in equal measure. Hope you like her. ATB Rick5 points
-
Hello everyone , this model was built from the short run MPM kit that goes together without much trouble and has nice details . The airplane itself , while attractive , had the unfortunate reputation of being one of the worst from that era. It is said the Italians found them more useful as airfield decoy than in the air . Regards , Basu Roy5 points
-
I have been working on the new Airfix P51 D for our clubs “Airfix Cup” to be held at the NSW Scale Model Show on the last weekend in April. This is a quick overview of the build as I am fairly advanced on the build. AM consists of Ultracast seat, Eduard wheels and HS standard cuffed prop. Paints are MM or Colourcoats enamels, AKI Extreme Metals and varnishes: As this was my first NMF scheme, I primed the build with AKI black base. I then obtained a set of homemade masks from. A mate of mine with a silhouette cutter and placed these prior to the AKI 479 Aluminium: The results are not too bad: The sub assemblies are also being done: This is the current state of play as I am away for 10 days: Regards,5 points
-
Well I’ve been scratching my head on what to build next and as usual I ended up confused and undecided! So I impulsively grabbed two from the shelf that are long overdue to be built. But which one? If anybody has a preference let me know, If not will start one by the end of the week. These both interest me as my old dad worked on both. Greg5 points
-
I don't think I've posted anything in the WiP section before now, but I've been getting more than a little bit cheesed off with my seeming inability to produce decent results as I get older. I posted under the 'Chat' section and other forum members offered very sound advice. Instead of drifting that thread I've decided to start this WiP as an incentive for me to extract digit! The model is already well on its way to being completed, but it's the final finish that causes me the greatest frustration so that's where this thread is focussing. Here's the base kit, bought for a tenner at the last Driffield show: I know that the latest Airfix kit is very nice, but with a bit of effort the ESCI kit is okay. I have a small assortment of DC-3 / C-47 decals, some probably being 30 years old: As a kid in South Africa in the early 80's, however, I regularly saw SAAF Dakotas droning overhead and thought that they looked the business (if rather antiquated). My parents bought me this superb, well-known book of Herman Potgieter's photos - this is the SA edition sold under the 'Princess' label: ...and this Potgieter photo in particular shows the scheme that I want to reproduce: To help with the blue castle insignia I have some of these old Superscale decal sheets, which are very nice except for all the fin markings having red instead of orange stripes. Not a problem here, as the camouflaged SAAF Dakotas didn't have fin markings: So, that's the kit and inspiration; next is the partially-completed WiP.5 points
-
Hi Folks, May I present you my Fujimi FG.1 007 This is not the Airfix kit, rather the old Fujimi one, I really like the kit tho there were some fiddly parts and some parts need a lot of sanding and filling but overall a good kit. The kit decals were ruined however was saved by a good friend Mark Davey (Thank you) he sent a one. For paint, I used a mix of Mr.color and Tamiya Japanese grey. Hope it has turned out satisfactory. Thank you. with the American Cosuin.5 points
-
Hi Guys, This is my completed M113 to go with the Centurion I recently finished. The level of detail in this kit is amazing and some of tiny parts really tests your fine motor skills Fit was great, however the removal of flash and joins from the finer parts was a challenge. I have based my model on a Aussie M113A1 circa 1967-8 with the Resin APC crew from Firestorm models. I have ordered the RAAC M113 conversion which will add some stores and ammo crates top side in preparation for the FSB Coral diaroma. Still very novice at weathering but I am happy with my fine grey splatter to simulate chips and scratches (thanks youtube). Anyway guys I hope you like and I certain welcome advice and suggestions. Cheers Fitzy5 points
-
This one was no precise modern kit with lots of resin & etch. It’s a (very) old school kit with lots of toyish features - retractable undercarriage, opening canopy, removable ejector seat - but a passable overal shape. I tried to improve the air intake, then promptly stuck a FOD cover over it. I built up cockpit interior with plasticard and side panels, and improved the seat with plasticard and pull handles. The canopy had a totally wrong hinge at the back to let it open, so I cut that off and added hinge extension on the side where they should be. I did preshade it (with a limited amount to be seen) but didn’t rescribe it. With limited surface detail the panels didn’t really stand out and I haven’t done a final wash to bring things out. Well this is how she looks5 points
-
As I said..no rush. I decided to rebuild the broken 809 one as an S50..may do an RIP for that. Found these when I was trawling instead of building. The angle it was taken at makes it look as if the back end was flush but as @Ex-FAAWAFU's phot shows it isn't.5 points
-
Very slow progress with the Dak, by which I mean virtually none as I'm still waiting for delivery of a new airbrush needle bearing. In the meantime I've completed the wheels and props but will leave them off until everything else has been completed. Jon5 points
-
Thank you Ozzy - I was quite pleased with the photo when I'd taken it. One of those lucky accidents. The lighting was so dark when I was trying to take the photos of the newly attached Sherman to the base that they were very grainy. So I decided just to do a couple in B&W and the above was the by chance result. Thank you Steve - you are too kind! Hi Sarge. Thank you for your comments and for the suggestion. I will see what I can do - I think it may be possible. If not gluing I might be able to wedge something between the tracks and sponsons and disguise them with the mud!! Hi Robert. Thank you. All the tufts on this one are from the Army Painter range. Hi Foghorn - you are waayyy too kind but thank you! Thank you very much Nigel - too kind! Hi Steve and thank you very much too. You are very kind. Just one photo to show that I got the final figure assembled as well as a couple of other bits from the Dragon set. It's a bit grainy as I took it around about the same time I took the B&W photo above: I need to get the painting on these done and then put together the final bits of the scene - hopefully this weekend. Comments and suggestions welcome. Kind regards, Stix5 points
-
As the finder, isn’t Paul Allen able ‘claim ownership’ of the wreck (if it’s in international waters) much like Robert Ballard regretted not doing with Titanic? That way there is an extra layer of safeguarding, in addition to it being designated as a war grave? Personally and as much as I would like to see the planes preserved, I think they should stay where they are because it’s all part of the overall wreck site. By all means take as many photos/videos as can be managed, but leave them untouched. Trevor5 points
-
I think your 1/72 version is probably worse in its sticky-outed-ness than my 1/48? To be honest, given the notorious fit issues with the Airfix Buccaneer, this looks not too bad - nothing holding it in place for this photo other than the grip of the original Airfix plastic. I have an S2/S2C/S2D/SMk50 boxing of the kit, which will be built as an RN cab - probably 809, since the transfers are easier to get. The S1 (Anti-Flash White natch) will be built from the S2B kit, which has RAF-specific features - notably the bulged bomb bay with the tank. The recce pod is how I plan to address that problem, plus I have the intakes - the rest will require some of that there modelling. The photo on the cover is an RAF S2 (note that Fox emblem rather than the FLY NAVY of Bill's similar shot above), but other than that I'm not sure there's any visible difference? A tiny thread drift, if I may - on the old "I saw this and thought of you" principle: A RR Gnome fitted to a TR3 chassis (I think - TR something, anyway) by a friend in the ?80s. @hendie, get back to your Wessex!5 points
-
Hi all, Here's my finished Lightning. Hopefully it captures the look of the Lightning well but the kit was not without its challenges to build. I used a replacement resin cockpit and wheels from Barracuda Studios and a pitot tube from Master Models. All of the painting was done using a combination of Mr Hobby and Ammo acrylics. I also used the kit supplied decals. Hope you like it! Thanks for looking. Matt5 points
-
Good evening, a little story before getting on with a small update. A few months ago, while I was working on my Jaguars, I bought a couple of these I also bought some aftermarkets and... this... Of course I put it in a drawer and forgot about it. Yesterday , while I was looking for something, I found it and had another look at it. Of course I didn't even remember i had it when I scratch built the Matchbox kit's interior and I struggled a lot to understand the cockpit layout. Had I remembered I had this book, I could hace used it as a reference... let's have a look: Never mind...it's done!!! Time for an upgrade now. As the airbrake is nearly done, having to flight to the UK, I left it at home and I decided to start having a look at the wings. And while I was looking for some reference, I found this picture.(All rights are Alamy.com's) To me it is pure gold as it shows an aircraft with folded wings, flaps down and ailerons not aligned to the wings . It's the only picture I've seen in this configuration,anyway it confirms flaps and ailerons could be off set while parked. As I hate all straight models, I've decided to angle them on my model and thus I started with some cutting. These are the wings' sections , the inner ones are in one piece with the air intakes. It isn't a bad base for a wing fold, but I'll add a little detail! Here I've thinned the edges down to get some space for the wing folding system. This picture shows the wings' inner section before and after some filing. I also cut the flaps and the wheels wells off. This is all the cutting I did tonight. I've extended the ailerons ' front edge, which will be filed down to make it round. And these are the outer wings' sections. That's it for tonight! Good night! Massimo5 points
-
Hello everybody, the German manufacturer Perfect Scale offers a brand new kit of the German ARV "Wisent" in 1:35. The kit won the titel "Model of the Year" in Nuremberg this year. It is a huge kit... in a huge box.... full of finest resin parts with great details.... great quality.... Plus a huge fret with photo etched parts, wire, decals and a mounting instruction. Its a complete kit, nothing else is necessary. But I am planning to use a Friul track instead of the resin tracks of the kit.... but that's all. The fitting is great - nearly the same as a "normal" plastic kit ... Cheers Micha4 points
-
Hello everybody, the bridgelayer tank "Biber" of the German army, based on the tank Leopard 1. This is a conversion of Perfect Scale, based on the Revell 1:35 kit o the Leopard 1. It consists of fine resin parts, photo etched parts, wire and decals. The bridge itself unfortunately is no more available so I will finish this without bridge ... Cheers Michael4 points
-
Well I guess this could go here or go in to be figure category. This is my long term restoration of my Lynx character. I started her about 4 years ago, rushed and ruined it. Between then and now she’s sat in the cupboard with various bits broken off ; sword,fingers,ear, hair, tail. the casting is good of her skin, but awful for the armour she’s kind of not wearing! I started off removing most of the enamel paint I’d used previous. This was a good soak with mr muscle these photos don’t do justice to how bad the paint was!! Coupled with the fact I couldn’t get near her face to paint it... I had to start all over. (I’ve neglected to get photos of her in the mr muscle bag!) today Ay I started removing her clothes. (Calm down 😜😜) basically this consisted of snapping them in to a billion pieces with pliers, knives, sculpting tools. Soaking what remained of her in Tamiya airbrush cleaner... that stuffs strong! It even softened up the residue glue! (Way too much glue splurging out of everywhere!!) here are most of the pieces I’m keeping! The green is filler.. on the opposite leg there is white milliputty... this is what im using. These were testers. So after scalping her, gouging her skin apart and cutting rents in to her back. I started restoration this evening. Fingers now have sausages of milliputty on them (no photo) will be sculpted once dry The right hand ear is the new one. Hair is only dry fitted for photo collar has been re defined after the outfit she was wearing was removed resulting in lumpy blobs of glue remaining same with her back This is what she “should look like” These will be my reference photos for restoring her. However I doubt she will be exact thanks for reading4 points
-
My second Fw 190, I was able to not break anything this time, and correct a molding error Hasegawa had made on their right hand fuselage (the area designed to take the mounting tab of the right hand wing has too much plastic, and if it´s not corrected will end up with a step in the right fuselage/wing assembly. I removed plastic with a sandpaper and the Xacto until the fuselage sat flush with the wing). The decals were of the old Hasegawa style I´ve read so much, of an ivory colour, but they conformed perfectly to the panel lines and over a mottle with too much paint. Next time I won´t add mottling where the decals go.4 points
-
Thank you for the comments . Here is the next instalment. Detailing of the masts hinges around removing the moulded on yard arms and replacing them with the photoetch starting with the foremast which was a relatively simple affair. The mainmast followed in a similar manner however I was not satisfied with the photo etch replacement s. Where I could get away with the 2 dimensional nature of the yard arms on the foremast I was not happy with it on the main mast. So out came the copper detail wire again and I fashioned the correct shaped tripod arrangement for the mainmast yards: I also had a go at the part that attaches to the top of the mainmast. This is supposed to represent the UAA1 electronic warfare antenna and the 992 surface search radar. I amended this bit by removing the moulded on yards and the top platform which was a little too thick for my liking. The platform was replaced with a thinner piece of plastic card and some 2 bar etched railing attached around the edge of the remodelled platform. The two PE yards were then fitted. I have retained the radar antenna for fitting at a later date. The other mast I have worked upon is the mast that supports the 1022 air search radar antenna. This didn’t need butchering, just some 3 bar PE railings being attached: The 1022 radar is provided in the PE but there seems to be a lack of information of how to construct it in the instructions that come with the PE. Fortunately for me I have constructed one of these before for a Type 42 model and so knew what to expect. However I am doing this WIP to help others with a similar build so here are a series of photographs showing how the components of the 1022 radar are bent and joined together ending with the completed article fitted on the mast. And finally for this post a view of the superstructure and masts dry fitted together. Next on the agenda is the fitting of the walkways around the hull. Thanks for looking in.4 points
-
Here are the new pics of the Landor 747-400 as promised The engraved panellines are too heavy on the kit.I missed to correct it on this build.I have 3 more -400s in my stash which will be modified in that matter. And together with my Revell 747-200...4 points
-
Hi folks! Finished this one. I´ll post the pics on the "ready for inspection" section. Thank you all for following this build!4 points
-
Hannes, no need to "tear apart by force" to make a spring. all you need to do is roll a metal wire around the appropriate metal tube and cut the size you need. also, assuming one fixes the springs, one may as well fix the valve heads and drill a horizontal hole and insert a bolt and nut, as well as a vertical pin. but still far from the real thing ... am ashamed of several parts now actually, specially the pin protective cap would have been easy to improve..4 points


This leaderboard is set to London/GMT+01:00