
Leaderboard


Popular Content
Showing content with the highest reputation on 18/02/18 in all areas
-
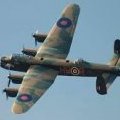
Aptly coded D-Dog for a Manchester, L7301 and one other aircraft were assigned to 50Sqn to support a maximum effort raid of 1046 aircraft on Cologne on the night of the 30th May 1942. That morning, Manser and another pilot collected their aircraft from 106Sqn at Coningsby. This aircraft was slightly unusual as it didn't have the mid upper turret that most Manchesters had but what wasn't unusual was the performance, particularly as loaned aircraft were often used for training. It was to carry a full compliment of incendiaries but in doing so, it wasn't able to climb above 7000ft which wasn't untypical of the aircraft being pulled along by the poorly developed Vulture engines. The crew hoped that being away from the main bomber stream up above, they would get left alone but unfortunately, their hopes were fruitless. Flak initially struck the fuselage damaging the bomb bay doors. A second burst hit the port engine setting it on fire. The fire then spread along most of the wing. Eventually, they managed to extinguish the fire and set for home. Unable to maintain height on a single Vulture and badly damaged aircraft, the crew discarded anything they could from the aircraft. Despite the efforts, the aircraft was still losing height, so Manser instructed his crew to bail out over Belgium just a few miles from the Dutch border to which they all did successfully. Manser stayed at the controls to ensure his crew got out OK but shortly after they exited, Manser lost control and the aircraft plummeted into the ground taking Manser with it. Five of the six crew made it back home with support from the resistance whilst F/O Barnes who was the navigator / bomb aimer was captured. As a result of the reports of the crew, Manser was awarded the Victoria Cross for his gallantry in giving his own life to save that of his crews. The VC read “In pressing home his attack in the face of strong opposition, in striving, against heavy odds, to bring back his aircraft and crew and, finally, when in extreme peril, thinking only of the safety of his comrades, Flying Officer Manser displayed determination and valour of the highest order.” Leslie Manser VC 1922-1942 I've been after a 48 scale Paragon Manchester kit for some time and considered it to be the holy grail of Bomber Command aircraft. Following a request on Britmodeller, Dennis aka @spitfire responded to say that he had one so I set off and over a cup of tea we put the world and exchanged money for resin (Big thanks Dennis ). Having a 48 scale Lincoln on the go already, that was a lot of resin and chopped up Lancaster that was going to be cluttering up the workbench. I can mess the bench up with a 72 scale Spitfire so you can imagine the chaos! Anyway, bit by bit, often 1 step forwards, two steps back, the Manchester came together as you can see HERE. There's still a few things to do including adding some bombs to the bay, but I'm posting as it is now as its 99% done. It's painted with Tamiya Rubber black / dark green and Mr Hobby Dark Earth with a variety of decals to complete the scheme. My next build was going to be OOB to have a rest, but now it will be a Classic Airframes Blenheim and a Sanger Short Stirling Anyway, hope you like... Thanks for looking, Neil57 points
-
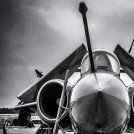
Good afternoon everyone. It's been a long time coming but I felt I had to get this done as it was such a fun build. A quintessential 60s jet in 80s clothes. "Are 'friends' electric?" in this case my friends the answer is definitely yes! Please bare with me while I pass a bunch of photos past your eyes. I hope you approve of what I did to the heaps of plastic that I found in my box. The English Electric Lightning. 1/48 by Airfix There you are, a lovely bird, not to everyone's liking but I find her mesmerising. I hope you liked the RFI It was a pleasure to have you all along for the WIP. I'm currently building the Mahoosive Tamiya Lancaster 1/48. If you would like to tag along you can grab on here. Looking forward to more plastic in 2018. Happy Modelling guys. Johnny Newman.26 points
-
Finished this little resin kit last year, went together really easily for a limited run kit. Scratch built the test bed. The build article and history feature is in this months Airfix magazine. 19-DSC_0932 by Dave Oliver, on Flickr 12-DSC_0924 by Dave Oliver, on Flickr 15-DSC_0927 by Dave Oliver, on Flickr21 points
-
OOB, Xtradecals. Built within 24 hours.19 points
-
Having lost all mojo for bigger kits here is my latest one a nice and easy kit make and I am pleased with the results.19 points
-
Hi again Fellow Modellers, This is my first build in my new home, intended to be a bit of a mojo restorer however I tried to use Airwaves PE kit with it and disccovered that Mojo and photo-etch don't mix at all well First time with PE and couldn't work out whether you are supposed to stick the PE onto existing stuff or scrape/cut the plastic off, used only the seat belts in the end. The decals were from Sky models Spitfire sheet and paint is Tamiya and Vallejo MA. To me the tailwheel looks a bit long, this is the 'Project Airfix' edition that I think is based on the new tool. Thanks for looking........I know Airfix Mk1's are ten a penny after the Aldi/Daily Mail thingies. I've just noticed the engine has had a major oil-leak Either that or I've over-weathered again !!19 points
-
Hi Folks, A quick built, a Ki-46-II Dinah of 82nd Sentai over Burma. The kit is very basic an Arii kit of the 60s with lots of flash and simplified parts, however, it was a joy to built. The paint was bit tricky, I thought the light green part should be more khaki but I didn't have the paint so I used lighter green, could be wrong but could be also right as Japanese unit paint their aircraft with whatever they had. I like the flying tiger markings, it was the reason for me to do this aircraft and also ki-46 flew a lot of mission during Imphal during Burma's campaign. Thank you for the time, cheers.18 points
-
Calling this one done. Was quite a big struggle for me at times... Mainly due to it's size alone. I broke off almost all the guns during the painting... All in all I really enjoyed the kit. The interior is nicely detailed, as are the engines. I had some real issues with getting the engines lined up inside the nacelles, but I think it just about turned out OK. The 4 colour paint job was a big jump for me - and due to my using Belton rattle cans (which come in an amazing variety of colours - but can be very thick) some of the surface details were lost under coats. I am quite happy with how the camo looks, but on reflection would have liked to make the sand / sky blotches a little more intricate. I used the box decals - with larger markings I sanded them a bit before applying them, which made it easier to chip at them with a sharp blade once microsol was on. Part of me wishes I had bought aftermarket decals for the actual unit... Was largely built OOB except for some wiring added to the gear, and some scratched details for the cockpit... I mainly enjoyed experimenting with varying acrylic shades on the interior and legs... WIP thread is here for those interested in my shambolic work along the way! Thanks for looking! Bruce17 points
-
After the Photobucket saga, I thought I’d post a quick summary of past builds... 1/32 Wingnut Wings Felixstowe: 1/32 Tamiya Mustang: 1/32 Wingnut Wings Snipe 1/32 Wingnut Wings Brisfit: 1/32 Wingnut Wings Albatros: 1/48th Tamiya Stug: 1/32 Wingnut Wings Spit: 1/32 Wingnut Wings Halberstadt: 1/6 SE5a: 1/32 Hobbyboss: 1/32 Wingnut Wings Sopwith Camel: Thanks for looking... Guy17 points
-
My first aircraft after a long time, slowly learning how to set decals properly. The interiors weren't really much detailed, the model even lacked the classic decals seat belts so i decided to model it closed, the fitting was far from perfect and it took me a long time to san everything and imperfections are still there. But I really love clipped wings on spitfires and this model was cheap, I couldn't resist!17 points
-
OOB, xtradecals. This kit is nice, but it’s really geared towards a launching jet. There were a few gaps that were kinda wide. Overall though, very good fit, and appears very accurate.16 points
-
Hawker Sea Fury FB.11 - HMS Theseus Korea 1951 Trumpeter 1/48 plus Eduard zoom, Aires resin wheel wells, Master barrels and scratch vacu canopy.15 points
-
I wanted an easy build and this looked just the job. It did indeed go together well although it is a tail sitter. Even with the recommended six grams in each nacelle mine tips up. Maybe my kitchen scales are wrong. Wish I'd realised earlier as there would have been room in the nose for more. Also, according to a couple of reviews I read, the kit is missing air scoops on the outer booms. I added these from the spares box. Finished with the box decals and Revell Aqua.15 points
-
Matchbox PK-8 Gloster Gladiator Mk.I Completed from the Revell reboxing using the Pavla decal sheet markings for 87 Sqn 1938, with additional research on the colours by Rowan Broadbent at Pheon Decals. Brush painted using Tamiya flat aluminium as the base shade and flat blue for the rest of the airframe, rigged using drill'n'fill technique and EZ Line fine gauge. Still a cracking little kit with a lovely outcome. Made for idiots like me to get a reasonably straight and true biplane! Build thread is here.14 points
-
This has been a right royal pain. To be honest, I don't like it. When that happens, I'd rather work on something else. Anyway, I think I'll tone this down some more by shooting some highly thinned white over the top. Cheers, Bill14 points
-
Here's my first Airfix Sea Fury. Straight from the kit except for Eduard seatbelts and decals from Eagle Strike. A really nice model to build except for the aforementioned short shot fin leading edge and sink marked rudder. I did attempt a gunsight but as you can't really see it I only ended up with a representation. Really nice panel lines and an almost perfect fit throughout. Thanks for looking. 20180216_204410 20180216_204352 20180216_20454713 points
-
The third of my recent completions is Academy's very fine 1/72 F-86 Sabre, here finished as a Canadair-built Sabre in RAF colours. The kit was built out of the box, going together excellently, with the addition of a masking tape seat harness and a scratch-built pitot tube after the kit part went MIA. It was painted in Mr. Hobby and Pollyscale acylics and finished with Alclad Klear Kote. The decals were a mixture of Model Alliance and Modeldecal (farewell Mr. Ward). RAF Sabre 1 by Martin Schofield, on Flickr RAF Sabre 2 by Martin Schofield, on Flickr RAF Sabre 3 by Martin Schofield, on Flickr RAF Sabre 4 by Martin Schofield, on Flickr13 points
-
PK-38 Aerospatiale AS-365N Dauphin 2 - from the Revell re-boxing. Built as the helicopter from the 1989 Bond Film 'Licence to Kill', with home-printed decals for the Coastguard lettering and logo, tail code and Aerospatiale logo, other decals from the kit except the 'Rescue' arrows from my spares folder. The white is Halfords 'FIAT white 210' (Aerosol spray) and the red/orange is airbrushed Model Master International Orange.13 points
-
My 'Purple' range Matchbox Tempest F.6 entry has finally been completed. Fully WIP can be viewed here - In summary, after approximately 30 years lying dormant as a failed project, this kit was salvaged from the spares box minus a few major components. With the help of BM's 'wanted' section and parts robbed from both a Heller & Academy Tempest (prop, u/c gear, canopy), this is my completed rendition of Matchbox' PK-23 Hawker Tempest. Most of the kits rather heavy panel lines have been filled, sanded and rescribed. This model is based on photographs and a colour profile of NX170 / K which served with No. 249 Squadron, Deversoir, Egypt in mid-1949. She is shown not long after being repainted into the new 'Desert colours' of Dark Earth, Light Slate/Sea Grey, and Medium Sea Grey lower surfaces. Cheers.. Dave And the Matchbox "Purple Range" inspired base!13 points
-
Hi All, this is the latest of my aircraft models off the bench and into the display cabinet. I bought this from the kit swap at Scale Model World in 2016 for the princely sum of one pound; a whole quid. It was in a bag, marked as complete and it was all just fine. The model went together quite well with just a tiny bit of filler and the cockpit has some Tamiya tape seatbelts, that's all. A big thank you to whoever put this one up for sale, I really enjoyed making it. Lifecolor RLM 76 lowers, Gunze Aqueous RLM 71 on the wings and Model Colour RLM 02 and Deep Yellow on the fuselage uppers and ID markings. All shot through my H&S Evo. Kit decals are the usual Heller fare, OK but a bit out of register though with swastikas included. I am still struggling with photography, but here it is anyway.12 points
-
Tomo, Nigel, Johnny, Ian: Thanks for that lads. I can be lamentably lax sometimes getting stuff at right angles when it needs to be but being one big box, any errors or irregularities of alignment as sure to leap out. Been getting some headaches and nausea of late, which along with tired eye muscles makes me think I'm due a visit to the optician's... Some substantive progress to report in on this afternoon. After all the prep work and pre-visualization yesterday I was now able to concentrate upon a thorough refit of the rear of this baby. Firstly, some confirmation that Italeri did an OK job (excepting my predations at the rear in turning it from G to J) of the general fuselage shape: Using this station diagram from the parts manual I was able to transfer the station markings to port side of the kit fuselage, and thence copy them across to the starboard counterpart: Likewise, establishing station intervals along the top: Prior to starting any internal fitting I established an internal datum on both sides for the ceiling and floor levels on the walls by masking off and using a rattle can of white: This seemed a much more direct and obvious way to get alignments sorted than my previous cack-handed parsing of this task back in the Spring. Internal station heights run from 26mm-31mm at this scale. Another reason this job had taken so long the first time around was that I'd individually cut the stations to length. Any halfway intelligent being would have set up a production line of this nature to cut them in batches: Using just a ruler and single-sided razor blade this took only a couple of minutes to achieve, with a uniform consistency. Stockpiled and ready to rock the Box: One spanner in the ointment for the unwary modeller at this stage is that Italeri's spacing of the portholes seems to wander about in relation to the station intervals (the original kit moulding on the inside walls bears little relationship to the actual intervals at all) and this necessitates a little bit of 'freestyle' repositioning of stations (compared to the references marks) in order to accommodate the openings: As this only amounts to 1-2mm in a handful of places these irregularities will be lost when eventually viewed from just the rear of the aircraft when closed-up at the end. Both sides done: Checked against ceiling and floor: Also obscured by the rear viewing angle will be the reinforcing strips that I'd added to the inside odthe kit/vacform join - these seem to blend in unobtrusively to the angled perspective looking down the length of the aircraft: Starting to look like an aircraft in there at long last: And from the outside too, more 'busy' feeling: What light from yonder porthole falls? Do you ever get that slightly uncanny feeling that you want to crawl inside your model sometimes? Ta-ta until later in the week. Tony12 points
-
Thanks Jon - the only smelly thing I have at the moment is the AK white spirit I'm using for cleaning - soon to be replaced by low odour stuff. I would chuck it out but where can I put it where it won't smell? Ah, the wine bottle where I empty the brush cleaning pot; done! Thanks Roger - more this morning, see below Thanks Rob, very kind as usual Thanks Keith - strange what 'hits your nose' isn't it? I can't stand nail varnish, instant headache. Must stop using it Thanks Johnny, kind of you Thanks Bill - I'm with you, Colourcoats thinners and low odour white spirit for cleaning - sorted! Thanks Teuchter - no quake here, I haven't felt the earth move for ages Thanks Jamie - I'm sold, as I hope you know! Let's try the cutter-cut Ultra Mask templates (gulp): With a bit of burnishing it settles really well into the panel lines and, even though it's low tack, stays down on the flat bits and goes over the bumps very nicely: I had the usual problems with the small bit on the nose (hard to get it to stick) and the long bit that goes from the port wing root over the nose but that's as much the template as the mask. It did its job though. On with the DG, trying to spray at 90o to the mask to avoid build up: Done. No, I can't wait either: Peels off without much effort and no paint was harmed. It's thin film so the build up on the edge is minimal or non-existent. Here's the worst bit: A few touch ups required: I always seem to have problems masking that bit. Some seepage on the Sky band - not the Ultra Mask, my problem not burnishing the 3M tape: Very happy with that experiment, method to be adopted in the future!12 points
-
Matchbox PK-1 Hawker Fury Mk.I Built straight from the Revell re-box using brush-painted Tamiya acrylics (mainly flat aluminium and chrome silver). Rigged using EZ Line (fine). Drill'n'fill technique. Build thread is here. A gem of a kit that's still really rewarding.12 points
-
Gentlemen, a little more about my brilliance in fixing the turret, perhaps, and a little less about the terrifying things that are happening behind your lips, if you please.12 points
-
Really enjoyed building this, the Eduard 1/72 Bf 110E. It's the Profipack version so lots of coloured PE for the cockpit, and I also added the Brassin gun-nose and wheels. The fit of the engine nacelles to wing is well documented but it just takes a bit of filing to get a decent join. I liked this kit so much I've just ordered the G-4 version.11 points
-
Another from my favourite experiments/prototypes category, built cca 10 years ago. Built OOB, only few details added to cockpit and undercarriage. Fit was not very good, especially around air intakes, prop beams and horizontal tailplanes. Colors used are Tamiya acrylics (Sea Blue) and Agama alcohol based colors. Mahogany on prop blades was done using artist oils. My other builds: Nothrop X-4 Bantam A-37 Dragonfly D558 Skystreak11 points
-
Hi folk's returned from the shelf of doom after a few part's went missing it seemed a shame not toget her in with the rest ofthe Matchbox family.11 points
-
Okay, so after much finagling and even more swearing, I came up with the following bodge: 20180218_001316 by Edward IX, on Flickr They can pass as ammo boxes or something, but more importantly, they give the machine gun butts something to stand on: 20180218_001502 by Edward IX, on Flickr11 points
-
Take that man's name.11 points
-
I start a new WIP. I using the new tool Airfix Lancaster, some PE Parts from Eduard for interior and exterior detailing and QB air scopes, CMK engine set, flaps from Paragon (for the old tool Airfix). engraves new panel lines - according to the sketch in Lancaster AJ-Press monograph. opened the panels for fuel tanks and the fuselage doors fuel tanks in progress some scratch for interior: flare dispenser, toilet, rails for ammo and ammo boxes, internal structures, flour.10 points
-
This had been in the stash for ages; the Airfix 'Design a Hawk' boxing picked up cheap, Midnight Hawks decals from a previous kit, also a knockdown PE kit from Hannants(Eduard made I believe}......what's not to like?? !!!LOADS!!! Firstly the kit is the early tool Airfix....one piece canopy, so won't see lovely PE cockpit anyway I think the PE was made for the newer mould it was so hard to fit(gave up on most of it) New aerials to build/fit and no pylons or smoke gennies. Screwed up the det cord lines in the canopy(again...how do you paint these without taking the paint off later?) Paints were Tamiya XF-61 dark Green with a drop of black and Vallejo MA 010 interior green. So slightly dissapointed by this build but here it is anyway, a 'problem shared' and all that !!10 points
-
Many thanks Martian, much appreciated! Thanks Adrian! I also sanded the trailing edges to bring them forward slightly and give a decent surface to attach the strip to. Wow, thanks Tony, praise indeed! Nearly done with the major stuff now. and thanks TonyH too This afternoon was spent covering myself, the floor, the bench, and a few other things, with fine plastic dust as I sanded down the wings. I added a smear of PPP to all the seams, especially the trailing edge additions, to make sure the transition from kit wing to styrene addition was a smooth one. Job now done and I'm very pleased with the result. Then of course, I couldn't help myself....I needed to see how it all looked! More than happy with that, and more importantly, it now fits the plans! Final job for today was to stick some styrene onto the ailerons to get them ready for resizing and reshaping. They are the last of the major parts to require modification, so not far to go now! At some point in the not-so-distant future I will need to rescribe it all. That's something I've never tried and I'd be grateful for any tips. I've heard mention of Dymo tape - is that the plastic tape that was used for labelling and had the letters stamped in it with the little hand held machine? Thanks for looking in! Ian10 points
-
Good afternoon everyone. It’s been a busy weekend here at chateau Spadgent. I had to fix my 1:1 scale fence. amongst other things. Don’t worry I scratch built a post out of 3” x 3” wood. 2.7 meters long mind but it fitted the brief. Any hoo enough of this madness let’s see what happens in Lancaster land. The wires got fitted ending the bomb bay. well until I get to the bombs. Here are some of them dry fitted. none too shabby. Now away with you while I do other bits’n’bobs. hidden Udet some card. It’s best all round.. I can now remove my platform of lego. I’m fully aware that this is turning into the Eduard bending appreciation thread but realistically what am I going to do? soooo. Here’s without. I’ll start with the big up front seat. Looks a lot like a cyberman, I know. Btw please if you’re going to follow along and do this crazy. Buy a Bending thingy. Because even with one this seat is a right royal pain up the bottom. next up the holders and things. Looks complicated. Not so bad actually. heres some rod I had to add. makes me winder if I had to buy all this rod. we shall see. WE SHALL SEE. I did need to use a whole 2mm more look. of course you can see it. It’s holding that round bit and that cog thing. The other seats were next. trust me, don’t get complacent. You will need that bending tool. as for those little baskety things. You can use a cocktail stick or some brass rod to bend that bad boy. Here is the main wheel. and a dry fit of the bits so far, front. And back. actually to be fair, it’s looking pretty busy in there. It might end up being worth it. moving on to th IP. This got chopped and primed, ready for more bending. joy! before I vanish tonight, I had a postal visit all the way from Belgium on Friday. Our wonderful chum and fellow Britmodeller @corsaircorp Has sent me bits of an actual Lancaster that was excavated by the help of his fair “rugged” hand. There is part of the wing and part of the engine mount. I will place a part of both into the main fuselage to give this build a true heart. Thanks CC for this. I can’t think of anything more poingnant to have at the core. I hope you don’t mind me adding this photo of your message. With that. I’m off to stoke the fire, drink a beer and finish watching this. there is indeed “a giant running off with the princss.” Thank you all for dropping by. Have yourselves a lovely Sunday eve. As always. Happy Modelling. Johnny.10 points
-
A tooth free post? I'll try. Toptastic turret solving young PC. Progress chez 06/24: Blenheim IV, 107 Squadron, RAF Leuchars Airfix 1/72 by jongwinnett, on Flickr Blenheim IV, 107 Squadron, RAF Leuchars Airfix 1/72 by jongwinnett, on Flickr PS ignore the wrinkles, that's just Microsol doing its thing.10 points
-
Reveal photos. A final coat of flat to finish her off. This was the scheme she wore at Farnborough. DSC_0225 by stuart wellard, on Flickr DSC_0226 by stuart wellard, on Flickr DSC_0227 by stuart wellard, on Flickr DSC_0228 by stuart wellard, on Flickr DSC_0229 by stuart wellard, on Flickr DSC_0230 by stuart wellard, on Flickr DSC_0231 by stuart wellard, on Flickr DSC_0232 by stuart wellard, on Flickr All in all a nice little build run alongside other builds at the moment.10 points
-
Positively anorexic, but much healthier now! Well, it is interior green (although not specifically kitchen green), so I don't see why you couldn't get away with it.. I hope i can live up to the expectations Massimo, thanks! A ) That would be far too obvious B ) My mother was a Scot, and it was a perfect excuse to use up a load of styrene offcuts! Thanks Guy, I have a stash full of great kits, but it's the crappy ones that get the attention. Perverse..... Thanks Roger, it is almost fully recovered now and looking far healthier! Well, what have I been up to lately.... (someone must be able to help me here...?) Oh yes, wings! After getting the fuselage basics sorted out, I finished off the rudder. Much better! I then returned to the wings. They were glued together, totally forgetting that I had wanted to get the undercarriage basics sorted and in place first, and also make up a cover for the join where it shows in the wheel wells. So I smeared some PPP in the join in the hope that that would sort it out. Rethink in progress on the landing gear fitment. Then on to the last of the major corrections. I added some plugs to the landing light cutouts to fill those, then sanded them to shape.... They were then recut in the correct places! Still a little rough, but they'll be lined with thin sheet before they're finished. The wingtips weren't right (surprise!) so they were marked up and sanded to the correct shape. I need to widen the chord which means adding plastic to the rear of that curve, so the easy way out here was to sand the rear edge flat to give me a straight surface to glue on a piece of styrene. That will be sanded to shape when dry. Far easier than trying to stick a piece of styrene on to a curved edge! With the trailing edge needing to be moved back, the aileron cutouts also need moving. I wanted to ensure that the wing to aileron join was dead straight, but I wasn't sure I'd be able to do it by sanding. My solution was to fit one piece straight across as the hinge line, and add small filler pieces of varying thickness between it and the rear of the existing wing. It won't be load bearing, so any small gaps here can be filled. I first shaped the existing cutout to accept a piece of .040 x .156 strip as the spar piece. Then I slipped smaller pieces in to find out what sizes fitted. They were then glued in and I used a metal rule to make sure that the spar piece would fit without bowing in the middle. Here are the spacer pieces glued on and then the spar piece was added Nice and straight! The last part was the correction for the rear of the tips, and a strip of .040 x .060 on the inner trailing edges. That piece is going to be sanded down almost completely at the inner end as the wing is actually correct at that point - I suppose something had to be right somewhere! The final major correction in the wing area was to the centre section. It is actually too narrow... Difficult to show it properly due to the angle of the camera, but sections of .040 strip on each side widen it to the correct dimensions. They have been added and will be sanded down tomorrow. Oh goody, more sanding! Have a good night all! Ian10 points
-
Ron Middleton VC "His devotion to duty in the face of overwhelming odds is unsurpassed in the annals of the Royal Air Force" The next build on the work bench is my most challenging yet...gulp. Kind of excited, kind of daunted, the only way to eat an elephant is bite at a time! I've bought this off Mike with the view to finishing it for Telford. Mike started it and did some great work way back when, the original thread is HERE What are the plans? Open the bomb bay up Re-profile the rear end as it should match the profile of the FN20 turret, currently it's too square. What am I dreading the most? Fitting all those windows. I might insert strips of acetate down the sides rather than trying to cut each one out individually. What parts do I already have? FN20 from the Tamiya Lanc Main wheels from the Lanc - I'll build these up with plasticard and miliput to get the right diameter Mid upper turret from the Paragon Manchester Resin engines What do I need? A miracle!!! Some replacement props Early (short) style carb intakes or copies if anyone has one I can borrow from a Beaufighter Someone who is good at forming clear parts Reference material possibly, need to see what I've got already from 12Jaguar who has been of great support on previous builds Some ideas on scratch building the monstrous undercarriage if possible rather than using the white metal parts Someone to release an injection moulded kit no later than April so I can chicken out and take the easy route Expectations Hmmm. I want it to look like a Stirling. Given limited skills, time at the bench and patience, there will be compromises, learnings and errors. If I can get the finished result to look like it came from an injection moulded kit, then I'll be happy. Next steps... Not sure!! Probably to cut the fuselage up and start to build the bomb bay floor. The fuselage needs more stiffness, so it makes sense to continue where Mike left off building the main internal structure to which the detail can then be built on. I'll leave cutting the top of the rear fuselage off until I can secure the forward section. I'm thinking of making internal formers of the correct shape then re-skinning around them to get the correct profile using the Tamiya FN20 turret as a guide. Photo's so far... Any help and prayers along the way most appreciated9 points
-
Hi All, Matador Models make some lovely kits and some fantastic conversion and upgrade sets for us braille scale modellers. This is the first of their kits I have built, though I used their Alamein M3 conversion set and have two others to use on Airfix 1/76 kits. As you can see from my tagline that I rather like Land Rovers, though a decent Lightweight is beyond the range of my savings and likely to stay that way. Now I have one in my display cabinet though, albeit a rather small non-runner. Matador's offerings are resin and white metal, this being an all resin kit. The kit includes a couple of Clansman TUAMs and a set of tools, but I decided not to use them. I added the gearchange lever and the two change levers, but you can't see them so they were a pointless addition. As we modellers understand though - I know they're there. The windows are Micro Krystal Klear, but I should have tried making them out of thin clear acetate. I added Little Lenses for headlights. I still have to try and make decal number plates, but my printer is not playing at the moment so they'll have to wait for now. Thank you for stopping by to look.9 points
-
Matchbox kit PK-31, Curtiss P-40N Warhawk, re-issued by Revell in the Matchbox boxing, Fantastically enjoyable build and a very interesting subject, a Burma Banshee of 80th Fighter Squadron, AAF 10th Airforce CBI in Assam, India 1944, provided. Build thread is here All a bit rushed and it looks like I have still a piece of canopy masking to remove but the time is up so here are the photos. Thanks again for all the 'community spirit' from the BM modellers, looking forward to the next time...9 points
-
Well I had a weekend of almost non-stop modelling, pausing only to cook and shop for cold cures (Mrs F is on the sofa with a woman-flu). I have to confess I feel quite burned out by the whole thing (the modelling, not tending Mrs F, obvs). So in a fit of madness I have finished the Bristol 188. I started by polishing up the Humbrol MetalCote, and then tried some of the C1 Metalizer mentioned above. It makes things much shinier, but the surface is very fragile and I realised how much more fiddling with the model I still had to do! So it's been a weekend of two steps forward and one back, and I forgot to take any photos along the way. So, in no particular order: Decals courtesy of XtraDecal sets Main wheels and legs from the old, old Revell Corsair Front wheels from the new Airfix Gnat with with fuse wire rims, front leg from the Ursus SR53 Shock cones from hardwood dowel turned with an electric drill and file (not SIHRC but good enough) with plastic card fins Reheat flame holders (I assume it had afterburners) from fuse wire Pitot from a stack of Albion Alloys tubes, painted and sanded down to replicate the tapered shape All involving far too much handling and dodgy touch ups. In rather disappointing light I managed to grab a couple of shots of the finished item: The lighter sections of the nacelles are done with self-adhesive silver foil salvaged from sweet wrappers. Thanks for looking, Adrian9 points
-
Ced - this is your fault. I should have been processing 11 colours this weekend. Instead I've been scuttering about making a pair of Spitfires I hope you're pleased with yourself...9 points
-
Corrected the pipework that goes into in back of the sandfilter as per the Haynes book, its a real godsend for pictures of the small details Added a few more lighter panels as per my Ref pictures, I'll probably be doing ZA166 No 16 from 771 Sqn Cheers for looking Dan9 points
-
Here is my finished Revell Luftwaffe Tornado of Reconnaissance squadron 51 in its "Black Panther" scheme worn to the 2011 Tiger Meet. built out of the box other than the crew from my spares box and the stand, this is a great kit anyway with plenty of detail and minimal work needed to make it al fit together. Painted in Tamiya paints, the silver tiger stripes should have been a bit darker, but I'm not too worried as they stand out . I was a bit nervous with the decals as ive had some issues with revell in the past, but the colour is great and they are nice and thick. The decal sheet needs some studying before tacking them and it was fun figuring out the best order to build and paint this. It really stands out on the shelf and I may have to collect all the special scheme tornados CSC_0142 by matt wellington, on Flickr CSC_0143 by matt wellington, on Flickr CSC_0144 by matt wellington, on Flickr CSC_0145 by matt wellington, on Flickr CSC_0147 by matt wellington, on Flickr CSC_0146 by matt wellington, on Flickr CSC_0148 by matt wellington, on Flickr CSC_0149 by matt wellington, on Flickr Some prior to the stores being added. The only issue with this is you loose the movable pylons as they are added after the decals. Not so much of an issue as it was being displayed in flight at 67degrees so they are glued in place now.. 20180215_171338 by matt wellington, on Flickr 20180215_171506 by matt wellington, on Flickr 20180215_171440 by matt wellington, on Flickr9 points
-
Update #12 - Finish !!!! I have to admit, it was a little bit of a struggle getting this one over the line, however it's done so I'm wrapped with that. I really should have made up some rocket rails and hung a few 60 pounders underneath, however with my enthusiasm waning and this GB end date looming, I'll call this one done. Since the last update, the Tempest received a few coats of Clear (my equivalent is "Pledge with Future Shine") and a pin wash of homebrew Winsor & Netwon oils. A very light dose of oil wash streaking was attempted, however these never seem to come out with the photos I take. It's probably too subtle, however less is more they say? Although the Heller undercarriage looks very smart, there are no locating holes for the gear legs to marry the main u/c doors. It's all a little bit of guesswork and I failed to align these correctly. Once again - it'll just have to do. Anyway, here are some completed photos and I'll post a few in the gallery as well to put an end to what has been a great Britmodeller Group Build. Big thanks to @Arniec, @Enzo Matrix & @vppelt68 for putting on such a splendid show. I now have two completed Matchbox kits that in all probability would have never been started, let alone completed. I must also thank the many fellow GB members (too many to mention however you know who you are) for all the fantastic encouragement and feedback to get these kits done. It really goes a long way and I love the way we all motivate each other and probably get a little carried away at times. Finally, it's been a pleasure to keep the Matchbox II GB list alive and current. Once it's all over I'll do a recount to double check my figures, however I never thought this would end up so large and filled with excellent renditions of Matchbox models. As I am a product of the 70's, Matchbox really was my first true love in both Di-cast cars and Plastic kits. Yes, they take some work to get right but they are very rewarding and rekindle the good old days minus all those 'cheating' products like PE and Resin bits!! So here's the Tempest F.6 as flown by 249 Squadron based at Deversoir, Egypt around Aug-Sep 1949. She is shown not long after being repainted into the new 'Desert colours' of Dark Earth, Light Slate/Sea Grey, and Medium Sea Grey lower surfaces. Cheers (and thanks).. Dave8 points
-
Hallo guys, Today I finally decided it was time to add some colour to the Buccaner interior. Blackfirst, then grey, then Future, then Tamiya back panel liner, then lighter dry brushing...Right side Left side Then final detail with different colours and it was time to add some decals. Final result. Tomorrow I may start thinking about the seats!!! Good night!!!8 points
-
So back from shifting boxes and on to the Phantom. A coat of grey was applied, which as always highlighted a number of imperfections to deal with. These cleared up, the light gull grey is applied. All the paints here are custom mixed using Tamiya paints. After some areas are touched up the whole model will be wet sanded and buffed up with a polishing stick. This will not only give me a smooth surface to apply the decals but should distress the paint work. Then the rear metal work can be applied.8 points
-
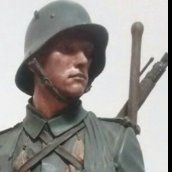
Another try in painting DPM (and eyes). The kit is from Firing line, called "British soldier Northern Ireland, 1970s" and it comes with 3 heads (one with Fusiliers Beret, one with Royal Scots Tam'O'Shanter, an this one with Glengarry). The figure is amazing, unfortunately my painting skills are way behind... Maybe you like it a bit... Cheers Tobby7 points
-
Hi, As in title - the second Kestrel driven Dutch Fokker in livery from April-May 1940: The Fokker C-X made out of AZ kit with small improvements. I was puzzled that in instruction colour of top is different from that in LF box of C-VD (I mean - the FS numbers are different) - so I asked in WW II section and got confirming. Therefore it is khaki from top. Please note, that "707" on photos have hastitly overpainted Dutch roundels on top wing. {EDIT - Three first photos replaced} Among improvments new intake to bottom glycol cooler and landing lamp as well as bombs were done or added Regards and comments welcome! Jerzy-Wojtek7 points
-
"Don't tell him Pike!"7 points
-
BANDAI KIT 1/72 B WING7 points


.thumb.JPG.2ce06c4ff2300a5faba93aaeacbdab25.JPG)


This leaderboard is set to London/GMT+01:00