
Leaderboard


Popular Content
Showing content with the highest reputation on 13/02/18 in all areas
-
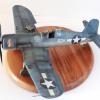
Good morning from Viet Nam ! This is my lattest build, the Saab Viggen AJ-37 from Special Hobby. This is actuallu a rebox of Tarangus Viggen with the added of color PE for the cockit. The fit is good overall, consider the nature of limit run kit. There are some inaccuracies lies within the kit, especiall the tiny main wheels which is too thin. I used several plastic sheets to add the thickness then sand to shaped. Paint use mostly with Gunze Color, weathering done with Mig and chipping here and there with color pencil The splinter camo is the hardest paint job I have done up to date. Maestor made a paint mask sheet for this camo, however the fit isn't that good and need a lot touch up to follow. Weapons are Maverick Missles from Eduard, RBF tags, others are from spare box. Pitot tubes from Master Model ( I think ) The Saab Viggen will surely stand out from all the F 16,18 etc thanks to it camo and muscle shape. The build was fun but the splinter camo is something I won't try again Thanks for reading !44 points
-
I'm on a bit of a roll with the Mustangs at the moment. Now that I've got a bit of a grip on airbrushing technique and the use of Alclad, the options seem almost limitless (and that's just in the 8th AF which is my interest). But there are a couple of iconic P-51s that I've always wanted to do, including at least one of the aircraft in those classic photos of the 'Bottisham Four' taken on 26 July 1944. Here's 361FG CO Lt Col Christian's 'Lou IV' captured on film that day: And here's my rendition of it. It's the lovely little Airfix 1/72 kit, basically out of the box but with fin fillet removed, wing panels puttied, canopy rails added, elevator mass balances scribed, and a rear view mirror scrounged: Decals are Eaglecals, which worked beautifully. The main code letters were a bit too tall so I cropped them a touch to get the fit just right. Underwing tanks are from the kit, but I moved the filler cap on one of them and added the flange that runs round the middle of both. I also added the plumbing for good measure. Paint is Alclad Polished Aluminium for the natural metal, and plain Aluminium for the lacquered areas. This was protected by a coat of Alclad gloss clear, brushed on - it worked a treat. The greens went on next and are both Tamiya: the dark areas are Olive Drab (brush painted and inspired by our very own Tony O'T's impressive results), and the lighter bits are RAF Dark Green (a mix of brush on the fuselage and airbrush on the wings). There's been a lot of discussion over the colours which I took into account before making my decisions. The invasion stripes were airbrushed for the wings and brushed on the fuselage. And the yellow is Xtracrylix. Final varnish is my preferred mix of Humbrol enamel Satin and Matt. To get a hopefully accurate reproduction of the underneath I used period photos of Christian's aircraft: ...and of 'Tika IV' also from the 361st FG. Both appear not to have invasion stripes on the radiator door: The cockpit is stock Airfix, so the seat, instrument panel and gunsight are not correct for a D-5 model. But I'm not fussed about that: the aim of this build was to get a decent replica of that classic paint job, and I don't think it's too far off. Here she is with my fairly recently built P-51B, which used the KP wing and the Hasegawa fuselage: Hope you like it! Justin29 points
-
Here she is: Williams Brothers classic 1/72 Boeing 247D airliner, modified to the original 247 (no 'D') configuration. That conversion included modifying the kit's 'straight-line' fin/rudder to the earlier 'notched' style, and detailing the hinges; cutting off the kit engine nacelles and scratchbuilding new smaller-diameter ones (from Monogram 1/48 F4U-4 drop tanks); and using the engines and speed-ring cowlings from an Airfix 1/72 Ford Trimotor to replace the kit's late-style NACA-design fully-enclosed engine cowlings. (Both real aircraft utilized the same Pratt & Whitney R-1340 Wasp engines, so it was an easy swap...just requiring new scratchbuilt exhaust collectors.) The kit includes the early-style 'forward slant' canopy as an option; though I had to cut out the centerline pilot's hatch and replace it with an acetate piece, since the kit canopy is a two-piece affair with the seam running right down the center. I added the early-style tall aerial mast forward of the canopy from a shaped section of bamboo barbecue skewer, to give it enough strength and rigidity to stand up to the tightly-stretched EZ-Line aerial. Details on the finish can be found in the WIP here. Decals were all made up on my PC and printed on my faithful HP inkjet, using Testors decal paper and their Decal-Bonder spray to seal. The decals included something I tried for the first time: 'printed' panel lines. Uncertain of how visible my usual 'pencil' technique would be against assorted shades of silver, I made up a bunch of straight and curved lines in various thicknesses and colors, to apply as decals. I used the charcoal-grey versions exclusively---the black were much too high-contrast---and it worked fairly well, particularly on the 247's complex curved nose panels. There were two main drawbacks: homemade decals tend to want to curl, and with tiny strips of panel lines this became an exercise in patience in some areas. The other drawback comes from putting mainly clear-film decals over a silver finish: even with a Future undercoat and liberal use of Solvaset, there were some 'silvering' areas that remained invisible until the final finish-coat was applied. Most could be dealt with, but a few rough areas frustratingly remained. The aircraft I chose to depict---NC13304---was the fourth production machine of the total 75 built, and went into service in April 1933; it is the same one shown in a well-known overhead photo taken over the Chicago World's Fair in the summer of that same year. Here's the same aircraft as it might have looked on the evening 0f 10 October, 1933: United Airlines' regularly-scheduled 'Trip 23'---they didn't yet refer to them as 'Flights'---preparing to depart following a twenty-minute refueling stop at Ohio's Cleveland Hopkins Airport, on the next leg of her trans-continental route from Newark, New Jersey to Oakland, California. Now headed for Chicago, the ill-fated airliner was about to enter the annals of aviation history...but for all the wrong reasons. At approximately 8:49 PM, the pilot radioed his regular position report, with all normal and the aircraft on-course for the Windy City. When the next scheduled communication---twenty minutes later---wasn't made, it raised no particular alarm, since radio communication was still highly subject to weather and/or occasional technical difficulties. Alarms were raised a short time later, as confused reports started to come in from ground witnesses: an explosion had been heard in the night skies over the rural farm area near Chesterton, Indiana. A short time later, wreckage was found: the aircraft had been torn apart in mid-air---by what authorities later determined was most likely a nitroglycerin bomb planted in a lavatory storage cabinet---with the loss of all aboard: four passengers (the aircraft could have carried as many as ten) and three crew, including pilot, co-pilot and stewardess. This first-ever bombing of a commercial passenger aircraft---an act of what we would now call 'terrorism,' though then it was merely referred to as 'sabotage'---was extensively investigated by the FBI and civil aviation authorities. Despite pursuing numerous seemingly-promising leads and an ever-widening list of possible suspects who had any potential connection with the airline, the flight, or its passengers or crew, no credible motive for the act was ever determined...no probable suspect(s) firmly identified...and no credit claimed by any individual or organization, for having brought the airliner down. The puzzle of the ill-fated United Air Lines 'Trip 23' remains the oldest 'cold case' in commercial aviation---and one of the most frustrating and elusive 'unsolved' cases in the entire history of aviation.26 points
-
Hi folk's I was never really into Frog kit's as a youngster they were not as ready available as Airfix or Matchbox so this is the first of a half dozen Frog kit's I'll be working through in the next couple of month's.It was still sealed when I found it at a local Sunday Market for a tenner Decal's were poor but I managed to save the serials and codes and after a few hairy moment's got them on.NV427 was with 404 Sqn RCAF and was lost on a mission over Norway on 8th March 1945 sadly with the loss of her crew.As will the other's I'm simply building OOB as we used to hopefully with a better paint job and no gluey fingerprints than years ago!Thank's for looking in.Tempest,Typhoon,Blenhiem,Boston and Hunter to follow.18 points
-
Hi all, one of the great things about working for Airfix Model World is the chance to build some really off-piste subjects that I would never normally attempt. Such is the case with the Basler BT-67 Turbo-Dakota conversion I built for the October 2017 issue. The base kit is the excellent Airfix Dakota III while the conversion set came from Alley Cat. There are several variants to be had in the range but in this case, we chose the single Mauritanian Air Force example, serial 5T-MAH, mainly due to its natty colour scheme. As was to be expected the Alley Cat parts fitted the kit perfectly with only the extra side windows needing to be made from clear acetate. As the BT-67 has a revised semi-glass cockpit the whole nose interior needed to be upgraded and this was done using parts from the Airfix kit, scratch-built panels and bulkheads, instrument panel, revised yokes, dials, via Airscale and the usual throttles, pedals and fire extinguishers. This version also featured a Star SAFIRE FLIR system for surveillance operations, and while the under-nose turret was included, the operator's area, seat, table and FLIR screen had to be scratch-built and fitted. True-Details resin wheels replaced the kit parts as these had a far better level of detail and the rear boarding ladder had railings fitted. The cargo interior also received new bench seats along with all strapping.The top of the forward fuselage was festooned with aerials and sensors that needed to be scratch-built and added along with the new oblong window added above the pilot's position. The model was painted using Lifecolour and AK Interactive Air-Series acrylics and weathering a mix of Abteilung502 oils, AMMO-MIG pastels and AK Interactive oil and grime washes. Good fun and highly recommended. Hope you like it... Cheers Melchie17 points
-
1/72 米空軍 第35戦闘航空団F-16CJ ファイティング・ファルコン "ワイルド・ウィーゼル"F-16CJ Fighting Falcon "Wild Weasel" #90-0802 of 35FW, Pacific Air Force (PACAF), Misawa AB, JAPAN.The 35th Fighter Wing is an air combat unit of the United States Air Force and the host unit at Misawa Air Base, Japan. The wing is part of Pacific Air Forces (PACAF)'s Fifth Air Force.14 points
-
Hi! Here are the photos of my latest work. It`s the ICM kit,which despite having received a lot of "flack" builds up into a beautifull model. It has several issues, mainly with the cockpit, but, after the glass work was installed, this modeller can live very well with it. paints utilised: Vallejo Model Air e acrílicos Mig. detailing sets: Eduard interior and exterior set If you have interest, you can find in my blog around 90 fotos with all the building and painting process explained. http://josepiresmodelismo.blogspot.pt/ This model was part of Airfix Model World mag, December 2017 issue.13 points
-
hello hall My first 2018 OOB , P40N Eduard... (hasegawa + Eduard goodies ) ,I have voluntarily not to modify some small errors of the kit I wanted to make a simple and fast made thing relax... And enjoy me with the painting and the weathering painting Gunze and Tamiya , oil wash , pigments Mig and Tamiya , and my water colors pencils best regards Pascal.12 points
-
Just finished this today. It's Hasegawa's 1/48 Grumman F6F-5 Hellcat finished in Mr Color 71 and with the kit decals. The cowling is by DMold and the wheels are True Details - sadly they solidly stuck in position before I could rotate them so the flats are correctly orientated. I also lost a pylon stub during polishing. More details at https://jonbryon.com/hasegawa-1-48-grumman-f6f-5-hellcat/. Thanks for looking Jon12 points
-
The Trumpeter kit isn't too bad. Fit is pretty good, detail adequate and the decals settle own nicely. One negative about the kit is the weapons. You get 3 drop tanks, more than a few Mk 83's, two MER's and two AGM-12's. It's is a little bit limiting as early in Rolling Thunder, thuds normally carried 6 Mk 117 bombs on an MER on the center line mount, but you get no centerline weapons mount either. For aircraft venturing into the more dangerous RP's, a QRC-160 jamming pod and AIM-9B were carried for self defense, neither of these are included. Thus I used Hasegawa weapons sets and scratch built a center line mount for the MER. This aircraft, 61-0132 was flown by 1st LT David Waldrop III on his double MiG killing mission over the Yen Vien Rail Marshaling Yards on August 23rd 1967. He claimed and was initially credited with gunning down two MiG 17's, although later on his second kill was disallowed. Waldrop would complete 100 missions over North Vietnam.11 points
-
@Stew Dapple @CedB @giemme @Biggles87 @keefr22 @At Sea @TheBaron @rob85 @Max Headroom Thanks guys, you are really too kind. A little more tonight. the other wall was put in and some wires at the far side. The tops had to be sanded, I couldn’t get her looking as neat as I wanted so I stuck on two strips of paper thin plasticard. Much better. I don’t know if you can see the little holders just in the middle of the main section? Well they’re CrAzY small, I have to fit 0.3mm wire twixt that bomb bracket and the holder. My eyes are so I’ll leave the rest for tomorrow. oh and. Thanks CC you are a true Gent. I can’t wait to settle the bit inside it’s new home. Thanks for looking in. More soon. Take care and as always. Happy Modelling. Jont.11 points
-
Almost OOB model, I used Eduard masking tapes for canopy and zoom for the cockpit.10 points
-
Will you be building it with the bomb doors closed?9 points
-
Hi everyone, just put the finishing touches on my attempt at Hobbycrafts 1/48 Beaver, which I hope you don`t mind me sharing Finished to represent a RU-6A Beaver of the 146th Radio Research Company, Army Security Agency, US Army, Vietnam Which were used to monitor North Vietnamese Radio Traffic and Intelligence Gathering I had to do on of these to compliment my RU-1A Otter I did a little while back that you may remember Apart from the obvious aerials and dipoles, made a few improvements the the base kit, including: brake pipes, steps on the undercarriage legs, embellished the kit steps on the fuselage........ ...made a new exhaust and wiring harness on the engine Markings came: some from the decal stash and some handpainting Finally a shot of it with its bigger RU-1A Otter brother... Hope you enjoy, Thanks for looking Cheers Russ PS I`ve done some new shots of the Otter now I`ve added the missing centre pillar on the windscreen and thanks to Larry for providing the kit8 points
-
Hi Gents. This is the superb Ki-61-Tei from Tamiya in 1/48th in the colors of the 19th Sentaï, an emergency unit swallowed by the God of War in the Philippines in 44. I have used pictures of real aircrafts of this unit to create the paint job, using the hair spray technic. All markings are mask made, and the tail markings touch up with a brush to simulate the hand paint job. Best regards. DSC_0001 by jean Barby, sur Flickr DSC_0002 by jean Barby, sur Flickr DSC_0003 by jean Barby, sur Flickr DSC_0004 by jean Barby, sur Flickr DSC_0005 by jean Barby, sur Flickr DSC_0001 by jean Barby, sur Flickr DSC_0002 by jean Barby, sur Flickr 1280px-Kawasaki_Ki-61_Hien_with_drop_tank by jean Barby, sur Flickr8 points
-
"The First Jet Squadron"F-16B Block 5 Netz #008-780539 of Lt. Col. Ytzhak, 117 Squadron "First Jet", Ramat David Airbase, Israel.It will be an out of the box project, with stock decals and parts from Hobbyboss, but I will use IDF weapons from Skunk Models Workshop.It's a Hobbyboss kit, Nr. 80273 issued at year 2008. Fitting are good, details are acceptable, everything is nice! Thank you for viewing and Happy Chinese New Year!!8 points
-
PK42 Rockwell T-2C Buckeye VT-19, U.S. Navy NAS Meridian 1975 1/72 Revell by John L, on Flickr by John L, on Flickr by John L, on Flickr by John L, on Flickr by John L, on Flickr8 points
-
I'm a newcomer to the world of 1/76 to 1/72 AFV's so I can only speak for myself - but for me it' all about 'fun'. I've actually been looking for more naïve kits - to see what I can add to them - rather than the ultra-detailed resin kits that you can get. I've been majoring on PSC kits - which have very little detail - but they do come with 'toy soldiers' and as Ratch says - it takes you back to when you were a kid - 'playing war'... There is always the thrill of the 'money shot' too - in 1/76 - it's a 1p piece ...but never forget - don't take things too seriously - this is supposed to be fun after all - or as Mrs X says... ...give it a go - it's fun8 points
-
I cant believe that I only started this two weeks ago. This is not the version with the already painted body work. I decided to add extra coloured wires (painted lead wires) to the back plate to busy it up a bit (a large expanse with lots of gaps otherwise. I also added twisted red/yellow wire to the main body to add a bit of visual interest. A really fun kit and probably the only model I have ever brought that I have sent a pic of to my wife from a model show and got told that I have to buy it (she is a big Back to the Future fan) I also tried to add heat staining to the two exhausts at the back, which I am pleased with how they came out. _20180213_113038 by Richard Page, on Flickr _20180213_113120 by Richard Page, on Flickr _20180213_113316 by Richard Page, on Flickr _20180213_113751 by Richard Page, on Flickr P2130029 (2) by Richard Page, on Flickr P2130030 by Richard Page, on Flickr P2130031 by Richard Page, on Flickr _20180213_113254 by Richard Page, on Flickr _20180213_113609 by Richard Page, on Flickr _20180213_113705 by Richard Page, on Flickr _20180213_113158 by Richard Page, on Flickr P2130032 by Richard Page, on Flickr P2130033 by Richard Page, on Flickr P2130034 by Richard Page, on Flickr P2130037 by Richard Page, on Flickr Couldnt resist taking these photos of my two 80's film legends together _20180213_112835 by Richard Page, on Flickr _20180213_112807 by Richard Page, on Flickr7 points
-
Two-Seat T-Harrier (T.2/T.2A/T.4/T.4N/T.8) 1:48 Kinetic Model The Harrier is an iconic (in the truest sense) example of what was possible when British Aviation was at its prime. It was a revolutionary design back in the 60s, and has seen many improvements and even a complete re-vamp in the shape of the Harrier II, which saw McDonnell Douglas get more heavily involved, giving the US Marines their much beloved AV-8B, and the British the Gr.5/7/9, all of which had new wings, massively upgraded avionics and improved versions of the doughty Pegasus engine, which was always at the heart of this legendary design. The Harrier is a difficult aircraft to fly due to the high pilot workload, and requires the best pilots to do it justice, which means that trainer variants are essential, as simulators can only offer so much realism, even now. The first trainers rolled out in the 1970s, and have been upgraded along similar lines to their operational brethren to provide as close to real-world training conditions as practical. The fuselage was extended at the nose, with a huge blister canopy encompassing both seats, with the instructor sitting substantially higher than their pupil to afford them a good view ahead, and a long, weighted "stinger" tail extention to equalise the centre of gravity with the single seater. Although it disrupts the sleek lines of the single-seat variant, the Trainers have a strange charm of their own, and there have been some interesting schemes, including the Raspberry Ripple and Qinetiq liveries over the years. The Harrier II trainers have the new composite wing, and are designated T.10/12. The Kit For many years modellers of the Harrier have been crying out for a good quality kit in this scale, and also the two-seat variants, with only a partial answer being forthcoming until now. Kinetic have put a lot of effort and research into creating models of the two Sea Harriers already the FRS.1 and FA.2, both of which we have reviewed in the past, and have been well-received for their overall level of accuracy. Now we have this new tooling, which has a substantial cross-over with the original, and sold out so quickly that we have only now received our sample for review from the second batch that have been commissioned. Something tells me this won't be the last re-pop of the moulds. This kit deals with the earlier "tin wing" Harriers before the introduction of composites, so the most recent variant is the T.8, and anything earlier, all from the same box. There are nine sprues in grey styrene, three of which are new, plus one that has been slightly tweaked for this edition. There are two sprues of clear parts, a small fret of Photo-Etch (PE), a large decal sheet and the instruction manual. The big changes are forward of the engine intake "ears", but the rear boom is also extended for balance purposes, which helps achieve the ungainly look of the finished model, and that of course is exactly how it should look! The cockpit has two ejection seats with separate cushions and headbox details, plus slightly simplified PE crew belts and the pull handle between the pilot's knees. These are fitted into the stepped cockpit tub with rudder pedals, dual control columns, instrument panels that have separate painting guides, coamings, HUD and the big windscreen-within-a-windscreen that shields the pilots from ejection backwash in the event a quick exit is required. Detail in the cockpit is good, and will come up well once painted with a fine brush and some patience. In order to close up the fuselage the main gear bay boxes are built and painted, as is the bell-shaped intake trunking, having the front section on the nose gear bay attached to the underside of the cockpit tub, and the aft section to the fuselage sides. The rear bay is attached to the mechanism that allows the exhaust nozzles to rotate, which must be positioned opposite their exits before you can close up the fuselage. A choice of open or closed auxiliary vents are provided, which slot inside the intake lips, and the closed ones depict the characteristic gravity droop of the upper doors, which is as it should be. The wing is top mounted, with the anhedral moulded into the full width top panel, and the lower panels separate parts that bracket the fuselage sides. Separate flaps and their actuator fairings are provided, and although undocumented in the instruction booklet, these can be replaced by parts E1 to pose them dropped. Clear wingtip lights are supplied, which makes adding them a breeze, as their location would be a pain to fabricate your own. More good things! There is a choice of three tail fins, each with a separate rudder, and the elevators have a separate swash-plate and pivot lug for attachment to the fuselage, and the wing panel can be fitted nose-first, using a small lug at the front to find the correct location and alignment. There are no LERX to worry about on the older tin wings, and just a tiny PE mesh insert covers a vent at the rear of the cockpit spine behind the air conditioning. At this point the airframe is ostensibly complete, so spare a little time here to whoosh it around the room making suitable jet noises and ensuring you don't get caught doing it. The smaller assemblies are then built up, including the bicycle wheels, the canopy parts with some additional PE and plastic parts, plus a set of plastic rear-view mirrors to finish them off. You have a choice of laser or a pointy nose cone, which varied between airframes, as detailed in the accompanying chart, with another chart showing which tail stinger was fitted to which airframe to ensure you get both ends just right. Another choice of undernose inserts is made between T.8s and the rest, and the main gear can be fitted along with their respective gear bay doors, and a choice of small or large air-brake, which has its own chart of which one was fitted to which airframe. It makes a lot of sense to choose your decal option at the outset. Lumps, bumps, aerials and antennae are fitted on almost every spare inch of the airframe, plus an optional shoulder-mounted refuelling probe, PE stays for the side-opening canopies, after which you just need to decide what to hang under the wings and fuselage of this ungainly but beautiful aircraft. You have a choice of gun pods or strakes under the fuselage, which was always fitted with one or the other to keep the airflow from the engines diving under the fuselage too soon, and when the outer pylon is not used, a small cover is fitted instead. Kinetic are usually generous with their weapons, and here you a decent array too, most of which are on two identical sprues, with a few others knocking about on the others. The parts most fitted are as follows: 2 x 190 gallon fuel tank 2 x 100 gallon fuel tank 2 x Aden gun pod There are various other weapons on the sprues that would usually end up in the spares bin, as most training sorties would be flown with either a clean airframe, or with extra tankage as required. The trainer is technically combat capable however, so can carry other munitions should the need arise. Typically, this seems to consist mainly of Sidewinders of rocket pods depending on training requirements. Markings The decal sheet is A4 sized, and printed by Cartograf, which is a guarantee of good registration, sharpness and colour density, with a thin matt/gloss carrier film cut close to the printed areas. Design was carried out by CrossDelta, and includes a host of stencils that are covered on a separate page, plus ten options for different airframes and operators. From the box you can build one of the following: Royal Navy Fleet Air Arm T.8, ZD990/721, 899 Naval Air Squadron, RNAS Yeovilton, 2004-2005, RN Fixed Wing Standards Flight to April 2006 – gloss black overall, with black or grey tanks and winged fist on the tail. Royal Navy Fleet Air Arm, T.8 ZD605/720, 899 Naval Air Squadron, RNAS Yeovilton, 1996 – gloss black overall with outlined winged fist. Royal Navy Fleet Air Arm T.8, ZD604/722, 899 Naval Air Squadron, RNAS Yeovilton, 1996 – Gloss black overall, with outlined winged fist. Royal Navy Fleet Air Arm T.8, ZD605/718, 899 Naval Air Squadron, RNAS Yeovilton,1985 – Dark sea grey overall, with outlined winged fist. Royal Air Force T.4A, XW265/W 233 OCU RAF Wittering, 1992 – Grey green camo overall. Royal Air Force T.4A, XW266/51 233 OCU RAF Wittering, 1975 – Grey green camo over light grey undersides. Royal Air Force T.4A, XW272/Z IV(AC) Squadron, RAF Güttersloh, 1980 – Grey green camo over light grey undersides. US Marine Corps TAV-8A VMAT-203, MCAS Cherry Point, Late 1970s - Grey green camo over light grey undersides. Armada Española (Spanish Navy) TAV-8S 8a Esquadrilla (8th Squadron), 1988 – gull grey over white. Royal Thai Navy TAV-8S, 301 Squadron late 1990s – Gull grey over white. The intake roundels are sensibly broken into sections with separate parts for each of the blow-in doors to ensure good settlement into the shapes found there. I would have liked to have seen some decals for the instruments, but with a detailed painting guide for that area it's not a major problem, and even if it is, Eduard are bound to be along any moment now with a PE set that will give you all the detail you need. Conclusion We now have a rather nice Trainer Harrier in 1:48, and I for one couldn't be happier. Two of them is better of course, but a modern, detailed model was much needed. How long will tranche two of the mouldings last? Not long, at a guess, so if you're planning on getting one, I wouldn't hang around. I'm also getting the prayer mat out to wish for the composite wing 2-seaters. Very highly recommended. Review sample courtesy of6 points
-
So I am about to embark upon my next build adventure, Italeri's 1:72 Stirling Mk.IV, and As.51 Horsa Mk.I to recreate the glider tug and pay tribute to the role they played during D-Day. The first kit I'm using is the Stirling Mk.IV, the Short Sterling was the RAF's first heavy bomber to be used during World War Two. The Mk.IV was adapted as a glider tug and used to tow Horsa and Hamilcar gliders. The box includes 5 excellently detailed sprues, as well as a clear sprue and Pe parts. There are 4 different colour schemes, with accompanying decals. I am planning to go with the scheme of 299 Squadron which flew from RAF Keevil, and could have towed the Horsa I am planning to build. The second kit, the AS. 51 Horsa Mk.I in contrast is minimal in parts and appearance. The box contains 2 sprues (with very little detail, as you probably would expect on a glider) and a clear sprue. There is also a sprue of Paratroopers (although I am not planning on using them for this project). The colour scheme and decals are that of the Horsa used in Operation "Tonga" Pegasus bridge 1944. I am planning on building them in flight, with the Stirling towing the Horsa, for that I will be adding small stands, but apart from this adaptation they will be out of the box builds. It's going to be a long build but I'm very excited about the work ahead.6 points
-
This Bf 109G-6 (part of the AZ Joypack I bought) is an aircraft of the Royal Hungarian Air force (Magyar Királyi Honvéd Légierő (MKHL)), W.O+21, of the 101st Home Defence Air Wing (101. Honi Légvédelmi Vadászrepülő Osztály), known as the "Red Pumas". Post war, the success of the Red Pumas against the Soviets was not an acceptable topic, and many of the pilots were severely punished for their actions during the war. However, the unit was reborn in 1988, and has since then proudly flown MiG 21 and 27 fighters and is now moving onto Saab JAS39's. The Red Pumas were considered an elite formation, and their successes (albeit at high cost) fully support this designation. This aircraft, W.O+21 was the mount of Lieutenant Lászlo Dániel. His aircraft is unusual in that it sports kill marks. Where the display of victories on aircraft was pretty much de rigeur on USAAF, Luftwaffe and even Soviet aircraft, it was almost unheard of in the MKHL. The bars on the tail show Dániel's early kills against the USAAF in the period of June and July 1944: a P-38, plus another shared, two shared B-24's and a further individual P-38, claimed but unconfirmed. He went on to score a further six kills against the Russian in 1945, and survived the war. As I said, this was an AZ Joypack kit – I’d recommend these with no hesitation, except for the fact that there’s only one early canopy in the set. Fortunately, vacform canopies such as Rob Taurus easily fill the void. Paints are the usual Tamiya mixes (RLM 74/75/76), and in this case I avoided panel washes and the like, just putting on a bit of smoke from the low-quality fuel that plagued late-war Axis operations. The decals are from a set by Print Scale: the decals themselves are superb, and although the instructions are a bit basic, the research is pretty good and all the profiles of the subjects can be traced to photos!6 points
-
Bit of an update here. Once all the colours had fully dried, I did a light panel wash with thinned black/brown oil paint. I then started using pure oil paint to create lighter versions of the plane's base colours. It's fairly repetetive, so I only took photos of the first round, which was making a pale sand yellow colour, which was then thinly stippled onto the middle of sand panels. This was then blurred in with a soft brush. Here I find it's helpful to have the dark oil pin wash still a bit wet, as it effectively stops the pale shade spreading from panel to panel. Like a little dark-tone moat! Here it is a bit more worked in.... This was repeated for the greens also. The guns I snapped off (of course) over the painting process were replaced. The stumps cut flat, then spares cut to correct angles and glued on from the outside. Sadly I had to snip off the prop attachment points, as it became clear to me that in spite of my best efforts the engines were not lined up straight inside the nacelles! Not sure why, but they look OK from through the access panels, and I don't think anyone will know better once the props and spinners are on! This leaves the Ju88 at the below stage. I will leave the oil to dry a few days, then put decals down, and weather those before brushing on a layer of Vallejo satin varnish, which should take the shine off the pale blue... Which, as one can see, came out of the Belton can inexplicably high-gloss. Thanks for looking! Bruce6 points
-
Here is my recently completed AMG Bf 109 B. The complete build thread can be found here: After fighting the AMG Bf 109 A to a draw, I thought I wouldn't want to touch another one for quite some time. But the more I looked at the finished model the more I liked it. This time I didn't adhere to "out of the box" rules and added a few bits. However the AMG kit is so complete, not much was necessary. The cockpit only needed a little sprucing up with some stretched sprue, plastic card and some Eduard preprinted steel seat belts. I also added a Squadron Vac canopy, Barracudacast wheels and wire brake lines. Decals came from A Kagero monograph (Cartograph) and Print Scale. Paints, as always, are Gunze Sangyo aqueous. All in all, this is a very good kit, but not without fit problems. And here it is side by side with its older brother.5 points
-
I was looking over some of the pictures I took whilst we were ensconced beneath the mighty TSR2 at one of the shows Not weathered just old is about the finest description she could have now Do you mind me dropping this here? I can remove as soon as you like, if you like Bill All those fasteners must have been opened hundreds of times, and she didn't even fly5 points
-
Thanks Martin, I thought so, but often all we could see from the gliding club car park was the tip of a tail fin. The dates on the information for G-BDIX certainly tie in with our late 70s, early eighties Sunday picnics. Thanks mate, nearly as tall as his old man now! Your correspondent is is not getting taller, quite the reverse, although he is getting rounder! Untitled by jongwinnett, on Flickr Not sure that Jet Provost ejector seat could shift me! The Harrier flight received some primer, mainly as a witness coat Primer by jongwinnett, on Flickr Pleasingly it looks as though the tail mods have blended in pretty seamlessly. I'm nervous the canopy join may have let overspray through, won't know until I unmask I wanted to prime the JP too, but discovered a world of fiddlyness in fitting the canopy and masking, plus the blasted thing seems to need a dozen different colours so I'll need to spray black first (Canopy frameinteriors), then white (top half of fuselage, hopefully that'll do for the red too, then grey underneath. Eek. If I was more confident perhaps I would skip primer and go straight to top coats? I'm still having a lot of grief gluing canopies, the PVA takes a long while to grab and I don't seem able to apply it neatly.5 points
-
No prizes for guessing which aircraft our newly acquired stash queen will eventually represent! Untitled by jongwinnett, on Flickr5 points
-
Hi guys! So i'm afraid i've very much caught the submarine bug. Having started with the Kursk here, I've moved onto Bronco's HMS Vanguard, one of the 4 SSBNs handling our nuclear deterrent. The kit is simply stunning to put it simply, there's so much detail from the towed sonar array right towards the bow sonar. I painted the submarine three different shades of black (believe me I did! The photo set up I've got is a bit rough though...) to account for the sections below and above the waterline as well as the main 'deck' and fin. The bow sonar dome is Tamiya acrylic gloss black and the trident missile is simply NATO green and white. Weathering was kept basic because 1. This is only my second submarine so I'm trying to keep things easy for myself and 2. the reference photos I saw of it showed it to be relatively clean. Again, sorry for the quality of the photos, they may just look like variable photos of a black pudding but thanks for looking! Sam5 points
-
Welcome aboard, Tim! We're trying to do some justice to the old gal, hopefully it won't disappoint. To be honest, I had expected to be done by now, but Airfix decided to keep us honest and throw a few challenges our way. I'm on my second application of PPP on those nasty wing seams. It didn't look too bad after the first, but wifey has a critical eye and won't let me get away with that. I'm still thinking about how to get the panel lines back. Move them, I guess, and scribe near the joints but not on them (PPP doesn't really like to be scribed). I know, that's cheating, but what the heck. They probably weren't in the right place to begin with. Cheers, Bill5 points
-
I hate building and painting aircraft undercarriage. The fuel tanks and pylons built-up. As well as these items, crew ladders will be added also.5 points
-
Almost finished! Just needs to unmask the canopy parts and apply a flat coat to everything and I can call her done! Matt5 points
-
I was! You don't think I wasn't going to miss something like this do you? I didn't have a decent camera in those days, only a little pocket Instamatic, so the images are quite grainy. Also, I didn't get much time to focus on anything specific; everything was happening so fast I couldn't decide whether to try and catch a jet or see where the bombs were landing etc. Mike5 points
-
opps......... well there's no going back now.........5 points
-
Apologies for the lack of updates. It's becoming clear I enjoy building more than finishing, so after the stress of the decals, I've retreated to plastic bashing - Harriers mainly. Hopefully a a combination of guilt and a day off will be motivation enough to get a move on with these two.5 points
-
The 1:72 Modelsvit kit of the Su-20 built in Iraqi markings from the early stages of the Iran-Iraq war. Since it's a short run kit, it didn't exactly snap together, but nothing that could not be made to fit. Colours used are Model Master 2130 blue on underside, Model Master 1706 sand and Model Master 2081 green on upper side. FAB-250 bombs and tanks are kit parts. Decals are from Linden Hill Decals Iraqi Fighters sheet. While Iraqi decals are included in the kit, they appeared to not be have been printed properly, However I did yse the intake warning decals from the kit. The Linden Hill decals went on without any issues despite being in multiple parts. Yje green triangles go on first, then the bit in the middle. Wing decals are abgled so that they will point forward when the wings sweep back. The MiG-23 had the markings painted the same way on the wings. Linden Hill decal sheet. Build Progress Photos Su-20-62 by Ryan Hothersall, on Flickr Su-20-63 by Ryan Hothersall, on Flickr Su-20-64 by Ryan Hothersall, on Flickr Su-20-65 by Ryan Hothersall, on Flickr Su-20-66 by Ryan Hothersall, on Flickr5 points
-
Getting used to weathering Decals totally fictitious because the kit decals would not fit around. the bolt heads As this is 1/35 scale please look from 10 foot away Thanks for getting to the end Rodders4 points
-
Made a start on this gorgeous little thing. Revell kit 07026. Engine decorated in a mix of Alclads Polished Aluminium, White Aluminium and Steel. Added some tiny bits of AK Interactive Grey Kriegsmarine wash. Tis German after all. And stripped wheels and gave them a coat of Alclad jet exhaust and dabbed Polished Aluminium on the fronts with a make-up sponge. Kinda worked how I wanted it to. I get the feeling this one will be a rather enjoyable build.4 points
-
I always wanted a work shop that resembled my old, favorite Hobby Store in 1960's Park Ridge, IL. My dad and I would walk to this shop every Saturday and pick up a kit. Thus my love of military aviation was born. My town had a knack for producing military aviators, four on my block alone: 2 Army Aviators (one was me), 1 USAF pilot and 1 Naval Aviator. My town also shared in the loss of two Naval Aviators, 1 USMC and 1 USN in Vietnam. But here are photos of my collection that I started collecting since high school. One of my valued kits is signed by Navy Cross winner, Captain Grant C. Young who put the last torpedo into the Yamato. Its also signed by Monogram Model's founder Bob Reder, two great guys I had the pleasure of meeting. (That isn't laundry hanging from the ceiling, but my collection of flying suits to decorate the place.) Enjoy a stroll down memory lane! Insert other media4 points
-
I saw this scheme on a 1/48 build on another forum and was really taken with it. This is the 1/72 Hasegawa kit, a really straightforward and enjoyable kit.4 points
-
#40/2015 It is done! My dad managed to finish number 40 for this year which is also really the last. Besides the USAAF also the USN tested experimental camos on their aircraft. The US artist McClelland Barclay designed 8 schemes which were applied to two Buffalos, two BT-1s, two Vindicators and two Devastators. In September 1940 scheme #8 was painted on the following VT-3 bird. Colors aren´t 100 percent sure but it was a very dark blue, a brighter blue for the two vertical half-bows on the rudder, a grey and finally white for the underside. My dad used a selfmix for the dark blue, further Tamiya XF-18 Medium Blue, Gunze H334 Barley Grey. GWH kit built oob, the camo was done with Uschi van der Rosten masks. kit generations.......Monogram together with Great Wall Hobby4 points
-
My wargaming buddy convinced me to build a British army for Age of Eagles rules. He's finished a huge French and Spanish army and I've partially done seven stands. Here are two views of the first highlander stand. Really well sculpted Italeri figures painted as Gordon Highlanders. Figures finished, still have to do the groundwork. Call to Arms foot artillery, fixing the size of the base to suit the rules. and the mounted officer from the Emhar Peninsular war set. Lots of work still to do on him.4 points
-
G'day all, Poor lighting pics of my Eduard 1/48 Spitfire XVI completed tonight. I bought this intending for it to be a way to fill in time while I was on course for 17 weeks, with brush-painting throughout. Took longer than 17 weeks and I didn't like the result from brushes, so bought a cheap, small compressor and airbrush from Bunnings and made a mess of a couple of bits. Doesn't look too bad after all that. Built out of the box, using Humbrol and ModelMaster enamels, weathered with artists pastels and crayons. Used Pascoe's floor polish instead of Future as the clear coat, which caused a couple of problems on the clear parts and the odd silvered decal (back to Future for the next models). Great kit - crap builder! I'll try to get some better light pictures soon.4 points
-
Hi M8's finished these some time back, nothing special, no added etch or resin, Just out of the box as these go up in the loft to be slowly broken over the years. Used additional decal from Model Alliance for both jest. The Lightning bolts broke up which necessitated a replacement sheet. Of course that scheme pops up in the Revell boxing so could of saved me the 16 quid of a reorder for the new set. :/ AWC Jet.4 points
-
I've done a bit of catching up with the sherman the last couple of days, after having a minor sabbatical on a miniart us motorcycle and mp, as light relief from the stresses of bronco tracks. I've got the rocket frame work done, painted, and sympathetically wired up, it's close, not that far off, but no cigar, I've also added a couple of jerry cans and improvised straps from leftover pe, and napsacks, i still need to decide if I'm going to have a bash at making the periscope gaurds from wire, aka nigel's superb job on soldering from scratch, convert back to kit ones, of leave well alone? Anyway gloss thiss week decals, and the bit I'm thinking of with trepidation the weathering, thanks for stopping by, stay safe Glynn A bit of detail added to the rocket launcher, reinforcement, and a bit of wiring for the jetison arrangement And a pic of a calliope with the parts ive tried to reproduce, althogh not necessarily all on the tank I'll be doing, And a little test fit, the wires for the rocket triggers will go down the spare airel blank And the distraction, awsome kit 150 odd parts inc pe, i may add this to a little scene at the end all being well Ive also made Also the airel extension Thanks Glynn4 points
-
PC has little room to talk. But I start three days off tomorrow, and I'm "working" from home today, so I hope to get back on track.4 points
-
OK chaps and chapesses I am calling this one done. The base arrived yesterday and after knocking a pitot together, I added the final details last night. So here is my rendition of the Revell boxing of a Matchbox T-2C Buckeye. by John L, on Flickr by John L, on Flickr by John L, on Flickr There should be an improvement in the weather later, so I will head into the studio (the conservatory) where the natural light is better for taking the photos to go into the gallery. This has been a great group build and it was a pleasure to be involved, special thanks should go to @Arniec @Enzo Matrix for getting things up and running and to @Rabbit Leader for keeping up with the informative stats. There is still an obvious fondness for Matchbox kits, reflected by the high number of completed builds in the gallery, and I apologise for not making the time to comment on a great number of those, but well done to you all. Finally, thanks to all those who took the time to comment on this build. Until the next time, There are now more photos over in the gallery..4 points
-
Hi Bill I've been watching this with fascination (and in awe) as I'm also building a 1:72 TSR2 at the moment. Mine is the earlier boxing though, not the Statos / Anime one. I found your thread after searching the forums. I originally came across the mind-boggling one that @Seversky did, then the one by @Martian Hale . Your's is going to be stunning too and I have to confess that, because I have nowhere near the skill or experience that you have, I'm using your thread as something of a guide on 'how to do it'. I hope you don't mind. I did wonder about creating a topic of my own but decided not to as I don't want to find myself making a huge cock-up in the full glare of the BM community! At least, not yet. I'll hold off until I get more experience under my belt. What I will do though is upload it once it's done (if it looks ok) and ask for critical comments. I have no idea when that might be as I'm nowhere near the painting stage yet. Anyway, I'll keep following and hope that mine ends up somewhere (anywhere) near as good as your's is shaping up to be, as well as those of the other guys mentioned above. Thanks for publishing it. Tim4 points
-
August 10th. Final assembly!! The background picture that was glued to the MDF a few days before, was drilled for the kennel and Triplane mounting bolts. After that, I taped the back in place, and drilled 1.2mm holes for the panel pins that attach the back into the frame. This is because the frame wood is only about 3/16 inch thick, and without pre-drilling, the nails would follow the grain and split the wood. So with the holes drilled, my daughter slowly nailed the panel pins home, and the tape was removed.4 points
-
Very cool. I did a Cheyenne in 1/35 about 10 years ago, it's a big one.4 points
-
I have re-realised a big problem with your builds Johnny I looks in, all contented and amazed I takes in all the 'stuff' you do, have done and what you say is next then I move away not remembering I ought to express my feelings, you know, as you do I kinda float on in a fugue state as they say... That bomb bay roof is terrific, in a very Spadgent kind of way A lovely job of work sir, proper lovely Thanks for doing it for us4 points


.thumb.jpg.d17ff607fc7e89ed057e63fcb6f2a888.jpg)


.thumb.jpg.eca0c14e328767d0864cd6db01ca9ccf.jpg)


This leaderboard is set to London/GMT+01:00