
Leaderboard


Popular Content
Showing content with the highest reputation on 02/02/18 in all areas
-
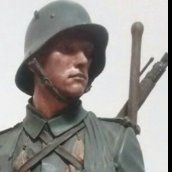
From the Tintin book 'The Red Sea Sharks'. It's the Hasegawa 1/72 Mossie kit with (heavily modified) Blue Rider decals. Depicting it in flying mode meant closing the undercarriage doors, which required a lot of filling/sanding. The only other deviation from the kit instructions was the re-configured nose gun arrangement, and I added Skut the pilot. My figure painting ability is – appropriately – comical, but he looks OK under glass.33 points
-
Final display for this years 74 Sqn Association reunion to go with the `J Cabriolet` and `Red Top` builds depicting Sailor Malan and `A` flight breaking into a dive to intercept bandits during the Battle of Britain. (The prop blur is courtesy of some basic photo editing)29 points
-
20 points
-
This was built from the Amodel DH100 Vampire Mk 1 kit modified by fitting the large tail fins, removal of the guns and different decals. There was much anguish about the colour scheme. It has been nearly done to death in a couple of BM threads but the upshot is that nobody actually seems to know what the colour scheme was. Most people agree that the topside was Medium Sea Gray but opinions for the underside colour range from yellow, silver to duck egg. I decided to go for silver. Decals were a problem as there was again a lack of hard information. I settled for 50" Type B on the upper surfaces and 'small' Type C on the underside. The others came from the spares box and and I made the registration. Incidentally the the blue in the kit decals, which I did not use, seems to be somewhat on the light side. Lastly seen here with its younger brother the prototype Venom. Any comments or extra information welcome John19 points
-
Good day, ladies and gentlemen! Let me present you my next very small model.16 points
-
This is one of the several civil versions of the Ki-15 (I and II) that flew for Japanese newspapers in the late 30s, in this case for Domei News. This somewhat old kit now re-released by Arii is very nice and only needs a few touches to render a nice model. As explained in the building article (posted here as work in progress): there used to be aftermarket decals for this one, but are now OOP, so I had to make my own, helped by the fact that the images needed are very simple and black. The hinomaru were taken from a kit´s stock decal sheet. This worked out as a relatively easy assembly with very few touches as a break from more complex and demanding endeavors, also showing how easy is to take a nice, affordable, available old kit and turn it into something not often seen on shelves and much less in model shows or meetings, where military types tend to be predominant. I found some of the info regarding this build some time ago on the Arawasi website: http://arawasi-wildeagles.blogspot.com/2013/01/mitsubishi-ki-15-ii-domei.html Enjoy this 30s nice civil plane:15 points
-
Thanks PC - handy chap to know The Wanhao is all boxed up ready to go back now for a refund (isn't Amazon great?). I do have this nagging feeling that I should have tried the supplied PLA rather than using the big roll I bought. The 'Surreal Pure' was £14.99 for 1kg of white but the 'Ultimate' stuff is over $40 (so about twice the price?) I think I've had enough for the moment but I'll certainly get in touch if I feel the need for another try On the wish list already! Fingers crossed for you Simon, although resin casting is a useful skill Thanks Rob I'm happy to share my experiences like this as I always have trouble finding 'normal people' reviews on the 'net. Not that I'm entirely normal, but maybe NFM? (Normal for Modellers) Thanks Cookie - love that quote There's no doubt an expert could probably have helped, but I was looking for a 'quick solution' to be honest... something where I could design with ease and print reliably. I think the former is doable but in my experience not the printing, yet. Thanks John Thanks Johnny I did notice that the edges were pretty good - it's the top that's a mess! So where am I with this quick build (a ha ha ha). Gear doors. Peg in the ground - the shape is too complex for me to just cut out. YMMV! I thought I'd try cutting Plasticard with the Silhouette - there's a guy on YouTube who's really pleased with the results he's achieved for railway modelling. Into Silhouette Studio to draw lines around the picture to get this: Then some test prints with 0.8 Plastruct on the cutting mat (it's too narrow and slippery to feed on its own). Note for users - to feed the mat into the machine during test prints, press the down arrow. I know, but that works. There's weird instructions about the blade settings and I couldn't find any 'if you do this then that will happen' practical advice. I ended up trying several different settings: See if you can guess what I did before I realised 'down' was 'in'. More cuts in the mat. See the doors though? The settings are blade depth (1-10), speed, Force and passes. Force? older versions have this as 'thickness'. Hmmm. After several tests I ended up with these set to 5, 3, 33 (the max) and 10 (the max). Even then the 'I can cut up to 1mm' cutter didn't get through: You know how much patience I [don't] have* so I hacked carefully cut the doors out with a #10a: Rough edges sanded off but not reduced in dimension - they're too small. I should have allowed for the cut which is obviously ON the line rather than outside it. That said, the shape is closer to the bays than I think I could get with a tape template and just cutting. I might try again to see if I can get the cutter to go through the plastic using different settings or double cutting. Lunch first. And some calm, please.14 points
-
AgustaBell 412EP, Italian Forestale Corpo. Dragon UH-1N, 1/35, gets an update to its big brother. For a while now I’ve wanted to build a AB412, after working on the RAF Griffon’s at RAF Shawbury then meeting up with various AB412’s whilst working in Italy, I’ve held a soft spot for this old timer that’s shown how to adapt without losing its basic appeal. We all know the Dragon UH-1N, don’t we?? Well for those that don’t it’s a heavy weight in rivets and panel lines, mind you so is the real thing. After digging out my notes I set about looking at what was needed to make the leap from Bell 212 to Bell 412. I did make my first school boy error here. I used the Italeri 412 as my base and went from there, mistake. After the first knock back I moved on and decided that 3D printing would help me, and so it did. So here is my 412 after the basic 412 conversion and a few extras via different Shapeways vendors, one for the conversion https://www.shapeways.com/product/YRXEFGG24/bell-412-conversion-kit-1-35?optionId=59328741 one for the upturned exhausts https://www.shapeways.com/product/K899H3669/bell-212-412-1-35-bended-exhausts?optionId=64464624&li=marketplace The decals and High skids came from Heli-scale and without these the whole Forestale project wouldn’t have got off the ground, so many thanks to Bernd for those. One more aircraft of the Forestale is on the workbench, the MD500. Anyway, here are my usual poor photographs Thanks for looking.12 points
-
This started life several years ago as a modification of the MPM kit. The original intention was to build an F1 to go with my P1040 but something, probably due to something between lack of nous and gross stupidity, led to it ending up as the N7/46, the navalised P1040. I thought that the first F1 had the short wings and tail and carried out the appropriate modifications but while searching for data on the original tailhook I found a picture of the N7/46 and realised that was what I was building. I also found that it appeared to have the the P1040's later canopy rather than the one fitted to the production Sea Hawk. Since I was in no mood to produce a new canopy at that point it was consigned to the shelf of doom until I could face up to making one. There it languished for several years until I realised that I actually had a suitable mould, created when I was refurbishing my P1081 so it was restarted. All went along well until I came to fit the main u/c legs when I discovered that the Sea Hawk u/c was different to that of the N7/46. (you would think that he should have noticed at the beginning - it's his age you know). It appears to me the the Sea Hawk main legs were shorter, perhaps to give increased angle of attack when being catapulted, so the kit legs had to be lengthened and new u/c doors made. The VP413 decals were made at home. The prototype 'P' decals were a problem as the ones I had were either a fraction too small or a fraction too large. I went with the smaller ones. There seems to be a lack of pictures of this a/c. I only found two. Fortunately one of them showed it with the wings folded so I could see the registration. For anyone building the 'proper' version from this kit the are some frustrating items. There are some 'holes' in the actual a/c for guns, boundary layer bleeds and something ahead of the windshield. None of these appear in the kit. There is a resin cockpit that requires much fettling before it will fit and a resin seat which is too wide for the resin cockpit. It has a 'battle damaged fuel tank' made from resin but lacks something that would be really useful, namely inlet guide vanes and the boundary layer offtakes in the intakes. Seen here with its predecessor the P1040 Any comments and extra information welcome John10 points
-
Here is another one of my "Tiger collection". It is the wonderful Tiger 1 mid. production from Tamiya, pimped with some etch from Aber and on the mark models, a metal gun Barrel from RB an home made Zimmerit. The SSyms-Wagon is from Ironside, hope you like it.... Cheers Tobby9 points
-
brought this last year at the brampton show as something about the boxart picture spoke to me. Crazily decided not to use the decals (except for the tigers on either side of the tail). I used photocopies of the decals to make my own masks. The orange of the tiger stripes and the blue on the rear fuselage were home mixes. I am very pleased with how it came out. definately want to give some other special paint jobs a try. _20180202_205624 by Richard Page, on Flickr _20180202_205655 by Richard Page, on Flickr _20180202_205721 by Richard Page, on Flickr _20180202_205758 by Richard Page, on Flickr _20180202_205821 by Richard Page, on Flickr _20180202_205848 by Richard Page, on Flickr _20180202_205908 by Richard Page, on Flickr P2020005 by Richard Page, on Flickr P2020009 by Richard Page, on Flickr P2020010 by Richard Page, on Flickr9 points
-
Here is another Challenger 2, this time with dozer blade. A really cool kit but don´t underestimate the size, it takes a lot of space on the shelf. Great fun to build, not to many parts, detailing is okay for the prize. All the best Tobby8 points
-
On 9 October 1966 Cdr. Richard M. Bellinger became the first Navy pilot to shoot down a MiG-21. He was flying an F-8E (149159 AH 210) leading three other “Hunter” F-8s as escorts for A-4s from the USS Intrepid. During the flight they were intercepted by a group of MiG-21s which were the newest communist aircraft and a real leap in technology. Using two Sidewinder missiles, Bellinger was able to nab one of the MiGs marking the first Navy kill over the new MiG-21. Back aboard Oriskany, Bellinger said, "I've waited 20 years for something like this. It was a tremendous feeling.". Cdr. Bellinger was awarded the Silver Star by Defense Secretary Robert McNamara aboard the Oriskany one week later. Now to the kit. Academy's F-8, eh... One of the best F-8 Crusader kit around, and the reputation is not without reason. I could go on and on about it, but I won't bore you guys since you can read all the reviews on the internet. Long story short, this is a build I really enjoy despite several complexities like the main landing gear. The reason why I decided to take 149159 as my build subject is because of the story of Cdr. Bellinger's kill that I read once when I was a little boy. As for the decal itself, Academy didn't actually provide decals for BuNo 149159, so I have to improvise by looting numbers from my friend's F-8C conversion build, and cut out the colourful stars on vertical tail plane decals and in place painted the rudder in yellow so I can get the normal all-yellow stars. Now some of you might notice that orange rusty panel on the gun ports, that was because I followed Academy's painting instruction a little too far and forgot to check my reference back so that's that. Enough banter, now for the (not-so-good) photos taken with my Sony Xperia Z1 phone camera. There will be more photos from my actual camera soon but for now this is what I got. Any comments and critiques would be more than welcomed.8 points
-
Thanks Guys Thinner plastic - I'll try that. I've been looking at YouTube again and it's confirmed that 'force' is the pressure of the blade and the numbers are the amount the blade 'pokes out'. You can see in these photos that the blade is usually sheathed but is longer than 1mm so should cut the 0.8: I'm wondering if the Plastruct is so hard that the blade is 'slipping'? I'll also try slower speeds. Over the pub tonight so more tomorrow8 points
-
Built in 2013, after the Stuka here´s another German aircraft in Bulgarian use. It is the GWH kit with Authentic decals, painted once again with Gunze and Tamiya acrylics. The model shows an a/c that flew with the Bulgarian 331 Air Squadron in July 1944. Older pics, done with my previous Nikon P50.8 points
-
Well, our resident modeleure d'invisibilite @Fritag has a lot to answer for. For 'tis a long, long slippery road filled with potholes and detours he has started me down. Take a gander at the Fly instrument panel... see anything wrong here ? In their defense, I understand from a molding perspective why they didn't try to mold apertures where the gauges should be, and in fact, their positioning of said gauges isn't too far off at all. However, just look at the panel above then take a look at a 1:1 instrument panel. We're not driving a Capri ghia here are we folks? Nope. So why all the fancy bezels around the instruments then? They don't exist in the 1:1 - it's just holes for the most part. and thus, the slippery slope begins.... (oh, and the Fly panel is not symmetric either) I think you can guess where I'm going here. Yup, it looks like the alchemy kit is going to come out again. I've used the 4+ drawing as reference, along with any photo's I can find though decent photo's of an HC2 instrument panel are a bit hard to come by so I'll have to get another artistic license the next time I'm out. This is only stage 1 - marking out the instruments position and sizes. Now I have to figure out what is going to be positive, what will be negative, and what is going to be a hole. I have a feeling the instrument panel may be a lamination of brass layers to achieve the full effect. That is of course, provided I can capture all this detail in the etch - that remains to be seen.8 points
-
Inspired by Etienne´s amazing Challengers I thougt it was time to get some of the old Trumpeter kits out of my stash. This is one of them, it is a cheap kit, but easy an fun to build. Great Project for a few days, and it gives you a good impression of the worlds coolest tank of our times (not the best...) . I really love the Chally... hope you like it cheers Tobby7 points
-
Hello friends, a little work with acrylic on this Miniature Evolution fig Some picts7 points
-
Hello, Here are a couple of shots of my recently completed Merkava mk1 hybrid (Takom 1/35) with crew (Walkyrie 1980's IDF crew). Beautiful kit, fastest build ever for me (about 2 weeks end to finish). WIP can be found here Main adds to the kit, again not much as it's a great kit: Antiskid done with diluted PVA glue spread with a brush and covered with embossing powder Basket contents from various sets (Tamiya, Legend and Plus Model I believe, they have been out of their original boxes for a long time) Tarp and ID panels done in white milliput Rear hull baskets completed with aluminium strips Comments welcome, always nice to have help and improve next time Arnaud7 points
-
Mornings like this.... And sunsets like this...7 points
-
Hi folks, this is the brand new Special Hobby kit quickly assembled over the past few days. It was very pleasant modelling experience and in fact my second P-40 kit from Special Hobby I had the privilege to built (will post the P-40K later on). We have a new title from Valiant Wings to be announced soon which will include, among the others, a full-build article of this kit. Cheers Libor7 points
-
There's a brand new Sea Fury gun sight in amongst the parts heap plus a crate or two of dead ones in one of the containers. 647 still has hers fitted as well. Since this is my 1000th post I'll be a decent chap and burn off a few happy snaps for those wanting to make their own.7 points
-
It's not nearly as complicated as it seems JR, the most difficult part is actually placing the masks where you need them! Still figuring that part out. Speaking of, I cleaned up all the little spots that where the masking didn't go 100% as planned: The other side: Added decals for the really tiny stuff, and tried to duplicate the exhaust weathering seen on most Hellcat reference pics. I've learned that Mission Models white really needs a sprayed varnish for protection - it's pretty fragile, so much so that my brushing a coat of Future/AK Satin mix damaged the white in a few areas.7 points
-
Another model from my favourite X-planes category. Special Hobby kit, built OOB (only Pitot tubes replaced with needles), Tamiya acrylic (red) and Agama acohol based colors. My other models: Northrop X-4 A-37 Dragonfly6 points
-
Hi Folks, as a photo-posting test (I'm new to Flickr) here's a 1/35 plastic conversion of ICM figures to produce a Lord Strathcona Horse Royal Canadian trooper. I'm not sure of the vintage of the cap badge.6 points
-
Latest effort to leave the bench is a Spitfire MkXIV in the colours of 17 Sqn RAF, based at Miho, Japan as part of the Occupying Forces. It's the Airfix PRXIX Fuselage mated to the clipped wings from an ICM MKVII Kit, paints by Tamiya, Decals by Freightdog (FSD48-001) The XIV is certainly an attractive variant, and the non-standard scheme of Medium Sea Grey and Dark Green is an eye-catcher too. Gunze rattle can clear coats and some Flory Wash finished the job. I'm very happy with how this one turned out. Thanks for looking, Troffa6 points
-
Just finished this one today painted with AK Extreme Metal and MRP paints. I built it OOB. First time building in this scale for me.6 points
-
1/72 Matchbox PK-26 Henschel Hs 126, 2.(H)/23 Russia, Winter 1941 Build thread http://www.britmodeller.com/forums/index.php?/topic/235029852-172-matchbox-henschel-hs-126-finished/6 points
-
Airbrushes are quite a personal thing but there are a few brands you never hear anything bad about. You don't need to spend a fortune on them IMHO but it does pay to pay enough to have a trained human being making sure that all the pieces actually are to tolerance and test the product fully before it's prepared for packaging and sale. The last bit is what you're foregoing with cheap airbrushes - the parts are manufactured and put together then it's boxed and sold. You might get lucky but and get a good one but it literally is more luck than judgement if it happens. Being fairly averse to spending in general (ask @Duncan B) I really struggle to buy modelling "accessories" that don't actually find their way on to the finished model even more than I struggle to spend a lot on kits - however a decent airbrush is something I would advocate planning for by foregoing a few model kits, saving up a bit and taking a hit on the wallet once. A decent airbrush once owned is then "in the bag" as they say. As was said earlier - you really shouldn't be paying much attention to an airbrush. You should expect to just pick it up and it works properly every time. That, I feel, is an important thing that everyone needs to take for granted if they're to feel comfortable with using it and decide to learn new tricks. A good airbrush and a consistent quality paint in it with a regulated air supply driving it will be as predictable as a thing can be. A crap airbrush means we're always playing a lottery when we pull that little trigger whilst aiming at our latest creation, wondering what the hell is going to come out of the nozzle and land on the model. Learning to airbrush consistently well can be a frustrating experience and much of that is down to a general uncertainty as to where one or more problems may lie. Is it my technique? Is it the pressure? Is it may thinning ratio? Is it the paint itself? Is the airbrush malfunctioning? When you know what you're about you can cross several of those off without a second thought and home straight in on a problem, but when you're new to it all none of those are certain so it can take an awful lot of disappointments to eventually find the root of the problem. It's not surprising so many just put them away in a drawer and go back to brush painting when you think about it, and that's a shame really. The right investments can eliminate several of those uncertainties before you even begin, and left with the knowledge that the hardware is all decent stuff there comes the comfort that one will quickly get the hang of it with a little practise.6 points
-
And we are off I started with the wings this time around (having built almost half a dozen of these now). I am going to give this one a war load as well and have added most of the weapons pylons There was some flash to contend with Engines got the treatment next, just basic assembly and clean up will come later Props got some attention, more flash And since they look a bit anaemic in back I have added some putty to fill them out a bit. The excess will be tidied up and no doubt a little more filler required.6 points
-
Almost at the paint stage, Added a few odds and ends today including attaching the gear The resin wheel are only pushed on and needed persuasion to get them to fit, As with the gear legs into the wings, they there and they aren't coming out!6 points
-
Kit: 1/72 ESCI F104G Starfighter Subject: F104G Starfighter 12883 439 Sqn, 1st Wing,Canadian Armed forces, RAF Woodbridege Tiger Meet 1969 Details: Modelled as per reference pics from interweb and decal sheet. Misc: Mr Paint Paints, Humbrol paints, Mr Color Paints. WIP Link: Here6 points
-
So away from the world of boilers, furnaces, car brakes and such excitements: Actual modelling Blenheim Mk I middle stone by jongwinnett, on Flickr However, do not look too close. The cheap airbrush has finally died. The nozzle no longer tightens, the washer is gone but worse, I think the thread inside the body has stripped, so even with Vaseline to seal, it doesn't spray. Although it hasn't lasted long, it has convinced me that I have a future with the AB, the ease of spraying enamels, particularly the Colourcoats has astounded.6 points
-
Sherman M4 early production (welded hull) Tamiya 1/48 incl. RB barrel and M2 MG improvement set..... build thread here: I am showing here my very first excursion into Armour modelling of course in 1/48 , as all (most) of my plane models are in this scale..... build thread to be found in the concurrently running Sherman GB here at BM, so if anybody is still interested, it runs until April 1st be gentle, but here it is! out of the box, but a metal barrel and M2 maschine gun from RB - great sets by the way! build thread here: WIP thanks for watching! cheers, Werner5 points
-
A representation of a 489th BS, 340th BG B-25J Mitchell. Conflicting references to 57th BW Mitchells in the MTO give rise to varieties of schemes. Tom Cleaver's The Bridgebusters infers that 340th BG aircraft were hastily overpainted with any available RAF greens or Olive Drab that could be found after a Luftwaffe night raid saw many NMF Mitchells at Alesan / Alesani destroyed and damaged. The Kitsworld decal sheet used here for 'That's All Brother' includes an NMF version with OD vertical tail surfaces with an RAF-style fin flash. A different interpretation is found in Watkin's 'Battle Colours' vol.IV. It is difficult to find any evidence that the RAF flash was employed after their use in North Africa, so that bit was omitted. The only photographs of this particular aeroplane are found on p.27 of Katarzynski's 'B-25J 'Mitchell' in Combat over Europe (MTO). They show this aeroplane as all NMF with dark tail codes. I only have four Hasegawa B-25J kits left and along with my Airfix backorder, will build more Mitchells from that rather overlooked theatre and take fuzzy images to hide as many shortcomings as possible. Michael5 points
-
Good day all A bit of a story: About 15 years ago I built the then-new 1/72 scale kit of the B-58 Hustler from Italeri. It looked really good, was finished with ALCLAD II + ALCLAD's own primer. About 6 months later I noticed that the surface of the model is covered in fine hairline cracks... After consulting around, it seemed that the ALCLAD primer was at fault (poor quality control, same as what clobbered the original ALCLAD company - hence, ALCLAD II). I tried several times to fix it, eventually gave up and tossed it in the garbage can. In the meantime I bought another B-58 kit that I found on eBay + a set of Caracal decals in 1/72 for that kit... The decals turned up much sooner than the kit, and the Caracal decals looked REALLY good so I started thinking - "Hmmm perhaps I should just try to fix that old B-58 once more"... So off I went to check if the trash had been removed yet, actually found the model plus the bits & pieces that got broken off in the trash can (broken eggshells and empty jam bottles etc on top of it had some effect). This time I removed all the old paint including the ALCLAD primer as best as I could. Now being thoroughly disgusted with ALCLAD II products I looked around for an alternative and found two full bottles of Polly Scale "Old Silver" in my stash... All I can say is that 1) Polly Scale being out of business now is a Crime Against Humanity (I should have bought tons of Old Silver) and 2) Caracal Decals is the BEST quality decals I have come across EVER. PS. excuse the poor quality pics (cellphone) and zero attempt at a sexy background...5 points
-
It's a pity that he's so far away. We could have had a nice little party and Ced could have told us all about his disasters...we'd need all night!5 points
-
What makes me happy? Popping out for a drive....... Perhaps up for a bit of fresh air..... and a good still, dark evening out with my telescope taking photos of the sky...... A bit of modelling now and again isn't bad either!! ;-)5 points
-
I started this kit very early in the GB and finished it completely just today. In my defense, I took off a couple of months for health issues. (Much better now.) I bought this kit for $3 but it was in a NASTY box with NASTY instructions and decals (which where both tossed). I could have found some decals but when I washed the kit I found it was badly warped. So I decided to build a WWII 1/72 scale "ID Model" which tend to have warped a lot anyway. First I looked for a photo of an ID model of the He-115 to make sure they existed and yes indeed they did. This is the ID model I took my inspiration from: And here is my finished Matchbox "ID Model: and finally at home with my other "ID" models hanging above my workplace. Greg in OK5 points
-
Quick update on the Celestial Queen. Photo below shows the cockpit dry fitted in the fuselage. The section I've cut out gives a nice view in and it all seems to fit together pretty well. Over the last few weeks I've scratch built a lamp, radio headset, little clipboard and map which will go in the cockpit. I'm currently adding some plastic "ribs" on the inside of the body which will be visible through the bomb bay doors and should liven up the plain plastic which is there at the moment. I'll try and get some more photos up this weekend.5 points
-
I thought I'd post a few pics of Bandai's new box scale AT-M6 for those who might like to see how it looks built up. So far the only completely new tool release from TLJ. A shame as I'd like to see the Resistance Bomber, even if it was only in the box scale range. The walker scales out at approximately 1/550, so it doesn't really fit in with anything else, but I guess that's the scale they needed to go with to get it in the standard box size. Usual Bandai engineering and detail levels. No articulation on the legs, but that would probably be asking a bit much at this scale. (and just for the sake of novelty, how about we don't argue about the film?) A quick scale comparison with Bandai's 1/144 AT-AT And to give some idea of the relative size, this is how they'd look if they were the same scale Andy5 points
-
Phew! Thought I'd lost my passport, but after a lengthy and panicky search possibly involving some wild accusations thrown willy-nilly at loved ones, I found it in the pocket of a light jacket in the mud room. I'll be Vancouver-bound tomorrow!5 points
-
Kit: 1/48 Monogram F104G Starfighter Subject: F104G Starfighter 26+47 JaboG 34 Memmingen, 1987 Details: Modelled as per reference pics from interweb and decal sheet. Misc: Mr Paint Paints, Humbrol paints, Mr Color Paints, various kit and other decal sheets kindly donated by @RMP2 WIP Link: Here5 points
-
Greetings Completed this 1/144 challenge today. Added to lots of stuff for this size. Resin Interior,Resin Exhausts,Resin Wheel Wells,Master Brass Pitot Tube Lots of Decals and major usage of Solvaset and Hairdryer as these decals would not settle down. Uschi Powders to Highlight the Exhausts Thanks for Taking a Look Comments welcome Bill D5 points
-
So, although I'm resisting the temptation to turn this into something of a triple build, I did just stumble (coincidence honest) on this, model on the Royal Maritime Museum site, sometime post Falklands, but worth saving I thought... http://collections.rmg.co.uk/collections/objects/67547.html5 points
-
As promised, more (better) photos taken by my proper camera.5 points
-
Let's try again.... I hope it works now.5 points
-
Hello! This is my new model. First in this year. I hope not lust. Building was hard. The set was not of the best quality. I used some additional details- resin wheels and exhaust. Painting- Tamiya and Mr. Color. Weatering- sold dots, oil dots, pigments and washes.4 points
-
I share from production photos I cut it by digging it with a knife roughly filled with voids door interior shapes 2mm metal rod on the body mounted on the door bar painted white, made of mask and painted blue4 points
-
I just noticed that a photo is missing. So here it is: The dust, dirt, debris etc is muck on your screen, not muck on my Sherman. TFL Badder4 points


This leaderboard is set to London/GMT+01:00