
Leaderboard


Popular Content
Showing content with the highest reputation on 01/02/18 in all areas
-
Good day all A bit of a story: About 15 years ago I built the then-new 1/72 scale kit of the B-58 Hustler from Italeri. It looked really good, was finished with ALCLAD II + ALCLAD's own primer. About 6 months later I noticed that the surface of the model is covered in fine hairline cracks... After consulting around, it seemed that the ALCLAD primer was at fault (poor quality control, same as what clobbered the original ALCLAD company - hence, ALCLAD II). I tried several times to fix it, eventually gave up and tossed it in the garbage can. In the meantime I bought another B-58 kit that I found on eBay + a set of Caracal decals in 1/72 for that kit... The decals turned up much sooner than the kit, and the Caracal decals looked REALLY good so I started thinking - "Hmmm perhaps I should just try to fix that old B-58 once more"... So off I went to check if the trash had been removed yet, actually found the model plus the bits & pieces that got broken off in the trash can (broken eggshells and empty jam bottles etc on top of it had some effect). This time I removed all the old paint including the ALCLAD primer as best as I could. Now being thoroughly disgusted with ALCLAD II products I looked around for an alternative and found two full bottles of Polly Scale "Old Silver" in my stash... All I can say is that 1) Polly Scale being out of business now is a Crime Against Humanity (I should have bought tons of Old Silver) and 2) Caracal Decals is the BEST quality decals I have come across EVER. PS. excuse the poor quality pics (cellphone) and zero attempt at a sexy background...19 points
-
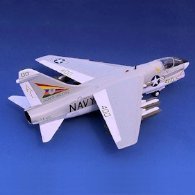
On 9 October 1966 Cdr. Richard M. Bellinger became the first Navy pilot to shoot down a MiG-21. He was flying an F-8E (149159 AH 210) leading three other “Hunter” F-8s as escorts for A-4s from the USS Intrepid. During the flight they were intercepted by a group of MiG-21s which were the newest communist aircraft and a real leap in technology. Using two Sidewinder missiles, Bellinger was able to nab one of the MiGs marking the first Navy kill over the new MiG-21. Back aboard Oriskany, Bellinger said, "I've waited 20 years for something like this. It was a tremendous feeling.". Cdr. Bellinger was awarded the Silver Star by Defense Secretary Robert McNamara aboard the Oriskany one week later. Now to the kit. Academy's F-8, eh... One of the best F-8 Crusader kit around, and the reputation is not without reason. I could go on and on about it, but I won't bore you guys since you can read all the reviews on the internet. Long story short, this is a build I really enjoy despite several complexities like the main landing gear. The reason why I decided to take 149159 as my build subject is because of the story of Cdr. Bellinger's kill that I read once when I was a little boy. As for the decal itself, Academy didn't actually provide decals for BuNo 149159, so I have to improvise by looting numbers from my friend's F-8C conversion build, and cut out the colourful stars on vertical tail plane decals and in place painted the rudder in yellow so I can get the normal all-yellow stars. Now some of you might notice that orange rusty panel on the gun ports, that was because I followed Academy's painting instruction a little too far and forgot to check my reference back so that's that. Enough banter, now for the (not-so-good) photos taken with my Sony Xperia Z1 phone camera. There will be more photos from my actual camera soon but for now this is what I got. Any comments and critiques would be more than welcomed.16 points
-
Latest effort to leave the bench is a Spitfire MkXIV in the colours of 17 Sqn RAF, based at Miho, Japan as part of the Occupying Forces. It's the Airfix PRXIX Fuselage mated to the clipped wings from an ICM MKVII Kit, paints by Tamiya, Decals by Freightdog (FSD48-001) The XIV is certainly an attractive variant, and the non-standard scheme of Medium Sea Grey and Dark Green is an eye-catcher too. Gunze rattle can clear coats and some Flory Wash finished the job. I'm very happy with how this one turned out. Thanks for looking, Troffa16 points
-
Another model from my favourite X-planes category. Special Hobby kit, built OOB (only Pitot tubes replaced with needles), Tamiya acrylic (red) and Agama acohol based colors. My other models: Northrop X-4 A-37 Dragonfly12 points
-
Hello! This is my new model. First in this year. I hope not lust. Building was hard. The set was not of the best quality. I used some additional details- resin wheels and exhaust. Painting- Tamiya and Mr. Color. Weatering- sold dots, oil dots, pigments and washes.11 points
-
The Airfix F86F - 1/72nd. scale The wing tanks were moved in 5mm and wing fences 7mm. Options for the air brakes are provided with short (retracted) hinges for closed brakes or with extended hinges for the brakes open. Although, I think, brakes in the open position would not have had the correct amount of droop. Painting: Brush painted with Humbrol acrylics, even Humbrol 11 silver for the NMF. Decals: I think the dragon decal should have been provided for both sides. The broad yellow fuselage band extends under the fuselage. The decal for the part below the fuselage was too narrow so was cut so the black outer lines would match up and the gap left was filled in with yellow paint. Lots of decals for stencil data - a lot of time to apply. Question: The box art for the kit shows tanks being jettisoned with the pylons attached - is this correct ?11 points
-
Yeah, but you guys get mauled by kangaroos all the time, and they're making that Crocodile Dundee sequel, so it's not all peaches and cream. I could watch this a thousand times, it never gets old. As a side helpful(?) note, if anyone else wants to do a Bisley, one is on the 'bay for about ten more hours: https://www.ebay.com/itm/142664724750 Sorry to all who've gotten textually-transmitted heater failure.11 points
-
Hi, this is the 1/48 hassegawa bf 109 e 4/7, as most bf 109 e's that went to the med arrived in European colours and were painted in theater by the groundcrews using Italian colours, I have painted her in the following colours rlm 76. Giallo mimetico 4, I have added a Resin cockpit and wheels and a prop and spinner by ultra cast, trop, master brass gun barrels, filter is borrowed from a eduard bf 109 e trop, Rlm colours by extracolor Italian colours are colourcoats. Decals (unusual emails) are by rising decals, national markings aeromaster & extadecals, to be honest I'm not that happy with the exhaust stains. Thank you for looking, Comments are welcome, nick Here is a photo of her10 points
-
PK-125 : UC-64A Norseman - Glenn Miller's Last Flight9 points
-
Hi everybody, a quick update this morning. I masked the windshield and canopy, outside and inside then I glued in the respective PE frames Sorry for the blurry pic. I used CA gel to glue the PE to the clear plastic, because it doesn't fog. Now I'll let them cure for at least 24 hours, then I'll use a Dremel sanding disc to refine the edges and make them level with the plastic edges. That's it for the day, comments welcome Ciao9 points
-
A model of an historic ship from ACADEMY. The ship's kit was very well done, I was very good. The boat is complemented only by wooden pulleys, the sheets are genuine plastic.8 points
-
The tank kit is from Rewell, measuring 1/72. I tried to make a non-slip surface. A desert camouflage is used, the tank is located in the landscape.8 points
-
There are many things that can make me happy, but just one stands head and shoulders above the rest......my Grandson. I have a son in his fifties who never married and has no interest in children. My daughter, now 46, always said that she didn't want children either, so I was resigned to the fact that I would never have grandchildren. But after a failed marriage, my daughter met and married a man who was a different person entirely from her previous spouse and low and behold, six years ago, along came my Grandson. Just the words "Hello Granddad" do more for me than a lottery win could do. At the age of 71, playing football over the park with him might be a bit of a strain on the joints, but I'll take that any day. John.8 points
-
Thanks Jr, And finally I consider this one done... Beaufighter Mk X "Operation Firedog" Malayan Emergency in the 50's8 points
-
Hiya Folks, Well I`ve finally got around to finishing my Pacific Coast Models Spitfire Mk.XIV after deciding which scheme I wanted to finish it,..and eventually opted for the aircraft flown by Sqn. Ldr, James `Ginger' Lacey at the time he commanded 17 Sqn in Singapore during 1945, just after the war had ended. First a bit of background; As commanding officer of No. 17 Squadron in India and flying Merlin engined Spitfire VIII`s, Sqn. Ldr. James `Ginger' Lacey claimed his last aircraft on 19th February 1945 by shooting down a Japanese Army Air Force Ki 43 “Oscar” using only nine 20mm cannon rounds. Lacey was one of the few RAF pilots on operational duties on both the opening and closing day of the war and his final tally was 28 confirmed, four probables and nine damaged, which was displayed under the cockpit of his Griffon engined Spitfire Mk.XIV, with which 17 Sqn was re equipped for the proposed invasion of Malaya. With the war coming to a close before this invasion could take place Lacey led the unit to Singapore instead when the colony was re occupied and in 1946 he took 17 Sqn to join the British Commonwealth Occupation Forces in Japan, still with Spitfire XIV`s,....although after a failed attempt to strip them to bare metal they were repainted in overall Med. Sea Grey with Dark Green sisruptive camouflage on the upper surfaces,.....but digress!. Here are some photos of Laceys `real' Spitfire Mk.XIV, from the time in Singapore....it has often been replicated in Dark Earth and Dark Green with white SEAC bands before,....but it was in fact a faded but very well kept and clean (hardly any exhaust staining or dirt) Ocean Grey and Dark Green with Medium Sea Grey undersides aircraft which had the original European style RAF national markings over painted using Dark Green which was blended into the existing camouflage where possible and note the white codes thinly outlined with black, the 17 Sqn Gauntlet insignia on the nose and Laceys scoreboard and command pennant under the cockpit,...the spinner is often depicted as being black but it has also been said to be blue too and judging from available photo`s it does seem to match the blue sections of the Sqn. Ldr.s pennant.; And here are some other unit aircraft from around the same time,...some had SEAC bands applied and some `may' have had the Dark Earth/ Dark Green camouflage,..although faded Day Fighter green grey colours with painted out markings do appear to be more common; And some other aircraft; And now the model; The PCM kit seemed to come and go from sale very quickly and unfortunately has not been available for some time now,....so I`m glad that I got mine when I did. The construction was mixed media with plastic main parts supplemented by resin and brass and it went together quite well really although the wing centre section was quite a struggle to match to the fuselage, especially along the undersides,.....but a bit of fettling here and there did the trick! Colour wise,...the model was brush painted using my dwindling stock of Polly Scale acrylic`s,.......and Humbrol enamel Trainer yellow was used to try and replicate some of the outer wing leading edge colour showing through after this had been over painted on the real aeroplane along with the European style RAF national markings. Polly Scale US Sea Blue was used to replicate the blue spinner with Humbrol enamels used for the interior, propellers, wheels etc. Anyway,....without any more waffling on,....here is the model; DSCF2411 by Tony OToole, on Flickr DSCF2410 by Tony OToole, on Flickr DSCF2408 by Tony OToole, on Flickr DSCF2409 by Tony OToole, on Flickr DSCF2412 by Tony OToole, on Flickr DSCF2420 by Tony OToole, on Flickr DSCF2421 by Tony OToole, on Flickr DSCF2426 by Tony OToole, on Flickr It really is an excellent kit and I wish that I could have afforded to snaffle away a couple more while they were available,....oh well!! In case anybody is interested,.....here is another Supermarine classic that I`m working on at the moment too,....the Airfix 48th scale Walrus,...if anybody is using the Xtradecal sheet on this aircraft beware,....the wing roundels are too large! These are smaller and from an old Swordfish kit; DSCF2433 by Tony OToole, on Flickr And in 32nd scale the FLY Hurricane Mk.I,....which is going to be in SAAF markings; DSCF2431 by Tony OToole, on Flickr So plenty of model on the go now,...I`ve got the elves working overtime once more lol! All the best, Tony7 points
-
https://www.suffolkgazette.com/business/norfolk-jet/7 points
-
#3+4/2018 First finished little armour models this year. Both built oob, only added plastic rods for the antennas. Painted with Gunze and Tamiya acrylics, camo done with a mix of Gunze H313 and Tamiya XF-57. First up the Abrams, 2nd Platoon, F Company, 2nd Battalion, 3rd Armored Cavalry Regiment, Iraq, April 2003 Build thread here DSC_0001 by Reinhard Spreitzhofer, auf Flickr DSC_0002 by Reinhard Spreitzhofer, auf Flickr DSC_0003 by Reinhard Spreitzhofer, auf Flickr DSC_0004 by Reinhard Spreitzhofer, auf Flickr DSC_0005 by Reinhard Spreitzhofer, auf Flickr DSC_0006 by Reinhard Spreitzhofer, auf Flickr DSC_0007 by Reinhard Spreitzhofer, auf Flickr DSC_0008 by Reinhard Spreitzhofer, auf Flickr DSC_0009 by Reinhard Spreitzhofer, auf Flickr DSC_0010 by Reinhard Spreitzhofer, auf Flickr DSC_0011 by Reinhard Spreitzhofer, auf Flickr DSC_0012 by Reinhard Spreitzhofer, auf Flickr DSC_0013 by Reinhard Spreitzhofer, auf Flickr DSC_0014 by Reinhard Spreitzhofer, auf Flickr DSC_0015 by Reinhard Spreitzhofer, auf Flickr and the Hummer, 1st Battalion, 37th Armored Regiment, 3rd Combat Brigade, 1st Armored Division, February 1991 Build thread here DSC_0016 by Reinhard Spreitzhofer, auf Flickr DSC_0017 by Reinhard Spreitzhofer, auf Flickr DSC_0019 by Reinhard Spreitzhofer, auf Flickr DSC_0020 by Reinhard Spreitzhofer, auf Flickr DSC_0021 by Reinhard Spreitzhofer, auf Flickr DSC_0023 by Reinhard Spreitzhofer, auf Flickr DSC_0024 by Reinhard Spreitzhofer, auf Flickr DSC_0025 by Reinhard Spreitzhofer, auf Flickr DSC_0026 by Reinhard Spreitzhofer, auf Flickr DSC_0031 by Reinhard Spreitzhofer, auf Flickr DSC_0027 by Reinhard Spreitzhofer, auf Flickr DSC_0028 by Reinhard Spreitzhofer, auf Flickr DSC_0029 by Reinhard Spreitzhofer, auf Flickr DSC_0030 by Reinhard Spreitzhofer, auf Flickr7 points
-
Hi, this is the 1/48 hassegawa bf 109 e 4/7,( my second modelof 2018) In the markings of unteroffizier werner ringer. As most bf 109 e's that went to Zg1. Were from jagdegeschwader that were converting to the bf 109 f.this bf 109 is documented to been in a two green comouflage possibly rlm 70,71 .which would by unusual for a bf 109 in 1942 and as the luftwaffe made use of captured stocks of Russian paint. I thought it could been repainted using stocks of Russian amt-4 olive green. So I have used the following rlm 76, 71,amt-4. I have added a Resin cockpit and wheels and a prop and spinner by ultra cast,master gun barrels, stretched sprue aerials Rlm colours by extracolor, amt-4 is by colourcoats.vallejo satin varnish Decals are by peddinghaus, national markings are xtradecals & aeromaster. I might put a 250kg bomb on it yet. Thank you for looking, Comments are welcome, nick7 points
-
I actually think that you're proceeding in a sensible fashion trying to troubleshoot outputting a simple planar shape first Ced. From experience with both CGI and physical modelling I know that if you are able to learn and calibrate your tools to produce something relatively simple initially, you can then build up to producing more complex and specific outputs incrementally on an informed - and more importantly - controllable basis. It sounds counterintuitive but ignore the fact that you're building a specific part for an aircraft at the moment and just focus on understanding and gaining a feel for the particularities of the 3d process here itself. From such patient development does fluency and insight flow... None of us expect this to be an easy learning curve and all of us respect your determination to attack this problem in the full glare of public scrutiny as it were - your learning increases the collective knowledge of those watching. Bravo and thanks for being brave enough to teach us! Tony7 points
-
Who? Except that the koala bears were obviously escaped circus bears, as koalas aren't bears. And they don't ever move that fast, even on springs. (That said and on a (slightly) more serious note, I have actually had roos jump out of the bush and run into the side of my car while I was driving at speed. Not the brightest of creatures*.) (*Kangaroos, not me. )7 points
-
All good, got one sorted Still Having a hell of a time finding decent references for the Godawful thing anyway, cant find squat with all the junk laying about the shed.7 points
-
Looks like we'll be getting a Pucara from Kinetic soon. Source: https://www.facebook.com/Kineticmodel/posts/921764501323995 Mark6 points
-
Hi everyone ! My latest completion ! The New-tool Airfix F-86 painted as an Iranian Air Force fighter . Freehand painted with gunze acrylics . I added a Pavla ejection seat to enhance the cockpit and the iranian decals from Hi-Line . Hope you like it ! IMG_20180103_194431 by Dionyssis Vacalas, on Flickr IMG_20180103_194449 by Dionyssis Vacalas, on Flickr IMG_20180103_194440 by Dionyssis Vacalas, on Flickr IMG_20180103_194456 by Dionyssis Vacalas, on Flickr IMG_20180103_194517 by Dionyssis Vacalas, on Flickr IMG_20180103_194508 by Dionyssis Vacalas, on Flickr IMG_20180103_194528 by Dionyssis Vacalas, on Flickr6 points
-
MARK 1 Models 1/144 hunter. the old revell kit, a lovely kit to build. Built the ETPS colours, its abit unusual for a hunter. painted with xtracrylix and mr hobby paints.6 points
-
Second kit off the workbench this month; this is the mount of Japanese Army ace, Captain Yoshio Yoshida from mid 1945: FredT6 points
-
Chris - lovely to hear from you! I think last time we chatted you were fitting out a loft? Or is my memory playing tricks... Thanks for the kind sentiments fella. Tomo - my thanks for that sir - much appreciated. Right. Ah, there you all are. I haven't been idle this last while, only too exhausted most of time to make any halfway articulate postings; nonetheless, being able to duck in to the bench for half an hour here and there made for a good antidote to other more pressing matters. Plastic psychology - the sort of thing you'd make a fortune on in California perhaps as a kind of modelling version of Gwynnie Paltrow's Gloop. Caffeine enemas my a- err... well exactly... Where was I? Ah. No disciplined approach to these recent jobs - just picking bits to do as they suggested themselves around the cockpit and canopy regions to keep it interesting, so I'll try and organize this post into some sort of condensed thematic to avoid repeating myself. The scratch-built canopy - to my surprise and I have no doubt yours - seems to be a viable process. Needs patience and a prolonged gluing sequence for the various panes, but it worked far better than I had any right to hope. When last you saw these parts they were swathed in kabuki-bandage whilst the glue was curing on the windscreen. Pulling the tape off after 48hrs revealed a nice clear front with a solid bond along the top joining it to the remaining kit roof area: Despite the extra strength involved in using epoxy for this job I still needed to be careful in general handling when it came to trimming down any excess that you see here along the sides and front: Angled medical scissors were the best tool and despite the pucker factor involved, those bits were brought in to match the negative space of the fuselage correctly and then it was time to attend to the final section - the triangular corner panes. These I built by fixing the the transparency down with some low-tack tape and marking-out length and angle for cutting, which seems the most straightforward way of doing this accurately whilst avoiding scratched to the medium: We then went back into Invisible Man mode for another day or so whilst those cured in place: Thence to the big reveal: Tadaa! Not quite the Rose windows at Chartres cathedral but not bad for a beginner: The intention later is to use metal foil along the seams for a threefold reason - the first to obviously give extra reinforcement to those joins, second to give a better visual expression for the raised framing, and lastly to run the rivetting tool along the foil where necessary to match detailing in that region: At least that's the theory...(Those curvy-cornered windows lower down at floor level are going to prove a chastening experience trying to cut out and glue-in though I reckon...) What else? Seats. Rather glad that we needed to move things around as there's always more to be done and in this case the kits seats could get an upgrade: Basic setup for all cockpit seating (bar the crew chief's perch by the flight-deck steps) is a set of rails allowing seats (pilot, co-pilot, navigator and radio operator) to move backward and forward in their respective stations, with the two pilots having lateral rails as well. Not being happy with the 'soft' feel that using plastic in my previous attempt had yielded, I opted for brass this time around.These Modellingtimbers packs are so beautifully packaged and labelled that you're almost reluctant to unwrap them... 0.15x0.4mm strip did for cutting out the initial triangular shapes for the seat brackets: These were then taped and marked-out for drilling with the Dremelclone and an old HSS bit: Being able to use an old bit as a sacrificial tool allowed me to grind out the bulk of the negative space to about this point: ...and from here on it was possible to get a small triangular file in there to smooth out any crenellation. Tacked in place with CA for a test-fit: To build the rails I used 0.4mm brass rod for the laterals and 0.5mm tubing for the longitudinal sections. These were soldered as one long run for simplicity's sake and then cut apart in order to form the two sets of rails: Once you see them in situ you get the idea: Your eyes aren't playing tricks - I've also erased all the moulded shapes from that central console as well as reshapingn it at the rear - the various TACAN, IFF and UHF panels and switches weren't right and I don't like 'not right' if I can help it. I've pencilled in the correct arrangement as you can see and will build these up at the same time as redoing the IP, which is another story in itself... Brackets epoxied to the chairs and soldered to rails now: Captain Mitchell need fear no longer about reaching the pedals of Pelican 9: I've also whipped of the mountings for the nav and radio-op seats behind him as these too were 'not right': Last task on those front seats was to add the perforated strip that runs along the back of each pedestal, plus the circular fitting just above them to which the seat belts are affixed: Cockpit rear had some final tarting-up, adding a chart canister to the top shelving and various boxed for flare pistol, medical kits and so forth: As a newbie to using the RP Toolz punch set, I read with some trepidation that within bounds you can also use it to punch out brass. Being such an expensive piece of kit I'd fought shy of trying it out for this until now but needing to make a hole in brass plates for the radio-operator and navigator seats put brass iron in the soul and I whacked away quite happily making 2mm openings: Delightful results - what a tool! Those plates were then scored, snapped, and taped-down for some 0.4mm rod to be soldered on for longitudinal rails: A better approximation of the seat mounting: The central pillar moulded to the seats is not quite lon enough for the structure I've built so these were drilled out: ...and more robust replacements added from old Dornier sprue: Trimmed to length and fitted: The actual seats are somewhat more baroque in the under-seat framing department: ...but despite my antipathy to 'not right', I know the limits of what I'm capable of at this stage and this will have to do: Notice also the absence of a base plate over the rails in the reference photo above - I don't know what variant that shot is taken from but my design follows the seat breakdown in the parts manual (minus the aforementioned 'birdcage' framing down below...) All four seats in for a test fit: I've taken the precaution all the way along here of using the PJ Productions' crew figures as test dummies to ensure that I get everything at the right height: It's almost a pity to have to paint the brass over sometimes I feel... And that now is you all up to date. I guess I need to turn my attention next to detailing the various control panels and cockpit walls, removing and masking and foiling the canopy, lower nose glazing and then <gulp> back to the rear section. Wonder does the Battlestar Galactica have this many parts? Nothing. Tony6 points
-
So away from the world of boilers, furnaces, car brakes and such excitements: Actual modelling Blenheim Mk I middle stone by jongwinnett, on Flickr However, do not look too close. The cheap airbrush has finally died. The nozzle no longer tightens, the washer is gone but worse, I think the thread inside the body has stripped, so even with Vaseline to seal, it doesn't spray. Although it hasn't lasted long, it has convinced me that I have a future with the AB, the ease of spraying enamels, particularly the Colourcoats has astounded.6 points
-
My Spitfire BS147 is ready for your inpection. A little on why I did this Spitfire. My last build of a Spitfire was my Orange Spitfire PH-NFP and while building and reading a bit about PH-NFP. I thought about what it Did in the war, I found out that it was part of the RAF 222 Sq and found this out about her. July 15, 1943 16:55 Fw 190A-4 5./JG26 sure near Le Crotey Spitfire F.Mk.IXC (BS147, ZD ? K) 222. Sq. So here is my effort of BS147.6 points
-
Nope. A local firm: Norfolk and Chance.6 points
-
Thanks Bill, you know me so well Should I buy a better machine or wait until the technology is more 'mainstream' in the hobby market? Won't be more than a year or so I'm sure... Thanks John Plasticard? How does dat work den? The material is 'PLA', an ecologically friendly plastic. No idea how well it 'works' with regards to sanding / glueing yet but I'm sceptical now, of course. Thanks Stuart I'm a tool tart, no point denying it. IF this works I can model and print perfect parts (see Hendie's SACRU's from Shapeways), like the exhaust for the Harvard (yes, I've started a model), that I've found hard or 'messy' using plastic bits. I've not tried soldering, yet. Perhaps that's a better bet... More tribulations this morning. I measured up the model and marked up the dimensions on a copy of the image: Measure and Markup by Ced Bufton, on Flickr ... then sized the model to the kit dimensions. Bit of 'sprue added' for adhesion and thickness set to 0.75mm, not unusual for the sort of stuff we need IMHO: Into Cura to slice the model: and print. Rubbish. I'd not set the fill to 100%. Back into Cura and try again: No idea. Still rubbish eh? I think the adhesion and levelling was right: Rats. Double rats. I must admit I was impressed by the surface finish on the 'OK': Surface finish by Ced Bufton, on Flickr ... before it crashed. Macro lens shot that. Worth persevering? Still not sure. I've created a test piece to check performance on holes, bumps and dents: That's printing now. If it works I'll persevere. If not, it's going back!6 points
-
Thank you Martin. (I'm sure the Airfix version will be an easier build!) Work progresses. I have added a wash to the panel lines and I have done some panel fading. A matt cote has been applied and the masks removed. Next stage is dome oil streaking, and then it will be time to build the undercarriage!!! Thanks for your continuing support & interest! Angelo6 points
-
Let's try again.... I hope it works now.6 points
-
Greetings Completed this 1/144 challenge today. Added to lots of stuff for this size. Resin Interior,Resin Exhausts,Resin Wheel Wells,Master Brass Pitot Tube Lots of Decals and major usage of Solvaset and Hairdryer as these decals would not settle down. Uschi Powders to Highlight the Exhausts Thanks for Taking a Look Comments welcome Bill D5 points
-
Just a quick update... It's all just fallen together beautifully. That said, I did have to take care. A little filler required, but how much that was me, or the kit I don't know. I suspect me. The canopy is masked with the Eduard offering - a vital extra for me. The individual masks are tiny in this scale (did I say I was used to 1/32?). Will be getting a fine primer coat shortly... Guy5 points
-
I guess it's a two way street. We hanker after going Australia/New Zealand Been busy on the rocks, see what you think. There are at least 12 colours/shades/base/wash/pin ...... you get the idea Happy days ... of to get my bucket and spade ..... Sand next, thanks for looking in Kev5 points
-
Thanks Gents - all comments appreciated and replied to after 'the news' below Proverbs 26:11 is very relevant here. The raft laid down well and printing progressed: Some weird crinkly noises made me run to the printer - the filling in seemed to be, er, intermediate: Fill stuff at 25% complete by Ced Bufton, on Flickr After a couple of hours, it's finished: Hmmm by Ced Bufton, on Flickr Macro shots: Square peg and bumps and dents: Crossed lines and circles: Not a happy bunny then. I think it'll have to go back. Shame. What am I left with? ... and a spool of PLA. Ho hum, it was 'an experience'. Summary and replies I'm writing this to summarise my experience and not to pretend I'm any sort of expert; it's just the result of a day or three fiddling with the software and the Wanhao i3 Mini. Bill I won't be buying a better one, yet. I think (after reading posts and blogs on the 'net) that the 'hobby' side of the technology is still developing; the machine is cheap but not reliable IMHO and the resolution with the PLA I was using suffers from poor extrusion. Nice try from me but no cigar. Jon you're right, it was overkill for the doors and, of course, I'll be using Plasticard any minute now. The idea was to test the technology and share experiences and, if it had gone well, move on to more complex models. Who knows, if it had worked out, Simon might have got his Spitfire nose! Tony thanks for the kind comments and advice - I've seen your design on the Dornier and it, and the software, is much more sophisticated than the stuff available for free (as far as I could find). We've yet to see if the 'hobby' side of the technique develops to get closer to the professional one. I suspect it will, over time. Keith you're absolutely right - the professional machines are far more capable (and expensive) although I think the i3 Mini might be OK for printing designs from the 'net (lots of videos on YouTube with happy clients). It's just not right for me at the moment. So that's it. Back to 'traditional' methods for me until the Hobby 3D printing market develops. I predict it will be months rather than years, but then what do I know? Now, where's my Plasticard5 points
-
On the ConspirAussie.com site there have been multiple debunkings of that clip. It's clearly two Koala bears in a Kangaroo costume on springs.5 points
-
Nice to hear from Martian! After having left the fuselage halves to settle overnight, this morning it was time for some scraping and sanding. Unfortunately I've run out of Tamiya quick glue and I'm working with STD Tamiya geen cap. Before trying the quick one I thought Green cap was the thinnest thing in the world...now it looks like Jam, compared to her new realative!!! First I used the cutter to scrape the styrene in excess and then I finished with wet sanding. Now I can go to work. Hacve a nice day! Ciao Massimo5 points
-
Here are the tracks now that the glue is dry. I have removed them and they'll be placed to one side ready for painting. I'm thinking I will paint and weather the metal of the tracks on their own, and paint the pads separately and add them afterwards. Painting them once they are attached would mean I would have to go in accurately with a brush and would add unnecessary time onto the build. Does any have any thoughts? I have also mated the upper and lower hulls. It's really starting to resemble a Chieftain now! The parts went together very well, top marks to Takom so far! Rear Hull section added. Here is where they put the L60 engine whilst it's wasn't in a REME Workshop.5 points
-
Hi all, I thought I would share photos of some of my older builds, all taken in natural light. This is done by using a Fuji camera and a base painted to look like concrete that measures approx. 3’x3’. I use the local airport as the back ground. In my opinion, there is nothing quite like the sun showing the work. When taking the photos, I try to envision the angles that I would be taking of real aircraft. scales are 72, 48, 35 and 32. Hope you enjoy the pics. NEW: got rid of photobucket.4 points
-
I knew of this aircraft but hadn't realised it was back on the US circuit. Fabulous! In the same way the Vulcan was shot with 4K before it retired, I just wish there was better footage of this almost extinct aircraft. I wonder if it will ever make it 'home' to the UK, and if so could it even fly here?4 points
-
Markings applied, together with a bucketful of assumptions as to how it may have looked;Wellington T.18, Matchbox kit (35) w by Philip Pain, on FlickrThe chosen subject is ND113 '27'of 62 OTU, one of the few T.18s to have a recorded code. This was in April 1945, and the 'assumptions' are as follows; It may or may not have had 'type C' upper roundels, but I didn't have any the right size, so applied 'type B'. They can always be overlain with 'type Cs' later. It may or may not have had underwing serials by that date, but I didn't have any letter 'D's the right shape, so left them off. They can always be added later. By April 1945 the aircraft may or may not have acquired yellow areas for greater visibility. The position of the rear fuselage serial (ND113) may or may not be correct, and many Wellingtons had them moved to above the tailplane. The code '27' could have been placed anywhere on the aircraft, and also repeated e.g. on the nose. I have copied the placing used by 51 OTU, which does have a photo.Wellington T.18, Matchbox kit (36) w by Philip Pain, on FlickrFor the few detailed markings, the decals from the Revell re-issue of the Matchbox kit were used. These include the bomb bay stencils, and the Wellington T.18 did have functioning bomb bay doors.Wellington T.18, Matchbox kit (37) w by Philip Pain, on FlickrAnd then there is the thorny question of the engines and props. The Matchbox kit comes with Hercules 16 engines which have wide blade props and spinners. Only one of the seven available T.18 photos shows this combination. The other six T.18s have the earlier Hercules XI engines with narrower Rotol electric props and no spinners. It is not correct to just leave the spinners off the Matchbox kit, the props have to be changed too. Having said all that, the Hercules 16 combination was very common on late production Wellingtons, so it is likely to have been used on many T.18s. That is what I have used.Wellington T.18, Matchbox kit (38) w by Philip Pain, on FlickrMost of today has been taken up with making all the twiddly bits, as the Matchbox kit is very absent in that department. Some 18 holes have been drilled in the model, ready to take them all. There is however, one major puzzle and if anyone can help it will be much appreciated! The T.18 was the only production Wellington that did not have the prominent radio mast behind the cockpit. However I'm fairly certain that the T.18 did still have the long HF aerial wire, from the tip of the fin to somewhere near the cockpit. But exactly where? There is not a clue on any of the seven T.18 photos, and other Wellington marks are no help as they all have the mast.Nearly finished, tomorrow maybe .................4 points
-
Hello Everyone ... Been busy over in the group builds lately but i havent forgotten that i build things with wings. I’ve been finishing up some models in my down time from the group build stuff. This is Hasegawa’s F6F Hellcat which i started last fall but just got around to finishing yesterday. I chose to do it in the markings of a Hellcat from VF-33 on Espirtu Santo in late 1943. I found the marking scheme while looking at an Eduard Hellcat, and yes i have a photo as well. Though I didn't have exact markings i was able to find spares in the same style. So without further talk I present to you my Hellcat. Heres a photo of the cockpit during the build. And for those that are curious, heres the photo from WW2.🔺 I truly hope everyone like this, and as usual please feel free to leave comments, questions, or jokes. Have a great modeling day. Dennis 🔺* not sure if this is public record so i will state the ownership rights belong to others. I only use them for informational purposes. If i have to i will remove them.4 points
-
Oooooh!4 points
-
Managed to finish this Spitfire, so will put it in the Ready for Inspection.4 points
-
“We are the Pilgrims, master; we shall go Always a little further; it may be Beyond that last blue mountain barred with snow Across that angry or that glimmering sea” Ah Ced we know how you are wired And we can sit back knowing that a new wizardry is about to meet its master (let's face it, if this goes back there WILL be another, shinier and glimmering...)4 points
-
Second coat look's good to me so touched up a few places. I'm now happy to get a gloss coat on.4 points
-
Sorry Chris. The one consolation of paying £2,000 for a new boiler (confirmed this morning) is that it's not -19C here, and only likely to get to -2C before it's fitted next Thursday. I hope yours lasts the distance (if not, send the bill to Mr. P for spreading the virus ). Apologies for side-tracking this highly entertaining thread.4 points
-
Dear twinpin, Very nice Sabre, and great job on the finish. (I know what you mean about the decals – I've almost finished the same kit, but it's John Glenn's Mig Mad Marine). I believe that is correct. The earlier discussion that @72modeler refers to might have have been from a question I posted: I've taken the liberty of reposting what I think were some of the images in that thread that no longer appear (Photobucket issue): Regards, David4 points
-
Thanks for the compliments folks. Yes it is sticky on the one side. Once burnished it is quite steadfast. Those who opt for using kitchen foil (the cheapo stuff is recommended due to its thinness) stick it down using a coat of clear gloss. More difficult I expect, particularly over compound curves, but a casual surf of the tinternet will show what can be achieved. Here’s a few recent examples from our own WIP. These fellas achieved superb results. http://www.britmodeller.com/forums/index.php?/topic/235028013-some-foil-on-a-starfighter-completed/&page=2&tab=comments#comment-2855385 http://www.britmodeller.com/forums/index.php?/topic/235030189-monogram-148-b-29-in-bare-metal-foil/&page=2&tab=comments#comment-2895033 Just a brief update as I continue to lay down the metal shiny stuff. It looks less impressive on small areas with lots of rivets, but when laid over a lard flatish surface area it really comes into its own: Again I apologise for the repetition, but it’s damned difficult stuff to get a decent piccie of with an Iphone and basic lighting. What the guys in the linked threads above did was go over it with a fine grade wire wool then finish off with metal polish. Very impressive results. Not sure I’ll get the same finish, but getting quite excited now4 points


This leaderboard is set to London/GMT+01:00