
Leaderboard


Popular Content
Showing content with the highest reputation on 31/01/18 in all areas
-
Hi everyone ! My latest completion ! The New-tool Airfix F-86 painted as an Iranian Air Force fighter . Freehand painted with gunze acrylics . I added a Pavla ejection seat to enhance the cockpit and the iranian decals from Hi-Line . Hope you like it ! IMG_20180103_194431 by Dionyssis Vacalas, on Flickr IMG_20180103_194449 by Dionyssis Vacalas, on Flickr IMG_20180103_194440 by Dionyssis Vacalas, on Flickr IMG_20180103_194456 by Dionyssis Vacalas, on Flickr IMG_20180103_194517 by Dionyssis Vacalas, on Flickr IMG_20180103_194508 by Dionyssis Vacalas, on Flickr IMG_20180103_194528 by Dionyssis Vacalas, on Flickr27 points
-
Hello! This is my new model. First in this year. I hope not lust. Building was hard. The set was not of the best quality. I used some additional details- resin wheels and exhaust. Painting- Tamiya and Mr. Color. Weatering- sold dots, oil dots, pigments and washes.22 points
-
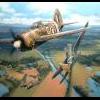
Hiya Folks, Well I`ve finally got around to finishing my Pacific Coast Models Spitfire Mk.XIV after deciding which scheme I wanted to finish it,..and eventually opted for the aircraft flown by Sqn. Ldr, James `Ginger' Lacey at the time he commanded 17 Sqn in Singapore during 1945, just after the war had ended. First a bit of background; As commanding officer of No. 17 Squadron in India and flying Merlin engined Spitfire VIII`s, Sqn. Ldr. James `Ginger' Lacey claimed his last aircraft on 19th February 1945 by shooting down a Japanese Army Air Force Ki 43 “Oscar” using only nine 20mm cannon rounds. Lacey was one of the few RAF pilots on operational duties on both the opening and closing day of the war and his final tally was 28 confirmed, four probables and nine damaged, which was displayed under the cockpit of his Griffon engined Spitfire Mk.XIV, with which 17 Sqn was re equipped for the proposed invasion of Malaya. With the war coming to a close before this invasion could take place Lacey led the unit to Singapore instead when the colony was re occupied and in 1946 he took 17 Sqn to join the British Commonwealth Occupation Forces in Japan, still with Spitfire XIV`s,....although after a failed attempt to strip them to bare metal they were repainted in overall Med. Sea Grey with Dark Green sisruptive camouflage on the upper surfaces,.....but digress!. Here are some photos of Laceys `real' Spitfire Mk.XIV, from the time in Singapore....it has often been replicated in Dark Earth and Dark Green with white SEAC bands before,....but it was in fact a faded but very well kept and clean (hardly any exhaust staining or dirt) Ocean Grey and Dark Green with Medium Sea Grey undersides aircraft which had the original European style RAF national markings over painted using Dark Green which was blended into the existing camouflage where possible and note the white codes thinly outlined with black, the 17 Sqn Gauntlet insignia on the nose and Laceys scoreboard and command pennant under the cockpit,...the spinner is often depicted as being black but it has also been said to be blue too and judging from available photo`s it does seem to match the blue sections of the Sqn. Ldr.s pennant.; And here are some other unit aircraft from around the same time,...some had SEAC bands applied and some `may' have had the Dark Earth/ Dark Green camouflage,..although faded Day Fighter green grey colours with painted out markings do appear to be more common; And some other aircraft; And now the model; The PCM kit seemed to come and go from sale very quickly and unfortunately has not been available for some time now,....so I`m glad that I got mine when I did. The construction was mixed media with plastic main parts supplemented by resin and brass and it went together quite well really although the wing centre section was quite a struggle to match to the fuselage, especially along the undersides,.....but a bit of fettling here and there did the trick! Colour wise,...the model was brush painted using my dwindling stock of Polly Scale acrylic`s,.......and Humbrol enamel Trainer yellow was used to try and replicate some of the outer wing leading edge colour showing through after this had been over painted on the real aeroplane along with the European style RAF national markings. Polly Scale US Sea Blue was used to replicate the blue spinner with Humbrol enamels used for the interior, propellers, wheels etc. Anyway,....without any more waffling on,....here is the model; DSCF2411 by Tony OToole, on Flickr DSCF2410 by Tony OToole, on Flickr DSCF2408 by Tony OToole, on Flickr DSCF2409 by Tony OToole, on Flickr DSCF2412 by Tony OToole, on Flickr DSCF2420 by Tony OToole, on Flickr DSCF2421 by Tony OToole, on Flickr DSCF2426 by Tony OToole, on Flickr It really is an excellent kit and I wish that I could have afforded to snaffle away a couple more while they were available,....oh well!! In case anybody is interested,.....here is another Supermarine classic that I`m working on at the moment too,....the Airfix 48th scale Walrus,...if anybody is using the Xtradecal sheet on this aircraft beware,....the wing roundels are too large! These are smaller and from an old Swordfish kit; DSCF2433 by Tony OToole, on Flickr And in 32nd scale the FLY Hurricane Mk.I,....which is going to be in SAAF markings; DSCF2431 by Tony OToole, on Flickr So plenty of model on the go now,...I`ve got the elves working overtime once more lol! All the best, Tony17 points
-
A representation of a 489th BS, 340th BG B-25J Mitchell. Conflicting references to 57th BW Mitchells in the MTO give rise to varieties of schemes. Tom Cleaver's The Bridgebusters infers that 340th BG aircraft were hastily overpainted with any available RAF greens or Olive Drab that could be found after a Luftwaffe night raid saw many NMF Mitchells at Alesan / Alesani destroyed and damaged. The Kitsworld decal sheet used here for 'That's All Brother' includes an NMF version with OD vertical tail surfaces with an RAF-style fin flash. A different interpretation is found in Watkin's 'Battle Colours' vol.IV. It is difficult to find any evidence that the RAF flash was employed after their use in North Africa, so that bit was omitted. The only photographs of this particular aeroplane are found on p.27 of Katarzynski's 'B-25J 'Mitchell' in Combat over Europe (MTO). They show this aeroplane as all NMF with dark tail codes. I only have four Hasegawa B-25J kits left and along with my Airfix backorder, will build more Mitchells from that rather overlooked theatre and take fuzzy images to hide as many shortcomings as possible. Michael17 points
-
The Airfix F86F - 1/72nd. scale The wing tanks were moved in 5mm and wing fences 7mm. Options for the air brakes are provided with short (retracted) hinges for closed brakes or with extended hinges for the brakes open. Although, I think, brakes in the open position would not have had the correct amount of droop. Painting: Brush painted with Humbrol acrylics, even Humbrol 11 silver for the NMF. Decals: I think the dragon decal should have been provided for both sides. The broad yellow fuselage band extends under the fuselage. The decal for the part below the fuselage was too narrow so was cut so the black outer lines would match up and the gap left was filled in with yellow paint. Lots of decals for stencil data - a lot of time to apply. Question: The box art for the kit shows tanks being jettisoned with the pylons attached - is this correct ?11 points
-
Second kit off the workbench this month; this is the mount of Japanese Army ace, Captain Yoshio Yoshida from mid 1945: FredT8 points
-
Good day all A bit of a story: About 15 years ago I built the then-new 1/72 scale kit of the B-58 Hustler from Italeri. It looked really good, was finished with ALCLAD II + ALCLAD's own primer. About 6 months later I noticed that the surface of the model is covered in fine hairline cracks... After consulting around, it seemed that the ALCLAD primer was at fault (poor quality control, same as what clobbered the original ALCLAD company - hence, ALCLAD II). I tried several times to fix it, eventually gave up and tossed it in the garbage can. In the meantime I bought another B-58 kit that I found on eBay + a set of Caracal decals in 1/72 for that kit... The decals turned up much sooner than the kit, and the Caracal decals looked REALLY good so I started thinking - "Hmmm perhaps I should just try to fix that old B-58 once more"... So off I went to check if the trash had been removed yet, actually found the model plus the bits & pieces that got broken off in the trash can (broken eggshells and empty jam bottles etc on top of it had some effect). This time I removed all the old paint including the ALCLAD primer as best as I could. Now being thoroughly disgusted with ALCLAD II products I looked around for an alternative and found two full bottles of Polly Scale "Old Silver" in my stash... All I can say is that 1) Polly Scale being out of business now is a Crime Against Humanity (I should have bought tons of Old Silver) and 2) Caracal Decals is the BEST quality decals I have come across EVER. PS. excuse the poor quality pics (cellphone) and zero attempt at a sexy background...8 points
-
A small pause for thought... and dry fitting... allowed me the first chance to take piccies of what may just turn out to be a Hawker Fury. I'm delighted with the difference in tone between Tamiya's Chrome Silver and Flat Aluminium. It's subtle but it's there. And it doesn't have any weird creases in it, which bare metal foil would if it was left to my tender ministrations. Yellow remains an absolute swine to paint evenly with a brush... it's all done with hairy sticks by the way. I don't own an airbrush and aerosols would send this little thing into the middle of next week. But for all that it's a lovely old kit, is PK-1 (as it still says on the sprue). It's quite confidence inspiring for a biplane. Hopefully she won't tempt me into over-confidence. Step-by-step I'm hoping to get to the stage where I will dare to have a run at my Pegasus S.E.5, which needs its interplane struts to be cut by hand from a strip of plastic. For now, though, I'm happy to have everything pre-aligned and with just a modicum of flash to trim off! Next jobs are to run the drill bit through the holes I made last night to reopen them after painting. Then I'll start building proper. With glue and everything! Yours optimistically...8 points
-
First build this month; the ancient FROG He-162 Volksjager. This really is a basic kit, but don't let that discourage you! This is my second one of these - the header paper below comes from my first in the early 1970s, when I really did pay 20p for it ! Built "out the bag", with the exception of a paper roll inside the (otherwise see-through) engine intake. FredT7 points
-
Hi folks, this is the brand new Special Hobby kit quickly assembled over the past few days. It was very pleasant modelling experience and in fact my second P-40 kit from Special Hobby I had the privilege to built (will post the P-40K later on). We have a new title from Valiant Wings to be announced soon which will include, among the others, a full-build article of this kit. Cheers Libor7 points
-
Good day, ladies and gentlemen. Let me present you my next model from "ICM" Ukrainian model firm.7 points
-
I'm thinking we should be able to get this on prescription OK I'm playing around with sails for solid, not happy with the first phase as someone said always better when you do it again. (Here's hoping}. Takes time for the paint to dry so ............ I started playing with the base for the wreck Using wall insulation board, PVA seems to stick it. Note to self don't use CA glue, I'm fairly sure that smoke coming from the foam is not a good thing ?? Rocks and beach covered with a watery tile grout. Rocks textured using a scouring pad Test fit Base coat applied to sand and rocks It will be going in the same type of box frame as used on Clyde Puffer, though a little deeper Thanks for looking in Kev7 points
-
I built this a few years ago but needed to take some photos for someone so I thought I would post it. It is the Academy kit with the Owl night fighter conversion. There is also a resin interior, wheels and a vacform canopy. It's a nice enough kit and rewards the effort you put in. The Owl conversion makes a different Corsair to most of the ones commonly seen. 212 was assigned to Lt Caniff but was flown by different pilots of VMF(N)-532. Capt Howard Bollman shot down a G4M in April 1944 flying this plane. Pictures7 points
-
Just saw this chat topic,so I thought I would have a sticky-beak,has been fun looking at other modelers work space,some well laid out areas,so in for a penny in for a pound,this is my space it is an area at the end of the garage,have a small car so it gives me plenty of room,and I can stick things on the wall,the bench is our old kitchen bench top,on top of cheap plastic draws,which house my stash and other odds and ends,my compressor is a home made job,had the motor and bought a second-hand tank and piped it to the motor,it is very quiet as the garage wall is the common wall with the neighbours,Models are on adjustable shelves and some are in an old book case,I have a long air hose and spray most models by the door,this gives me great light(weather permitting) Cheers.7 points
-
Looks like we'll be getting a Pucara from Kinetic soon. Source: https://www.facebook.com/Kineticmodel/posts/921764501323995 Mark6 points
-
It seems I've been running my own private KUTA build for some reason, with the J-22 that stalled during the summer, the (also Swedish) Tunnan, and my long-standing Tactical Pod Regult builds all seeing some action over Christmas and the New Year. It's been nice doing some modelling again, but BOY have I gotten rusty! This is the excellent Planet Models 1:48 FFVS J-22A fighter, which most folks including me have probably never even heard of! It kind of looks like a Swedish take on the Fw.190 after a fashion. It's pretty much out of the box except for the gunsight, which was a bit simplified, and some struts to hold the canopy open. painted with Lifecolor, Mr Color, a bit of Alclad (mostly primers), some of the new AMMO Bare Metal series, and whatever else I could lay my hands on, Ultimate Washes, the superb AKAN Flat varnish, and some old Mig filters too on occasion. Thanks to @petr@SpecialHobby for the review sample, and to Sten from Flying Colours Aerodecals for the additional decals I needed. Pictures... here they are: Thanks for watching, and if you've enjoyed it, please remember to hit like and subscribe... oh hang on, that's YouTube You can find the Work in Progress (WIP) thread here if you're bored.6 points
-
1/72 Airfix P51-D Mustang starter kit. Okay it's taken me two months on and off (more off than on really) but found it a mix of relaxation/frustration/elation over these dark winter nights. Coloured in with mostly a flat hairy stick and then dirtied up. I throw myself at your mercy! ;-) TTFN Steve6 points
-
Thanks Simon, Benedikt, Cocky, Cookie and Bill Hi Tony - I hope all as well as can be expected at home. Printing with PLA, the only thing really the cheap ones will print with as far as I know. Thanks for the tips - it's all your fault, of course Don't jinx it but I got my problems sorted and it's printing a test file as we speak. 11% through after 20 minutes. I have no idea what it is... it's called 'OK'. Of course I Googled it. It's a handy, er, hand: We'll see what mine turns out like in, oh, a few hours or so.6 points
-
Thanks Johnny, very kind Thanks Steve - it's a test, that's my excuse. Once I've mastered the technique I can make new things... that's the plan Thanks Rob, wait not longer! Wandao Duplicator i3 Mini by Ced Bufton, on Flickr I was excited and went through the setup. My initial experiences are not good: Um.... by Ced Bufton, on Flickr It's table levelling. I've seen a video on YouTube that says 'ignore the setup instructions and do this...'. I will calm down, have something to eat and try again.6 points
-
Looks like a British Battle Fighter to me... John6 points
-
With too much decent new telly to watch so far this year, my workshop and Sandcrawler both got neglected until mid January when I finally got the inspiration to chance the wind and rain between my back door and workshop - finally my mojo hath returned and I have ventured all 20 feet out to my workshop and the warmth of my oil filled radiator in it. With a base prime of grey down, I have now added a black and light brown prime for some base colours which have had chipping and masking mediums spotted on to them prior to the overall dark brown airbrushed top coat. There is a simple reason I never go near military modelling - I can't weather models. However, this kit demands it so the process and stages I am undergoing are a very big new adventure for me. I have a MIG technique's guide book which should help too. Masking the control deck from the inside took 2 hours - it was very fiddly and this picture highlights how much tidying up is needed around the upright window pillars primed bogie track cover plates VALLEJO Model Colour Light sky Grey brushed on as a base colour for the metallic scratched and flaky areas - I assume this is the right way to work (lowest colour on first) HUMBROL Masking Fluid being dabbled on hereon the black, light sky grey and light brown areas next stages: airbrushing the first base coat of the overall dark brown prior to adding the washes and pixels6 points
-
Thanks dude! Yeah sure thing, hope a tin of beans does the job! 20180130_131148 by Nick Frost, on Flickr Right I have been working on him, and as you can also see in the above photo I've started blocking out the open damaged alien bud, did this by putting a bit of foil around it and then wrapping it with armature wire 20180129_133535 by Nick Frost, on Flickr 20180129_133751 by Nick Frost, on Flickr 20180129_134222 by Nick Frost, on Flickr 20180129_134228 by Nick Frost, on Flickr And then I started adding clay, this one only has two supports because the third petal will be damaged where the space explorer has already lasered off one of them 20180130_131957 by Nick Frost, on Flickr 20180130_132658 by Nick Frost, on Flickr 20180130_133333 by Nick Frost, on Flickr 20180130_134103 by Nick Frost, on Flickr So the basic shape is their, next up I'll start refining and nailing down detail, whilst I had the wire out I also made a start on the larger open bud that will be underneath him. Started by making a paper shape just to check size and rough position and then made my wire armature for it. 20180126_134533 by Nick Frost, on Flickr 20180127_160432 by Nick Frost, on Flickr 20180127_160450 by Nick Frost, on Flickr 20180127_160441 by Nick Frost, on Flickr But for now I'll mostly be focusing on the ones on the base, as this one will be baked separately anyway I want the main piece to be finished and sculpted asap. And once again I'm running low on clay so that will be a 3rd block I need to order soon Thanks for looking, more soon6 points
-
Dads models have arrived. For the most part they are all intact. A couple of repairs have been done, just wheelhouse doors etc, and a few pitto tubes missing but all looking good. I shall try and get some pictures up when I get time :0)6 points
-
Last update I mounted the engines along with its exhausts on wing and aside the naca waits to be glued; the exhausts are not pipes type like the others Dornier, but crushed and light grey with smoked color traces, I got the color from a picture of a maintenance aircraft on Valiant publication. Glue the naca, after a few hours I joined the wing to the fuselage and masked the upper and lower canopy, apart I colored the defensive weapons and cut at the base of the barrel, the part with handle and recovery shells was glued inside, in such a way that at end I'll glue the barrels. But in the picture you can not see ........ trust me Once glued the weapons and the transparents, these have been fixed with adhesive tape, to avoid misunderstandings ..... The lower cannon received a nice hole with a thin hot needle, precision and delicacy made the shotgun credible ............ and on next step I can start with the coloring. Ettore6 points
-
Hi again, This is a long due update, to show the point I reached by the end of the GB. I've been terribly busy in the last two weeks with work in the office and the final stretch of the semester in my German course, so I only managed to get back here today. So, after solving the installation of the tail turret base, there were still a few parts to glue to the fuselage. These are the mooring heads (?): IMAG5221 Two are glued to the front of the fuselage: IMAG5222 Two on each sponson: IMAG5223 Two on the aft fuselage: IMAG5224 The remaining parts go on the tail: IMAG5225 And here is the fuselage ready for priming: IMAG5226 But before priming, there's still a lot of work to do. The engines must be assembled first. Here they are in different phases of the assembly procedure: IMAG5227 And finally, the completed engines: IMAG5228 The fit was quite good. I just have to do some tidying up on the joins. That's as far as I managed to go within the GB. The next update will already be post-GB work. Thanks for looking Jaime6 points
-
You asked for opinions and I gave you mine. I prefer the overall shape and dimensional accuracy of the Airfix kit. If panel line detail is more important to you and you don't think the Trumpy shape issues are that bad, then go with that kit. It's up to you which kit you build....but I wonder why ask for opinions if you're going to argue with the people who provide them.6 points
-
Thought I might as well draw up a standard Pro Forma that we can all use, as required.... Dear Ced, Please could you make a........(name of part) For a .........( name of kit) By.............(name of manufacturer) In...........(enter scale required) Please state number reqd....... Please advise me of my position in queue by PM...... Email..................@......... Many thanks, Yours sincerely................... That should cover most eventualities, I guess.6 points
-
Sherman M4 early production (welded hull) Tamiya 1/48 incl. RB barrel and M2 MG improvement set..... build thread here: here it is, thanks for your great support in builing my first ever tank! and a bit of a time travel: historic photos of my model thanks for this GB! cheers, Werner6 points
-
Hi, here are pictures of Horten 229 in 1/48 scale. Well, it is not in fact finished, I still need to do some cleaning and add bits and fix some parts. I didn't still add hatches and brakes, since I had an accident with one brake and one hatch leg, so need to fix it. Upper part is glued but only on some points and very lightly, so it can be removed. Inner areas are completely engraved since it came with no details. those wooden planks at the back are scrathcbuilt. Hope you like it, cheers, Marko5 points
-
Greetings from Hot and Humid Australia. Back in October 2017, the 2nd edition of Britmodellers Matchbox Group Builds got underway. It is still currently open, however has now only two more weeks for final entries to be submitted. In the day, Matchbox kits were probably my equivalent of what some folk here talk about Airfix & Frog models of the sixties. Each box had a beautiful Roy Huxley painting on top and came in 2 to 3 different shades of coloured plastic. Overall they were always quite basic, however were the perfect start for beginners, whilst also providing the experienced modeller with a platform to turn these models into absolute masterpieces. Amongst their new line-up of kits for 1976 was a Hawker Hunter. Now Matchbox had a knack of producing some quirky versions and off-beat subjects and true to form graced the modelling community with the first injection moulded parts to build a twin seat Hunter. I'm sure even back then, those modellers with an eye for detail soon realised that what was offered was quite simplistic and a little off in shape, however we could now build a T.7 of sorts so credit goes where credit is due. As a 15 year old (1985) I recall seeing this kit re-released in the lovely RAF Blue Diamonds Aerobatic team scheme. I'd heard of the Black Arrows c/o the Airfix F.6 kit, however the Blue Diamonds were new to me. For some reason I never ended up buying this kit back then, however have always wanted to have a go at one in this scheme. This latest Matchbox GB once again peaked my interest in this kit and I managed to hunt one down without dipping to deep into the kids inheritance! So here is my version of this classic kit in all it's shiny glory (or is that gory?). The obligatory GB WIP is also attached which shows a few modifications I made to 'hopefully' enhance the basic plastic. Now I'll admit that it'll never be branded as my best piece of work, however I figure that if I somehow went back in time as a 15 year old and produced this result, I would have been quite chuffed. Either way it does add a splash of colour to the cabinet and ticks off a 30+ year old modelling "Bucket List" item. Cheers... Dave (By the way - please take time to look through the Matchbox II GB gallery. There are some wonderful entries already presented and hopefully a few more to follow in the weeks to come). And some WIP shots.. And the Matchbox "Orange Range" inspired base!5 points
-
In October 2017 I was lucky enough to have two warbird flights, one in the Boultbee Spitfire I built here and the other in the 'Wacky Wabbit' Harvard (thanks to Brian) at Classic Wings in Duxford. The full story and the 'crikey I learned a lot' WiP is here. New things include a LONG discussion on creating custom decals from photos. The kit is the old Heller T-6G Texan and some modifications included custom decals, pitot, exhaust, canopy framing, fuel fillers, undercarriage indicators and crew. Not a fully accurate model but the best I can do and a great memory of the day. Painted with Colourcoats (I love them now too) mostly airbrushed but with some brush work, especially dotting around the decals. That's me in the back and @brianj1uk in the driving seat. What a great guy (Brian, not me, obviously) See? No, not really then. Ho hum. My compulsory 'in flight' shot: I really must do something about that backdrop. I'm hoping to pose them like this: Without the hand, obviously. Yes, we did fly in formation with a Spitfire - I did say I was lucky. Not this one (that's my Boutlbee) but Classic Wings 5RoH. It is a day I will remember for a long long time. It's also given me a liking for the Harvard; previously I thought 'dumpy', now I think 'sturdy girl'. Very aerobatic sturdy girl. I may even love them now, a bit. Thanks Brian.5 points
-
Hi everyone,thought you all might like to see the collection of our late member Ronnie who sadly passed away in september 2013,during the latter years of his illness Ron was unable to continue modelling or participate in the forums ,consequently many of his models which were built over a long period of time have never been posted before.This seems to be a good time to show them as Rons widow is shortly moving to Australia to join her family and the whole collection is being shipped with her,fingers crossed they survive ok.Sorry if picture quality is not that good as there are reflections in the cabinets plus my photographic skills are not that great.Thank you Ron for 50 years of wonderful memories. Michael. DSC00435 by michael hobday, on FlickrDSC00436 by michael hobday, on FlickrDSC00437 by michael hobday, on FlickrDSC00439 by michael hobday, on FlickrDSC00438 by michael hobday, on FlickrDSC00441 by michael hobday, on DSC00442 by michael hobday, on FlickrFlickrDSC00440 by michael hobday, on FlickrDSC00443 by michael hobday, on FlickrDSC00445 by michael hobday, on FlickrDSC00444 by michael hobday, on FlickrDSC00447 by michael hobday, on DSC00449 by michael hobday, on FlickrFlickrDSC00446 by michael hobday, on FlickrDSC00450 by michael hobday, on FlickrDSC00453 by michael hobday, on DSC00454 by michael hobday, on FlickrFlickrDSC00452 by michael hobday, on DSC00456 by michael hobday, on DSC00457 by michael hobday, on DSC00459 by michael hobday, on FlickrDSC00458 by michael hobday, on FlickrFlickrFlickrFlickrDSC00451 by michael hobday, on FlickrDSC00461 by michael hobday, on FlickrDSC00460 by michael hobday, on FlickrDSC00455 by michael hobday, on FlickrDSC00462 by michael hobday, on FlickrDSC00466 by michael hobday, on FlickrDSC00465 by michael hobday, on FlickrDSC00463 by michael hobday, on FlickrDSC00467 by michael hobday, on FlickrDSC00472 by michael hobday, on DSC00473 by michael hobday, on FlickrFlickrDSC00471 by michael hobday, on FlickrDSC00474 by michael hobday, on Flickr5 points
-
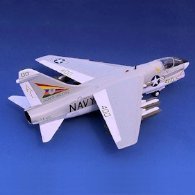
Hi all, Here are some (quite a few actually!) pictures of my latest build, it's Hasegawa's well know 1/48 F-104 Starfighter finished in the markings of 202 Hikotai when playing the role of an aggressor for one of their annual Air Combat Meets. These ACM's have produced some very nice and unusual colour schemes and it was difficult to decide which one to build, suffice to say that there will be a few more in the future. Anyway here are the pictures. Here is a link to the WIP and whilst you are there have a look at the other great builds going on in the GB. Thanks for looking in and all comments and criticisms are gratefully received. Craig.5 points
-
He does take a good shelf-portrait doesn't he?5 points
-
Courageous - Well nudged - you've shamed me into starting I can hardly believe that the last work on this was June 17 I can only plead an Airfix Spit and a half built Nagmachon in my defence - woeful really. I find scratchbuilding slightly taxing - I'm envious of the experts here Any hows - the next step was to build an anchor winch - I obsessed about finding gears which in reality are barely visible (there's a lesson in life here) I put this together in a single session Work begins on detailing the bridge I pondered how to do the bow reinforcement below the water line - I tried lead foil but the curve was so great I had to "pleat" it which didn't work. I finally tried some Green Duro putty which is overly thick but at least is fairly smooth. It doesn't sand easily so there's some happy scraping time left Good to be back on 196 Rob5 points
-
Good evening, things are progressing slooooowly here in Cyprus. Not knowing exactly where to start from, I decided to procede by cutting removing the bulged bomb bay from the fuselage halves, as it was introduced afterwards and the nose wheel bay, which wasn't deep enough. Since I erased all cockpit detail ... eehhmmm...I decided I hadn't enough knowledge to proceed with the scratch building replacement, thus I started with... ...some pencilling!!! Ideally these marks should coincide with the bulkeheads and the instrument panel position and angles...or at least this is where I got after a careful research... The only conclusion i came to is there was a I shaped a bulkhead , thus I went for it!!! Then I cut two strip of thick plastic card and glued them into the empty spaces left from the bomb bay. After some filing and sanding this is what the new belly looks like. And this is its original shape. I should carry out something like this to reduce my belly, but it ain't that easy... That's it for now. Gunnait!5 points
-
Hello Ced. Great work on the 3D printings. I guess the most difficult thing is to make a good model file to be printed. Go on with that and you will have sucess very soon with a bit of patience! Maybe this help ( or maybe you can print yourself one in the future):5 points
-
Not a lot will be seen through the glass, and the seams needed a smear of filler While the putty set I made up some sub-assemblies Seams sanded and wings and nacelles added5 points
-
I get the impression modellers fall broadly into two camps; 1) Wish to make an accurate representation of a real subject 2) Wish to make an attractive looking small subject Those in camp 1 value shape accuracy first and foremost, as mhaselden observed, if the shape is wrong then to correct it destroys all of the qualities that would have appealed to camp 2 anyway. E.g. the 1/48 Tamiya Spitfires - if you want a Spitfire that's shaped like a Spitfire then the Tamiya's convenient and easy parts fit and crisp detail is all worth zero because you'll saw the kit into pieces and glue it back together then rework the entire surface to fix the fundamental shape flaws. Those in camp 2 value precise fit and the aesthetic appeal of surface detail more. It is more important that the model builds up easily to something that looks good than it is important that it holds much resemblance to what it was supposed to be. I've heard it said that waterboarding in Guantanamo Bay sounds brilliant so long as you don't know what either of those things are. In a similar vein, Trumpeter models tend to look good provided you never actually check them against the original subject and that's true of their aircraft and ship kits generally. They make very nice kits of little aeroplanes and ships - they're just not scale models of what's written on the front of the box.5 points
-
Morning all,first coat o fgreen brushed on one more should doit tomorrow when it's fully dried,props also under a coat of paint and started the u/c painting.5 points
-
This last one fought me tooth & nail, the first track went fine but it was four links too long.....The next one broke! I managed to get it fixed, but it's a bit ugly TBH.....I've used trickery to conceal it from the casual glance (it's visible in the photo), but it won't stand up to serious scrutiny. It's entirely possble I will be ordering another three Heller M4A2s just so I can replace this track (& build some Emchas).....At least that's the excuse I'll be using when the credit card bill turns up.5 points
-
I reviewed this lovely kit link here, as well as some aftermarket from Eduard's Brassin line, and just couldn't put it in the stash to linger there. There's something kinda nice about Fw.190s, although the Ta.152H is my all-time favourite of the derivatives if I'm honest. I broke out the instructions t'other day and picked options D and M from the two, as I had two cockpit sets, and one engine set. The Tropicalised version already needed its nose cutting to fit the filters, but I suspect that might come back to bite me a little when assembling the cowling comes around. Nevermind, I'll deal with that later The cockpits are ostensibly the same, with only a small detail in the side console of one of the tubs to tell them apart, so I've been labelling things with M and D for the very obvious reason. I prepared all the resin and assembled things into sub-assemblies for painting, with only the infinitely fiddly gunsights causing much gnashing of teeth due to the tiny size of the parts, and the fact that there's a slight weak-point between the base and the business end. Yes, I snapped one by way of finding out. Please feel free to learn from my mistake Next up was the engine, and that is a beautiful piece of resin & PE engineering, with clever methods used to put it together neatly without too much hassle. The wiring loom is fiddly of course, but the stiffeners were a piece of cake! They fit snugly into little c-shaped receivers that once you see them, are a doddle to hit with the parts dipped in CA at both ends. The fit is astonishingly accurate The parts can be made into assemblies for ease of main painting, so they along with all the cockpit parts have been prepared, attached to sticks & such, then painted with black primer so that any missed spots in the engine in particular can be passed off as shadows I said there were a lot of assemblies, didn't I? I wasn't kidding! Not much detail to be seen yet in a sea of black, but I'll start getting some colour on shortly, and hopefully you'll be able to see a bit more. You might notice I've been writing on the wood to remind me what base colour is intended for each area, but the detail painting is going to take the lion's share of the work before I can begin stuffing things inside fuselages Wish me luck!4 points
-
Hi All, Here's my most recent and 4th armour completion, Tristar's excellent little Panzer. I build it out of the box including the ModelKasten tracks which came in the initial boxings. This was the first time I used the popular hairspray technique to show a worn and weathered desert vehicle showing it's original panzer grey colour scheme. I used a mix of Gunze and Tamiya acrylics and only the slightest bit of weathering pigments. My only comment regarding the kit is to cut the '833' decal into separate numerals so they match the curve of the turret better. Hope you enjoy the pics! There's a few more at: http://www.timboth.com/models/armour/panzer1a/panzer1a.htm Thanks for taking a look. Tim4 points
-
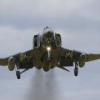
Finished this a year ago, super detailed the aircraft and engine, scratch built the crew ladder and engine trolley and heavily modified the figure. This was great fun to build as well as being very interesting aircraft to research...they are a tough bunch the Russians. A few things aren't quite right, but I'm pretty happy how it turned out. The build was in issue 87 of the Airfix magazine DSC_3486 by Dave Oliver, on Flickr mig by Dave Oliver, on Flickr DSC_3489 by Dave Oliver, on Flickr DSC_3497 by Dave Oliver, on Flickr4 points
-
Little bit more progress; Couldn't resist a test fit, you can see why they extended this dock!; Bow structure finished; Steps added, need a bit of blending on the sides, and the walls of the base built up; Water level added at the aft end and then cartridge paper pasted on top to give some texture; Dry dock gate and the basin end walls next and the main structure will be finished. Thanks for looking. Cheers Nick4 points
-
One other small, but to me, important job I forgot to mention, were the holes all along the edges of the track guards. These are the attachment points for the sand shields. There are around 25 per side, and I used a .4mm drill bit to drill them out. I have no photos of the tank that I am modelling, just the one profile on the instruction sheet from Star Decals, so some things are going to have to be guess work and poetic licence. One of these is the rear of the track guards, the not quite vertical parts, for want of a better description. In the Sabingamartin book on the M1 Super Sherman, there are several close ups of ex French M4A1's with HVSS, with various configurations of the rear track guards, so I just chose one and copied that. The parts were cut from 10thou card and glued in place, and detailed with a couple of elongated holes and some small bolt heads. Also added were the two triangular fillets either side of the exhaust deflector. Rather than waste time making a new one, I added the kit's folding stowage shelf to the rear of the hull. The fact that it's a bit thick and over scale wasn't really a problem as I intended to load it up with stowage that would hide the discrepancies. Before doing that, the cranking handle was glued in place on the rear hull plate, and the gun cleaning rods were glued underneath the shelf. On the right of the rear hull plate there is an infantry telephone box. There is one included in the Tamiya M51 (but not in the M1), but it must be of a later model as it is a different size and shape. Rather than cut up the kit's one, I thought that it would be quicker and simpler to build a new one from card. Ha!! Four hours later…...I had a telephone box. It's approximately 8mm x 6.5mm, made from strips of card for the sides and the door. The locking handle on the front is made from stretched sprue with thin copper wire wound around it to represent a spring, and rod and strip. The cable is 15amp fuse wire. Successfully uploaded this lot before the Orange Gremlins struck again. Now I'm off to do some more to it. John.4 points
-
Just to prove that I have been busy, here is a photo of my tank with the first coat of 'Light mud' applied. These are the major components, obviously, but all the other bits that required 'Light mud' have also been airbrushed. A second coat will go on this morning. Light mud (by Colourcoats) is a vaguely green grey colour. The disruptive colour I am planning to use is 'Blue/black' also by Colourcoats.4 points
-
Once the decals had been applied I could put the pioneer tools on. Unfortunately, @Graeme H (who's also doing this kit, here) got ahead of me at this point and glued the tools on before decalling. If you do that you're going to struggle fitting them behind the tools. I'm now happy with the overall colour, which is unusual for me as I struggle with dark green finishes (as mentioned before), so the time had come for weathering but I couldn't decide how to do it As a starting point I used AK Streaking Grime on the vertical surfaces and also to dirty down the decals. It actually worked better than the pics show. I used raw umber for the obligatory fuel stain and (although you can see it in the pic) it's now disappeared as Mr numbskull managed to smear it off before it dried, I might do it again later on. But I was still undecided how to weather the beast (pigments, pastels, paint, washes) so I bottled it and moved onto the stowage instead. Again I wasn't sure how much, or if any, stowage I was going to put on. For me, stowage has to sit naturally otheriwse it's not worth it but I've had an idea floating around in my (vacuous) mind for a while and I decided now was the time to try it. I got some plasticard, cut it to shape and added some 'bits' of plastic to make a rough shape, this would be the 'bulk' of the stowage which would then be hidden under a tarp. For the latter I got some foil (which is the silver foil that scalpel blade packs come in) and cut it to size. I wanted this to be removeable (just in case the idea didn't work) so I used blutak to stick it to the hull and then pressed down the foil on top of it. I used a kit bag to peep out the edge of the foil to suggest what was underneath. I prodded, poked and folded the foil to make it look more natural but it will need gluing down. It kind of worked but I also wanted to put a bit of stowage on top, the problem is I couldn't get stowage to sit 'into' the tarp and make it look natural. I then had a brain wave, use just Blutak for the bulk under the tarp, doing that means I can press something on top of (and into) the tarp and get it to sit naturally rather than on top of the stowage. That's the theory ... but I'm still mulling it over4 points
-
Heheh. That might offend Boney... I did the red bits last night/this morning: They're Khorne Red with a heavy Agrax Earthshade Wash. Then I highlighted with glazes of Evil Sunz Scarlet thinned with a water/flow improver mix. This looks really patchy and bright when it's wet but much better when dry. To smooth the edges I went back and glazed the mid-tones with a Khorne Red/flow improver mix, covering the edges of the scarlet and quite a lot of the shaded areas as well. Lastly I added some edge highlights with Wild Rider Red and blended with the scarlet. I think I might add a few more bright edge highlights with a light orange though? I went to block in the bases so I could see what they looked like and picked a lighter brown. I quite like the contrast between the warm sandy base and the green bone, so I'm currently doubting my plan to put them in a green environment. Maybe mossy tundra would still be a good idea, or desert with succulents? Cheers, Will4 points
-
A quick update - then it's time for tea. The guards for the lights are a tad thick, but I'm no expert in using brass wire and I can't find any 'after market' online - so we will go with what we've got... ...now I'm an 'accident waiting to happen' when it comes to filling locating pits so I have come up with a solution... ...drill straight through - as you can see I did the same with the lights and it allows you to add plenty of this - which seems to set things much 'harder'... so the headlight bars are on and the guns in too - right - lamb chops / sweet corn / petit pois and yes CHIPS - but no gravy... See you later4 points


.thumb.jpg.b4a5069fd2c2dd5708ce1694345c5b11.jpg)


This leaderboard is set to London/GMT+01:00