
Leaderboard


Popular Content
Showing content with the highest reputation on 26/12/17 in Posts
-
My latest effort and one that has been in the loft for a year or two. Not the easiest kit but goes together fairly quickly. Some of the instructions were a bit vague and sometimes plain wrong and the kit decals are pretty poor. The model is finished as XV233 of 42Sqn as it appeared in 1998. Painted with Xtracrylix Hemp and Light Aircraft Grey and Model Alliance decals Part III. 20171226_143033_edit by dereknferguson, on Flickr 20171226_143024_edit by dereknferguson, on Flickr 20171226_143004_edit by dereknferguson, on Flickr 20171226_143000_edit by dereknferguson, on Flickr 20171226_142951_edit by dereknferguson, on Flickr17 points
-
Well it's done - not sure what to make of this kit, it's full of 'niggles' and silly errors by Italeri but it does end up quite nice. If it was Revell pricing it would be great, but it's Tamiya pricing so feels overpriced for what you get, especially with the errors. Peter12 points
-
Delivery of the F-4J(uk)`s to the RAF started in the Autumn of 1984 with the first three arriving at Wattisham after a trans Atlantic flight named Tiger Trails 1. A further 4 Tiger Trails were flown before December 1984. Individual tails codes were not supplied until arrival in the UK and this model depicts the standard scheme each `J` wore on arrival. The only exception being ZE363 which gained a partial spray painted Black Tail after a technical fault led to a stop over at Goose Bay.10 points
-
Merry christmas one and all! I was hoping to get this finished with its diorama base, but the post held up the snow.........or by the snow :-) But i have been working on this beastie (its huge compared to a spit or a 109!!) between studies for the last few months, its a great kit with a few fit issues around the wings area. I tried a few new techniques out on the kit as I wanted to explore a few more avenues to make my models look more realistic. I started by priming the kit and doing a black pre-shade and then doing the full camouflage out the topside of Russian green (Mr Hobby 135) and black (Tamiya XF-1) with the underside painted with light blue (Tamiya XF-23). Then I de-canned some hairspray and coated the craft with my spray gun to get a better coverage on the kit, over the top of this I sprayed white (Tamiya XF-2 with a drop of brown and blue so the white wasn't a brilliant white) and then weathered it by using a stiff brush and warm water to lift the paint (very scary moments). Then its was gloss coated and decals set followed by a matt coat and post shading, the post shading was my first attempt at it and I am very happy with the result. There maybe a few inaccuracies, so please be aware I model on a 'it looks good, so its good for me' basis. Forgive the photo's on a white background as I had nothing else to use, but I ended up using the Sturmovik's base that will be grassed and snowed....when it turns up, I will update photos when it does :-) All comments and criticism is welcome, as criticism is how we improve. Many thanks for looking. Thanks for looking9 points
-
I have always had a soft spot for the Lightning, built my first from Frog-Hasegawa when I was a teenager. Not really a beautiful aircraft, but it transmits a sense of brute force... very much like a MiG-25 or an A-10. Then the Trumpeter kit came, and I decided to build it. Then the Airfix kit came, and being more accurate in shape, I decided to build it. Then the Sword trainer came, and... why not? So here they are. The Trumpeter F.6. With Aires cockpit, Aires corrected exhausts, Xtradecal decals and Master pitot. The Airfix F.6, OOP except Xtradecal decals, Master pitot and scratchbuilt cannon muzzle brakes. From a 1.25 mm steel tube with cuts made with a cutting wheel. The Sword T.5, OOB except the Master pitot, and the fin decal. The original was totally out of scale, so I used the one of the Airfix kit. The resin seats and colored photoetched parts are from the box. I couldn't get access to the forum for 1 day, so now finally I've been able to post pictures from Imgur.7 points
-
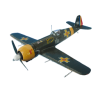
Hello everybody. I wish everyone a Merry Christmas (my apologies for being late, I couldn't access the site for 2 days). My first RFI ever. It's the new Airfix 1/48 P-40, my first fully completed build since.....1982. My sincere thanks to all the people here who share their experience(s). It helped me to get back into saddle. I did it strictly OOB but scribing the missing rudder tab and removing the right hinge off the rudder. I also had to rebuild the pitot tube from scratch (broken 5 times!). I tried Eduard mask for the cockpit. Very happy with it and I shall make further use of this stuff. I'd say it was my most enjoyable build ever. Great fit, simple and good looking kit. I'm not knowledgeable enough to comment about accuracy but IMHO it more than fits the bill. Some minor things id'like to mention: the cockpit interior frame should be removed from the sprue with a cutter, using side cutters I bent it. The fairings of the gear wells were the only part that needed some trimming/sanding for perfect fit. I'd have liked attachment points to help with the gear doors placement. It was airbrushed with a H&S Evolution Silverline (0.2 needle). Only acrylics (Gunze and Tamiya) were used (a first for me). Primer: Stynylrez grey Camo: Gunze H302 (green FS 34092), H310 (brown FS 30219); underside: H311 (gray FS 36622) Cockpit: Gunze H58 (interior green) Tamiya XF 4, 11, 16 and X18 for the interior details and weathering. Hope you'll enjoy it. All mishaps and mistakes are mine. Comments are welcome.7 points
-
Hi, I have been building the HB Claude over the last couple of days. About 10 Hrs over 2.5 Days. I ran a WiP Here is the Finished Model... A Simple build but fun with a pleasing result. Cheers Plasto7 points
-
My second and probably last aircraft kit for 2017.7 points
-
The latest diorama built by a friend of mine. V1 missile launch station from Modelcollect. Sorry for the poor pictures but it's a rather long diorama base.5 points
-
Merry Christmas to all! here my last build in 2017: Eduard`s nice MiG-21bis. Add a metal pitot by Master and some PE´s by Eduard. Decals for are Croatian AF MiG-21bis D are out of the box.5 points
-
2017 was a pretty good modelling year for me. Nine completed - nearly 10 but some decals let me down, this one will be finished in the 2018 KUTA group build - 6 Britmodeller group builds entered, just 2 on the shelf of doom. I started the year by finishing the Modelsvit Beriev Be-12 - loved building this kit. Having developed a taste for Amodel/Modelsvit kits, and got a couple for Christmas, I moved on to the Amodel 1/72 Tu-134A, finished in the colours of the Kazakhstan Ministry of Emergency Situations. A first for me - home-made decals. Next was the 1/48 Prone Position Metoer - Airfix kit with Brigade Models conversion - which I built in the Prototypes, Experimentals etc group build. Back to Russia for the next one - the Bobcat 1/48 Yak-28P Firebar. Can't wait to get my hands on the Brewer to go next to it. This one was in the 70s NATO vs Warsaw Pact group build. More from Amodel next with an Antonov double build - An-24T and An-30 - in the From Russia With Love group build. I think I need an An-26 and an An-32 sitting next to these two. First was the An-24T in the colour scheme it wore at the 1967 Paris Air Show. I loved the mustard colour! And the An-30 in Mongolian Airlines colours - home-made decals again for this one. Revel's little 1/144 146-200 next, using F-DCAL's Manx Airlines decals. Another GB entry - this time in the Made in Britain group build. Back to Russia again for the Xuntong 1/48 Tu-2T. This one was in the Radial Engines Rock group build. Finished the year with Airfix's lovely 1/48 Walrus - I'll be building more of these. Another first for me - first time I've rigged a biplane. This one was in the Flying Boats and Floatplanes group build. That's it for 2017. Roll on 2018. If I finish half of what I have planned for next year it'll be another good year!5 points
-
Hi Cees, Would that be off the Wellington kit? Not a bad idea if I can source one although not sure people would have one spare. Happy Christmas everyone, hope you all got what you wanted and had some well earned quality time with family or friends. Progress has been slow leading up to Christmas, in part due to a hand operation, in part with the usual rat race momentum. I've finally got the turrets finished tonight. The FN4 has fought back quite a bit due to the fiddly nature of vac formed parts and the fear of getting glue on them, but I'm declaring it a victory on the whole. It's not as tidy as I would like it, but looks like an FN4 and fits the fuselage well...5 points
-
Edwards Airacobra built a few years ago, remember really quite enjoyed it. Has a few well known faults but to be honest I think it looks like an Airacobra it was a trouble free build and fun! Merry Christmas5 points
-
Construction Part 3 She's a big one... Dwarfs some of the kits I have been working on lately. Added the forward undercarriage bay which was very straight forward. Like the mains it has some good detail and one could go to town on it if they wanted to. Will leave that to another build. Finished up the Pavla replacement ejection seats which came up rather well with some weathering. I rather like Flory Models 'Grime' for this work. I had to trim part 21 flush with the opposing cabin floor to ensure they fit and gave the right look under the canopy. I elected to leave the Nav's seat out on this occasion as unlikely one will see much through the two small windows on top of this compartment. Having read and watched a few 48 scale Canberra builds I was taking no chances with the amount of nose weight. I fear I have well and truly over done it but it will sit on its gear no problem... A further test fit revealed some fettling was required on the joint between the fuselage and the nose cone and the removal of some material from the top of the cockpit instrument panel - Part 13. I went as far as I could on the nose before letting the glue and filler do the remainder of the work for me. With the addition of some tabs inside the fuselage from some plastic card it was time to join the fuselage halves. Very easy and quite a good fit and panel line alignment. Extra thin cement and capillary action worked very well. No alignment issues experienced here. Next came the clear part and then the nose. Once the extra thin cement had dried I noticed a bigger than normal gap at the rear of the clear part. I added a strip of card with some additional extra thin cement that took care of that. With these dry there was some reasonable gaps and alignments to address at the join of the nose and fuselage. A little scraping with the back of a scalpel blade followed by a reasonable amount of zap-a-gap to fill the remaining gaps, and enough to ensure a good amount of material existed for some contouring to the nose where necessary. It doesn't take too long to dry after which I used a 180, 200 and 800 grit sanding stick and some water to tidy up the seams. The same process was used for all the fuselage and fin joins. A little bit of work but she looks the goods... A little re-scribing required here and there but no different to any other kit I've completed recently. Cheers, AGW..5 points
-
The last completed work this year in scale 1/144.4 points
-
Hi All, I'm going start off with the Dragon kit of an early-war Sherman. If things progress nicely then I'll have a go at a mid-war Sherman and then a late-war Sherman - so many variations so little time. It's a nice looking kit, first build of 2018. Dave.4 points
-
Hi folks, many years separates one assembly from the other. So, it´s very easy to see the weathering techniques differences that I used in both kits. The Matilda 35024 model is one of Tamiya’s older kits made in 1973, I think. The detail level is basic, typical of the earlier Tamiya kits like the vintage Tiger IE 34056, Sherman M4A3E8 35018, Hunting Tiger 35058, the T-34 series, etc, etc, etc. The hull dimensions are not accurate due the old Tamiya´s idea of motorizing their kits. So, the kit have many omissions and mistakes, but for many decades was the only one available in “1/35” scale, until the production of the new Tamiya 35300 Matilda Mk.III/IV kit. Well, I build this kit in 1999 and at that time I only used Eduard photo-etched detail set and Jordi Rubio metal barrel. Painted with Tamiya XF-60 dark yellow. Hand made german crosses. This depics a captured Matilda by AK; The Tamiya Matilda 35300 released in 2009 is an all new tooled kit, have the double of the number of parts of the 35024 model and excellent details: superb surface textures and parts fit, more delicately detailed parts and correct dimensions. It is a GREAT kit in all terms, indeed. Like in the previous kit, I added only a photo etched detail set and metal barrels, from Voyager Model (35300) and Lion Mark. This depics a Matilda of the 7.RTR: In fact I have another ancient Matilda tank from Tamiya, build OOB in 1994 or 1995, I think, with wrong CS camo, but with many falts, including a wrong mantlet for desert war. However it looks good... Thanks for looking...4 points
-
Having followed the gestation of this much awaited kit, I received my order last week. Upon opening the box I was pleasantly surprised at the quality and detail staring back at me. I have been eagerly awaiting an accurate replacement for the old Airfix kit for quite some time so as to fill a large gap in my 1/72 RAAF collection. The five grey and one clear sprues are crisply moulded with finely engraved panel lines consistent with any of the major manufacturers. IMG_0199 The clear part that represents the canopy and navigator windows is moulded as single part that forms a section of upper section of the aircraft - Smart! It allows for easier attachment and clean up and less chance of messing up the canopy which is such a prominent feature on the Canberra. IMG_0188 IMG_0187 The instructions are clear and the decals look very nice and are in register. While I won't use the RAF version supplied in the kit the stencils will come in handy for my RAAF examples. Construction Part 1 Having surveyed the instructions several times it was time to remove the fuselage, cockpit, nose section and canopy. A little tidy up of each and some tape to check the fit and all looked very good, very good indeed. IMG_0189 IMG_0190 Things lined up rather well especially the cockpit bulkhead to fuselage and clear plastic parts. I added the nose which for my example that will be a T4/Mk21 that does not need the clear section. To make the B2 there is a different nose section that allows for the fitment of the clear nose. Note the clear nose does not come with the T4 boxing. The shape looks accurate to my references and way ahead of any equivalent Canberra kit that I am familiar with. There is some nicely moulded cockpit detail on the inside of the fuselage halves, along with the parts that make up the cockpit and navigators compartment. These should come up nicely once painted and detailed. Sadly not much will be seen through the canopy. IMG_0185 IMG_0174 With that done I set these parts aside while I tried the wings and horizontal stabilizers. All good there by the looks of it. The wing to fuselage join is a little different to most kits. Rather than a tongue and groove approach it butt joins to a lip on the fuselage. A test fit of that and it looked good too. So it was time to break out the glue and get started. I departed slightly from the instructions opting to get the wings well underway before detailing the cockpit and closing up the fuselage. The main undercarriage bays go together with 6 parts that fit neatly. Too easy. They are nicely detailed and lend themselves to much more if you wanted to go further. These were then added to a recess on the inside of the underside half of each wing before gluing the top and bottom wing surfaces together. A nice and accurate fit with a minimal amount of clean up required. IMG_0172 IMG_0175 I tested the wings again to the fuselage for fit and it looks like it will be a nice and close and with a bit of luck either no or just a limited amount of filler. Next was the intakes. Each intake is comprised of two sides, a ring and intake bullet moulded together with compressor blades. These go together easily with a minimum of clean up required. These were then put into position. This required a little fettling to eliminate the need for filler. About 5 minutes each and I was done. Much easier than my recent MPM Meteor Mk8! IMG_0182 IMG_0183 The exhausts which come in two major parts/assemblies require a little trimming of the cavity they fit in at the rear of the wing. A little fettling here goes a long way for snug fit. A little filler was required to get the right result. IMG_0181 The kit doesn't come with wing tip lights so I've elected to cut these out and will add some clear sprue and I'll fashion my own. IMG_0184 So far I am liking this kit - a lot. More to come... AGW..3 points
-
#26/2017 Another one made it before year´s end, seems this is my dad´s last model for 2017. When Eduard released the new 190, my dad had to build one. Finally also the first model of our Austrian WW2 leading ace Nowotny. The kit is definitely to recommend. Fit and engineering are far better then with Eduard´s initial 190ies. Only the main wheel seem still too thin. Built OOB, painted as usual with Gunze and Tamiya acrylics, lead wire and plastic rods for the brake lines, fishing line for the aerials. Build thread here DSC_0001 by Reinhard Spreitzhofer, auf Flickr DSC_0002 by Reinhard Spreitzhofer, auf Flickr DSC_0003 by Reinhard Spreitzhofer, auf Flickr DSC_0004 by Reinhard Spreitzhofer, auf Flickr DSC_0005 by Reinhard Spreitzhofer, auf Flickr DSC_0006 by Reinhard Spreitzhofer, auf Flickr DSC_0007 by Reinhard Spreitzhofer, auf Flickr DSC_0008 by Reinhard Spreitzhofer, auf Flickr DSC_0009 by Reinhard Spreitzhofer, auf Flickr DSC_0010 by Reinhard Spreitzhofer, auf Flickr DSC_0011 by Reinhard Spreitzhofer, auf Flickr DSC_0012 by Reinhard Spreitzhofer, auf Flickr DSC_0013 by Reinhard Spreitzhofer, auf Flickr DSC_0014 by Reinhard Spreitzhofer, auf Flickr DSC_0015 by Reinhard Spreitzhofer, auf Flickr DSC_0018 by Reinhard Spreitzhofer, auf Flickr this year´s winterly JG54 gang DSC_0019 by Reinhard Spreitzhofer, auf Flickr DSC_0020 by Reinhard Spreitzhofer, auf Flickr DSC_0022 by Reinhard Spreitzhofer, auf Flickr3 points
-
Hello to all a B26, transforms in RB26C used first in then Indochina during the Algerian conflict. in mods for the box monogram; change the leading edges of the wings, manufacture and release them volets(c'est un sytéme pas tout à fait simple sur cette avion) then I "opened" the bull's nose to represent the fixations of the bubbles superimposed, then open the fuselage at the front left, on the back of the post of bombardier and at right-back slightly indented the downstairs location removed in this version with the installation of glass parts and equipment photos embarque.fabrication trapping access compartment photos to the front axle, as well as the wiper - ice. shock absorber front changed wheel and main train of the box is changed in favour of B25 wheels that were mounted on the motor Francais.cote B26, "dress front engines and especially manufacturing and installation of pipes for exhaust...72 on 2 engines.Tarpaulin on front and rear compartments and big improvement of the cockpit and the opening of station canopies. Painted and re - re painted with a brush and the humbrol. small detail, no decals at this time, other Cockade, badge and painted codes...3 points
-
I do!!! I ordered it on EBay a while ago and it probably arrived half a while a go, but Treasure hid it and ti was under the Christmas tree! It was quite a surprise! Every year my daughter comes up with a very exclusive item for my personal Christmas wardrobe!!! Last night, after everybody else had gone to bed, I could concentrate a bit on the wing outer section's detail. I added some hinges, covers and holes and this is the result I achieved: The panel lines were enphasized, as they were a bit on the light side. I'll have to do this all over the entire model, as panel lines are very light. I may start working on the middle sections now, but the outer end is quite a mistery! I'll have to go through James pictures and all my documentation again!!! Ciao Massimo3 points
-
I hope everyone had a great Christmas, and may New Year be good to you all! Here's where I am at noon on Boxing Day: I began masking the canopies yesterday morning, primarily using Tamiya tape but I also employed a new (for me) material, Parafilm M, for the areas with difficult compound curves. Parafilm M is a thin plastic film that can be stretched tightly over the canopy, then carefully cut away using a very sharp blade. Here it is on the front panels of the P-61's forward canopy: Here's the forward canopy completely masked and glued in place. Perfect fit! And this is the radar operator's canopy. The fit here is close to, but not entirely perfect. I have a couple of small gaps to fill, such as the vertical join just aft of the wing: Nearly ready to paint! Engine cowls have been added. All I need to do is mask off the wheel wells, engine cowl openings, etc. and then it will be primer time. Speaking of engine cowls, Hobby Boss molded the cowl flaps in the fully closed position, and the panel lines between individual flaps was very faint. So I my trusty scriber came out to rectify this issue: Lastly, I assembled, painted, and weathered the wheels and tires. Here's the result: When I next post, painting should be well underway. Wish me luck!3 points
-
Good evening Today I sanded the kit and rescribed it Patrice3 points
-
That's the way it looks to me! Welcome aboard Jon! Well it could have been, I couldn't get on the site yesterday! No Queen's speech in the US unfortunately, I don't think they like that sort of thing over here. Having said that, I went out to a rather top-end restaurant yesterday for lunch, and they only set 1 knife and fork on the table, no dessert cutlery, and no wine glasses. They expected me to use the same fork for starters and main course! Don't even get me started on soggy mashed potatoes with roast turkey....Honestly, these colonials..... Thanks Adrian! I'm not going to go OTT on it, but will make a few improvements to areas I think really need them. I think you're initial reaction was probably about right! Glad to have you along. OK, well after yesterday's lack of site access, I have a few updates to relay. Firstly, a couple of "heads-up" issues... The Eduard PE set instructions will have you remove all the moulded detail from the instrument panel (part D3) DON'T! These details represent the backs of the instruments, not the side the pilot is looking at! I now have top reinstate all that with bits of plastic rod..... Second, there is no mention of removing detail from part D6, the throttle quadrant. The moulded throttle and prop controls WILL need to be removed. @The Baron - look what's at the top of the page - a very nicely done geared ring for the upper gun position! (Plus the gunner's sling seat, which will serve as a pattern for a brass rod replacement!) Another couple, regarding the kit itself: I wasn't sure whether or not to use the resin tailwheel that is in the set I have, so I started looking to see how the kit item mounts. The fuselage back there is empty yet the instructions clearly show the wheel assy attaching to something inside.... There is nothing in the instructions showing anything mounted in there, and I couldn't find any part that looked as though it should go in there! I couldn't for the life of me figure out what Airfix had done, it looked like they'd made a huge mistake.....I'm not sure why, but I looked at the tailplanes - that's it! One side of the mounts for those has the cutout that the tailwheel fits into! However, that also meant that I needed to find a way to box in the front and rear around the tailplane mounting lugs, before fitting the tailplanes! With the parts in place (fortunately they fit snugly so I could work with them without gluing anything) I added a couple of pieces of .020 x .040 strip fore and aft, comme ça ] This is how it looks when it's all fitted together Good enough for now, a piece of .010 card can be slipped over it all to hide the seams once everything is fitted. No attempt has been made to make this accurate, I just didn't want to leave it open. You'll also notice that the edges of the opening have been drastically thinned down. Now onto further improvements made yesterday. I continued work on the rudder pedal assemblies, and added the brake cylinders with Albion Alloys tube and brass rod, and brass rod for other linkages. The pedals themselves are from the PE set. This is the second incarnation of the brakes, as the pics I had been using showed a master cylinder on top of the pedal mounting bracket, and being attached directly to the front face of the pedals. I then found pics of the Norwegian aircraft which shows the pedals mounted on a triangular shaped bracket, with the cylinders vertically mounted in front, so I changed it to that set up. I also found some scrap PE and made a little mount and shield for the bomb door winding handle. The pilot's seat was next to receive attention, although only minor. The sides were sanded thinner, and the rear end of the sides was lowered slightly. I also filed back the front edge of the seat legs, to leave a lip under the front of the seat. [/url] The right fuselage was altered slightly because of one of my pet hates - locating lugs that look like oil barrels! I carefully removed the holes for the fold-down seat to the right of the pilot. It's not a problem, the holes are deep enough that there is still positive location for the seat without the huge outcrop of plastic! After that I spent quite a while just cleaning up the parts on the sprues, removing ejector pin marks and various little extra tabs from the moulding process. If there's one thing I'm not too keen on with this kit it would be the relatively soft plastic. It's very easy to work with, but also very easy to mark, and it's difficult to clean parts up properly with a file or sanding stick without leaving little "furry" edges. Anyway, the last job last night was to tackle to tail wheel itself. Here are the kt parts Not bad at all, but would it really have been too hard to make the wheel a separate part? Fortunately the resin set has a separate wheel, but the mounting for it is the wrong shape, being straight instead of curved backwards. Only one thing for it then....out with the clippers to remove the wheel, and the needle files to open out the mount..... at about 1am this morning I had this.... I have no idea how I'm going to drill it and mount it, but I'll figure that out later. It's certainly a huge improvement! That's all for now, back to the bench! Ian3 points
-
Happy Christmas & New Year guys,sorry for the lack of updates.Thats mainly due to work & not being in a good mood for modelling but I did a little now & again but nothing worth posting about.Right so what has been done? I used a RB Productions scriber to scratch some detail in the flaps top & bottom but it looked a little overdone so I gave it a coat of Mr.Surfacer later to blend it in more. The tailplane/elevator area was tidied up to narrow gaps,the bullet fairing was shaped & the end tip cut down for a clear sprue light (not fitted yet),some wire was bent & glued to the front of the tailplane for the HF aerial to pass through.The ailerons were also tidied up for a better fit & a small intake was cut into the bottom of each wing along with a little scribing.I started on the cockpit area by cutting down the kit seats to shape,added armrests from strips of plastic,seatbelts from wine foil,Mr. Surfacer brushed on the seats & stippled as it dried to give the sheepskin effect.Centre console made from strip plastic & all painted with Vallejo acrylics in 1970's fashionable cockpit colour.Control columns are being made from strip plastic & bent wire. More photos later,phone / app acting up for posting pics.Off to meet the outlaws for a few hours. All the best, Jimbob. ...3 points
-
Trumpeter is to release in 2018-2019 a 1/72nd Tu-22K "Blinder-B" kit - ref. 01695 Source: https://www.facebook.com/TrumpeterModel/photos/ms.c.eJw9UtmNRVEI6mhy3LX~;xiYX5X0SBRUceRYRoh5plX~;z4RQdUZ2Ww9lRPTF6uPTr14jFpYm6OfkNfl090kfUng75sfzTi9r5cfPD5dMruf6IAN~_a~;Q0s1O~;Fj9gTer~;9~_2G~;frcv~_Nrk19jXL9y~;UlC326~_eg8~;9qgv9Tj1r4B7y5~_v3~_c3fe516sv5xfpoDj7FeWz~;99AfcRT~_gX4~;6b~;1T5qebXwnz2XuK89ffoL85CpxNvVo9zo8HPed~_XtBz~_rF5CvOsGWA9vQrcJ2XUA3~_M~;L1feH8m8tC8PEI332S~_ihcoIzb4aUM~;Ff~_apv9w7JUi.bps.a.910355045789756.1073742119.103526326472636/910355559123038/?type=3&theater V.P.2 points
-
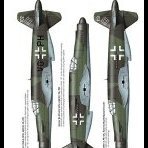
After my dad started the KG(J)54 Bf109 he decided to give it some company and build a 262 from the same unit, using the Tamiya kit. DSC_0006 by Reinhard Spreitzhofer, auf Flickr DSC_0007 by Reinhard Spreitzhofer, auf Flickr not yet decided which scheme either the easy camo "Yellow 3" Me262A_Base by Reinhard Spreitzhofer, auf Flickr or the hardcore camo "Yellow 2" Sample_p.17_fs by Reinhard Spreitzhofer, auf Flickr2 points
-
Hi all my missus bought me this for Christmas here is the start My son also bought me these interesting things for Christmas I've never seen these kits before.2 points
-
This is my first group build on BM, and it couldn't have been a better subject for me. Shermans figure very high on my build list with over a dozen in 1/35th and 1/48th scales built already. For this build I wanted to do something a little different and having recently received a conversion from Greg Beuchler for the Chilean M60, it was decided. When Israel had finished with it's M50's and M51's, a lot were passed over to the Chilean army. Some modifications were made to the M50's in the form of an engine change, which in turn resulted in a new engine deck, and a change of main gun in the form of a very powerful 60mm cannon. The subject for this build is based on an ex IDF M50 that itself was based on an M4A1 with HVSS. I was originally going to use the Tamiya M51 as the base kit, but remembered that I had the old Dragon M51 which I was using as spares, so that's the one that I'm going with. The turret will come from Dragon's M50 kit. The conversion set. The markings, of which there are very few, are from the Bison decal sheet for South American Shermans, which is now available under the Star Decals banner. Well, it's nearly time for the off, so until then, thanks for looking. John.2 points
-
I`m posting this not with the expectations that my model will impress anyone, but with the hope that the subject might inspire others. It was started as part of a GB here, but having to take a long break from modding I have only managed to complete it this month. I apologize for that! I did take pictures with the work in progress and kept some notes but posting in that GB section is no longer possible so I`ll skip right to the completed model. It represents Hurricane no.15 in Romanian service. This is one of three ex-Yugoslav machines captured by the Germans and sold to Romania. The other 12 Hurricanes in Romanian service were British built and of the late Mk.I type, with metal wings. Very soon after finishing the model I bought a new book on the Romanian Hurricanes (pity some of the information included in it reached me too late for this model) and since I took a picture of that for a review I thought it fun to pose the model on top of it for a few shots. You can find my review of the book here: http://www.britmodeller.com/forums/index.php?/topic/235031176-hawker-hurricane-voli-of-the-illustrated-history-of-romanian-aviation/&do=getNewComment By the way, all Hurricanes served with the famous 53rd Squadron which gave the country its first three aces. Incidentally, the 53rd Squadron has been recently reformed and is now equipped with the first batch of F-16 to enter Romanian service (text in Romanian with a history of the squadron in WW2 and relevant photos to be found at page 28): http://www.roaf.ro/ro/cer_senin/arhiva_pdf/2016/CERSENIN_4(147)-2016.pdf I chose to largely follow the instructions from the old AZ model kit and the profile from Romanian Fighter Colours for the camouflage pattern instead of properly studying the available black and white pictures. When I finally did the latter I wished I had made some of the shapes and colour dispositions differently, but that`s that now. The kit used is Airfix`s A01010, but I`ve replaced the wheels with the 5 spoke resin ones from CMK. I`ve also replaced the mast with a 0.9mm brass tube because this particular kit did not contain the baton aerial that my subject required. Inside (not that visible) I`ve used Eduard`s Superfabric RAF early seatbelts (awesome product!). The crosses and emblems are from Radu Brinzan`s RB-072008 decal sheet (great quality decals!), but I`ve had to mask the tail numbers myself since there was no decal available for these when I started the project. In the meantime though, Radu has released a decal sheet for this very subject: http://www.britmodeller.com/forums/index.php?/topic/235028180-new-romanian-hurricane-decals-rb-productions-in-telford/ I`ve had problems masking the canopy (among other things) as the paint mostly lifted with the aftermarket mask and after masking it again with tape and achieving the same result I simply painted it by hand, hence the result. The model is - obviously, I suppose - entirely brush painted and for the camouflage I`ve used Italeri acrylic paints which I choose according to the FS codes listed here: http://www.britmodeller.com/forums/index.php?/topic/234951133-yugoslav-hurricanes-recommended-schemes/?p=1524398 4709AP Flat Dark Tan 4726AP Flat Dark Green 4797AP Flat Pz. Schokobraun RAL 8017 4778AP Hellblau RLM 65 The interior is Vallejo`s 70.974 Green Sky. Happy Holidays to everyone!2 points
-
Hello all! Merry Christmas and Happy New Year ! I present to your attention the result of the test-build of the new model from MiniArt - the early T-55A Enjoy watching !2 points
-
Somewhat reduced output this year, with a few significant work trips and then an unexpected health issue right at the end of the year (who knew reaching 50 would have that much effect on my blood pressure ). As per usual models generally brush painted with Tamiya and/or Italeri acrylics. Not so usual, I got on to a real roll with 1:48 scale military vehicles, which is a bit of a change for me. I have a few aircraft close to being finished, but not confident I will manage them before 31 Dec. Thanks for looking. Merry Christmas and happy, safe and prosperous 2018 to all. Special Hobby 1/72 Bristol Beaufort Mk1A in Malta Colours Build thread can be found here. Airfix 1/48 DH Mosquito PR XVI in SEAC markings Build thread can be found here. Tamiya 1/48 scale Crusader III Build thread can be found here Tamiya 1/48 Matilda in desert colours Build thread can be found here. Tamiya 1/48 Dingo Mk II Scout Car, NW Europe 1944-45 Build thread here. Airfix 1/48 Bedford MWD in RAF colours Build thread can be found here. Tamiya 1/48 Tilly in desert colours Build thread can be found here. Tamiya 1/48 Humber Armoured Car Build thread here.2 points
-
This is my latest build. The kit is Airfix and the decals are made by me. Many thanks for looking and happy holidays.2 points
-
Good evening to Everybody! Posting something new from my manufacture done after a long time, so have a mercy with me! BRGDS to All!2 points
-
my last for 2017. 25591862_1518572691513439_3224366477315530329_n by paul sabin, on Flickr25591597_1518572831513425_5348907322992766623_n by paul sabin, on Flickr26001111_1518572734846768_4853420791523534623_n by paul sabin, on Flickr26047096_1518591988178176_4153189773317742566_n by paul sabin, on Flickr it's a nice little kit,and having done a couple of resin kits now it was no real challenge...the decals were more of a callenge as they are printed inverted(colour side down) so that took a bit of getting used to. overall it has been an enjoyable build and i suspect they will be getting more of my money in the future. oz rb fan Posts: 827 Joined: Mon Apr 14, 2014 7:28 pm2 points
-
I finished this a few weeks ago but then spent the weeks since mucking about making bases. After three jet builds this year I felt like something quick and easy . Nothing in the stash from the good guys took my fancy so I pulled out my double boxing of the Hasegawa Hs 129 and Ju 87. The Hs 129 looked like the more simple of the two. Reading a few reviews confirmed this. The aircraft I chose was an aircraft from 9 Ground Attack Air Wing 10 (anti-tank) Company Eastern Front: July 1943 More images at my blog.2 points
-
So, this is it, guys! Are you ready to spent some money? OSCAR EW 5894 1/72 and 1/48 decals! You can buy in from here: https://ctamodels.com/decals or here: https://www.ebay.com/sch/novokits/m.html 1/48 perfectly fits to Arfix kits A05123 or A051242 points
-
DSC_0003 by Reinhard Spreitzhofer, auf Flickr DSC_0004 by Reinhard Spreitzhofer, auf Flickr2 points
-
@Spitfire31 ... Personally i think preshading or blackbasing does help paint-schemes. I think it helps give life to a dull camouflage color. Besides Lawzers great example above I would point out specifically in modern grey, grey, & more grey camouflage schemes. They need as much help as they can get to be interesting. I agree 100% its not what real planes look like though. Dennis2 points
-
Cookie, While looking for some Bunker Hill Helldiver photos, I found this photo collection of the SB2C-5 recently restored by the NASM. It looks to be pretty original; I know you've finished yours, but thought you or any of the other BM'ers thinking about doing one still might find them useful. Happy Holidays from sunny south central Texas! Mike https://airandspace.si.edu/collection-objects/curtiss-sb2c-5-helldiver2 points
-
Merry Christmas everyone! Two local clubmembers will try in the comoing month to produce a set of resin wings for me. One har the unbuilt kit, the other one knows how to mold resin... I'll keep my fingers crossed! Naturally the build has hit a bit of a rough patch due to the missing parts, but I have atleast done something! Airfix claims that 35g of noseweight is sufficient, so naturally I went for 40. Also, the first parts in EDSG has been painted! Since it's the air intakes, how long this paint will actually live on the model is a different question. However, the fit of the intakes is not the greatest. But sureley filler and sanding builds character?2 points
-
I'd agree with that Julien. Finely detailed (by standards of the day) both they and the B-29 are still worth having and can still be had at reasonable prices. Personally, I hope Airfix DON'T do any 1/48 WWII (or later) heavies. 1/72 is quite adequate. I would also suspect that such kits would be very expensive and,taking into account their large size, both factors might actually restrict sales. Allan2 points
-
I personally know the author, and I have seen some of the effort that has gone into this book (the plans, for example, were re-sent to the drafter a couple of times for revision, until every minute detail was done right.) Also, I have purchased the book, and it is obvious that this was a bit of a "passion project" for the author, shown in the thoroughness of his research. Highly recommended!2 points
-
Airframe complete and a couple of coats of matt varnish on. I've sourced a Fairey Red prop, a dinghy housing and an arrestor hook from a Pavla boxing in the stash. Here they are cleaned up and awaiting painting. Then I'll be done.2 points
-
Wheels painted and aerial rig glued back on for the umpteenth time. It's quite strong but then just goes. Only the tools and the mirrors to go. I've also glued the diorama parts together. They look quite European but let's see what a few coats of sandy/earthy colours do.2 points
-
Hi mates, just a quick update. This morning I woke up early and, before my Tresure could come up with plenty of things for me to do, I got some work done. Up to then I had already filed and sanded down the ailerons. I filed a strip of thick plastic card with a round file to match the aileron front's shape, then I cut it in two halves and glued them in front of the ailerons. Then I shaped another piece of plastic card to match the inside of the wing section and glued it to it, using a couple of bitd of plastic strips as a back stop.That was it as at that point, my lovely half arrived and I got to real work!!! After a long day getting things ready for tonight and tomorrow, We've just exchanged our presents and among other things I got a fantastic tie from my daughter and a book. It'll be a very interesting read for the next few days. This morning I got up early again and completed the wings sections inner frame. Now I'll have to add some detail. Back to James' pictures now!!! I think this is it for this time. I'd like to wish a very Merry Christmas to all of you! Ciao Massimo2 points
-
Well who da thunk it? Amongst all the hustle and bustle I got an hour or so at the bench today. The pesky rear cockpit bit got glued in place, gaps ‘n’ all. Then I built the dashboard bit. For some reason “the instructions say clear” but the view finder bit is solid plastic so I cut it off ready for a scratch clear part later on. I also built a square radar thing out of tiny bits of plasticard. (Very tiny) The gaps got filled with plasticard shins and PPP then sanded, sprayed and sanded again. And on the bottom. I’ll come back to this after Christmas, I really wanted to have a go at a wheel well. So best intentions and a vague stab at what you get in the real thing we are here. I have to add the other strut when I put the leg in but I’m pretty happy with that. right I’m going to settle down with Agatha Christie and a nice glass of red. I hope you are all having a wonderful Christmas time and best wishes to each and every one of you. Thanks for dropping by for a wee snifter. Happy Modelling chums. Johnny ho ho ho!2 points
-
Afternoon all,started the decal's despite their age doing OK.2 points
-
Good evening Yesterday I placed the wings and today I used some putty on the panel lines I also followed the instructiion sheet and shortened the propeller blaldes Patrice2 points
-
To be entirely candid with you, it was only because I couldn't find a clip of his similar appearance on Clerks: The Animated Series. And now, with absolutely no apologies to Wham! (who, if anything, should be apologizing to me, to you, to everyone who's ever been alive and in a shopping mall within a week of Christmas, as I was Friday): This Christmas, I masked a Wimpy And forgot to say, started painting it yesterday This post, to save me from arrears I'll get it all up on Flickr (Flickr) So t'other day, I actually laid down the Dark Earth (Colourcoats, natch, and what a pleasure it remains to use) first, since I feel like it makes more sense to do the lighter upper colours and then the dark undersurface and flank colour. There should be a substantial amount of masking any way one does this scheme, so the best thing is just to get on it. 20171223_111425 by Edward IX, on Flickr The Dark Earth dried with pleasing rapidity, and I used the classic "blu-tac and tape" method to mask it, which I'm getting much better at. I have some mild colour perception issues (one reason why I rarely if ever try to mix my own paint colours), and the low contrast camo guides in both the Techmod decals and the Trumpeter base kit may have given me a migraine, but I think I figured it out. The Trumpeter roundels are rather off anyway, so you should buy aftermarket decals (and Techmod're really the only ones who give you many options), but even if not, the Techmod painting guide is a much more sensible size, given the generally decrepit state of modellers and their eyes across the world. (I'm always a big fan of the modellers who do youtube videos in footbal/futbol/soccer jerseys -- you're not fooling anyone, pal). 20171224_095714 by Edward IX, on Flickr Annnnnd...presto! Unmasking, phase one. Now to wait for this to dry and do the Night undersides and flanks -- the demarcation on this aircraft abaft the cockpit seems to have been rather higher than on some other Wimpys, going by the paint guide, and I can't see much different in the two photos. 20171224_101103 by Edward IX, on Flickr Hope you're all enjoying your pre-Christmas jollities; I cleaned the entire main bathroom and kitchen last night, including floor washing and all the trimmings, and Mrs P has graciously taken the kids to have brunch with her parents, so I've had a blissful and quiet morning. It is in fact the ninth anniversary of our first date today (lunch at a now-closed sandwich shoppe -- the extra e for expensive!). My how time flies.2 points


This leaderboard is set to London/GMT+01:00