
Leaderboard


Popular Content
Showing content with the highest reputation on 19/12/17 in all areas
-
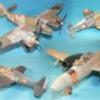
Good day, gentlemen! Here I present you 1931 racing seaplane. The kit consists from resine details of very high quality, assembling the plane took me only a single weekend. Surface of details has rather bad adhesiveness therefore, I strongly recommend using primer.13 points
-
Hello all. As mentioned over in my W.I.P. thread on this same topic, here are the completed photos of my YA-7F. The thread can be found here: YA-7F WIP And, finally, a side-by-side with a Fujimi A-7A model: Not the greatest pics, but I'm pleased with the model. Hope you enjoy it Ed Note: Just updated pics after correcting white balance -- you are NOT seeing photos change spontaneously!10 points
-
Good day, gentlemen. Let me present my next model.9 points
-
Here she is, in her full 1950's glory. The bright decals make it better I think. Not as simple to make as I was expecting, as the Mistercraft kit needs a bit of cutting and sanding to make an F.6, but in the end I thought I'd use one of the Xtradecal options to brighten her up.8 points
-
Yes, it's unfortunate. My mother's standard defence is "what's normal?" but both my youngest sister and I agree it isn't whatever's happening at any given moment within the leafy and alarmingly toroidal branches of our family tree. I trust you proposed by slipping the ring over your uvula prior to an appointment? No, don't disabuse me of this. I've long believed there's nothing the Royal Navy can't do, and I don't want you spoiling it. Alas no. Most of it is too cheap, dumb, and venal for Twain to touch. In any case, I am determined to preserve my children unsullied by the myriad curses of my family, which surely must be to some extent a product of upbringing, rather than genetics. Will I fail? Oh, probably. My mom had the same dream, but I do think I'm willing to go a little further on that front. Here's Winnie; some children have a stuffed teddy bear, he has an Su-15 Flagon to protect himself from nasty old Korean jetliners. 2017-12-17_11-14-45 by Edward IX, on Flickr Anyway, tonight I got downstairs and did a little more work in between watching episodes of The Sandbaggers, which really doesn't get enough credit. 20171218_224458 by Edward IX, on Flickr I also did the collector rings, using Aluminium as a base, followed by clear blue and then clear orange. The photos don't capture it well, but in different light they look different: 20171218_221530 by Edward IX, on Flickr 20171218_221520 by Edward IX, on Flickr And yes, I left the front part of the rings unsullied. Don't worry. I used my Grex Genesis XN for all of this, as it has the smallest needle of all of my airbrushes (0.2mm). When I first bought it, it had a sticky trigger and I had to send it in to be refurbished at the factory, and ever since I've felt like it's kind of finicky and am loathe to use it. It did okay here, but I don't know that this is the best brush to showcase the brand. Fine detail brushes all feel pretty much the same to me. 20171218_221301 by Edward IX, on Flickr I hand-painted the tailwheel (and airbrushed the masked mainwheels) and I think this is the best I've ever done at brushpainting a wheel. All downhill from here. 20171218_224423 by Edward IX, on Flickr Then I used the rest of the Tamiya Rubber Black in the brush to undergird the windows and get them ready for priming. 20171218_225701 by Edward IX, on Flickr Unfortunately, despite lining everything up with its respective pegs, the oil cooler air scoops are caddywumpus: 20171218_225719 by Edward IX, on Flickr The scoops are separate parts; I should not have added them until the cowls were on. Alas.8 points
-
Hi everybody, Here you are my latest build... a frenchy Turbofirecat made with Hasegawa/Revell Grumann S2A Tracker kit and Wolf Model conversion kit.Decals Sheet from Syhartdecal.You can see more on my FB https://www.facebook.com/AviapassionMaquette-1507844922841510/ Or on Master194 frenchForum http://master194.com/forum/viewtopic.php?f=4&t=99446 I hope you will like it Cheers Thierry7 points
-
Still lots to do, but hey! Lots of filing and filling needed for the wheel spats, and I think there's still a seam. I think I can see the end from here though.7 points
-
So far "only" 25 models by my dad this year, some more time consuming and bigger subjects among them. 1-2 models could still make it until year´s end. My dad and I enjoyed all of your work here, hope you had the same pleasure with ours. We wish every Britmodeller and their loved ones Merry Christmas and joyful holidays. So, here´s the 2017 output, as usual all in 1/48. Airfix Meteor F.8 with Isradecals DSC_0001 by Reinhard Spreitzhofer, auf Flickr DSC_0003 by Reinhard Spreitzhofer, auf Flickr DSC_0007 by Reinhard Spreitzhofer, auf Flickr DSC_0011 by Reinhard Spreitzhofer, auf Flickr Hasegawa A-4E, decals from the kit, Hobbycraft and Isradecal DSC_0001 by Reinhard Spreitzhofer, auf Flickr DSC_0003 by Reinhard Spreitzhofer, auf Flickr DSC_0007 by Reinhard Spreitzhofer, auf Flickr DSC_0011 by Reinhard Spreitzhofer, auf Flickr Tamiya JGSDF Type 10 DSC_0001 by Reinhard Spreitzhofer, auf Flickr DSC_0003 by Reinhard Spreitzhofer, auf Flickr DSC_0010 by Reinhard Spreitzhofer, auf Flickr DSC_0014 by Reinhard Spreitzhofer, auf Flickr Eduard Bf108B with Fantasy Printshop decals DSC_0001 by Reinhard Spreitzhofer, auf Flickr DSC_0003 by Reinhard Spreitzhofer, auf Flickr DSC_0007 by Reinhard Spreitzhofer, auf Flickr DSC_0011 by Reinhard Spreitzhofer, auf Flickr Eduard Bf109F-4 with HAD decals and some from the sparesbox DSC_0001 by Reinhard Spreitzhofer, auf Flickr DSC_0003 by Reinhard Spreitzhofer, auf Flickr DSC_0007 by Reinhard Spreitzhofer, auf Flickr DSC_0012 by Reinhard Spreitzhofer, auf Flickr ProModeler/Revell Germany Ju52 with decals from Fantasy Printshop and IPMS Austria DSC_0001 by Reinhard Spreitzhofer, auf Flickr DSC_0002 by Reinhard Spreitzhofer, auf Flickr DSC_0003 by Reinhard Spreitzhofer, auf Flickr DSC_0004 by Reinhard Spreitzhofer, auf Flickr AMG Bf109B-1 DSC_0001 by Reinhard Spreitzhofer, auf Flickr DSC_0003 by Reinhard Spreitzhofer, auf Flickr DSC_0008 by Reinhard Spreitzhofer, auf Flickr DSC_0012 by Reinhard Spreitzhofer, auf Flickr Classic Airframes Bf109D DSC_0001 by Reinhard Spreitzhofer, auf Flickr DSC_0003 by Reinhard Spreitzhofer, auf Flickr DSC_0007 by Reinhard Spreitzhofer, auf Flickr DSC_0012 by Reinhard Spreitzhofer, auf Flickr Tamiya JGSDF Komatsu LAV DSC_0001 by Reinhard Spreitzhofer, auf Flickr DSC_0003 by Reinhard Spreitzhofer, auf Flickr DSC_0012 by Reinhard Spreitzhofer, auf Flickr DSC_0013 by Reinhard Spreitzhofer, auf Flickr GWH MiG-29 9.13 with Caracal and Fantasy Printshop decals DSC_0025 by Reinhard Spreitzhofer, auf Flickr DSC_0023 by Reinhard Spreitzhofer, auf Flickr DSC_0010 by Reinhard Spreitzhofer, auf Flickr DSC_0006 by Reinhard Spreitzhofer, auf Flickr DSC_0009 by Reinhard Spreitzhofer, auf Flickr Revell Germany C-47 with decals from North Star Models DSC_0006 by Reinhard Spreitzhofer, auf Flickr DSC_0011 by Reinhard Spreitzhofer, auf Flickr DSC_0014 by Reinhard Spreitzhofer, auf Flickr DSC_0018 by Reinhard Spreitzhofer, auf Flickr ICM I-153 Chaika DSC_0001 by Reinhard Spreitzhofer, auf Flickr DSC_0003 by Reinhard Spreitzhofer, auf Flickr DSC_0007 by Reinhard Spreitzhofer, auf Flickr DSC_0012 by Reinhard Spreitzhofer, auf Flickr Stransky Bücker Bü181 Panzerjäger DSC_0001 by Reinhard Spreitzhofer, auf Flickr DSC_0003 by Reinhard Spreitzhofer, auf Flickr DSC_0007 by Reinhard Spreitzhofer, auf Flickr DSC_0017 by Reinhard Spreitzhofer, auf Flickr Tamiya P-47D with Tigerhead decals (partly) DSC_0001 by Reinhard Spreitzhofer, auf Flickr DSC_0003 by Reinhard Spreitzhofer, auf Flickr DSC_0007 by Reinhard Spreitzhofer, auf Flickr DSC_0012 by Reinhard Spreitzhofer, auf Flickr Hasegawa F-4E with Hi-Decals and Icarus Decals DSC_0001 by Reinhard Spreitzhofer, auf Flickr DSC_0003 by Reinhard Spreitzhofer, auf Flickr DSC_0007 by Reinhard Spreitzhofer, auf Flickr DSC_0012 by Reinhard Spreitzhofer, auf Flickr Tamiya Elefant DSC_0001 by Reinhard Spreitzhofer, auf Flickr DSC_0002 by Reinhard Spreitzhofer, auf Flickr DSC_0003 by Reinhard Spreitzhofer, auf Flickr DSC_0014 by Reinhard Spreitzhofer, auf Flickr Hasegawa F-86F-40 with Hi-Decals DSC_0022 by Reinhard Spreitzhofer, auf Flickr DSC_0024 by Reinhard Spreitzhofer, auf Flickr DSC_0028 by Reinhard Spreitzhofer, auf Flickr DSC_0033 by Reinhard Spreitzhofer, auf Flickr Xuntong Il-4T DSC_0001 by Reinhard Spreitzhofer, auf Flickr DSC_0004 by Reinhard Spreitzhofer, auf Flickr DSC_0007 by Reinhard Spreitzhofer, auf Flickr DSC_0017 by Reinhard Spreitzhofer, auf Flickr Hasegawa Bf109G-6 with Kagero decals DSC_0003 by Reinhard Spreitzhofer, auf Flickr DSC_0005 by Reinhard Spreitzhofer, auf Flickr DSC_0009 by Reinhard Spreitzhofer, auf Flickr DSC_0014 by Reinhard Spreitzhofer, auf Flickr Hasegawa Bf109G-6 with decals from RB Productions DSC_0001 by Reinhard Spreitzhofer, auf Flickr DSC_0003 by Reinhard Spreitzhofer, auf Flickr DSC_0007 by Reinhard Spreitzhofer, auf Flickr DSC_0012 by Reinhard Spreitzhofer, auf Flickr Taymia F-84G with Hi-Decals DSC_0001 by Reinhard Spreitzhofer, auf Flickr DSC_0004 by Reinhard Spreitzhofer, auf Flickr DSC_0009 by Reinhard Spreitzhofer, auf Flickr DSC_0013 by Reinhard Spreitzhofer, auf Flickr Hobby Boss IAR-80 with decals from RB Productions DSC_0001 by Reinhard Spreitzhofer, auf Flickr DSC_0004 by Reinhard Spreitzhofer, auf Flickr DSC_0008 by Reinhard Spreitzhofer, auf Flickr DSC_0012 by Reinhard Spreitzhofer, auf Flickr Hasegawa Fw190A-4 with decals from the sparesbox DSC_0001 by Reinhard Spreitzhofer, auf Flickr DSC_0003 by Reinhard Spreitzhofer, auf Flickr DSC_0007 by Reinhard Spreitzhofer, auf Flickr DSC_0011 by Reinhard Spreitzhofer, auf Flickr Revell USA Mil Mi-25D with Aztec Decals DSC_0001 by Reinhard Spreitzhofer, auf Flickr DSC_0003 by Reinhard Spreitzhofer, auf Flickr DSC_0007 by Reinhard Spreitzhofer, auf Flickr DSC_0012 by Reinhard Spreitzhofer, auf Flickr Hasegawa Bf109K-4 with EagleCals DSC_0001 by Reinhard Spreitzhofer, auf Flickr DSC_0003 by Reinhard Spreitzhofer, auf Flickr DSC_0006 by Reinhard Spreitzhofer, auf Flickr DSC_0011 by Reinhard Spreitzhofer, auf Flickr new Eduard Fw190A-4 DSC_0001 by Reinhard Spreitzhofer, auf Flickr DSC_0003 by Reinhard Spreitzhofer, auf Flickr DSC_0007 by Reinhard Spreitzhofer, auf Flickr DSC_0011 by Reinhard Spreitzhofer, auf Flickr Italeri AH-64A DSC_0001 by Reinhard Spreitzhofer, auf Flickr DSC_0003 by Reinhard Spreitzhofer, auf Flickr DSC_0005 by Reinhard Spreitzhofer, auf Flickr DSC_0013 by Reinhard Spreitzhofer, auf Flickr6 points
-
Just finished my Airfix 1/72 Jet Provost T.4 this morning. Out of box and Hataka and Tamiya acrylic paint job.6 points
-
It's a hangover from the changes our hosts made to their network at the weekend. They're still ironing out the kinks, so bear with them6 points
-
Seeing the 6th Lancers presented in work in progress by Fred G, I thought I'd show my 5th Regiment, the other half of the`2nd Brigade of the 2nd Cavalry division at Waterloo. These are 28mm Perry miniatures and I'm afraid the harsh light of the flash does them few favours. The horses do not conform to the excellent plans presented here earlier but I decided during the 100 Days that any 'orse would do. As always thanks for looking5 points
-
Thanks Jean. A bit more done today. Pilot painted No, you can't see much with him in there Tail planes on Canopy on and masked, cowling ready Undersurfaces airbrushed Vallejo Model Air 71047 US Grey Topsides Tamiya XF-62: Olive Drab5 points
-
Thanks Keith Masked up for the camo: Masked by Ced Bufton, on Flickr These also arrived yesterday: I'd better search the stash for some roundels. Oh, and get on with the (gulp) custom transfers.5 points
-
One of those days where you spend a lot of time cleaning up seams, doing little bits of filler and generally tidying up... and before you know it 3 hours have gone past. Every review I have read of this Trumpy Seafang kit says that there is a dirty great moulding seam running down the canopy, and mine was no exception. That's now been polished away and both parts of the canopy dipped, so the cockpit is now shut (I added the gunsight before I glued the windscreen in -place, but forgot to take photo. I also added rails for the canopy to slide back on, which Trumpeter missed out completely for some reason; you can just about see them in both pics, but they will show up nicely after painting etc. They are certainly pretty visible on the real thing. I've already said that I am planning to use a Barracudacast tail designed for the Airfix Seafire 46/47, so I have been doing quite a lot of sanding to get the rudder to fit nicely (no photo). The horizontal tail surfaces need rather more work, because the fuselage is clearly a different shape back there - I have glued the Trumpeter parts together (and to be fair to Trumpy, though some of their accuracy ain't that great, the fits of the parts is really excellent) and then cut most of it away leaving just a wedge of root onto which I will add the resin part; Finally, as @gingerbob kindly pointed out, Trumpeter's spinner is not great; it's far too pointy. Here it is alongside the Mk 46; they ought to be the same... (and as you can see I had actually already started sanding the tip before I remembered to take a photo, so it was originally even worse!). I've also been doing Walrus-y things, but nothing worth photographing so no update on that thread. More soon Crisp5 points
-
5 points
-
Hi mates, I started this model for the Prototypes, Experimental, World's First & Record Breakers Group Build, but life got in the way and I wasn't able to finish it in time. Eventually, it came together and here it is! The Curtiss-Wright XF15C-1 mixed-propulsion fighter was developed for the United States Navy at the end of WWII, first flying in February of 1945. Only three prototypes were built, as the US Navy moved their focus to pure jet propulsion. Only one of the prototypes survived. Similar to the Ryan FR Fireball, which entered service on a limited basis, the XF15C-1 had both a Pratt & Whitney R-2800 radial engine/Curtiss Electric propeller up front and an Allis-Chalmers J36 turbojet (license built de Havilland Goblin) under the tail. The mixed propulsion concept was devised to counter the slow acceleration of the early jets, a characteristic that limited their appeal for carrier use. Including the radial engine allowed for safe carrier launch and recovery, and the turbojet in the tail would contribute to higher cruise speed. Or so the theory went. The need for further development of the mixed propulsion concept for carrier fighters was negated by improvements in jet power, and the Curtiss-Wright XF15C was never ordered into production. It was the last Curtiss aircraft to be built for the US Navy, and the penultimate design for Curtiss itself. This kit, from Olimp and their Pro Resin brand, represents the T-tail design as incorporated into the second and third prototypes after the crash of the first, which had a more conventional tail. The casting of the resin parts is very nicely done, with lots of detail and no real fit problems. This was my first Pro Resin kit, and I wouldn't hesitate to build another. The only issue I had were the stickers, which refused to lay down without silvering no matter what I did. The spares box is meant for these occurrences. Project: Curtiss Wright XF15C-1 Kit: Pro Resin (Olimp) Kit No. R72-008 Scale: 1:72 (if you're not building in this scale, you've got a lot of 'splaining to do) Decals: Kit decals were unusable, all markings from the Island of Misfit Stickers Resin: Hey, the whole thing is resin! No need to buy any aftermarket... Photoetch: Supplied with the kit and included instrument panel, seat belts, landing gear torque links, cooling flaps, etc. The usual stuff. Paint: Testors Model Master Dark Sea Blue FS15042; Gunze Flat Black, Flat White, Interior Green, Tire Black; Tamiya XF-69 NATO Black; Alclad Aluminum, Magnesium, Steel; Floquil Flat Weathering: None. I'm starting to like my models clean and without tar in the panel lines. Besides, when the second prototype XF15C had these markings, it hadn't flown very much. Improvements/Corrections Scratch built the inner main landing gear door retraction mechanism All the splendid (?) details of the build (and a lot of off-topic stuff) can be found here (Part 1) and here (Part 2). Enjoy the pictures! All right, that's enough of that. On to the next project! Cheers, Bill4 points
-
-The weather is chilly, snowy, windy , cloudy ...Well ....we are in winter and close to Christmas, so, no outside photo for now. - Only these two of this unfinished camouflaged Foxbat I eagerly wanted to add to my own VVS with the help of from Stenka of Cold WAR STUDIO and AKAN paints, more Begemot decals to be added in a near process.. - Merry Christmas to every ones of you all ..J.M.4 points
-
These were fun to paint.4 points
-
Revell 5" Star Destroyer kit (as you can see from the markings, which are accurately measured out!) Silliness aside, this was my first experiment at DIY decals, which worked OK although the transparent area is still just about visible.4 points
-
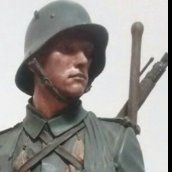
Hello Everybody... It's Christmas this week, the weather over here in the Fatherland is cold and icy, so I guess we need a winter setup: This is my Sturmgeschütz III Ausf. B from Dragon in 1/35. It is pimped with some etch and some homebuild extras, Magictracks and a Tamiya commander with a NWM resin head. The two guys in the trench are from CMK. And I'm pretty sure the lads in the StuG. would prefer to be "Driving home for Christmas..." instead of freezing in Russia... All the best to all of you.. Cheers Tobby4 points
-
Here is my version of the 50 year old kit from Revell. It is built as the instructions indicated. For it's age it's a fine kit to build.4 points
-
I hope it's settling in for you Jaime without too much of a fight. That book you reccomended ('German Genius') arrived today! Thanks phoenix. I'm just trying to keep the momentum going on the last building tasks so that the painting stage isn't unduly rushed and leaving the door open for error to creep in... Ta hendie! Neither would you expect anything less of me than to have already snapped a bit of it off and have to re-glue it. Duly noted. I'm still feeling my way with the rod after using tube but have to say it won't be long before I order more of the stuff - dead handy material. Was that the Scottish sojourn? I hope you had an absolutely beezer time of it! A lot done in the last 24hrs but not a lot to show due to the time-consuming nature of matters in hand. The canopy is now primed inside and out: I deliberately went heavy on the primer coat as I wanted to build it up slightly to produce a shallower framing around the front panes, as well as mimicking the slightly rounded contours of the other framing on the side at the front - not entirely successful first timeout on the port side - you can see that slight crevice there that needs a smear of filler just to blend it in. I'm almost out of Halford grey at the moment with no chance of a trip to said merchant for several days so may have to switch to Alclad primer for the last bits of tittivation. The big time-eater though has been building the various antennae from brass sheet, tube and rod: Moving from left to right along the green tape they are respectively: Angled antenna for top of gondola Port and starboard antennae for the wings Small antenna for roof of radio room Pitot tube for under port wing The brass rod is soldered to the bottom of each to assist with fixing in to place after the painting is done. The bit I'm most pleased with however is the circular double-antenna for the top of the fuselage toward the tail. In the end I made it up from 5-amp fuse wire wrapped around a screwdriver shaft. The plastic base for it was lathed from some sprue and drilled out so that the antenna loop cold be glued into the holes. I forgot to photograph it but I've also started adding the catapult spools at the waterline on either side of the funkraum. I need to build the steering rudders out of brass as well for the keel, as well as the balance weight for either side of the tail. Then after painting the inside of the canopy with RLM02 that needs fixing into place and masking off. It seems prudent to then pause and take stock of anything I might have forgotten. Ooh. Beaching trolley that too. There was fawn sewing thread in Lidl earlier - going to try Bill's rope spinning technique as well. Tony4 points
-
...and now after a bit more fettling, plus construction of the 3 slots for the blade roots. A distinct improvement on the original, I think: EDIT: just noticed that the forward airscrew is the wrong way round in those photos, but you get the idea!4 points
-
Built OOB, only added FODs on intakes. Used Agama alcohol based colors.4 points
-
After a long break I have found renewed enthusiasm for my STS build. I have started to apply my representation of the Thermal Protection System blankets that covered particularly sensitive areas of the Orbiter, nothing more than rectangles of masking tape painted over with a generous layer of my 'Gloop'. Additionally I have created raised strips on the Nose, leading edge of the vertical stabilizer and OMS engine modules to accommodate the TPS blankets more smoothly. I have also added the hinge point representations on the payload doors. The wings are attached and I am in the process of sanding and re-scribing. Cheers, M.4 points
-
With the Baron comfortably seated, we joined the fuselage halves, and set that aside to dry. Step 4 in the instructions was working on the centre wing and gun mount. The wing was cut free from the sprue along with the gun breech holding piece that was painted in the previous session. She was becoming more confident with the scalpel, although still needed additional pressure from a daddy hand to cut through some of the thicker sprue joints.4 points
-
Thanks Ced - yes I think Jack's hair orbits the room in a permanent holding pattern until it finds a newly-painted surface to adhere to... Thanks Jaime! I won't be doing a lot of chipping of the paintwork for two reasons: firstly I am concerned primarily with finishing the kit before the group build ends, and I will be away for a while over Christmas so my time is a bit limited in that respect, and secondly while there is not a great number of contemporary photographs of the Emily on the internet those I have found show some weathering to the paintwork, as might be expected, but very little chipping. I think we sometimes have a knee-jerk reaction with Japanese aircraft that they must have the paintwork badly worn to the point of flaking off, and while I have not studied it in any great depth this seems to be truer of the Imperial Japanese Army aircraft than of the Navy ones. I painted the fabric areas of the wings and tailplanes: Hasegawa suggest adding flat base to silver for this part, I used Citadel Runefang Steel; depending on how the light catches it, it exhibits a different effect to the Alcladded areas. I'll start spraying the uppersurfaces next... Cheers, Stew4 points
-
Another GB entry finished! After hitting the base with a very diluted dark earth colour, I'm finally happy with the sit of the whole thing. It all looked a bit too sandy to me. A couple of shots for here, I'll take a few more in the morning and add them to the Gallery. There's some kind of weird reaction going on with a coat of flat varnish I applied around the crater. White spots are forming. I'll rectify the problem once things are properly dry.4 points
-
Here it is as of this afternoon. Chassis mostly done, what an effort with not very good parts fits and a load of small parts. Sitting beside a partially complete 1/16 Panzer IV, not very big. That wrecker scares me if the chassis was this hard.4 points
-
The completed 6ème Regiment de Chevau-Légers Lanciers (FRench 6th Line Lancers) The little fellows don't look too bad.3 points
-
Unlikely to get any of the F-4J builds completed before the year is out so it seems like a good time to give the annual run down now. In no particular order; 1. South Atlantic Shoot Down 2. Testing Times for the TSR2 3. A-6 SEA Experimental Scheme Bomb Drop (Try saying that quickly after a few beers.....) 4. 15th September 1940 5. Taking the Barrier 6. High Speed, Low Level TSR2 7. Head On Attack 8. Anti Shipping Strike 9. Tiger Hurricane ........ and my modelling claim to fame for this year ended with my 74(F) Tiger Squadron collection going on display at the Norwich Aviation Academy last Friday. Thanks for looking.3 points
-
My recently finished project.- Type 94 Fine Molds 1/35 I hope you like it If you have any comments or suggestions feel free to post them below. A few shots without the truck.3 points
-
Hi. Its getting a trifle too cold to be modelling in my shed. Even with heating full on!! So to save a little energy I have confined my self to indoors and dug out my slide scanner and turned to my negative print films. Lats year i ran off all my slides and sevearl are here in this thread But for this term Something else from my archives. So, to kick off my pics from August 1970 at the Upper Heyford Open House. Not colour as you will see. Camera was a Kodak Instamatic 126. Cartridge tpe of film the wider one and not the narrow cartridge camera film sized at 110. One issue I recall with that camera was suffering parallax error. The view finder was off to one side so it was not easy to get your subject centred when taking the picture!! F-100. At the time of the show, all the tail codes were removed and soon after the F-111 arrived. A memorable moment of the show was when one Super sled did a very low pass down the runway at a break neck speed .... djort of the sound barrier I reckon.. Mighty fast!!! I recall logging around 70 F-100 that day. HH-3E Jolly Green Giant. 64-14716 HH-43 Huskie(?I do believe thats how they spelt it ??) There was another there serial 62-4533 which gave a fire fighting demo. ( Note the sexy white boots below the right hand fin... Those were the days>>>) C-130E 63-7799. Another on site was 63-7808. CF-104G. One of a pair 104776 and 104813. Nice bare metla and very pale grey/ white wings. Nice!!!!! Belgian TF-104G FC-06. Thats yours truly on the left( age 17) No idea who was "photo bombing"?? Anothe Belgian F-104 on display was FX-29 Taxiing out to display Rothmans Team Stampe G-AWIW Spitfire P7350. Jet Provost T.5 XW295. There were for T.4 there as well. I think the team was the Macaws Maybe wrong on that but the serials were XP679, XR651, '667 and 676. Finallly Hunter F.6. The two present were XF387 and XG161. Thats all I have photographically of that warm August day. Other types there were Chipmunk team with 6 of them but not all in the air, 4 x RF-4C, 2 x C-47 USAF, pair of Lightning F.6, Vulcan XM609. Thats all I have recorded and those numerous Super Sabres. Couldm't take very many pics because the film only had either 12 or 24 exposures. And I couldn't really afford that much on my pocket money back then. Oh, one other thing, the images were always squre so some of the above I have had to crop a bit as there is a lot of nothing in the lower half of the photo... as in the Hunter pic for example. Enjoy. And from time to time I#ll bung up some more black and white pics and some colour ones too all taken with the above mentioned camera and whe I progressed to the SLR world with my Zenit E. See ya for now.3 points
-
In 1947, civil war looked imminent in Paraguay. President Higinio Morinigo sensed rebellion in the air and thus decided to bolster his air arm, as this consisted mostly of WW2 unarmed training aircraft. Open Civil War broke out on March 7th 1947, by this time a dozen surplus P-38J's with mercenary pilots and ground crew recruited in the US were on their way. Most of the former Paraguayan air force sided with the Communist rebels, but the hastily repainted P-38's served pro government forces well, shooting down most of the rebellions aircraft, while carrying out bombing and strafing runs on insurgent positions. By August 20th the rebellion had been violently put down. This kit is the old 1970's Revell mold. It's not a great model, I started it as just something to tinker on between projects and it had been sitting 95% complete for the last month. I did plan on doing a Cuban machine, but I decided against using a nice decal sheet on what is a pretty poor model. Thus, I made up this little story. The P-38 did not see action in the Paraguayan Civil War.3 points
-
Dear fellow Britmodellers, this is Fly Models' 1/72 Ilyushin Il-10, "Soviet Service", built from the box. There have been a few comments about accuracy issues on this kit in the 'Rumourmonger' thread : In my humble opinion, the nose section looks undernourished, being about 2mm to slim and lacking the distinctive curavture of the original. The windscreen sits a bit too high, about 1mm. The placement of exhaust rows does not match plans either. Despite these issues, the kit builds into a well-detailed replica and does look like an Il-10 to me. A detailled build review will be featured in an upcoming edition of Scale Aviation Modeller International. The model was painted using Gunze/Mr.Hobby acrylics. All photogrpahs by Wolfgang Rabel. Thanks for your interest, greetings from Vienna.3 points
-
A few more. A few years later and still toting my trusty Kodak Instamatic!!! This time August '74. I went with a couple mates to the St. Mawgan show which was a mid week event back in the days. An overnight stop in the car on route was part of the nightmare to come!!! When we got there .... it was all over!!! WHAAAAAT!!!??? Yes we were a day late thanks to the driver who was adamant it was on the Thursday !! What could we do.. oh well the weather wasn't brilliant anyway and we made do with what we could see from the fence and crash gate. A nice surprise though was while we were hanging around said crash gate a Land Rover pulled up, officer chap gets out, says hi Lads as he went about checking the gates. Then said " If you wait a bit longer , a pair of Lightnings are on their way in and you should see them taxy past" Wow! It made up partially for the show being missed and we thanked him lots and without another word or anything telling us to clear off or else... he drove off!! You definitely don't get that nowadays!!! So we hung on a bit and sure enough in they came. Classic run and break, in the circuit and landed . Below is my meagre pic I managed... I think this one was XP740:B. the other was XP762 ;C. One of the few Canberras about. They were; WJ860,880 WH856, WK119,145. Nice grey and white Nimrod. One of a few about on the day. The other movements were the aboveand some show departures. Among them CAF Argus 10741, C-5A C-141, Danish Drakens, P-3C, Dutch Neppy and Atlantic, and Shack WL756. So, after that we retired to a local watering hole sank a few Cornish ales and hit the road( Drink drive ws not that much enforced back then. We never got caught and I wasn't driving at the time. Not for another year....) Another very uncomfortable night stop in the car loomed..... Next morning, a tour around HMS Heron gave us these and a visit to the museum.... Following this little escapade we headed back home. I was supposed tobe at work on the Friday(in a poorly paid, yes even in 1974, shop)!! Needless to say I got a lot of grief from the boss and all I lost was a days pay So my pay packet that week was about £15.00!!!! Some of the above pics I have enhanced to see what they look like. I still have the original scans in case. any way, I hope you have enjoyed these and a glance of what I was up to.... See you again for more soon....3 points
-
Here is my year in builds, not a bad year, 4 completed. Ill do them in order of completing. First off the bench was an 1/24 Italeri DAF 105 XF in the Swiss company Schoni livery. Almost an OOB build, It has some KFS rubber low liner tyres as this is a max-cube truck, resin air-con pod on the roof and some adjustments to lower the ride height DSC_0010 by richellis1978, on Flickr DSC_0012 by richellis1978, on Flickr Second is a scale drop, 1/35 trumpeter FAUN german tank transporter, I saw the real truck a few years ago working for ALE in Stafford. The decals are from a german company on EBay, mainly OOB exept for the ballast box. used some Eduard etch on this also. DSC_0001 by richellis1978, on Flickr DSC_0008 by richellis1978, on Flickr Third is a build thats been going for a few years, completed this year its an AEC Mammoth MkV, the real truck was used on the M25 construction and had the cab from an RAF Blue Steel missile carrier grafted on when the original fell apart. These trucks where worked very hard untill they fell to bits, when they where welded back together and put bact to work! 1/24 scale using a resin cab, everything else is scratchbuilt. Lots of build photos here image1 (1) by richellis1978, on Flickr image2 by richellis1978, on Flickr image1 by richellis1978, on Flickr last off the bench is a Revell 1/24 Iveco stralis Hi-way in the Italian livery of Gruber. This is another lowliner build using KFS rubber tyres, the chassis has been drilled out to copy the 1:1 with a lot of etch parts from CTM inside and out. Fully plumbed chassis. I went all out to detail this and its weathered to show a looked after but worked truck DSC_0010 by richellis1978, on Flickr DSC_0008 by richellis1978, on Flickr DSC_0004 by richellis1978, on Flickr DSC_0005 by richellis1978, on Flickr Lastly one of my euro-liners together DSC_0014 by richellis1978, on Flickr More pics of my builds for this year are on my Flickr here3 points
-
In the mood... Last weekend I opened the local newspaper and immediately found this article. The 'gist' of the story is that the Australian defence minister has agreed that the Australian Ministry of Defence (here known appallingly as just ''Defence'' for some God-unknown reason) will match, dollar-for-dollar, $500,000 of privately-raised funds for the purposes of searching for the wreck of AE1. AE1 was AE2's sister submarine and was lost, with all hands, very early in WW1 somewhere near East New Britain, which is a province of Papua New Guinea. The exact circumstances of her destruction and her final resting place remain unknown, however the loss is believed to be due to an accident and not the result of enemy action. This was the greatest loss of life suffered by the RAN during WW1. It would seem fitting and proper that the remains of the vessel be found and properly commemorated. Naturally I wish the expedition every success. This story has got me in the mood to press on with this modelling project. I recently had the good fortune to stumble across a few sheets of this stuff 'Tamiya PLA Paper' at a bargin price. I'd seen it once before but it was very expensive - not so this time! I grabbed the package to see what it was like. I think that 'PLA paper' is short for 'plastic paper' and that's a very apt description. I am impressed with this stuff - it has all of the best properties of paper; extremely thin and flexible - while retaining all of the best properties of plastic; tear resistant, sand-able and able to be glued with plastic kitset cement. It's ideal and now that I have tried it I would be happy to pay full-price next time. I have also got myself a paper slicing trimmer thingamajig as shown below. It's pretty good - but I'm not raving about this as I think it's possibly a bit big for this kind of work. I'm finding the accurate setting of each cut a bit harder than I had hoped. Anyway, it works OK with a bit of patience it produces nice square and even cuts. And so I started the process of skinning the conning tower. The plastic-to-wood contact is made with cyanoacrylate glue. Here is where I'm up to... Note that I've had to fashion a sort of 'vent' - 'outlet' - 'thingamee' on each side of the tower - that's what the scallops were cut out for earlier. They are both a bit crude - but they are done now, and at one point I wasn't going to put them on at all. So anything's a win really. There's still quite a bit more work to go on this tower but it is moving forward. I hope to stay in the mood a bit longer as I currently feel I'm getting somewhere with this project. I hope our friends out there searching for AE1 are feeling the same way. Very best regards and Merry Christmas to you all. Bandsaw Steve3 points
-
After a period of sanding the tip of the original spinner, I still wasn't satisfied with the shape... but then I thought about the 5-blade airscrew that is included with the Airfix Seafire 46/47 mouldings (I assume it shares sprues with the Spitfire 22 release?). So I dug that out and sawed off the rear portion of it: ...a closer view of the two visible in the background above; Trumpeter (partially modified) on right, Airfix on left. The Airfix spinner is slightly too wide at the base to fit perfectly onto its counterpart (see what I did there?), but nothing that cannot be fixed. the key thing is that it is more rounded throughout its length, whereas the original Trumpy part is too skinny and thus looks slab-sided. Not a vast change but I think it will improve the overall look. More later Crisp3 points
-
Scratch-built, with decals from Arctic Decals of Finland. There were several models and modifications. I scratched this model a few months ago, posting some images of it still without decals here in Britmodeller in the "British Heinkel" post: http://www.britmodeller.com/forums/index.php?/topic/235025835-the-british-heinkel/3 points
-
No, not just you, Ced. I find it a) implies they've reached perfection and are now heading off for pastures new; b ) indicates that they are clearly well up themselves and should therefore be treated with a deal of mistrust, and c) inclines me to suspect that they don't really understand the principles of evolution. That is a neat tailwheel, though!3 points
-
Very nice work on the metal bits PC. And that tailwheel - perfect! I hadn't heard of Grex before but their 'tag line' looks a bit suspicious? 'The Evolution of Perfection' eh? Doesn't that imply they've not got there yet and that perfection maybe achieved at some point in their future? Obviously it's just me; they no doubt had innumerable focus groups testing the concept before they adopted it. Probably. Sorry to hear that the oil cooler air scoops are caddywumpus but full marks for vocabulary, as usual3 points
-
It isn't sawdust, it's man glitter.3 points
-
Revell 1/144 Hawkeye3 points
-
Thanks @MeneMene. That makes sense. After looking more carefully at the Verlinden, it just isn't that nice compared to the Ultracast, so a Vector engine is on the way. @Corsairfoxfouruncle, I don't think so: as far as I can tell, it seems like the Verlinden would fit, and that's almost .2" (5mm) larger. In the meantime… wheel wells! The Tamiya kit offers rudimentary detailing, with the hydraulic cylinders and a simplified junction box. We could just weave in wiring around them, maybe drill out the cylinders to add the piston rods, but what would the fun be with that? Instead, I scraped out the detailing, including the ribbing, with a Mission Models Micro Chisel (super useful tool) and a file. I added back the ribbing with .020 x .010” styrene strip. For the junction, I took 0.020” rod and carefully glued it in an arrangement roughly approximating the prototype, with two bars, a spacer, and then a third bar. I also scraped out four ribs on the interior sidewall and CA’d on a bit of wine bottle foil for the canvas access hatch. You can’t really tell in this pic, but I embossed dots around the ring to simulate buttons. At this point, I added the outside sidewalls. These don’t normally get added until you add the outer wings, but as far as I can tell, you can add at this point. The alignment is critical to getting the seam between the outer sidewall and the top, so I wanted to do when I had the most control and the fewest moving parts. To make sense of the somewhat chaotic wiring, I color coded the lines in a shot of a restored F4U-1A. Apparently the wheel wells didn’t change much at all between the F4U-1 and the F4U-5, at least, so almost any reference you can find of almost any version will be generally accurate. Starting to add wires. Looks pretty silly at this point, but the night is still young. I also have some clean up to do. I haven’t addressed the hydraulic cylinders yet. The reference clearly shows them sitting over the back row of wiring, so that could happen later. I do have a couple thoughts about how to represent them—either nesting Albion aluminum tubing with strips of wine foil, or turning styrene rod in a drill, probably using the aforementioned micro chisel to rough in the shapes. Either way, I’ll need to drill holes perpendicularly at the ends and add 0.020” rod to represent the connection to the hydraulic lines. And that’s as far as I’ve gotten. Thanks for looking. -J3 points
-
I hand you lot over to the tender mercies of the Martianess....................... "Vet bi blowed! We doan't 'old wi' any o' that modurrn dahcturin' rown these parrrts - bit o' stickin' plaaastur and a slug o' aaapul braaandy's orl 'e needs furr a flesh woond! Allus works ahn me owld 'effers." (Trans: There's no need for the vet, thank you kindly. Some sticking plaster and a snifter of good spirit should do the trick! My cowman always finds that most efficacious for both man and beast.) The Martianess3 points
-
Flat coat on, some light weathering applied and exhausts added: Just the canopy to add and that's it done. Dave3 points
-
Wrapping things up. My Aussie spit builds took center bench for a bit. Got the decals on, satin clear, panel wash, and weathering. thanks for looking!3 points
-
Thanks for all the interest guys. As predicted Christmas is coming fast and time for plastic on the run up is running low. I did manage to get some bits done over the past few days but its all about the hurdles. First off the intake bit and the cans got added. I added some re-enforcement using old sprews and gorilla glue to both parts as the locating pins were a bit flimsy. the extra weight was then added around where pointed out in the instructions using lead shot. (about 15g to be sure) all was going well until i did a dry fit of the other fuselage half. firstly the lines were all off on the top and the bottom and there were problems with in the bit that goes behind the seat joining it to the fuselage, It didn't fit and at the sides are pretty big gaps . I filed down the rear section to fit and squeezed and squeezed to try and get it to fit until POP. The seat popped out and a dirty big bit of paint get transferred to mt thumb. grrrrr It looks as though I'm going to have to make some sims and paint that part again. I also needed to cut all locating pins off the main fuselage to get the whole thing to sit straight. I squeezed the cockpit area together, pegged the blighter and left out the seat until later. That needs to dry. I did some work on the wheels next, but the pics aren't coming through this end and dinner time has just ended so I'll post up about that stuff later. Thanks for popping in guys. If the pics aren't there I'll try and fix that up later too. All the best and happy modelling. Johnny thumbs3 points
-
Hi everybody: getting close to completion (maybe... ) I posed all the decals on the airframe The Savoia emblem and the little red arrows used for the tail planes alignment are Eugenio's @72linerlover (thanks Euge, great stuff! ), while the others are from the kit, but printed by Cartograph; that means they are thin and not prone to silvering, as opposed to standard Hasegawa's Opposite side I will perform some desaturation, then spray a protective clear coat on, prior to weathering. On a different matter, I continued working on the main wheel struts and U/C bay doors; here is the hi-tech gluing setup and after 24h curing Wheels and axles Inner U/C doors: when I did the C202, I wasn't completely convinced about their shape and the way they were supposed to be linked to the fuselage; this photo clearly shows that Hasegawa have rather over-simplified them And here's what we have in the box They are basically moulded inside/out, if you know what I mean: the three small rectangles should represent the hinges, and should be facing outside, while the receiving hole for the actuator arm should be facing inside. One could say: how can you tell which side is in and which out? Because these doors aren't flat, but curved, and the curve is obviously opposite to the real one .... Anyway, I decided to scratch built new ones, and put came the beer can: Basic shape copied onto Tamiya tape, then stuck onto a beer can cutout. Using the tools you see in next pic, I gave them their final shape Then I copied said shape on a 0.5mm styrene sheet Slightly resized and superglued to the alu parts Once properly cured, I used tweezers to give them the rounded shape and glued in some PE frame leftovers to reproduce the hinges They still need some refining, but now I think I can reproduce the real assembly shown above in a better way. Some work done on the other doors, too: small outside ones needed some care (left done, right undone) while for the ones connected to the struts, I tried a different approach compared to what I did for the C202; instead of actually separating the two pieces actually forming the door, I only deepened the outlines using a micro-saw (here I added some dark wash to make them stand out a bit more) Now I still need to add the brake lines to the main struts, glue their doors in and I can start priming and painting them. That's it for now, comments welcome Ciao3 points


.thumb.JPG.3498f40362ff13ebfc4b2e45abbd545e.JPG)


This leaderboard is set to London/GMT+01:00