
Leaderboard


Popular Content
Showing content with the highest reputation on 24/11/17 in all areas
-
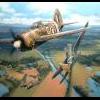
Hi guys Here is the Airfix Vulcan I recently finished. I built her for a guy who's dad used to be a flight engineer on these before the Black Buck missions of 1982. He had been given the kit by family but never got round to building it. My club West Middlesex were contacted back in July 2016 asking if someone could build this for him. I volunteered as I built one as a kid and wanted to see how she would turn out by today’s standards. At this point I had no idea of the life tribulations that would come up as the build progressed. Everything modelling stalled from October 2016 until March 2017 because we moved house followed a month later the birth of our second child. Roll onto November 2017 and around 110 hours of work, she is finally finished. I decided to build XM607 from Black Buck 1. The aftermath was the famous picture of a string of craters including the single crater on Port Stanley’s runway. The build I was given free rein on this to do and add what I felt the build needed. The first job was to completely re-scribe the entire kit. This took an age but was well worth it. The kits raised details were optimistic to say the least considering how much sanding and filling is needed to get her decent. For aftermarket items I purchased the Master metal refuelling probe, 26 decals cockpit masks and Freightdog’s “Gods of Sea and Fire” decal sheet. Next we had @gazza l offering his stunning homemade turned brass exhausts. These are exquisite and really draw the eye when viewing from the back. Lastly @Jason provided the AN/ALQ-101 ECM pod from his spares box. The aircraft was painted with Gunze. WIP Here Thanks for looking. DSC_7998 by Mark Inman, on Flickr DSC_8001 by Mark Inman, on Flickr DSC_8005 by Mark Inman, on Flickr DSC_8006 by Mark Inman, on Flickr DSC_8007 by Mark Inman, on Flickr DSC_8014 by Mark Inman, on Flickr DSC_8017 by Mark Inman, on Flickr DSC_8029 by Mark Inman, on Flickr DSC_8032 by Mark Inman, on Flickr DSC_8033 by Mark Inman, on Flickr DSC_8035 by Mark Inman, on Flickr DSC_8036 by Mark Inman, on Flickr DSC_8040 by Mark Inman, on Flickr DSC_8041 by Mark Inman, on Flickr DSC_8042 by Mark Inman, on Flickr DSC_8043 by Mark Inman, on Flickr DSC_8044 by Mark Inman, on Flickr DSC_8046 by Mark Inman, on Flickr DSC_8049 by Mark Inman, on Flickr DSC_8050 by Mark Inman, on Flickr DSC_8053 by Mark Inman, on Flickr DSC_8057 by Mark Inman, on Flickr DSC_8062 by Mark Inman, on Flickr DSC_8067 by Mark Inman, on Flickr44 points
-
Enjoy !!!15 points
-
Sifting through some older photographs, I thought this kit is worth sharing. This was an awesome kit. Absolutely enjoyed every second of it. The kit itself was beautifully engineered, fitted like a glove with a different colour scheme. If you haven't built a Tamiya P-47 then you are missing out. It was fantastic! I know the colours are not quite accurate, and that the M versions were almost exclusively high altitude interceptors, so wouldn't carry bombs etc. The 1/32 Hasegawa version I've done of this plane is far more accurate in that respect. (That article is in the forums here somewhere..)10 points
-
Revell Mosquito Mk IV. Finally got round to finishing my Revell Mosquito after a lot of time and issues and am quite happy with the result. Although the kit had major fit issues they are almost completely hidden with a lot of filler ( and mess in the process after one of my tubes exploded at the other end ), I still really enjoyed building the kit. Ever since I was a kid I was fascinated by the Mosquito and its roles in the Second World War and finally got a chance to build one so its fair to say this has been my favourite build in 1/48th scale. I am still learning methods etc. for building model kits and have been doing it less than a year so still have a lot more to learn, but I think I am getting to a stage where I am happy with the results of the builds enough to post them, my only issue is the fact I am using a phone camera which doesn't highlight parts you see in a more natural light so may have to borrow my sisters DSLR next time and get her to show me a tutorial on how to use it.... At a later date, I plan on buying a vacuform canopy and bomb sight as this is the main issue I had after building the kit, and delayed me finishing the kit. I also had to make my own window on the port side out of a plastic bottle as I managed to lose it but feel this didnt turn out too bad in the end. I also plan on building a base for this kit, such as a summer time airfield and paint up the ladder to make a mini diorama but that can be a post x-mas project. P.S. I still have no clue how to make the images smaller, but at least they are no longer links... Hope you all enjoy, Ryan10 points
-
My latest project is the neat little P.7a from Arma. This is a somewhat short-run (but very cleverly engineered) kit, which I believe is the second injection-molded release from this Polish manufacturer. The version I used was the "Junior Edition" which comes with two markings options and a small PE fret that includes harnesses, ring and bead sights, and cowling struts. The kit has pretty good details, but I did elect to rescribe some of the fuselage panel lines, as they were a bit uneven. The small parts have large sprue gates, but they attach at particular angles, which makes them easy to clip off without damaging the pieces. Parts fit is good, and the PE is very easy to use as well. I added EZ-Line bracing for the landing gear and painted the kit with mixes of Tamiya colors. Overall, I'm very pleased, and will be getting more Arma Hobby kits, as they become available. I posed them model next to its successor, the PZL P.11c, built around 6 or 7 years ago from the Heller kit.8 points
-
Hi, everybody I made I-153 biplane model from ICM two years ago. OOB. The model is made for the customer Pleasant viewing and thank you that glanced. Cheers, Martin8 points
-
I finally feel I'm making progress... famous last words The instructions say that the floors and columns are the same parts: Untitled by Ced Bufton, on Flickr but in fact they're slightly different. As the TR bits are on a separate sprue I made sure I kept the rear bits (floor with larger rear bit, column slightly shorter) separate but, to be honest, I'm not sure anything fits well anywhere. With the rear floor fitted (at last) and the front bulkhead in, I found that the front floor was too short: Rats. A bit of strip on the back: ... glued on a glass block so it didn't stick to the bench. Time for the crew to come off their block: and, thanks to PJ Productions 'correct' sizing, they fit in the cockpit without the need for surgery: You lookin' at me? Out tonight for a triple bill of contemporary dance. I know. Not really my thing but hey, one should try everything once (except, as they say, incest and Morris dancing)8 points
-
Some of the well detail added, I suspect these to be the wingfold hydraulics8 points
-
Hiya Folks, It had to be done,......I`m going to tackle the Halibag! I`m not sure which version yet,....I have three in mind; 1- Mk.II- 138 Sqn Special Duties 2- G.Mk.V- Airborne Forces glider tug, N.Africa/Sicily 1943 with desert bomber scheme and Z Nose. 3- M.Mk.II- Desert Air Force with desert bomber scheme. Anyway, here is the kit; And some extras; Including the Aeroclub white metal prop blades and an old vacformed Z Nose,......another Z Nose from Freightdog and some turrets left over from the Revell kit,....I may be dipping into the Revell spares box a little more, especially if I decide upon a Mk.V with the different undercarriage! Also,...I was going to do a Tempest but one of the upper wing sections, a tailplane and the canopy is missing,....yet another model show buy!! So we`ll sack that one! Cheers for now, Tony7 points
-
picked this one up at the Wallop show also, there will be a lull in battle until late December as I'm in the process of moving house.7 points
-
The only thing standing between me and closing up the fuselage now is the two Observer windows, which I plan (thanks to Eduard) to model open - they hinge at the top. I built the PE frames a while ago, so now I needed to add some glazing. Here they both are, plus the material from which they are made. I've tried to slant the window so you can see the glazing - they are in fact both done. More soon Crisp7 points
-
Hiya Folks, Here is another Matchbox Wellington, built as a B.Mk.X of 425 (Allouette) Sqn, RCAF when it was based in Tunisia during 1943. The model was brush painted and the kit was modified,...... new nose and tail turrets were added from the spares box, the nose from an old Airfix Wimpey kit and the tail from an old Airfix Lancaster, the fabric effect around the rear of the nose turret was also added using masking tape and white glue. As the kit interior is practically non existent and incorrect, I used the interior from an old Matchbox Halifax. The wheels also came from a Trumpeter Wellington kit and the cockpit canopy was sanded to reprofile it. Here is the WIP, from the Matchbox Group Build; And here is the model,...; Cheers, Tony6 points
-
Hi, everybody Model Pfalz E.I from Gavia it was collected in 2012. OOB. Thank you that glanced. Regards Martin6 points
-
1/72 S-Model kit with the NBC flag from scratch .Nice kit ,not a lot of parts .......................6 points
-
Hi all Po-2 medical, 1/48 ICM and begemotdecals. Average type of the sanitary plane. It is made for the customer. Cheers, Martin6 points
-
Hello, This small plane was a gift from my daughters. It is nice little and easy kit (former Heller) but you need to sand off pre moulded French roundels and too high raised panel lines. Decals were drawn regarding pictures on the internet by my colleague who is graphics designer. It might have bit toy look (regarding to size) but it was nice relax project Martin6 points
-
Well, I've been steeling myself to have a go - I'm lucky to have an opportunity at work - so I figured by announcing such a thing in the thread I'd burn my boats and have to get off the proverbial rump and do it instead of justmusing about it. I expect a few false turns here and there along the way but I'll do it in full visibility so people can see what's involved. And now I've gone and mucked them up again this evening! (but in a good way...) It sounds like you and me have the same language skills in that dept. Cc! Mrs B. is a mellifluous -if infrequent- Irish-speaker, whereas I am largely limited to identifying a post-office and pointing to red dogs... Well, back from Dublin in a more refreshed condition than anticipated - one of those icy-cold but sunlit winter days that is so restorative to the spirit. The drive across the Midlands at daybreak was a dramatic tableau of the Turneresque - great fallstreaks of snow, sleet and rain against the rising sun. The exhibition we went to was magnificent - if you're ever in Dublin the National Gallery is an excellent place. A brief snooze upon returning then and itching to do a little more tonight. I'm at that stage where I'm deciding what remaining flaws with the kit need ironing out in terms of shape - I'vehad my eye on both stummel (sponsons) for a while but I've also been in conversation with Bernard (@blg63) who has convinced me that I need to rethink slightly the angle of the return I was putting onto the finished bow. He was kind enough to share s comparison graphic which showed that the D3 variant (this one) is a kind of halfway house between the blunt/rounded earlier D variants, and the more angular and later G variant. Not a massive change, but one that would look wrong if not finessed. That'll happen once the fuselage is closed-up. Right then. Sponsons. There are two shape issues with these both to do with the leading edge. On the actual aircraft it is both thinner along the leading edge, and has a more linear profile. You can see what I'm doing here with the sihrsc, linearizing the curve along the front: Reducing the the front slope in thickness needed a sanding drum on the Dremel-tentacle (Dremtacle?): Original cross-section on the left, reduced on the right: Hopefully that's clear enough to show the distinction between the original beefy-Botham-ness of the kit OOB and the required modification of about 1-1.5mm off, graduating in to the root. Looking more acceptable one the brutal grinding was smoothed down. Port: Not port: I've also been incrementally blobbing Mr Surfacer on the seams and gaps around the actuators and so forth on the trailing edge of the wings. That's coming along and should be ready for smoothing down tomorrow - a fiddly job no doubt. A final thing before I go; something I'd meant to mention a while back. If you're having trouble with shadows photographing your work on the bench with a single light source there's a handy little Android app called Pocket Softbox: https://play.google.com/store/apps/details?id=com.pimentoso.android.softbox&hl=en It lets you use your tablet (or phone, but the light will be smaller) as a lighting panel that you can interactively control the colour temperature of in order to match artificial light sources, or even match to daylight from the window. Image on the left is just lit from one side with an LED, the one on the right with Pocket Softbox running and dialled to the same colour temp as the LED, giving no different colour casts to the image. Both shot with same exposure values: As you can see it gives a soft and even fill light to mitigate the shadows and give a greater sense of form to objects. (I deliberately stuck both lights in shot for the demonstration - you'd obviously want to avoid doing that yourself). There's also Photo Soft Box Pro that does similar for the iOS users but you fanbois will have to shell out a few $ for the privilege... Ta-ta for now. Tony6 points
-
Careful there or General "Old Walrus Face" Melchett with think we're talking about him...and that's a dangerous thing. He'll either take offence (he is, after all, such a sensitive booby) or he'll think we're complimenting him, and take it as an invitation to join in the conversation (AGAIN!). Either way, it won't be pretty!6 points
-
Hi Mates, after a quite Long time, last but not least because I could not start topics with my Firefox-Browser, I would like to show, one of my recent builds. It`s the updated Version of the quite old Kit from Italerie. Mostly oob, only the Exhausts are from Quickboost, Paints are above RLM 72+73 from Agama, below RLM 65 from Humbrol, done as always by brush. I hope you like this cutie, as I do. Any criticism is highly appreciated. Best regards Stefan6 points
-
With a little bit of mojo, a lot of trimming and some TET, the rear floor is now in: Nothing seems to fit really well so I'm taking this slowly and letting things that ARE in the right place dry before trying other bits.6 points
-
I echo that sentiment entirely Crisp, and today's little episode probably reinforces that very statement, for reasons which shall become obvious. With the bulkheads now fixed in place, I could get a reasonably accurate center line, and started opening out the holes for the transmission shaft. Again, as Crisp mentioned.. research is key... and I came across another photo which showed that I needed to add another bulkhead in the tail section. I spent ages getting the contours right before I realized that the bulkhead doesn't go all the way across the tail. oh yes... research is key ! That bulkhead was fixed in place after a lightening hole was added along with a couple of braces made from brass rod. I have a sneaking suspicion that there's not going to be a great deal visible when this is all put together. Probably about this much.... With that in mind, the remainder of this thread is completely unnecessary and a bit pointless really - but it's fun and I like it. Thanks to the kind souls of this forum I now have the information I need on the tail mechanical gubbinses. I'll apologize in advance 'cos I got so carried away I forgot to take photo's during the build. The intermediate gearbox - a piece of kit that will be so buried inside the plastic that you would never know it's not there - so I thought I'd make one anyway. Starting with two pieces of brass tube soldered together in vaguely the approximate angle... The adding a third - for those interested, the soldering set up can be as simple as this... I threw some flux on, fired up the propane flamethrower, and a few minutes later we had one of these. - After some clean up obviously. I should have taken a photo - it looked a real mess with solder everywhere, but clean up still took less than a minute. Then, forgetting to take photo's but essentially, just cutting off and adding bits of tube, I ended up with this approximation of the gearbox. Which will sit in here where no-one can see it Obviously, there's still a bit to do to the gearbox before it's finished, but I'm quite pleased with the way it turned out, and how trouble free it was to make it. and now back to your regularly scheduled programming...6 points
-
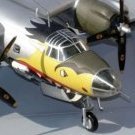
Hi Folks, Here is my latest project for the GB The Beaufighter TFX. One of my Fave Matchbox kits, which i no doubt mangled back in my youth! It a Revell/Matchbox issue in the black box, and didn't come with a stand... IMG_2576 by G DSC, on Flickr The contents..... IMG_2575 by G DSC, on Flickr Progress pic.s, which have taken place over the last week... IMG_2577 by G DSC, on Flickr As you can see, next to nothing in the pit ot observers position, i'm doing this one OOTB IMG_2579 by G DSC, on Flickr Builds up pretty quickly with no fit issues... IMG_2581 by G DSC, on Flickr IMG_2587 by G DSC, on Flickr Paint going on... IMG_2588 by G DSC, on Flickr And thats where i am as of tonight. Great little kit, which has been a joy to build. Shouldn't take that much longer.... Thanks for looking, cheers Greg5 points
-
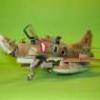
Hi folks, Having finished my Hunter F6 in Borneo, I made a good start on the Airfix Swift, in fact I got as far as needing primer before finding he Humbrol can I had brought with me had run out! There are no Humbrol suppliers in the jungle, and in fact the nearest remotely likely place was Singapore, a cool 966 miles distant! So the painting, decalling and weathering plus final assembly have been done back in Blighty since the end of May. I added the Eduard interior and exterior etch set, although I didn't bother buying the flap set as the kit offerings were pretty good (good enough, in fact, to tempt me into posing them lowered. I very rarely do this!) I also added quite a lot of wiring into the undercarriage bays. This is a nice kit although rather lacking in moulding quality in places. The slide moulding of the upper rear fuselage in particular had left some nasty steps and doubled panel lines which I spent a while cleaning up before I even started. The cockpit, however, is very good, as are the multi-piece intakes and exhaust. The only place rather lacking in detail is the wheel bays, hence my extra effort here. It's brush-painted as per usual, with markings OOB as WK275 of 79 Squadron RAF based at Gütersloh in the late 1950s (the aircraft is now at the Tangmere museum). Hope you like! Some of my wiring and the Eduard etch in the undercarriage bays. Typical, I've just spotted a couple of places that need a touch-up! Last but not least, here's the Swift with a younger, heftier sibling (Xtrakit Scimitar). The wide-angle lens distorts the perspective, the Scimitar is at least 30% larger!5 points
-
As you can see next to an Accurate Miniatures Stormvik she is big!5 points
-
Hello !!! Here is my last kit 1/72 ICM BM21 GRAD :5 points
-
As you can see when it is posed next to an Accurate Minitures Stormvik!5 points
-
Hello Dear Martian ! Sooo, once again we will play in the same pool ?? Seem that your Siko's looking a little bit better than my Fonderie one !! Are'nt you going to try this one ?? Mine will be blue and Korean war related ! You surely will finish your far ahead of mine Since Fonderie... Well, we talk about that when sipping our Belgian beverage just in front of a belgian table that did'nt noticed anything !! And it has been said ! All the confiscated stuff has been thoroughly destroyed !! Was thinking about your Trainer harrier before the Helo !! And the Roc ?? Will work on mine today ! Have a good modelling time, Hope that the Chimay, Rochefort and Westmaelle has let you good and nice rememberances ! If not full boxes of B-17 searching for the Wind in your head on the next morning side Which is very oftenly a side effect !! Once again ! glad to see you, your mem sahib, the General ( without his stick !! Poor Britannia !) And Longshank too !! Sincerely. CC5 points
-
Hello Here are some pictures of my Horten H229 Zoukai Mura 1/48. The wood is simulated with oils on a background H318 Gunze. The metal, with Rub'N Buff. For the other colors RLM Gunze. Hoping you like it Best Regards4 points
-
This is the 1/72 Azur short run release of the Cierva C.30 Autogiro. A curious looking aircraft which is unlikely to have seen use during the war, there were a few in the Spanish Air force before the war broke out but their fate is unknown. The kit is what you would expect from Azur and didn’t cause any problems, it is best to take your time around the under carriage at the front as its very delicate, I also had a slight issue with the rotor blades as the resin part in the middle was damaged, I replaced those parts with stiff wire. I finished the model in Mr Metal aluminium buff-able metallizer, with details painted in Tamiya acrylics. I used the kit decals but I think the markings are fictitious.4 points
-
This was a commission build for a client who creates amazing photo-composite work. You don't see many of these built, and I'm not surprised as it's a b***h of a kit in places! My client wanted a wheels-up configuration, which the kit does not include so I used a resin aftermarket undercarriage set and worked those into the configuration for raised undercarriage and re-scribed panel lines. A very challenging kit but satisfying results finally achieved! I was also required to build a torpedo and dolly (Flightpath set), a really nice little build!4 points
-
Hi Guies, today i would like to show you, one of my recent completed builds. It´s the superb Hasegawa B-26-B with a beauty Noseart. As allways: Done by brush, Paints are Agama and Revell. Hope you like this Beauty.. Best regards Stefan4 points
-
as mentioned I'll start doing these daily now as things will start to get very interesting. ....and things are getting interesting at 9th place, the final slot is still very open. Even the Eleventh Hour GB could still make and last minute (11th hour) dash!! Be thankful I do this in the morning and not at night after a few beers! I think for something different next year we should have the 9 GB's with the least amounts of votes go through! Now that would make for some really interesting strategic voting!!!4 points
-
Hello, After Ruslan http://www.britmodeller.com/forums/index.php?/topic/235026555-antonov-an-124-ruslan-aeroflot-revell-1144/# I have finished another Aeroflot "Heavy Lift" It is IL-76 from Trumper. Kit was much more difficult to build as Revell Ruslan and it has no interior. So If you think about IL-76 buy fantastic new Zvezda. Airbrushed wit Revell enamels and aqua.4 points
-
The starboard window has now been fitted. When I came to prepare the port one, I found that the section of nickel rod at the top had dropped out - no problem to replace it (it was still there, just no longer attached), but I'll give it 12 hours before I fit the window. So you only get one of them today: Seen from outside: Looking forward into the cockpit: And from the nose: And the photo of the real thing that gave me the idea: More tomorrow Crisp4 points
-
Just finished - after it was put aside for a while - the Amodel kit of the elegant Italian Piaggio P-180 'Avanti'..... Two marking options are given in this release - a Spanish-registered charter turboprop EC-LPJ - or an Italian Marina version.... I replaced the ill-fitting clear cabin windows with black decals - printed onto clear decal sheet using my inkjet printer. Because of the decal windows, I left out the fully-detailed cabin interior (which can't be seen cleary even if the clear windows are used). The Avanti is typically Italian - like a flying Ferrari - although I have heard some people say it is ugly??? I think it's gorgeous. Ken PS - Some more photos - plus sprue and build shots.... here.4 points
-
Here's some of my photos. Nimrod XV237 (2) by ravodavo, on Flickr Nimrod XV241 (4) by ravodavo, on Flickr Nimrod XV241 (6) by ravodavo, on Flickr4 points
-
It sounded ruder than it should have done tbh Giorgio, now that I read it back. Bod was a UK children's TV show back in the 1970s that had possibly the most irritatingly catchy theme music that sounds like a cross between skiffle and a village choir who have binged on amphetamines... The Gannet wheel well always reminds me - for reasons my analyst is struggling to explain - as the profile of said irritating youth with the oversized head: I will refrain from putting a link to the music but will simply proffer some Mamba voyeurism to Bill for sullying his thread....4 points
-
The next progress wasn't until the beginning of April. It had been raining all day and not a day for being outside, so after watching some disney films in the morning, we got the Spitfire out to do a little more. After a little sanding of seams which we both did, out came the pink paint for the PR Spit. It was only half an hours work, painting the upper surfaces which are now drying before we can do any more. This picture shows the drying Spit along with the base which we were painting last time. I need to find some wood to glue this down to, before we do any further work on this.4 points
-
ay ess, one feinds it very impowtant to pwoject the right image to ones neighbours. Posers. I'm with Quentin Crisp on this "Don't try to keep up with the Joneses, draaagggg them down to your level - it's cheaper!"4 points
-
You're not wrong mate, I hadn't been looking forward to the masking at all but it was surprisingly painless once I got started - I would have masked the little squares as well, but I would have been none the wiser so probably wouldn't have felt that bad about it Yes I fear I have become lazy as I routinely do my bit to increase the GDP of the Czech Republic by buying mask sets for practically every kit I buy - it was a nice touch by Hasegawa to include this in the kit, along with the crew it does add value to what otherwise might be considered a pretty expensive kit. Thanks very much mate I'm very much looking forward to that Tony I got the guys installed in the nose section - I'm not sure in real life if there was a dedicated nose-gunner and a bomb/torpedo-aimer or whether the same crewman got both gigs, I suspect the latter but since I have two figures and this is what the instructions recommend, I may as well use them: "I'm getting tired of looking at your backside, Ryuichi" ... and then I fitted the dorsal and waist gunners. The dorsal gunner still has to have his right arm re-attached, and the turret fits with a keyed base-ring much the same way as the turrets on tank kits do, so once the glue has set I can remove the dorsal turret and gunner, and re-install them at the end of construction and painting: Hopefully over the weekend I can get the fuselage halves joined and the nose section attached... Cheers, Stew4 points
-
Miami Connection is the rare movie I feel is almost better without the riffs. It's so perfect in the totality of its failure that I just like to watch it straight. And on that slightly earnest note, I'm thankful for all of you, my friends on Britmodeller (and often in real life too): "You do not know how much they mean to me, my friends, And how, how rare and strange it is, to find In a life composed so much, so much of odds and ends, (For indeed I do not love it ... you knew? you are not blind! How keen you are!) To find a friend who has these qualities, Who has, and gives Those qualities upon which friendship lives. How much it means that I say this to you — Without these friendships — life, what cauchemar!" -- T S Eliot And now...DRAGON SOUND.4 points
-
ok that fun time of the week we've all been waiting for.............chart update time!!! Good news for some and not for others. The front runners are still the front runners and the cellar dwellers well......maybe next year! It's now just a race for that final 9th spot! While to chart shows pretty much gains all round, but when I update it daily I see the votes are going all over the place. Behind the scenes there is a lot of vote changing going on mainly of course around that 9th position spot. Even at this stage 8 votes above the current cutoff mark still isn't a guarantee of a spot in next years GB's. It's all going to happen in these final days!!4 points
-
My PK74, Panzer III Ausf L is as done as it's going to be. An easy, fun build. I can see a few more of these kits on my workbench in the future. Pictures have been through Photoshop. They have been cropped , sharpened and had a frame put around them. The top two shots were taken in early morning sunlight on a black perspex sheet outside in my garden. The last three shots were taken in the same setting this afternoon. The light was a bit cooler by then.4 points
-
Nice Mamba shot Tony, not convinced by the fictional piping 'down in the hole' But that said not every modeller gets the support we do in here, James's pictures alone make such a huge difference and give invaluable help don't they let alone the guidance I'm getting through Crisp and you others But I still don't remember the Bod thingy, I must have been marching the hills back then.3 points
-
Cheers,....glad you like it! Another slight update,.....gloss varnish has dried and time to apply the decals,......I`m probably going for a 47 Sqn aircraft from 1940-41 in East Africa with large fin flashes, using decals from the Valom kit; Cheers, Tony3 points
-
on Allison mustang, the landing gear control diagram was different. It was not necessary to pull the emergency ldg handle (which open the fairing doors) to lock the landing gear handle. For this reason, the fairing doors on these Mustang were always closed and locked on the ground(except if someone opened them for maintenance) EMM P51A & EMM A363 points
-
Morning All, Cheers for the support so far everyone. Who needs larger pieces when you have 'technology'...3 points
-
Think the boxart from this era was based on real events even if the exact types were not quite strictly correct. Certainly recall reading 'Johnnie' Johnson describe something similar in his book Wing Leader.3 points
-
I agree the classic F86D kit is very nice. I built this one with a few tweaks but no aftermarket bits... It uses the kit decals... Appllogies for the quality of the photo it predates my current photo set up.. If you approach any vintage kit with a view to it being as good as a more modern tooling of the same subject then 99.9% of the time it will fall short. Market demands have driven new kits to deliver better fit and detail for the most part. If you approach a vintage kit from the perspective of nostalgia or simplicity of build then they are satisfying to construct and paint generally at low cost if you fossick around for one at a swap meet or show. If you want inspiration of what can be done with classic Airfix kits then a quick search for Mike Grants ‘circuits and bumps’ articles is well worth a look. He built a whole host of the classic Airfix kits in a modern style and produce some stunning models that compare very favourably with modern offerings. Cheers Plasto3 points
-
Just got mine today. Having already built a couple of them, a few initial comments (though I will be more thorough later on): * The external detail is beautiful. The engraved details is crisp and the rivets are where they should be. * The size appears to be correct, at least when compared with the MPM example * The flaps will need modification if one decides to pose them in the totally extended position * The main landing gear compartment is good, but not as detailed or accurate as the CMK parts for MPM example. Well, I know this is not fair judgment! * The seats look good as well as the cockpit in general * Some extra parts are there for the ZA! That's great! * Wheels... Just throw them away... Overall, this is a much better kit than I expected!3 points


This leaderboard is set to London/GMT+01:00