
Leaderboard


Popular Content
Showing content with the highest reputation on 26/06/17 in all areas
-
Airfix 1/48 De Havilland Sea Vixen FAW2 This was my recent entry into the De Havilland Mega Group Build. The kit was a gem and went together well. I added resin seats, PE cockpit set, PE ladder and brass pitot tubes to supplement the kit. It was Avery enjoyable kit and I'd recommned it if you can get your hands on one. Thanks for looking and please leave any comments or questions! Build link here -23 points
-
This airfix kit ( the starter pack edition ) is rather special to me because this is how it all started in Jan 2015 . I am from India and scale modelling is non existent here bar a handful of modellers , all of us relying on imports . As such I had no exposure to this hobby and in fact was completely oblivious of the same until I stumbled upon the airfix kit in an e commerce shop while searching for something else . The low price of 300/- INR and the fact that it came with brush , glue and paint prompted me to order one - I am sure I would have passed if the kit didn't have the glue and paints and missed on a wonderful hobby . I really enjoyed the build and I quickly ordered another starter pack kit - the swordfish . Long story short , I purchased about 8-10 of these starter pack kits , then got an airbrush , found HLJ and ebay and I think you all know how it unfolds from here I built this kit recently out of the box and here are the pics - Regards , Basu Roy20 points
-
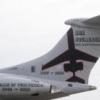
I've completed this f-111e from th 77th tfw based at upper heyford in the gb forum , its the 1/48 hobby boss kit , mr hobby paints , super scale decals ,eduard etch sets, and a squadron vac canopy,Just the screen, i used the kits doors ,slightly modified Thanks for all comments Glynn17 points
-
This is the Hasegawa kit with an Italeri cockpit and tail in 1/72 scale, hope you like it. Hope you like it Regards Glenn15 points
-
Hi guys just completed both sort of a oceana theme. The mirage fought me all the way. Apologies for shortcommings thanks and regards mr b14 points
-
The old 1957 Airfix series 2 1/72 scale Mosquito FBVI, as far as Mosquito kits go I think this is the origin of the species. Probably one of the most inaccurate kits ever produced by Airfix, having said that this kit still has a lot of appeal to me. The thing I like about this kit is that it looks like a piece of trench art, it's shape is like what you might see in an amateur wartime sketch or in a Commando comic book. This kit also holds great nostalgic value, I built two back in my childhood and I can remember most of my friends back then having built one also. Compared to today's kits and even the current early seventies Airfix Mosquito this kit is very clearly a load of rubbish. The shape of it is all wrong, just look at the canopy, guns, nose, the list goes on, the parts fit together terribly and it has moped wheels and rockets without warheads. The instructions even on later 1980's releases of the kit still quote sky as the underside colour, out of nostalgia I was actually going to paint the undersides sky but the fuselage code letters would not have showed against it. The 1960's and 70's box art, note the artist has the undersides painted in sky. The later very dry 1980's box art, the model maker here has taken it upon himself to contradict the painting instructions and paint the undersides grey. The parts, in particular I bring your attention to the wheels. I wanted a nostalgia build but felt fitting these stupid wheels would be going a bit to far, so built it wheels up mounted on the stand. It looks like this Mosquito has Hispano canons instead of Browning 303s. The model has a very unique flying boat nose. . I miss the old Airfix stands. After 60 years it stills looks like it means business.14 points
-
Finished my first Sword kit!!! Another Skyknight for the forum - this one a USMC electronic warfare bird using an option from the very nice decal sheet. skyk7 by pat cauthery, on Flickr As was pointed out on the other Skyknight in RFI, the Sword kit comes with cable ducts running down both fuselage sides that need to be removed for anything but a handful of missile test aircraft. THis was a reasonably easy job, with a few panels needing to be rescribed as a result. skyk8 by pat cauthery, on Flickr The fit of the intake ducts left a bit to be desired. I mounted the the compressor faces further back than the kit allows for based on a few pics showing this area. I also tried to blend in the intake area with Milliput. skyk2 by pat cauthery, on Flickr Another small mod was to shorten the nose landing gear in order to replicate the sit of the aircraft I was modelling. Some Skyknights do have a more nose high stance on the ground so you may want to consult some pics of the aircraft you are replicating. Fit of the canopy was fiddly with all three pieces needing careful sanding along all their mating surfaces to make them slightly smaller. skyk6 by pat cauthery, on Flickr Paint was Xtracrylix LGG over white with Gunze Tyre Black for the anti dazzle panel and radome. skyk1 by pat cauthery, on Flickr Hope you like!! skyk5 by pat cauthery, on Flickr skyk3 by pat cauthery, on Flickr Pat13 points
-
Another kit rescued from the shelf of doom, Aeroclub 1/48 Tiger moth started some time ago . It was intended to be a Tiger Moth of the pre-war CFS display team but was abandoned after painting had started , when I discovered that the actual aircraft was a single seater. I decided to restart it after seeing pictures of G-ANNI , a current Tiger Moth in the same CFS colour scheme. Model in finished in Halfords rattle can paint with decals from Xtradecal and Fantasy Printshop Andrew12 points
-
Long delayed since I finished this over a month ago but here are pics of a 1/72 Zvezda MiG-29S. The aircraft depicted is Red 24 which has the nice Russian flag on the fins and an odd patch of dark green on the nose which offsets the otherwise standard Fulcrum gray/gray-green came scheme. All paints were Akan from their basic MiG-29 set. Decals were from the kit although the specific Red 24 markings came from the very comprehensive Begemot sheet. Now having built both the Zvezda and the Trumpeter MiG-29 (as well as the previous standard-bearer, the Italeri), the obvious question: which is the definitive Fulcrum? The answer is... neither. Both are great kits but both also fall short in some areas. Where Trumpeter wins: - Surface detail. It's gorgeous, riddled with rivets that are small enough to not look overdone. Zvezda doesn't have a single rivet. - Better fit. There are no problematic areas at all. The Zvezda doesn't snap together perfectly in all areas: the wings need some clamping among other things. - Overall better engineering. The exception is the front fuselage joint which is carried over from the Italeri kit. Requires putty and sanding off and re-scribing the delicate panel line detailing. However, the fit of the fins and horizontal stabilizers is much better; the Zvezda has issues with the fins which leave a big gap with the fuselage, almost as big as the Italeri's. Also, the wing is a single piece unlike the Zvezda where the wingtip is separate and has a stub barely one mm thick! Not only does it need filling and sanding since it runs where there is no real life panel line, it means that grabbing the aircraft accidentally by the wingtip is almost asking for a tragedy. - Intakes are a single piece. Zvezda's are a two-piece which leaves a seam on the outer side which is visible. Had the seam been on the inner side it would be less apparent. - Has the open fuselage intakes which IMHO looks better on a Fulcrum even though they're usually not open on the ground (then again, most planes don't have open airbrakes when parked and we still build them as such...) - The decals are easier to handle although may not be 100% accurate - Correct nose neutral profile (see pics below). Zvezda really screwed up the front landing gear as it leaves the aircraft with a nose up profile that is not evident in the real thing. - Cockpit. Aside from the inferior instrument panel decals, Trumpeter's ejection seat is better, the thing with lots of knobs behind the seat (is it the radio equipment?) looks more realistic, and the upright HUD is accurate; Zvezda's is a generic transparency slanted diagonally. Where Zvezda wins: - Accuracy. Trumpeter has a slight bump where the wing meets the fuselage. The rear canopy is too narrow as well (my main gripe). The spine of the MiG-29S is too skinny, whereas Zvezda's has a proper rounded (fatter) shape. This may be a carry over from the canopy issue. - Instrument panels. Ok, both use decals but Zvezda's decals are way nicer in this regard and are also split into various pieces for all the different raised bits. Trumpeter's is just one which means you need to cut it up manually or else it'll be a mess. I also don't understand Trumpeter's obsession with outlines on these decals, makes them look very toy-like. The rest of the cockpit, however, is a bit disappointing. - Decals appear to be more accurate although there seems to be an excess of decals near the engines that I don't seem to notice on the real thing. That said, Zvezda's decals are a PAIN to apply. They are extremely thin and curl easily, and on top of that, there are so many that the decal sheet is packed tight. Note that Trumpeter does not have decals for its fuel tanks which is annoying. Trumpeter is also obsessed with the big black bands around the missiles which don't seem to be used that often these days; Zvezda has the more subtle markings which IMHO look better. - Things under wings: both have fuel tanks and standard Fulcrum AA ordinance, but Zvezda adds some AG ordinance as well. - The engineering of the front fuselage is better: it's a two piece that is sepearate from the rest and joins at the middle rather than the side, thus avoiding having to sand off panel details. Unfortunately, the fit of this is a bit iffy and I found that the starboard side would have needed some thinning otherwise it doesn't align properly with the fuselage. A shame since otherwise this was quite a creative way of avoiding the ugly side seams that are the only main engineering issue in the Trumpeter. - Price. The Zvezda MiG goes for around £18-20. Trumpeter's originally sold for slightly less than that but they've jacked up the price recently and now it's at around £22 or more. - Availability. Very easy to find. Trumpeter's distribution in the UK is very erratic: their basic MiG-29 quietly disappeared a few months after release and their SMT was hardly ever stocked here at all. The MiG-29S has had better availability though. So there it is. Which to pick? If you are an accuracy buff above all else, Zvezda is the obvious choice, the nose up profile being the only obvious fault (and which I suspect could be corrected). However, Trumpeter is the more pleasurable build and if you're willing to look beyond its inaccuracies, looks better once built. P.S. avoid the Revell reboxing of the Zvezda kit. It has only markings for the Russian Falcons, no stencils, no missile markings, etc. It's an absolutely pointless rebox if you ask me. Btw, apologies for my terrible phone camera. One day I'll use a real one istead...10 points
-
Finished! Airfix Mosquito. Thanks for looking, Adrian9 points
-
Seems this is the most common desert scheme typhoon, but I figured, why not? Techmod Decals.8 points
-
evening folks finally I am happy to report I have what I think is a working pull for the canopy lots of tries, and lots of fails, but I now have one which has one tiny bubble in a pretty remote spot and manageable imperfections - it is still not as good as you might see on the packaging for a BIC razor, but then I do not have a vacuum room to work in, ionised air supply, metal moulds or industrial kit... essentially, most of the problems are heat related - there is a very fine line between success and failure, and most different supplies of PETG exhibited similar issues - eventually I found a sweet spot on the vacform rig where a slower, lower exposure to the heat element gave a good enough result.# there is still some polishing work to do, but at least I can now start to build the frame.. ..it's not perfect, but finally it's good enough for me to carry on.. thanks for all the advice & support - its one of the things that make this place a great place to hang out TTFN Peter8 points
-
My latest completion the 1/72 Lightning F2A and Sword Lightning T4 completed as aircraft from 92 Sqn RAF, as I am no Lightning expert these were built virtually OOB with the exception of Xtradecal sheet X72155 used on the Airfix Ligntning so I could depict a 92 Sqn aircraft and a Pavla replacement seat, the Sword kit had a Master pitot probe added to replace the kit item that was like a tree trunk. Both kits went together pretty easily with no great problems all I would say is that some of the decals in the Sword boxing seem a tad overscale. As I have mentioned I am no Lightning expert and can't comment on the accuracy of either kit. Anyway enjoy, C + C welcome. Willy IMGP6755 by Phillip Wilmshurst, on Flickr IMGP6762 by Phillip Wilmshurst, on Flickr IMGP6760 by Phillip Wilmshurst, on Flickr IMGP6751 by Phillip Wilmshurst, on Flickr IMGP6757 by Phillip Wilmshurst, on Flickr IMGP6758 by Phillip Wilmshurst, on Flickr8 points
-
Here is my Special Hobby Oxford representing the ambulance version in 1940. The build involved constructing a new tilt-up door, moving some windows and detailing the visible inside. This took some time and for the first time I took a snap of my labours (to prove that it is there) as most of it cannot be seen after closure of the fuselage halves. Otherwise it was a straight forward build that was finished with Tamiya paints and decals from the spares box and a few custom made ones from my friend at MAV decals. Finally here's a note on the B/W image; Girl Guides from all parts of the British Empire contributed donations towards the purchase of two air ambulances and a motor lifeboat in 1940. This photo shows one of the air ambulances and with Guides and Brownies on the day of its presentation. As usual comments (especially on bo-boos) are welcome. Cheers, Etienne. .8 points
-
Good day, gentlemen! It's my next model from excellent model maker - Eduard.6 points
-
Hi! This is an earlier build of mine and I'd like to show You. Actually You see a restart. Something gone wrong and I had to deconstruct the kit, remowe the painting with NaOH, and so on. After all I an say it did not worth the effort anyway. So I show it from the restart. The kit is generaly OOB just some modifications were made. This is the kit: Construction: Good fitting overall: P1030076 by Antal Ferenc, on Flickr Just a little plus: P1030112 by Antal Ferenc, on Flickr P1030889 by Antal Ferenc, on Flickr P1030900 by Antal Ferenc, on Flickr It was much better at first try: P1030902 by Antal Ferenc, on Flickr Cockpit painted after photos: P1030919 by Antal Ferenc, on Flickr (Black painting shows it is night vision compatible.) P1030932 by Antal Ferenc, on Flickr P1030942 by Antal Ferenc, on Flickr P1030943 by Antal Ferenc, on Flickr Look how the flashlight changes the colours: P1030949 by Antal Ferenc, on Flickr P1030950 by Antal Ferenc, on Flickr Finished : P1040827 by Antal Ferenc, on Flickr P1040829 by Antal Ferenc, on Flickr P1040830 by Antal Ferenc, on Flickr P1040831 by Antal Ferenc, on Flickr P1040832 by Antal Ferenc, on Flickr P1040834 by Antal Ferenc, on Flickr P1040833 by Antal Ferenc, on Flickr P1040836 by Antal Ferenc, on Flickr P1040837 by Antal Ferenc, on Flickr P1040838 by Antal Ferenc, on Flickr P1040839 by Antal Ferenc, on Flickr Look, the D has multiplied! P1040840 by Antal Ferenc, on Flickr6 points
-
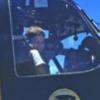
Good evening everyone please find below, after a 40 year build ! Berwick Winston Churchill's Boeing 314 Clipper. Here is a photo of the man himself at the controls, with the signature cigar: Below are the pictures of the completed build. The kit was lost in my parents loft until being recovered when we sold the house after I lost my father. I failed to finish in the KUTA IX Group Build so here it is. All comments greatly received and many thanks to all the BM members for the continuing encouragement, it would never have been finished without you Cheers Pat6 points
-
Another one of my recent builds, this time it is a Bf 109E-3 of 9/JG3 in France 1940. It came as a profipack and is OOB apart from the marking being painted with Montex (told you I was converted). The fit on this kit is supreme and it pretty much fell together. Only place you have to do some fettling and dry fitting is around the engine cowling and cannon area. Hope you like IMG_2062 by Phillip Loughlin, on Flickr IMG_2063 by Phillip Loughlin, on Flickr IMG_2065 by Phillip Loughlin, on Flickr IMG_2068 by Phillip Loughlin, on Flickr IMG_2066 by Phillip Loughlin, on Flickr6 points
-
Hi everybody, painting on the C202 has officially started! After the minor touch ups needed and another primer coat, I did some preshading, using Tamiya Black Green for panel lines and Tamiya Flat Black for the movable surfaces gaps and for the bottom wing panel lines Then I airbrushed Grigio Mimetico on the bottom wings - Lifecolor Dark Gull Grey thinned with Future and a bit of Windex, in several light coats (pictures straight form the spraying booth) Once dry, I added some Lifecolor Matt White to the mix, and sprayed randomly in the middle of the panels, insisting a bit more on the fabric covered movable surfaces Then I went over it with a couple of Future coats, as a protective prior to masking: The tail wheel well was brush painted, same color as for the bottom wings Before going on with painting, I added the antenna cable attachment point on the tail fin: This was done cutting out a suitable strip from wine cap lead foil, and gluing it in place with CA. I meant to do this before priming, but I just forgot it - so here it is now, primed by brush Masking ... And on with painting: I used Lifecolor Verde Scuro Mimetico, again thinned with Future and Windex The above pics were taken when the paint was still drying, as you can see. Once cured, like I did on the bottom area, I added some Lifecolor Matt White to the mix and post shaded spraying in the middle of panels and on the fabric covered parts: The splotched egg camo pattern is going to break up most of this pre/post shading effect - reason why i tried to keep it as pronounced as possible Comments welcome, as ever Ciao6 points
-
1957 Airfix Mosquito FB MkVI. Love or hate this Mosquito kit it was the one that started it all 60 years ago.6 points
-
Just finished this - reasonably happy with it. It is a nice, straightforward build - not too much filling and sanding, great fun, a nice subject. Mostly out of the box, I used Hataka acrylic paints, gloss seal coats by Pledge, decals ( 501 Squadron, RAF Filton) by Xtradecal. Top semi matt finish by Model Master acrylic, with some very light panel washes using Flory washes. Metallic finish was using Vallejo acrylic metal aluminum colour. I didn't go attempting multi metal shades, since the actual aircraft were painted high speed silver, rather than left as bare metal. I attempted "black basing" for some shading / tone variation. It didn't quite come out as I wanted, but I still feel it made a positive difference. Build thread:5 points
-
Hi I have just finished it. This is CASA-Breguet 19 A2 with W-type Elizalde engine. I had a single kit of an elusive Polish company producing some years ago very interesting short-run kits. It was hard to me do a choice of version, so I decided to breed it a bit. I did the CASA-Breguet 19 A2 (presentsd now) and I am still constructing version 19.8 of Royal Yugoslavian Airforces. I have feeling that HIt Kit made very short series of this 19.8 as well, but there are no traces of this in net. the WIP thread is here: Shortly - the model is made of some plastic original parts but whole fuselage and tail are my resin copies of orginals. The CASA licenced build Breguet had more fabric covered fuselage, so this convesion was done out of scratch . Here is result: I hope to present Breguet 19.8 in not far future... The painting scheme is for fall of 1936 or early 1937. Comments welcome Best regards Jerzy-Wojtek5 points
-
It's all I seem to assemble lately. Probably the last for a while because this one made it clear it was happier left alone in its box. On that note, you will notice the canopy appears not to fit properly. That's because it doesn't. It was slightly short shot on one of the arms and is warped, splayed like it's been sat on. I tried rectifying that without success so it'll have to do. Hasegawa 1/48, 95% from the box. I added seatbelts to the kits seats and used TwoBobs decals. Painted with Tamiya, Mr Colour, Humbrol and Revell acrylics. Weathered with my usual mix of pound shop eye shadows. Finding enough reference pictures of this aircraft at a single point in its life proved difficult. There are a fair few pics around but never more than a couple from any one point in time. I decided therefore to take what I liked from each era and try to apply it to my model. I'm not sure on the travel/ACMI pod combo either, but I wanted something under the wings. Anyway, on to the pictures. Some family pics with my previous build: Thanks for stopping by. Comments, constructive crits and advice on how to fix that canopy welcome!5 points
-
5 points
-
Here's the exhausts, after the final effort at a burned/discoloured metal effect. And the prop. Note that this isn't the kit propellor - that's gone the way of the wind, never to be seen again, despite how carefully I thought I stored it! This is a slightly modified spare from an Avia B534, that looks as near as I can get based on plans and photos. The cockpit edges have been done, the headrest painted to represent a leather cushion, and gun barrels added from steel tube. The main wing struts fit well and attached at a nice, consistent angle. I tidied up the paint when all the messing about was done. And with the top wing on (and the prop, and the bombs, and the aerial mast...). It all aligns without (too much) difficulty, using CA glue. What it would have been like trying to do this with Britfix poly cement I don't even want to think about! The windscreen is in the background. This, and the aerial wire itself are the final bits that need adding. Here's the underside with the bombs, plus things like the struts and footsteps in place. What this needs now is a bit of dirt and grot. Remember how a landing site was selected? Find a big enough field, then drive across it in a car at 30 mph. If you and the car survive, you can fly an Hs 123 off it. Evidently, such fields would have been both dusty and muddy at different times, and Hs 123's operated close to the front line, flying repeated missions in response to calls for air support for ground forces. Between sorties, the ground crew would have refueled and rearmed the aircraft as quickly as they could, perhaps topping off the engine with pre-warmed oil, while the pilot would have taken a quick leak, swigged down some coffee and been briefed as to his next sortie. Hence, dust, dirt and mess would have been commonly observed (except perhaps on the bombs themselves!) until the aircraft got a clean at the end of a hectic day. Time to get the oil paints out...5 points
-
Well that was close! I got my photos taken and in the gallery with about 4 minutes to spare. So I had to mask the squadron codes. I was going to do a step by step but I was in too much of a rush to take pictures! So here are the first three with words to cover the rest. First make a template for the spacing and size of the codes. Q and M are the same width so we can invert the mask on the other side: Carefully cut out a strip of tape that is exactly the width of the character strokes. Mark it with a bit of tape at the end so you don't lose it or swap it for another. Put the character stroke tape where the stroke would go and mask around it, then remove the character tape. You now have a masked stroke of the right width: Do all the verticals on one side. You can now paint the strokes, leaving out the corners of the Q and the right side of the D. Remove the template and position the character tape along the bottom of the uprights, mask it off, remove it and paint the bottoms of the characters. Repeat at the top. When you have the outlines, sand gently to remove ridges and touch up by hand. I used more masking for the M but just freehanded the tick on the Q. I was dreading the band on the spinner. But I blutacked the spinner to the end of a hotel biro then simply rolled it across the edge of my cutting board while touching a brush loaded with Sky on to it. The build is now in the gallery. It is complete, but could do with some more weathering and washes and a coat of varnish: Will take better pictures in RFI when "done" done. looking at the b&w pictures of the real thing on the web, I think a real model would use 36" black codes and have darker patches on its belly and nose. I did the belly slightly darker, but it doesn't show in tonight's pictures Thanks for looking, Adrian5 points
-
Just caught up with this one, Martian. Very nice work with the white plastic card - I love that stuff! You can make so many cool things from it, like Roc floatplane cockpits and who knows what else. When I built the Special Hobby 1:72 Skua, I believe I modified the kit cockpit parts (floor, bulkheads) so that they did not make the fuselage wider than the canopy. Maybe something was off in their master file and the error was propagated across both 1:72 and 1:48 Roc and Skua kits. Anyway, my rule of thumb is that canopy parts are only modified as a last resort - always modify the other parts first to ensure a good fit with the canopy, especially with respect to its width. Your work with the white plastic card stock is excellent, and it looks like you'll be sure of a proper canopy fit at the end. Tubular, dude! Cheers, Bill PS. Don't forget the range extender (aka relief tube). It's cleverly disguised as a fire extinguisher.5 points
-
Airbrushing part of the job finished, time for washes, guys with hammer and chisels, rust and so on GP rubbish: rafts: mast: spare torpedo boxes(?): and fangs of all sizes : Thanks for following Mick5 points
-
I also took some shots next to the Trumpeter MiG-29S. I guess you can't really see all the differences from here. You can make out how Trumpeter botched the spine. Still, there's something about it that makes it look better. And here's the nose problem with the Zvezda. Both kits are face to face with quite a big clearing between the two nose antenna. Trumpeter's spine issue is also apparent here.5 points
-
Today, after giving the primer a light sanding, I masked up for the white roof and spine. I also made a handle from some stretched sprue: I then applied another round of preshading: Once that was dry I applied the blue gloss enamel: As that's a gloss finish I can't do any more work there (it will be good to let it harden up for a week), instead I turned my attention to the rotors. First I applied a black Flory wash to the detailed areas: The after applying a coat of Aqua Gloss I could get on with the rotor decals. The kit decals proved to be highly reluctant to wrap around the arms on the rotor hub, after struggling with the red band I decided it was easier to cut the rest from my spares box: Here are all the rotor decals finished: Once the ones on the main blades are fully set I think the next job will be to give the blades some droop and then assemble the main rotor. Bye for now, Nigel5 points
-
Mosquito FB.6 RS679 AU-P, IV Sqn, RAF Celle 1949 Kit: Tamiya 1/72 Decals: Freightdog FSD72004 Build thread http://www.britmodeller.com/forums/index.php?/topic/235016781-in-futurum-videre/5 points
-
Finally got this one finished. Quite an enjoyable build. I just love the airliners from this era - they are so full of character. . I could tweak it a bit more but I don't want to do any damage. Getting the undercarriage doors in position was a bit of a struggle. I also added on a few additional aerials and the DF loop fairing on the underside (which came from a Welsh Models Argonaut I never finished.4 points
-
My latest effort. This is Revell/Monogram Promodeller 1/48 Focke-Wulf Ta154 nightfighter. Pretty decent kit but needs lots of weight to keep the nosewhel down. There's weight in the engines, the propeller spinners, the nose, I even resorted to lead in the nose gear bay. I sprayed the Xtracrylix dark grey RLM75 first then masked it off to spray the RLM 76 Lichtblau overall. Had trouble with the Xtracrylix clogging the airbrush. Fixed with a little cleaning and thinning. Oddly enough the bad-language solution had little effect. Anyway here it is.4 points
-
Hey Peeps. What's up. It has been such a long time. Hello to the new members and old acquaintances I made when I was in the UK. I have been away for too long but finally, I know have a completed kit that I want to show to you guys. More informations and more photos and bigger ones can be found on my blog as usual - http://modeller-innovation.blogspot.com/2017/06/tiger-model-135-amx-30b2-brennus.html Please do have a look and thank you so much in advance for any feedback you guys may have. C&C are welcomed. I may have lost some of my previous skills. Thank you for always supporting and for the kind words and various encouragements. Until the next launch.4 points
-
Here, finally, are the pics of my finished Short 184. But first a little potted history of this aircraft: The Short 184 was the first aircraft designed specifically to carry and deliver a torpedo. The prototype, (no 184 strangely enough!) was put aboard HMS Riviera on May 3rd 1915, then joined HMS Ben-my-Chree on May 21st. No. 842 was the second production machine and joined HMS Ben-my-Chree on August 10th, in the Aegean Sea. On August 12th at 0455hrs, Flight Commander CHK Edmonds took off in 842, without an observer, and with only 45 minutes fuel - all he could carry to get the aircraft airborne with an 810lb torpedo! He got up to the dizzying height of 1,500 feet and crossed over to the Sea of Marmora. His target was spotted near the north shore, where an earlier reconnaissance flight had reported it to be, and he dropped to 15 feet, launching his torpedo at a range of about 800 yards. The ship was struck abreast the mainmast. It was later discovered that this particular ship had earlier been torpedoed by a submarine, which was given credit for its sinking. However, on August 17th, both 184, flown by Flight Commander GB Dacre, and 842, again flown by Flt Cmdr CHK Edmonds, launched to attack enemy ships at Ak Bashi Liman, on the Gallipoli Peninsula. Edmonds torpedoed the middle of 3 ships which caught fire and was later taken to Constantinople. Dacre had engine trouble and landed in the straits. His engine recovered enough for him to taxi towards False Bay where he fired his torpedo at a large steam tug, which he hit and sank. He then taxied 2 miles before managing to get 184 airborne again, crossed Bulair at around 200 feet, and was within gliding distance of Ben-my-Chree in Xeros Bay when his engine finally failed completely! This made 842 the first aircraft ever to torpedo a ship....the rest, as they say, is history....... This build is in tribute to those brave and relatively unknown fliers, who faced challenges that modern pilots would deem ridiculous - and succeeded! For those interested in the build thread, it's here. Thanks to all for your support and constructive criticism throughout the build! Ian4 points
-
Freighter finally finished using the old Airfix kit, Magna conversion and lots of filler. Main changes are the engines beefed up with new exhaust positions, the Airfix ones are too small and the Magna ones simply wrong. Decals home made. A few pics... Just noticed how silvered the wing decal is, may correct that. Next project Contrail Blackburn Botha and a Bristol Scout.4 points
-
I set aside some time this weekend to work on my Thud build. I had hoped to get the cockpit done but only got so far as the ejection seat. In addition to the Aires parts, I substituted some Eduard photoetch (seatbelts and ejection handles) and scratched an O2 mask hose and some cabling. Here are some pics. Trust me, it looks better in true life -- the camera sure brings out all of the flaws and magnifies them ten-fold! And, a couple while testing fit in the cockpit tub: Cheers!4 points
-
The length was most likely limited by an elevator or maneuvering on an elevator since by this time they were all located at the edge of the deck. The folded width was less constrained but needed to be minimal because of the need to cram aboard as many aircraft as possible. I'm not sure that the following numbers are directly comparable, but 94 F-14As could be accommodated on a Forrestal-class carrier according to its SAC; a spotting diagram of the F-111B I have indicates that only 85 could be parked on a unnamed super carrier leaving the angle clear for landings. However, since at most two squadrons would be aboard, 24 airplanes, (and in the case of the F-111B, only 12 since it was a one-trick pony) the actual impact was somewhat less than that difference suggests. At the risk of oversimplifying, The A-3B, RA-5C, F-111B, and F-14A all had about the same catapult-weight limit, with the RA-5C being the heaviest. (The Skywarrior reportedly holds the catapult-weight record of 84,000 lbs, but in the fleet that would have been allowed only for a war-emergency launch.) As a practical matter, the RA-5C and F-111B weighed about the same when launched for their respective missions. The F-111B had the highest maximum arresting weight, but that was because it had to bring back all six Phoenixes totaling 6,620 lbs. Take that away and it was about the same maximum arrested-landing weight as the RA-5C. Approach speed was also a weight-limiting factor: the A-3B and F-111B had stall speeds at landing gross weight of about 100 knots. The RA-5C and the F-14A, 112 knots. For more detail, see http://thanlont.blogspot.com/2011/01/f-111b-versus-f-14a-one-more-time.html I agree that the Navy was better off moving to the F-14, if for no other reason than to avoid the embarrassment of having F-111Bs being delivered for at least a couple of years with no missile control systems. That's also discussed in the link given above.4 points
-
Thanks Bill, it looks like the moulds were either scaled up or down. These days one of the first things I do on a project is to check the fit of any transparencies and modify the kit if necessary. Like you, I will go to almost any lengths to avoid having to start changing the width of canopies. In this case the work undertaken has ensured a good fit of the centre section transparency. I may make my Alley Cat 1/48 Jindivik soon, if only because it has no canopy! Hang on a minute! Aliens building unmanned aircraft? There's a recipe for a sensible thread, free of lunacy if ever I saw one! Martian4 points
-
I fear we are about to upset the General again by discussing some more modelling. I was able to separate the turret ring from the model and relocate it as far down as it will go. Perfect Plastic Putty was used to fill any small gaps. There was a beam that was attached to the pilot's bulkhead and this has been constructed and glued to the model. The fuel tank is being constructed and mountings have been attached to the floor of the rear cockpit. I had a slight concern that it is on the small side and may replace it with a larger item. I shall sleep on this one however; the problem that is, not the fuel tank! I have also been slowly adding more of the main structure to the fuselage and this is slowly coming together to my satisfaction. Thanks for looking Martian4 points
-
Airfix 1/72 Mosquito FB. Mk VI in 75 sqn RNZAF colours, Old Models decals, Jays Models treaded tyres, actually for Beaufighters but I reckon they looked OK, though I put a disc over the spokes. Mosquitoes served with 75 squadron RNZAF postwar from 1948-52 when they were replaced by Vampires. The one I've modelled YC-B NZ2336 is preserved in a private aircraft collection near where I live & on retirement from the RNZAF had only some 80 airframe hours on it & was destined for destruction as were many others before being rescued by the owner. Build thread Sorry for the light patch in the top right corner of some of these, actual sunlight. A frosty start but promise of a lovely clear day. Steve. Replaced the photos from my new Flickr account.4 points
-
Grumman A-6 Intruder The Grumman A-6 Intruder was an American, twin jet-engine, mid-wing all-weather attack aircraft built by Grumman Aerospace. In service with the United States Navy and Marine Corps between 1963 and 1997, the Intruder was designed as an all-weather medium attack aircraft to replace the piston-engined Douglas A-1 Skyraider. As the A-6E was slated for retirement, its precision strike mission was taken over by the Grumman F-14 Tomcat equipped with a LANTIRN pod. From the A-6, a specialized electronic warfare derivative, the EA-6, was developed. Following the good showing of the propeller-driven Skyraider in the Korean War, the United States Navy issued preliminary requirements in 1955 for an all-weather carrier-based attack aircraft. The U.S. Navy published an operational requirement document for it in October 1956. It released a request for proposals (RFP) in February 1957.Proposals were submitted by Bell, Boeing, Douglas, Grumman, Lockheed, Martin, North American, and Vought.Following evaluation of the bids, the U.S. Navy announced the selection of Grumman on 2 January 1958. The company was awarded a contract for the development of the A2F-1 in February 1958.The A-6's design team was led by Lawrence Mead, Jr. He later played a lead role in the design of the Grumman F-14 Tomcat and the Lunar Excursion Module. The first prototype YA2F-1, lacking radar and the navigational and attack avionics, made the Intruder's first flight on 19 April 1960, with the second prototype flying on 28 July 1960. In general, development flying went well,[with the major problem encountered being handling problems associated with the aircraft's air brakes mounted on the rear fuselage. In an attempt to solve this, the third prototype had its horizontal tailplane moved rearwards by 16 inches (41 cm), but this did not completely solve the handling problems, which were resolved by fitting split-hinged speed-brakes on the aircraft's wing-tips. Early production aircraft were fitted with both the fuselage and wingtip air brakes, although the fuselage-mounted items were soon bolted shut, and were removed from later aircraft. This is the trumpeter 1/32 sauce kit, and apart from a few issues a dream to build, the cockpit had the Eduard PE added, with a few other bits of Eduard to enhance the other bland items. All the figures are from Reedoak ( amazing figures) and the base is scratch built, using flight path tie downs. all painted using a combination of Mr Hobby, Tamiyia, and Vallejo air3 points
-
All fingers legs arms and toes crossed here that this coming week brings this particular model subject much closer to reality; subject to wind and tide, we should see a Royal Navy Aircraft Carrier back at sea for the first time in many years, ready for the first F-35B to land on later next year. These markings for 809 Sqn in HMS QUEEN ELIZABETH and HMS PRINCE OF WALES are largely from my own imagination and courtesy of my inkjet printer, but perhaps not that far from the truth. This is Fujimi's delightful 1/72 F-35B kit, with a little hacking about from me (e.g. the rather obvious auxiliary air inlet is missing on the kit) and my own decals. I haven't fitted any weapons in the open bays yet - but some scratch built Meteors and SPEAR 3s are on the workbench! For those who doubt that colour can ever be applied to these aircraft, check out the USN variants at sea now! And as a comparison, here she is alongside Italeri/Revell's old X-35B kit Edit - here is a link to my second build scheme and an update of this one post FoC Flying Trials: 2018 Updates FLY (ROYAL) NAVY ! FredT3 points
-
Got as far as the underside of the sponsons; probably one more session should do it... Port: Starboard: No, they aren't a mirror image yet, cos I have been applying them in a different order (and anyway, the starboard sponson has the flood light underneath, whereas the port doesn't). Tantalisingly close to a serious milestone now! [And how nice to see Queen Elizabeth with water under her keel. Now that is a true FBS...] More soon Crisp3 points
-
From memory they're 5/32 SP85 Mush Hds . Its got to take some punishment.The blind rivets look like T/Pop Domes also used Cherrys or a type of Avdel that was new to me at the time called an MBC . That Bonding strap up the cab (left 1/4 down ish ) is held by two 3/16th Black Msh hds with washers under the heads for scale. Pretty sure I was drilling out 5/32s on the fuse to fit the straps. I don't know how many Sea Kings they built but when I was fitting the attch. point anchor nuts for the FOD (Your Barn Door!) I had concessions for every attachment point due to the drill off jig not lining up with the roof angles ! This was on the last 8 SKs built. I found some of these nesting angles,saddles and packers in one of my boxes the other day !3 points
-
Quick update 26 June. This is were I am up to at the moment, words to follow later. It's beginning to look like an aeroplane now Cheers John3 points
-
Managed some more bench time recently so time for a small update. First job of the day was to get the fuselage sealed up. This took a bit of time and quite a few test fits, mainly down to the Eduard IP, and the way Airfix would have you assemble the cockpit. As with all the new Airfix releases, tolerances are extremely close so careful cleanup of paint on all the mating surfaces is needed. Once the interior is aligned, it all clicks together well. The tape is there purely to hold it whilst the cement sets. Once that was done and had been put aside to set up, I thought I would take the turret. As previously mentioned, there would be the rest of the Zoom kit in the plus the Master .303 barrels. It's not the the kit barrels are bad, they're not with some careful finishing and opening of the muzzles they will look good straight from the box... But the Master barrels bring some much more, especially in 1/48th. The turret is a lovely little kit all of its own, and even without the etch and some careful painting it will look the business as is. I have convinced myself I need to do another one of these and use no aftermarket just to see how it turns out. The turret has loads of detail, but as I had it I will put the etch in, so lots of of the standard raised detail has been removed. So that's it for now, just going to leave that little lot to set up, then a bit of clean up and we can start squirting paint about again. I may well have a go at the undercarriage later if time permits, but for now, That's All Folks!! Steve3 points
-
So I don't think I will make the finish line, but I have been plodding along all the same Some weaps finished Pappy3 points
-
Right - here we go - finally got her finished. I've gone right up to the wire but managed to complete and get some pics in the gallery. Thanks for the constant encouragement Dag lol. So from my last update I had to prime her and do a little more sanding and fettling here and there. Then I got her painted up in overall aluminium. Once this was dry, I did a fairly weighty bit of masking for the 'Day Glo' which was really worth the effort for the overall effect. Then she received a few coats of Tamiya X-22 clear before receiving the decals and further coats of X-22 to seal them in. Also at this point I painted up the undercarriage and other little bits and pieces that would be added at the end. With all this complete, I did a panel line wash to really help make the excellent detail pop. I decided not to go for any obvious weathering as I wouldn't think trainer aircraft would get the same kind of beating as those in service. Then she was put on her legs with the undercarriage added and the final piece of the canopy added in the open position to show off the cockpit and its two occupants. So here she is in all her 'Day Glo' glory - I hope you enjoy and as always your comments and feedback are always welcome.3 points
-
Thanks Martin, somewhat to my own surprise I managed to do everything I said I was going to do and the end result is below. Gallery shots will go up after some food and a stiff drink.3 points


This leaderboard is set to London/GMT+01:00