
Leaderboard


Popular Content
Showing content with the highest reputation on 23/06/17 in all areas
-
Here is my Special Hobby Oxford representing the ambulance version in 1940. The build involved constructing a new tilt-up door, moving some windows and detailing the visible inside. This took some time and for the first time I took a snap of my labours (to prove that it is there) as most of it cannot be seen after closure of the fuselage halves. Otherwise it was a straight forward build that was finished with Tamiya paints and decals from the spares box and a few custom made ones from my friend at MAV decals. Finally here's a note on the B/W image; Girl Guides from all parts of the British Empire contributed donations towards the purchase of two air ambulances and a motor lifeboat in 1940. This photo shows one of the air ambulances and with Guides and Brownies on the day of its presentation. As usual comments (especially on bo-boos) are welcome. Cheers, Etienne. .22 points
-
Long time lurker on here so I thought I'd post up some of my recent builds. Here is my 1/24 Typhoon that I recently finished. Whilst it was a marathon build, I thoroughly enjoyed it. Additions are the Airscale instrument decals, HGW harness, Master Models rockets, Eduard wheels and cannons. All markings were painted using Montex Masks. This was the first time I had used them but I've got to say I'm converted! Hope you like. IMG_2075 by Phillip Loughlin, on Flickr IMG_2078 by Phillip Loughlin, on Flickr IMG_2080 by Phillip Loughlin, on Flickr IMG_2082 by Phillip Loughlin, on Flickr IMG_2083 by Phillip Loughlin, on Flickr IMG_2081 by Phillip Loughlin, on Flickr IMG_2076 by Phillip Loughlin, on Flickr Finally, here is one on its base at Salisbury Model Show, eventually it will be busied up a bit with ground crew, pilot, missing cowls and general clutter IMG_2027 by Phillip Loughlin, on Flickr17 points
-
Just announced the first 2018 release is the Wellignton 1C in 1/72 scale Now thats very much welcome11 points
-
At last I get a swift bit of bench time. Gigs, birthdays and working darn in the smoke all done! Dancing penguin indeed! First off off I managed to tidy up all the little rear seat parts and fuel tanks then bunged some primer on everything ready for a bit of pre shade loveliness. Then I saw that the bombs need to be added too. Flash! Ahhhh ahhhhhhhhh. I know I'm doing the last days scheme so bombs wouldn't be on board but I really want to add the bombs. They do look a right pain though. About an hour in I'm here. three to go and then I still have more clean up and I'm loosing the will to live so I need something more fun. I know! sanding. That's right, I'm going for it. First pass is a bit patchy. this is primed so I give it another go, finding a nice little way of evening out your sanding on ribs if you ever undertake the 0/400 challenge. basically the primer gives a guide on where you are taking height from letting you even out the rib dips. and again primed. not bad to my eye. It's a tired eye to be sure but even still not bad. side by side I still need more off I think but the plan is working. By the way going back to the bombs. Green or black? Im off to bed now as I've just noticed the time. Thanks for dropping by. Take care you lot. Johnny sand stick.11 points
-
Good day, gentlemen! It's my next model from excellent model maker - Eduard.10 points
-
Hiya Folks, I`ve been wanting to built a RCN Silver Star for some time so when the GWH kit was released I had my perfect excuse,..... but was struggling to find some decals. Here is where my Canadian friend Jim Bates came to the rescue,....... he contacted his friend David Knights who kindly sent me part of the Canadian IPMS limited run sheet on the type,..... thanks fellas you are true gents. Here is the real thing; For the silver I used Tamiya rattle can Bare Aluminium and for the Day Glo I used a can of Halfords VW Orange applied over a base coat of white. The rest was brush painted, as was the matt varnish which helped to dull the model down, as per the real thing. This is a lovely model to build and is highly reccomended,...I used the Taiwan special edition as the original kit sold out so quickly. Cheers Tony10 points
-
EE Canberra Pr.9 1:48 Good evening! Finally, at long last I'm calling this one done. It's a 1:48 Airfix Canberra Pr.9 that I picked up at Cosford this year. Overall the kit is quite a good one- only problems are the thickness of the plastic, lack of a proper Pr.9 cockpit or Navigator's nose compartment and lack of a bomb bay. Thankfully the latter was amended with the help of @canberra kid who very kindly offered me one to use in this build! WIP: Kit: Airfix Canberra Pr.9 1:48 Paints: Vallejo, with Alclad for the exhausts Weathering: Thinned down Vallejo paint, Flory wash, as well as some AK Interactive washes Scratchbuilt: Almost the entirety of the Cockpit and Navigator's compartment, upper fuselage aerial, rear fuselage camera and bomb bay. And a few in-progress images of the cockpit: Thank you very much for having a look! Kind regards, Sam9 points
-
saw him get into his car earlier So I guess it's safe to hang this on the front door now9 points
-
Polikarpov I-16 Type 24 Eduard 1/48 I don't often post in the aircraft section, as I'm usually an armour and SF builder, but I've been sorting through the photos of some of my older builds on Flickr, and came across this I-16 I built back in 2015. I didn't get around to posting it at the time, so I thought I may as well do so now. It's a strait OOB build of Eduard's excellent Polikarpov, and the third one I've built over the years, painted with Gunze Aqueous and weathered with various AK pigments and washes. Thanks for looking Andy7 points
-
Airfix set out their release dates at the beginning of the year and none of their new tools were due until July anyway (the 262) with the others towards late summer and into autumn. You've been forecasting the imminent demise of Airfix for the last few months on this board, yet they continue to disappoint you - perhaps it's time you got a new hobby? Jeff7 points
-
The slightly cooler weather has allowed me to get a bit more done on the Roc. The target winch was mounted on the aircraft's turret ring which was an integral part of the fuselage structure and a small panel butted up against the winch's forward edge It is this panel that has been the focus of tonight's efforts. The panel sits on top of a bulkhead and this has had to be very carefully cut down to accept the panel. Once glued in place, the rear of the new panel has to be cut very accurately to accommodate the turret ring. To add strength to what is a weak area of the model, the ring was very securely glued to the panel and port fuselage side. So far this model has proved one of the harder builds I have done, mostly due to the accuracy and fit of the new scratch built parts needing to be close to 100% to avoid distorting the fuselage and ending up with transparencies that won't fit. Thanks for looking Martian7 points
-
This is the last... OOB for the B, and much scratch for no name... More pictures next...6 points
-
Most of you that have not seen my WIP are probably not familiar with this one. It was a never-realised project from the late fifties to create an attack-/bomber aircraft to carry the projected (but later cancelled) Swedish nuclear bomb. See more in the WIP thread. The whole project was cancelled since it would have become too expensive, and instead Saab started working on what became Viggen. But this is the missing "36" between Saab 35 Draken and Saab 37 Viggen. I used RBD Decals for Saab A 32 Lansen. This individual is portraited as it would have looked like in about 1969. The camouflage pattern is inspired by a suggestion for Viggen, before the classic splinter camouflage was created. Main landing gear and wheels are modified F-14 Tomcat ones. The front leg is a modified 1/48 Starfighter leg. Wing tanks are from a F-16. A nice fighting face! Finally a duo that could have been...6 points
-
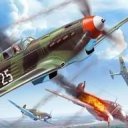
Another one of my recent builds, this time it is a Bf 109E-3 of 9/JG3 in France 1940. It came as a profipack and is OOB apart from the marking being painted with Montex (told you I was converted). The fit on this kit is supreme and it pretty much fell together. Only place you have to do some fettling and dry fitting is around the engine cowling and cannon area. Hope you like IMG_2062 by Phillip Loughlin, on Flickr IMG_2063 by Phillip Loughlin, on Flickr IMG_2065 by Phillip Loughlin, on Flickr IMG_2068 by Phillip Loughlin, on Flickr IMG_2066 by Phillip Loughlin, on Flickr5 points
-
1/72 Wellington 1c for 20185 points
-
Almost ready to paint update. Trying to get this bird ready for its pink paint job. I picked this up at the local hobby shop. You would be surprised how limited the pink camo paint selection is at your local hobby shop! But, I think the electric pink will work out just fine. I added the tail section to the fuselage, along with some bits and bobs that go on the body. I did have a slight problem trying to find this nose section part 97 That’s because it is really part number 77! Next up were the wings and exhausts. I left the exhausts off to make painting and decaling a bit easier. The next items to add were the intakes for each side As you can see from the pictures, the intakes either have gaps or steps that have to be dealt with. There are also some minor seam problems along the top and bottom of each wing to fuselage join. Whether it is my fault (most probably) or the kit has some slight misalignment putty was used and then sanded The nose cone was stuffed with some lead fishing weights as was the space in the fuselage where the nose cone joins. I think there was enough weight added. So, the nose cone was glued on with a high tech, very complicated structure to insure the nose dried in place properly. The next step is to mask the canopy and put that on as the cockpit will be closed. Don’t ‘know whether to try and create a female looking pilot or just leave the cockpit empty. Decisions, decisions. Once the canopy is in place, it will be paint time and then the best part, application of the decals. As always, all comments are welcome.5 points
-
I didnt really mind what you did in here, but I just had to delve back to page 5 to find it D'you call that playing the game huh? he he Well its been quite hard to overcome the travel and sun lethargy but I have had a go making the Gyron Juniors has been a simple easing-in to modelling again Started with the Staedtler pen tube With fuse wire ridges added and slid into a convenient mould box with a plasticene header Oops looks like the ridges have 'sprung'... Oh well....:( Latex poured and resin-added-value Emptied from the latex With a tad of work that will do It has to, I'm out of fuse-wire So cast another A fair old bit of trimming to do but no worries here Mix up a few Vallejo metallics with a smidgeon of colour too, for sombrenessnesssness And prepare to get the inner bays a nice white colour Still making progress slowly with the airbrake construction and nose wheel bay Oh yes the ejector seat blank is coming along nicely too Just had a thought, got to pick a few for the Coventry show on Sunday, must awa' for a wee lookin' Nightol5 points
-
OK still 3 and 1/4 hours to go, but I thought I would put up here what I intend to begin with I plan to try and get the F-111C finished before the deadline, so this will be a slightly delayed start, with a bit of tinkering here and there, while waiting for paint to dry on the F-111 It will be as the header says a 3 Sqn RAAF aircraft in what is called the Lizard scheme, based at Butterworth in Malaysia, a place familiar to me, but I was a youngling back in the days of the Avon Sabre, and long before the Mirage started to appear there. The Lizard scheme is the 3rd scheme used by RAAF Mirages, after NMF, sprayed silver and it was just the 2 colours, Dark Sea Grey overall and Green on top in a matt finish. The decal sheet is as you can see by Red Roo, I have a Master Pitot for this, that's about the extent of the AM This is the revised tooling HPM kit, although it's not marked on the box.4 points
-
Dragon's 1/6th scale type82 Kubelwaggen. I built this some years ago for a magazine review. Due to it's size I had to put it away in the loft where I rediscovered it today. It needed some repairs, and I've lost the passenger side mirror/indicator. When I built it I added a loads of extra detail as it was very simplified, and toy like. I rebuilt the poorly moulded floor grid out of wooden drink stirers and rebuilt tool and weapon clasps out of wire and plastic. The weapons and personal gear comes from various manufacturers. So now fixed, it's back into the loft as I have no where else to put it! Thanks for looking Angelo.4 points
-
Hi guys! This time I would like to show you my last model. It´s the simple Academy F4U-1D Corsair in 1/72. It has some Eduard PE and some improvements, like a longer tail gear and navigation lights. Decals are custom made and the bands are painted to represent an aircraft of the USS Intrepid. I hope you like it! Every critics and comments are welcomed! Best regards from Uruguay, Ignacio4 points
-
Finally finished and ready for the cabinet.4 points
-
Hello. I will build a model Spitfire Mk.XVIe from Eduard in 1/72 scale. I have Overtrees kit (only plastic). Will use photoetching, bronze legs, engine bay and wheels from Eduard Brassin. Decal will be from Xtradecal. Now ready cockpit. Alex.4 points
-
Hi all, Here is my latest bird. This is the well known Hasegawa Dora, here upgraded with some resin goodies. For those interested, upper wings are RLM76/82, fuselage and upper horizontal tail 81 and 82, underside and sides are 76/ bare metal. Engine covers are 76/71. Ailerons (underside) and rudder are 65. Paints are Gunze but I made my own mixes for 81 and 82, the rest is "out of the jar". The spinner spiral is copied on the one shown on "Schwarz 1 + I" of the same unit. It is a Fieseler built machine with an unknown Werknummer, so I've opted for something plausible (600378). Markings are a mix of self-made masks (thanks to my new Silhouette cuting machine, I strongly recommend it), wet transfers and decals. You may click on the photos to enlarge them. Cheers Tristan4 points
-
It's all I seem to assemble lately. Probably the last for a while because this one made it clear it was happier left alone in its box. On that note, you will notice the canopy appears not to fit properly. That's because it doesn't. It was slightly short shot on one of the arms and is warped, splayed like it's been sat on. I tried rectifying that without success so it'll have to do. Hasegawa 1/48, 95% from the box. I added seatbelts to the kits seats and used TwoBobs decals. Painted with Tamiya, Mr Colour, Humbrol and Revell acrylics. Weathered with my usual mix of pound shop eye shadows. Finding enough reference pictures of this aircraft at a single point in its life proved difficult. There are a fair few pics around but never more than a couple from any one point in time. I decided therefore to take what I liked from each era and try to apply it to my model. I'm not sure on the travel/ACMI pod combo either, but I wanted something under the wings. Anyway, on to the pictures. Some family pics with my previous build: Thanks for stopping by. Comments, constructive crits and advice on how to fix that canopy welcome!4 points
-
Here's my build of the Airfix 1/72 Airfix Spitfire PR.XIX: Attack squadron resin camera was added for the oblique camera, kit decals, Vallejo paint, Mig wash. WIP Thread is here4 points
-
Today's tank tinkering - added the final tools, and built up the turret And finally made up the miracle of engineering that is a Tasca 50cal Peter4 points
-
Thanks Roger but let's be honest. You and I both know it is down to me being a stubborn old $**^£%. I saw the optician this morning and the result, other than me being somewhat poorer, is that some new high magnification spectacles will shortly be winging their way to Martian Towers, allowing for ever more insane attempts at fine detail. Martian, Now as poor as a Church Martian on the day his wife has run off taking with her their last remaining Flanian Pobble Bead, following the collapse of the Triganic Pu.4 points
-
Just to let you all know, not forgotten about these. Still sat at the bottom of the cabinet. Will be resurrecting this thread soon and be starting the next three soon. Probably when july begins... Tony4 points
-
The last of the bandsaw - for now Once again, cut out the paper shape you need. In this case the profile view of the saddle tanks. Stick it on in the right place. I think you can see what we are aiming for here. Run the cuts - just one for each tank. Now we have two tanks that look just like this. Even though the tanks have just been made with a bandsaw there is some 3D subtlety to their shape. And they fit quite nicely - there will be filler required but I judge that the contact is tight enough that the demarcation between the pressure hull and the saddle tanks will be suitably sharp. Mercifully this is as far as I can go with a bandsaw - for now. Next up Chisels! Reconcilor - AKA 'Bandsaw Steve'4 points
-
OK I have managed to recover the photo links to the first page and this one: I will endeavour to restore those on page 2 as soon as I can. Annoyingly I had a few updates to post and so I spent a lot of time finding a new web host that would allow me to link photos for this site and not charge me $399.99 per year (I am not kidding!) to do it... Enough of that. I started painting the exhaust headers, using the 'salt' method of (attempting) rust replication. First of all, a thin, uneven coat of Mr Hobby silver: Then on with the salt: the more uneven the better, though I wanted most of the effect to show on the upper area of the exhaust: Then a coat of my interpretation of red lead paint - Mr Hobby Hull Red. Looks a mess at this stage: Then, using my wife's tooth brush, scrub all of the salt off (once the paint is dry): Looking better. I added a thin wash of orangey-red paint around the flanges to show a bit of powdery rust (I added a bit more than shown here in fact): And finally, offer the whole thing up to see how it looks. I think I may have over-done the effect, but I can always tone it down with a dusting of a pale colour later if required.4 points
-
has he gone yet? I have got the fireworks I didn't know if I could do that, has it worked? found it at http://bestanimations.com/Holidays/Fireworks/Fireworks.html4 points
-
HI Guys this is my second MFH build but the first time on this site, so please bare with me if I cock things up. So this is the full detail kit of the famous Ferrari 315 as raced at Le Mans in 1957. I decided to start with the wheels as each has 148 parts to them, MFH give you 2 jigs as there are 2 different tyre widths. The wheels are different to the 250 kit we have compared them and these seemed easier to assemble. I built 3 jigs after measuring the length of each layer of spokes there are 6 in total, so I could cut the spokes to the correct length in batches. The instructions take a bit of reading to understand how the spokes are offset as you can see in the pictures. I secured the sleeve onto the spoke with superglue and added a tiny amount onto the end of the spoke to attach to the hub, once each layer was completed I used a UV setting glue around the rim to secure. Then once all 6 layers were done I used 5 minute epoxy around the rim to make sure none of the little suckers would come loose. The center hub had been polished and now used satin varnish to seal it.Finally adding the air valve and tyre. You get 4 turned rims and 1 cast rim for the spare wheel, next I assembled the spare wheel cage and painted it this was soldered together, finally the leather strap was made and added. Next the engine.3 points
-
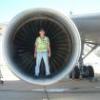
Hi guys, I'm not usually an aircraft builder however I decided to incorporate a diorama into this build and have a go at adding an electric motor to one of the engines, also this is my first attempt at modelling a grass base. I wanted a patchy and worn looking effect where a lot of work seems to have been carried out under the plane and the grass has suffered for it. I hope you like the results.3 points
-
日本航空自衛隊 第6航空團 第303飛行隊 小松基地 創隊60週年紀念塗裝 2014年9月 第303飛行隊(だい303ひこうたい、JASDF 303rd Tactical Fighter Squadron)は、航空自衛隊第6航空団隷下の戦闘機部隊である。小松基地に所属し、戦闘機にF-15J/DJ、連絡機にT-4を運用する。 JASDF 303rd TSF F-15J Eagle "60th Anniversary", September 2014 Komatsu Air Base.3 points
-
My Modelsvit Su-17M3 based at Shindand AB during the Soviet Afghan war 1985 Shutterchance_UL-7776 by Simon, on Flickr Shutterchance_UL-7764 by Simon, on Flickr Shutterchance_UL-7759 by Simon, on Flickr Shutterchance_UL-7755 by Simon, on Flickr Shutterchance_UL-7750 by Simon, on Flickr Shutterchance_UL-7748 by Simon, on Flickr Shutterchance_UL-7747 by Simon, on Flickr3 points
-
I am currently converting Hasagawa's 1/72 S-2F-1 Grumman Tracker in to the S-2G as flown by the Royal Australian Navy from 1967-1984. Australia also flew the S-2E variant. I have used the donor kit, Plane Bits conversion set, Hawkeye decals and the Eduard coloured photoetch to add more cockpit detail. 1st step was to re-scribe all the panel detail.....and there was lots. Next step was to add the resin detail...... The fuselage extension was one of the characteristics of the S-2G variant. Other work included hollowing out intakes and drilling appropriate openings. and of course adding the etched pieces..... It's slowly starting to take shape.3 points
-
This is my attempt at building this older kit 1997. Hope you like, as usual all comments and suggestions welcome.3 points
-
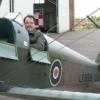
I've been working on this for the last few months – this dio is my first born, so be gentle. It's 1/48 and consists of: Airfix 'Battle of Britain, Ready for Battle' set (amazingly good value), Italeri Mk.I Hurricane, and an entirely scratch built dispatch/billet hut, including corrugated roof & contents. A few words on the build: Airfix – great, Italeri – awful, hut & contents – enjoyable. Rivet counters please note: It's just a bit of fun and not intended to be a totally accurate representation of an RAF base, so please take with a pinch of salt. Apologies if this should be in the dio section, but as it is 90% aircrafty, I thought I'd put it here. Thanks for taking the time to take a gander. The photo on the desk is of my mum during the war and the photo on the bed is of her when she was 19. The orange booklets are pilots notes. Gorby3 points
-
Are you sure? Check the stash3 points
-
And were off, no detail in the pit, not even dial decal as it was really translucent and the black paint wasn't fully dry so its just black now, might try printing a replacement off. Avoided the issue that killed the last by not fitting the wing halves together, which will go togethor after the intakes are cleaned up a bit to make the seem a bit less unsightly.3 points
-
Very little time for modelling or photography today. I got a bit done yesterday - mostly more of the main body - might manage to photgraph those bits tomorrow. Here's this morning's effort - two jerry-can holders:3 points
-
I think they've got the pressure in the mainwheel tyre all wrong.......... for that reason alone I won't be buying one..........3 points
-
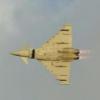
With the start of the GB approaching fast, it's time to show what's inside the box. Here we have four sprues in dark green plastic. and one in clear. Actually the dark green sprues could be said to be five, as the Exocet missile (that was only included in this box) has its own runners, attached to one of the common sprues. The plastic on the main parts is not bad, being quite hard (I prefer harder plastic to the soft style used for example by Airfix). Surface detail looks good at first sight, with engraved panel lines all over... at a closer look however the lines are not very consistent, getting deeper and shallower sometimes on the same panel line. Lines are also not all straight and some access panels are not perfectly oval or round as they should be. Not great, other older Esci kits were much better. The definition of the smaller parts is again not bad but not great either. Esci did better but I can live with what's in the box. Of course as we know some areas are not accurate, but I'll discuss these during the build. Speaking of inaccurate parts, let's however take a look at the clear bits: That windscreen.... the front of the windscreen is very, very wide ! This results in a much flatter looking profile compared to the real aircraft. Really this single part throws the whole look of the model off as it's very, very visible. For completeness only, here are the decals: What can I say.... Esci supplied some very interesting markings with this kit ! The so called "Tanker War" raged by Iraq against Iran as part of the conflict between the two countries was very recent history and the news of Iraqi aircrafts sinking ships using their Exocet armed Mirages were on every newspaper. The cover represented one such aircrafts... or did it ??? Iraq had ordered the Mirage F1-EQ5 and EQ6 with specific wiring for the Exocet, however these aircrafts used a very different scheme with dark grey on top and white on the undersurfaces (think FAA in the '60s). I've read that later other aircrafts were wired for the Exocet but I'm not sure if the Esci cover was really accurate. In any case, Exocet or not an Iraqi aircraft was very interesting and the box offered another exotic option in a Jordanian aircraft. Completing the sheet were decals for an SAAF aircraft, interesting of course but had already been covered by Airfix so less unusual. The problem is that the decals were not great ! For a starter the Iraqi markings were inaccurate, and this regardless of the colour scheme suggested: The triangle in the Iraqi Air Force insignia is equilateral while Esci's decal show one side much shorter than the other two. The printing is also awful, on the Jordanian roundel it's possible to see through the red triangle where this meets the green centre. And the registration is not perfect. I will not comment on the SAAF markings but they don't look particularly good to me. Of course none of this is important to me as I should need none of these decals, the LF set supplies all markings and in case I need more stencils I should be able to get them elsewhere. I'd better be, as 99% of Esci decals of that vintage are likely to shatter as soon as they touch water. I never had such problem in the days, but these decals didn't stand the test of time well. Guess how I know....3 points
-
Almost done here.3 points
-
Nah Martian, I've always been an equal opportunity encourager A little mayhem lets the world know you are back in town Which town however I might just keep to myself at times3 points
-
I'm fairly certain that the BL755 was only for use by RAFG Bucc squadrons - the assumption behind that planning notion being that UK-based units would've been busy enough if the balloon had gone up without having to worry about a sport of tank-bashing over the Central Front. I have seen (open source) a reference to a maximum load of eight weapons - four in the bay and one per wing pylon. Edit (before pressing post, so perhaps not an edit...) - Knew I'd seen one somewhere. Obviously not one with which anyone would've done any aviating, but even so: https://plus.google.com/photos/101072341150285679861/album/5985037427509489505/59992041585654673303 points
-
Hello all. I did not manage to get much done today to Escapade. What I did complete was quite fiddly: They consisted of five etch parts each! I cut out all five parts and trimmed the fret tabs, then folded the pedestal (two folds), held that in the self locking tweezers, then fitted the shield and ammo drums (two pieces) to the front with Glue'N'Glaze, then the barrels (one piece) to that again with GNG but then ran some thin CA along both sides, then fitted the base plate with GNG. All parts fitted except the barrels were placed using a damp end of a cocktail stick, barrels were held gingerly in a pair of tweezers. They have now been painted, once again being held by self locking tweezers. Or I could have used these: I have test fitted the etch versions into the midship gun platform, and they fit. Hopefully more tomorrow! Thanks for looking, Ray3 points
-
Hi all here is the progress so far.3 points
-
Day off today so got some more done - completed a lot of the hull Peter3 points
-
Today I've applied the oil paints. This is how it looks before I start work on it: First swipe with cotton sticks ... ... second ... ... and the final.3 points


.thumb.jpg.1bfd8b8f095b8a4ccfc9ffc0cbecf59c.jpg)


.thumb.jpg.cfc129272ffec824439b15e6013d5952.jpg)


.thumb.jpg.ba34a9f6ddce411193946dbdcc7b5fe8.jpg)


This leaderboard is set to London/GMT+01:00