
Leaderboard


Popular Content
Showing content with the highest reputation on 22/05/17 in all areas
-
Well I have now finished my first Wingnut Wings Sopwith Camel (bar a few teeny tiny touch-ups and so I have taken a few photos to show what even a cack-handed modeller like myself can make out of this superb kit. The kit went together faultlessly and any errors, or deficiencies are entirely my own But hey who cares, it is meant to be fun and I found this one a whole heap of fun and the finished model looks just grand to me. Wee tip for anyone building this kit, be careful once you have the ailerons and control horns in place. I put pressure on an aileron and managed to detach it and snap the accompanying control horn meaning fun and games with superglue and a file to try and get it looking anywhere near it's original self prior to the Beardie bear getting my grubby paws on it. Anyway I hope you all enjoy and it inspires you to get into the wonderful world of World War One aircraft and WIngnuts39 points
-
Hi folk's,another Hobbyboss easy kit this time the La-7,it's the mount of Ivan kozhedub triple hero of the Soviet Union.Built as part of a three easy kit build ongoing in the from Russia with love GB.19 points
-
Hiya Folks, I`ve fancied doing a 22 Sqn RAAF A-20G Havoc for a while to go with my Boston Mk.III and a post by Syd here on BM a week or so ago prompted me to do something about it! By combining the Revell Boston Mk.V/ A-20J kit (Special Hobby parts) with the late gun nose left over from a Revell P-70 kit (again Special Hobby parts) I came up with an A-20G and with decals from the spares box (roundels/fin flashes), Xtradecal (white codes) and Ventura (Grey serials). Here is my WIP with photos of the real thing; And here is the model; Yes it did end up being a tailsitter,......I didn`t think that the undercarriage was strong enough to handle the weight required. As usual it was brush painted,....using a mixture of Humbrol enamel (155- Olive Drab) and Polly Scale acrylic (US Neutral Grey) (US Dark Green,...representing the Mid Green `blotches') and Humbrol enamel black, yellow, silver etc. Thanks again to Syd for his help with info for this model, Cheers Tony PS- I`ve only just managed to post this,.... here is the A-20G with an earlier aircraft from 22 Sqn, in this case replicated by the 1/72nd High Planes Boston III.17 points
-
A brief history of the aircraft: On August 29, 1961, the DTIA ordered the design and development of two Mirage III V vertical take-off prototypes to be produced conjointly by Dassault Aviation and Sud-Aviation. The Mirage III V, a Mach 2 aircraft heavier than the Balzac, prefigured the operational version. It had eight Rolls-Royce RB 162-1 lift jets and a Snecma TF 106 with afterburner, the French version of the Pratt&Whitney JTF 10 turbofan. Mirage III V 01, equipped with a TF 104 b turbofan (63.7 kN of thrust with reheat) made its first stationary flight at Melun-Villaroche on February 12, 1965, piloted by René Bigand. A new version of the engine, the TF 106 A3, was mounted in December 19685, for the 15th sortie. The authorities realized that the chosen configuration was more complex and cumbersome than they had expected. At the end of 1965, the Air Force general staff drew up operational requirements for a Mirage III V called 1970 as they foresaw the need by 1970 for a nuclear vehicle to replace the tactical air units’ F 100s and Mirage III Es in cas of a hostile first strike. The aircraft’s first transition from stationary to horizontal flight was made by Jean-Marie Saget on March 24, 1966. Disappointingly, the lateral behavior of the aircraft during the transition phase proved more problematic than on the Balzac. On March 28, 1966, for technical and financial reasons, the Defense Ministry halted the production program, though allowing tests to continue. In June of 1966 NATO in turn abandoned its vertical take-off supersonic aircraft program. Mirage III V 02 fitted with a Snecma TF 306 turbofan made its first flight on June 22, 1966 piloted by Jean-Marie Saget. It was equipped with new air intakes over the lift jets. During its 11th sortie on September 12 it reached Mach 2.03 in level flight. It is the only VTOL aircraft in the world to have broken Mach 2. But on November 28, 1966, at Istres, it was accidentally destroyed during crabbing flight tests, and the program was definitely abandoned. WIP Link: This is the 1/72 Modelsvit Mirage IIIV-01. This is the first time that I have attempted a short run kit and experienced the challenges that this brings. It has been the hardest, most complex and difficult kit that I have ever done. The fact that it was a commission build is the only reason that it was even started let alone finished...!! Every part of the build was a challenge with barely any parts fitting properly - I sometime thought whether it would of been easier to whittle the aircraft out out of a solid block of plastic!! Anyway, it's all done and dusted now and will be heading off to its owner this week. The model has been airbrushed using Vallejo paints, aluminium for the fuselage, various shades of grey for the rest. The decals were superb and went down a treat. No weathering as such was applied as this is a test airframe. All sealed in with Alclad Gloss. I want to dedicate this to my best mate who passed away in March, he too was a keen model maker and aviation enthusiast. He was looking forward to seeing this build completed but I wasn't able to finish it in time. Cheers guys, Phil Thanks for looking, Phil16 points
-
rhank you folks it was like Christmas this morning when I peeled all the tape off... ..apart from the wingtips, the skinning is complete... ..however, the reason it is kept in tape and will be wrapped again can can be clearly seen when it is sat on my tiny and very messy workbench... dinks are bound to happen.. so an important step is pretty much complete, and next on the block is the canopy - I have some great drawings in the Montforton book but the thing I need to know is if the XVI canopy in there is the same as a Mk XIV - can anyone tell me?14 points
-
Dear fellow Britmodellers, there's been a couple of Eduard 1/72 Lavochkins around here, recently. May I add another one to the growing collection? This is "White 23" from 2nd Sqn, 2nd GIAP, “Mongolsky Arat”, operating in spring 1945. The model was built from the 'Profi Pack' which includes paint masks and photo etch details. I replaced the pitot tube with a piece of wire. The spinner of Eduard's kit is slightly mis-shaped, resembling a "kremlin tower"; this was substituted with a resin item from Hungarian manufacturer SBS Models. Painted with acrylics from the Mr.Hobby range. Photographs by Wolfgang Rabel of IGM Cars & Bikes. Thanks for your interest!13 points
-
I'm bored of ejection seats and I don't doubt you are too.....but before I could move on there was still the belts to do - which meant getting to grips again with the (to me) dreaded PE. It would have been easier to use lead foil but I had a couple of the Eduard painted PE sets for there Finnish Hawk Mk51 - and there's just no way that painted foil could match the detail. So... The first two are finished and the second two aren't far behind. In the following photo's the one on the left is the front seat and the one on the right the rear seat with the solo flight apron fitted. The hardest thing was fitting the shoulder straps - which are invariably seen hanging from the head box on parked Hawks. I nearly gave upon at one point - but a bike ride followed by a glass of wine revived morale enough to persevere The straps on the solo flight apron are lead foil - with a couple of spare PE buckles. So these two can go somewhere safe now. I wasn't looking forward to doing the seats - glad it's nearly behind me now12 points
-
For the build look over here:11 points
-
Latest off the bench is the Airfix Club Spitfire. Straight out of the box, but did add the black stripe under the length of the fuselage. Hope you like. Please feel free to comment etc. Thanks for looking Dick11 points
-
This is Bandai's latest addition to their ever growing Star Wars range, and probably their best one yet. They've done an incredible job both with the moulding, and with the engineering, meaning the kit has some stunning detail, and will slot together perfectly. The only thing they need to do is make it BIGGER. The original studio models famously featured a raft of parts from various classic Tamiya, Revell and Airfix kits, and Bandai have faithfully reproduced all of these, the most obvious one being the German Sd.Kfz 222 Armoured Car that sits on the back of the AT-AT's hull. For this build I've gone with a non-movie dark colour scheme, which was based on some profile artwork I produced for the project. You could see it as a special forces version, or anything at all really. I'm leaving it open to interpretation. The full build is here The original artwork that was used for inspiration And the build itself And some scale comparisons, first with the proverbial paint pot With Bandai's 1/144 Y-Wing... (at this point @Gekko_1 will be thinking up plans for a AT-TC (All Terrain - TIE Carrier)) And, obviously, with a Nigel top hat Thanks for looking Andy10 points
-
After discussion about the potentiality of 3D printing for those stripdowns in my Fokker Dr.I stripdown thread (and Grzegorz showed a 3D Fokker Eindecker) this is a good point to show my Fokker E.III stripdown in 1/72. It was mainly out of the box, but I replaced the bars with a brass profile and scratched a gear with help of brass rods. The painting was done with Gunze, Alclads and oils. The best on this model are the white bands to suppress vibrations, made with a third of dental floss (after trying a lot of different materials). At that point the rigging (also inside the wings!) was already done so it was more tricky. The Fokker was done two years ago, but I still really like that little Eindecker! Have fun, Frank Note the additional green suppression struts between the spars The view from below: It is damn small too!10 points
-
Hi, everyone! I present you my next model - French heavy fighter prototype of WWII. It's full resin kit with vacuumformed canopy.10 points
-
Thanks Johnny! To be honest, the butterfly valve is something I got from a few other Macchi's builds I saw on Internet; I thought it would add a nice realistic touch Grazie Matteo! WE update, everybody! Actually, not much time for modelling, as on Saturday I had to take care of my yard, and yesterday it was a day like this: with BBQ for lunch (WARNING: explicit food pic to follow) and later in the afternoon, my middle daughter Confirmation, dinner out with family etc So in the remaining time, I worked on the C202 main wheel bay. A dry fit of the kit parts shows an already quite busy appearance: It also showed that fitting the wheel leg actuator arms later in the build is going to give me a few headaches, and I'm strongly considering putting them in at this stage. The downside is that they are very fragile, and I'm very likely to break them while handling the model for painting. Very undecided here Anyway: since I wanted to replace the piping showed here with some actual tubes, I thought I'd batter scratch build this part rather than modifying it. This kit part isn't supposed to represent a firewall, which was simply not there on the C202 and C205. It should be the back of the DB601 engine, the big pipe being the supercharger intake duct. So i used some Tamiya tape to make a template of it: and the idea is to fit this piece of copper pipe in the scratch built part Template roughly cut and taped to a 0.5 thickness styrene sheet some refining needed then I marked the holes and slots and after drilling/carving them out, I test fitted it added the supercharger intake duct (it's only dry fit, at the mo) Next: replacing this triangular bit with something more like the real deal out comes the Dremel chopping bit and here is the replacement, made from 0.5 styrene sheet The plumbing inside the main wheel bay is like this: Quite intricate, ain't it? So I started with the main piping: 1mm welding wire with a very thin copper wire wrapped around and held in place with CA ( @PlaStix trick ) receiving hole drilled into the back part of the wheel well, now I need to cut it to size, bend it and dry fit in position. Repeat for all the piping ... AAaargh! That's it for the day, comments welcome Ciao10 points
-
Hi mates! Allready finished Flying Flapjack (KH 1/48) WIP link - Edited July 09 - all picture links changed from photobucket to onedrive9 points
-
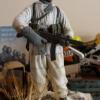
1/72 scale diorama (made in 2008) with Roden armoured car, a Revell panzer IV turret and Preiser figures. Everything else is scratbuilt, including the ruined house (made with plaster and a home-made mold).8 points
-
I've had this kit, Tamiya, for years and haven't built any armour for almost as long so thought I would have a crack after seeing the Panther build by PlaStix. Tracks are the individual kit ones and are a weak point. I just need to do the crew now that came with the kit. Kit: Tamiya 1/35 Tiger I E Late w/commander and crew. AM: Aber zimmerit in PE, metal barrel/brake, some of an Eduard detail set. Paints: Vallejo Model Air and Tamiya.8 points
-
Cheers for that Crisp, it's good to see that if necessary even I could train up for that part of the complex deck handling duty Out at club this arvo, took the Midget for its monthly happy run, half way round Brum on the Motorway network... Nice Came back this evening and after dinner climbed the stairs to the modelling mecca As I sat down the sky began rumbling "S'funny" I thinks, "the sun has only just gone down across a cloud free sky, why's it gone thundersome?" Then I looked out of the window to espy this pottering noisily in a weird quiet rumbling... Familiar thinks ,I thank god there is not a war on, we saw these when they were repatriating to Birmingham Selly Oak Hospiddle No the camera isnt instantly ready, I had to pick it out of its case and run through to the front to catch this on its way into BHX Nice also Anyway, club meeting I expected to meet Tomo so I took the Wasp with me, glued down to the deck but not tied yet For the craik I decided en route to bung it as is on the competition table, warts and all It came first with lots of congratulations, I was a bit pleased at that Not even tied down on deck, even However when I got started tonight I did this on the port side as Plan A Thin strip cut to length and handling buckles added No ratchet handles yet and no tied together excess either I did manage to get the 'pin out' flag fitted (but not lettered... Yet) to the tail fold ratchet On the starboard side I'm trying a slightly different tack Two piece straps joined at the ratchet and with the excess nylon tape tied over the strap to keep it from lashing about in the breeze I have trimmed back a bit from this now but I am considering taking this tack with all for straps and nop decision time with strap four Cut and tie like the other one on this side or fake it the way I am considering doing with the first set Waddayasay? Still working side screens and wipers, be about it then I HOPE!8 points
-
I have finally finished. This kit gave a few problems being fit issues on nearly everything but I have really enjoyed doing it as it gave me a chance to try a few new things. I am really pleased with the result and after reading references on the Pucara I can see why people loved it. Anyway here are the photo's and I am sorry there are a few. Before I forget thanks to everyone for their advice and support through the build which can be found at http://www.britmodeller.com/forums/index.php?/topic/235018470-172-airfix-pucara/7 points
-
Hi all. The old Tamiya updated with some goodies, not bad for a 35 years old kit!7 points
-
Hello, on Friday I finished the latest project, which started beginning of this year. And after the great feedback for my D.H.2 Stripdown I like to show the latest here too. This Pup was created from a very old Eduard short run kit, a 80PS Le Rhone form Small Stuff replaced the kit engine, real wood was used again for struts, air screw, gear, top of fuselage. The seat belts are the new steel from Eduard too and the decals come from Pheon. Painting was done with colors from Alclad, Gunze and Oils. The etch parts of the kits were fantastic, but the Vickers was added from "Parts". A lof of brass was added for the terminals of the "RAF-Wires" and other details. Have fun - I hope you will like it too, Frank Looks really like a Pup. Please note the open coolings of the Vickers: Please note the open tail with a wooden skid with scratched metal parts: I like the engine: And finally the view from below: In the open cooling vent the cylinders are visible: The end.6 points
-
I built this a couple of years ago, number three in my list of Cromwells and Centaurs. It's basically the Tamiya Centaur kit with a few modifications, most notable being the substitution of Tamiya Cromwell wheels for the Centaur perforated tyres. I rebuilt a lot of the rear of the tank. The rear of the air box had a first aid box moulded onto it, but I was fairly sure that this tanks didn't have one. I could have just cut it off and filled the resulting hole, but I like to do things the hard way. So I made a new rear for the air box from thick card and detailed it with bolt heads from Calibre 35. I also replaced the rear track guards with ones from Aber. Many Cromwells had parts if not all of the sand shields ripped away, so I replicated this using the kit parts but thinned down by scraping with a blade. I used the Normandy Cowl from the kit, but replaced the sides with ones made from thin card. The lids on the stowage bins were replaced with ones made from thin pewter sheet. Stowage was a combination of Accurate Armour and Black Dog and the etched brass was curtesy of Aber. The base colour was sprayed on using Tamiya paints for the SCC15 and the disruptive cammo pattern was brush painted on with Vallejo acrylics. The tank that I was depicting belonged to the Czech Independent Armoured Brigade and this unit spent most of it's time after D Day keeping the German garrison in Ostend penned in, and the 95mm howitzers of the Mk.Vl's were used to shell the port. The decals I used were the rub down variety from SKP. The 95mm shell boxes came from Accurate Armour and the empty cardboard shell tubes I made from plastic tube. The figures are Miniart with Hornet heads. The base was built up using balsa wood onto a photo frame from Wilkinsons. Thanks for looking. John.6 points
-
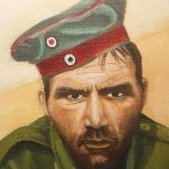
The background to this a/c is well known to all BoB nuts and anyone unfamiliar with the detail can view the actual a/c partially renovated at the IWM Duxford. My own fascination stems from seeing the Flying Review article from the 1960s when I was in my first unspectacular modelling phase, made more potent since I moved in 2000 into a house in East Dean that's arguably the closest to the actual site which Horst Perez chose to force-land his damaged a/c on the evening of 30/9/40. Some years back, I made what I thought was quite a representative 1:24 scale model of this a/c based on the camo scheme used on the Duxford a/c. I'll do a separate post on that one, but I've since found additional contemporary pics of the a/c and, rightly or wrongly, decided that I prefer to believe that the Duxford scheme may be mistaken, despite well respected opinion to the contrary. The evidence outside the contemporary b&w pics suggests I'm wrong, but I nevertheless present the following series of pics of W Nr 1190, White 4 from the 4th Staffel JG 26. I prefer most of m y BoB models that represent a/c that have been in the field for some time to look a bit used and abused, particularly the Jagdwaffe ones which were rarely housed under cover, mostly being located in the open or in rudimentary pens. Despite it being the subject of some paint adjustment in August 1940, "White 4" was doubtless heavily used as the BoB continued through Aug & Sept 1940. So, apologies to those that finish their models factory fresh. This model has been finished in Tamiya acrylics with uppersurfaces in what I concocted to show a faded variety of RLM 70/02 over Tamiya AS-5, which I feel is a credible faded RLM 65. The 4th Staffel tiger head emblem is my interpretation of the b&w contemporary pics, transferred to inkjet white transfer paper after reducing to what looks like the right size, with Abschuss and W Nr markings treated similarly. The yellow fuel triangle is also my interpretation. Evidence from the actual machine suggests the mark within the yellow triangle was "100" in line with the engine requirements, but on Luftwaffe a/c the marking would normally show "C3". B&w contemporary pics of the a/c on display in N America suggest that the triangle showed "C3" rather than "100" which may have been present due to earlier renovation attempts. I suspect my fascination with this particular casualty of the BoB will inevitably force me to re-think the whole thing and have another go at sometime agw, but the sun's shining and the green bits in the garden are getting restive!6 points
-
Hello, since I have finished the only 1/48 Stripdown from Eduard and shown it here already with a fantastic feedback, I like to show my first built Stripdown model too. This one is the Fokker Dr.I in 1/72 from the new re-edition kit which also includes some resin parts. The PE is soldered and the model was painted with Gunze, Alclad and oils. This is a really fantastic kit, but the result is a damn small plane! This plane is built out of the box, at that time the engines from Small Stuff were not yet available and a wooden propeller as now on my 1/48 kits is a bit hard to be done in 1/72. The complete Eduard Stripdown series is in my stash, but I have not yet built all of them. Have fun with the pictures (the macro is merciless) and I hope you will like that model too! Frank That is a real 1 Euro Cent! And finally the view from below: As detail picture I like to show a soldered aileron:6 points
-
Forgot the guns6 points
-
Hi Greg The resin is some of the best iv used ,hardly any clean up needed , no air bubbles and super fit .As for the markings im thinking of useing masks and maybe hand painting the unit shields. I havenot decided yet which aircraft to do ,so will watch film again this week to help in final decision . Yes the nose looks sweet . here it is ccompaired to a revell G6 with Alleycat improvement set Thanks BerndM a much rasier build than the Revell kit .Probably the best thing about the revell is the price, I have been cracking on with the build and should have posted some pics sooner during assembly but i got on a roll . Wings and tail are on and iv done severall tweeks to bring it towards Bof B spec 1) tail struts made from plastic card and super glue . 2) wing tips cliped 3)Engine cowl guns made from plastic sprue and brass tube The resin section beneth the cockpit is a little short so i attached a plastic card tab to rear and filled with some evergreen strip Have used my fav mix of superglue and talk from a puncture repaie kit . So this is where im at now Next thing to do is a cleanup and a coat of primer .6 points
-
The second one of the two finished models this year beside my Sopwith Pup is also a 1/48 kit Dual-Profipack of Eduard: Pfalz D.IIIa For me it was a "speed build" in exactly one month (I cannot understand, that someone is able build a Weekend Edition on a weekend). As usual I added details made from brass, Gaspatch turnbuckles for the rigging, HGW/Eduard fabric seatbelts and a wooden air screw. I added another PE set of Eduard and used the LMG 08/15 of Master. The painting was done with Gunze and Alclad, the wings are done in semi matt alu, and oils. The marking is a bit speculative, but damn cool! The Cartograf-decals are provided with the kit. Have fun with the pictures! Frank5 points
-
First model with interior. Lots of work, and mods inside as interior isn't the Grant one, just Lee. I fitted the metal barrels and Bronco tracks.5 points
-
I don't have much to show yet, but just wanted to stake a claim in the GB. This far, I have painted all of the RLM 2 parts and began gluing a few together. Here are the engine mounts/gun deck, and the fuselage chin panel with air cooler. Tamiya rlm gray with a light wash so far. Weathering still to come.5 points
-
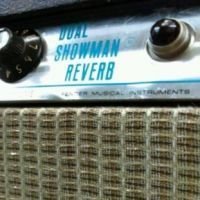
Hi Folks. Here is my interpretation of a 1/72 TF-86 Sabre Trainer, build here: http://www.britmodeller.com/forums/index.php?/topic/235003834-172-tf-86f-sabre-trainer/ This build consisted of the Falcon Vacuform Conversion that uses the Heller Sabre as the donor but I also used the Hobbycraft kit for mainly the wings which had to be converted back. Painted using Humbrol Metalcote. Kit decals were used but serials had to be DIY as none exist in this scale. Came out better than I thought after a few setbacks and their is always room for improvement. Hope you like. Stuart5 points
-
Other struts fitted: Untitled by Ced Bufton, on Flickr I'm not sure how you're supposed to make sure that everything's in line when it's all so wobbly... I guess that's what the rigging's for.5 points
-
Well, I got some shed time this weekend, The Breech of the 120mm got a shot of primer after I`d fabricated the final pieces of the Co-Ax feed tray. On the whole, considering the only "off the shelf" parts are some meng nuts and bolts and the .30 cal from the FCT I think this sub assembly has turned out ok! I restarted work on the FCT, I have tightened the "cone" shape slightly, and fitted the firing handle for the Commanders .30 cal, I have used the one that came with the kit as the Co-Ax, however I have another superior example to use on the roof! Firing handle on the left! And a quick "taster of the FCT in situ! Now that the FCT is the desired shape I started remaking the turntable base, this should be a conical shape as well, so I cut some thin plasticard and secured it in place with a rubber band, then went to work with some extra thin around the opposite end to the join! When this has gone off I can trim the cone to the base, tidy up the join at the back, complete the seam 100% of the way round and then carefully trim it to the correct height with a scribing tool! Here is the cone trimmed before it is finished off on the sanding flat With the scribing blade fixed at 6mm all I have to do is rotate the FCT until the excess material is cut away, "Simples" as the eponymous talking CGI meerkat might say! the Turret Turntable Driving Bracket is complete, just filler to sand off, the hinge at the top works as you can see from the Fots, I decided to do it this way because I am still not 100% sure of the final angle of the bracket to the turntable or the attachment point angle on the turret ring. And here is a quick shot of the intended target! The 3 O`Clock point on the turntable. The Turntable is quite small in relation to the turret ring, however there is also a lot of kit to fit in here, there are ready rounds all the way around the sides and engine bulkhead end, front right is the battery box, front centre is a locker, the air cleaners go in the rear corners left and right on the engine bulkhead, on the turntable are the beginnings of the bottom end of the Mollins gear, this is where the spent case should be deflected to prior to its cigarette vending machine derived extraction journey outside! On the turntable forward of the Mollins gear there is more of the recuperation system, plus ready rounds and cases! Beats me where the crew were supposed to fit in! Plodding on with the drivers compartment, here is where the height adjustment ratchet quadrants will go! this is the second spare, the carpet monster has munched the others! Air cleaner bodies are coming on nicely! And finally for today, I had to disassemble the top end to the Mollins gear! It`s original angle was too shallow, but in my defence I had not intended to build beyond this point, once I built the turret turntable it became clear that the angle would need to be steepened to reach the centre of the rear of the turret turntable. I have also plated over the interior for the case ejection hatch, this is so that the top end of the mollins gear has a firm attachment point. So there we have it, a fruitful weekends work! Ta for lookin` no "G" Granto5 points
-
Afternoon gents. As I sit here a few hours before I head off to see the MIGHTY Iron Maiden beer in hand I'm contemplating nearing the end of this my first Acadamy build and my most third party stuff build evah. i really thought I'd get it today but due to a few slight hiccups I think it's one maybe two posts away from completion. Let's begin with this mornings secret lemonade drinker mission. first off the tyre treads looked so ace I thought I'd pick rack one out with German grey. took a while. nice initial base though. Then the canopies got unmasked. Spot the error? As I had spotted it before glossing thanks to @Vadim's pics I didn't gloss that hump bit. A few swipes with Mr Collour thinners and. Blammo! There is the side panel to. The nose got a pre shade and a blast of red. and done. The tyres got a pigment pass. then toned down and assembled. the anti glare panels got Matt coated. All the bits got painted. Even the prop tips. Now this is where all my builds seem to falter. I dread removing the canopy masking due to unknown CrAzY and this build is no exception. Taking off the tape the inside had some blotchiness so I cotton budded it. Big mistake, I pinged off the target sight, lost the glass part and also pinged off the steering wheel. but to be fair she looked pretty good on it. I managed to make a new glass sight and glue all the bits back on again. So no worries. Phew!. fitting the wheels bought up the (oh hell the peg doesn't fit the hole) problem. So 20 mins later and lots of very careful scraping the wheels are on. we are here and here she stays for another night. thank you all for following my little build. I'm off on my holibobs the week after next so this will be my last until I come back. I'll contemplate my build while away although I have an idea. take care Y'all and happy Modelling. Eddie says hi. up the irons etc. Johnny.5 points
-
.....decals are on.....washing done......matt clear done.....now the wethering.....5 points
-
Little update before the weekend. More work on the C202 wings; a bit of primer showed that the spent shell cases ejection apertures needed more attention: More CA applied, than again sanding and polishing. Here they are, together with the wing top parts I did cut away the wing guns and sanded flat; all the hatches had been filled in with PPP, using a spatula; after a few minutes, I removed the excess with a moist microfiber towel, and used a nail polishing stick to refine them. Little enhancement in the wheel bay area: the two triangular plates were drilled out according to ref pics: Tail wheel front fairing: I ended up using Tamiya Tape for curves to complete it, cutting a thin strip and running it around the fairing. I think I'll mark the riveting once the primer is on. I decided to leave the back fairing as it is, as I have no conclusive pictures showing any sort of lips. Still thinking what to do with the plumbing/cabling in the main wheel well, although @Giorgio N instilled this crazy idea in me of a fake engine back part .... Anyway, while thinking of that, I worked on the supercharger intake, which in this early production type had no sand filter; so I glued the two kit parts with Tamiya Green Cap which left some work to do on the join. I drilled a hole inside the intake, to give some depth Then with the following tools and material (plastic strip from yogurt cup ) I did cut out a small disc, to represent the intake shutter which will be positioned this way After some sanding and polishing of the front part of the intake, I glued it in position with Tamiya Green Cap Left there to set overnight. That's all for the day; any comments welcome. Happy WE everybody! Ciao5 points
-
John R recently asked about details of the XP-86 so I thought I would post what I have. It's a convoluted story and it may take some time, but to cover the XP-86 I need to start with the closely-related FJ-1 Fury. Yes, the FJ-1 was a tubby, straight-winged object, but for a while so was the first version of the Sabre. Though a bit messy, this drawing is the earliest one I've found for the XFJ-1 prototype Fury (North American Aviation (NAA) Model NA-134). It's a 13 October 1944 NAA drawing for a proposed "JP Shipboard Fighter" (JP being "jet powered"). I've highlighted a few key items and appended a few dimensions on this version. Notable are two items which did not make it on to the FJ-1 Fury: the wing-mounted dive brakes (also planned for the XP-86); and the folding wings (line/dotted line shows angled wing fold top/bottom joint). Frontal view shows that a ventral tank was planned (again, not taken up in production). Also note that there is no dihedral on the tailplanes: Side view from same drawing set of October 1944: Assigned the NAA Model number NA-134, this NAA artist's impression dates from 4 October 1944 and reflects the drawings above. I won't go into the FJ-1 in any detail, but for comparison the following 3-view shows that the production FJ-1 Fury was generally smaller than the initial October 1944 proposal: So to start with the XP-86. In 1944 the USAAF had issued a design request for a medium-range day fighter, and NAA submitted a version of its NA-134 (FJ-1) on 22 November 1944, and this design was given the NAA model number NA-140. The NA-140 was very similar to the NA-134, but this early model shows that already the NA-140 had gained a 'lip' to its engine intake and retained the less tubby lines of the "Shipboard Fighter" drawings. NA-140 would be designated XP-86 by the USAAF. But towards the end of WW2, swept-wing data started coming in from NACA and also from captured German files, which led NAA to look at a redesign of the NA-140 with swept wings. Different aspect ratios ("AR" on the wind tunnel model drawing below) were looked at for the mainplanes. This one is from 23 April 1946, when a straight fin and tailplane was still part of the design: And finally, by 15 October 1946 a fairly definitive version had been arrived at: More in the next instalment: maybe some good ideas for "what ifs" here?4 points
-
Dear fellow Britmodellers, here's my 1/72 Airfix Mustang P-51D (Kit #A01004A) built straight from the box. Decals represent the mount of Lt. Eugene W. James, 352nd FG, 328th FS, Bodney/Norfolk, England 1944. Painted with acrylics from Gunze/Mr.Hobby and Alclad II. This kit is cheap, easy to build and has very good surface detail. The plastic used by Airfix is quite soft, which resulted in some broken or bent parts. I broke the control column and the blade antenna when trying to remove it from the sprues. (I scratch-built a new control stick and replaced the kit's antenna with a photoetch item.) One of the undercarriage legs was badly bent. Due to the softness of the plastic, the model is in a "wobbly" state, when you touch it, it rocks from side to side! This is the only weak point of the whole model kit. If I build another one, I will invest in a metal undercarriage from Scale Aircraft Conversions. Ok, here's the pictures ... as usual, taken by Mr. Wolfgang Rabel of IGM Cars & Bikes. Best wishes from Vienna! Thanks for your interest! Roman4 points
-
Hi guys, well this has been an interesting project. It wasn't an easy build being vinyl, it had its challenges. It would have been much quicker and easier to have built the 1/32 Pegasus kit, but I felt the model looked a bit small and although the Horizon Hunter Killer is technically a different scale to the Pegasus Endoskeletons kit, I think they look good together. I'll look forward to any comments or criticism of this build.4 points
-
My first build after long hiatus (explained more in my Heller 109K thread) the Hawker Hunter MkI. Completed this a couple months ago, just getting around to posting it. Actually used the Eastern Star reissue, but it's the original 1959 Frog tool. Built box stock with the exception of blanking off the intakes and I decided to give scribing recessed panel lines a go. Painted with Tamiya acrylics. Oh...I also used a piece of the sprue to carve the little bullet fairing at the back of the horizontal stabs. Yes...that's a pilot's head molded into the solidly blanked off cockpit...and the wheel well outlines are simply scribed into the bottom...it was 1959, after all. Still, builds a nice looking model of a beautiful jet IMHO.4 points
-
What an excellent kit and photo set. Loved this build and I can see why Tamiya are still selling this kit. One of the best £10 I have spent. The full build is available at http://www.britmodeller.com/forums/index.php?/topic/235018264-135-tamiya-panzer-kampfwagen-ii-ausf-fg/&page=1 Anyway here are the finished photo's.4 points
-
One of my firsts models. Added metal barrels and Bronco tracks.4 points
-
After it looks like, that not only one person here like my style of modeling I like to show a Fokker E.V, which I finished a year ago. Again in 1/48, again a great kit of Eduard, enhanced by my usual wooden air screw, Oberursel rotary engine mad by Small Stuff, LMG 08/15 from Master, HGW fabric seatbelts and some Gaspatch turnbuckles. The painting was done with Gunze and Alclad and oils, especially the wing. Happy modelling! Frank The darkest wood is Black Cherry: And finally a size comparison against an 1 Euro Cent coin:4 points
-
I have painted the model and the markings: the latter were hand painted. To put on the roundels I scored the circles with a pair of dividers and then painted the red and blue circles allowing the paint to fill the grooves. The serial number on the nacelle was printed on my home computer. I have been drilling holes in the nacelle to take the various pipes and parts which are attached to it: this seems to have more holes than a Tilsiter cheese! The engine was fixed via a pin from the rear of the engine which was put into a hole in the horizontal bar which crosses the rear of the nacelle. Then the braces from the rear end of the drive shaft to the bottom rear of the nacelle could be fixed. The small exhaust pipes which lead from the ring on the rear into the rear of the nacelle were made from bent 30 thou card and inserted into some of the holes mentioned above. The radiators have been put into place and the pipes to and from the engine. The pipes were made from 20 thou rod and were fixed to the holes drilled in the fuselage and sides of the radiator blocks. The next stage will be to add the top wing. Thanks for looking. P4 points
-
Be gentle, first time I've ever posted a RFI and my first contribution that isn't an aircraft! But got to say, love this kit. Easy build, used Tamiya spray can too (I still consider myself a newbie at all this!) and aftermarket decals from SpotModel, which in my opinion are a complete game changer to the stock decals which miss the sponsors. Few pics to share... Thanks for looking4 points
-
De Havilland Mosquito FB Mk.VI 487 Squadron MM417 EG-T 1/48 Tamiya WIP4 points
-
Struts - ugh. Having realised that looking at them does no good I decided to try some things. Have I told you how much I like Berna clamps? Yes? Well I like them even more now that they appear to be exactly the right size to hold the wings apart: Untitled by Ced Bufton, on Flickr It's been sat like that for hours, but this morning I decided to bite the bullet and glue the central struts to the fuselage: Drying now while I build up my courage...4 points
-
Thanks gents - the camo scheme is going to be tricky and I don't think it likely that I will be able to effectively replicate it, but if you don't try... The other 'extras' I ordered arrived: a set of Aires seats and belts: ... and some Quickboost joysticks and gunsights: In addition to the exhaust pipes the Quickboost set shown earlier includes some small straight tubes - it took me a while to figure out what they are for, but I believe they are intended to replace four moulded 'bumps' on each side of the cowlings, further back from the exhausts. I'm not sure what they are in real life, but having looked at the kit parts I decided it would be less hassle to drill out the holes in the moulded kit parts than to drill out the whole moulded bump and replace it with the Quickboost part - these are the parts drilled out: I also made up the Aires seats, with the remarkably complicated harness - these could have turned out better but hopefully once painted up and installed inside the fuselage will be acceptable: Next I can start putting the interiors together... Cheers, Stew4 points
-
Latest progress pics.... As you can see i have assembled the main airframe, and have started to lay down some paint. I am as usual brush painting using Hannant's Xraclour Acrylics for the main colours and humbrol acrylics for the rest. The Hannant's stuff has a good glossy surface so this should help the transfers go down well. Next step is attaching the front and rear cockpit transparancies then its on with the Sand upper surfaces. So far so good. The front end has no engine block, i managed to align all the components without too much fuss. The exhausts will be added after the sand paint goes on as will the tropical filter. Thanks for looking, Greg4 points
-
Hello all, Yesterday, I went out to the central part of the Czech Republic to attend the biannual open day of Čáslav air base. The weather was slightly better than forecast, but still far less than optimal. I have to say this event has changed a lot since I first attended it in 2011. Year on year it gets bigger, but they need to work on the logistics to make the event fit the larger size of crowds. With a single runway and three or four aprons spread out along it with a fair distance between them, I'm not sure the base is making the best use of the available space. large chunks of the static display line were set up between the crowd and the dynamic show line. As such, it was quite difficult getting close to some parts of the static line for people standing there to watch the dynamic show. There were large empty areas of the aprons that would have been much better for placement of static displays and would not have obstructed views of the dynamic show. Transportation arrangements to and from the base to the Čáslav rail station also were not optimal for the increased volume of people this year's event saw. Hopefully these matters will be better dealt with at the next one. At that, here's a few of my more presentable shots on the day: This is an Aero L-159 ALCA in a special scheme reflecting a Spitfire. This event was the public premier of it: Another member of the Čáslav home team, the Gripen: A veteran of the Cold War and stalwart of the Czech air force, this is one of two Yak-40 aircraft still in Czech service. They will be replaced soon: A look down part of the static display line shows a bit of the international flavour of the event. Military Participants came from Belgium, France, Germany, Poland and Switzerland: Belgium brought both their F-16 solo and Agusta A-109 display to the show: The Patroille Suisse brought six jets, but opted for a four plane display. It was no less impressive with four: I'm putting this pair of civil machines into the mix not only to show the broader flavour of the show, but also out of respect for their pilots. While the forecast rain stayed away, the early part of the show had some strong winds and both these guys displayed in them: Thanks for looking. Any and all comments are welcome3 points
-
So moving on an update of the build. Central frame with leather chest pad for prone operator and the dive planes in foreground The completed two tone wooden paint job, which although supposed to be wood didnt quite sit right with me Finished central frame, looking like new Central frame fitted A little black wash added for a more used look A better looking finish a gentle black wash applied and wiped with kitchen roll, note dive planes fitted. Had to be careful as the wash and wipe did try to lift some of the paint job. Forward dive planes shown in place All the best Chris3 points
-
Thanks everyone, I spent yesterday tinkering with the weathering, mainly adding a bit more shading and highlighting, and a few streaks here and there, and I've decided to call it done. I could keep adding more but, given the small scale, I think it would start to look over-worked. I'd rather keep it more on the subtle side, although admittedly I may already have gone beyond that point The hull's had some more enamel work, and some of the raised details have been highlighted in acrylic. Most of the hatches have had some oil paint shading around them, to give them a little more definition. There's also some very subtle streaking, which was done with watercolour pencils The legs and feet have had some shading and dirt added, using a few oily/grimy colours After adding the main hull to the chassis and legs, the last things to attach were the two flak shields on either side of the 222 armoured car So that's it; build finished. It's gone together much faster than I'd initially thought it would, but the kit's deceptively simple, especially considering how much detail Bandai have packed into it. For my money (all 50 quid of it, courtesy of the post office and their fees) it's the best (Star Wars) kit Bandai have produced to date. I can't think of much they could have done to improve it, apart from make it bigger of course. Thanks to everyone for following along. I'll get the finished shots up in RFI shortly. Andy3 points


.thumb.jpg.cfc129272ffec824439b15e6013d5952.jpg)


This leaderboard is set to London/GMT+01:00