
Leaderboard


Popular Content
Showing content with the highest reputation on 22/02/17 in all areas
-
Funny thing about the Britannia, I always thought it was an ugly aircraft. I saw them twice in Australia, once as a teen a British Eagle example overflew us on the Geelong road as it was on short final at Avalon airport then many years later as an ATC at RAAF Pearce when a RAF example paid a visit.. Then I saw G-AOVF at Duxford and I thought it is not ugly, not pretty but "handsome" as one might describe a slightly imperfectly proportioned female face. Then I saw the RAF example at the RAF base whose name eludes me and I was hooked, I had to get me a model, in 1/72 a hard to find vacform is the only game in town. I still have to do the nav lights on this and blow me down if one of the HF aerials didnt pop out of the fuselage which needs to be repaired. It will not fit in my cabinet on its wheels I will have to make a stand for it and put it in a slightly banked position to make it fit. 1P4A0096 by wallycacsabre, on Flickr 1P4A0091 by wallycacsabre, on Flickr 1P4A0083 by wallycacsabre, on Flickr 1P4A0097 by wallycacsabre, on Flickr oh I have to do the prominent pitots as well !25 points
-
I've completed this Fw 190 in the summer of 2015. I had big expectations of the arrival of this new tool kit, reviews were very positive, sadly it did not proved to be an easy kit to build (for me). I had to work hard to make proper fit. The following main modifications were done, among many small ones: - thinned the very thick training edges of the wings - added the missing MG ammo racks in the wheel wells - replaced the guns and the pitot to metal tubes - shortened the undercarriage legs, added brake wires - replaced the wheels Please also not the antenna wires are missing, as I only realized the small bump from the canopy is missing after the removal of the mask and I didn't risked to ruin the almost finished model to try to glue on it. Thank you for watching.25 points
-
Hello Chaps, This is my second "Hairy Stick" adventure that I completed in November 2016- a very basic kit by Matchbox from 1976 that has been in my stash untouched for a very long time. I was really concerned about the decals being so old and the fact that they had "yellowed", whether they would work or not, but, if I let them sit in warm water for a few minutes, I was able to carefully peel them from the backing paper, they wouldn't slide, but beggars can't be choosers...I was just happy i got them to work! I'm not going to say anything about the kit itself, because it's no longer available and I'm just going to post my efforts with a very basic kit... If you'd like to see my YouTube build video for this model, here is the link to it: Thanks in advance for taking a gander and commenting, much appreciated! Happy modeling, Cheers, Martin19 points
-
It was one of those warm August afternoons some twenty years ago. I had just arrived from my local library with a bag full of “Aeroplane Monthly” magazines. I sat at the terrace with a cup of coffee and started to read. Soon I was flying high above the South China Sea with Flt Lt Edward C. Powles en-route to photograph Yulin harbor at Hainan Island. I hardly noticed the sudden afternoon rain shower; so fascinating was the story told by Flt Lt Powles. When Airfix released their 1/48 scale Spitfire PR.XIX it was clear that I will build PS852, Powles’ favourite Spitfire. After an extensive research and build here is how she turned out. I painted my model with Humbrol 230 and a finishing coat of Humbrol 135. Because I used a paint brush, several coats were required. PS852 was built at Southampton (Shacklady & Morgan) or at Eastleigh (Spitfiresite). It was a Type 390 with pressurized cockpit and RR Griffon 66 engine. Construction Number was (possibly) 6S.594676 (Spitfirsite). On 31st of October 1944 PS852 was taken in charge by PRU Benson. It was transferred to No. 541 Squadron on January 9th, 1945 and again to No. 542 Squadron on May 8th, 1945 (Shacklady & Morgan). After that the literature gives confusing data until 1950s. I couldn’t find any information when PS852 and its’ companion PS854 were transferred to the FEAF. Powles wrote that the two PR.XIXs were made available to him on December 31st, 1950 at RAF Seletar. That gives a hint that these two Spitfires were at MBFE’s (Maintenance Base Far East) custody. In the early 1950s No. 81 Squadron had five Spitfire PR.XIXs at RAF Seletar (PS836, PS852, PS854, PS888 and PS890). According to photographs on RAF Seletar website they were painted PRU Blue overall with D –type roundels in four positions. Orders to paint all PR aircraft with PRU Blue were given in AP 2656A Vol.1 Sect. 6 para. 51 (issued in October 1944). Photographs of PS852 and PS854 confirms this camouflage. PS852 in it's original paint photographed in early 1950s at RAF Kai Tak (Copyright J.E. Steele). A close up shows Flt Lt E.C. Powles sitting in the cockpit of a Spitfire PR.XIX (PS852 or PS854). Note the original wartime stenciling below the cockpit (Copyright E.C. Powles) I used stencils from Kitsworld's decal sheet. However they had to be modified heavily (some very, very careful cutting) because they were pretty inaccurate. For example take a look at the yellow "HOOD RELEASE" text. It should read "HOOD RELEASE ON TOP" but what can you do. Some extremely careful cutting was required when I corrected the oil capacity number to 9 and airspace to 3! I also added the "12 VOLTS" marking; PS852 and PS854 were the only Spitfires at RAF Kai Tak with 12 volts system. Those Mk. 24s of No. 80 Squadron had 24 volt systems. This is my wild guess as I haven't found photographic evidence to back this up. Note also the dark grey exhaust stains that gives a hint that this aircraft has been flown at low altitudes with rich mixture setting and high power. Properly leaned and with correct cruise power set these stains should be light grey or almost white. Here is a photo of PS854. It is possible that Flt Lt Powles himself is sitting in the cockpit (Copyright E.C. Powles). As Powles wrote: "When I was sitting in the cockpit of PR.XIX, with all my safety and survival equipment and with the seat in the lowest level, there was just half an inch between the top of my tropical cloth helmet and the canopy". Note also how weathered the aircraft seems to be. Jim Kiker (see Hyperscale website for Jim's article on PR.XIX build) was lucky to interview Flt Lt Powles who told him that when he asked these two Spitfires to be repainted, no paint was available. According to Powles the other Spitfire was then painted with a mix of Roundel Blue and Post Office Red. Soon after that PRU Blue was suddenly available at RAF Kai Tak! As the Officer Commanding 81 (PR) Squadron detachment Flt Lt Powles flew 107 photo reconnaissance missions out of RAF Kai Tak. In February 1951 he was asked to photograph an airfield in mainland China. The job was a low level oblique line overlap. Powles wrote: " I was reluctant to use one of our Spitfires as they were painted PR Blue." This tells to a modeller that in February 1951 both Spitfires were still PRU blue. A new order concerning aircraft camouflage -AMO A.217/51- came into force on April 19th, 1951. According to the document all PR aircraft were to be painted with PRU Blue and Medium Sea Grey. High gloss finish was required. Two different paint schemes were introduced. Powles photographed the Yulin harbor on May 22nd, 1951. He asked the ground crew to clean PS852 carefully. After a flight time of 3 hours 30 minutes Powles made a Dead Stick Landing back at RAF Kai Tak. Another Dead Stick Landing followed on August 27th, when Powles photographed Haikou harbor. By the end of January 1952 Powles had completed 63 photographic reconnaissance missions and 36 high altitude weather observation flights. On February 5th, 1952 Powles made his best known mission. He climbed to 51.500 ft with PS852 and was forced to made an emergency descent from that altitude. It took three minutes(!) to reach the altitude of 3000 ft! During the dive Powles was flying at M 0,96! PS852 was given a thorough check and was declared airworthy by the end of the month. Powles took this shot of PS854 flying at 1800 ft near Aberdeen fishing village in Hong Kong using the Spitfires oblique camera (the Fiducials are visible in the original print). The pilot of PS854 was Sgt Ken Walker. According to Flt Lt Powles: "...shortly after PS854 was repainted". Sgt Walker arrived RAF Kai Tak in September 1952. So PS854 was repainted in early autumn 1952. The question is: when was PS852 repainted? "Flight" magazine's photographer Norman Macmillan photographed PS852 and PS854 sometime between February 22nd and March 4th, 1953 at RAF Kai Tak. These pictures were published in "Flight" magazine in colour on May 29th, 1953. Another one showing just PS852 but taken at the same time: For comparison here is my PS890 of No. 81 Squadron in MSG/PRU Blue scheme. PS852 and PS854 had also fuselage sides and spinners painted with MSG. Powles confirmed to Jim Kiker that PS852 was painted with PRU Blue and MSG with red and white spinner when he flew his record breaking high altitude mission on February 5th, 1952. Two questions arise: 1. Was the spinner later again repainted with MSG? 2. Red and white spinner was the mark of HKAAF, why would No.81 Squadron had used it? On December 18th, 1952 AMO A.685/52 came into force. It stated that all PR aircraft must be painted with High Speed Silver overall. Flt Lt Powles' "Tour" in the Far East was complete a few days before Macmillan pictured the two camouflaged Spitfires at RAF Kai Tak. So Powles never flew a silver coloured PS852 or PS854. In the end the two Spitfires were painted with HSS with red/white spinners and transferred to Royal Hong Kong Auxiliary Air Force on March 23rd, 1954 (PS852) and on August 6th, 1954 (PS854). Here is PS852 in it's last paintwork: A detail shot showing the propeller: The most common Jablo propeller had it's blades made of compressed "Jablo Wood". These blades were marked with pink discs containing numeric information about the blades. Airfix gives yellow discs which were for the rare blades made out of birch(?) tree. Do not use those manufacturer's winged logos either as they were not used in the 1940s or 1950s. The blade leading edges were mostly reinforced with brass plates so do not use aluminium paint to mark wear unless you are certain about the propeller type used in your particular Spitfire. Note also that Griffon rotated counter clockwise when viewed from the cockpit. I am not sure about the underwing serials. According to the photographs they were rather small but I can't tell when they were painted on. PS854 carried them at least after repaint in the fall of 1952. Here is a photo of PS854 for comparison: Some modellers think that the serials were white but I think they were painted with gloss black. If they were white then also the last digit should be visible. Some versions of this photo suggests that the spinner was white. The spinners of the three other Spitfires at RAF Seletar were painted white just before their retirement from service. The original "wartime"serials on the fuselage are interesting also: the last digits sat higher than the first ones. Take another look at this photo. This close up shows the corrected rocker cover bulges, some added hatches and landing gear down indicators. If you use Kitsworld's stencils remember that the fuel grade was 100/130 octane, not the fuel amount. So my Dear Fellow Modeller You've read so far. Thank You for your time and hope to see you again! Best Regards, Antti14 points
-
Hello Chaps, This is my fourth "Hairy Stick" adventure that I completed in January 2017- again, this was a very basic kit by Matchbox from 1980 that has been in my stash untouched for a very long time. Upon opening the box, I found that the decals were missing along with the port-side air brake. I was fortunate to discover that a fellow modeling buddy had a spare set of decals for this kit that he kindly sent to me, the port-side air brake, I scratch built by using the starboard side air brake as a template and marking out the shape onto a molded part that had very similar surface geometry. The cockpit for this two-seater version was very basic- just two seats in a blank tub, so I decided to scratch-build 27 parts and added 15 sections of decals from my spares box to dress up the scratch-built instrument panels and the side-consoles. I scratch-built foot pedals and their support mounts, two joysticks, two instrument panels, seat-belts, ejector pull handles- 2 to each seat mounted at the front ends of the seat side panels, green display screens for front and rear IP's, the canopy actuator and its housing behind the Pilot seat. The exhausts were just two hollow tubes which I didn't like, so, I decided to make the inner afterburner tubes and thrust rings to dress those up a little and include the turbine fans in the rear of the tube. The inner tubes were created from spare bomb parts that I glued together then chopped off the nose ends. I then took spare 1/32 scale Eduard Me109 E-3 wheels and cut the center hubs out and the rings that were left were used as the thrust rings. The spoked hubs that I removed were used as the fan blades in the back end of the tubes. For an old basic kit, I had a lot of fun building it and adding the extra scratch-built items, crude as they may be.... If you'd like to see my "Build Update #1" YouTube video showing what did within the cockpit, here is the link to that: ...and if you'd like to see my "Final Reveal + rest of the build' video, then here is the link to that one: Thanks in advance for checking in and leaving any comments, much appreciated! Happy modeling, Cheers, Martin14 points
-
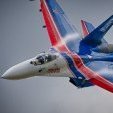
Pleased to present another new finish. Kinetic Su-33 completely OOB build. The camo was airbrushed freehand and is not as sharp as it should be. This is now my 6th flanker build of various variants, just waiting on Kittyhawk's Su-3414 points
-
Hello Chaps, This is my third "Hairy Stick" adventure that I completed in December 2016- a very basic kit by Matchbox from 1973 that has been in my stash untouched for a very long time. Again, I was really concerned about the decals being so old and the fact that they had "yellowed", whether they would work or not, but, if I let them sit in warm water for a few minutes, I was able to carefully peel them from the backing paper, they wouldn't slide, but I was just happy that I got them to work! The cockpit for this two-seater trainer version was very basic- just two seats, so I decided to scratch-build two instrument panels, four side consoles, two joy-sticks, seat belts made from wine bottle foil and ejector pull handles for both seats. The canopy was one solid piece which wouldn't allow for displaying the model with the rear section of the canopy open, so, with a hot knife, I carefully separated the rear section from the front section, glued the front section in place, then scratch-built a canopy actuator for the rear section and displayed it in the open position.... If you'd like to see my YouTube build video for this vintage model, then here is the link to it: Thanks in advance for taking a butchers and for any comments made, much appreciated! Happy modeling! Cheers, Martin12 points
-
Good day, gentlemen. Let me present you my next model. I spent a lot of time to put in order panels and wing. There was absolutely untrue imitation of fabric.12 points
-
This is my effort at building this kit. Built completely oob with no extras. As usual all comments welcome.12 points
-
Thanks TT - same for me. I have a few pots but no idea, really, what to do with them to achieve a specific effect. I need to practice I guess, and remember what I did! Thanks Rob - I think pastels are the way to go then. At least they build up slowly and come off fairly easily. A couple of shots this morning close to the window: Untitled by Ced Bufton, on Flickr Happy with that, but not with the top of the nacelles: Should have taken the paint back to the panel line. Now I need to try to mix another tiny batch of the same colour... or do some crafty 'weathering'!12 points
-
11 points
-
Thanks Rob. Yes. levelling thinner works great with AMMO paints and primers. I'd be cautious about using it with Vallejo though. It will thin it, if you add a lot of thinner to the paint, but it can be hard to clean up from the AB. I usually use plain tap water with Vallejo, with a little flow aid added if I'm spraying a large quantity. Okay, the last bits of detail painting and weathering have been done on the Striker. The cockpit glazing frame was sprayed in Vallejo Black Grey, followed by a very light dry brush with a lighter grey. Some of the smaller details were picked out in different grey shades too. I gave all the detail areas a pin wash with AK neutral wash (dark grey), then I blended some AMMO engine grime around some of the raised details, to give it it bit more shading The same weathering was applied to the wings. I painted the engine grime wash between some of the layers of the solar panel frames to help define them a bit more I've also added some paint chipping on the wings and fuselage. I didn't want anything too strong, so I just went with a light grey, which stands out just enough over the weathering That finished the weathering off, so I could pull the masking off the glazing, clip the wings in place, and that's one finished Cylon Raider TIE Striker (it does look like one of the reboot raiders though) The last thing to sort out was the base. I'd bought a 4" wooden circle and I was intending to fit a 3mm clear acrylic rod to it to support the TIE It came with the hole already drilled, which was larger than 3mm, so I had to add some plastic tube spacers to hold the rod. The base was stained black, then had an Imperial logo sticker applied Only problem is the hole for the stand on the base of the TIE is right at the back and, with the long wings, it's very front heavy, so this was the result... I had to substitute an aluminium tube in place of the acrylic rod, which was strong enough to hold the TIE level So, with that last mini drama cleared up, I'm going to call this one done. I'll get some shots up in RFI later. Thanks to everyone for following along. Andy11 points
-
Hello Chaps, Until my man-cave is setup in my new home, I cannot do any airbrushing and so my last 6 builds have been "old school" brushing with the "hairy sticks". I've decided to stick with 1/72 scale while using brushes because there is less surface area to cover compared to the 1/32 scale I prefer to build. This was my first adventure with the bristled wands that I completed in November, 2016- the HobbyBoss 1/72 Seahawk Mk.100/101. Not a bad little kit with decent tub details for this scale; I added seat belts made out of foil from the top of a wine bottle and the rest was OOB... If you'd like to see my YouTube build video, then here is the link to that: Thanks in advance for taking a look and commenting, much appreciated. In the meantime, happy modeling! Cheers, Martin10 points
-
I built tis model a few years ago after having the kit sit in my stash for a few more yeas prior to that. The kit was labelled as being Italeri, but in reality, it was originally released under the Zvezda brand. Because of it's ancestry, the detail wasn't as crisp as say, an offering from Miniart, but with a bit of work and a sheet of Eduard etched brass, a reasonable could be produced. The load in the back is from a set by Miniart, and consists of some 85mm ammunition boxes along with an oil drum from Tamiya. The markings on the boxes are decals which are included in the kit. Russian trucks were painted in a colour known as ZK, which is a lighter shade of green than the armour colour 4BO. I used Tamiya NATO Green. The decals weren't much use so most of the markings were hand painted with oils, the exceptions being the circle on the tail gate and the red stars on the doors. The beam on the lower rear was painted white to help drivers keep station whilst in convoy at night. The figure came with the kit and I adapted him to appear that he was working on the engine. Miniart Russian truck kits are sharper moulded, but this is still a worthwhile kit to build. John.10 points
-
Hello everybody! After months of procrastination, I finally completed this model I had started on in August of last year. Details added: Scratch built Ejection Seat detail Full hydraulic lines on landing gear using stretched sprue closely matched landing gear bays (hydraulic lines and additional detail) scratch built ventral fins Scratch build Sub-sonic ramps in the intakes (missing in the kit) Riveting where ever appropriate (around cockpit and on the upper surfaces of the fuselage Improvement to the chin pod TVSU Drilled out a hole in the fuel dump pipe scratch built carrier deck base (with liberal dose of creative liberty in design) wheel chocks from styrene card Boo-boos include: Fogged up canopy due to improper future application Cockpit Instrument panel PE print lifted off the brass due to water damage during salt weathering Salt weathering was a MESS. Fortunately it was salvageable with spraying on the weathering again through a thin slice of dish scrubber as mask Spilled Alclad on a completed exhaust corroding away the plastic (again salvageable fortunately) Omitted AoA sensors on fuselage side (it would have been lost to the carpet monster anyways) "100" decal applied in reverse on starboard side Additional PE and accessories include: Dream Model cockpit PE detail set Dream Model Pitot Tube Infiniti Carrier Tie-down point PE set (including the chain) Pilot and RIO from Revell NATO Pilot set The model was a joy to build, and the option to pose the wings extended or retracted provides a lot of flexibility to displaying it. It also had a perfect blend of detail v/s ease of build. Kudos to HB for that. A special thanks to Parabat, Tony Oliver, Navy Bird and Ratmigs for all their inputs during the build process. Tony Oliver's experience with the kit helped mitigate a lot of problems I would have otherwise run into. The wooden pedestal was made by a colleague skilled in woodwork. Much appreciated guys! On to the pictures! The reason I was excited about this particular scheme was this die-cast model of the F/A-18F in the same Bounty Hunters CAG scheme. Do they look beautiful together or what! Ejection seat detailing with stretched sprue and Dream Model PE set Cockpit detailing with Dream Model PE set and tissue paper to simulate the canvas covers on the IP cowls Nose Gear bay detailing Nose gear Detailing... Everything eventually disappeared into the dark recesses of the aircraft Sub-Sonic Air ramp scratch-building. Hardly seen in the shadows, but good to know it's there Scratch built the ventral fins to recreate the prominent NACA vents Scratch build a carrier base using the Infiniti Tie Down PE set. There were a 44 tie-down points included, thus I had to keep the base to a small size despite increasing the distance between points slightly A parting shot taken from the balcony of our apartment during a glorious sunset. Thanks for watching! Cheers, Alex.9 points
-
OK, let's see. The strengthening plates are on, and just for fun I sprayed some Alclad Grey Primer to see how bad they look. To be honest, the material is very thin and they might get lost under a few more coats of paint! The big issue now is "some" of the panel lines on the fuselage. I think the ones on the wing will be OK, especially since I don't plan to use a panel line wash. Some, but not all, of the ones on the fuselage are quite deep, so they'll need more than primer. A few coats of Mr.Surface 500 should do the trick, but I suppose I should see if I need to make any more corrections (adding panel lines, filling others). You may notice that the vertical panel line which goes through the aft end of the strengthening plates has been moved rearward. Too much fun. Cheers, Bill9 points
-
Thanks guys and yes the Baronial one has noticed I took the plunge and got some of Ceds swanky clamps. not too bad. it was all going so well. Not really badness but let's say turbulence. The Mr S worked well after some sanding but I had to add another layer so that means s wait over night so I decided to add some little bits. this little door, I'm having it closed but he no fitty, so a blob of Mr S. then this bit on the other side. He fitty but.... two ruddy great sink holes, so Mr S. I know I'll fit the top bit that should fi........ dag nabbit. Never mind, scrape time with the scalpel. and some Mrs S and we're in. I primed the cans and took a pic, the insides looked rough as old boots. So I wrapped some w and d around a paint brush and gave em what for. much better. and that's yer lot. Gotta dash Inside No.9 starts tonight. thanks for looking in on the part where parts don't fit. I knew it was all going too well. Happy Modelling folks. Johnny let it dry.9 points
-
Completely out of the box and I enjoyed every single bit of it except the horrible metal seat belts and they really should give us pre-cut masks for the price! Painted with Vallejo now I've discovered I need to thin them with their airbrush cleaner rather than their thinners! The subject is a bit of a cliche by now but a lovely excuse for some unsubtle weathering with AK Interactive enamels. So enjoyable I want to do the bubble top version right away. Thanks for looking.7 points
-
Hi all Finished this one a couple of weeks ago so thought id get some (not very good) pics out in natural light. Built OOB with paint from Akah. This is my first ever Russian aircraft so pretty happy with how it came out. Enjoy ScottC7 points
-
This model was for a French build for a model club.I am unable to make it due to car troubles,so I thought I would post it here.As is my usual it is is painted with a hairy stick with acrylic paints and it is mounted on a home made stand.I know it is not up to the standard of the models on this forum,but I enjoyed making it even though it was a Spitfire and French.The model has just been finished thats why it appears glossy in the photos.7 points
-
What it says really. Today I began the tedious process of sanding, polishing, re-scribing, and repeat, you know the drill! A start was also made on getting the ailerons fettled to something like a decent fit. the main thing though is that we now have something approaching a complete airframe. I think I will do something on the undercarriage legs and propellers next as a bit of light relief! Thanks for looking Martian7 points
-
Good evening Rockers and Bobbysoxers: Reasons to look at a Special Hobby decal sheet more closely: Pt.2 Fiddling with the remains of the sheet earlier I mused over what this white line could possibly be: That's right. They give you the dinghy release line as a decal as well as the dope patches to fix it in place. Another big tick for SH! The Flashing Blade(s) Another of item on the seemingly Sysiphean snag list - finish the propellor as there's some badges to go on the blades. Not as straightforward as it first seems because with an Merlin added to the equation there's a shaft coming from it to the boss, so I need to remove the stub on the kit boss and drill it out to accept it: And like so: Thence to the blades themselves. More SH user-friendliness in that they have a rear cross-section on the stub of each propellor that makes fitting each blade with the correctly-oriented pitch a foolproof task, I don't know if you're able to make it out in this shot? The flat end to the bottom goes into the slot in the boss, lining them all up precisely: I basically aligned them like this and then capillaried some extra-thin around the sides. Once they'd had a chance to set it was on with the top section and here they are along with the fences, having had the last of the decals applied now: The Lady Varnishes On gettting home this evening, out with the airbrush after downing a cottage pie and a sealing coat of Klear to keep all the badges safe for the next stage: Modelling Sardaukar-style! Just noticed on the mask how 3M spells 'Me' when viewed in the mirror. Somewhere Douglas Adams is smiling down in benison at such trivial profundity... Zoiks and jenkies. What on earth did Mrs. B put in the pie?6 points
-
It does look good, doesn't it? Thus far all you have seen are close-ups, but it looks even better a reasonable viewing distance, where the rivets don't look anything like as stark: Windows drying after a bath of Clear underneath, by the way.6 points
-
thanks folks & good evening moving along a bit - I got some nice pics from the Mk14 manual from Bob so could clear up some of the fit questions I had - I needed to remake the rudder trim housing as it is the longer 'L' shape and a cover panel to the rear of that - also a big control unit that has switches for fuel and electrical stuff as seen here.. ..started by making a template in paper of how I would cut and fold the litho to make the main control box.. ..needed to make a tool for my folding thing, and it took two goes to get the folds in the right order... ..ended up with the box structure - it has a dink in it where a fold got pinched, but I wasn't about to do it for the third time.. ..used some dymo tape to line up some airscale bezels as switch housings.. ..soon had the top pretty much done - the switch bodies were turned from wire on my dremel... ..and added everything else I could see in the picture.. ..and this is where it sits on the sidewall - also the new rudder trim panel is in place - the panel behind that was made from a MkXIX reference but is pretty much common with this one I guess.. ..thats it for now - more gubbins next time TTFN Peter6 points
-
Thanks Rob and TT - glad you like the yellow, I do too! Thanks Leon - I like the Vallejo Air a lot, straight from the bottle with a drop or two of W&N flow improver mixed in if I remember. I do find that, sometimes, the flow starts dropping off but a blast onto the paper towel on the spray booth base usually sorts it out. When finished I then do a 'deep clean' on the airbrush and usually find it's mucky, despite my best efforts to keep it clean. Ho hum. Thanks Simon - they're not cheap those filters are they? That said, I bet the cheap ones don't filter out the smell... A trip to the vets this morning - Mols has been eating carrion according to Mrs B (typical Spaniel) and has been waking me up in the night to 'go outside'. Not approved. She was due her booster today but she has a small temperature so, instead, an anti-biotic shot, worming tablets and another appointment tomorrow. She's worth it, probably. Then it was over to the LMS to buy the Czech paint scheme paint. Apparently Hu80 and 98 are only available in enamel so I have a nostalgic smelly session in my near future. I already had the chocolate (for some reason) so a trip for two pots of paint. Nice to get out though. Scheme and paints prepared: Untitled by Ced Bufton, on Flickr They went a bit mad with this camo didn't they? 'Unusual' isn't the word for it! I had hoped that the white primer, thin paint and my useless brushing skills would produce a scruffy finish and I wasn't disappointed: Patchy paint allowed, brush marks not... I hope! Now drying in preparation for the enamel colours. Gave me a chance to get out some unused Sable brushes - RobVulcan (where is he?) warned that acrylics would give Sables split ends and he wasn't wrong - I still have some fluffy ones used for rough work and weathering now but these are new. First enamel brushing for ages. Nervous? A bit...6 points
-
Thanks Ced - I always thought the Eduard wheel masks were to cover the hubcaps while you paint the tyres too, but the instructions indicate to use the mask's outer 'ring' to surround the hubcap for spraying after the tyre has been painted - however in practice this turned out to be well in excess of the permitted faff-factor tolerances so I just sprayed the hubcaps without the mask - the wheel-rims are well-defined so painting the tyres again will be easy enough. Thanks Adrian - black is so slimming, as my ex used to say, it makes even the Buffaloes look a little less tubby Yes, you are right, more paint was applied, this time the Colourcoats ACUS05 WW2 USN Light Gray: Not sure if I've underdone the coverage, the colour variation looks a little more pronounced in real life, but I'll wait to see it in proper daylight, or whatever equivalent Dundee offers today Cheers, Stew6 points
-
Bandai's new TIE/SK x1 Air Superiority Fighter, or Striker for short, from the Star Wars Story 'Rogue One'. I wasn't sure about the design when it was first revealed, but it's grown on me since seeing the film, and more so while building it. A great kit, easily up to the usual Bandai standards, and quite large for a TIE, coming in at over 9" long (about twice the length of a TIE Interceptor). The one criticism I can lay at it, and it's not the fault of Bandai, is that it's a swine to photograph as the wings always seem to be in the way, hence the majority of the shots being from below. The wip can be found here Thanks for looking Andy5 points
-
The model is Revell's Fokker E.III Eindecker. Though '1980' was detailed on the interior of the fuselage I believe that the original mould dates from 1965. In my expereience of Revell's kits, the parts sort of fitted, lacked detail and had loads of flash. Maybe their newer kits are better but unless they're an ex-Matchbox I won't be finding out. The wings have been reshaped but the fuselage, allegedly slightly short, has not been modified. The detail in the cockpit was all scratchbuilt, and turnbuckles made from 5 amp fuse wire with barrels from stretched cotton bud stems. The pulley for the wing warping wires is scratched from circles of fine plasticard stamped with my mini punches and a couple of other bits, five in all. Wing wires are ez-line and the control wires at the back are invisible mending thread. The propellor boss is scratched and the finish on the cowlings is 9B pencil over Humbrol's Aluminium metalcote. 'Max' is the 1/72 WW1 Aerobonus German and Austro-Hungarian Pilot figure in resin. In June 1916 Max Immelmann and Oswalde Boelke were the darlings of the German press, leading aces vying for the top spot and flying the Fokker Eindecker. Allegedly the Pour-le-Merit is named 'The Blue Max' after him. In the late evening of 18 June 1916 Immelmann took off with his squadron in an E.III as his E.IV was damaged, and eventually attacked a flight of FE.2bs. After a pass at one of the aircraft where he mortally wounded the pilot he started one of his trademark manoeuvres and began an Immelmannn turn. One of the other British pilots had witnessed the attacking pass and, realising what the enemy pilot would do next, had positioned himself to make his own attack. Immelmanns aircraft was hit, appeared to recover, then fell away out of control and the tail broke off; the wreckage carried Immelmann 5000ft to his death. This is my interpretation of Immelmann as he prepared for his last patrol. And finally; Max: Thank you for looking.5 points
-
I was in the attic when this parcel arrived this evening... What could be inside? Ah yes... The nice people at Eduard also sent me these: I now have all the kits I need for the D-Day anniversary build I have planned for May, June and July this year.5 points
-
So here she is, Dominie T Mk1 'D' of 1 Air Navigation School on a visit to RAF Scarborough. This model is completely hand painted by brush. Two coats of Hannants Xtra Color X38 RAF High Speed Silver enamel overall. Humbrol 191 Chrome Silver enamel on the leading edges. Humbrol Gloss 209 Fire Red enamel for the Day-Glo panels. Humbrol 22 Gloss White acrylic cabin roof.5 points
-
Thank you for all the kind words, they're much appreciated everyone. A little more progress to report today. I've been busy 'busying up' the rear fuselage a bit more. Here's the port side, with the .50 cal temporarily fitted, and then the ammo box for that added. The ammo box seems to be fitted to a frame, perhaps so that it could be swung out of the way when not in use: That side's pretty much done. I've also been adding stuff to the starboard side. Here are the starboard ammunition rail, master compass hanging from the roof, the opened door, and a few other bits and pieces: I think that's perhaps enough for the rear fuselage, so maybe it's time to get the fuselage buttoned up. More soon Simon5 points
-
Well- it's finished! Thanks to all for the help in researching it! This was quite an enjoyable build. Apart from the maddening fuselage insert, this kit is a real gem.5 points
-
Thanks Simon Mask it? I did consider paper templates but the scheme's so mad, and I'm brush painting, and the 'plan' is a faded finish, and I'm lazy, so I decided to free-hand it. Thanks Giorgio - it certainly is 'different' Thanks Benedikt - Mols is worth it and not that expensive compared to some females I could mention! Thanks Whofan - not seen 'the Coroner' - worth a miss eh? First coat of thinned Green on: Untitled by Ced Bufton, on Flickr I must admit that I've taken some 'artistic licence' with the scheme but it's close(ish). I'm wondering if one thinned coat is going to be enough for 'faded' if followed by pastels. Certainly, where I've 'touched up', a second coat is going to be more solid, possibly too solid. Chocolate next to fill in the gaps - unkind as I'm on a diet!5 points
-
This is why it is worth all that effort! Still a couple of tiny touch-ups to do, but this side is essentially finished on the rivet front, and at long last it is really starting to look like it always has in my mind's eye. Happy! Crisp5 points
-
Hello gents, the CV90 got a little bit of weathering and brand new shoes I'm still thinking about the further weathering ... Cheers, E5 points
-
Ha! Not me, that's for sure. I'd reckon I use more thinner in my airbrush mixes than just about anyone else on this esteemed board. Thinner is your friend! And so is air pressure! My particular style is probably why I use Gunze and Colourcoats 99% of the time. The pigments are exceedingly fine, and they atomize into an extremely fine spray. And they don't clog. If I'm doing a free-hand camouflage "soft" edge, I'll use up to 75-80% thinner - and I open the airbrush so that a very small amount of highly thinned paint emerges. I can hold the airbrush in one place for seconds, and just watch the colour appear as if by magic. I love it! Takes freaking forever to do some of my paint work, but I like the result. To top it all off, I use a Paasche Model H - single action, external mix. Can't get more basic than that. Some folks spray Alclad grey thinner primer straight from the bottle, but I thin it with 1/3 lacquer thinner. I thin Future too. Did I say thinner was your friend? Cheers, Bill PS. The preceding was paid for by the International Thinner Producers Cabal.5 points
-
Long day today, so no photos, sorry chaps. I painted the props today and applied the sky bands that I forgot to do before -- they'll need some cleanup. There's a reason I normally do them first. I think I've found one of the limitations of my 3M 1/4" tape -- no flex to it, so it doesn't do the best with the tapering rear fuselage of a Spitfire near the fin. Fortunately, 3M also makes 1/4" vinyl tape very much like the Tamiya's tape for curved surfaces, so some of that is on its way to me. I have a plan, and I'm never more dangerous (to myself, and to a lesser extent, to others) than when I have a plan. On the subject of Spitfire weathering, incidentally, I picked up a little book from Poland called Donaldy Zumbacha, about Jan Zumbach's Donald Duck-adorned Spitfire Vs, and if you're at all interested in what Spitfires looked like up close during the war, I heartily recommend it. Even without any grasp of Polish, I found the photos very invaluable. They've given me a lot of ideas for future builds. Future poorly-executed builds, granted, but it looks like a fair bit of the actual weathering on a Spitfire could be done with a good silver coloured pencil. (Recommendations welcomed.)5 points
-
Filling the holes - used Stew's sponge idea, top tip - and I remembered the slot in the nose. Some reference shots show a sort of blind or blanking over this so I found some suitable strip and glued it in the top, held at 'the right angle': Untitled by Ced Bufton, on Flickr then bent it to the bottom, cut it and glued it in: Once that was done I was ready for the Stynylrez white primer: There seemed to be a lot of spray about, so I decided maybe it was time to change the filter: New one underneath. Oops. Perhaps I should have done this earlier? Anyway, here's the toolkit for the underside: Untitled by Ced Bufton, on Flickr I think the 002 is too yellow eh? Best to use the 078 (RLM04) with some white. Aged white or normal white? Thoughts chaps?5 points
-
Hello Chaps, During my recent spate of "Hairy Stick" painting, I came across this kit buried in my stash with 3 other 1/144 scale kits. They were buried for good reason- i generally prefer large scale models that I see better with my aging eyes. But, I must have been going through a patch of masochistic delirium and decided to have a go. But that said, after wearing 4x magnification Opti-Visors during the whole build so that I could "see" what I was attempting, then taking them off at the end, my vision was blurred for a few days after trying to readjust. So, I'll never attempt one again! I completed this build during the first week of this month (February 2017). I got lazy with this one and didn't attempt any scratch-building in the cockpit! Astonishingly enough, this kit included some stencils which were hardly visible with magnification, let alone with the naked eye, the main decals were the size of the average stencil! The kit includes movable wings, so the photos below will show some images where the wings are both open and closed. The last 4 photos include two with the model next to a US Quarter coin- slightly smaller than a UK 10 pence coin and two with the model next to my Revell 1/32 Supermarine Spitfire Mk.IIa to provide an idea of scale and how small this model is.... If you'd like to watch my YouTube "Build Video" for this model, there here is the link to it: Thanks in advance for looking at this post and the video, if you should watch that, and for any comments left, much appreciated! In the meantime, until my next build presentation ( Italeri 1/72 F-16 A/B NATO Falcon), happy modeling! Cheers, Martin4 points
-
Hi guys, here is one of my latest build i finished a few weeks ago. The Tempest is one of my favourite plane with the Fw 190 D9. The SH kit is magnificent but it's not an easy build because the separate nose does not fit well. The plane i've realized is one of the Clostermann's plane. Thanks for watching, Cheers, Manu.4 points
-
I was liking this post right up to the moment I saw that last picture! Martian4 points
-
Battle damage it is Thank you Glynn Thank you Martian but don't stop taking the pills I sent you ..... A bit more progress on the myriad of deck fittings. Im trying where ever possible to make a positive location so that I can paint the deck and then add fittings. This is 'A' for security of fitting 'B' Make life easier painting the deck. Rear cowl vents and ready use lockers positioned. Not a lot of space around the engine room hatch. The white circle(s) just below the oil drum have been causing a lot of problems involving tubing and rod in plastic, alloy, brass etc etc. all of which went in the bin. It is the sounding point for the bilges in the various compartments and would consist of a round deck plate with a plug/cap! Simples! Not for me, after going all around the houses I finally had the idea of two discs. Next we move forward..... Bullring, anchor lead and drip tray around the winch Thanks for stopping by Kev PS Can anyone offer any information on " Denton Life Floats " All I can find is a blurred pic on HMS Hood site. Dimensions 3' x 3' Ta4 points
-
I managed to spray a coat of grey primer tailplane and wing joints this morning and this is just drying off at the moment. The tail joints look OK but I will have to do a bit more work around the wing roots to blend them in a little more, after that I should be able to get some paint on. Photo of how things stood before adding primer this morning.4 points
-
Oh, by the way: You cannot see in this shot, but the inside is now lovely and clean.4 points
-
I confess that removing the entire door hadn't occurred to me, and it is tempting... but for now at least I am going along Martin's route. Door removal Plan B. Radome removal, nowhere (sorry, Bob!) Open doors are for the next, 819 SAR, iteration of this aircraft. Not now, Cato4 points
-
Pastels for me my friend, get some cotton pads and rub them in the pastel colours of your choice and the then gently dust the aircraft once the transfers are on and it will tone it all down, if you want to bring out panels then use q tips, make up applicators including the angled little sponges you can get for a bit of precision.... they work for exhausts and the odd bit of oil marks, but for that a prefer enamel or oil paint streaked with thinner.... HTH Rob4 points
-
I agree Tony. More stylishly presented than Parisian women, often in outfits completely hand made by themselves. I was there in early to mid 1996. Warsaw, then Krakow, then a few places in Upper Silesia; an extended stay in Katowice. For me it was research, looking at how the release of extensive property records (by the former Soviets) was causing quite a stir. Many descendants of those that had originally owned dwellings in the city (pre WWII) were arriving from e.g. the USA, and trying to reclaim properties that by then, may have been home to two generations of altogether another family. Business premises were an even more complicated concern. Situations that needed delicate and compassionate handling, especially in the once ghetto areas, for quite obvious reasons. A profoundly beautiful city. So much history, understated strength and dignity. In my case also a missed opportunity with an exceptionally lovely and intelligent young lady; caused by a missed letter, nothing more . The vodka! Polish pure spirit served in brown paper bags from behind the counter, or perhaps Bison grass vodka (Żubrówka)? Don't know about putting hairs on the chest, more like it sizzles them off ! Any Polish BritModellers will probably be having a good chortle at us reminiscing, but we're very fortunate to have spent time there. Your journal will make fascinating reading . All good inspiration to model a few PZL and RWD subjects . All the best TonyT4 points
-
And so to painting of the interior. Original Airfix 1960s pilots in the cockpit..............please bring these guys back Airfix.........a Harrier pilot in 1969 DID NOT wear the type of helmet Airfix have moulded in their new Harrier Mk 1. Another Airfix crew member has been added to the cabin operating the sextant. .............the stars move a lot bloody quicker than they did from a Varsity................4 points
-
Being a perfect lady and being vicious are not necessarily mutually exclusive.4 points
-
I'd say the plan worked This is the look I aimed for so it will suffice several light mists of Tamiya Smoke over Tamiya Clear Blue So on with the other stuff we do to these little bits of plastic no 42 Masking Sorry we have a darker picture but the flash wasn't very good here Bit better here though, t'other side The rotor pylon has its support structure and the engine is on for encouragement only, 'tain't glued on we've paint to endure/enjoy soon The float here shown in its immaturity is my least favourite bit I knew when he said it why Martian, the chronicler of all things Scout and Wasp back in the day, asked what I intended to do about the flotation gear Was never going to be a shoo in was it? Thank the lord for evergreen 0.020" x 0.020" strip which is going to save my sanity This is definitely going to be cast, I'm beggared if I'm making two of them from plasticard Cusses, mumbles, drat those pesky kids, darn the... ...............................ow Oh sorry, I got a little bit Blyton there Apologies offered folks, almost unforgivable but it'ld be nice if you tried4 points


.thumb.jpg.0bac681e0da8e4ed7557610e98fda908.jpg)


This leaderboard is set to London/GMT+01:00