
Leaderboard


Popular Content
Showing content with the highest reputation on 11/10/16 in all areas
-
Evening all! It’s taken two years of on-and-off work, but I’ve finally finished my Airfix 1:72 Vulcan! The Vulcan has been my favourite aircraft since being wowed by the Duxford aircraft as a child, so without it sounding trite i tried really hard at this kit. Still, I am unbelievably glad to see the back of this, a really very strenuous build which required quite a lot of willpower to get through. Much whisky has been consumed and much filler dust produced! I used the following aftermarket stuff: · Wolfpack resin intakes and engine faces · Wolfpack resin undercarriage bay set · Master turned aluminium NATO refuelling probe tip · Fündekals Vulcan set for XM605 of 101 squadron RAF c.1977-8 · CMK resin Canberra PR9 ejector seats (they’re close enough through that tiny canopy!) I also did quite a lot of other mods: · Full rescribe including quite a lot of added panel lines and inspection panels, and correction of the lines around the nose radome. · Rear crew seats from the Airfix Valiant (though you need a torch and a dentist’s mirror to see them) · Scratchbuilt ladder, retraction jacks and interior around the inside of the door · Brake and other undercarriage hydraulic lines from wire. Thinned out the u/c scissor links and added several other details from plasticard. · Replaced pitot heads and aerials from plasticard stock, added several other details such as a tail bumper. · Lined exhausts with brass tube to approx. 4 inches deep, and used kit engine faces as exhaust faces at the ends of them. · Drilled out most of the small exhausts and intakes, and lined the four protruding heat exchanger things under the engine areas so they weren't see-through. · Thinned out the splitter plates at the inboard edges of the intakes with files, sandpaper and anger. It’s a mixture of rattlecan and brush finishing – the Humbrol 165 Medium Sea Grey was straight from the can, but the Dark Green (Revell Aqua 68) and the Light Aircraft Grey (Humbrol 166) were brushed on, as was the flat coat (also Revell Aqua). References include trips to XM594 at Newark and XM598 at Cosford, as well as the excellent BM walkaround threads here and here, and the magnificent "Vulcan B Mk.2 from a different angle" by Craig Bulman, and "Vulcan" by Ken Ellis and Duncan Cubitt. WIP is here although I've done more comprehensive WIPs in my time. Anyway, I'm very happy to move on but I’m pretty pleased with this one. Hope you enjoy it too! Addendum: I learnt loads for this build from surveying previous BM builds, so it’s only fair if I summarise some of my advice for taking on this beast of a kit: · The Wolfpack intakes and undercarriage bays are SERIOUSLY worth it if you can find them. They’re the most trouble-free resin add-ons I’ve ever used, very accurate and detailed, and fit pretty much perfectly if you are careful removing the kit undercarriage bays. The intake parts have one slight niggle, in that they are drop-in replacements for the kit parts and locate using the same hole on the underside, which fits a pin on the lower wing half. If fitted as per instructions, there’s about a 0.5mm gap between the intake lips on the kit and the front edge of the resin. I supported them slightly further forward with plasticard stock, and solved the problem.. · When sticking the kit together I recommend you join the three wing/fuselage sections of each half, then join two huge halves later, rather than the instructions' approach. That way the gaps are relocated to the fuselage sides and wing leading edges,rather than being large steps between inner and outer wing sections, which are very difficult to deal with. · The Fundekals sheet is the best Vulcan sheet by a country mile, and the only one to correctly depict the badge for 101 Squadron (the Airdecal offering is 50% too big and the colours are too dull!). It has only one fault which is that the fuselage roundels are about 2mm too small in diameter. This very much notices on the finished model, so replace from other sources. The Cartograf sheet for XH558 provided by Airfix in the recent boxings works perfectly.33 points
-
Hi Everyone, finally finished the T-28 I always wanted to do....... ...an Air Commando`s T-28B in Operation Farmgate markings in the early 1960`s Built from Roden`s T-28C kit ( the B parts are still included ) Finished in the markings of 1st Air Commando Squadron `Soc Trang Angels`, Soc Trang Air Base, Vietnam, 1963 Decals from AOA Decals 48-005, The bombs came from their `D` issue of the kit, the pylons are modified Mohawk items and ...the 500 round Gun Pods I made from scratch from plastic sheet. Finally here`s a pic` with it along side an Operation Farmgate Invader which I made from the Monogram kit Hope you enjoy, thanks for looking Cheers Russ28 points
-
Hi all, This is my recently finished 1/48 Hasegawa kit with FCM decal. I built it OOB with some scratchbuild parts unique to Indonesian Skyhawk. This particular bird is one of two ex-Israeli AF's TA-4H purchased by Indonesia in 1980. She was also the last flyable Skyhawk in Indonesian service, retired in August 2004. Thanks for looking28 points
-
Really enjoyable new-tool kit, needing only minor tweaks. This was a pre-release kit built for the current (November) issue of Airfix Model World, so there were no decals included; I used Xtradecals 72250 instead.26 points
-
I made this for the Corsair GB earlier this year but I don't think I've shared it on the RFI section - apologies mods if I have (I did check first!) Anyway, the model is OOB except the usual Eduard seatbelts and ariel wire. I lopped off the tail hook, as advised and the decals are from Skymodels, with Xtradecal roundels. I know there are many stunning Corsair builds out there but I'm quite happy how this has turned out. thanks Mike15 points
-
Dear All, As I try to built jet trainers of the Indian Air force, I added another to my collection the Polish PZL Ts-11 Iskra, the last aircraft was withdrawn from the IAF on 2004 and eventually the role was carried forward by the BAe HAwk. I have the privilege to see the real aircraft at Palam air force museum in Delhi and the nose number 57 is what I have build. The Kits is very basic as arma hobby release three version of the kits, the plastic was soft however it was easy to built, however they have not told to put weight in nose, so need to put about 5gm otherwise it become tail sitter. Regards13 points
-
This was completed for the Airliner III GB currently underway. Since some of you don't venture over there and are having airliner withdrawals in RFI I thought I would post this here :D. It is the Revell B767-300 kit from the Gulf Traveller boxing. I built it out of the box and used Australian Airlines markings from the Draw decal sheet. A bit of history on Australian Airlines Australian Airlines was a short lived full-service airline based in Australia, servicing Australian and Asian destinations between 2002 and 2006. It was an all-economy, full-service international leisure carrier, and was a wholly owned subsidiary of Qantas, (although run independently of the mainline carrier). The airline ceased operations under its own livery on 30 June 2006. Qantas decided to discontinue the public use of the Australian Airlines brand in favour of having Jetstar Airways as its leisure, now low-cost, carrier. Qantas and Jetstar began operating services to replace Australian Airlines' routes, with Jetstar International introduced in late 2006 to help expand the Qantas Group's international presence.12 points
-
My latest model, Hasegawa’s older mould of F-14 family. I started it just for fun, re-scribed it, added some details that were missing, changed some parts with spare ones and used Hasegawa’s decals which performed well (at least the ones that were used). Work in progress here http://www.britmodeller.com/forums/index.php?/topic/235010183-f-14a-vf-33-1982-1983-cruise-hasegawa-172-old-mould/#comment-2505964 And the real one F-14A VF-33 BuNo 159428 I hope you like it. Comments and critisism are welcome. Regards, Nontas12 points
-
Airfix Gloster Gladiator Mk1, finished in Irish Air Corps colours. The rigging is fine fishing line. The colours were masked using masking fluid. Worked well, but when removed, some of the smooth demarcation lines became ragged (quite a nice effect, but not what I wanted. Also, something happened to the aluminium when I clear-coated it. Not sure what, but I'm glad it's underneath. Dave12 points
-
A thoroughly enjoyable kit with a build thread here Build thread Finished with Halfords Appliance white spray undersides and Xtracrylix Light Gull Grey appplied with a brush.12 points
-
Well here is my third Naval aircraft and as I said it was fixed wing and modern, an enjoyable build painted with Vallejo Acrylics, love the look of the Rafale. Guy 20161010_175411 by Guy Hales, on Flickr 20161010_175233 by Guy Hales, on Flickr 20161010_1744 10 by Guy Hales, on Flickr 20161010_175256 by Guy Hales, on Flickr9 points
-
Tamiya Mosquito PR Mk IV. I got the Tamiya IV kit to make the bomber version but the all Blue PR version appealed to me, so I made this version and bought another to make the bomber version. Totally built OOB and painted with Vallejo Model Air paint. I actually found this a little bit more fiddly than expected, especially the canopy. This was made for the Great Britain group build earlier this year but I don't believe I posted it in the RFI section. thanks Mike9 points
-
My latest build - 1/72 HobbyBoss A-7D Corsair II, 353rd TFG, 254th TFW, Vietnam 1972. I really like the HB Corsair - I know that there are shape issues front and back but it still builds into a great model in my opinion. This is the second time that I have finished this particular kit. I have added photo etch IP, side consoles, nose pitot's and chaff/flare dispensers. Also used a resin seat and added 2 x Mk.84's for the outer pylons. Airbrushed free hand camo using Xrtracrylics. Cheers guys, Phil9 points
-
Fresh off the bench, finished tonight actually, I present for your delectation a pair of aeronautical dead ends, The Spitlefool and Sea-Elefang. The Spiteful was a Supermarine development of the Spitfire equipped with the all-singing, all-dancing, laminar flow wing (as seen on the Mustang). Unfortunately the new technology wing was a bust and proved less efficient than the Mk21 Spitfire wing. Not that it really mattered as the prospective customers, the RAF, had their hearts set on JETS at the time (late fifties). Ugly or lovely? I can't make up my mind. Sometimes I like it, sometimes it just looks silly. Whatever, it was a fun and fast build and enabled me to practice a few new techniques. Spurned by the RAF, Supermarine tried to flog the beast to the Navy as the Seafang (" just the sort of bloody silly name they would choose"). Contra props to kill the swing on power changes, folding wings and a hook at the back didn't make up for the poor performance and The seafanny was never a threat to the Seafury in procurement offices. Actually, the Navy wanted JETS too and the Supermarine Attacker became the first RN carrier jet in due course. Interestingly, it used the same laminar flow wing! The two Trumpeter kits went together well straight from the box.I only had a couple of photos for reference so I just relaxed and enjoyed myself. I ignored the what-if schemes and built the real prototype options. Despite being prototypes, both appeared to be quite beaten up so I could play with a variety of weatherings. Both airframes were preshaded, sucessfully on the Seafang, less so on the Spiteful The whip aerials were made from domestic paint brush bristles. (I used to use cat or dog whiskers but I'm pet free now.) Pitot heads were made from a hypodermic cut to length and with a strand of wire pushed up the centre. (The kits had none at all) This was a new idea. Instead of painting the u/c well first and then masking it, I worked in reverse. It was so much easier on this type of aircraft. (I hate masking) Seems to have worked. (ps I do have a reference photo showing that much muck on the belly. Aeroengines used to leak a lot more back then!) The cockpits were identical and adequate. I guessed the colours. I liked the red seat as a dramatic highlight but I've no evidence to back this up. I was quite pleased by the instrument painting, next time I'll paint the figures in as well as the needles. So there you go. Please feel free to criticise and comment - I won't be offended, promise!9 points
-
Thanks Keith - perhaps our mojo is linked to the weather and it's getting colder? Who knows... I've fiddled and diddled and got the tiny straps fitted and poked into what could be considered a 'realistic pose': IF they were wet, someone left the cockpit open overnight and the frost got to them. Hmmm. As I can't (yet) manage the fiddly cockpit fixing I have got out the unpainted reserves: some of which look more like Dr Who's Cybermen than Spitfire pilots but hey, when they're on the ceiling... I'm quite confident now with the Citadel seam scraper and still bemused about how 'it knows' what's detail and what's flash - you can scrape quite vigorously without damaging the parts. Odd, but clever. Stuck on sticks and base coat applied:9 points
-
Ta chaps. Had am awfully good time in Venice. How can you not? Eschewed the water taxi though Ced. Have you seen how much they cost??? Especially with the pound and euro almost at parity. The vaporetto and Shanks's pony are good enough for me and mine I'll think of you doing a peacock impression tho'...... Squeezed in a session or two at the bench before having to lose myself in catching up at work. Nearly finishing texturising the surfaces of the Hawks. There's a raised flat panel riveted onto the the side of the intakes - dunno why - and a little plate high up on the fuselage side - again dunno why - that took my eye and I thought would add interest. So I had a stab at them using 0.1mm plastic card: Cutting the intake plates: Little template to cut out the fuselage plates: Attached using Tamiya green cap (sparingly): I've also carefully cut them back a little - especially the intake plates - with a rigid fine sanding stick so that they're not too prominent. If they stand out too much when primed I'll cut them back a little more.9 points
-
There are multiple conversions to be done to the Revell kit to get it right for the danish Mk 90B' Some additional detailing involved, Avionics Bay in the nose, Rolls-Royce Gem engine, Rescue Hoist, Gearbox panel, homemade decals for the danish markings. rivets from HGW and Archer etc... Photos of the finished build, hope you like it...9 points
-
Thought I'd share my latest build with you all. This is an Airfix Hawk in 1/48 with the 19 sqdn spitfire anniversary commemorative livery(xtradecal). Basically out of the box: It's a slightly crude kit for a 1/48 scale but it looks like a Hawk(to me) at the end of the day. Main problems were fitting of the blast screen after assembly and the usual wing root and engine intake filling chores. Paint was Vallejo MA 017(green) and the dark earth was a mix of VMA 26 & 29(50:50). Silver was Humbrol metalcote(mainly cause I had loads left over). I broke the pitot tube....as you do...so replaced it with a cut-down sewing needle. Not perfect by any means but I pretty pleased with it. I have another one in the stash destined for Royal Navy black. Cheers all, comments appreciated !! PS: Remember(unlike me) to fit the pylons on after the large underwing serial numbers.8 points
-
Good evening to whole modellers staff! Let me to post here something not so much known, but even this one is small piece of plentiful human aeronautical history... So enjoy it and have a mercy with my skills!8 points
-
Almost ready to close her up. Some light dry brushing with medium grey acrylic (Tamiya XF20) on any black painted instrument panels. Interior parts treated to a wash of raw umber acrylic diluted in floor polish. Seat belts approximated with some masking tape. Started to glue the rockets and external fuel together, as well as the exhausts. Then it was time to glue the fuselage together Glueing in the innards, needed some pegs to keep things in place Wings and other bits on.7 points
-
Hi, here's the latest completion. Not a bad kit, but I had issues with the under fuselage wing joint. Painted with Tamiya rattle can silver and Gunze for the camo, and used Xtradecals for the 64 Sqn markings. Not my best, but another one for the 1/72 RAF collection that I seem to have embarked upon! Untitled by bryn robinson, on Flickr Untitled by bryn robinson, on Flickr Untitled by bryn robinson, on Flickr Untitled by bryn robinson, on Flickr Untitled by bryn robinson, on Flickr7 points
-
The greatest title (but not the greatest essay) by the sadly-departed David Foster Wallace, the finest American novelist and essayist of his generation, would have to be "A Supposedly Fun Thing I'll Never Do Again". That was this: 20161010_214419 by Edward IX, on Flickr I used the Marketar Canopy Masking kit for this, which turned masking the canopy into something I'd forgo building the kit over to merely a stressful and hideously fraught experience. 20161010_214630 by Edward IX, on Flickr Once I'd finished using the Marketar set, I filled in the gaps with regular old Tamiya tape: 20161010_221159 by Edward IX, on Flickr 20161010_221216 by Edward IX, on Flickr We'll see how it looks (probably pretty bad) after we paint and unmask. Indeed. I like it -- I remember it being very mysterious when I was little -- "we know the hard-nosed, practical Russians never do anything without a reason, so this aircraft which looks like a hypertrophic idiot cousin of the MiG-21 and carries exactly two missiles must surely be a very, very capable machine that brings a lot to the table." Nope. But it does look neat, and you get to look smarter than people when they go "nice MiG!" And like all failures, I love feeling smarter than people. Honestly, it really isn't that bad so far. Let's see how I feel when I fit the landing gear, though.7 points
-
Hello folks , this is the roden kit of this pretty little airplane . The kit itself is not very sharp and requires filler all over the place but it looks like an acceptable representation of the real thing . Rigging done with stretched sprue. I have included a photo with two other German WW 1 model I built previously6 points
-
Thanks Benedikt - bailing out of a serviceable aircraft? Not me Sir! Thanks Giorgio I think I'll agree with you and leave the pilot out, especially now the belts are fitted (see below). Your English is perfect and thanks for the compliments on my tidiness... just my upbringing I guess! I finally managed to get the bits of the cockpit aligned and glued (after bending the control column back a bit) so here's a final look: and with the final belts fitted: No room for a pilot there I don't think. I must say I'm impressed by this Eduard kit so far. Nice detail and pretty painless, despite the fiddlyness... Famous last words.6 points
-
Here comes another 1/72 AZ Model Bf-109. This is the G-14AS version, built with Brengun photo etch and Rob Taurus vacu. Pitot tube from Master Model. Decals from Model Alliance "Defending The Reich's Skies Pt.2", representing a machine of JG77, early 1945. On that sheet, the code number "1" is represented in Green; a colour profile in MMP "Bf-109 Late Versions" shows the number in Red. I followed this colour profile, painting the "1" in Red using paper mask. Of note is the patchy appearance: Front cowling is RLM76, fuselage is RLM84, rudder is RLM81/83. Undersides in natural metal. Painted with acrylics from the Gunze range. Photographs: Wolfgang Rabel, IGM Cars & Bikes. Cheers from Vienna!6 points
-
Hasegawa Curtiss Kittyhawk Mk IV (P-40N), Sqd Leader Geoffrey Atherton, RAAF. The kit is Hasegawa's P-40N, finished with Academy decals. The kit's a bit basic but not bad, it's OOB except for the seatbelts and ariel Wire. Painted with Lifecolor RAAF colours. It might seem crazy to use Academy decals (not much good in this case either!) but I love the RAAF aircraft with the white tails and leading wing edges and it means I can do the Academy kit as a P-40M. thanks Mike6 points
-
Right pay attention you lot. For instructional purposes only I loosely assembled the cockpit components as supplied by Matchbox to show what wants changin' Matchbox have based the kit on an FAW.21 but have overly simplified many details and just plain left a lot of them out. The rear bulkhead and floor have a large extension molded to allow the seats to be mounted, this doesnt exist in the aircraft as the seats are bolted to the floor via the lower gun mount and the rear bulkhead is flat with various black boxery mounted. Matchbox included the arch of the nose wheel well but neglected to add the surrounding structure or the raised area around the control column. This is the same area in WZ.897 This causes a couple of knock on issues, the control column is far too long, the gap between floor and the instrument panel is too far and the side consoles are too high. The instrument panel is undersize making the issues even worse. These have to go I may reuse the nose wheel housing, I'll deal with that later The instrument panel is a reasonable if undersized representation of an FAW.21 Unfortunately I'm not building a 21 so its off to the bin for this one. These are usable with a bit of butchery First job was to make a new floor and number 2 bulkhead. I used the kit floor as a template but extended it up to where bulkhead one would be it the real one. This gives me a spot to mount all the bits that go on the observers side forward. Next job is to start building up the floor structure and cutting out the gear well. Ciao6 points
-
Ha! I hadn't even made the connection in my own mind. I confess, I discovered MBD because of my love for the film they take their name from. It just happened that those were the two nearest dark-coloured things that the masking would show best on. Now, that being said, tempers are frayed here at Hedgehog Manor, what with an offer for the house on the table and Winston developing some revolutionary new techniques in the area of misbehavior. There's something quite extraordinary about seeing a fat little hand pop up on the table like that sewer monster from Star Wars (shamefully, I knew its actual name, though never its Christian one -- probably Terrence, though) and grope about until it finds a water glass, whereupon the glass is battered into describing a liquid-dispensing arc. If you are one and have no conscience and limited English, this is the best thing in the universe.6 points
-
few more pictures6 points
-
evening folks thank you so much for your contributions - enormously helpful and essential to unpicking what is going on with this big and prominent panel.. ..I made a few observations in case it helps anyone doing a late Spit themselves: 1. This is an air compressor scoop that sits on it's own panel 2. curiously the fasteners at the nose are not equally spaced - this is evident on a few pics so I have copied it 3. lots here - there is a double row of rivets that secure the bulges to the panel, a panel line splits a lower section from the top curved bit, and a small irregular shaped door 4. this is actually TZ138 showing the small air scoop so I need to include that 5. the circular access panel on one of the bulges has a ring of rivets around it - I haven't done that yet.. 6 hard to see but these are the double row rivets by the bulges ..so in making a start, I wanted to make sure with a tape template that I could use flat annealed litho so laid that on and drew out the boundaries and some details.. from that came a template which was quite fragile to work with.. ..I taped it to some perspex so I could rivet it and would then add the holes for the access panels.. ..after a days work I ended up with a fragile, one-piece panel with the access holes that have panels to fit in them later. I spent ages getting ready and preparing to stick it down as the tolerances are very tight and there is only ever one go at positioning.. ..eventually, and I mean hours later, I stuck it down - thankfully the prep paid off and I got it right - it still needed treating for roughness & rippling though so I had at it with a rough sanding stick.. ..and after a clean up it turned out pretty well - it is such a definitive area of this mark of Spitfire I hope I captured it properly ..thanks again for the help with references and on to the side panels next... TTFN Peter6 points
-
I have spent the past few days getting some paint on, I applied the grey on Thursday and that was left to harden off before masking up today for the white. After two coats of primer and two top coats I carefully removed the masking from the lower half and wing/tailplanes. I will leave this for a week or so to harden off before I remove the window masks after trimming around them with a new blade. Doing that should negate the risk of tearing the paint, and this will be followed a light sand and polish to get rid of any hard edges The lull in progress should give me time to try and find a match for the blue of the decals that I have to apply to the nacelles, and there are still the little details like the main wheels and exhaust to take care of, not to mention the structure for the top of the canopy - so still a fair bit to sort out yet.6 points
-
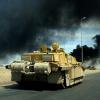
I've finally got some paint on 11B. The model was basecoated/preshaded/modulated with Tamiya Nato Green, Black Green, and Dark Green. While I let this dry for a few days I mixed up my own British desert yellow sand color using about six different Tamiya paints until I got it just about right (to my eyes). The model looks more green in these photos than it does in person, but my lighting wasn't cooperating today so I think that's the best I'll get for now. I gave the model a coat of hairspray in the areas I would be depicting the scratches present in the photos of the real 11B. I've viewed several hundred wartime photos of the Challenger 2 in Iraq over the course of this build and I've found that 11B appears to have the least amount of chipping and fading of any of the Challengers that served in Operation Telic 1. This makes for somewhat of a boring model if weathering is everything to you, but I'm going for historical accuracy on this one rather than an attempt to use every weathering product in my modeling arsenal. Not surprisingly, something that was intended to be a quick project using a kit that essentially falls together has turned into a drawn out rivet counting fest. I'm currently trying to decide if I should attempt to depict a few extra details such as: 1. A rectangular box mounted to the top of the right armor skirt (The Eduard PE set supplies this) 2. The large camouflage tarp draped on the front and sides of the tank 3. An orange and white (air identification?) square draped on the rear of the turret 4. A canvas cover on the roll of wire near the jerry cans So unless I decide to add these extra details, my Challenger 2 is now painted and ready for the final weathering phases.6 points
-
Hi second model from introduction part..... Well known P-47D from Academy. Out of box, only some correction - shortening about 1mm main lending gears, so now it sits a little better. Model master olive drab, tamiya neutral gray, washes - artistic oil paints, varnish - gunze mat top cote. Only thing missing on pictures is drop tank, still not finished, and light bulb under wing for landing light, applied just after taking pictures. As always pictures not perfect but i hope you will like this model. I enjoyed a lot making it. Regards Djordje5 points
-
Found this is the stash and decided to move it up the to do list so here it is It is said that this is one of the best kits that Airfix made and looking at it I can see where they are coming from. I have yet to decide the markings but I am inclined to do one of the 2 original trials aircraft for the RNZN seeing as my daughter lives in that far away country. As you can see the box features the kit made up and the inside is cramed full of sprues. Lots of pieces Unfortunately the model as lots of sink marks as well as injector pin marks but then again that is what Mr Surfacer is made for. I wonder how I got along without this marvellous product before. This is the radar screen that hangs down from the roof and as you can see there is an awful sink mark but it will be filled and you wont know the difference. So onto the building I don't normally take long to build a model and I cant see this being any different Rodders5 points
-
A final update on the seats before I go away for a couple of days (I am looking for a job, so interviews have to take priority over modelling even when I don't want them to...) Firstly, my third attempt at getting the compound curves of the forward seat frame right; I think this will do. Second, the seat you saw earlier in (dry fit) situ, having had its sprue insert largely sanded away; there will be additional stuff on top of this, so it doesn't need to be perfect. Note also the dinky little circuit breaker box on the rear bulkhead; it comes from a Hasegawa cockpit part that is not needed for this build, so looks the part quite well i think. Wiring still to add, plus a fire extinguisher and a couple of other things behind the seat. Oh, and the curtain texture has gone to join Nigel's Banana. More later in the week Crisp5 points
-
The only (UK) Sea Kings left flying now are the ASaC 7s, and I don't know whether they have any truly ancient airframes - one suspects not. But until last year 771 were still flying XV647, which was one of the 7 aircraft on 700S NAS, the Sea King IFTU in 1969. God only knows how many hours it had on the airframe. Jessica, I love that patch. I flew with a most excellent Canuck Sea King Observer on 819 in the early 90s, name of Steve "Crash" Roberts - so called because it was reckoned (by us Brits, anyway) that there had been 5 Canadian Sea King crashes at that time, and he'd been part of the crew for 3 of them... Top bloke! And yes, 71chally, I have thought about doing a book. Indeed, I have gone as far as reaching out to the Fleet Air Arm Officers' Association ( a bunch of reprobate old farts if ever there was one) and asked who'd be prepared to share their stories, steely [Edit: originally said "sternly?" WTF??], funny, or whatever. We'll see what the response is - but some of the early stuff is in danger of being lost in the mists of time; there was a famous (at the time) rescue in 1974 (771 were still flying Whirlwinds at the time...) which involved 3 RN and 2 German Navy (training at CU, so mixed RN & FGN crews) aircraft. A ship called Merc Enterprise capsized off Plymouth in truly atrocious weather (the photos are terrifying). 2 AFCs and 3 AFMs on one night - and two aircraft crash landed because the engines ingested so much salt that their engines started to flame out... I'll see what response I get - at the very least someone should accumulate this collective memory and make sure the Museum have it.5 points
-
Hello all. This is my L-39C Albatros, built out of box and with kopro decals. Hope you like she gained me a silver in IPMS nationals in Dublin on Sun, all comments welcome.I was really chuffed with this.5 points
-
So do we, and ours are a minimum of 10 years older than the ones you lot use.5 points
-
Ah, Tom, and I have an immense advantage over you in that my poor spatial sense means I haven't noticed the wings are or aren't asymmetric. In fact, after I post this, I'm going to slam my head into my desk so hard that I forget about it altogether. No clue, but if you grew up in the restrictive kind of religious household as a kid, those movies were godsends. Burning Death Star reactor cores can't melt steel beams! This is what having to work on Twitter everyday has done to me. I'm not familiar with that feeling; I just like the attention so much I keep shouting. The masking set is pretty useful if you have shaky hands (like me), but I'm betting I won't get more than four or five masks out of it before I run out of the good bits. My current theory is that he was sent from Hell by the devil, but I will update you as I get new information. We're trying to buy a specific house, which although slightly smaller has an attached two-car garage and central air conditioning and which in general is more up-to-date than ours. So it's a race to sell our house before the other sellers either call off their divorce, or sell first.5 points
-
So its been a while, been busy as we have just sold our house, however I have managed an hour today at the bench and hopefully I can get most of the build complete before Dads's model shack gets packed up for a while. In the process of painting up the track pins that hold the spare links in place and sorting a commander figure out, he's not final but I'm just checking to see if its workable, yes I do know he needs a head Cheers for looking5 points
-
The "in-flight entertainment centre" is where the Orange Crop controller would sit in an ASW aircraft - and I think the "toothbrush" is some sort of wacky SAR radio for talking to MRTs and the RNLI. But it doesn't half look like a toothbrush, I agree. Be prepared! "Utterly un-aerodynamic"...? Wash your mouth out; this is the Queen of the Skies you are talking about. 50 years of front line service next year; that's like the RAF still flying front-line Hurricanes in the late-1980s. That alone suggests that the designers got something right! Mum good - thanks for asking; out of hospital, home, comfortable. Ancient (92+), and obviously won't go on for ever, but she still seems to enjoy life, so more power to her elbow.5 points
-
Slow progress but here's the latest - The seats aren't finished but they're getting there. Initial painting of the cockpit side walls - Details still to be added but it's starting to look like an F-4 cockpit. Last couple of photos to show the cockpit in position.5 points
-
This'll be fun. If you're looking for reference material I know a guy.............oh hang on! Duncan B5 points
-
Morning all,Here's Airfix's Hurricane trop as a North African machine of 274 Sqn in 1941,I,ve gone with the box art's colouring for the fuselage flash as there is no definitive colour photo's of the actual aircraft.Thanks for looking in.5 points
-
Spitfire Vb 352 (Yugoslav) Squadron Royal Air Force, Canne, Italy September 1944. Kit:- Airfix, Decals:- Balkan Decals, Paints:- Gunze + Tamiya. Thanks for looking. Craig.4 points
-
Hey all, I built the Hobby Boss F4F-4 Wildcat in the colors of the Cactus Air Force in the fall of 1942. Joe Foss flew this aircraft on just a couple occasions and I think his tally in it is about 2 Japanese Navy fighters. Black base painting and weathering technique four subtly different shades of blue faltered on the gear bay: some sources showed grey indents for the wheels, some are green; I mixed them both rudder posed, elevators cut and posed somewhat incomplete and interim radio antennae made of stretched sprue used Vallejo chipping medium to reveal aluminum and yellow zinc chromate landing gear was a pain in the butt for me, alignment issues and broken tail wheel means these are VERY delicate built up the sides of the cockpit with plastic shims to fix the infamous canopy fit issue black, grey, white and burnt umber powders; light panel wash bottom starboard star painted with stencil because I destroyed one of the six roundel decals '53' number masked and painted four times base made of cork board, plaster of paris, and sand textured spray paint4 points
-
An Indian chief had three wives, each of whom was pregnant. The first gave birth to a boy. The chief was so elated he built her a teepee made of deer hide. A few days later, the second gave birth, also to a boy. The chief was very happy. He built her a teepee made of antelope hide. The third wife gave birth a few days later, but the chief kept the details a secret. He built this one a two story teepee, made out of a hippopotamus hide. The chief then challenged the tribe to guess what had occurred. Many tried, unsuccessfully. Finally, one young brave declared that the third wife had given birth to twin boys. "Correct," said the chief. "How did you figure it out?" The warrior answered, "It's elementary. The value of the squaw of the hippopotamus is equal to the sons of the squaws of the other two hides."4 points
-
OK well I made it back from the depths of the Kentish outback but it was touch and go a few times. Managed to crack on with a few things.... The cockpit sides were given a coat of Xtracrylix RAF Aircraft Grey/Green in varying shades before receiving a wash of Burnt Umber and Sienna oils thinned with White Spirit to pop out the details. At the same time the wings were glued together and the undercarriage bays built up and sprayed with heavily thinned NATO Black, Again with lightened panels, washes and dry brushing to add relief... The MkV rear end was removed by razor saw ready to receive the slightly re-profiled resin AW turret base. As can be seen here the bases of the Mk V fins needed to be removed to ensure a flush fit for the earlier broad chord ones. These fitted straight onto the tail planes without the need for re-contouring which sped things up a bit just needing a smear of Perfect Plastic Putty either side.....the fin bracing strut holes will need to be filled as they are in a different location for the older style fins. Brass will be added to these and new holes micro-drilled. With the turret base and broader fin and rudders fitted it's starting to look more like an early-bird now. More soon....just as soon as old Baldrick gets back from his walkies, (he likes to take me for a drag around the local fields for a few hours this time of year)...4 points
-
Ced, that cockpit is a beauty and, despite the model is going to end up hanging from the roof, I would not add a pilot there - IMHO, obviously. But I can't refrain from commenting on how tidy your workbench is and that pic with all the primed pilots' lineup is just a celebration of tidiness (I'm not sure what I've just written is proper English ) (I'm a little envious, here ) Ciao4 points
-
I decided not quite on the spur of the moment that the interior was nice enough that I really wanted to light it so it's not lost forever. So I made up these, using SMD LEDs with resistors on breakout boards (very convenient!) inside some kind of AFV transmission parts: I cut tracing paper diffusers and then filled in the "lenses" with five minute epoxy. It was a bit bubbly but I flat varnished over the top to make it look like frosted plastic. I thought the little tabs would be a good detail, but in hindsight they'd have been better cut off so I could dome the lenses - oh well. I wanted some decoration for the bare walls so I knocked these up very hastily and then aged them with paint and washes: Then I could close up the pieces The ends/ramps fit rather loosely so I added a sealing strip from plastic rod - you can see the light shining through but it should be blocked when it's painted. Lastly I finished up the barrels, flat varnished all the accessories and added some glossy weathering for oil/fuel/grease stains. So quite good progress, especially compared to yesterday's efforts... Still to do: White water, ripples, plants, Tyranid Warriors, and installing/detailing/blending in the bits. Cheers, Will4 points
.thumb.jpg.d17ff607fc7e89ed057e63fcb6f2a888.jpg)


This leaderboard is set to London/GMT+01:00