
Leaderboard


Popular Content
Showing content with the highest reputation on 31/07/16 in all areas
-
Hi gang, Here are some pics of my build of Gallery Models H-34. Model Master paints and Caracal decals were used. Pics taken my usual way in natural light. No tricks or filters used. I wish I had the photography skills of some on this this site, particularly indoor shots. So camera set on auto and I just start snapping away. Thanks for looking, hope you enjoy the photos. Rod http://i806.photobucket.com/albums/yy345/rodbettencourt/H-12.jpg[/iMG]20 points
-
Last finished model. Interior Glasses Ready. <a19 points
-
Have just completed this build for the NATO 80's Group Build. I used the new 1/72 Airfix GR3, Eduard zoom, Freightdogs corrected fin & Pavla gun pods. All brush painted using good ol Humbrol enamels & weathered with Ammo Black night panel wash & Tamiya weathering sets. The base board is a small plank of wood covered in modelling clay, painted with Hum 29 & Tamiya browns and weathered with Revell mud green powder. This is what I was aiming for And this is what I managed May I introduce Sqn Ldr Tes Tickle rolling in on the range Thanks for looking, as always C&C's welcomed.19 points
-
Hey everyone, Long time lurker here on Britmodeller. I have not had the chance for 16 years to build anything....that problem stopped recently with my little Fieseler that I finished a couple of days ago. All out of box, I only opened up the exhaust stacks as they looked a bit unrealistic with the solid mold. Had a lot of fun with it, especially the controversial "Vermicelli" paint scheme. I ended up buying a very fine empty Montana paint pen from Amazon and filled it with some Tamiya XF-23 and drew the squiggles with the paint. To me it looks okay. Took some experimenting to get it right and also the pastels for all the dust....great kit, everything went together fine, except for the port engine cowling that for some reason is touching the Argus engine...I'm sure I put that engine in straight so I must have bleeped up something else. Many thanks for all the tips and tricks I found on here! Hope you enjoy my effort.16 points
-
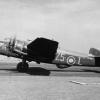
In 1943, the Westland Whirlwind was being withdrawn from service, one factor being lack of support for its Peregrine engines - together with the need to maintain two engines per airframe compared with the single-engined Typhoon intended to replace it. However with development of the Typhoon taking longer than expected, an interim solution was needed to support the second front expected to be opened in France in 1944. The remaining Whirlwind airframes were therefore re-engined with Bristol Mercury XVs, which were in plentiful supply and could provide enhanced performance running on 100 octane fuel. As the radial engines were air-cooled, the radiators could be removed from the wing roots making more volume and weight available for fuel tanks. The wing hard-points were strengthened, to allow carriage of two 1000lb bombs. Finally, the new MkIII IFF was fitted, the rod aerial under the starboard wing replacing the previous tailplane-to-fuselage wiring. Enough aircraft were re-manufactured to equip 263 squadron, which flew as part of 2nd Tactical Airforce over France from February 1944, until finally replaced by the Typhoon at the end of that year. ... Well, it could have happened anyway! Based on the venerable (if that is the right word!) Airfix Whirlwind, with engines from the old-tool Blenheim IV, spare propellers and spinners from the new Spitfire I/II and bombs from the Bomber resupply set. Following my reading of the regulations for D-Day stripes, and 24" wide stripes on the wings of twin-engined aircraft, as well as the 18"-wide fuselage stripes. I kept the sky band forward of the tail, and assumed the squadron codes would be re-painted over the stripes. Decals from a variety of sources, including some of the original airfix ones which had stood up pretty well for a 1980s-era kit. and a few more photos here: Westland Whirlwind FB.215 points
-
Afternoon Fellow modellers Here is the new Airfix Harrier GR3 with Pavla nozzles and Eduard PE. The decals are from Xtradecal and the Houchin starter from Flightpath Do you remember when back in the 1970s we saw the Harrier GR3 as one of our most fearsome ground attack aircraft? They would pop out from the woods and take off from a road. Not sure in that era of dumb munitions whether they really would have been all that effective? Andrew13 points
-
Hi everybody; Here's my last one : Italeri (formerly AMT/ERTL) Northrop YB 49 Flying wing. Sanding the whole thing took me more time tnhan putting it togetner ! I sprayed my model with Tamiya Bare metal silver . After a coat of clear varnish, the decals were placed at their proper location . I darkened the area between the tails and painted an anti-glare area just in front of the pilot's station. The pictures I found on Internet show that USAF doesn't appear anywhere on or under the wings and the black stripes must be corrected (the square zone ) to match with the real YB 49 Now I need to find room on the shelves... Critics and comments welcome, A bientôt, Pierre10 points
-
This is my daughters first attempt at an aircraft build. It is the Revell 1/32 MKI/II, and she used a resin seat that I don't remember where it came from. Paints are Tamiya. Still a few little bits to add and she'll be finished.10 points
-
Greetings from Canberra, Another couple of Bristol products, Special Hobby's Beaufort Mk.I and another Hasegawa Beaufighter, this time a Mk.XXI The Beaufort was an interesting build, and although pretty much satisfied with it, feel I could have done better. The perpetual problem of silvering I'm afraid, despite using the new Humbrol acrylic gloss. Still here it is, N1172, AW-S from 42 Squadron, normally based at RAF Wick, but detached to RAF Thorney Island in 1940-41. The Beaufighter started life at least 15 years ago as the ubiquitous UB-E of 455 Squadron RAAF, but I decided to strip the paint right back, clean it p and re-build it as A8-27 "Rockabye Baby" DU-A from 22 Squadron RAAF based at Morotai in early 1945. So there you have them... Cheers, Matt Beaufort... and Beaufighter...10 points
-
Here is a change from plastic, that old fashioned material, grows on trees.9 points
-
I'm calling this one done, Monogram's 1974 issue of the DO-335 Pfeil. There are nicer kits out there, but this one was in the stash, and I do like a challenge! Kit was rescribed completely, molded in engine details cut out and the forward and rear cowls closed, exhaust boxed in (and reduced in size), rear engine radiator flaps opened and boxed in, clear nav lights made from drilled acrylic rod, elevators cut free and dropped, molded in cowl guns removed and replaced with brass tube guns. The wheel wells, gear, and cockpit were detailed with copper and brass wire, aluminum tubing, sheet plastic and some photo etch belts , and Ultracast exhaust stacks (designed for the Tamiya kit) were used. Paint is Tamiya acrylic, and weathering is oils and pastels, with Cutting edge decals. Hope you like, Colin and an interesting size comparison, it shows what a huge airplane the Pfeil really was! - Thanks for looking, Colin9 points
-
After have finished the three whirlwinds I went on with the helicopters. 1/72 scale Westland Wirlwind Matchbox kit in RAF colours and Frog kit in Navy clothes Matchbox kit almost out of the box. I added some mesh to the nose and swapped wheels with the Frog kit. I added some details in the cockpit in this one. I used parts from an Sea King. Not correct but it is almost invisible anyway. I got the winch from the same Sea King kit. Again not correct but it look so naked without a winch. The decals are the remaining Matchbox decals. Horrible. The white lettering is fuzzy and this is the wrong version of Wessex for the decals but I let it pass.8 points
-
Well, today was my fifth wedding anniversary, by which point about 20% of all marriages in the USA end. We are still married as of 10:43 PM this evening, so we're doing okay. Granted, we forgot to put in a reservation to the fancy restaurant we were going to go to tonight, so we went to a Mexican place by our house that got both of our orders wrong, totally wrong, and prior to that, Mrs. P abruptly cancelled our anniversary breakfast to take Winston to something hellish called Gymboree [sic], but being able to make it through all that is just part and parcel of staying married for any length of time. While Winston was at Gymboree, meeting lots of other small people and their affluent, latte-quaffing, overprotective parents (have you ever seen a John Hughes movie? We live right by where most were filmed; my mother knew him reasonably well), I snuck into the grotto and did some work. It really does go together pretty quickly, all things considered. If I had more time, this could easily be a 1-week to 10-day build, I think. I might have to primer it and then go back over it with filler and whatnot to spot the flaws, normally I do that first. But time is just not with me.7 points
-
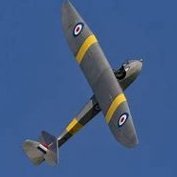
evening ladies time for another rumble around a Mk XIV...... .. I find when making more than one of something (like these two rad fairings), it is always best to make them simultaneously. It takes some discipline sometimes to stop yourself getting too far on one, and stepping back to the other, but for me it must be done this way, otherwise I run out of steam in repeating something from the beginning.. ..so I skinned the leading edge and nose cap on the other side, and also sanded out some of the deformity to get nice uniform rivets and skins.. ..the next skin section is all one piece so I needed to cut out the radiator flap - a little tip when trying to cut symetrical stuff accross compound vurves is to use a template - here a rectangle of litho is used to mark and cut the door.. ..masking tape is used to find the exact shape the panel needs to be - it is also used to mark out where features and rivets are,,, ..when peeled off and laid on some aluminium it is pretty straightforward to add the detail and cut to the lines... ..you can see after riveting the metal 'blows' a bit, it is later turned over and rolled onto a sheet of glass to try and work out some of the deformity.. ..the part is then burnished to shape with wooden tools like paintbrush handles & cocktail sticks - I start by taping the straight leading edge and working backwards onto all the flat faces. After that the curves are chased out to little kinks & pinches to be filed off after glueing.. ..you can see I have cut out the door opening so the metal can move & bend freely around the curves here.. ..the mushrooming of the rivets and other deformity needs quite aggressive sanding out... one thing I did find was it is extremely hard to re-instate rivets if they are sanded out as the metal gives too much and there is a danger of creating unwelcome great big depressions.. ..added in the lower fairing panels, and still have the tailcaps and a bracing strip to go.. ...now I need to catch up on the other one Hi PR - thanks for stopping by and your kind words yes, I think I have to, I am just thinking about what else I can put on the fret as it's one price so I might as well work up any parts I missed or just some random stuff that is always useful... TTFN Peter7 points
-
which reminds me Martin - I must send my kilt to the dry cleaners sometime. While I was away this week I started wondering about the differences from the CMK resin parts I have against their counterparts on the Hawk kit, and it really started to bother me. So, when I got back, I found some plans of the wing and printed them out at 1/48 scale and tried the kit wings against the drawing. Okay, I accept that I have no way of knowing if the drawings are 100% accurate but the kit wing lines up with these drawings perfectly - as do the ailerons, flaps, and other wing related bits - so that was good enough for me. The biggest question I had was the difference in width of the kit flaps on the top view versus the bottom view - but they agreed with the drawing so I could start cutting. To be honest, this was a bit scary as there was a significant step to cut through, and when gluing wings, I always try to make sure I get plenty glue in there so they never come apart at inopportune moments.... oh dear.... Once I cut through to the halfway mark from each side, it was a case of gently rocking the flap back and forth trying to break the seal... and not the flap itself! Eventually, I got the flap free from the wing. - You can see what I meant about the difference in the width on the top and bottom. Some how I am going to have to make that disappear when it comes to putting the wings together. Now I had a big chunky edge all along the trailing edge of the wing. Once again I resorted to scraping with the knife - thanks goodness for hard plastic! I managed to achieve a reasonably sharp edge all along the trailing edge. Now it was time to start filling in all those gaps and to try and get the wing to stay together. The kit also has a nice curved edge leading in to the flap underside so I have to get rid of that (cos I don't see it in any photo's). Styrene infills plus bits of styrene shoved inside the wing with some extra glue - and pray they all stay together. Same goes for the flaps. Styrene strips glued in to place to eliminate the big step. Senga has been out casting chicken bones again.... more sanding and shaping in my future... much, much more It's going to be fun (NOT!) trying to get those bits of styrene to look like integral parts of the flaps Then I had one o' them whadjamacallits.... brain waves, or annyerism or summat. If I flip the flaps upside down, then swap them over - port onto starboard and vice versa.... the styrene filler strip then disappears underneath the wing. Obviously, there's still a lot of shaping and skullduggery to come but flipping those flaps over certainly makes the job a lot easier. ... still lots of sanding and shaping going on in the background but nothing worth taking any photo's of.7 points
-
Hi Folks, Continuing to plough through my late Father's collection of aviation photographs (and ultimately my Grandfather's since he inherited these too). I came across these two photos which may be of interest since they are of aircraft not often seen in these markings. I make no apologies for the quality…they have been scanned from some very old Kodachrome 35mm slides that have, over the years, been stored in less then optimal conditions in several hot and/or humid countries around the world. Thankfully one of my friends was able to rather skillfully clean up the originals digitally for your viewing pleasure !. Anyway, I hope you find them interesting. Imperial Iranian Air Force C-47 Skytrain photographed at either Tehran or Tabriz Airport sometime in 1962. I am pretty sure the photo was taken at Tehran Airport since we were shortly to board the aircraft. Evidently during the flight, at approximately 10,000 ft and flying over a mountain range, the passenger door started to open !. The Iranian Air Force Air Loadmaster rather casually moved forward and attempted to secure it in place with a piece of rope for the duration of the flight which partially worked although everyone was deafened by the constant banging. My father was quite relieved to get my mother and I (i was 2 years old at the time) off the flight at the far end. Note the rather non-standard aerial fit on the lower nose and upper fuselage surfaces. I am hoping, on day, to reproduce this aircraft using the new Airfix kit and some decals cobbled together from the spares box and homemade titling. Next up, a very rare bird indeed. An immaculate Ilyushin Il-4 which had been personally gifted to the Shah of Iran by President Khryushev of the Soviet Union, I suspect in an attempt to get the Iranians to start buying Soviet equipment. The Iranians were, of course, quite reliant on US equipment at the time, operating a variety of secondhand types and buying some new, including F-86 Sabres before they embarked on a massive re-equipment programme which involved F-4 Phantoms and F-14 Tomcats. Unlike the rather well worn C-47s, this aircraft was maintained inside and out in immaculate condition and carries a 'Two Star' plate on the nose which indicates that it was probably on loan to the regional commander since I believe the photo was taken at Tabriz Airport, again circa 1962. Anyway, enjoy ! Mark6 points
-
ICM Ju 88 A5 1/48, with crew figures from IP and a cockpit etch set from eduard.6 points
-
And some more photos6 points
-
Greetings, Originally issued by Frog many decades ago, this build involves the Modelcraft reissue from 1996. Firstly, this has to be one of the worst molded kits ever. This is not a kit that can be quickly or easily constructed - it demands many hours of tedious work and endless scratch building. Some of the parts are so poor, they really can't be cleaned up or corrected. Every one of the remaining parts required some work, in some cases significant modification. In several instances, I decided to discard kit parts entirely and scratch build replacements as this was faster and easier than struggling with the kit parts. There is a PE set available for this kit from Atlantic Models, but I used 1/125 scale brass railings and other parts from Toms Model Works which helped tremendously. I also used similar scale photo etched inclined ladders I had in my spares bin (can't remember who made these). Many kit parts were improved with scratch built details or items from the spares bin. Although there are many faults with this old kit, it has great potential. If you enjoy scratch building and have lots of patience, this is a great project of a unique subject in a large scale. Many thanks for having a look, your questions and comments are always welcome. Cheers, Bill5 points
-
Hi Everyone, I`m relieved to say that this one is finished, my attempt at Academy`s 1/48 scale F-4J kit Finished to represent an aircraft of: US Marines, VMFA 232, the `Red Devils`, based at Nam Phong RTAB, circa 1972 The aircraft itself is mostly what is in the box except for the rear view mirrors and some added seat belts but I added some different armament to fit the units mission and theatre of operation These being some Eduard Brassin` Zuni Rocket Pods and some Rockeye Cluster Bombs from the spares box . The decals came from Furball `USMC Rhinos` set 48-012 Hope you enjoy, thenks for looking Cheers Russ5 points
-
This is my last Lithuanian Fokker D.VII, so this topic is finished for me. Next will be three of Polish Fokker and one from Finland, but I don't know when. I have 3 or 4 Roden and 1 additional Revell and 1 ESCI and 2 PE sets from Part for it. So I present you my Fokker D.VII - 5 from Lithuanian Air Service ca.1928. Enjoy it here both of my Lithuanian Fokkers in early national markings and last version of it5 points
-
Hello all, I've been lurking in the shadows and admiring the works of so many great modelers on this site for a while now. However, given the subject of my latest build, I thought it was time I finally contribute something. So, here it is... I'm no Tornado expert by any stretch, but I tried to model a front-line GR.4. Hope you like it! Todd5 points
-
Greetings! This is the classic Revell kit of the Forrest Sherman Class destroyer John Paul Jones DD-932. Not certain of the scale, but often reported as 1/319 or perhaps 1/320?. Anyway, it is the same kit as Alan P used in his excellent build of DD-936 in this forum. First issued in the 1950's, I built DD932 USS John Paul Jones as she appeared in early 1956 using a reissued version of the kit (USS Forrest Sherman kit #H-463 from 1972). This old kit from Revell has some very nice detail, but is also very crude in several areas. Despite its problems, the kit does capture the overall sleek lines of this warship. A large amount of scratch building and modification of the kit parts was required along with use of photo etch from various sets (primarily the original version of the Gold Medal Models 1/350 modern USN set) and many items from the spares bin. Finish included Floquil and Testors enamels, Krylon gloss clear, a black wash, and flat Krylon clear. UNI-Caenis 20 was used for the rigging. References included photos from several sources, especially a series of excellent images from NAVSOURCE and expert assistance from Rick E. Davis. Thanks for having a look, your questions and comments are always welcome. Cheers, Bill5 points
-
I was at the East of Scotland model show yesterday so didn't get any work done and today I have been mainly repairing some of my models that got damaged by a really aggressive speed bump in Dundee. I have got a bit more done though, first I sanded the primer all over and corrected the odd highlighted flaw with a touch of filler: Then I got some of the blue grey applied to the underside: That can harden up overnight and then it will be masked off in the morning. Bye for now, Nigel5 points
-
Moderators, Could this excellent build article and tips be pinned please ?5 points
-
Thank you guys! The painting continues a lot slower now. Conning tower rust practice. I was always going to do another layer of white paint on top of this grey. I'm scared though, XF-2 is so finicky, I can't put it on too thick or else it won't chip, but I don't want it looking too speckly. So I will do some heavy rusting round here, if I go over the top I have further incentive to paint over it. I made something to hold the schnorkel, I don't really care if I can't raise and lower it, but I'm going to try. It fits nicely in it's recess when under the deck, but when raised it's leaning forward. Hopefully I can fit this without causing to much damage. Rigging. I'm using easyline for the riggin, I printed some little brackets and pullys, but I'm still not fully sure what the best way to go is. Decking. I feel like all the hatches are getting a bit lost, and the surface is a little too precise. Here I cut them all out, After a bit of sanding around the edges, I put the hatches back in, flipped some over etc. It adds a nice bit of definition to the hatches. You can't see it here very well but the hatches are also at slightly different heights which further breaks things up. It's also interesting with the hatches missing. OK so I did the white chipping. I did a lot of work trying to get good at spraying XF-2 flat white. First it's mixed with meduim grey, this makes it a kind of warm light grey, the hull is slightly blue, so this white is warmer to balance it. I mix it with about 30% thinner, the x-20 stuff. I tried water but it's a lot mushier during chipping for me. It has to go on at a high pressure with a lot of paint flow, which means you have to be quick to add a thin coat. So there it is, sitting on top of 2 thick coats of hairspray, that were left to dry for a hour. I gave the white paint about 10 minutes to harden, else it goes mushy. My plan was to wear away the paint under the wintergartens, which will be in shadow anyway. I also wanted to keep the upper tower paint fairly un-chipped, U-991's diving eagle will go here. My Dad made me these super-awesome legs. I got round to cutting a temporary base for them. So much better (those other holes are different spacings and hole sizes). The legs are as long as the hull is tall, I messed up the holes in the base, that brass washer is supposed to be underneath the base. Cheers!5 points
-
I'm definitely a seasonal modeler; during the summer months I hardly have time to sit at the bench. I'm still putting along on Nellie though... here's some current shots: Almost there and not a moment too soon as I have a new box of pricey Trumpeter plastic just begging to be cut on!:5 points
-
Hiiii! Good news! The wings, fuselage and tail have all been scribed and sanded down. Oh, I couldn't just post this update without dry-fitting all of the major components together for the first time It finally looks like a Vulcan! Thanks for having a look, Sam5 points
-
Thank You Leonl It's time for an update. Actually here should read something like "The Incredible Adventures of The Spray Gun Man" Before I started to paint the camouflage there was still some detailing to do. That means: the Tail Plane center section. Take a look at this photo. It is easy to make with a knife and sanding stick. After that I painted the "Tiger Stripes" of 60 Squadron using a brush and Tamiya tape. Judging from photos it seems that the black band is twice as wide as the silver one. This is also confirmed in some of the books. I had a problem however. Some four years ago I found a "new" Humbrol shade labeled as 191 in a Finnish hobby shop. It was wonderful stuff. Very easy to apply with a brush and highly opaque. It also gave a beautiful silver surface AND you could brush a Humbrol Gloss (Hu 35) on top of it; absolutely no problem (Try that with Hu 11!). I purchased some new tins some time ago and noticed the Union Jack on them. This can only be even better I thought. It wasn't. It was absolutely rubbish! The new paint is more like gloss varnish with some silver flakes in it. Something that teenage girls would love to put on to their nails. It also takes ages to dry. I painted an Airfix Canberra with it and it took five layers until I was somewhat happy with the result. But back to the Javelin. I decided to make a mix. Half a tin of this new Hu 191 and half a tin of old Hu 56. It worked very well although it is not as shiny as the "old" Hu 191 or High Speed Silver. And HSS didn't fade in the Far East like it did here in Europe (weird would you say). I have had also some nasty moments wit decals with large white areas in them. Nothing is more frustrating than a camouflage pattern that is visible through a white decal. So here is the remedy I now use for all such decals. Off course the same goes for the wing Roundels as well. In this photo you see the correct Roundel size and placement for a "late" 60 or 64 Squadron Javelin. If you want to model let's say XH846 "JF" (Wing Commander Fraser's personal mount) from the "Heights of Confrontation" then you should use a smaller Roundel and place it further back on the wing. Before I started with the "Spray Gun" I attached the wind shield and the center glazing using MEK (Also known as Butanone; a very strong solvent and excellent glue for a modeller). NOTE that if you choose to use MEK you must not touch the clear parts with it! They are ruined instantly. I use MEK always for the clear parts because it gives an "unbreakable" joint. Another word of warning If you use MEK with clear parts: do not apply any "Clear Coats" before gluing. It will cause a "Frost glass effect". I also masked the hood rails not to get any extra paint on them to make sure that the hood will move easily. Using the masks I made together with Blu Tack worms I then applied the camouflage. And I wasn't happy with the result. Luckily I have been painting soft colour demarcation lines with a brush so I started again. Here's the trick. You need a new small brush. For example Italeri number 0 or 1. Soak it in water and then cut the bristles with a sharp blade to get a "blunt" tip. Then polish the first camouflaged surface (in this case Dark Sea Grey) with a grade 1200 paper until it feels smooth. Do not use water. Finally blow the surface to clean it up. Then dip your brush in the paint and wipe off excessive paint and start slowly painting. Simply just touch the surface with the brush perpendicular to the surface. This technique is very slow but with practice (and patience) gives beautiful results. When the camouflage was complete I started to make "Post Shading" using my own simple technique. I studied the photographs of XH766 to find out the visible stains and panels. My weathering technique gives a nice effect to the surface but it is not too visible. If you are looking a 1/48 scale model from a distance of one foot it should look like the real thing seen 48 feet away. So I follow the rule "Less is best". Here is my weathering technique. You need some oil based crayons, a piece of "Wet and Dry" paper and some cotton swabs. I use Caran d'Ache crayons exclusively. I have tried other branches also like the British Derwent Studio Line but these Swiss made crayons are the best for modelling purposes and Derwents for drawing (surprise, surprise ). You can apply a gloss cote on top of it and Caran d'Ache will not get mixed with the enamel lacquer. Then simply erase the the crayon with "Wet and Dry" to get coloured powder and ... ... apply the powder with a cotton swab. When happy with the looks apply a gloss cote to seal your weathering. Here is an example; the under surfaces of my Tarangus SAAB J32E Lansen. The basic colour was Hu 145 and I applied crayon "powder" directly to the painted surface before any gloss coats were applied. I used this technique also on my Phantom FG.1. Take a close look on the underside http://www.britmodeller.com/forums/index.php?/topic/235006098-the-north-sea-gt-sports-model-phantom-fg-mk-1/ Then it was time to mask the model and get ready for the under surfaces. I decided to go on with my air brush. Once again I studied the photographs and made an interesting finding. The colour demarcation line was painted a little higher in the Far East than it was here in Europe. In Tengah painted Javelins the colour demarcation line runs above the ladder handle in the rear fuselage not under it. I know, some two millimeters on the model but.... Here is the result. The HSS is not "shiny" as it should be but I am pleased with it. Only one coat was required using this paint mix. I have already applied gloss coats (brush work again). I am using a mixture of decals: Airfix, Xtra Decal maybe Alley Cat. Let's see. Thank You and hope to see You all again soon BR, Antti5 points
-
How do chaps. Now that I've finally got my NATO GB contribution to the paint stage It's time I made a start on my Vignette GB piece DSC_0001 (1) by Steve Witton, on Flickr The Dingo is a smashing little kit. Not a huge ammount of detail, but nice all the same. DSC_0004 (1) by Steve Witton, on Flickr Some nice figures in the Tamiya set too. Most of them are scaled down versions of 35th scale figures from the Cromwell and Churchill kits and the Infantry On patrol set. DSC_0006 (1) by Steve Witton, on Flickr These are the ones I'm going to be using. These are new tools I think as I dont recall seeing 35th scale versions in the past DSC_0007 (1) by Steve Witton, on Flickr Started work on the Dingo. Falls together without any problems and after about half hour i got to here! DSC_0009 by Steve Witton, on Flickr Think I'll need to find a bigger base for the vignette though! DSC_0008 (1) by Steve Witton, on Flickr The plan is to have the Dingo being supported by the three soldiers rooting out a Jerry or two. Or I may have the Dingo off the road with the three squaddies using it for cover. Not sure yet More as time allows. Regards, Steve4 points
-
Tarangus latest release comes in two boxings; one Swedish AF, one RAF (and some other options). The content is very similar to Tarangus Saab Safir, detail is about the same. Not extremely much, but not bad at all (since there are not much more details in the real aircraft...). Panel lines are fine and crisp, not deep at all and the clear parts look very nice. The canopy is moulded in one piece which might be negative - but I think it would be difficult to display it open, since the canopy opens "Spitfire-style", (tha plastic is too thick, so it would demand another construction). The Swedish boxing has three decal options, two SwAF (one with Draken-style camouflage and one all green) and one Swedish Army, with Viggen-style camouflage. In fact, Bulldog was the first aircraft to carry this camouflage. Sadly, there are no instrument decals, which is a pity since the instrument panel will be very visible. As always with Tarangus, decals are brilliant, perfect in all ways and nicely printed. A first look tells that this looks like a trouble-free build. And even if fit should be bad - which i doubt - there are few parts that have to fit... The only real challenge seems to be to find enough place for nose weight to prevent it from become a tail-sitter.4 points
-
After asking a question and getting some excellent advice about FG.1 bits I've decided to start a WIP thread on the one I'm currently building - XV582 M Black Mike. As a break from kits with time consuming modifications I just wanted to build something quick and out of the box, so a Hasegawa Phantom was released from the loft. I find it hard to believe that these kits are almost 30 years old, and they are still on a par with modern kits. The moldings are perfect, they go together really well and I've never had to use filler on them. I guess the only let down in modern terms is the shallow engine intakes, and for some the rubber tyres. I say exactly the same for the 1:72 Fujimi UK Phantoms The kit is being built straight from the box, with no extra bits. Just to give me some fiddling to do I've decided to model it in a 'just getting airborne' pose. I didn't take pictures of the early part of the build, so this is how far I've got. Hasegawa Phantom FG.1 by James Thomas, on Flickr The first coat of satin black is on at the nose and tail, being brush painted I rather do something of this size and uniform in colour in a couple of sittings. Hasegawa Phantom FG.1 by James Thomas, on Flickr Hasegawa Phantom FG.1 by James Thomas, on Flickr Cockpit is painted, using dry brush to bring out details, the tone is probably a bit too much on the blue side. Hasegawa Phantom FG.1 by James Thomas, on Flickr Hasegawa Phantom FG.1 by James Thomas, on Flickr After sticking the wing halves together it then occurred to me to droop the flaps. The leading edge ones were pretty hard to do, but getting there now, they are cut at the top (a right swine due to the angles!) and scored along their bottom piano hinge line. I've looked at loads of photos and there seems to be a condition on retraction where the outer LE flaps are fully up before the inboard ones, so this is what I'm trying to achieve. I've subsequently found some pictures that I took with leading edges completely clean at this phase of the take-off - doh! The plastic clear plastic cap in the wing mid section is a tight fitting sleeve for the stand rod to slide into and to give the take-off attitude. Hasegawa Phantom FG.1 by James Thomas, on Flickr I've extended the undercarriage legs to represent their fully extended weight off length, shortly before they get pre-shortened to fit in their bays. I used 1/72 Sparrow missile bodies to make up the oleos. The extended legs are compared here with the standard legs Anyway, thanks for looking and hope that you enjoy, any advice or criticisms welcomed!4 points
-
Hi Everyone Just like the proverbial No.36 bus, you wait ages and then 3 come along at once. So hot on the heels of HartDeco and Phone Phixers recently posted fantastic RFIs, here's my interpretation of Buccaneer XW547 as flown by 12 Squadron sometime in the mid 80s. My plan was to build something representing one those beautifully faded and dirty workhorses, and I also wanted to show off the unique shape that I really quite like; to achieve this this I may yet decide to remove the underwing stores........dunno yet. With so many options, the hardest part of this build was deciding what colour scheme, configuration, weapons etc to run with. I used parts of the Flightpath set which came with a pair of lovely Martels and so my subject had to be Martel capable; this blew my original plan for building XT273 out of the window. I was using Model Alliance sheet MA-48101 which included decals for a 237 OCU aircraft wearing the tail code 'FC' but I was planning a 12 Sqn subject. Then I stumbled across an online photo of a 12 Sqn jet coded 'CF', and a plan was hatched.......unfortunately getting to this point had taken the best part of a year. With Martels sorted, a look at stores options on the blackburn-buccaneer.co.uk website led me to a configuration carrying a CBLS pod under the stbd wing and a AN/ALQ-101 pod under the port. Sorted, all courtesy of Flightpath. The only thing is, I really like the look of the wing fuel tanks; possibly the best looking external tanks fitted to any aircraft I reckon, more of that later. A Neomega cockpit was used, a couple of bits were scratch built, some of the out-of-register decals replaced, and photos taken on my cellphone. So here it is. I hope you like it. Comments good or bad welcome as usual.....I've probably missed something as usual . Cheers Gaz As for fitting an underwing tank, showing the folding wings and airbrake, ooh and maybe another colour scheme...... Well, I have a cunning plan. To be continued !( Later.......much later.)4 points
-
Well i think i have finished the Leo 2 i have weathered the turret and top deck and tidied up the cam net. It is as probably the best i can do and i reckon resembles a panzer hot off the training area. I have added a Live resin ammo belt to the mg. The observant (Recce Troop) may have noticed the figures. They are Valkyrie and imo pretty damn good. There is plenty of detail that a wash will pull out. They are primed up ready for me to have ago at figures painting. I will report back once they have a less zombie look about them.4 points
-
Thank You All It's nice to have You around. I have started with the decals. As this kit has been waiting it's turn for two years I was a little nervous about the decals. The longer you wait to more trouble they will give to you. I was very pleased when I noticed that these decals actually behave nicely. My first Javelin back in 2014 required lots and lots of Microset and Microsol so this time I decided to start with Tamiya's "Mark Fit Strong". I also noticed that far more better results can be achieved if you firstly soak the model's surface with Mark Fit and then leave the decal to dry in the right position. Let's see how it goes... In the mean while here are some photos of the progress so far. More to come, stay tuned BR, Antti4 points
-
Thanks Sithman. Some more progress then, this time with some exhausting work: Right, lets get it on with all other parts that are yet to be finished. It never ends it seems4 points
-
The finished article, I finished the base this morning with some plaster of Paris. The photos were taken outside in some lovely sunshine. Thanks to VP and smuts for giving me the excuse to build it.4 points
-
Finished. Thanks for your company along the way. Comments bad or good always welcomed. Have a Canberra to finish in this GB then off to the Airliner GB with this http://www.britmodeller.com/forums/index.php?/topic/235006251-hs-airline-build-a-couple-of-747s-im-not-on-the-list-but-can-i-come-in/4 points
-
Italy is a level 2 partner, along with the Netherlands. The partnership levels were decided some time ago, and the UK was - and to date remains - the only Level 1 partner nation. There is some evidence to suggest that we will be the only level 1 partner, even if another nation turns up shouting 'Shut up and take my money!'. Britain - not just BAE - is the only level one partner. As well as bringing/sustaining somewhere in the region of 25,000 jobs in the aerospace industry (level 2 partners estimate about 6,500 jobs), it gives us some er... interesting levels of influence in certain areas of the programme which are unlikely to be discussed in any great detail in Flight International any time soon, if I can put it like that. You have to measure this in more than just the construction of the FACO facilities; the other partner nations had to be given some clear benefit for their not insignificant investment in the programme, which is what we see with the facility at Cameri. It might look like 'stealing a march' on BAE, but, with respect, it's a bit more subtle and complex than that.4 points
-
One last picture taken under the good old sun light4 points
-
Revell B17, Academy vehicles and Airfix P51's. 1:72nd scale.3 points
-
Hello All, I've been working on a Frog Westland Wessex (build thread here), and here it is: This represents XM328, a pre-production HAS.1, during the period of its trials with the Royal Navy. It was later converted to HAS.3 standard and it has been restored by the Helicopter Museum in Weston-super-Mare. Thanks for looking, Adrian3 points
-
Hello all, Didn't think I could join in just yet, however I see the rules allow a 25% start for any currently in the works. Luckily, my BAe 146 hasn't been worked on for some time and only has the fuselage together with cockpit window in and side windows filled in. So my Airliner GB is a BAe 146-200QT in TNT livery. Two options are Pan Air (ops TNT) EC-FZE or OO-TNT, the latter I cannot find any reference for and wonder if it ever existed? Kit uses is the Revell kit I bought last year for a reasonable price (Can't remember but somewhere around the £10 region) Don't usually use stock decals, but I will this time Kit itself looks easy in some respects, just hoping it won't be too fiddly. Doesn't require a lot of paint, but I'm not looking forward to painting the bit where the orange curves down and the black stripe, not done a paint curve before! This is what I have so far: Next job, sand the putty off (done now) and spray it white3 points
-
Thanks Brad & Steve for your comments on my post. I decided not to go the way of the ground camouflage, the photos do not really give a good indication of the scheme used on this aircraft as you both so rightly stated. Instead I found another photo of abandoned & wrecked He219s, presumably, also of NJGr1 found at Munster Handorf April 1945. These all wear the standard 75/76 scheme of most He219s, albeit with different applications of these colours. I have therefore decide G9 + SK will wear these colours, although the application is my own interpretation. I reversed the way the scheme was actually applied, then wished I hadn't!! I used the new Vallejo Luftwaffe colours (Model Air) & had great difficulties getting the mix for airbrushing correct I seemed to be continually cleaning the tip of the airbrush needle due to the paint clogging it !! Got there in the end though & hopefully will have her ready for inspection soon. Andy3 points
-
31/7 update: In which "Grungy Gertrude" gets even nastier. The thick mud is applied as far as I am concerned. I probably will add more mud/grass mix when this assault has dried up (it tends to shrink when dry ). Then I can start using the splash mud effects. The teeth on the drive wheel don't look right, will have to do something there and there are several places that need some wash attention. All in all I am very chuffed with the results so far (the only way out if things had gone really "pear shaped" would have been to bin Buttercup. That is no longer an option IMHO. A fantastic start by Lewis and a magnificent result. I have an excellent Picpoul de pinet chilled to celebrate this :yahoo: :yahoo: :yahoo: :yahoo: :yahoo:3 points
-
Base paint work blocked in: Still quite a few bits to highlight/pick out. I am not happy with the gutter paint work at this stage, it just seems bland.3 points
-
Ooo eer is that the time? Have been on holiday for a few weeks, but blimey I need to get my finger out. Right then, I have been cracking on a bit. First thing was to get the wings glued on. First up though was to give a little more depth to the duct thingies. As you can see they are a little one dimensional. I cut out the apertures, made a duct shaft out of take-away tin foil, some mesh from a pipe screen. Here is the finished job which I think adds a little depth. The pipe screen mesh could be finer, and I think I will purchase some fancy tea bags from a posh supermarket, as they use fine mesh for their teabags. However, I will have to have a few sharp drinks to summon up the courage to buy “Manuka chai infused honey herbal lemon whole leaf pekoe hibiscus rosehip” tea bags or whatever they’re called! Oh and I finished off the navigation lights: I spent more time on little details. There is a small duct on the nose. This is represented on the kit as a mere outline which you can just make out in one of the piccies above. I made a rough template by pushing a piece of heated sprue through a scribing template like thus: They were cut out and sanded: And after much faffing around here it is in place with an aerial made from beer can foil: While I was at it I added a little hydraulic piping to the airbrake and a new retraction arm from Albion Alloy tubing. The nickel tube save the need for painting it chrome, and looks more realistic than the kit offering which I’ve included in the piccie, even if it will hardly be seen. I’ve also cut out an aperture for a landing light. The kit provides a blob of plastic, but I reckon a little sanded clear sprue will look better. The hole just below and to the left of the airbrake aperture is to receive a little aerial I’ve made from beer can foil. There are a few of these spikey bits on the aircraft, which Italeri do provide for, but the plastic is moulded too thick and out of scale, hence my replacements. I haven’t stuck it on yet cos I’ll only bust it off. I got the SNEB pods finished off and applied some primer to show up any flaws. Very few fortunately. Here they are ready for the pylons – the latter had to be adapted with a bit of plastic rod. I got some primer on the exhausts and the drop tanks. I decided against using the bombs in the end as virtually all Harriers I’ve seen of the period have the drop tanks, so I’ve consigned the bombs to the spare box. Righto here we go with the tailplane in place, wings glued on, filled, sanded and rescribed. I also modified the main wheels undercarriage by cutting it in half. It will be rejoined latter by way of a small steel rod. The kit would have you stick it on in one piece when you join the fuselage halves together, but this makes for cleaning up the seams more difficult, and it would get busted off. Here then is the top view: I had to scribe the hatch openings as these are surprising absent on the kit. I also drilled out the vent on the tail. Again the landing light on the spine is a plastic blob. I sanded this back and will replace with a bit of sanded clear sprue. Next up is the canopy and a few spikey aerial bits and bobs. And then at last paint. In the meantime I am making jet wooshing noises…3 points
-
Here's my entry, a 1/72 Trumpeter MiG-29 built in record time (for me)... less than a week. Built entirely OOB with Hi-Decals for the Red 46 and Guards markings (kit decals for all the rest)3 points


.thumb.jpg.d17ff607fc7e89ed057e63fcb6f2a888.jpg)


.thumb.jpg.87669a5ffb8b13672a3d675087a46d42.jpg)


This leaderboard is set to London/GMT+01:00