
Leaderboard


Popular Content
Showing content with the highest reputation on 26/06/16 in all areas
-
After some years of Shelf of Doom exile, I decided to finish my Academy F-4B. Here it goes: All (constructive) opinions welcome. All (less constructive) opinions welcome too, if they're funny (I'm the one to judge). Cheers, S.21 points
-
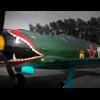
Airfix 1/48 BAC TSR-2, XR222. Background: The British Aircraft Corporation TSR-2 was a cancelled Cold War strike and reconnaissance aircraft developed by the British Aircraft Corporation (BAC) for the Royal Air Force (RAF) in the late 1950s and early 1960s. The TSR-2 was designed to penetrate a well-defended forward battle area at low altitudes and very high speeds, and then attack high-value targets in the rear with nuclear or conventional weapons. Another intended combat role was to provide high-altitude, high-speed stand-off, side-looking, radar and photographic imagery and signals intelligence, reconnaissance. Some of the most advanced aviation technology of the period was incorporated in order to make it the highest-performing aircraft in the world in its projected missions. Only one airframe flew and test flights and weight rise during design indicated that the aircraft would be unable to meet its original stringent design specifications. The design specifications had been reduced as the results of flight testing. The TSR-2 was the victim of ever-rising costs and inter-service squabbling over Britain's future defence needs, which led to the controversial decision to scrap the programme in 1965. With the election of a new government, the TSR-2 was cancelled due to rising costs, in favour of purchasing an adapted version of the General Dynamics F-111, a decision that itself was later rescinded as costs and development times increased. The replacements included the Blackburn Buccaneer and McDonnell Douglas F-4 Phantom II, both of which had previously been considered and rejected early in the TSR-2 procurement process. Eventually, the smaller swing-wing Panavia Tornado was developed and adopted by a European consortium to fulfil broadly similar requirements to the TSR-2. Source: https://en.wikipedia.org/wiki/BAC_TSR-2 "All modern aircraft have four dimensions: span, length, height and politics. TSR-2 got just the first three right ..." Sir Sydney Camm, 1965. Kit Manufacture: Airfix #A10105. Scale: 1/48. Type: British Aircraft Corporation TSR-2. Extras used: Eduard Big ED set, Airwaves Resin Ejector seats and CMK Resin FOD covers. Paints and colours used: Primer was Black Stynylrez. Paints used were Tamiya XF-54 dark sea grey, XF-2 white and XF-57 Buff for the main colour, citadel Foundation Paint - Macharius Solar Orange, AK Xtreme metal aluminium. Weathering: Black and grime clay wash used as a pin wash. Build thread: http://www.britmodeller.com/forums/index.php?/topic/235002573-airfix-148-bac-tsr-2-xr222/18 points
-
Please forgive this indulgence, but I thought it would be nice to have a photo of my last three 1/48 R&D Canberra's. They are left to right B.6 Hybrid WT333, HAPR.9 WH793 and B.8 Hybrid WV787. John17 points
-
Here's my attempt at SH's Skua in 1/72nd. I haven't finished a build for 20 years (not counting wargaming models). It went together well, I have learnt a lot since coming back to the hobby last year or so. Its by no means as perfect as I'd like it to be but I'm impatient to get some kits done! Colours are Vallejo, except Dark Sea green was Xtracrylix, but I had some trouble airbrushing that, Vallejo were perfect straight out of the tin. The scheme is a complete mess-up as I went off two of the drawings, and also got the colours the wrong way round! But just carried on regardless, used it as a practice build! Ariel wire is stretchy USCHI stuff, 0.001 OD, easy to use. New Airfix 1/72nd Defiant to come soon.16 points
-
Hello All, Here's the old Airfix F5A. It is OOB apart from a vac canopy, my own markings and a ton of filler. Build thread is here. Finished with AK True Metal (which I heartliy recommend) and a mixture of kit and home brew markings: Thanks for looking, Adrian16 points
-
After 8 flight in ETO Charles Yeager got shot down in this aircraft.. he survived, escaped, flew again and the rest is history..15 points
-
This has been built out of the box,apart from figures and adding more detail to the superstructure.Very enjoyable build,that I have moved straight on to Leander class frigate as "HMS Hero" from the TV series.Enjoy the photo,s and a big thankyou to Peter Hall for bring out these kits. http://i699.photobucket.com/albums/vv360/mightyhood41/Ton%20class/Up%205_zps8m77ale7.jpg[/img14 points
-
#19/2016 After two German cover versions, here´s finally the original Russian one. The infamous "Nähmaschine" as the Landsers called them, like my dad´s father who served as a supply driver in the Luftwaffe on the Eastern Front and experienced the Night Witches first hand. ICM kit without any aftermarket stuff, elastic thread for the rigging, Gunze and Tamiya acrylics for painting. The model shows an a/c of the 46th "Taman" Guards Night Bomber Aviation Regiment late in the war.14 points
-
Hi all, My WNW SE5a 'Hisso' of No.40 Squadron, RAF during early 1918, as flown by Capt. G.H. Lewis. Third party bits were seat belts from HGW, Vickers guns, prop by Doug Craner, figures by Kellerkind and turnbuckles from Gaspatch.12 points
-
Hi all, I've gotten back into modelling after a 40 year break and have started to build a collection of WW1 aircraft in 1:32 scale. I thought you might like to see my latest build. This is a Roland C.IIa (Li) ‘Walfisch’ Black III operating with Schusta 13 during early 1917, as flown by Vfw Hesse. • Manufacturer: Wingnut Wings. • Scale: 1/32 • Type: Roland C.IIa (Later version) • Paints/Weathering: Tamiya (by brush and Airbrushed), Flory clay washes and AK weathering washes. • Aftermarket: HGW seat belts, Gaspatch weapons, figures from Kellerkind and Model Design Centre, ground accessories from Historex and ground cover from Scenic grass mats. • Rigging: Gaspatch turnbuckles with micro nickel/silver tube from Albion Alloys. Rigging wires from monofilament (0.12 mm diameter). • Engine ignition leads: Created using fine lead wire. • Display case and plaque: Made by on-line specialists. My next build will be the Wingnut Wings 1:32 scale Sopwith Triplane.12 points
-
Having re-based my Tornado display, I thought I'd share some updated photo's This is a kit-bash of the Tornado's from HobbyBoss (wings and tail surfaces), Italeri (main fuselage, and bulk of the kit, and Airfix (Skyshadow pod). Also added are:- Aires exhaust nozzles NeOmega cockpit Flightpath Hindenburg fuel tanks Eduard Zoom set PJ Production pilots Revell 1/144 Tornado Gr.4 The aerial view of the desert was printed for me by Coastal Kit Display Bases. The original was two screen prints from Google Earth, and didn't look that good. Untitled by ian gaskell, on Flickr Untitled by ian gaskell, on Flickr Untitled by ian gaskell, on Flickr Untitled by ian gaskell, on Flickr12 points
-
The Antonov An-2 was widely used in Russia, and neighboring countries. A hardy, easily maintained, Short-Takeoff-Landing aircraft, it proved to be a life-line to many far flung rural communities. This little vignette is supposed to reflect the aircraft in that vital role. The Build: There was some minor scratch-building attempted on the aircraft: The cabin door was molded closed, so it was opened and a basic interior was created before joining the halves together. The engine was detailed a little as it's visible thru the front. The kit was missing the prominent wing-flap hinges, so they were created from 0.5mm styrene sheet. A bi-plane without rigging is no bi-plane at all, so despite the 1/144 scale, it was worth the effort. The cockpit frame was created with decals, unfortunately that area is one of the weaker points of the build. The rest of the scene is scratch built. The base was made from epoxy-putty, with real stones,graded sifted soil and match-sticks for the fencing. Static grass and colored saw-dust was used for the ground cover. Twisted wire and brush bristles dusted with colored saw-dust made the conifer trees. The chocks, access ladder and crates were built from stretched sprue, styrene sheet and choice expletives. Barrels were just bits of sprue. The man and dog were made from styrene sheet and stretched sprue. The man measures around 1cm in height, and had me cross-eyed for a few days after making him. On to the photos! Thanks for watching! Cheers, Alex.11 points
-
This is my fourth 'new tool' Airfix build since returning to the hobby - a Defiant night fighter in the markings of 256 Squadron, Feb 1941. It's out of the box except for masking tape seat belts and the Xtradecal markings. Paintwork is Tamiya rubber black with a coat of Humbrol Clear and then a few washes and pastels to try and break it up a bit. I also added some chipping with a silver pencil, but as usual I think my weathering is a bit too restrained. It's more visible in real life than in the photos. I really enjoyed building this one, and might have a go at one in a day fighter scheme at some point too. Thanks for looking Ian11 points
-
Here is my very first 1/48 hasegawa legacy hornet in VFA-192 Golden Dragons. I used the kit decals as well as twobobs. Some eduard pe for the cockpit and vinyl intake cover from steel beach. Exhaust cover courtesy of my kitchen aluminum foil. Painted with Gunze Aqueous acrylics. Hope you like it. Thank you for viewing. Eric11 points
-
Hi fellow modellers, This is my first try with 1/35 vehicle, i ve allways been a 1/72 aircraft guy, but its allways nice change habits to see what happens... My wife offered me this miniart model and i gave it a try. It s a nice model with some small issues, but the main difficulty was my inexperience...everything took a lot more time and it was harder to understand the processes...but i think it turn out nice (IMO) Now i m fully convicend...im still a "plane guy" but i ll be doing some vehicles in the future...it allows a lot more creativity in the weathering a much more ideias for bases and dioramas... I did a small base to fit the guys in : Give your opinion of what is good, but mainly what could be better !!10 points
-
Hi - A few shots from the 2016 Australian Model Expo held in Melbourne - Just a few as my skills are not on a par of David Bailey The official website has a lot more coverage via their Expo Blog on http://www.modelexpo.com.au/ A lovely Sea King Did not realise how big the Avro Arrow was Car door Typhoon Some nicely finished What If Hornets Part of a 1970's display9 points
-
First!!! Oops, sorry Here's my build; the Hasegawa Ju88G-6, a nice little model that went together very well and didn't give me any particular problems - that's more than can be said for the markings which were from Authentic Decals and were truly horrible and indeed were only usable thanks to a sort of bloody-minded determination that I didn't even know I possessed. The paints were a couple of old tins of White Ensign Models Colourcoats, RLM75 mottled over RLM76, various other colours were used for the interior and detail painting. The aircraft represented is W.Nr.621197 of NJ-Staffel Norwegen, I don't know anything about the crew or their combat records. Anyway here she is: Thanks to V-P and Smuts for hosting Cheers, Stew9 points
-
Hi peeps, here are my first two completions for 2016; Airfix's B5N2 "Kate" and the Academy P-40N, both 1/72. The Kate is strictly Out-Of-the-Box, down to the colour recommendations Airfix cited with Nick Millman's help. The only aftermarket used was Peewit canopy masks: The P-40 has been the subject of a few extras, however. The exhausts, spinner and prop blades have been replaced with Quickboost items and I managed to graft (after some fun and games!!) the Squadron vacform canopy intended for the Hasegawa P-40N on to it. This was also my first go at masking a canopy the tedious ( ) way for the aft and sliding sections. The windshield was done using an Eduard mask intended for the Hasegawa P-40E altered P-40N pattern. I have to give thanks to Occa, LDSModeller, Nick Millman, Pete Mossong and everyone else for the help they gave when I made my initial POST relating to NZ3254 back in February: Thanks guys! Comments welcome! Mike.8 points
-
Here's my effort at the 1/72 Airfix new tool BP Defiant. Built out the box except some PE seat belts added. Used Humbrol Acrylic 33 out of a rattle can. Maybe gone a bit OTT with the weathering! Think the wheels do look a little small, should have maybe used those resin upgrades that are available.8 points
-
All 1/48 Attack squadron F2F Icaero Designs IAR 81c Lone Star Models F-15 Reporter conversion of HobbyBoss P-61B8 points
-
Hi all, Continuing with my growing collection of WW1 aircraft, here’s the latest. It represents the Sopwith Snipe, Serial No: E8069, of ‘B’ Flight, No.4 Squadron, Australian Flying Corps (AFC) in 1918. It was flown by 2nd Lieutenant Thomas Charles Richmond Baker (12 victories), DFC, MM and bar. He was shot down and killed on the 4th of November 1918, aged 21, just a matter of days before the end of the war. In February 1919, he was posthumously awarded the Distinguished Flying Cross. • Manufacturer: Wingnut Wings. • Scale: 1/32 • Type: Sopwith Snipe (early) • Paints/Weathering: Tamiya (by brush and Airbrushed), Flory clay washes and AK weathering washes. • Aftermarket: HGW seat belts, Master guns, figures from Kellerkind and Wings cockpit figures, propeller (hand made by Doug Craner), ground accessories from Historex and ground cover from Scenic grass mats (plus stones from my garden). • Rigging: Adjusters for all flying wires (not turnbuckles - made from micro nickel/silver tube and RB motion nuts) with monofilament for the wires (coloured with silver ink pen). All control wires at the tail were micro-tube with GasPatch turnbuckles. • Scratch built: Supports for the guns boresight. • Display case and plaque made by on-line specialists.7 points
-
Hello everyone,this is my last finished model and the first one that i post here, it is a Bae Hawk from Airfix in 1/72 scale. Easy to assemble and good in general terms. It has added photo etched parts of Eduard , resin wheels from CMK , a pitot tube from Miniature Master and some own caps added as air intake and remove before flight. This represented the aircraft of the Indian Air Force (IAF),from training squadron Bidar airbase. It is advanced training aircraft and attack powered by a jet engine manufactured in the UK. It made its first flight in 1974 as Hawker Siddeley Hawk. The Hawk is used by the Royal Air Force and other air forces as a trainer and fighter jet low cost. Is still in production with 1,000 units sold to 18 customers around the world. General characteristics: Crew: 2 (student and instructor) Length: 12.43 m Wingspan: 9.94 m Height: 3.98 m Wing area: 16.7 m² Empty weight: 4,480 kg Curb Weight: 3,000 kg Maximum takeoff weight: 9,100 kg Powerplant: 1 × Adour turbofan Rolls-Royce Mk. 951. Performance: Maximum Operating Speed: 1028 km / h (639 mph) (Mach 0.84) at altitude. Range: 2,519 km (1,565 mi). Flight ceiling: 13,564 m (44,500 ft).7 points
-
My guests left earlier than I expected so I got a bit more done today that I thought I would. First I finished cleaning up the props: Next some more work on the skis. The claw shaped feature under the frame is part of the braking system. There should be a forward facing extension to it which then joins to a spring, for the extension I folded a thin piece of PE from my spares box: That was then inserted through the front of the frame and glued in place. Next I made the first spring from 0.5mm brass tube sleeved over some 0.2mm nickel sliver wire: Here's how it looked finished: Using that as the master I got the other four finished: I have numbered the skis as they each have an optimum position. The last job of the day was to consign the unused kit parts to my spares box: The last bit of construction I have to do now is to add some details to the engine. Bye for now, Nigel7 points
-
Thank you all very much gents; the remaining jobs didn't take as long as I imagined, so I'm calling time on this build now... here's how she ended up: More pics in the gallery here. Thanks very much to Enzo for setting the Group Build up and to V-P and Andy (Smuts) for hosting, and to everyone who passed by and dropped in, it's been a pleasure, as usual. Cheers, Stew7 points
-
26/6 update: Tools given a base coat. Spare track lengths given a coat of Vallejo track primer. Various odds and ends painted, fitted or grounded. Touching up in progress as is the mind numbing track building process The wooden block for the jack is the OOB plastic square. I grounded it with Vallejo Iraqi Sand, distressed it with a hacksaw blade, gave it a burnt umber oil coat and then used a moist brush to remove most of the oil wash. After blasting it with my "El Cheapo" hair dryer ( MiG does not approve of this :bleh: ), i fitted the other parts to it and gave it a final resting place on the left hand side of Buttercup.7 points
-
Good day, gentlemen. This is my first model of vehicle, I'm an aircraft modeller). So please be forgiving to this my work. Any of your comments and suggestions will be greatly appreciated. Thank you for attention.6 points
-
Flickr finally responding: Untitled by Ced Bufton, on Flickr6 points
-
I've decided what I'm going build......Imagine the scene... the front of a French café and a German soldier seated out front, dining on a salad with vinaigrette. Vignette 'Vinaigrette.' Maybe not. Badder.6 points
-
Hello there, I started the Spartan about 3 years ago and this is now my second rollout for 2016 (which is already quite a lot for me...) It took me sweat and blood to finish it and almost landed in the trash bin, after a serious incident with a hot spotlight... But, I managed to save her and proceeded to the very end. As for the kit - it is from Italeri (1/72) and...well, not the best fit. But ok, the guys from Italeri did a good job all in all. Details are more than ok and they were bold enough to produce a plane like this, that is not that popular after all (imho). And still better than any resin kit... The decal-sheet is from Ronin Decals. Never worked with decals thin like this. They are excellent, but one has to be very careful and patient, because they tend a lot to "roll over". Other than that, they resist to a proper amount of tear, unless you really mess it up. Nevertheless, there is a drawback for this sheet. I found the walkway color tone being wrong. So I had to mask everything (which was probably anyways better and smarter, but a lot of work) The colors came from AK and it's the first time I've been working with these. They are pretty good, have a very good adherence and the color tone seems to be spot on. (again imho) I used as suggested by the decals sheet FS36099 / FS35237. Aftermarket parts came from Eduard ED73394 (Detail Set) and Eduard EDCX281 (Mask) Ok, enough of writing, I hope you enjoy my effort and on to the pics:5 points
-
Hi Next from my current series of "old and odd Germans" - Heinkel He 60 "La Fiera del Mar"/512. The kit by Azur (first kit released by this company) with some modifications (for example forward fireing MGs added). Painting scheme from Legion Condor (AS 88), based in El Atayon-Melilla (a Spanish territory in North Africa) 1936 and early 1937. Decals home made and some from drawer. Let me show two photos of real thing, which I found in Net: (Please note - no white wing ends as it is displayed on coloured profiles of this machine). And here is model: Comments welcome as always Best regards Jerzy-Wojtek5 points
-
hello fellow artists. I leave you here a model i made last year. It is academy's F-4J phantom which comes with jolly rogers decals. but i decided to build it to resemble the tomcatters scheme. With decals from the original kit and the ones from superscale decals, which i was lucky enough to find them on ebay. Also resin upgrades to the intakes, wheels and tires, tailhook, and exhaust pipes. minor scratch into the wheel wells, and finally painted PE for the cockpit. now, to the pictures. regards from Mexico!5 points
-
In preparation for a move into another room, I have emptied my display cabinet and thought that I would take the opportunity to photograph the 1/144th aircraft whilst they were all out together. Some have featured on Britmodeller in the GB section, so apologies to those of you who may have seen them.. A pair of Eduard MiG 21's One exception is the Tamiya 1/100 scale Me 262 and Me 163 This was my attempt at recreating the 'inverted' scene from Top Gun using Revell's 1/144th Tomcat and F-5 for the MiG 28 . Here is the Revell Lightning F.6 A Whirlybird 74 Sqdn Phantom A collection of Revell Tornados alongside a Dragon Tornado F.3 and finally a couple of Eduard Spitfire Mk. IX's with DU-N being the most recent completion.5 points
-
No. 151 Squadron, Wittering, 22/12/40 – April 1943. When 151 Sqn arrived at Wittering they were flying Hurricanes and had just completed a spell of night-flying training at Bramcote and was being re-equipped with Defiants. The squadron received Hurricane IIcs in June 1941. One was Z3467 DZ-Y. By January 1942 the squadron’s role had changed to convoy patrols along the east coast. The Hurricanes were retired in April 1942 when re-equipping with Mosquitos started, 151 Sqn moved to Colerne in Wiltshire a year later. This is the Revell (04144) 1/72 Hawker Hurricane IIc5 points
-
My Harvard is done too! Dave5 points
-
Cheers Si Tetra fire extinguisher test fitted. Perfect Started work on the jacking block, removed all the moulded detail and added the wood grain with a pin and scriber. Not the best photo but its not much really, loads of PE parts to add to it yet anyway. Dan5 points
-
After seeing Julian's Tetra Fire extinguisher on his 1/16 PZ IV build he reminded me that I had a set of decals in 35th scale so I set about in scratch building a Tetra extinguisher from plastic card and rod. I added the handles from the Eduard PE set, Simple And the decals Enjoy Dan5 points
-
evening folks thanks chaps in fact I had an email this morning from Ken who maintains TZ138 in Canada with some pics he took of the rib and wheel well and thankfully it is the type as seen above so I am pleased and can rest easy & just build them now.. thanks to Tony Taylor I had some great shots to work from - the most obvious feature is the 'L' shaped flanges that border the cutout for the leg... ..I tried making the 'L' section and bending it, that didn't work, I tried making the section and rivetting it, that didn't work either so after trial and error I ended up making a template, rivetting next, bending, then cutting.. ..the bending is best done by doing the flat bits first, and then nibbling the corner with flat nose pliers.. this is actually another test part before I worked out to rivet first.. ..again the fold tool being used, this time to break along scored lines and free the part... ..and one of ther finished ribs - this is the face side - once the walls around the tyre are done most of each end won't be seen.. ..and the leg side with some fittings for pipework... ..and in place.. ..now starting to work out how to do the walls - a test part being developed.. thats it for now TTFN Peter5 points
-
Hi all, I thought you might like to see my Pfalz D.XII as flown by Jasta 32b during 1918. The kit was from WNW with third part extra's of hand made turnbuckles, guns, seat belts from HGW and figures by Model Design.4 points
-
G'day All Once again Aztec Decals are partly to blame for this motley collection of F-4U Corsairs as their excellent sheets have once again made building some models that I had wanted to build for a long time possible. WWII aircraft nearing their "use by Date" are a favourite subject of mine. The US Marines example is from the old Matchbox F4U-4 built OOTB using kit decals but painted green bands while the F4U-5N is from the Italaeri kit marked as an Argentine example flown from Punta Indio naval base with markings from Aztec's " Cunning Devils Corsairs" sheet. As for the Salvadorian aircraft, both are Goodyear FG-1Ds from the Hasegawa F4U -1 kit and represent two aircraft flown in the 100 hours or soccer war. The grey one carries the remains of the "Airshow" scheme as it was painted for a display while 207 retains the sea blue scheme of her former owners and the "Stars and Bars " showing through the worn paintwork as she was one of several cobbled up from spares in 1968 when the Corsair fleet had dwindled to six examples. The grey panels show evidence of parts "borrowed' from less fortunate aircraft. Even the cowl ring is in green and brown camouflage. Lastly , 616 is a Honduran F4U-4 built from the Hobby Boss Kit and formed the main opposition to the Salvadorians in the 100 hours action that legend claims was fought over the results of a Football match. These Corsairs were all great fun to build and there many more of them waiting to be modelled. Thanks for looking, Trev. IMGP7918 by Trevor Putterill, on Flickr IMGP7919 by Trevor Putterill, on Flickr IMGP7931 by Trevor Putterill, on Flickr IMGP7929 by Trevor Putterill, on Flickr IMGP7930 by Trevor Putterill, on Flickr IMGP7921 by Trevor Putterill, on Flickr IMGP7922 by Trevor Putterill, on Flickr IMGP7923 by Trevor Putterill, on Flickr IMGP7925 by Trevor Putterill, on Flickr IMGP7926 by Trevor Putterill, on Flickr IMGP7927 by Trevor Putterill, on Flickr4 points
-
I had always been fascinated by the idea of this proposal for Cavallier aviation in Florida to build an airframe to meet a USAF requirement for a COIN aircraft based on a P-51D and powered by a Rolls Royce Turbo prop engine. It was tested extensively and met the requirements but word has it that the USAF did not want to be seen to be investing in out dated WWII technology. I believe that the later Piper Enforcer also fell foul of the same mind set. My model ,built some time ago, uses the ancient Matchbox Mustang kit and is based on drawings found in the old book on how to build the Airfix 1/24 scale P-51, put out at the time that kit was released. I cut off the nose just ahead of the wing and plugged the hole with a plasticard bulkhead a 6mm hole was then drilled into it and a piece of Plastistrut tubing of the correct length, capped with the air intake and propeller taken from an Airfix Friendship and the whole thing built up with Plastibond filler which was later sanded to shape and the under belly scoop was also cut off and filled. The huge exhaust was also made from plastic tubing and the extended fin tip was from card. A simple plunge moulded deeper canopy completed the job. Give one a go if you can source the F-27 intake, a simple cheap homemade conversion for all Mustang fans. IMGP7937 by Trevor Putterill, on Flickr IMGP7938 by Trevor Putterill, on Flickr IMGP7939 by Trevor Putterill, on Flickr IMGP7940 by Trevor Putterill, on Flickr IMGP7944 by Trevor Putterill, on Flickr4 points
-
I didn't spend much time with the Hawks this weekend - nothing much changes 😊 (save of course for the dramatic political and social change which has just happened but wot mustn't be mentioned here 🤔) But I did get the airbrush out for the first time in yonks and touched up the rear cockpit bulkheads - after all life must go on (self censored inappropriate political comment 😬): Pleased with them little radiused corners. How sad am I eh ? 😀 While I was at it I gave the resin seats a squirt of dark sea grey. Ready now for detailed painting and straps, pads etc.4 points
-
thank you folks - appreciate you taking the time to leave encouraging comments, or just dropping in to see whats going on I am trying to get the wheel well shapes right, and looking at the real thing the opening where the wheel is has the lower wing skin just folded over for a cm or two and then the lining panels fix to this.. I decided to line the edge with litho to get a nice even working surface.. ..and then faired this down to skin level.. well, as with many things on this build, I wasn't happy with it after some cross checking so needed to do it again. I had printed a scale plan view from the Monforton book onto transparent copier plastic through my home printer - it was a nervous moment as I thought I might break it or the plastic might melt. The ink came out a bit wet, but while I had it I laid it over the wheel openings and they were not right in some places - up to a few mm out and the curves themselves were a bit off. I slept on it last night and wondered how to sort it out.. I could fill the edges, I could re-line it with some plastic and shape it, then it struck me - why not just use the plan to make the right shape in litho, strengthen it and fair it into the wing.. ..soon after that I had another brain fart and thought it would be better to recess the panel into the wing instead .. I marked out the shape and laid Dyno tape around the borders so it would be a good edge to 'scribe' against - only the scribing was done with a wide flat blade... ..the P38 filler that makes up the bottom of the wing took the treatment well and I was pleased with how neatly it came out.. ..I put a small square section stock around the hole itself and then faced that with litho too.. ..they both fitted well and are 100% accurate to plan ..you can see I also used the plan to set out where the inner wall linings meet the wing top skin and how the circle is offset which creates the angles the walls are set at... ..used the bits of plan in the wells as masks and went around the edges with a sharpie so I know where to build to - I also had to reskin one of the well roofs as I had made the litho too short - at the back the walls cant at quite an angle & go quite far backwards.. ...all I can say is thank goodness for the Monforton book - it makes it like building an old Guillows kit from a plan - just wheel out the drawing and make the parts.. it's going to get complicated now with curved angled walls - but thats for next time.. TTFN Peter4 points
-
Thank you Arnold ,Ozzy, Jaime and Rich Rich here is my practice /warm up sheet that iv used for over 5 years . Just used my new second hand Iwata HP-BH had to thin the paint down ,lower the pressure and get in close Still got to figure out how to use the Mac valve . Decided to use the Patten used by Pastor John on his build which is of this style Used some Model Master RLM 75 for the blotches thinned to homeopathic amount . and re did the rudder with some poly scale RLM 82 as the 83 mottle i did yesterday didnt look different enough . I used White ensign ACOL 04 for the red putty around the joint withe the replacement Berlin nose . Rich ,how about the new Revell Me 262 night fighter thats to come out later this year4 points
-
For your enjoyment and nostalgia, an OOB build of Polar Lights re-issue of the aurora 8 window model of the Seaview submarine which spawned a movie and 4 seasons of television, which i remember as a kid. I now have the DVD boxset to digest and probably have a giggle over now. Anyway the kit considering its age went together well with very few fit issues, a small amount of filler, the only problem was the front windows lining up, probably with a little more care they would have lined up, bit this was a spur of the moment build for some fun, taking a break from my more serious builds. Therapy it was and it worked. It was painted in humbrol enamels, no masking (practising my steady hand LOL) and then humbrol satin coated, the windows to the doors on the sail were kristal cleared. Finally i found a very realistic octopus on fleabay to finish it off. Enjoy Chris4 points
-
Cheers Chaps So a bit more progress, detailing the jack, just a few missing details added like handles. Swapped out the Standard dragon clamps and added these nice brass RBM late war German Items, now the same as the front shackles. Last clamp assed to AA gun mount. Just needs a bit more tidying I've also removed the moulded hinge detail for the rear mud guards so I'm now ready to add the PE versions once they are complete. Cheers for looking Dan4 points
-
Hey all, This is my latest build. I built this plane for a fellow in Turkey, who's dad apparently flew this exact aircraft at the tiger meet. I used MM acrylics and Tamiya acrylics. The seat is aftermarket along with the photo etch in the cockpit. The build was pretty easy without any complications. Hope you enjoy the the photos..🇺🇸4 points
-
Ready for transfers by Ced Bufton, on Flickr4 points
-
Right time to stop faffing about and continue with this build. I had a bit of downtime forced by some home repair work that saw my entire 1/72 airshow lineup parked on my workbench. With all that commotion long finished I finally got back to it. I decided to tackle the glazing next. Masking up in this scale which was a pleasant surprise, also the glass bits were thankfully blemish free saving me that particular heartache. I had a few small issues with the fit though. There was a reasonable sized gap between the front cowling and the windscreen. I had to break out the CA and baking soda to eliminate it which is always a blood pressure raising ordeal with transparent bits on the line. Luckily I think I managed to clean it up well enough without making a meal of the glass. The rear glass went on well enough but again there was a small step around the edge. I gave it a swipe of perfect plastic putty to blend it in a bit as there was no way I'd clean that up without a lot of collateral damage. It'd also be hidden behind the sliding section anyway so I wasn't too fussed. Once the fixed glazing was in place I looked to mask up the open cockpit which turned out to be a real challenge due to the angled windscreen, protruding headrest / armour and a number of little sliver gaps around the cut out access hatch. I couldn't use the spare closed canopy as it required some material to be removed from the fuselage sides that's needed for the open canopy arrangement. I couldn't just jimmy the sliding canopy bit on either as it overlapped the fixed glazing frames. I managed to cobble together a franken-mask out of foam, the cut out access door bit and carefully positioned bits of masking tape. I'll have to be mindful of my spray angles as I'm not 100% confident that I haven't missed some tiny hole somewhere. I then shot the seams and the glazing with some interior green to check if it looked ok under paint, which it thankfully did. I'll now have to turn my attention to the wings...3 points
-
and finally....3 points
-
3 points


.thumb.jpg.158e2e086d45b8f96b7d93b8bee8dc21.jpg)


This leaderboard is set to London/GMT+01:00