
Leaderboard


Popular Content
Showing content with the highest reputation on 21/06/16 in all areas
-
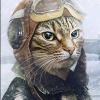
Hello Here a few pictures of my last build. I used the recent Italeri offering, with Musthave! resin wheels and seat. The whole build, paint and weathering process is detailed in the issue n°3 of the french "Cocardes" magazine: To go further, here is my box review on Cocardes websites: http://www.cocardes.com/2015/12/visite-guidee-du-premier-mirage-iiic-au.html And a walkaround: http://www.cocardes.com/2015/12/walkaround-du-dassault-mirage-iiic.html Hope you like it! cheers Romain21 points
-
Hello. My next work, Most popular kit in a very famous painting. Tamiya 1/48 plus small PE parts from Eduard and paint Mr.Paint. Enjoy !!16 points
-
Another pair of Russian airliners, both by Zvezda Both kits were relatively easy builds but as always, the cabin and flight deck glazing is an issue. For the Tu134 I tried masking the windows but it didn't really work. For the Tu154 I just sprayed the white all over and used the window decals. The landing gear on both kits is very fine and a little fiddly in this scale with the added bonus of lots of wheels to paint. The Tu134 is finished in the kit decals which were surprisingly good. The Tu154 is finished the Slovakian government markings with decals from BOA decals. The Tu-134A The Tu-154M The two together.13 points
-
Kit has been painted with alclad II metal finishes and floquil old silver. Wash used is a water based Winsor & Newton cotman water colors. I also used the wash as gas spillage around the gas tanks. Small areas of chipping paint was achieved using a silver pencil, I would have prefered to use the hairspray method. Exhaust was created using thinned out flat black and dry brushed over very lightly with a light grey . Hope you like the way it turned out. Thank you for looking. Steve12 points
-
Latest of the bench is the new Airfix Defiant in the markings of 410 Squadron, RCAF Drem, 1941. Cracking kit, and good value for the price. Decals are from Xtra decal. Would I do another one ................................. YES On to the pics. Please feel free to comment. Cheers Dick11 points
-
Hi, i'm new here, this is My first post 1/48 Bf-110 D, ZG76, North Sea, 1941 built this myself recently from a Dragon kit with a Eduard cockpit PE.10 points
-
Hi Folks Title says it all,not the easiest of builds but I got there in the end. Finished with Xtracolor and Tamiya paints,decals straight from the box. Cheers ian10 points
-
It would look like this. A great day spent with the crews and B-52's that are currently in the UK at Fairford. Going home Thursday sadly...9 points
-
Hi guys, I'm proud to present my last model, the Sherman M4A1, 191st Tank Battalion, Salerno (Italy) 9 September 1943, unloading from USS LST-379. A month ago, my friend Maurizio gave me this built model and proposed me the painting phase. In four weekends, I painted and completed it and these are some photos. I hope you like it. ByeBye9 points
-
Hey guys, one week ago i have finished this kit (built as a birthday gift), but i did not have time to create the RFI till now For anyone interested, some quick WIP is here http://www.britmodeller.com/forums/index.php?/topic/235002039-f6f-hellcat-148-eduard/(i was rushing to finish the kit in time so i did not take that many shots during the build). The kit is totaly great and amazing, well recommended to everyone interested in building the Hellcat in 1/48! I have added some details here and there, mostly scratched (tank infront of cockpit, reworkded cockpit, opened and reshaped flaps) For painting i have used Mr.Paint brand paints for the very first time and also these are totaly amazing and wonderfull (for airbrush only though), well recommended as well Weathering was done by using various Ammo and AK products (chipping fluid, fresh engine oil, fuel leaks, panel line washes), a bit of oil colours (mainly to tone down the washes a bit) and some pigments of various brands. Here is the result - i know i could add some more weathering and dusting around if i had time, but i was running out of time badly But i m still quite happy with the result So first some scratched details And the final look Thanks a lot for watching and have a great day9 points
-
I think you're right Giorgio - it may even be better to sequence the painting of the rear cockpit bulkhead and the sills until after the fuselage has been painted.🤔 Excellent thanks for the confirmation 👍Not much time on the Hawks today in the end. But the airbrake mods have turned out neat enough: And I think the partially drooped look will add an unusual touch:9 points
-
Hi mates, Having just finished one folded wing project (my Fairey Firefly TT.4), and having not learned any lessons by doing so, I decided to jump head first into another! And in resin to boot! This time it's the de Havilland Sea Venom in fabulous 1:72 scale. The build consisted of the basic Sea Venom kit, plus the optional folding wing set, both from those master craftsmen in the Czech Republic, CMR. I love CMR kits - the level of detail is astounding. This project is a tribute to Steve Long (NAVY870) from the Camden Museum of Aviation in Australia. Steve was such a big help with my Firefly build, that I wanted to build a model of an aircraft that he restored, Sea Venom WZ895. He was a huge help on the build, making sure I had all of WZ895's configuration correct. I think I got it all! Project: Royal Australian Navy de Havilland Sea Venom FAW.53 Kits: Czech Master Resin (CMR) de Havilland Sea Venom FAW.21/22 & FAW.53 (kit number 231); Folding Wings Set (kit number DS7207) Scale: 1:72 (Her Majesty's Own Scale) Decals: From the kit, representing WZ895, 870-NW, No. 724 Squadron RAN, Naval Air Station Nowra, Summer 1959 Photoetch: Included with the kit, primarily for the cockpit, control surfaces, antennae, windscreen wiper, wing fences, etc. Vacuform: Two copies included with the kit, and old Fumble Thumbs needed them both! The canopy is supplied as one piece, and must be cut into three sections to be displayed open Paint: Gunze H333 Extra Dark Sea Grey, H331 Dark Sea Grey, H74 Sky, H11 Flat White, H12 Flat Black, H77 Tyre Black, H322 Phthalo Cyanine Blue, H329 Yellow FS13538; Alclad 101 Aluminum, 115 Stainless Steel, 314 Klear Kote Flat, and a bunch I forgot about. Weathering: Post shading to simulate paint fading and wear, and the assorted stains and hydraulic fluid/oil streaks. I applied a grey wash to the Sky underside, and a black wash to the EDSG topside. Improvements/Corrections This was built pretty much out of the box, the only things I added were: Canopy shades Whip aerials (two on the rear canopy and one under the starboard boom) Longer jury struts (the kit supplied struts were too short for proper alignment of the wings when folded) Build thread: Link Now, let's see some photos! Enjoy! Perhaps the most difficult part of the build was getting the alignment of the wings correct. They're not perfect, but I think they're pretty close! I couldn't figure out how to hold the model upside down to take some photos of the underside once the folded wings were on, but I do have these in-process shots before they were added. I wasn't completely finished with the weathering, etc. but I think you can get the idea. And a couple of family shots: Cheers, Bill8 points
-
Hi again, Here's an update of work done since Saturday. I'm pressing ahead with building as many sub-assemblies and preparing as many parts as possible before starting to paint. This time I turned to the bomb holders, of which there are four, each one with two claw-like grips to hold its respective bomb. The following picture shows one holder and one grip already off the sprue, but still with excess plastic to be cleaned off. In the sprue we can see another holder and four grips, as well as the bomb fins, which won't be used, as they'll be replaced by PE: The grips are so tiny that I opted to saw them off the sprue, in order to not break them. Then, I cleaned the excess plastic and moulding lines with a combination of a nº 10 and nº 11 blades: Here we can see one bomb holder and two grips already cleaned and ready to be glued together: And here they're already glued together: After more than two hours taking parts off the sprues and cleaning them, here are the four bomb holders finished: Next, I turned to the bombs. I'll be loading the aircraft with a pair of 500 kg and a pair of 250 kg bombs. These are the parts for the 500 kg bombs: And these are for the 250 kg bombs: The parts where glued together and held by clothes pegs while the glue cured: Unfortunately, the fit of the 500 kg bomb parts is not good. There's a huge gap on the front, which I later filled with CA: After this, it was time to take care of the landing gear. Here are the parts for the landing gear legs: These parts had to be cleaned, as they had quite noticeable moulding lines. Here we can see one of the legs already cleaned (the front one) and the other still with moulding lines: The excess plastic was removed with a nº 11 blade and the moulding lines were scrapped away with a nº 10 blade. The cleaning process took a lot of time. Next, I removed the main wheels off the sprues: The parts were cleaned of excess plastic and glued together: Finally, here are the bombs, landing gear legs and wheels: Thanks for looking. Jaime8 points
-
re- posting images after PB went mad Well calling this done I think this is the Dragon Sherman M4A2 with some Verlinden figures the palm trees are home made and the ground work is from mt spares box bits of all sorts. Beefy7 points
-
Greetings all! Im pleased to show you my latest the well-known and oft-built Matchbox 1-72 scale Armstrong-Whitworth Meteor, built in this instance as the NF.14 variant. This, the last in a series of night-fighter variants of the Meteor, really only saw active service for about 2 years ( I think from 1954-56), largely as an interim solution prior to replacement by Gloster's own Javelin. Common to all the NF variants were performance problems due to the extra aircrew and associated radar equipment, meaning that climb-rates and performance-at-altitude etc., were unfavourable when compared to other contemporary aircraft like the Canberra. Despite this I find the NF.14 a graceful-looking aircraft: theres something about the morphing of the various Meteor variants - from early to late - that seems to illustrate the evolution in jet aircraft design of the period,This is perhaps best typified by the NF.14 canopy and nose more flowing and aerodynamic feeling than early versions you can almost feel the later shapes of Hunters and Phantoms straining to burst out (if that makes sense?) The WIP for the build is over here: http://www.britmodeller.com/forums/index.php?/topic/235002360-the-dual-build-diaries-a-meatbox-apocalypse-172-edition/page-1 A final bit of background: this was a dual-scale, dual-build, started at the same time as John (The Spadgent), who was himself building a 1-48 Gloster Meteor F.1 from Tamiya. You can find Johns RFI over here: http://www.britmodeller.com/forums/index.php?/topic/235004487-meteor-dual-build-the-tamiya-148-one/ Wed done this once before as Britmodeller virgins (doing dual-scale Stringbags) earlier in the year, enjoying the process of building in tandem so much that we decided to do it again here with Meteors. For myself, its been a blast! My build is a largely pro forma job, using the included Matchbox 85 Sqn decals and paint scheme - the only AM items were an Airwaves photo-etch set for cockpit walls and aerials; everything else additional was scratch-built. This is, of course, an absolute creature of a kit to wrestle into shape (had I read some of the build reports of other modellers more thoroughly, I might have got cold feet). Im not going to criticize an old kit for different production values, but be prepared to spend a long time filling and sanding and scribing. The decals showed their age by being very brittle, which caused a number of problems that I covered in the WIP. Paint was self-mixed by eye, from a range of Tamiya acrylics. I started the build convinced that if I was going to build a model that had been done umpteen times before, I had to offer people something different to look at, so I decided to build the NF.14 variant with a removable radome, in order to show the AI.21 radar unit. I havent seen this done before. <pauses for flood of corrective replies> The biggest problem I faced was an almost complete lack of photographic documentation for this part of the aircraft lots of shots of empty nose units, but nothing with the radar in. As I predicted early on, it was only after Id built everything that I finally found a single photo of an NF.14 undergoing maintenance, in the archives at the RAF Church Fenton website here: http://www.rafchurch...er pic 015.jpg From the photo, (which isnt very detailed) my guesses about form and scale dont seem too amiss. If anyone wants to follow the research for this build with a view to making something similar themselves, its in this topic here in the Cold War discussion thread: http://www.britmodeller.com/forums/index.php?/topic/235001940-meteor-nf14-radar-images/ as well as further info here: http://www.britmodeller.com/forums/index.php?/topic/234990198-nf-meteors/page-5 The following BMers were extremely generous with technical and historical advice on this build: 71chally, (who put me on to the YAM restoration of an NF.14). You can catch up with the lads here: http://forum.keypublishing.com/showthread.php?137187-A-W-Meteor-NF-14-WS788-Restoration-Thread Jun in Tokyo, John Aero, fatalbert, and NAVY870 all weighed in with a selection of drawings culled from various official sources, all of which were immensely helpful in visualizing form. John (canberra kid) also provided a couple of photo references, which helped greatly in terms of colour work. Thanks, you are gentleman all. The WIP says it all in terms of what needed doing. The scratch-built elements on this briefly were: cockpit (pilots gunsight area and observers radar units, seat frames), wheel wells, AI.21 radar equipment and radome, Hispano muzzles, brake lines on main gear, rudder pedal assembly, landing-light window in nose-gear door, topside aerials and flap at rear of sliding canopy, the Derwent engines, maintenance trolley for removal of radome. Be warned that some of the Airwaves etch for this kit is insanely small, to the point that there is so little surface area to glue onto the aircraft (like the steps) that I ended up leaving these out as simply impracticable. Also, the rudder pedal assembly seems oversize for the scale when compared to reference photography, hence I discarded these for my own scratched-up items (a biro refill seems the right scale for the rudder-pedal channels!) Aside from the above web links above, books I found useful on the build were the Warpaint (Good panel drawings!) and SAM volumes on the Meteor, as well as the Pilots Notes for the NF.14. My thanks to John, for being such an engaging and amiable companion on the build. Tony Firstly some plan views: Some obliques: Finally: the 'Night-Prowler': Thanks for all your support, comments, criticisms during the build7 points
-
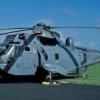
Hi BM'ers I have put this up elsewhere but I though that some might like to see it here as well. This is the Italeri MH-60K kit as a base with some eduard goodies and lots of scratchbuilt stuff as well. This was a two year project on & off. Built to represent a Blackhawk of 5th Avn Regt Australian Army. I had to get some custom decals done as well for the aircraft name "Vigilance" and the tail markings. She won first place at the recent Australian Model Expo competition - Rotary wing category. Thanks for looking. Andrew P.7 points
-
Time to build a Spitfire I think. Then again, it's always time to build a Spitfire! And what better subject than Squadron Leader James "Ginger" Lacey's F.Mk.XIV in SEAC markings. This was from the time when he was CO of 17 Squadron in early 1945. The aircraft is RN135, YB-A. I've always felt a kindred spirit with Lacey ever since I saw the photo of him building a model airplane in 501 Squadron's dispersal hut in 1941. The kit is from AZ Models: My choice of markings is on the left: My understanding is that the plastic in the kit is identical with the AZ Spitfire Mk.XVIII and that the rudder needs to be replaced. You'll notice that the kit includes both low and high back fuselages, so the low back will find its way to the spares box. I seem to have two extra rudders, one loose and one still on the sprue. They are identical, and are slightly larger in chord than what is moulded with the fuselage. Height seems the same. There is no mention in the instructions about changing the rudder. Interestingly enough, the instructions for the Admiral Mk.XIV (a brand of AZ and the same kit, only low back) does have instructions to change the rudder. Sounds good to me, I guess I'll change it. Although the box top proclaims that there are resin ("PUR") parts in the kit, there was nothing in my copy. The resin exhausts in the foreground are from Quickboost. Additional aftermarket parts that may find their way into this build are these photoetch sets from Eduard, Marabu, and Yahu. All designed for Mk.IX Spitfires, but I think there are some things here that can be used on the Mk.XIV. Additionally, some three-spoke resin wheels from Barracuda, and the beautiful lathe-turned brass armament from Master. The kit comes with both three- and four-spoke wheels. The instructions have you use the four-spoke, yet the box art shows three-spoke. I love it. I guess I'll have to wake up the research department and have them get to work. I posted some questions earlier in the WWII forum about the Mk.XIV cockpit, and I got some good information, especially a link to the pilot's manual. Lots of good drawings! Well, that's the plan anyway. I've read quite a few on-line discussions about the camouflage colours and markings on RN135, but I think what AZ has shown for the SEAC scheme is good. Quite a few die-cast replicas have this aircraft in the TLS of Dark Earth and Dark Green which seems unlikely to me. Stay tuned, as I may actually start this soon. Cheers, Bill PS. When did the designation change from F.Mk.XIV to F.14? It's a lot easier to type the latter!6 points
-
another week and another build finished mind had this one going for a while but had to source some decals, then had try find out if needed stencils??? but after speaking to someone got told that not all the special scheme had the stencils re applied as some the scheme weren't kept long enough, but couldn't find many pics of this scheme...though admit don't think is one my best but the decals were a nightmare, they went done but soon as tried put in place they broke into pieces and seemed brittle??6 points
-
Bit of a departure for me as I'm an aircraft man. These really are fantastic little kits and a real hoot to make. If you have not tried one do so .... you will not be disappointed. Please feel free to comment. Thanks for looking Dick6 points
-
Airfix kit with resin seat and Isradecal decals for a Target Tug aircraft. HATAKA paints, Flory wash. Chris6 points
-
Dear forum members and our modeller friends; We are grateful for positive comments from you. Your thoughts and recommendations are very valuable for us. Of course we are planning to present 1/72 scale projects to you. There is a re-box T-33, Buccaneer and Casa Cn-235 in our 1/72 scale projects. We are collaborating with famous Japan manufacturer PLATZ for T-33. We are preparing to release PLATZ AC-14 coded kit with engine details under TANMODEL label. We will add Cartograf decal set and mask set to this kit. Plus, 3D design of Buccaneer is ongoing. TANMODEL 3D design team has named this aircraft as the “Last bomber manufactured for men” We want to present a great kit for your. We will share the details with you when the time comes. Regards, Baris TANSOY TANMODEL Plastic Model Kits6 points
-
Just a quick addition as I got carried away and did the base too, so here it is. Thanks again for looking. I'll post an RFI when I've got some better shots taken and the base has dried properly Phil6 points
-
evening ladies so the leg mounts set, and as far as I can tell are the right angle(s) - these have been cut down now so the real legs can slide onto the stubs.. ..I laid out some stiff brass walls where the main structural elements like spars or lateral stiffeners are - I will make detailed faces to go onto these... the false floor covers the u/c leg stub mounts (hopefully) as in real life this is the wing top skin.. ..and fixed into place... ...also added a litho well roof in three parts split where the stiffeners go.. ..the stiffeners themselves are litho sheet - I can't bend the edges like the real things (they are pressed parts I think) so I CA a very thin strip of litho and round the edges.. ..folded the bottoms and assembled - I used my new home made rivet template to mark out the fixings on another strip of litho.. ..and the inner ones are done,, ..and with the outer ones... ..and fitted in one of the wheel bays... the walls that go around the edges seem to be at an angle and are not perpendicular to the roof so these should be in the right place (he says..) ..lots more to do in here... TTFN Peter6 points
-
Hi guys This is quite an interesting subject by Takom that surprised us all. It just goes to show the vast range of kits and subjects available now. I bet most people never would have thought they would see a kit of this ever be made. Personally It's not my usual build but unusual enough to grab my attention. I have been working on it on and off for a while now. Quite a nice kit but a bit laborious to build. This is down to most of the bits being duplicated to cover both guns and a slight mould misalignment meaning the parts clean up is taking longer than it should. I can finally see the light at the end of the building tunnel though. IMAG0475 by Mark Inman, on Flickr IMAG0478 by Mark Inman, on Flickr IMAG0479 by Mark Inman, on Flickr IMAG0480 by Mark Inman, on Flickr IMAG0481 by Mark Inman, on Flickr IMAG0482 by Mark Inman, on Flickr IMAG0483 by Mark Inman, on Flickr IMAG0484 by Mark Inman, on Flickr IMAG0485 by Mark Inman, on Flickr IMAG1166 by Mark Inman, on Flickr IMAG1167 by Mark Inman, on Flickr IMAG1168 by Mark Inman, on Flickr IMAG1169 by Mark Inman, on Flickr IMAG1170 by Mark Inman, on Flickr IMAG1171 by Mark Inman, on Flickr5 points
-
One of the many R&D tasks that Canberra B(I)8 Mod WT333 was used for was the test and re-calibration of the Harpoon anti ship missile. The Harpoon being an American system was originally calibrated to operate in the Pacific Ocean area but to operate over on this side of the globe the software had to be re written and calibrated for the North Atlantic waves. These trials required WT333 to fly attack profiles so the weapon could be re-calibrated. The mode is based on the Airfix 1/48 B.2 with a lot of home made mods the full build is here if you want to take a look http://www.britmodeller.com/forums/index.php?/topic/234988093-wiggaly-amps-canberra-bi8-wt333/ Thanks for looking John5 points
-
Hello All, I saw this at the Cosford show for the princely sum of £3: I remember building this as a kid and even then being dismayed at how badly moulded, strangely engineered and ill-fitting it was. So I bought it as a challenge in between my helicopter builds. I had not mis-remembered! The plastic hasn't flowed through the mould properly, so the thin edges are all curved where the plastic hasn't reached the edge and there are pinholes where the plastic has not joined up over features. The metallic finish plastic shows lots of swirls and join lines. The plastic hasn't filled parts of the undercarriage and pilot, resulting in paper-thin parts. And the fit of the fuselage parts is awful: I made a rudimentary instrument panel and consoles: Much filling and sanding and priming and sanding later, it's starting to look joined up: And I have to say that, once the flash was cleaned up (how can you have short shots and flash at the same time????), the undercarriage doors and air brakes fitted much better than many other kits of that same period (I had to add the tiny white shim): So I will do a bit more filling and sanding, then more primer and a light sanding before a natural metal finish. Thanks for looking and I hope it wasn't too distressing! Adrian5 points
-
Hi there! This is my first work posted and thought it would be the best way to introduce myself. Your comments are very much welcome. Eduard "Limited Edition" P-38L Lightning - Pacific version and finished it in 2014. Completely riveted and painted with Alclad - Polished Aluminium, a big mistake from my side when it came to weathering it with oil colors. Let's say that I used a bad combination of weathering techniques. Hope you like it anyway. Greetings from Mallorca!5 points
-
Another pair of Spitfires. Firstly the new Airfix Vb with the Silver Cloud floatplane conversion. Finished with Xtracrylix and a brush. Next the new tool Airfix Mk.I. Lovely kit albeit a bit complex.5 points
-
Good morning all, Well I finally dug this out of the deepest, darkest depths of April and have actually done a touch more work on this. I knocked up a hoist from some square plastic rod, which started up looking a bit like this, I shaped accordingly and fitted the stays. I need to add some hooks inside, the cormorant has a double hoist so I'll be looking at two of them. I fitted one set of bubble windows and have seem to have misplaced the other set for the rear so I will go on searching for those. The front canopy and overhanging fairing have also been secured in, I have a set of etch wipers to fit later. I also got some Aluminium tubing (6mm) to replace the exhausts, I put a small bend in it, and cut to size. The good thing about this tubing is I can be quite ruthless with thinning the edge, so it looks nice and sharp. I painted the insides to give them a sooty appearance and polished the outside to give a dull ally look. The actual exhausts would be a bit more tarnished and maybe a bit darker, but I think it looks ok for now. I just have the 3 ejectors from the kit exhausts to fit and tidy up that back plate. Here is what she looks like now and finally a close up on those exhausts Its all starting to come together now, I'm just wary of picking it up without knocking anything off! The next area to sort will be inside the ramp area and fitting that ramp, but for now that'll be all! Bob5 points
-
Thanks guys, I had a great day. I also managed to get a day off yesterday to get ready for the rellies decending on the house for boys eighth birthday which meant a few hours stolen away to finish of the Box of meat. Weathering was the order of the day so I tested out a mix of flory brown and black at a 1:1 ratio. tested on the tail the colour looked good on the yellow. Light rubbing gave a great effect, just panel lines with minimal wear and tear, just enough to make my bird look old. so off with the rest of it. All good, time to roll it out on to the whole under side. Looks kind of messy but the bubbles calm down when dry and the flexibility of how much you rub off = how weatherd it looks is brilliant. Most of the was came off for me but you can see the potential, Phill has done similar on his tanks of late but left the deep muddy effect intact and looking stunning. Before I forget I need to get the wheels and flaps on. All looking dandy. time for the top side. everything was going so soooooo well. then disaster strikes. time to remove the canopy mask. you see that slight ruffle? Much swearing and mouth agog. Not only had the glue crept up and under and made a big bloody mess, The smears on the inside were a thing of beauty. Better seen here. not only this but I had not one but two scrags of paint stuck on the inside, one yellow one light grey. Too add insult to injury I had forgotten to paint the rear part of the inner cockpit. Honestly Im such a plonker. There was really nothing else I could do but slip a scalpel under it and pop off the canopy. Not to worry folks. it popped off really well, thank heavans. Luckily my order of Klear turned up yesterday morning so I decided to try and see if I could sand out the glue and fix the paint, after much sweat, tears and yes some blood I managed to get it back into some sort of shape. Phew. It is actually ready for pics now but I ran out of time. Here is a quickine before the RFI. Gotta get back to work before I get fired. Thanks for looking guys and making this build awesome. Speak soon. Johnny work shy.5 points
-
Update 04 Hi Pals, a new update, this time I have completed the turret with small details, the hull, on the back, the sides, the front of it, and I have applied a new coat of MR.S.500 in the turret and the front of the hull Coming touches the base layer. Coming soon more.... Thx for watch and comment, cheers Pals5 points
-
Thanks for the comments guys I have made a little more progress over the last week or so. Decals are on, I have used some, but not all of the stencil decals, there are a crazy number of them on the decal sheet and I had some major silvering issues with some of the really small ones that was hard to resolve - so I am leaving some of the most tiny ones off I think. So here she is as she stands now, paint on, decals on and start of weathering being carried out. The gloss coat is still on, so please excuse the shiny effect, this will go once the matt is on. Although I have found that the gloss coat I am using (Windsor and Newton) has a strange, and rather unpleasant side effect - when it gets hot in the room I am modelling in, the gloss coat gets soft and tacky again and can leave fingerprints - very strange. I think I will have to try a different gloss coat - maybe Alclad Aqua Gloss as I haven't tried that yet.5 points
-
We all love modelling a bit of realistic droop as we get into middle age.5 points
-
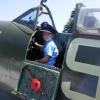
Hi Everyone, Whilst I battle through my current AMT/Hobbycraft P-40 ( which was supposed to be a quickie ) build, I thought I`d show you a previous attempt at one of AMT`s P-40 Warhawks Completed as P-40N `Tweedy II`, flown by 1st Lt Dwight `Bob` Butler of the 45thFS, 15th FG, , Gilbert Islands, 1944 Built as usual mostly OOB with a few bits of wire here and there, except for the decals which were from a Superscale sheet 48-889 I cheated a bit and built the canopy side walls up a bit to improve the look of the open canopy Hope you enjoy, Thanks for looking Cheers Russ5 points
-
Have made a start, hull is together with saddle tanks fitted and front planes fitted. I had forgotten how fiddly and small the parts are for this, but all good fun. Chris5 points
-
Hi all, i propose to do an underwater scene with the the revell monogram udt boat and frogmen kit and the mantis miniatures animal set 20 (marine fish, rays etc) winging its way from Hong Kong. The plan is to have a frogman in a small trench sabotaging an underwater cable, with the lip of the trench as a sea floor and divers returning to the surface were the udt boat will be. I am conscious to keep within the rules the boat will overhang the 6" square area being some 11" long but all figures and frogmen will be kept over the base area. Anyway thats the plan, photos to follow. All the best Chris4 points
-
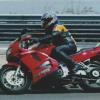
Hello everyone, I have started this kit 6 months ago. I used Hobbydesign's detail set and Tamiya's front fork set along the kit. Tamiya's panigale kit is very nice, not for beginners probably but the kit comes along nicely, although there are a few subassamblies that can drive you nuts:) Especially the tail and side cowlings fit are not that good. Both detail sets are amazing. Front fork set is a great addition, it is very easy to assemble and saves your from a lot of painful mask and paintwork. But the hobbydesign set is a little difficult, especially the chain set and exhaust pipe require a lot of patience but the end result is worth that patience. Some images from the construction: And here is the final images from the complete bike. Beginning with the naked pangale first: And here is the normal ducati, with her clothes on: Thanks for looking... salih4 points
-
This was built for the Helicopter Group Build, but didn't quite get finished in time. Here is a link to the build, showing a few of the little details I added, for those of you who may be interested. If not, please just enjoy the pictures. http://www.britmodeller.com/forums/index.php?/topic/234997496-revell-172-uh-1h-iroquois-huey/page-3 Vietnam era 'slick' of the 11th Armoured Cavalry Regiment 'Blackhorses' Hope you like it, thanks for looking.4 points
-
evening folks thank you I am enjoying this bit too.. that was an interesting story - I knew it was sent to Canada for cold weather trials but had no clue it was put on a set of ski's by a stranded pilot! as far as the build goes I seem to have been spending 75% of my time staring at reference, measuring and scaling, and trying to make sense of the layout and structures within what is quite a complex area in the wheel well... ..the 25% spent building has been a lot of making things to learn the best way and then remaking again and again until I am happy with the part.. ..here is the U/C leg mount area - a few things to cover - the big angled spigot the leg mounts on, the round inspection panel in the top wing skin, and some of the ribs and stiffners on the well roof.. ..I spent a while trying to make the round inspection panel... ..tried lots of processes before I ended up with one I was happy with.. ..I also scaled some drawings to the dimensions in the well - the rib positions are consistent both sides, but the height of the spar is different due to the lax and lazy approach I took to fixing the leg mounts meaning the false roof is at a slightly different height... the drawing means I can see what goes where in terms of marking out structural and detailed elements of the main spar face that can be seen in the well.. ..and starting the detailing.. also lots of holes drilled for the bigger bolts in it - I did try embossing them, but they looked crap... ..the bolts were laboriously made by putting bits of rod through the holes and sanding them down nearly flush... ..and the basic part - I started to make the spigot so it slides over the U/C leg stub, but the angles involved mean that I meed to mount this to the gear leg rather than the spar face... ..also started to fabricate the false roof and some of the ribs - I had to reshape the back wall a bit and re-line it, but it's starting to come together in a dry fit.. ..I want to get the basic structure in there, but even that is a lot of complicated fabrication.. TTFN Peter4 points
-
I'm going to add some bits and pieces at the rear of the fuselage, to make it look busy. Added short oval shape styrene on both sides of the fuselage for a total of 6 short lengths.4 points
-
Cheers Kev Decided to use the Aber PE rear mud guards...Blimey fiddly, but I like a challenge the small hinge is 2 parts and works but can I solder into place ? 3 more hinges to make and another mud guard. Cheers Dan4 points
-
Trouble is, Ced, I can't solder... even if it was to save my life. I have, however, just spent half-an-hour stretching sprue for the upper tube and as the mount for the lower one, which was then glued into a piece of stretched cotton bud stick (if you're careful, it maintains it's tube-shape). Here's photo.4 points
-
The big news for the week from Atlantic Models is that I have ben in discussion with Richard Harden at Tom's Modelworks and we have agreed to transfer all of the former WEM kits in 1/350 and 1/700 scales to Atlantic Models for release in a new White Ensign range, under the Atlantic Models umbrella. This will also include the Narrow Seas range of kits and the 1/72 and 1/144 scale accessories for the submarines and Coastal Craft. It will be a lot easier to get the kits produced and made available now as the time limits caused by shipping things to and from the USA will not be an issue. Things have started off with the arrival of the samples for the HMS Scorpion and HMS Vigilant kits in 1/350 which will hopefully be ready for release by August. All the best Peter4 points
-
Made a start on the other side. Cheers for now Dan4 points
-
Thanks lads. I'm enjoying the time this one is taking and seeing you all working on other Hunter kits is great inspiration. So, a little more done, an attempt at the intake splitter plate with some plastic sheet and filler; ...which got tidied up to produce this; ...and fitting the flying surfaces makes it look a bit more like a Hunter Still some gaps to fill underneath but they are small and shallow so used glue for them; I've since sanded the glue down smooth then packed a little lead sheet in the front fuselage before fitting the nose and gun tray but didn't take any photos yet. Also filed and sanded away the brake 'chute housing from the tail so she's a confirmed F.6 now.4 points
-
Here's my one and probably only model of 2016. Tamiya's wonderful Mustang with Kits World's decal sheet of Lt. Abner's P-51D "Daisy Mae". The original never carried invasion stripes but as I'd never painted any before I couldn't resist adding them! Enjoyed every minute of this one. Painted with Humbrol Metalcote and Halford's finest car paint rattlecans!4 points
-
This was something of a themed build, begun in 2014 in acknowledgement of the 70th anniversary of the Normandy landings. One of their early kits, representing the half-fabulous initial high-altitude variant. A few were issued to FAG.123 at Guyancourt, with the thankless task of providing adequate photoreconnaissance cover of the Normandy area in the weeks following the invasion. Significantly increasing an aircraft's wingspan and area (and this was little more than two plugs inserted between the existing G-5 wings and fuselage) rarely works well, and this was no exception. The aircraft was only present for a brief time, being ostentatiously left outdoors in the hope that the Allies would take care of it. 'Oh Heinrich, you make me shudder' one Luftwaffe airman is said to have remarked. I am unsure about the historicity of some of the details, but the camera setup of the G-5, with a tall fin of the final variants, and a longer tailwheel (not needing so much AoA on takeoff), along with the removal of all guns bar the engine cannon seemed consistent enough, along with the overall RLM76 scheme. I hope you like it. http:// http:// http:// http:// http:// http:// http:// http://4 points
-
Thanks for the info Bear! Finished the seats (inkl. drybrush) - they made me crazy yesterday ...... But, the look really good to me and in place (not glued) Oliver4 points
-
It is a useful bit of kit Crisp. It's called an 'Alec - R-BOKO Seam Scraper'. Google it and you'll find UK stockists if you're interested in one I've done the rear bulkhead/shelf of both hawks now and am Umming and ahhing as to whether to touch up the paint now or leave it till later: Next up was to do some work on the airbrakes. Airfix give you two airbrake mouldings - here they are with the new tool Revell offering for comparison - one to display closed (right hand one) and one open (middle one). The teardrop fairing on the Airfix ones is way too skinny so that'll get removed, whereas the Revell teardrop is rather accurately moulded - so I think I'll take a plasticine impression of it and cast a couple of resin copies to stick onto the Airfix The closed airbrake doesn't have the hinge extensions to the top and Airfix haven't moulded the hinge recesses into the fuselage. Don't know why. Any way here's the closed airbrake in-situ. Another issue is that Airfix also moulded a large cutout either side of the airbrake housing - again don't know why. The under fuselage strakes fix there - but the cutouts are over size as mounting receptacles. Hey ho: I don't plan to display the airbrakes open as you only see them like that when an hawk has been posed at an air display or some such. The airbrakes were closed on the flight line. That said you often see the airbrakes drooped open by just an inch or two as a result I suppose of a drop in hydraulic pressure - and that's the look Im going to recreate. This gives you the idea: Easy enough to fill the cutouts with some plastic strip: And after filing and sanding: I dealt with the missing hinge recesses in the fuselage as follows. Traced the shape of an open airbrake onto a closed airbrake: Cut out the bit between the hinge extension and stuck the resulting plug into the fuselage thus: Not yet trimmed and filled - but this is sort of how it'll look: It has the additional benefit of moving the front edge of the airbrake proper (not the front of the hinge extension) slightly rearwards - which is a more accurate position than would be the case otherwise. Done both of them. Should get the plugs smoothed down - and any filling that requires doing - later today:4 points
-
Hi Guys, Finally finished the detail painting. Here are some pictures. Now I just need to close it up. That is it for now. Cheers,4 points


.thumb.jpg.158e2e086d45b8f96b7d93b8bee8dc21.jpg)


-1-1MINIATURA.thumb.jpg.bd7a7e672869500d45ee6e80478f6f25.jpg)

.thumb.jpg.d17ff607fc7e89ed057e63fcb6f2a888.jpg)


This leaderboard is set to London/GMT+01:00