
Leaderboard


Popular Content
Showing content with the highest reputation on 20/06/16 in all areas
-
Hey guys, one week ago i have finished this kit (built as a birthday gift), but i did not have time to create the RFI till now For anyone interested, some quick WIP is here http://www.britmodeller.com/forums/index.php?/topic/235002039-f6f-hellcat-148-eduard/(i was rushing to finish the kit in time so i did not take that many shots during the build). The kit is totaly great and amazing, well recommended to everyone interested in building the Hellcat in 1/48! I have added some details here and there, mostly scratched (tank infront of cockpit, reworkded cockpit, opened and reshaped flaps) For painting i have used Mr.Paint brand paints for the very first time and also these are totaly amazing and wonderfull (for airbrush only though), well recommended as well Weathering was done by using various Ammo and AK products (chipping fluid, fresh engine oil, fuel leaks, panel line washes), a bit of oil colours (mainly to tone down the washes a bit) and some pigments of various brands. Here is the result - i know i could add some more weathering and dusting around if i had time, but i was running out of time badly But i m still quite happy with the result So first some scratched details And the final look Thanks a lot for watching and have a great day29 points
-
Hi BM'ers I have put this up elsewhere but I though that some might like to see it here as well. This is the Italeri MH-60K kit as a base with some eduard goodies and lots of scratchbuilt stuff as well. This was a two year project on & off. Built to represent a Blackhawk of 5th Avn Regt Australian Army. I had to get some custom decals done as well for the aircraft name "Vigilance" and the tail markings. She won first place at the recent Australian Model Expo competition - Rotary wing category. Thanks for looking. Andrew P.27 points
-
Here's my one and probably only model of 2016. Tamiya's wonderful Mustang with Kits World's decal sheet of Lt. Abner's P-51D "Daisy Mae". The original never carried invasion stripes but as I'd never painted any before I couldn't resist adding them! Enjoyed every minute of this one. Painted with Humbrol Metalcote and Halford's finest car paint rattlecans!16 points
-
Hi mates, Having just finished one folded wing project (my Fairey Firefly TT.4), and having not learned any lessons by doing so, I decided to jump head first into another! And in resin to boot! This time it's the de Havilland Sea Venom in fabulous 1:72 scale. The build consisted of the basic Sea Venom kit, plus the optional folding wing set, both from those master craftsmen in the Czech Republic, CMR. I love CMR kits - the level of detail is astounding. This project is a tribute to Steve Long (NAVY870) from the Camden Museum of Aviation in Australia. Steve was such a big help with my Firefly build, that I wanted to build a model of an aircraft that he restored, Sea Venom WZ895. He was a huge help on the build, making sure I had all of WZ895's configuration correct. I think I got it all! Project: Royal Australian Navy de Havilland Sea Venom FAW.53 Kits: Czech Master Resin (CMR) de Havilland Sea Venom FAW.21/22 & FAW.53 (kit number 231); Folding Wings Set (kit number DS7207) Scale: 1:72 (Her Majesty's Own Scale) Decals: From the kit, representing WZ895, 870-NW, No. 724 Squadron RAN, Naval Air Station Nowra, Summer 1959 Photoetch: Included with the kit, primarily for the cockpit, control surfaces, antennae, windscreen wiper, wing fences, etc. Vacuform: Two copies included with the kit, and old Fumble Thumbs needed them both! The canopy is supplied as one piece, and must be cut into three sections to be displayed open Paint: Gunze H333 Extra Dark Sea Grey, H331 Dark Sea Grey, H74 Sky, H11 Flat White, H12 Flat Black, H77 Tyre Black, H322 Phthalo Cyanine Blue, H329 Yellow FS13538; Alclad 101 Aluminum, 115 Stainless Steel, 314 Klear Kote Flat, and a bunch I forgot about. Weathering: Post shading to simulate paint fading and wear, and the assorted stains and hydraulic fluid/oil streaks. I applied a grey wash to the Sky underside, and a black wash to the EDSG topside. Improvements/Corrections This was built pretty much out of the box, the only things I added were: Canopy shades Whip aerials (two on the rear canopy and one under the starboard boom) Longer jury struts (the kit supplied struts were too short for proper alignment of the wings when folded) Build thread: Link Now, let's see some photos! Enjoy! Perhaps the most difficult part of the build was getting the alignment of the wings correct. They're not perfect, but I think they're pretty close! I couldn't figure out how to hold the model upside down to take some photos of the underside once the folded wings were on, but I do have these in-process shots before they were added. I wasn't completely finished with the weathering, etc. but I think you can get the idea. And a couple of family shots: Cheers, Bill14 points
-
Hello. My next work, Most popular kit in a very famous painting. Tamiya 1/48 plus small PE parts from Eduard and paint Mr.Paint. Enjoy !!14 points
-
Probably the best kit I've ever built. Bravo Pilot Replicas Thanks for watching Andrew12 points
-
Hello Here a few pictures of my last build. I used the recent Italeri offering, with Musthave! resin wheels and seat. The whole build, paint and weathering process is detailed in the issue n°3 of the french "Cocardes" magazine: To go further, here is my box review on Cocardes websites: http://www.cocardes.com/2015/12/visite-guidee-du-premier-mirage-iiic-au.html And a walkaround: http://www.cocardes.com/2015/12/walkaround-du-dassault-mirage-iiic.html Hope you like it! cheers Romain12 points
-
It is a useful bit of kit Crisp. It's called an 'Alec - R-BOKO Seam Scraper'. Google it and you'll find UK stockists if you're interested in one I've done the rear bulkhead/shelf of both hawks now and am Umming and ahhing as to whether to touch up the paint now or leave it till later: Next up was to do some work on the airbrakes. Airfix give you two airbrake mouldings - here they are with the new tool Revell offering for comparison - one to display closed (right hand one) and one open (middle one). The teardrop fairing on the Airfix ones is way too skinny so that'll get removed, whereas the Revell teardrop is rather accurately moulded - so I think I'll take a plasticine impression of it and cast a couple of resin copies to stick onto the Airfix The closed airbrake doesn't have the hinge extensions to the top and Airfix haven't moulded the hinge recesses into the fuselage. Don't know why. Any way here's the closed airbrake in-situ. Another issue is that Airfix also moulded a large cutout either side of the airbrake housing - again don't know why. The under fuselage strakes fix there - but the cutouts are over size as mounting receptacles. Hey ho: I don't plan to display the airbrakes open as you only see them like that when an hawk has been posed at an air display or some such. The airbrakes were closed on the flight line. That said you often see the airbrakes drooped open by just an inch or two as a result I suppose of a drop in hydraulic pressure - and that's the look Im going to recreate. This gives you the idea: Easy enough to fill the cutouts with some plastic strip: And after filing and sanding: I dealt with the missing hinge recesses in the fuselage as follows. Traced the shape of an open airbrake onto a closed airbrake: Cut out the bit between the hinge extension and stuck the resulting plug into the fuselage thus: Not yet trimmed and filled - but this is sort of how it'll look: It has the additional benefit of moving the front edge of the airbrake proper (not the front of the hinge extension) slightly rearwards - which is a more accurate position than would be the case otherwise. Done both of them. Should get the plugs smoothed down - and any filling that requires doing - later today:12 points
-
Hi everybody; I decided to declare this build completed (for the moment). So here's where I placed Little Gene: I took a few pics to determine the right place for the Spooky badge: but I think I should print it out a little smaller, what do you guys think? I've also tried a couple of "ambient" shots, but I definitely need a better lighting and a different backdrop (although the one you see is Cam Ranh original ) Should be able to take some proper RFI pics along the week, I'll keep you posted for the link. Meanwhile, any comments welcome Ciao12 points
-
Hi Again fellow modellers, it's been a few months since I posted on this forum; the last build being consigned to the 'shelf of doom'. So here goes with Airfix's rendition of a BAe Hawk Mk 1, I've built one before but it was the previous moulding, lacking in detail. I'm pleased with the result but there were a few headaches with fit on this kit: wing section needed filing down to fit , engine nacelles required filling, etc. Paint is Alclad Black Primer. which I found out is a bit of a dust magnet !! I may have 'overdone' the wing nav. lights a tad. Undercarraige was also a pain, does anyone have the same trouble as me with wheels/tyres?? Oh and those bl**dy tiny stencils..........took me about three hours in total to decal. And how do you reproduce the white(?) seal round the main canopy? Anyway all comments appreciated. Next up: Revell 1/48 Bf109F11 points
-
This was built for the Helicopter Group Build, but didn't quite get finished in time. Here is a link to the build, showing a few of the little details I added, for those of you who may be interested. If not, please just enjoy the pictures. http://www.britmodeller.com/forums/index.php?/topic/234997496-revell-172-uh-1h-iroquois-huey/page-3 Vietnam era 'slick' of the 11th Armoured Cavalry Regiment 'Blackhorses' Hope you like it, thanks for looking.11 points
-
Spitfire PR 1G "Dicer" Airfix new tool Mk1 converted by using Mk V oil cooler ( included in the box ), extra fuselage tank made from enlarged toolbox from tank accessories set and three camera ports drilled and fitted with 'glass' from a Quickboost PR XI conversion set. The domed oblique port is made from a 1/32 missile seeker head and the sliding canopy is from Aeroclub.10 points
-
Hi, Thus is my first post it's a number of builds I have finished over the past few weeks.9 points
-
Hi, here fresh from my desk the new Airfix Gnat T.1 in 1:48. Build was OOB apart from some spare parts I used for the Cockpit details. Build was very easy, need about 3 weeks for it. Hope you like it9 points
-
One of the many R&D tasks that Canberra B(I)8 Mod WT333 was used for was the test and re-calibration of the Harpoon anti ship missile. The Harpoon being an American system was originally calibrated to operate in the Pacific Ocean area but to operate over on this side of the globe the software had to be re written and calibrated for the North Atlantic waves. These trials required WT333 to fly attack profiles so the weapon could be re-calibrated. The mode is based on the Airfix 1/48 B.2 with a lot of home made mods the full build is here if you want to take a look http://www.britmodeller.com/forums/index.php?/topic/234988093-wiggaly-amps-canberra-bi8-wt333/ Thanks for looking John8 points
-
#17/2016 After the two ANR Italian stallions, the Bf109G-6 and the Fiat G.55, my dad now built a fighterbomber of the other half of the divided Italian airforce. Italeri kit, which is not good, the cowling arrangement is totally misaligned/out of center and needs some surgery. Or you buy the Vector resin correction set which comes with cowling, prop and engine. Except the engine my dad used these parts. Painted with mixed/shaded Tamiya/Gunze acrylics. The model shows an aircraft of 239 Ma. Squadriglia, 102o Gruppo Palata in Campobasso/Italy 1944.8 points
-
Hello All, Well, I haven't quite got helicopters out of my system with the group build... At the Cosford model show I was rummaging in the bagged kits section on a stand and I came across a bagged Frog Wessex for £1.99. When I asked the man whether the boxed one was complete he said he didn't know and threw it in for free! So I now have two Wessexes for 99p each - seems rude not to build at least one. The boxed one is complete, so I decided to build the bagged one. There are some issues with it. The canopy is subtly short shot - the right hand side of the windscreen has shrivelled a bit and does not fit. Some of the windows were missing, but that's not big loss as they all needed replacing anyway. There is also a missing rotor plate (here replicated out of plastic card and rod), bulkhead (plastic card and scored wine bottle foil), and a missing seat (spares box). I knocked up a quick cockpit from the seats, balsa, card, rod and fuse wire. I also cut away the shrivelled side windscreen and located a Frog Blenheim turret as a donor for a replacement pane: Cockpit painted and fitted: Replacement pane cut from the turret: I made some replacement side window frames from card: And here are the parts for the windscreen taped together. I will file down the new pane and add a pillar to the edge: The bulged side window needed replacing so I made a quick balsa and superglue plunge mould: It fits! And I've hollowed out the exhausts: So I plan to use the decals from the boxed kit and go with the overall blue scheme. Two questions: Is it blue or blue-grey? Is there a source of white letters and numbers in Royal Navy font? I have a number of projects that are crying out for these (including a tasty orange and blue scheme for this one), but I can't find a suitable decal sheet. Thanks for looking, Adrian7 points
-
Another fairly recent but protracted build, started to try to unblock myself after a disaster with an Airfix Shackleton. I'm a bugger for tinkering and it ended up being a bit of a time vampire and left on the shelf for long periods. As a kit it's a bit dated and I wanted to sort out the panel lines and add a few rivets as the original was covered in them. The kit I have dates back to the early 80s and the decals were pretty much shot, I ended up glueing them down with pva. I also ended up losing the optical sight thing in the front door so scratch built a new one from some tube. All said I'm fairly happy with it; the weathering and snagging was probably the most fun phase over the course of a weekend in company with a Peaky Blinders box set. I've got a transport version somewhere as well but I'll need to recharge before getting back into that amount of upgrading. Cheers Liam7 points
-
Anti-Aircraft-Gun Bofors 40mm wz.39 - "First to fight" kit in 1/72 scale. Poland IX.1939 Bofors with tractor C2P7 points
-
Hey guys, i m sorry it took me so long to post more progress here. The thing is, i was finishing the kit in quite big time pressure, i even did not have time to take shots during the process Honestly, i have "finished" the kit like 5mins before i had to leave house for the weekend (i was taking the kit with me to give it as a bday gift). I say "finished", bcs rockets and antennes i had to add to the kit yet.. Well, lets make this long storry short I was working on the weathering, used various Ammo washes all around (deep brown, deep grey, blue black, mix of stone gray and neutral brown, + variations of these toned with oil paints). For exhaust staining i started with using airbrush, but i had some issues with the compressor and did not have time to try to solve it, so i had to finish it by using pigments - the only two things i do not like about pigments, are the black not being enough black (to me ) and mainly that there are tons of pigments all around my work bench once i have finished the work on it :D For fuel/oil leaks i have used the nice ammo stuff (fresh oil, fuel stains), here and there toned with oil paints slightly. At first i have finished the fuel tank - added some details on it, scratched it in the same way as the plane itself. I wanted to make the joint line around it, but i could not make it looking good enough so i have removed it. Then i have finished the exhausts - base paint tamiya XF-64 red brown, followed by rust and red brown pigments, then rust wash and again rust pigments (sprinkled over the exhausts while still wet from the wash), once the was was dry i have gently removed the excess pigments by brush. Next was black pigments used just on the end of the tubes, followed by black wash (used only to the "deep" areas between the tubes). As a pigment fixer i m using Winsor n Newton´s White Spirit sprayed by airbrush after every layer of pigments. I was rushing hard but everything was going quite good, i was dry fitting the gear legs (like manytimes before during the build..) and then suddenly... Lucky for me, the Eduard´s fit of the wings/fuselage is so great, i could simply add a bit of CA glue into the slot, press the wing in and there were almost no signs of the incident at all Earlier i have created new flaps (used the parts cut out of the wings, added some plastic profiles and re-shaped it), so i have used these now . Also, you might notice on the later shots, i have added the blue position lights at the top side of wings by the ailerons. Well, as i said, i had to rush to finish the kit and leave the home, so i have packed some CA glue, black paint, fishing string for antenne, finished rockets and some more stuff to box and went for the weekend. My dearest lady was holding the box with kit carefuly all the time as i was driving so nothing bad has happened during the way The next day i have finished the rockets, added antenne and created new little antenne mast at the tail (i have lost that one and also i have lost the two light covers on the fuselage spine ) and took some photos there - sadly i did not have enough light there so the shots are a bit too dark Well, so thats it I ll add more shots a bit later today into the RFI (ll add link here too ) Have a great day guys and thanks all for the nice support EDIT: the promissed RFI link for more shots http://www.britmodeller.com/forums/index.php?/topic/235004377-sharkmouth-f6f-5-hellcat-148-eduard-pic-heavy-;/7 points
-
Weekend can start the hydraulic part of the engine, which promises a lot of work. the heating system of the cabin has been done. Corrected a painting bug, the version that will represent the inside of the flap and landing gear bay are in green primer. installed fuel tanks, along with tubing and filters. By....7 points
-
The photo-etch and barrel arrived on Saturday morning and I set to getting more completed. The photo-etch is a nice set and has a superb set of fenders for the tank. I fitted the barrel to the gun mount... There is also a grille for the engine vent on the rear in the set... It fits here... and fitted... The fenders are nicely detailed with a good treadplate pattern, the pattern is also on the edge of the fender which is like on the actual tank, the kit parts are just plain... The edge of the fender was bent, this is best done with a steel ruler placed on the fender, which is upside down, and the edge of the ruler matches the little indents in the edge, I use a sculpting tool to gently ease the thin edge up and create the bend. If done carefully and slowly a nice edge with the treadplate detail is achieved. I used the kit's fenders to create the correct folds, the kit fenders need all the location lugs and little bits removing to create a completely smooth surface to ensure the correct angles... Here is the edge, the best thing about this is that you can easily simulate buckling from the odd knock with a pair of tweezers... The fender is then fitted to the hull body... With the tracks in place... Before I fitted the other side's fenders I glued the Atak tool box to the rear, it is nicely zimmerited. The actual kit photo-etch provides two nice little catches for the box... The other side has its fenders attached.. Next on the agenda is the fender supports, I managed to get the front one done, this is the piece taken off the fret... And after folding... There should be another piece of photo-etch with rivets on that fits in the groove, but I find this clumsy and not effective. I intend to cut some small rivets from a hull bottom of a suitable tank and stick those in place, using either thin superglue or varnish. Well that is it for now, hopefully I will get a bit more done over the next week, but it is now moving in the right direction. All comments welcome. All the best, Paul7 points
-
Hiya Folks, I`ve been building a pair of Airfix 1/72nd Hurricane kits with the addition of the later metal wing provided as a resin after market item by Alley Cat and had been hoping to show you them both here,.....but a final varnish disaster left the left wing of my second model looking like it had whitewash applied,.....so it has had to be repainted! The WIP is here; http://www.britmodeller.com/forums/index.php?/topic/235002106-172nd-metal-winged-hurricane-mkiusing-the-new-alley-cat-resin-conversion-set/ Here is the RCAF Sea Hurricane model, built as an aircraft of 129 Sqn RCAF based at Dartmouth, Nova Scotia circa 1942-43. These Sea Hurricane`s were diverted to the RCAF from a batch intended for the Fleet Air Arm and were featured in a superb wartime colour film, which was used as reference for this model. Most had their `Royal Navy' titles painted over but this one didn`t. They also had the previous unit markings HA overpainted and replaced by 2+ codes, the other unit stationed ar Dartmouth with Sea Hurries wore 1+ codes and by the time the film was made the arrester hooks had been removed, although the catapult spools remained. To make the catapult spools on the model I drilled holes in the rear fuselage and inserted a length of plastic rod, while the forward spools next to the radiator were scratched using plastic card and rod. A pilots head rest was also made from scrap sprue. The model was brush painted using Aeromaster Extra Dark Sea Grey, Pollyscale Dark Slate Grey and Humbrol Sky,.... as these colours seemed to be the best match for those applied to the real aircraft. The red and yellow for the spinner were also Humbrol enamels, as were the black and white eyes. With all of that,....here is the model; Sorry for posting loads of pics,......I hope that you like it and thanks to my Canadian mate Jim Bates for his help with research. Cheers Tony PS,.... Here is the real aeroplane in a still from the film; Here is another still showing some of the other aircraft; The painted out HA codes can just be made out on most of the Sea Hurri`s, And here is a link to the film;6 points
-
Hi folks,this is my proposal for this GB,it's Masterbox's newish release of WW1 British infantry climbing over the top of their trench.Here's the box. Inside there are four beautifully molded sprues two for the trench alone although some parts are duplicated. And here's the two sprue's relating to the trench That's the basics as the build progresses more of the detail will be revealed.The parts are beautifully molded and should be a good canvass for more detail,If built as per the box you get a nice but strange looking affair I'm thinking of boxing in the base out of balsa then deciding on a muddy wet scene or as per conditions on the Somme on 1st July 1916 dry with everything and everyone covered in chalky dust.I wont get a start for a couple of weeks till after the Holidays. Regards Steve.6 points
-
Well I can finally say this will be the last update with photos before she, #1 is finished! Got a lots of the fiddly bits done today. The nose gear is in place and pretty much finished now. There were a couple of accumulators missing from the nose gear, so these were added and plumbing. It’s still a bit bare but at least she is now much closer to the original than she was! I may still add a wee be here, plus I need to add the nose gear doors and bits! The canopy is now painted so I just have to assemble all the bits, that’s nearly a days worth of work there, and finish any wear n tear I want to add. The main gear covers are now on….what a pain that was!!!! All I will say is, all is not what is seems….and that’s all I’ll say on the subject. Other then of cause nothing fitted as usual and the Eduard PE new bits didn’t help one bit!!! The RATO’s are now fitted, one of the wee pins on the back of them went walkabout, a replacement was brought into service and all is good again. The drop tanks I have to admit are complete crap! The join lines are almost impossible to get ride of unless you want the tanks to be oval! So I’ll pick the best 2 and try to get them up to standard for the Soviet Nuc. version. This baby will have a pair of rocket pods instead, not a common configuration but just right for all those pesky NATO tanks! So that’s it, now more updates (photo’s that is) for this beasty until the final one in two weeks time. So this is how she looks at the moment with the canopies just sitting there and the weapons held in place with Blu-Tac. The Air Brakes are in their final positions, paint and weathering is nearly completed. Pitot probes and cannons on the way, plus I have to build the ladder. I may have to replace the nose serial numbers as those ones are horrible, they are just so thin and are starting to silver up!!! No big drama just a pain in the ar#e to fix! I’m really happy with how she looks, though while I’m away for the next week I’ll review how she looks…..don’t be too surprised if I change a couple of things. Oh and I’ve started work on #2’s canopy plus may do some work on her tomorrow.6 points
-
Thanks Simon. Ooh, sticks of rock... one of those things that I used to get as a kid and then realise I didn't really like the stickiness. It's triggered my 'treat' circuits though so I'll be off hunting for something nice, always hard in this 'healthy' house. Thanks Adrian, glad to have you along! Morning Keith. Was trying to find some 'funny' comment about flat heads but I have nothing... Decorating or modelling? No contest! Primed with Stynylrez, no problems, can't see the joins / filler (hooray!): Primed by Ced Bufton, on Flickr6 points
-
Good morning to all Phantom fans, started on the seats yesterday and must say that the phantom seats are the most difficult ones i ever made..... They are not finished yet, most of the PE´s are left and the drybrush is missing! The undercarriage is sprayed in white The outside frame of the cockpit was sprayed in flat black and a dryfit of the upper and lower mainpart. Cockpit 90% done, only a washing and drybrushing is left. Oliver6 points
-
Best I can do at the moment: Cheers, Bill6 points
-
But what are the bananas for?6 points
-
another week and another build finished mind had this one going for a while but had to source some decals, then had try find out if needed stencils??? but after speaking to someone got told that not all the special scheme had the stencils re applied as some the scheme weren't kept long enough, but couldn't find many pics of this scheme...though admit don't think is one my best but the decals were a nightmare, they went done but soon as tried put in place they broke into pieces and seemed brittle??5 points
-
Here's my Avia B.35. This is the old KP kit. With a bit of TLC I think it builds up a treat. I added some cockpit details and finessed things like the aerial, exhausts and such. The scheme is a totally speculative go as an aircraft of the Estonian Air Force, with German pre-war colours (as ascribed for the Estonian Henschel Hs126) and home-made decals. The original B.35 was intended to have two cowling-mounted machine guns and a 20mm cannon firing through the propellor shaft. The motor cannon never materialised, in the real aircraft. For a real front-line fighter, this would have been a bit scant (although not uncommon) so I fitted a couple of gun pods under the wings, in the style of the Gloster Gladiator.5 points
-
We should be able to beat or match Eduard's afterparty promo price and with less postage for UK customers. So if anyone has patience, they can save some cash. thanks Mike5 points
-
So a bit of paint on the T-34. I used the AMMO colours and freehanded the scheme on with my airbrush. so looking a bit nicer... Cheers Plasto5 points
-
Thanks Debs I checked the canopy this morning and the fit was, er, ropey so I pulled it off and sanded down the rear gunner's head until it closed up nicely. (I've gone back and edited a warning into the appropriate post) I've now masked the guns using the cable insulation with a bit of BluTak on the end (to stop them blowing off during airbrushing) and used some packaging 'slugs' to mask the engines; a perfect fit as it turned out: Untitled by Ced Bufton, on Flickr Given everything a quick rub down with IPA. I'll get some primer on later. (Any double-entendres in this post are entirely accidental. Fnaar fnaar!)5 points
-
Dear Friends, I share with you this my last job! I excuse me sometimes bad grammar. This it’s the Mig-25PDS Foxbat variant from the Irakien Air Force (IrAF), serial number 25211, piloted by Leutenant Zuhair Dawood, who, at the begining of the Gulf War I on 1991, shoots down an US Navy F/A-18 Hornet using one of its R-40 Vympel (Codename “Acrid”). I Added some scratch details, reshape of the engine exhaust (incorrect for the PD Variant), also some work in the main wheel Wells and landing gear, also I added some aftermarket upgrade sets like : · Neomega’s cockpit set. · Metalic landing gear. · Armory’s made wheels. · Armory’s Pitot tube. · Eduard’s exterior Photoetched set. · Plusmodel’s R-40 Missiles. · Aerobonus resin pilot (seated) figure · Photoetched ladder. · Eduard’s intakes and FOD covers. · Linden Hill’s Irakien decals. As you will see only the most visible repair errors, no more! For weathering the model i used different techniques: Preshading, lights, washes, sponge paint chipping, pigments and some oils. ----------------------------------------------------------------------------------------------------------------------- I hope you enjoy the model. Greetings from Chile Ivan4 points
-
I'm really quite scared about this one. It is way out of my comfort zone, so be prepared for it - and me - to crash and burn. I'm most comfortable building aircraft. So this one will be an AFV. I'm not in the least bit comfortable building figures. So this one will have six of the blighters! And I'm going to go totally harpic* by putting it on a base. * other toilet cleaners are available4 points
-
So for something different for a change, I looked for a figure of everyone's favourite Great Old one, Cthulhu! Reaper Miniatures came up trumps with a 6" tall vinyl figure: The main body is cast in solid cream-coloured vinyl and there are 8 pieces in all: body, tail, 2 x arms, 2 x wing wings, head and base. The detail is superb and the mould lines are minimal. The tail and arms fit together very well - the arm sockets are keyed so they only fit in the correct orientation and the tail has a well formed plug that fits into the socket at the rear (ooerr!). I had to use only a very small amount of Mr Dissolved Putty to fill some small gaps in the joints and when that was all set, a sharp scalpel was used to pare down any overlap on the joint and any spare putty. From there, the next stage was to was in soapy water and then prime, which is when I remembered to take the next photos! This is the body with tail and arms attached The head with some well detailed tentacles, which have tiny suckers moulded undernath each one The wings, one side has a sort of pebble-dashed texture while the other is smooth with veiny ridges That showed me that the joints were well covered and so we could move onto the first stage of painting. For this I wanted a "diseased" yellow sort of colour for the undersides so chose XF4- Yellow-green. Next for the uppser surfaces I wanted a base coat of a sickly green, so mixed XF-4 with XF-5 Matt Green and some XF-21 Sky to get a sort of pale snotty green In the background you can see the base - it has a depression for the right foot and a raised plinth for the left which has some eldritch writing carved into the surface. I'll use a wash to bring those out later... I accept no responsibility for insanity caused by viewing a Great Old One4 points
-
Hi folks, May I present my T60 from RPM I am currently trying to make a dent in my eastern european kit stash. I have always liked this little vehicle and this is a fairly decent offering( much better than the Zvezda kit) which includes an etched fret in the kit. I have added Fruil tracks and an elefant barrel. Cheers K4 points
-
Evening all... well I've completed it finally after what feels like months! Here is a Revell F-4F (Phantom Pharewell) built as an F-4E USAF of the 307th TFS operating out of Udorn, Thailand during the Vietnam war. Following some great advice from here and some research I've ended up with a half accurate bird and I'm quite happy with the result. I used two sets of decals from Print Scale which had their good and bad points. The technical stencils went on like a dream with only the occasional silvering but the flight group and custom markings were very twitchy. I almost lost one of the shark mouths when fixing and had to call upon the wife and her patience to recover the ZF marking which had folded up on itself! I customised the cockpit as the detail was non-existent OOB and purchased brass pitot and ram tubes. The Revell canopy's suck and I cannot locate a replacement so they'll have to do. Thanks to PhantomBigStu for the correct central tank replacing the Revell supplied F-15 style one. I may return to this at a later date to add some chipping but I'm quite happy with the result at the moment. Hope you enjoy and comments as usual are welcome4 points
-
Hi there! This is my first work posted and thought it would be the best way to introduce myself. Your comments are very much welcome. Eduard "Limited Edition" P-38L Lightning - Pacific version and finished it in 2014. Completely riveted and painted with Alclad - Polished Aluminium, a big mistake from my side when it came to weathering it with oil colors. Let's say that I used a bad combination of weathering techniques. Hope you like it anyway. Greetings from Mallorca!4 points
-
MiG-17F 2047 of Nguyen Van Bay, 923rd 'Yen The', April 1972 In between the more difficult, challenging and time consuming builds I like to have a little bit of something on the side that I can tickle into shape without too much effort.... Here is my latest such conquest, the lovely little MiG-17 by Dragon. Build is very straightforward and only needed a slight bit of filler on the wing join and undercarriage doors. Airbrushed using Vallejo metal colour aluminium, Flory dark wash to highlight the panel lines, decals from the PrintScale VPAF sheet (72-116). Sealed using Alclad Aqua Gloss and posed inflight using a spare stand. I am really pleased with how this has turned out and I have another one that I will do in the camo scheme that some VPAF MiG's wore. Here it is alongside one of my diecast aircraft: Cheers all, Phil4 points
-
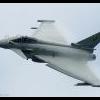
Seen this weekend at Avord air base. V.P.4 points
-
Thanks Debs - what's a 'Boxhead'? Can't find an English definition on the web... Thanks Keith - blobby guns Reminds me of the porridge cannon on Grommit! Thanks Hacker - Stynylrez is my primer of choice now, especially after all the effort I've gone to being able to type it without thinking! It is great stuff though, fast drying, smooth and it smells nice! Thanks Jaime - the insulation trick seems to work and I'll certainly be using it again (unless disaster is waiting when I take them off) Thanks Alex - I use an airbrush because I get a better finish faster than hairy-brushing and I'm basically lazy; the cleanup only takes a minute or two when you get into the routine. Thanks Leon - easy with the Stynylrez (there, typed it again!) On with the RLM65: Untitled by Ced Bufton, on Flickr In a vain attempt to emulate his superb finishes I've tried to use Bill's technique of shading the panels by adding some white to the cup and spraying the centre of some panels, and then black and spraying some more. I'm not sure it's worked. The black seemed to make the RLM65 come out white!!?? The overall effect I've achieved makes it look like poor airbrush technique. Or perhaps it's just my poor airbrush technique? Ho hum.4 points
-
4 points
-
Alclad applied! Dave4 points
-
Thanks Keith - it was yum. Good for Yorkshire! I remember Mrs B asking her Yorkshire friend how she achieved 'perfect' Yorkshire puddings. "You need really hot dripping in the tray" was advice that, sadly, was not adopted. Thanks Girvan. Here's the photo for others with part B28 clearly not fitting there either. I don't feel so bad now! Thanks Jaime. I have had trouble with the main canopy which may be caused by the back gunner being too high: Untitled by Ced Bufton, on Flickr I'll have to leave that overnight so no paint until tomorrow.4 points
-
A little progress..... the rudder chord has to be increased..... The cockpit is perfectly adequate considering that the canopy is closed - the instrument detail is raised for those who like to paint - but Trumpeter supply decals, which I used.... The K-36 ejection seats are simplified - there is no firing handle - but Trumpeter include a clear plastic HUD and the whole cockpit looks OK to my simple tastes.... With the cockpit section in place, the fuselage can now be closed up... Ken4 points
-
1/72 Hasegawa EF111A 'Spark Vark' 'Cherry Bomb' - July 1987 Well, done and done! Tamiya and Xtracrylix, Modeldecal decals, and Master metal pitot.4 points
-
Fujimi Sea Harrier FRS1 - 1980s defender of the fleet. Build thread http://www.britmodeller.com/forums/index.php?/topic/235003753-tims-sea-harrier-frs1-completed/ 899NAS Winged Fist Sea Harrier operational training squadron.4 points
-
The following pics Shows the parts with paint and the first Color PE And that is all of my work (4 hours) today! Hope you like it, excuse for the bad Quality of my pics! Oliver4 points


.thumb.jpg.158e2e086d45b8f96b7d93b8bee8dc21.jpg)


This leaderboard is set to London/GMT+01:00