
Leaderboard


Popular Content
Showing content with the highest reputation on 13/05/16 in all areas
-
Loaded out as if on the day of the engagement, Gulf Of Sidra I. This is Fast Eagle 102, that slashed an Su-22 Fitter on that day. OOB, except for the decals, which came from the exquisite Furball sheet.28 points
-
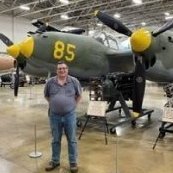
Hi there! This is my first work posted and thought it would be the best way to introduce myself. Your comments are very much welcome. Eduard "Limited Edition" P-38L Lightning - Pacific version and finished it in 2014. Completely riveted and painted with Alclad - Polished Aluminium, a big mistake from my side when it came to weathering it with oil colors. Let's say that I used a bad combination of weathering techniques. Hope you like it anyway. Greetings from Mallorca!21 points
-
Modelers, Grumman Tracker S-2A in Royal Netherlands Navy service, on board the deck of the light aircraft carrier "Karel Doorman" The crew of four is from designer Hugo Petiers. Two pilots and two operators. In these days, the crew in the cockpit consisted out of officers and SNCO's. One of the caps has some gold, this is the Commander Air group. Next time, the Lockheed Neptune with a seven man crew. Enjoy, Orion.20 points
-
This is my first aircraft project after a long break for about 2 years. This is famous flying wing Horten Go 229 by Revell in 1/72 scale. Nothing was changed, except for some minor changes in details and opened technical hatches. Camouflage and markings are "what-if". There is no swastika on this plane, because on the original photos it hasn't got one.20 points
-
G'day all, This is my take on the OH kit of the Royal Australian navies LHD HMAS Canberra with a few extras I hope you like her A nice kit apart from a couple of missing decals and guving the wrong style landing craft Thanks for looking Cheers Callum19 points
-
Hi Another bird to inspect. Bf 109E-4/Trop of JG 27 off the North African coast, summer 1941 SCALE- 1/48 BRAND - EDUARD PAINTS - Mr Hobby Alliance Model Works Masks for the green camo. Thanks18 points
-
Sundowner.. Coral Sea... sounds to me kind of a vacation resort... but no! It is just one of the badasses soaring the Vietnam skies... Academy kit is great.17 points
-
Hi Guies, the next aunt is comming. This time a Sani-Version. This build is also a couple of years old. Oob, colours by Humbrol, done by brush. Hope you like her. Any comments are warmly appreciated. Best regards16 points
-
Thank you all sincerely for the kind support you have all shown on other F-14 Tomcat threads. The one thing that will remain the greatest thing out of all of this is that the modeler (me too) will very soon get a great choice and “you pays your money” as they say. We have always been about the modeler in our company and this is great news for us all alike. We get to choose what we want for our budget, expectations and quest for quality. Competition just makes us all better right? I can’t go into all the details we are going to include with the AMK F-14 series just yet but you can be assured of some things: The AMK F-14 will contain new technologies just like the MiG-31’s. But we will go further than that for this kit. One piece missiles and weapons will be included (of course). Slide mold techniques will be used for weapons and some kit parts again. Flight surfaces will be posable (for take off or landing dioramas), great engineering which will make this kit a joy to build (our “Easy to Build” ethos). Decals will be of an extremely high standard and the finest quality materials used for both the tools and plastic. We are also working with a secret partner to ensure that this kit is as good as it warrants to be. More on that in due course. Now, Mr Sio and the team in Macao are working very hard to bring this to you but, as always, we intend only to bring this to market when we (and our specialist advisors) are happy that the kit is as good as it can possibly be. If this means we are later than others then so be it. If we are earlier this means nothing either, it just means we are happier sooner. Thanks again for your support and patience friends. Cheers.16 points
-
Thanks everyone Thanks Tolga. The masking isn't really difficult, just a bit fiddly. It was all done with strips of 1mm and 2mm Aizu tape, cut into random lengths, and applied wherever looked right. OK, so, I've got the aztecing applied to the top side. It was a little harder that the bottom due to the fact I'd added more shading and highlights during the initial painting, so some masked areas didn't show up as well as others. The aztecing was very much an after thought, and I'd originally planned to have a much simpler paint job. If I do one like this again, I'll use a more even, solid tone for the initial coat. As it was, I had to keep partially peeling back bits of tape to check on the contrast, then adjust the over-spray to be darker or lighter to suit. It's come out with a better effect in some areas than in others but, overall, I'm reasonably happy with it. I've picked out some of the smaller details with Vallejo Off-White, to sharpen it all up a bit. I'll probably add a wash around some of the features like the gun emplacements, and maybe some shading with oils around the raised sections Andy12 points
-
Hi folks, Just took some pic`s of my latest completion, Eduards 1/48 Messerschmitt bf-108 kit, that I`ve completed to represent an aircraft of The KNIL ( Netherlands East Indies Air Force ) based at Andir, West Java, Indonesia, around 1941 Built almost completely OOB with just seat belts and decals which came from the stash I intended to do it as a French Indochina Nord 1000, but couldn`t decide whether they were blue, green or O/D and came across a couple of builds of this aircraft whilst searching and was hooked. Hope you enjoy, thanks for looking Cheers Russ11 points
-
Hi folks a stalled build from a while ago was Eduard's weekend boxing of the 109e,my take on the captured machine evaluated by the British after being captured by the French in 1939 it later went to the States and lost in an accident in 1942.Eduard's kit is a little beauty with just a couple of over engineered area's.Airfix decal's from the old club kit.If ypu check out photo's of the real aircraft it seems to have a non standard centre section of the cockpit glazing maybe damaged when the aircraft was captured. Thanks for looking in.11 points
-
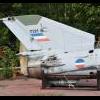
First the MiG-15: I used Kuivalainen (Eduard) photo-etch for the cockpit. I know there are things that are not 100 % correct, but this was enough for me. Since it was pre-painted, the whole cockpit became a bit too blue. I painted it with Vallejo's new, brilliant metallic colours. Decals are - also brilliant - from SBS Models. The whole build was pretty uncomplicated. Although nothing fits perfectly, it is easy to get a good fit with some trimming of the parts. And over to its successor in Finnish Air Force, the MiG-21UM: Painted with Gunze colours. Decals are a mix from different sheets - the roundels are actually from Eduard's MiG-21bis in 1/144, the old-style large roundels were perfect for modern small ones in 1/48! The lynx is from the MiG-15 sheet. The model has two main problems: The nose and the cockpit. The nose has an avionics bay that can be displayed. However, this is wrong, since it is from MiG-21MF. But when closed, the door does not fit at all, so lots of sanding is required - which also affect the canopy that has to be trimmed to fit. The other issue is the cockpit. Trumpeter have left out the window between the two cockpits. The problem is that even if you can scratch-build it, it will not fit since the whole aft cockpit is too long. My solution was to build the "roll bar" between the cockpits, which also gave me something to glue the (scratched) pin to. Apart from that, this was an enjoyable build. Thanks for watching!10 points
-
Well known modell from Eduard. Afterburner decals. Painted with Akan paints. 1/48 scale.7 points
-
Tamiya's SAS "Pink Panther" WIP: http://www.britmodeller.com/forums/index.php?/topic/235001251-its-pink-sas-pink-pantherfinished/ Built using Legend's update set and parts from the Eduard etch set. Figures are from Tank. The Legend set has some beautiful resin parts, absolutely flawless castings, but I found the instructions frustratingly vague Luckily an article in Airfix Model World magazine was helpful. The figures are beautifully cast and posed and really compliment the Pinky. upload gambar upload an image upload gambar pic upload free image host post image online Some shots against a gloomy morning sky: image upload screen shot on windows Thanks for looking7 points
-
After building and attempting to detail a 1/48 Canberra I decided to do something simple. What's more simple than an all black Spitfire? It's the new Airfix Vb and using the Victory Productions Aces of the Empire decal sheet. Painted using Tamiya gloss black, Nato black and rubber black. Final coat was Humbrol matt acrylic spray. I also tried using salt as a mask for the paint chipping for the first time and quite liked the result.7 points
-
Here is my effort of producing an F86A in 1/72 scale. Life started from Academy's F86E kit and underwent some modifications; tail-plane activation fairings were removed, slatted 6-3 wing back dated to early slatted wing, front windscreen with one from Pavla and for good measure, a K-19 gun-sight fitted. I added a little more detil to the cockpit. The mods took a bit of an effort with filling and sanding but we got there. The overall NMF was achieved using Metalcote paints from Humbrol. Decals were a mixture of Matchbox for the serials and 'Miss Louise' and the rest from the Academy kit. The Matchbox black & white band decals were too small and so these were painted on instead. Not a bad effort for my first NMF aircraft, room for improvement. Comments are most welcome.6 points
-
After I finished the Hawkeye of VAW-124 a while ago, I picked up the Eduard Su-22M3 Fitter limited edition again. This kit is based on the old Kopro kit and not that sharp and crispy as we are used to lately. But Eduard put some extra's in the box like PE for the cockpit, a brasin seat and lots of nice decals. Nevertheless I had to do some mods. The majors are: The inside of the exhaust was reworked; Flaps were dropped; Slats were reworked and dropped; Eduard AA-2 Atolls were added; Airco on the canopy frame was added. The model represents one of the two Fitters that were shot down on the morning of 19 August 1981 over the Sidra Bay by two Tomcats of VF-41. There is not too many reference on the Fitters available. Every aspect of the two Tomcats is widely available, on the other hand, we know the two Libyan pilots ejected and they fired one Atoll, and thats about it. So there was room for some guesswork. Hope you like.6 points
-
Hi Folks Another Seahawk for you,this time from 898 Naval Air Squadron based at Brawdy. Painted with Xtracolor and finished in the Model Alliance aerobatic teams decals. Ian6 points
-
Morning you lovely lot... My take on the excellent Tamiya P-47D. OOB apart from the Superscale decals and the Eduard seat belts. One of the best P-47 paint schemes ever i think, looks really good nice and bright! NMF with various shades of AK Xtreme Metals, other paints Tamiya. Enjoy!6 points
-
No Mr Hood it's not ready for nicking and never will be. Please place your plans for world domination on permanent hold. Masking the red bits - I used punched out 7mm discs of masking round the rockets on the underside: Those were finished off with 3mm discs and some liquid masking: Next I masked up the rocket exhausts and decided that the tricky masking round the engine inlets was best aided with a card template: I started with a 2mm disc and then the custom piece: Here it is finished off with a blob of Blu Tack: Now it's all ready for primer and top coat in the morning. Bye for now, Nigel6 points
-
Friday 13th update #2: Radio operator gunner seat fitted, Z-18 intercom box fitted and wired up6 points
-
My last work, an Avia B.534 from the German propaganda film aircraft played the part of the Polish fighter PZL P.11c6 points
-
Hi everybody; little progress made last night: a bit of chipping, very restrained as anticipated For the air scoops I used the base color mixed with Matt White; for the metallic chipping, I used Italeri Flat Steel. Vari-ramps: I've highlighted the edges with a lighter mix of the base color, and did some minor chipping (barely noticeable) on the front edge It was then time fot the top side wash; tempera again, mixing black and burnt Siena: That's it for now, comments welcome Ciao6 points
-
Thanks YoungTiger! I still have many opportunities to screw this up, and I must admit that I stand on the shoulders of many other great Uboat builders I have seen around here. Before I stick the tower together, I should pain these wooded slats. They were to stop people sticking to frozen metal. Starting off with a nice orange. I have a colour photo on the back of a book, which shows these slats, so I will try and copy it. Darkening with oils. I spend some time with the dremel going over the pressure hull, this isn't exactly accurate, but it's nice to get a different texture between the black steel pressure hull and the zinc galvanized plating. I also scribed a channel between the two to further separate the saddle tanks from the plating. I still have some more riveting to do. As I am leaving the exhaust ports open, I'm going to use this perforated metal tube that I removed from the drawstring on some trousers I have. I t will give a little interest to the exhausts. The #D printed peice comes with a bent pipe so I can fit them into the hull with some adjustment. Here is the plumbing in the rear, at the left are the intake manifolds that going to the engine room, in the middle are the high pressure air tanks, and to the right are the exhaust manifolds, with the rear torpedud loading tube between them. The high pressure tanks are 3D printed end pieces that are sized for evergreen tube, to save moneys as well as to alter the length of the tanks. Another shot of the exhausts, again using styrene tube to adjust the length of the silencers. Up front is the inner conning tower, mainly intake pipes but on either side are the flodding vents to the saddle tanks. Lets hope this #D printed stuff doean;t dissolve over time... Here is the 3D printed loading hatch. Cheers!6 points
-
Some of you may be aware that I had shoulder surgery last year and I have been unable to model for six months. A few weeks ago I started modelling again but despite it being good rehabilitation for my shoulder, it, in it's turn hasn't been as good for my modelling. Although I can and sometimes do build kits with all the bells and whistles, I like nothing more than knocking out old clunkers straight from the box. I remove the panel lines and rivets and produce very clean builds with very little weathering and don't even bother with aerial rigging. So, here are my builds for 2016 so far - most recent at the top: Airfix 1/72 Beagle Basset 206 (02025-5) Not a bad little kit although I had a lot of problems getting the windows stay in place and also with the decals (especially the fuselage stripes that I left off in the end). The glossy anti-dazzle panel should have been matted down before the photo was taken but that has now been done. Frog 1/72 DH Hornet F.Mk3 (F239) An OOB build of the old Frog Hornet that still scrubs up well. I bottled out of painting the white spinner stripes. Airfix 1/72 Piper Cherokee Arrow II (01060-5) Another lovely little kit. Unfortunately, the decals had yellowed beyond repair which had an effect on the blue of the decals, turning it green. Heller 1/72 Caudron C.635 Simoun (80208) A lovely little kit. Unfortunately, my tin of H52 Baltic Blue was awful and so I replaced it with H222 Moonlight Blue. Definitely not the right colour but it produced a pleasing result. Eastern Express 1/72 Navy Interceptor DH110 Sea Vixen FAW-2 (72284) The fragile decals almost had me in tears of frustration and it is a worthy candidate for re-decalling in the future! Revell 1/72 Hien "Tony" (H-261) A quick OOB build of the Revell 1/72 Hien "Tony" (H-261). This was an 60's boxed issue which has been "de-rivetted". Airfix 1/72 P-47 Thunderbolt (125) A quick OOB build of the Airfix 1/72 P-47 Thunderbolt (125). This was an original 60's polybag issue which has been "de-rivetted". Despite some problems, I have enjoyed building them and it is great to be back modelling again. Now that they are finished, they will be packed away in a shoebox in the attic. Dave5 points
-
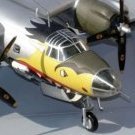
Hello modellers, today I would like to show you the result of my Farmgate modelling project. “Farmgate” was an American program in the early sixties to provide the South Vietnamese with some air power. Offically a training program, it wasn´t a big secret that American crews flew combat missions with often an enlisted Vietnamese in the cockpit only for political reasons. Both models were built from vintage kits, I had in the stash. The T-28 is from Heller and and the markings were included in the kit. As with the Royal Laotian T-28, I have already published in my “Secret War” topic, I cut the canopy in three parts to present it in opened position. Pilot and South Vietnamese co-pilot came from Hasegawa and Esci, wing pylons are scratchbuilt and the upper cowling vent is closed as indicated in my references. The Invader build has been a lot more complicated. There were B-26s with six and eight gun nose in the program and I choose the old Airfix kit as a basis with a lot of changes and homemade improvements. As there are often three persons seen in the cockpit, I reshaped three figures from the Revell Nato pilots set and placed them on scratchbuilt jump seats. The rear compartment was also given some detailing and all clear parts were polished. The nose gear was shifted forward and slightly extended. Wing pylons and ordnance are from plastic sheet, parts of old wing tanks from the spares box and epoxy glue. The nose of the Invader was reshaped three times until I was happy with the result. The gun barrels were attached later from hypodermic needles. As obviously all Invaders with eight gun noses were in NMF, I used Revell´s silver as basis paint. As I had rescribed some of the panellines earlier, could add my usual wash with black oil paint. Exhaust stains were archieved by airbrushing, drybrushing and some pastel chalks. The VNAF insignia came from the Heller Trojan, I converted into a Laotian machine. The back tail number was self-printed. Found in the Invader an interesting modelling subject and plan to build a glass nose C-model from the Korean War and a Counter Invader in the future. Have also bought a resin set recently to convert the Airfix kit into a civilian On Mark Marksman. Hope you like the models Mario5 points
-
Hi, everybody! I present you my next model.5 points
-
I concur sir. Whilst doing some glueing and filling and waiting for these to cure, I've done a bit more modification. The first pic shows before (left half) and after some surgery on the radiator grille. You can see what I meant by the tunnel effect (I think I mentioned in my first post). The right half shows the tunnel removed as well as the area where the etched grill will sit. And here's a comparison of the steering wheel before and after some work. There are recesses on the front face of the spokes that I've just drilled and then thinned down. No doubt some brass aftermarket will arrive shortly! Inset is the dash that I've done because the kit's is just a decal sitting on a piece of etch - no recesses, no switch positions, just blank. But then I've got decal that should be behind and decal that should be on the front - 'sgonna be fun! Back to the sanding now . . . Nick5 points
-
A good year to be an F-14 fan. Shame to see a bit of criticism for a kit that isn't released yet. Personally, i'll give both Tamiya and AMK offerings a go, whilst keeping my Hasegawa kits too. I'm looking forward to seeing both. If the Tamiya kit is like their F-16 kit we're in for a treat. If the AMK kit is like the Mig-31 kit (from what i've read in reviews) we're in for a treat. What's not to like? Dave5 points
-
Nice little kit from AModel, came together pretty well without major problems. Not everything went according to the plan, I'm particularly unhappy with cabin windows masking Along with the Starship WIP: http://www.greenmats.club/topic/1310-%D0%B3%D0%BE%D1%82%D0%BE%D0%B2%D0%BE-lear-fan-172-amodel/5 points
-
I tell you what, this is a phenomenal kit so far. The cockpit detail out of the box is impressive. Cockpit is done for the most part, also wheel wells.5 points
-
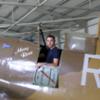
Tony T from all the picture based research I've done it seems that the straight across at the wing roots effect was normal on Austers so Airfix were a tad 'out' with this one The frame on mine needed a pretty thorough redo-ing and because I opened it up I decided to add previously left out bits such as the throttle and its associated other levers such as the flap lever between the front seats Then I began fitting new tubes as seen here at the start The axe on the side wall is I admit an embellishment that seems OK so its staying unless we get howls of protest but the fire extinguisher is authentic Extra research usually finds more bits and bobs to stick on, this is no different Now I have the flap levers in I had to find a way to show some of the quite visible parts of the mechanism, here the two flap rods stick up behind the B posts and the compass sits in its frame below the cross brace tube I expect to close the canopy up directly and then get finishing the generator mechanism in its wing LE housing Then the fun begins again 536 has fewer 'historic' markings on her since her recovering sessions, a great relief 'cos' I still dont have any more Airfix Decals to do a replenishment with (thinks... must keep checking 'the Bay for unused Auster decals, maybe even flog the Antarctic ones to one who will...) The framing of the window area needs to be close to the Perspex as it is actually the mounting frame for the panels so I'm trying to use this sliver of this inside and will be masking and painted on the outside Fingers crossed it will work Last update for a day or so, Mrs P and I are orff to the Isle of Wight for a bit of R&R5 points
-
Well, after starting this project about 18 months ago, trying to fit in time around my gorgeous baby girl, its finally complete! A nice little kit, a bit tricky in places but a huge improvement on the old Airfix kits that I would not normally touch. Gunze, Tamiya and AK interactive acylics, oil wash/filters and flat/satin finish, kit decals. Additions: - Kit exhaust rings and air inlets replaced with the Quickboost set but there's little difference to be honest. - Replaced all kit MG15's with Master brass barrels - Quickboost resin wheels and props/spinner set (big improvement on kit parts) - Hydraulic lines on undercarriage are copper wire - Built antennae on underside of fuselage from Albion Alloys 0.3 brass rod - Replaced kit pitot tube with Albion Alloys brass tubing - Undercarriage struts from oleo to guard - Added vertical struts to crew access door - Antennae wire is super fine elastic from Ushi Van Der Rosten4 points
-
Thanks guys Right, the last few bits have been added, namely the bridge and the engine bells, and it's had a pin wash to bring out some of the detail. I was a little unsure about the wash, as it could have killed the scale look but, on the other hand, I felt it needed something to lessen the flat look on the hull. I think it's been partially successful. It's probably a bit too dark (a mid grey would probably have been better), but it has given a little more definition to the details I could continue to tweak it, but it would be overkill on something this small (come on Bandai, make a big one), so I'm going to call it done. Can't quite believe I've taken this from a parcel at the door, to a finished model in, what's it been... four days?. Of course, you can't really class this as a regular model. There's only a handful of parts, and you could easily put it together in 20 minutes, but Bandai have somehow still managed to make it a fantastic model. I'll probably be making another one before long, probably with one of Warren's lighting kits (hopefully he'll figure out a way to get it to fit in the limited internal space). I can't say I'm that interested in the micro X-Wing and the forthcoming Y-Wing, but I'm hoping Bandai will release more capital ships in this range. A Mon Cal cruiser, a medical frigate or a Republic Cruiser would all look great along side this I'll post some finished shots in RFI later. Thanks for following this (incredibly short) wip. Now, back to the X-Wing Andy4 points
-
Well that's the lippy on, now for some eye shadow.4 points
-
I know it has been quite a pause and that some of you will be disappointed by the fact I have not tried my own photo-etching but I had an offer I could not refuse and the results arrived today: So thank you Mike McCabe of Starling Models I am in your debt and I truly appreciate you doing this for me. As for those desperate for me to have a go at DIY Photo-Etching, I have realised that I am going to have to do some for my build of HMS Brereton: http://www.britmodeller.com/forums/index.php?/topic/235001978-ton-class-mine-hunter-hms-brereton-1350-atlantic-models-kit/ So next step is painting and fitting and my model of HMS Somerset is done.4 points
-
Good evening everybody, your interest in my Combat Search and Rescue collection encouraged me to do a similar second part. All these here shown aircraft played a crucial role in the aerial campain to back anticommunist forces in Laos and to interdict North Vietnamese supply on the Ho Chi Minh Trail. These missions were flown from bases in Vietnam and Thailand, with Nakom Phanom (NKP) as one of the major bases for propeller driven airplanes. Often referred as "antique airforce" these vintage planes as Skyraiders and Counter Invaders suited better for the truck hunting role as they had good payload and loitering time and were slow enough to find smaller targets. Later Gunships as the AC-119 and AC-130 took this role altough said to be vunerable to ground fire especially when after the bombing halt against North Vietnam the North Vietnamese began to move more radar directed guns and SAMs to Laos. The neutral status of Laos also led to a covert American involvement in this country, with the ethnic group of the Hmong under General Van Pao as main alliies. Their fighters were supplied by Air America using many airstrips constructed by the French and Japanese called Lima Sites (LS). The Headquarter of these guerillas was Long Tieng (LS-20A). Some of the Hmong got flight training in the US, flying the T-28 and O-1 from Long Tieng and other bases. There also was a group of American Forward Air Controllers, called the Ravens who flew missions as civilians. There is a very interesting documentation about that. I think you can find it on Youtube. The first two pictures show the Heller T-28 with Royal Lao Airforce markings in 1/72. I built one of these years ago straight from the box with Soutvietnamese markings and knew about it`s flaws. The biggest problem was the bulky Canopy. I tried to hide that by cutting it in three parts and present it in opened position. i also closed the upper air intake and shifted the windscreen about 1mm backward. This the impression of a longer cowling. the cockpit was detailed with two unused seats from Revell F-105, a pilot figure of unknown origin and an observer from the ESCI Special Forces set. This is not authentic of course but fills the space. I also added some other detail like underwing pylons from styrene, four MK 82 bombs from the Hasegawa set and gun barrels from small nails. The decals are self printed. As a gimmik I fixed the airvent of my airbrush and laid it in front of the diorama. The Arii Cessna O-2 was once again a restauration project . I found it without landing gear and side windows. I made a new landing gear from styrene and wheels from a Fujimi F-14 engine trolly. The windows are clear styrene, rocket launchers from Esci UH-1D and miniguns from sprue. The decals are from the spare box. The white letters on top are Verlinden dry transfers rubbed on clear decal film. The particular aircraft number is not correct by the way, but I had only these red decals. The Cessna O-1 is from Airfix. Straight from the box with only figures and antennas added. Actually it`s a FAC aircraft used in South Vietnam but I thought it would match well with this collection. The UH-1Bs are Italeri models. I added pilots made from Hasegawa`s ground crew and some bags and helmets to fill the interior. The triangle on the roof is not a winch but a sort of antenna I made from sprue. Decals were homemade. The final model the AC-119K is from Italeri, too. I think it´s older than 25 years. I only added seme antennas on that. Over the years so many parts broke off and were repaired that the model was in fact built two times. That was a lot of work for a rainy Saturday. i hope you like the second part as much as you did with the first. Nice weekend to all of you Mario4 points
-
Morning folks I,ve fixed the nacelles in place and cleaned up the joins a little white putty was required to smooth out the upper rear join otherwise a decent fit bearing in mind John's comments on the gap which I will tackle next.I,ve painted the stowage boxes and interior fittings for the rear fuselage too.off camera wheels,props,bombs etc are being painted.4 points
-
I begin to work inside4 points
-
I'm sure Ottar will find a way to explain how this wrong4 points
-
Ced, Here are some pics of my interior. Have fun. This thing just falls together.4 points
-
evening folks been a bit flat out lately so this is all I have managed.. ... the first thing was I finished the priming pump - I just punched a disc and made up the switch from tiny bits.. ..I sort of got a bit stuck in a catch 22, I couldn't keep adding to the sidewall as I might struggle to paint all the detail, and I didn't want to paint too early as I didn't want to do lots of assembly on a finished surface.. it took me days to resolve the quandry and I kept just fiddling about instead of actually getting somewhere.. eventually I thought I would paint - so that meant primer. I got a quick dry etch primer off ebay that is for the automotive industry and it works great but is very thick. I took a chance on some scrap and decanted some and diluted it 50/50 with Mr Leveller thinner and the test came out fine so shot a few parts... ..after that I mixed up a tamiya pot of interior green to get a shade I wanted and shot this too - I have no idea whats in it - greens, blues, greys etc but it looks ok to me,, ..the undercarriage selector has a little bit of green on the casing so shot that too.. ..and also the lower bulkhead under the panel.. ..and a sort of mock-up of how it will start to come together,, (he says optimistically..) ..at least I made a decision and can get going again... TTFN Peter4 points
-
Today I started cleaning up the remaining parts including these booster rockets. The nozzle wall thickness was a bit chunky so I thinned them down with drills and then a scrape round with a knife: As it would be virtually impossible to airbrush some paint into the blind nozzle hole I painted the inside matt black before mounting them all up ready for painting: The first stage of external painting was to get some of the cockpit colour of the canopy frames: That was followed by Alclad white primer: It never ceases to amaze me how primer highlights numerous issues especially on seams. They were lightly sanded and Squadron White filler applied where required: While that was hardening up I made the two dinky pitot tubes out of 0.3 and 0.5mm nickel silver tube: I then got virtually all the remaining parts finished and ready for some more primer in the morning: Bye for now, Nigel4 points
-
Thanks Craig! A little update with this one. After sanding down the marks and trying a few things to remove the paint (unsuccessfully) I just settled on wiping/scrubbing it all off with Mr.Color thinner. It removed everything in seconds, the Gunze, Alclad and Halfords white primer, that really is a hot thinner! No damage to the plastic though so in future if I need to strip a model I know the method I'll use. One of the flaps and some of the filler has come off (no surprises there with the thinner) so a little more TLC and I can get on with primer. I masked off the canopy area with a few mm around the base to stop any thinner getting anywhere near the clear parts and the cockpit. A good few mm of paint allowed me some breathing room to then sand and polish this back to blend in with the plastic. Given that the paint sanded well it must be nearly cured therefore I'm hoping no reactions will happen with the enamel paint going over the Gunze around the canopy frames etc. then blended, Some little traces of paint still knocking around panel lines but a quick light scriber down them should see to that. Phew, now I can repaint it with no compatibility worries, no bad thing imho as its my favourite part of modelling! Thanks for looking, David.4 points
-
Hi all! My new model. WIP: http://www.greenmats.club/topic/320-convair-b-58-hustler-148-monogram/3 points
-
They can have ours.... then they won't have to repaint the roundels..3 points
-
As promised, here's a side-by-side comparision of the two mixes:3 points
-
1/48 Monogram MiG-29, depicted in 1986 when they were first viewed in the West. Build Thread HERE Thanks for following the build, and good luck with the rest of your builds! All the best, Al3 points
-
Finally, my humble contribution: Tamiya 1/72 F4U-1D Corsair VF-84, No. 167, from the USS Bunker Hill, Feb 1945 Modelled as if on approach for carrier landing. Extras: PJ Productions pilot; Aires resin flaps; some scratch-built bits and mods (engine details, seatbelts, aerial wire, landing gear lengthened, and arrestor hook lowered) Build link: http://www.britmodeller.com/forums/index.php?/topic/234999304-tamiya-172-f4u-1d-corsair/ Thanks for looking. David3 points


.thumb.jpg.d17ff607fc7e89ed057e63fcb6f2a888.jpg)


.thumb.JPG.3498f40362ff13ebfc4b2e45abbd545e.JPG)


This leaderboard is set to London/GMT+01:00