
Leaderboard


Popular Content
Showing content with the highest reputation on 10/05/16 in all areas
-
Well, after starting this project about 18 months ago, trying to fit in time around my gorgeous baby girl, its finally complete! A nice little kit, a bit tricky in places but a huge improvement on the old Airfix kits that I would not normally touch. Gunze, Tamiya and AK interactive acylics, oil wash/filters and flat/satin finish, kit decals. Additions: - Kit exhaust rings and air inlets replaced with the Quickboost set but there's little difference to be honest. - Replaced all kit MG15's with Master brass barrels - Quickboost resin wheels and props/spinner set (big improvement on kit parts) - Hydraulic lines on undercarriage are copper wire - Built antennae on underside of fuselage from Albion Alloys 0.3 brass rod - Replaced kit pitot tube with Albion Alloys brass tubing - Undercarriage struts from oleo to guard - Added vertical struts to crew access door - Antennae wire is super fine elastic from Ushi Van Der Rosten33 points
-
Hi all! My new model. WIP: http://www.greenmats.club/topic/320-convair-b-58-hustler-148-monogram/31 points
-
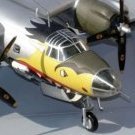
Hello, Here's my 1/48 P-51K done as N3-609 (USAAF serial 44-12758), yellow flight, No. 121 Squadron of the MIlitary Aviation branch of the Royal Netherlands East Indies Army (ML-KNIL in short, in Dutch). No. 121 squadron flew P-51D's and K's from Tjililitan airfield (nowadays Halim Perdanakusuma International Airport), just east of Jakarta, during the period between early 1946 and the Indonesian independence. They were used extensively during the "police actions" against Indonesian nationalists, which was perhaps not one of our best moments in history. N3-609 was handed over the Indonesian Air Force and was renumbered to F-309. I used the Hasegawa kit, with decals from Flevo Decals and Fündekals stencils. RP-3's come from the Airfix Seafire FR.46/47 kit, 4 from my kit, and 2 kindly donated by Reccephreak. I used the Vallejo metal color paint on this, and I found it pleasant to work with. Thanks for looking, and I hope you like it.22 points
-
Hi, Here is my completed P-40 from the nice Airfix kit. Decals are after market of one of the Aircraft at Pearl Harbour on Dec 7th 1941. The kit is OOB apart from some brass gun barrels and pitot. Finally here is one with the AVG Hawk I built s while ago from the same kit... Thanks for looking.. Plasto17 points
-
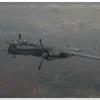
I built this model a few years ago, but as I was photographing it today for some other reason, I thought I could post a few photos here. During WWII, a large number of B-17s (and B-24s) made a refuge in southern Sweden on their way back to Britain from bomb missions over Germany. Many aircraft were short on fuel or had one or several engines damaged. As the Swedish airline AB Aerotransport (which later emerged into Scandinavian Airlines Systems - SAS) was short on long distance aircraft, they made an agreement with the Americans to take over a number of B-17s, which were converted to airliners by SAAB. To avoid mixing up the designation with the SAAB B.17 (single engine) dive bombers, the converted aircraft were designated F-17 and named Felix, both after the popular U.S. air attaché Felix Hardison. More about the Felix can be read in Jan Forsgren's book Swedish Fortresses, and my own (soon) forthcoming book The Stockholm Run, both published by MMP Books. The model is converted from Minicraft's B-17F with a few parts from Magna Models conversion kit for the Felix. The interior is fully scratch build, from drawings found in Swedish archives. Decals are home made, printed on an Alps and a laser printer. Nils14 points
-
Finish!!!14 points
-
Hi Guies, because you liked my swimming aunt, i decided zu show some more "aunts". This time a Mausi. OOB, Paints are Humbrol done by brush. This Plane has been finished several years ago. This time i tried to weather my plane. Hope you like her. Best regards13 points
-
Yesterday Mark suggested a 24-hour build in honour of Mike (BM owner)'s birthday. Never one to turn down a challenge, i accepted! I started at 8.45 this morning with this: (Pics are timestamped - no cheating!) And finished a while ago with this: First time I've ever tried anything like that, and very pleased with the result! It's not a subject I'd usually tackle, and in a scale I would very rarely venture into. Happy Birthday Mike! Al13 points
-
My sweet pair! )))13 points
-
I forgot that I promised to post a few photos of the current status. I've added the flaps and speed brakes, complete with the actuators in both resin and photoetch. Very fiddly! Tiny, tiny pieces that are difficult to see in the photos - but they are there! The gear doors are on, although I still need to scratch build some brackets for the nose gear door. The nose gear door approach light was painted Gunze Clear Orange, as it looked like a dark amber in the walkaround photos I saw at Prime Portal. The IFF antenna on top of the nose was attached; I still have the lower one to do as well as the UHF and VHF antennae. Wheels and tyres are on, and the model has that characteristic Sea Venom stance. I finished painting the outer wings and tip tanks, and applying the applicable stencils and national markings. After the rest of the antennae go on, it will be time for an overall semi-gloss varnish. I know that the Sea Venom was glossy when the paint was fresh, but I have this thing about really shiny 1:72 models. They just don't look right to me - they look like a toy. I'm one of those modellers who subscribe to the "scale effect" applying to the degree of shine. In such a small scale as this, semi-gloss or egg-shell provides a better scale gloss. But that's just me - others like to do things differently, and that's OK. So here we are: I still need to finish the black leading edges on the outer wings, and add the fixed slats. The outer wings need their panel line wash, too. The arresting hook needs to be repaired (I broke it), then painted and mounted. And I haven't even started to work on the main canopy yet. Lots of little things, but pretty soon it will be time to attach the wings and prop them up with the jury struts. Sweet! Ta for now! Cheers, Bill12 points
-
Howdy folks Here are a few snaps of my 1/72 Hasegawa D.520 Built OOB nothing fancy. Part of a combo boxing so a Morane Saolnier M.S.406 should appear at some time.....work pressures permitting! Sorry the photos are nothing flash....I've just popped these up here for completeness so I can get the D.520 into the cabinet of glory and hopefully press on an finish the 406 Cheers Bruce11 points
-
Hello All, Just finished. This is Hobby Boss kit. Some details to correct to reach the prototype configuration. Rather nice kit. Very bad wings fit and mediocre quality plastic. Anyway, this one was tested during the early 90'. Thanks for looking at. I'll make some more pics later. The step by step topic is on BM also. Anis10 points
-
The Adversary. Another joint project featuring F-15K Slam Eagle and MiG-29 Fulcrum. This F-15K will be modded from Academy F-15E Strike Eagle (Item code: AM12478) since the K variant was a derivative of the F-15E. The MiG-29 is from Tamiya, it's an Italeri tooling imported into Japan by Tamiya and reboxed for the Japanese market. It has recessed panel lines, adequate detail for the scale & a full missile load. The plan is to replicate the dogfight scene between ROKAF F-15K 004 and KPAF MiG-29 in the R2B: Return to Base movie. I'll use my own decals for this project - ROKAF logo, 02-004 tail code, 11th Fighter Wing (11전투비행단) emblem and Jaguar emblem, F-15K emblem, Rogue skeleton, KPAF logo & aircraft number 504. Yea it's the power of customized decals - do anything you wants. 1/72 ROKAF F-15K Slam Eagle, 11th Tactical Fighter Wing (11전투비행단) Gunze #305 as main color. CBU-87, AIM-9x and AIM-7 as the weapons and also AN/AAQ-13 LANTIRN + Navigation pod under the fuselage. ROKAF related decals by Fishbone Inc. and the others are stock decals came with the F-15. Called it done.9 points
-
Hi, I have started this build early this year and just finished it these days. Kits used are Me 163 from Trimaster and GMC CCKW from Tamiya plus Hauler PE and some other bits an pieces. Hope you like it Alexandr9 points
-
Hi all, build out of the box the new SEM by Kinetic in 1:48. So far, the best Kinetic Kit I ever had in may hands. Hope you like it!8 points
-
The MiG-29, considered as What-if theme, inspired by the Korea movie commonly known as Soar Into the Sun outside of Asia and R2B: Return to Base in Asia. Replicating the Korean People's Air Force's MiG-29 in the movie, dogfighting a ROKAF F-15k which I will link it in the comment section with 98% of completion. 1/72 Tamiya MiG-29, OOB. KPAF emblem, aircraft number and skeleton head near cockpit by Fishbone Inc. Calling it done. Thank you! Let's start with a nice photoshopped cover: Thank you!8 points
-
Here is my Hasegawa kit: Cheers!8 points
-
Assembly8 points
-
(Sorry chaps, caught me mid-post and I missed clicking the message) Hi Duncan and welcome Hi Simon I think this one will be flying straight(ish) with a Hurricane on its tail. I already have one bombing my desk: Stukas! by Ced Bufton, on Flickr The Meerkat is a screen wiper, present from the girls8 points
-
Caawww, but there're some nice builds in this lot. here is my effort fwiw. The Frogfix Corsair, finished in some recent Ventura decals which were a treat to use & a stunning colour scheme. Build thread here. Rather than being the overly faded RNZAF roundels that too many kits/sheets include, this is a home based aircraft with roundels painted in local paints that were paler to begin with than the Insignia Blue used in the islands & much more prone to fading apparently. My photographs make them look a little brighter than they are.8 points
-
7 points
-
Rivets. Sanding off rivets on these things is so common Archer make a dedicated set of replacements, including these handy bow pieces. before I tackle that I will get warmed up on less risky parts. I also soldered these little eyelets onto the top piece of bow (I soldered them on before CAing to the hull) they are anchor points for the wire guard rail that runs the length of the boat, but is usually not installed. You can also see the carrier film from the rivet decals which I hope doesn;t show up when painted. Ok, on with the bow. Not entirely sure what the correct layout is, so I might be making this up. Sme of the 3D printed parts being assembled. Leaving the straight parts to be made from styrene tube gives me some freedom in fitting these things as well as save $$. Galley hatch. Cheers!7 points
-
Thanks FL! Thanks Andy, I certainly hope so. Been thinking more about the replacement wing idea. And I think I will go with it. Should be fun to paint and weather slightly differently from the rest of the ship. My thoughts are that at some point Poe's ship sustained enough damage to warrant the replacement which was scavenged from another, but less lucky T-70. And wars being the way they are, the slightly less Black Leader was sent out before new paint could go on. It certainly wouldn't be the first time. Here's a couple examples I found during a short search. half_half3 by _m_sinclair, on Flickr ScreenShot2012-03-11at164557 by _m_sinclair, on Flickr 2b023277febe3da9f259295538935ece by _m_sinclair, on Flickr So the last few days proved busier than expected with socials and fundraisers. So no progress was made, until tonight! I shamefully stole the masking technique from Andy, using a sponge to apply liquid mask. I've never done anything like that before and it proved fairly simple and rather fun! Oh man, how I have missed Mr Masking Sol. It used to be my go to mask for canopies but local shops stopped carrying it. I probably haven't used it in almost ten years. I tried others but they just didn't match up. Thankfully eBay came to the rescue and my beloved is back! You can see the small piece of sponge I used as the applicator. 20160509-MJS_4246 by _m_sinclair, on Flickr Here's the nose all masked up. This process is so quick and easy it's almost hard to believe. 20160509-MJS_4245 by _m_sinclair, on Flickr A very thin coat of "black" was lightly and unevenly sprayed over the whole of the air frame. This shade was mainly Vallejo dark panzer grey with some azure and straight black mixed in. I wanted it to be a slightly darker version of the base coat. The goal was to reign in the shading as well as provide a contrast to the masked areas. Here's how it came out. 20160509-MJS_4247 by _m_sinclair, on Flickr The mask was removed using a short bristled brush and even just rubbing my fingers against the surface. 20160509-MJS_4248 by _m_sinclair, on Flickr It's not perfect, but I'm pretty damn pleased with my first attempt. 20160509-MJS_4249 by _m_sinclair, on Flickr 20160509-MJS_4256 by _m_sinclair, on Flickr So we've got some subtle paint wear and toned down fading. It's actually a little less subtle in person. 20160509-MJS_4254 by _m_sinclair, on Flickr The light black chips match fairly well with how the life size ship was weathered. I also decided to add some chips/flaked paint to the surface of the engine covers. I figure that's a result of the engines running hot in some rather intense combat. 20160509-MJS_4260 by _m_sinclair, on Flickr 20160509-MJS_4259 by _m_sinclair, on Flickr This top coat helped make her look a little more black too. After all the highlights, she was a little too grey looking. 20160509-MJS_4261 by _m_sinclair, on Flickr Only had less then an hour to mask, paint and photograph this. So that's all for today. Tomorrow I want to mask off a few panels and add a few more variations of black. Then that colour will be done. After that, orange! Or rather, a white undercoat, then orange. Can't wait for my next few days off! I haven't felt this good about a model since... 2007? Yep, that was when I started (and finished!) my most ambitious project to date. A small diorama of an American Abrams. It's good to have some mojo back! 20160509-MJS_4264 by _m_sinclair, on Flickr -matt7 points
-
Pictures of my recently completed model of HMAS Launceston, a Royal Australian Navy Armidale Class Patrol Boat. The model is 1:700 scale a straight out of the box build of the Dodo Models kit with minor enhancements for rigging and antennae. A detailed build log can be found here: http://www.britmodeller.com/forums/index.php?/topic/234999281-dodo-models-1700-royal-australian-navy-armidale-class-patrol-boat/ and pictures: I hope you enjoy.6 points
-
Hello All, I would like to share with you my rendition of Airfix's excellent new tool Defiant (and a couple of pictures of their not so good old tool Defiant!!) I had a lot of fun with this build as it goes together so easy, I have another in the stash that will be done as a Night Fighter. Built OOB except for tape and wire seatbelts and wingtip navigation lights and done in the kit markings. Decals are nice but a little stiff, I found that they would not conform to the panel lines even with a good dose of Micro Sol, I ended up using a toothpick to help them settle in. Paints are (my favourite) Tamiya Acrylics with a light oil wash on the top to modulate the colour and a preshade on the bottom. I kept the weathering to a minimum. Also are some pictures of it's older brother that I made a number of years ago with a lot of modifications (Tail enlarged, new chin intake, altered ailerons etc etc) as a comparison. Sorry about the very average photos. Thanks for looking and I hope that you enjoy. From the land of the long white cloud Shane.6 points
-
This morning I unclamped the glued fuselage and it held, no bother. These intake shrouds are supposed to be silver inside so I created some conical masking: I established the radii using a circle template: Then cut it out using my compass cutter: With that installed I could glue on the engine front and shroud and fill and sand the seams. One thing to note by future builders of this kit is that the engine front has a preferred vertical fit. It caught me out and I had to file quite a bit of the underside of the engine front of the first one to get the shroud flush with the fuselage. I then rescribed around the shroud using insulation tape: I then cleaned up the wing parts and to increase the strength of the fin joint I added a 0.5mm brass dowel: Its not much but a bit of metal makes quite a difference to the strength of a joint like that. The final job before fitting the canopy was to add a gun sight: I then fitted the canopy with five minute epoxy: Then on went the completed wings: I would like to get them both up to the same stage of build so I will be focusing on the one that's lagging a bit. By for now, Nigel6 points
-
The small diversion finished - Trumpeter's 1/350 scale F4U. Greg in OK6 points
-
Time for a straightforward build... please? My next one's the new tool Airfix Stuka: Untitled by Ced Bufton, on Flickr There's a review by John (back in January) with some nice sprue shots. It was with some trepidation that I found only one build here by thepureness and that's unfinished. Gulp. Admittedly I gave up on page 3 of the search (mostly bigger scale). I'm hoping it's not because things go awry? we shall see. Fondling the lovely sprues (there is some great detail) I did find one possible problem: Easy to fix (if needs be). I'll get started once the FR IXc is finished and the pink has left my eyes...5 points
-
I built this for the Made in Britain GB which ended recently. I wanted to do something different from the aircraft that I normally build and, whilst I am sure that the railway aficionados will be able to point out all my mistakes, I am pleased with end result and had a lot of fun in the process. I thought I would share my efforts here, I hope that you like it I used the Dapol kit and modified it to the best of my abilities by removing the moulded handrails and replacing them with Alan Gibson parts, I also added Smiths connectors, Mainly Trains lamp brackets , vac pipe, and door darts, along with Modelmaster nameplates and numbers The paint came from Phoenix Precision and the lining and stylised GWR are from the Presfix/Methfix range sourced through the HMRS. The tender had the moulded coal removed and, after adding sides and a floor using sheet plastic, was refilled with some scale coal at the end of the build. I also replaced the handrails, brake columns (Mainly Trains) connectors and vac pipe on this too. Here is alink to the build for those who may be interested. GWR City of Truro Thanks for looking and apologies to those who have seen this in the Made in Britain GB.5 points
-
Imperial Star Destroyer Bandai Box Scale Don't worry, I haven't forgotten the X-Wing. This will just be a quick side project. There's only a handful of parts in the box, so I'll just run through the main assembly steps 22 parts in total for the destroyer, plus a poseable stand. The instructions are printed on the inside of the box lid Construction starts by adding the side walls to the upper hull. Like all Bandai's stuff, this is snap fix, although I added a little glue here and there to strengthen the joints After that, the docking bay clicks into place Followed by the lower hull. It starts to look like a SD now The rear panel's got some very fine detailing on it. I'll be leaving the engine bells off for painting The upper hull superstructure is built up from 5 main parts, plus a couple of detail panels on the rear tower Then the superstructure simply clips onto the upper hull Some of the detailing on this is pretty special considering the size. If Bandai do decide to scale this up, then the results should be spectacular. I'll post the final build shots later on Andy5 points
-
Hi, everybody! I present you my next model.5 points
-
Here's some pics of my most recent completion. It's Spitfire MH434 as seen in the film Battle of Britain. I used a combination of custom paint masks and decals from Fundekäls for the markings.5 points
-
The USS Seawolf was the second nuclear boat after the USS Nautilus - but fitted with a sodium-cooled reactor. After service as a testbed and attack boat, she had a 52ft extension added amidships for 'Special Projects' work - i.e. covert ops. Fitted with a lock-out shelter for divers and retractable skegs to allow her to sit on the seabed, she also had side thrusters fore and aft for precise maneouvring... To disguise her true purpose, she was equipped for testing the Mystic DSRV mini-sub on her stern - with white paint to aid docking. My model is scratch-built using two Mikro-Mir Nautilus hulls cut and joined to increase the length - with a revised bow shape from plastic card and a scratched stepped sail..... WIP discussion here and more photos of the finished model here. Ken5 points
-
Engines and plugs in the air intakes ... And the cherry in the cake - M61. )))5 points
-
Ah good man Ced; I really must lay one of these in for the Plastic Cellar at Dapple Hall In the meantime I look forward to seeing how yours goes Cheers, Stew5 points
-
Here's a finished gallery: Cheers, Al5 points
-
Hi guys, I managed to finish my first two models of the year (It only took till May ) . First up is an F-16A from the RDAF. I wanted to model the first jet as it entered service in 1980, a brand new Block 1 example with inspiration coming from two photos like these: https://www.flickr.com/photos/alfblume/8194950032/in/photolist-nbar31-68i3L6-pJNy3p-898n97-898naQ-8958J4-cWKpMN-pJNyfP-psj7WZ-9HoHUi-6T6hj6-6TaiQN-6T6idx-6Tai5f-p7fqc1-oQEaJt-gWfR6E-p71Xt6-duag8W-p5eKXb-oQE4bP-oP5c4A-p6wuY9-oMZ5gU-p5rbF3-oPMhHR-oMYTEH-oPLLtJ-oPMQbP-oMY7mD-oMYZDX-p71rsz-oPMn4c-p8ah8c-oMXyvW-p8aexn-p7f8tS-oQERKj-oPMctJ-oMYcUc http://www.f-16.net/g3/f-16-photos/album37/album20/abd The idea being a celebration of the first F-16 entering RDAF service and tooled up showing what it could do, little what-if I guess about it but what the heck. Imho I didn't manage to pull off the brand new look, looks a bit toy like maybe but I learnt a few things that I'd do differently for the future to maybe help convey this appearance type on other builds. I chose a mixed load of Mavericks (IIRC evaluated initially but not purchased until the 90's), Mk.84 slick, Mk.82 slick and Mk.82 Snakeyes on triple launchers, active seekers for the Aim-9s. Of course it would never have flown with this but I like it Having a few troubles with my camera atm so sorry for the slightly grainy images. The canopy tint is stronger than I wanted but RDAF examples do have it quite dark, well thats my excuse , live and learn I guess. The WIP is here (plus 4 other F-16s in various stages of construction-http://www.britmodeller.com/forums/index.php?/topic/234993893-f-16s-172/?hl=barak. The second model is a F-104G (Hasegawa kit) from the Marineflieger Geschwader Zwei, during the last years of service early to mid eighties. By this time many jets had the chaff/flare upgrade. I chose number 26+72 which later was repainted the the striking airshow Viking scheme. Aftermarket was the seat, nozzle and Kormoran missiles, oh and the excellent DACO decal sheets. Some of these later jets looked pretty battered so I went for a heavy amount of weathering. Uncommon as it was, I made everything live, including the chaff and flare dispensers. In natural light the jet takes on a nice blue hue which is noticeable in many photographs, The Hasegawa 1/72 kit is a gem, great for doing multiple 104s. The WIP is here, http://www.britmodeller.com/forums/index.php?/topic/234998633-marineflieger-f-104g/page-1. I'm doing a 1/32 kit as well, currently experiencing a minor hick up but should have a RFI for that a few weeks down the line. As always thank you for all the encouragement and advice during my builds, sure makes it a pleasure to construct models on here I hope you like them, the Starfighter is one of my favourites in my finished pile now, just need to replicate that in 1/32 and I'll be content indeed. Thanks for looking and any comments much appreciated, David.4 points
-
This is a amazing kit for me, I love it! I suggest everyone who is in fond of aircraft should try ihis kit. Not satisfied with painted, but Magister is a beautiful plane. Thanks guys.4 points
-
This has been a bad luck kit all through construction - glad to have got it finished and off the bench. Just to give an indication of what it's been like today between the house and the shed the main cockpit IP etch fell out, and one of the sparrows fell off, requiring a change to having the canopy shut (which of course required stripping off etch to get it to 'fit' WIP is available here for those who need a laugh/cry. Peter who's now moved onto a none cursed kit - really glad I got a couple of these stashed away though....4 points
-
Considering that this kit must be at least 35 years old and came in a faded box I'm reasonably pleased with the end result. The only part that suffered from ageing was the vinyl tubing which had hardened and become unusable. There's a Rover V8 engine under the bonnet/hood which isn't worth showing as the ignition leads are overscale and the alternator has nowhere to go. It also took me an age to get those bonnet straps on All the decals on the model where kindly supplied by Roymattblack as all you get in kit it are these dubious number plate stickers: Thanks for looking. Cheers, Steve4 points
-
Dear forum members, I have done a repaint of the big 28" Hasbro Millennium Falcon and would like to show it to you. So far I was hesitating to buy expensive additional parts from Randy Cooper. Maybe I will try to get them later as this is a really nice model, much cheaper than the Falcon from DeAgostini and for me nice enough. I hope you like it!4 points
-
Calling this one finished this afternoon. It is the Kinetic 1/48 F-16F UAE Block 60 kit OOB using Gunze Sangyo paints and Flory Models washes.4 points
-
Stunning build. I was reminded of how that nose wheel undercarriage worked so I checked out some youtube clips. This one being a superb one. Thanks for sharing your photos and inspiring me to look up some clips... Martin4 points
-
4 points
-
Back to the Meat! Having had 5 days to dry thoroughly, I hoped I would not have any paint lifting issues when masking the tail. Sometimes I have no problems at all and it feels like you could use duck tape to mask, whereas others it seems to lift when you look at it, yet I use the same undercoat, and Klear finish before masking, sometimes multiple coats. Anyway.... I like the new Tamiya white tape which can bend around curves, so I employed this along with post-it notes and the yellow tape. And voila... A small amount of paint peel but nothing that couldn't be remedied later with a strategically held post-it note. I went with Xtracolor X31 for the red So while this dried (actually before I took the masking off) I got on with some dangly bits. Adding the bay doors.. ...and the flaps, and constructing the airbrakes, which consist of brass detail backing plates that fit onto the plastic parts, with very small Y-shaped actuators that are nearly invisible Next area was to start adding bits to the port engine. Copying the extracted engine I detailed last week, I added some bits using plastic rod and wire, with odd bits made from plastic strip. Also painted the airbrake bits silver while I was at it I added some weathering to the engines and bays by brushing on various Humbrol powders and working them into recesses: rust, oxide, smoke, black, dark earth.. Brought some wear and use to this engine I think. The brass hexagon I added to represent a filler cap which will need painting. Word of warning, the weathering powders can literally cover anything if you're not careful, especially when taking the caps off. I ended up looking like a toddler had attempted to put make up on my hands thus was reluctant to pick up a nice shiny Meteor! Thus we are here.. Footnote: I removed the pitot tube from the sprue, held it up to the wing to see how to fit it, and it decided to do this... If Master don't come out with one soon, I'll make my own with stretched sprue, unless I can find something in the spares4 points
-
I've got one in the stash (unlike Stew with his cellar, I bury mine under trees in my Deer Park for the plastic pigs to hunt a la truffles), had intended to build it alongside my Zvezda Stuka but something happened (or rather it didn't!). Duncan B4 points
-
Hello All, I'm away again but here are two pictures from my last modelling session: I made some yagi aerials from 5 Amp fuse wire and superglue. I've also dipped them in future to try to give them a plastic coating. I'm hoping they will be tough enough to survive... I also painted the large "66" for the Apollo 11 recovery. When I was planning this build, all Hannants had were the decals for the Apollo 12-13 recoveries, which have most of the markings I need but not the right size numbers. SInce I spent my money at Hannants the 8-11 set has been re-released. Oh well... You can also see the Yagi bracket on the sponson strut. I'm also not sure whether I want to adjust the sit of the tail wheel, which doesn't quite look right. I have about four days at home between now and June 12th, so this is not a shoo-in for finishing on time. I will try. Thanks for looking, Adrian4 points
-
S...STUKAS! ::ditches bicycle, runs for the hills::4 points
-
A couple more... In addition to the decals, I used Barracudacast's cockpit door and tires, RB Productions PE rad screens and Eduard seat belts. All in all, a very straightforward build. Carl4 points


This leaderboard is set to London/GMT+01:00