
Leaderboard


Popular Content
Showing content with the highest reputation on 07/04/16 in all areas
-
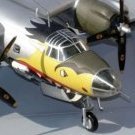
My first vac-form kit is finally finished! a tribute to the late Gordon Stevens as part of a group build on HyperScale: Britmodeller build log can be found here: http://www.britmodeller.com/forums/index.php?/topic/234997838-172-rareplanes-pbm-mariner-gr1/26 points
-
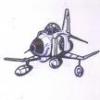
Airfix 1/72 Harrier Gr.1. What a fun wee kit this is! Went together with no fuss whatsoever. Hand brushed with Humbrol enamels and Revell Aquacolours. Finished with a spray of Humbrol Satin Cote (y)24 points
-
Airfix 1/72 Supermarine Swift Fr.5. Have to say, not one of Airfix's best recent efforts. Had major problems closing up the forward fuselage and nose. Ended up having to remove quite a bit of plastic on the inside to get her to close up around the pit. Hand brushed with Humbrol enamels and Revell aquacolours, and finished off with a spray of Humbrol Satin cote (y)18 points
-
Hi everyone, so atlast I got smth to show as welcome post on britmodeller. And the thing is soviet mid-war T-34/76 in early-spring conditions. As presented by dragon with kit #6564. Built OOB as part of out-of-the-box group build on scalemodels. One-year-in-modelling landmark for me Not everything goes right way (for example I totally missed look of dragon provided tow cables so left them aside), but generally I like result. Probably it's time to select some new GB to participate Ok, less words, more images. Have fun. And some close shots16 points
-
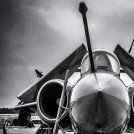
Here's my finished Lightning F6 pretty much built out of the box other that a needle pitot tube and some tape in the cockpit. Its The lightning preservation groups XR728 based at Bruntingthorpe. All paints are Humbrol, finished with humbrol gloss and weathering powders. Thanks for looking lightning-8 by matt wellington, on Flickr Oops, in some of the pictures you can see blobs of blu tack under the missiles... Ignore those!15 points
-
Hello fellow modelers I would like to introduce my latest finished model. It is an F-15E from Revell 1/48. Kit I added resin from the nozzle Aires and RBF from Eduard. Perhaps you will like it15 points
-
Very good model, rock solid, easy to build OOB. I chose an alternative version to the three supplied, numbers are from the spare box.14 points
-
Hi Guys So, the plan for this build was pretty simply: I was supposed to do this machine: and the effects: Too glossy I supposed but still I'm ok with the final look:14 points
-
Hello everyone. Doing a bit of spring cleaning at the moment, unearthing old models from the loft and photos on the PC. I built this out of the box when it came out in 2012 for Spencer Pollard's Cold War Modeller, but I don't think I showed it here. Not usually my type of subject but really enjoyed building my first Spitfire in over forty years! Haris12 points
-
I don't know what possessed me to think that I wanted to build a jet, I suspect it might have been Procopius's Valiant build which ended up looking so pretty in a coat of High-Speed Silver... whatever, I evidently lacked the confidence to tackle such a big project and this was proved to be the case when I ended up with the Xtrakit De Havilland Vampire. There has been some analysis which I couldn't find on the inaccuracies of this kit but fortunately beyond having a vague liking for unusually-shaped aircraft I was sufficiently unaware of the finer points of this aircraft to remain blissful in my ignorance. The kit itself wasn't a very easy build, in order to keep things square - especially important with a twin-boom aircraft - I ended up with some substantial gaps which were clumsily disguised but there for all to see... and in addition to packing every square millimetre of the nose cavity with Liquid Gravity, once the wheels were fitted I still needed to pack the nose-gear bay with more in order to get it to sit properly. This looks pretty ugly from underneath but is marginally less annoying for me than seeing the model sitting on its hindquarters on the shelf; I just won't look at the underside. The paint used was Vallejo Metal Color 77.706 White Aluminium. I used the kit markings for WA294 of 502 (Ulster) RAuxAF, based at RNAS Sydenham in 1953. The 'C' decal on the port boom literally fell off at some point, the gods only know where that ended up, presumably I will wake up tomorrow and find it stuck to my left eyelid or something. Also during photography I broke off the tip of the pitot; again: vanished without trace. You may have guessed from the preceding that I don't consider this my best work but I still like the look of it and in keeping with my vow to put every kit I finish in RFI, here is my Vampire: Thanks for your attention gents Cheers, Stew12 points
-
Hi all, I'm glad to finally present you my first model for 2016, that I've just finished Many thanks for looking, Serg11 points
-
Hello everyone, Here's another finished project, number 4 for 2016. It's KP's old tool 1/72 Lavochkin La-5FN finished in the markings of twice Hero of the Soviet Union and 41-kill ace Vitaly Popkov. The colors are slightly off, but overall I am quite pleased with it. Despite being an old kit, it built rather nice. It is finished with Vallejo acrylics. The little silver band around the engine is a piece of Tamiya tape painted, and the 50 kg bombs are from Eduard's MiG-15 kit. I started this kit over a year ago, only to lose the canopy to the carpet monster. While I was in Japan over the winter, I stopped by Leonardo ET, a small used model shop in Tokyo. Much to my surprise, in the very bottom of a bagged kits box was the very same kit. Mr. Yamaguchi, the shop owner, gave me the kit for free after I told him about my mishap!10 points
-
Hello again. More spring cleaning and a couple more old models. The Hobby Boss Hellcat was a quickbuild in 2006 to try out what was something of a novelty kit from a new manufacturer - an easy to build and well moulded model presented in a box with plastic tray. The wing was in one piece if I remember correctly, there was hardly any detail in the cockpit and it had very shallow wheel bays. They've come a long way! Looked pretty good when painted up though. The I-3 was a very impressive resin kit from Russian company Rest Models. I'd completely forgotten I'd built this! Great looking plane, the sleek lines ruined by the protruding radiator. I'm not sure that aesthetics were top of the design specification at the time. Rest Models still have a website but it was last updated in 2014. I'd love to see their promise of a 1/48 Westland Wapiti materialise. Thanks for looking. Haris10 points
-
Hiya Folks, Here are a pair of AZ Model 1/72nd Martlet Mk.I`s which I have been working on for a while on and off,......it is nice to have a kit of this important variant available at last but it needed a new propeller and a bit of work,....plus I added slid back canopies by sawing the kit canopy and some left over from the Hobbyboss kit. The decals are mixture of Euro Models and Xtradecal for both models and using photos of the real aircraft as reference some of the engine panels have been painted in the original Sea Green and Dark Blue scheme, with Sky band and black lower left wing which were both added during November 1940 to comply with RAF Fighter Command directives, as these Fleet Air Arm fighters were land based at the time The CO of 804 NAS did not like the Grumman applied Sea Green and Dark Blue colour scheme so he ordered it to be replaced using British Extra Dark Sea Grey and Dark Slate Grey but the Sky Blue undersides were retained. Here are some pics of the real things; Martlet Mk.I, BJ561, S7L. Like many 804 NAS Martlet`s this aircraft wore artwork in the form of Jiminy Cricket from the Disney Pinnocio film. The codes S7L were different colours on either side of the fuselage and those on the right have been depicted as being red but they were more than likely in mid process of being painted out so I may cover the red codes with Dark Slate Grey later? The propeller for this model was a spares box item which was cropped to size. [/url] Martlet Mk.I, BJ562, A, This Martlet had Pluto painted behind the cockpit. On the right side of the fuselage behind the cockpit there is a lighter section of camouflage which looks to be a partial repaint and a lighter shade of EDSG has been used to represent this. It also retains the original US Navy style propeller colours with a bare metal hub and front section of the blades with red, yellow and blue striped tips. The propeller for this model was a cropped white metal Dakota propeller from the Aeroclub range and it was polished up to replicate the real thing. From the reference photos,....this Martlet appears to have had its outboard pair of .5in Browning`s removed. I hope that you like these,......they were both brush painted using Polly Scale and Tamiya acrylics and Humbrol enamels, I want to make another in the Sea Green/ Dark Blue/ Sky Blue scheme but I cannot find another kit at a decent price! Cheers Tony Edit,....I`ve since removed the undercarriage on both models and put them back on the right way around,....dohh!! Also,...check out the photos of the Martlet Mk.V being restored in N.Ireland posted by Grey Beema further down among the comments,..fantastic restoration!9 points
-
Bristol Blenheim Mk.1 L 1145, 57 Sqn, 1 Gp RAF Bomber Command Shot down by a Bf109 near Bad Kreuznach whilst carrying out reconnaissance over the Siegfried Line. Kit: Airfix 1/72 Paints: Tamiya and Vallajo MA Decals : Extradecal Extras: Scratch built turret interior, Airwaves seat belts and Barracuda exhausts and air filters. WIP: HERE7 points
-
This an old build been part built in the box for many years . have built it for my brother in law who loves this aircraft .I had many problems with the paint job including terrible fish eye issues all over the whole model . also the decals were brittle and broke up into little bits and took a lot of reassembling . any way here it is . its now in its new home on a shelf with lots of its brothers as its owner collects lightnings .7 points
-
I've made a start on the stabilisers, which will be based on the ID Models Lancaster parts: The later model Manchesters, Lancaster, Lincoln and Shackleton all share the same span, but the chord was increased on the Shackleton. Here you can see how the chord needs to be widened with the Lancaster parts being placed on the Shackleton plans. I've also removed the elevators as these are a little basic in shape and I will make my own at a later date: So the solution is to cut the stabilisers down their length: And add a plastic card insert to widen them to the correct chord: Now that's sorted, it'll be a case of filling the gap and constructing the stabilisers in readiness for adding to the rear fuselage... Until next time, Tom7 points
-
So a bit more work today, not much though, I wasn't happy really with the OD on the tank, to me it was a little to brown in hue, more suited to a more modern era such as Vietnam. So what to do, a strip and re-spray would of destroyed at the Archer resin decals so I decided to touch it up with the Vallejo OD modulation set. It worked, I'm happy now with the results, its a bit more green. I've made a bit of a mess with one of the hull stars, some touching up required but nothing serious. Its not shown on here Dan7 points
-
My first vac-form kit is finally finished! In the end I decided I could not live with the Minicraft mid-upper turret because it's transparency shape seemed so wrong. I spent ages sanding down an an old Airfix Hudson turret transparency but then elected to use the Rareplanes one. It's shape is much better, but the gun slots are too close together, so I had to modify the Minicraft turret structure to accept it. I used the Minicraft nose turret unmodified except I made the canvas gaiters around the gun barrels. I also used the Minicraft rear turret, but it has a horrible join through its centre which I had to hide with spurious framing. From what I can tell, the PBM's turrets had very little framing, being almost entirely perspex. In truth, the vac-form side of things presented few challenges or frustrations (other than having to scratch-build a master for the canopy and plunge-mould the transparency). A bit of extra work was needed to incorporate Red Roo's conversion set intended for the Minicarft kit, but it w as worth it. I'm not so sure the extra work to use spare Minicraft PBM turrets was worth the extra effort involved because they are not all that accurate in my opinion. The biggest drama was huge patches of paint lifting off after masking, despite priming with auto lacquer primer. An industrial chemist mate of min with a background in paints and plastic moulding said release oils on eh original moulding could have become very hard to remove with age, and that my warm water & detergent wash was probably insufficient to clean them away. Anyway, thanks to all who persuaded me to carry on when I was ready to bin the project; here's my finished tribute to the late Gordon Stevens as part of a group build on HyperScale:7 points
-
Well Jonners this is a very interesting thread and thank you for going to the trouble, starting to like the business now !!! in regards to the engine cover panel it does warn in the instructions it wont fit if you install the extra piping and is designed to be left off mate if you install said piping ,confused ? i bet your not ...but i was at first, these new instruction booklets and the way they are set out take a bit of getting used to i reckon, maybe i'm getting old or have become senile at 63 years of age !, I have been a Meteor 'nut' since my early childhood haing been sat in one at the RAAF base near where i lived at the time ,and have built most available kits of it in various scales over the years, i see the F8 we have flying here in Australia on a regular basis and am quite familiar with the layout of panels etc, It is my 'personal' opinion this kit is amazing, now i am basing that on the fact i have built Classic Airframes , Tamiya ,Pamela Veal and Aeroclub versions in 1/48 as well as various 1/72 kits, i am very impressed with the surface detail, cockpit, engine and undercarriage details as well, the rippling effect on the gun panels is just lovely and what a great thing to include, options options options, and then there's markings, i see why you got three up front ! good move, In regards to options, well as i mentioned when you get your head around the instruction booklet and its variations it is full of bonuses and surprises, i do like the seat options of with or without harnesses, the canopy options and the fact they include a clear radio compass fairing, phew ! What's not to like ? i applaud Airfix for giving us such a truly remarkable new kit, oh and what about the deep recessed line on the fuselage inside just aft of the wing trailing edge ? and also the separate nose cone, what variations does Airfix have in store for us ? mmmmmmmm and even if they do not i bet some enterprising resin manufacturers come to the party ! Keep posting and i do hope i havent hijacked your great build thread i just wanted to offer a very positive opinion of a great kit which most British reviewers seem to have been reserved about in their praise ( not a criticism !!!!) there is so much negativity and finger pointing these days i just feel credit needs to go where it is deserved both to you and Airfix Keep posting Cheers7 points
-
Hi guys This is my latest work A pair of Swedish SAAB Drakens in 1/72 from Hasegawa They were built OOB and painted with Tamiya acrylics XF-66 (with a touch of white) for the undersides XF-51 for the top green XF-17 and XF-8 (9:1) for the Blue Cokpit XF-58 All colors got coats of lighter shades hope you like it!6 points
-
Hi Mates, because you liked my He 115 so much, i will show the second reworked Plane, i did for my "Seeplane Section". It`s mostly oob, but i added some Antennas and two 50 kg Bombs under right wing, a better looking MG for frontstation, and a hardly needet new Cannon for middlestation (Afaik Spareparts from Italerie. Last not least i took a carrier for a BV-138 out of my Stash. It`s not historical correct, but fitts and looks far better than without. Paintwork is, like allways by brush, Paints are above Agama and below Humbrol. If you are now thinking about buying one please be aware: This is a truly "Sanding Monster" I could not remember a second plane that needs nearly the same filler/sanding session, like this babe. In my memories, this plane was much more fun in past buildings. But see the pictures. Any comments are warmly wellcome. Best regards6 points
-
Life, and a lack of patience, is slowing this down... a lot. I had another session this morning but the lack of proper locations for the 'upright parts' means I really need to dry fit carefully and every time I try, something pings, or Sqn. Ldr. Martingale decides to kick the I/P, or not sit still... I definitely want to avoid things like this: Untitled by Ced Bufton, on Flickr So it's sand, fit, ping, curse... and repeat. At least I now have the Sqn. Ldr's feet fitting through the I/P, and I'm almost sure it's the right height now: Hopefully I'll be able to close up soon. What a wuss.6 points
-
6 points
-
Thanks, everyone. I truly appreciate the support from this marvelous group of friends (most of whom I've never even met). This really helps in so many ways. Well, today is D-Day. I got a reprieve from my doc so instead of 14:00 for my last dose of Oxycodone, it will be 21:00. And, she said I can take a higher dose of Clonodine, which is used to combat the withdrawal symptoms. I have no idea what it's going to be like tomorrow after I wake up and before I go for the Suboxone in the afternoon. It will be the first time in over a decade that I will not be on some kind of opiate pain reliever. I learned this week (or was it last?) about opiate-induced hyperalgesia. Basically, I've been on these bad boys for so long, I may be experiencing more pain as a result of treatment. Increasing the dosage of the opiate can often cause even higher pain. I guess it's very difficult to distinguish this from tolerance related effects. I talked to a person in the group session yesterday whose pain went away after she stopped taking the opiates. Isn't that lovely? Weird, at least, but I'd sign up for that! I'll catch up with everyone when this is all over! Cheers, Bill6 points
-
Evening all- I hope everyone had a good Easter. I'd like to present my take on the Airfix fabric wing mark 1 Hurricane. I started this kit some time ago but found it quite challenging- the wing especially, with a trailing edge at least 4 scale inches thick... Also I managed to break the canopy, and Airfix were out of stock, so I used the Squadron item (with mixed results). Anyways, I'm calling it finished. It's a lovely little kit (I'm a huge fan of these new 1/72 Airfix kits) and looks the part when built up. Comments and criticism always welcome. Thanks for watching- Dave. pp.s Can anyone recommend aircrew/groundcrew figures in 1/72 ? These Airfix chaps are very frustrating- being polythene it's almost impossible to clean the flash off them. Cheers, D5 points
-
Hello fellow Britmodellers, As suggested a couple of days ago on another Tamiya 1:32 Sptifire thread in the RFI section, I will be sharing my build of Tamiya’s 1:32 Supermarine Spitfire Mk.IXc which will eventually be part of a diorama that I have planned as a tribute to the great Wing Commander J.E. ‘Johnnie Johnson. The diorama will be in the form of the Spitfire being worked on by the mechanics in readiness for another sortie, with the engine covers off, whilst Johnnie is chatting to another officer on the ground by the open cockpit door? Besides the 1:32 diorama as described above, I intend to have a 1:9 figure of ‘Johnnie’ Johnson himself at the front of the display and standing on his own small platform which will be set lower than the main diorama and probably in one corner of the base? Hope that makes sense? I started working on this about a year ago when I was a member of another forum (which I have since left) and which you may recognise from that forum, but because of other commitments and life generally getting in the way, it got shelved. However, I want to get going on this build again and have decided to share the experience with you great guys now that Britmodeller is my one and only forum - of which I’m very pleased to be a member!! Besides the basic Tamiya kit which many of you will know is a superb model straight OOB I am adding a whole raft of extras to this build to try and make this into something special? This will be a VERY lengthy WIP!! So, what will I be using for this project?: Base Kit: Tamiya 1:32 Supermarine Spitfire Mk.IXc (Kit no. 60319) in the markings of Wing Commander J.E. ‘Johnnie’ Johnson. Extras: Eduard ‘Big Ed’ set (BIG3283) - Spitfire MkIX (Early) Eduard (32772) Fabric seatbelts set Aires (2148) resin Cockpit set Aires ‘Quickboost’ (QB 32078) resin Exhausts (Fishtail) Aires ‘Quickboost’ (QB 32152) resin Cockpit door Aires (2128) resin Wheels & paint masks Barracuda (BR32003) Spitfire cockpit upgrade set (as a back-up to the Aires cockpit set) Master (AM-32-016) Turned brass Hispano 20mm cannons) RB Productions (RB-P32022) Spitfire radiators (etch) True Details (32514) RAF WWII era aircrew parachute #1 (which will lay flat either on the wing or on the ground?) A lot of scratchbuilding!!! I will probably be using a set of pre-cut masks for painting the insignia and markings, but yet to buy them. In my time working on this kit whilst I was posting on the old forum, I started with the engine and spent a lot of hours adding loads of extra scratchbuilt details and have gotten to the point where the engine itself is almost complete and I’m starting to move onto the engine bearer/frame and looking at working on the firewall? I don’t want to go into detail all over again about how I’ve made some of the scratchbuilt stuff so I’ll just show a few photos of the construction of the engine and where I’m up to currently – I hope you like it!? WARNING!! PICTURE HEAVY!! The kit: Construction photos of the Merlin engine with extra detail added: I made an engine stand for the Merlin whilst I was working on it (Just for fun!): The Merlin starts to take shape after some colour and weathering has been added: Followed by a lot of scratchbuilding of parts and then test fitting the supercharger/carburettor units with the Merlin just to be sure it all fits!!: Started construction of the engine bearers - the firewall is only loosely fitted with a small piece of sprue left attached for ease of painting/handling: Temporarily placed the supercharger/carburetter unit into the engine bearer frame just to make sure all of my added detail doesn’t interfere with fit? (it fits ok!): Primer, base colour and detail painting: Engine test fitted again with the supercharger/carburettor unit (gap is because they are not fully pushed together yet!): There are still a few more pipes and cables to scratchbuild and connect between the two separate units!! Engine bearers/firewall base painted: And that is where I am currently with this build!! I shall be using this 1:9 figure (from Mitches Military Models) with my diorama: However, I will be replacing the stock head from the figure kit with one of ‘Johnnie’ Johnson from the same manufacturer: Quite a good likeness I think: So there we are!! A couple of quick questions before I close this post; A – Do I build and include the 1:9 figure within this WIP as it’s part of my Spitfire project, or do I build it in the ‘Figures’ section of this forum and bring it back to the final display piece when all is done? B – I seriously need some help with details of the firewall on a Spitfire Mk.IX as it is holding me up from putting the engine into the bearers/firewall assembly because I need the detail added first? What I want is photos/drawings of the routing of the various pipes and cables/wiring on the firewall? I am aware of some photos that were posted on this forum previously and don’t need to see them again, but I am hoping that one of you may have something that can give me the missing details? Otherwise, I’ll just need to guess but I’d rather be as accurate as possible after all of the work I’ve put into the engine side of this build? Thanks for looking. Kev5 points
-
Hiya chaps. Hope you all like this one. I finished this one a couple of weeks ago and only just getting round to plucking up the spuds to post it for inspection. This offering from Revell is overall a real cracker, and imho better than what's available elsewhere. The fit is good and the engineering ensures a pretty easy build in most places. My only real criticism is though Revell absolutely nailed it in 90% of places, unfortunately where they slip up they slip up bad! The nose wheels are terrible, off scale and look nothing like the real thing (I had a set floating around from a hasegawa 18E that failed before it was finished). The only bit of bad fit on the whole fuselage is at the back, just behind the wings, this is a tricky area though and no one else really nails it here either. The one area that imho they really dropped the ball, is the panel lines, they are all over the places. Beautifully molded in some places, completely missing in others and bears no resemblance to what's on the decal guide! All this aside though, the one thing that really stands this kit out is the stunning decals, designed by Daco and printed in Italy. You'd pay close to the price of the kit for them alone from any of the major decal suppliers, which makes the plastic a bargain. Haha, think of it as more of a decal sheet that comes with matching plastic instead of kit that comes with decals and you won't be disappointed! Anyway, enough of my ramblings, on to the pictures. Hope you like them. Cheers Dan5 points
-
Slaters, it may well have been, most of the rest of the bigger sizes are black. Today I have finished cleaning up all the remaining rotor parts and got them primed. I have also masked up and primed the probe ready for some Alclad on the tip. I also had to respray one of the guns as somehow it had got scratched: I have also applied top coat to the door parts and resprayed everything that was RLM 75 as I could still see blue on all of them: I will let those all harden up overnight and should be able to get on with the camouflage scheme tomorrow. Bye for now, Nigel5 points
-
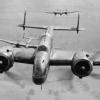
Liberty Belle of the 61st FS, 56th FG 1:72nd Tamiya kit, decals from the AJ Press5 points
-
My contribution to the suez conflict. Will give it to the old pilot who frequents my local as he flew with 806 NAS.5 points
-
This is my first WIP so bear with me as it will jump around and will make a glacier look distinctly spritely is its progress... I'm slowly building a collection of Fighters flown by RN Aces inspired by the Osprey book. So this model is to represent Fairey Fulmar N1884 of NAS 806 flown during late 1940 and early 1941 in the Meditereanean by Sub Lt Stan Orr. I started a thread in in the WWII area to discuss its appearance see http://www.britmodeller.com/forums/index.php?/topic/235000157-fairey-fulmar-mki-n18846k-806nas/ The kit is the 1/48 Special Hobby boxing with the resin cockpits and PE. So yesterday I started with the Pilots Cockpit and Instrument Panel... [/url] [/url] Today I built the Observers Cockpit, and assembled the fuselage. Wrapping the fuselage together around the observers cockpit proved to be a pitch battle - man against plastic. Consisting of milling out the thickness of plastic in the fuselage, milling down the outsides of the Observers cockpit then once that fitted cementing and clamping the fuselage section by section to get it to close up (hence the cable ties).. So now it looks something like this.. [/url] [/url] [/url] So tomorrow's job should be to fill, clean up the seams and attack the wings.4 points
-
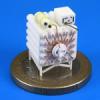
This was build for the "Made in Britain" GB, but I thought I'd post it here as well. This is the old Bandai 1:16 scale kit. I'd built the Steam Roller version a couple of years ago and have had this kit in the stash ever since. My original intention was to add lighting to the bulbs around the roof, but in the end I released this was waaay too difficult to achieve so sensibly gave that up! The kit comes with a gold-plated sprue, but that got stripped off and the pipework and features repainted with Alclad paints. This allowed a variety of colours and textures from Pale Gold to Polished Brass to Copper, Aluminium and Steel. The main modification to the kit is around the dynamo at the front. The kit part is severely lacking in detail Close up of the dynamo. I've added cables from the control panel up into the roof to simulate how the lights would be powered. Here you can see the cables that would have delivered power to the lights, with a scratch built junction box joining two of the cables I've just realised on seeing this photo that I've fogotten a decal that should go on the end of the dynamo boss Here is the box - its a biggie! This is the dynamo as it comes in the kit and this is what a typical dynamo should look like and this is what I ended up with Having completed this, I'm really pleased with how it looks... its actually "pretty" How I EVER thought I could light all those bulbs...4 points
-
A little late to the party on this one but better late than never. Going to create a `crash landing` dio for this build with a tad bit of battle damage. Kit and plenty of reference pictures. Progress so far....... ..... and a rough idea of the base I`ll be using although I may make a new one depending on time.4 points
-
Morning all, I haven't done a WIP in a while so I thought I might have a go with the new Airfix BE2c (1:72). I'm planning to do this as an "out of the box" build-apart from one or two scratchbuilt details along the way. First, the kit. A nice, small and sturdy box The contents. Exceptionally good decals, very neat! Clear windscreens without any blemishes, the only problem is that they are terribly small! The sprues- one or two ejector pin marks on the inside of the fuselage- but these are out of sight when the cockpit is fitted. Sam4 points
-
This plane's scheme is way so cool that l had to share. Anyone care to produce decals of this!4 points
-
F4U-5N Corsair from Hasegawa. Markings - VMF(N)-513 "Flying Nightmares" - Pusan (K-1) or Pohang (K-3) base - early Korean War.4 points
-
Thanks Tony, very kind Fighting all the way. Having sorted the pilot and I/P the backrest was too wide and pushed open the fuselage again. Tiresome by Ced Bufton, on Flickr Oh, stop moaning man and just get on with it! What were you expecting... RIGHT! Sand this to death until the fuselage closes without the clamps: At last. Check the canopy fit. Rats. Sand the backrest top trying to avoid the Sqn Ldr's head: That'll need a touch up but the joins are glued now except under the back fuselage which is gappy at the moment. I might leave that until the wing fit. Just in case. Oh, you may remember I forgot to fit the tailwheel bay to the Airacuda so I made sure not to forget it this time. Cut the part off the sprue, test fit, sand, test fit, ping, locate on the carpet, sand... oh for goodness sake, I'm building wheels up so I'll leave it out and cope with it later.4 points
-
Good afternoon everyone, On Sunday I went to Cosford and picked up, among other things, an Airfix 1:72 TSR-2 and a Pit Road 1:144 TSR-2 "Strike Role". So, seen as I'm planning on doing the 1:72 TSR-2 as my local Cosford example, I thought- why not utilise the 1:144 kit's belly fuel tank and martel missiles to create a "what-if" variant? Based on other info on the internet: This is my interpretation of the TSR-2 GR4 as it could have served in the 1990-1 Gulf War. it is fitted with a targetting "pod" underneath the nose of the cockpit and a retractable refuelling probe on the side of the cockpit, as well as the 4 underwing pylons with Martel missiles. -RBF tags and engine nozzle FOD covers made from paper -Paint was mixed from a variety of Vallejo Air colours -Decals from the Airfix Buccaneer (And the obligatory comparison with a 1p coin) Thanks for having a look! Any comments are much appreciated. Kind regards, Sam4 points
-
Of course ok for all the 1/48th Su-17/-20/-22 kits, Master from Poland is to release a pitot set - ref. AM-48-122 Source: https://www.facebook.com/media/set/?set=a.1019321408149213.1073742123.118634424884587&type=3 V.P.4 points
-
Thanks gents; it's the Phoenix Precision Paints Dark Green and like all their colours is a pleasure to use. I cut it with cellulose thinners and it self-levels beautifully even when brushed on. I got the second coat applied: So hopefully after work tonight I can remove the lower camouflage and tail-band masking and see what needs touching-up and where... Cheers, Stew4 points
-
plugs on the jet engines4 points
-
Gaining contrast between different areas of the model4 points
-
I consciously think that the box art doesn't influence me, but looking at the kits in my stash I know that it does. Having said that, other influences are in play. For example I build model kits to have a representation of that particular aircraft/building/vehicle/group of people etc that I am interested in, and eye-catching artwork will never tempt me to buy a kit of a Ford Mustang hotrod because they don't interest me. At the same time it is ARTWORK that attracts my attention. All those models by Tamiya which show a photograph of the finished model are just not what I like to see on the box leave me unimpressed, because I want to explore what I can make of it. The artwork on a model box should fire the imagination and inspire the creation of the model that you want to build, whether you like to strive for absolute correctness or something that vaguely resembles the real thing.4 points
-
Thanks lads. First here are some of the tools I use for re-scribing. The top two scriber's are my favourite and I use them most of the time. I think I ordered them from a company in the Czech Republic and cost around £14 each so they weren't cheap but they are the best I have used. I have got a Tamiya one knocking around somewhere as well. Templates and a flexible metal rule. 3M 471 Blue Fine Line Vinyl Masking Tape 3mm (£3.85 off ebay delivered) which is excellent stuff for guiding the scriber around fuselages. jet intakes, etc. I used to use Dymo tape but this stuff is a lot cheaper and the adhesive lasts a lot longer as well. Here is the lower fuselage before I started and there is a quite a bit to do but I find if I get bored or fed up with re-scribing, its best to go for a coffee or watch the TV but don't carry on and try to rush it takes when I make a mistake. Its one of those jobs that you have to take your time. I started sribing the panels first using the templates. Normally I would sand down the raised panel lines and then re-scribe them but this time I decided to use the raised panel lines around the panels to help postition the template and keep it in the right place. I scribed the new panels then I would sand them down to remove any ridges. I have left the dust in the new panels to make it easier to see in the photo. Also here is the 3M tape in action. On this line I sanded the raised line down first just enough so you can see the original line then I placed the 3M tape along the line. Now it just a case of running the scriber along the edge of the tape, not pushing down on the scriber just letting the weight of the scriber do the cutting. You may think it hasn't cut anything but it will have. Now do it again and again and you will see a bit of waste plastic starting to come up from the scriber. When you are happy remove the tape. Here is the completed lower fuselage. Now for the upper fuselage. I used the 3M tape again around the air intakes. Here is part of the tail fin. Before...... And after.... to be continued.4 points
-
Hi all, Following on from my Wellington I've had another go at one of Airfix's classic bombers, this time it was a new boxing of the old Halifax kit. Built OOB apart from a bit of scratch detail in the cockpit which of course you can see anyway lol Markings are of 78 Squadron based at RAF Breighton, Yorkshire 1944. Not a showstopper but an enjoyable build - next up will either be a Stirling or a new tool Lanc i've got in the stash! Cheers Simon3 points
-
Only thing I have left mate. Back on thread. second fire extinguisher. This normally covered by a black vercro'd cover, but I dint see any harm in leaving this exposed3 points
-
Hi Folks A few recent completions,I had been working on the CA kits when Airfix surprised me with the release of their Meteor. All are finished in High Speed Silver from Xtracolor with decals from the available Xtradecal sheet. Ian 616 Squadron when based at Finningley,CA kit 64 Squadron when based at Linton-on-Ouse,CA kit 74 Squadron when based at Horsham St Faith,Airfix kit3 points
-
Thanks chaps. Another airbrushing session this morning re-coating the light cover and changing the gun colour to "Aluminium" which while hopefully subtly different from the missile launchers does bring them more in line colour match wise: I also applied the RLM 75 to various bits and the main airframe: Unusually I have decided to apply the darker camouflage colour first as I think this will aid in the masking process. I will have to give it another coat though as there are still some areas of blue visible. The upper rotor got the same treatment as the lower one. I was going to leave the link rods but two snapped during clean up and I was forced to repair with more 0.5mm rod: I then made this part from a piece of scrap card. I made a hinge point by scribing with my Olfa cutter then wetted both sides with liquid poly to soften the plastic and prevent any cracking: That got added here along with some 1mm square blocks drilled out for the pipe work to be added later: I then added these angled uprights using 0.25 x 0.5mm strips (that was quite fiddly) followed by some 0.28mm lead wire for the pipes: I think I'll declare the upper and lower rotor hubs now ready for some paint. The sprues are now virtually clear with just three rotor blades left to finish. I'll get those done before any more painting. Bye for now, Nigel3 points
-
1/32 nd Revell (newest kit) as a gift to a 84 year old relative. I didn't add the codes as this is not important in this case.3 points


This leaderboard is set to London/GMT+01:00