
Leaderboard


Popular Content
Showing content with the highest reputation on 11/03/16 in all areas
-
38 points
-
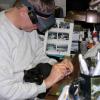
Hiya Folks, I`ve managed to finish off a few models lately and here is one of them,.....it is the 1/72nd scale Special Hobby Baltimore kit built as a Mk.IV flown by the Greek 13 (Hellenic) Sqn which flew as part of the Balkan Air Force from Italy and Greece suring 1944-45. Most of the aircrew and groundcrew were Greek but the majority of Air Gunners were seconded from the RAF. Anyway enough blurb, here is the model; [/url] After the Italian Co Belligerant`s began to fly Baltimore`s as part of their wing wearing Italian national markings, the Greeks decided to aplly a blue centre to the fuselage roundel and added blue to the fin flash too. The decals came from one of the Xradecal Mediterranean Twins sheet which I researched for Hannants. All the best Tony20 points
-
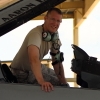
Hi folk's this is number four in the P-47 STGB,my take on Revell,s "M" in the marking,s of Capt. John C Fahringer's aircraft of the 63RD F.S at the end of the war.Revell have shown her in the late scheme with the fin fillet added,red outlines to the codes and the lower wing buzz code added,while being flown by Maj. George E Bostwick on March 25th 1945 she downed an Me 262 and damaged another(I,m two kill markings shy on the finished model).Thanks for looking. And all four take a final bow.18 points
-
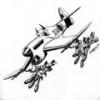
Hello All, Just a couple of pictures of the Airfix Roland CII, which I realise I haven't put up here. It checks out well against the old Harborough plans, although I now think those plans are not as accurate as the modern ones. Still, that meant I could do some interior detailing: And I finished it as an early version with a Lewis gun and flying fish anenometer, in a scheme taken from the Wingnuts site: It's a nice little kit and I had fun building it. Unlike most Airfix biplanes of that era, the struttery and wing alignment is very simple - you don't have to get a dozen plastic sticks to point in the same direction! Thanks for looking, Adrian18 points
-
I've long been a fan of the Beech Kingair & so decided to take on two, very different kits--Mach 2's RC-12 & RVHP's MC-12. The Mach 2 kit was a pig (surprise, that!) and basically required a complete re-work. The engine nacelles represent the very-early C-12, with the round profile and had to be re-sculpted with milliput & profanity. The undercarriage was unusable, and I swapped them for part from the spare bin. Most of my effort was expended replicating the various structural reenforcements, lumps and bumps of the RC-12--I decided to model the latest RC-12X, instead of the kit-intended K-model, which required sculpting the ironing-board SLAR antennas on the aft fuselage & building-up new wingtip pods. I used the spare vacuform canopy from the RVHP kit--they pack it with two!! RVHP is the exact opposite of Mach 2, and the MC-12 Liberty is no exception--it's lovely! Warning on the vacuform canopy though, it fit the Mach 2 aircraft, but was too wide for it's intended kit!! In retrospect, I should have shimmed the resin fuselage with styrene sheet before joining! Lesson for next time. Only major mod was cutting out the crew door & adding an operator's station--I still aim to sculpt the aft SATCOM hump to make it a later version of the MC-12, though it's finished as an early version for the time being. Both kits were expensive, but the MC-12 set a record for damage to my pocketbook! I think it was worth it & my wife has come 'round Amazing what flowers will do!! And the MC-12!14 points
-
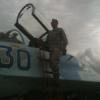
Well it's bright and it's done. This is my second Hasegawa Phantom depicted as a jet (37-8322) of 302 Hikotai based at Naha Okinawa in December 2008. It was specially painted to commemorate the transfer of the unit to Nyutabaru after 24 years on the island. The aircraft was scrapped 3 months later in March 2009. Lessons Learnt Not all Hasegawa Phantoms are the same. Even though the Sprues for the Wings (sprue L) and Fuselage (sprue J)are labelled the same there are 2 different versions of the same sprue depending on the boxing. As such I really should have used the F-4EJ Kai boxing, which has the proper fuselage and wings with the correct antennas. My biggest disappointment was the Wolfpack resin nose. I wasn't happy with the depth of the lines /detail so I re-scribed it, and didn't do a good a job. I'm not sure what it offers over the kit nose to be honest. A close second was the True Details Pylon's, The engraved detail in these is pretty fine (non existent) and also needed re scribing. Thirdly was the colours chosen by Model Alliance for the bright green decal text. It's nothing like Tamiya X-15, which seems to very closely match the green on the actual aircraft. Enough rambling, onto the details The Kit 1/48 Hasegawa RF-4EJ Recon Phantom (HSG 09923) Aftermarket Wolfpack Nose and Pitot True Details Pylons AMS Resin Intake Blanks Aires Exhaust Eduard PE Quickboost Seats Royale Resin Wheels SAC Landing Gear Decals Model Alliance and Hasegawa for the stencils Painted with Tamiya Acrylics and Gunze Lacquers. Gaianotes and Tamiya Gloss coats Winsor and Newton Galeria Matt Varnish with some Dullcoate thrown in. Vallejo and oils for the details Weathered with Oils and Pastels. This is probably a bit underdone but I'd lost interest by this stage The Photos. More photos at my blog or facebook page Build thread is here14 points
-
Hi, here is a famous "MEG X" from my workbench. The model is generally OOB, with addition of Eduards PE and painting masks by Montex (almost all markings were painted). Hope you enjoy!13 points
-
A request was made in the thread about my Jasmine Hellcat for more photos of their Horten I built a couple years ago. I'm happy to oblige! How it all started. This WIP shot gives an idea of its size. The remaining photos are of the completed model. Cheers, Eric13 points
-
Hi all, I was able to reshoot my Hasegawa 1/32 Ju 87D-8 Nachtschlacht from squadron 1.NSG 9 Italy during the summer of 1944. I was not satisfied with the pictures from last year due to the color of the country side background. =http://s806.photobucket.com/user/rodbettencourt/media/D82.jpg.html][/url]12 points
-
Hello everyone! This is what I have recently finished. An absolutely oob new Airfix Nakajima B5N2. There is nothing really special about this built, it went together pretty well and generally was fun to build11 points
-
Well, I'm not sure if the following will convince you, and in truth I'm not too bothered as you must follow your own inclinations, but would make the following comments. The L-shaped panel on the inside of the D-door was in fact a polished steel plate. It was there to prevent excessive wear to the door when it was closed on a still-spinning wheel. It always appears brighter than the painted door it is set on. The undercarriage legs appear Aluminium painted (which they were) because they are circular in section and reflect the light in a convincing way. The flat surfaces of the doors themselves do not show any variation in the way they reflect light. So appear similar to MSG. Having seen the original colour transparencies from which most of the images appearing on the net have been drawn, I don't think you can deduce too much from the images on show above. It is often easier to see the Aluminium finish in close up black and white photos. Nothing I've seen in half a century of poring over Typhoon photos has convinced me that the u/c bays and inside of the doors was anything other than Aluminium-painted. Normally. CT11 points
-
Hi all , Here are some pictures of my 1/48 F-104G of the "Marinefliegergeschwader 1" Basic is the Eduard -Kit "Bundesfighter" of the F-104G incl. the typical Eduard add. parts (Cockpit - Eject.Seat - Pilot Tube ) Here in the version of the german Navy This aircraft 22+74 from MFG1 (german Navy) was stationed in Schleswig / Jagel from 1964 until its sale to Greece in 1981 The gray camo (Norm76) shown here was introduced in 197010 points
-
Hi all Here are some pics of my Dragon Heinkel 162 Mistel. The model represents a Heinkel He 162, which has been re-deployed from JG1 to a new bomber unit. Hence the painted out previous markings and the application of new bomber unit codes. The Me 262 represents a tired, in-service fighter which was sent back to the Messerschmitt factory to be reconfigured to a drone aircraft with a new warhead nose cone. As this combination of a Mistel never existed, it allows for some latitude in terms of historical accuracy. It also afforded me an opportunity to use the markings seen on the Me 262, which to the best of my research never existed. He 162 - Eduard photo etched detail set used in the cockpit - kit pitot tube replaced with hypodermic needles - FuG25a IFF antenna added - photo etched DF loop added - landing gear doors modified to allow them to fit in the closed position - machine gun barrels drilled out - airframe painted with Xtracolor X210 Brunviolett RLM 81, X211 Dunkelgrun RLM 82 and X208 Lichtblau RLM 76 - model is weathered with chalk pastels - markings are from various sources and AeroMaster 48-334 Reich Defense 163’s and 162’s Part 7 Me 262 - kit pitot tube replaced with hypodermic needles - fuselage rescribed to depict where the cockpit was removed and new sheet metal added - aileron trim tab linkage added airframe painted with Xtracolor X210 Brunviolett RLM 81, X211 Dunkelgrun RLM 82, X212 Lichtgrun RLM 83 and X208 Lichtblau RLM 76 - model is weathered with chalk pastels - markings are from AeroMaster 48-336 Me 262 Sturmbirds Part 3 Trolley - drag chute cables and breakaway retaining ropes added References Aero Detail No. 9, Messerschmitt Me 262A Aero Detail No. 10, Messerschmitt Me 163 and Heinkel He 162 Classic Publications No. 7 Mistel German Composite Aircraft and Operations 1942-19459 points
-
Enjoy !!9 points
-
Roland C.II 1:32 Wingnut Wings Ever since building the 1:72 Airfix kit as a kid I have liked this aeroplane, with its streamlined shape and 'face'. The real aeroplane was built with the fuselage in 2 halves, just like a plastic kit, which was then fitted over the interior framework to give a very light and strong unit. So it should have a visible join line top and bottom! (The join actually had a strip of fabric doped along it). As is usual with Wingnut Wings the kit was a total pleasure to build from start to finish. Of the 5 colour schemes offered, I had to go with this one as it is the very same that Airfix offered all those years ago. The anemometer on the wing of this aircraft had a canvas and wire fishy fairing attached! Remember the Airfix dogfight Double with the Roland and RE.8? You can do it in 1:32 now! Thanks for looking, John8 points
-
I'm calling it finished.... it's an Academy B-29 painted as a Tu-4 Bull with a Modelsvit Tu-91 Boot attached as an engine testbed - it really did exist - as shown in this photo.... A lot of hacking, filling and sanding later...... Because I used Milliput to form the rear end of the cut-down Tu-91 fuselage, it is very tail heavy - so I had to fit a support prop under the Tu-4 tail. I reckon if they removed the turboprop engine and put a few seats in the Tu-91, they could have made a neat passenger version of the Tu-4 My attempt at repicating the photos of the real thing...... Comments welcome - more photos of the build are here I'm going for a lie down in a dark room now..... Ken8 points
-
Thanks Simon - in your own time! Hi Rob Ooo, like plasticine? I might get some of that to try... I had an odd hour this afternoon so I spent it fitting the landing lights. What a pain. Saw, cut, fit, cut, fit etc etc. Eventually they went in, although they don't really have a profile so the fit was, er, not the best. After a lie down I realised I'd fitted all the bits and could enjoy doing a bit of NMF. Before I knew it I'd covered it all so she's drying now: A bit of touching up then it'll be some buffing and on with the transfers. Night off tonight methinks.8 points
-
Took some time to get this one done due to life stuff and work getting in the way. Anyway a little gem I picked up in Plymouth Pannier market for a fiver. And it was a good chance to give the airbrush (NEO) an outing after five months to do various blotches. dots, wiggles and squiggles. Revell and Tamiya acrylics with Citadel skull white for the band. All over finish with ancient Humbrol Matt which was flawless as usual after all these years. Decals came from a Revell Seatta. Few embellishments in the cockpit area such as radio deck and new seat and a bit of framework. Canopy a bit thick so hard to see it. A bit of reprofiling on the nose, filler here and there. A fair few pics some of which just to prove you can get two days consecutive sunshine in West Devon See if you can see the thin strip of maskers left on canopy which took a bit of fettling etc. to try and get it to blend in. The aft section of which looks ropey close up. Grin or gurn at it at your will.7 points
-
Hello U-Boat Type VII/C scale: 1/72 manufacturer: Revell additional parts: [Pontos: detail set (etched parts, turned brass parts, wooden decks, dry transfers, resin parts) RC-Subs: etched parts WEM (White Ensing Models): etched parts Archer Fine Transfers: welding seams, rivets (Decals) Eduard: deck gun (resin) Blue Ridge Models: upper part of the pressure hull The boat was fully modified. The complete surface of the hull reworked with a mill, scraped with a round knife. All openings / holes were opend, some additional openings added. Etched parts repalce the areas at the torpedo openings and several other areas on the hull. Several layers of sanding, filling, primering, sanding, ..... were necessary to get a smooth surface after that. Rivets and welding seams were corrected and added as decals from Archer or welding seams made with putty. The painting was done in several layers (black primer, rust painted, salt, tamiya acrylics in several layers and colors, removing of salt, clear coat matt. The weathering was done with oil color washings (black, white, brown, blue, green) The propellers were painted in silver, then weathered with a sponge and grey, white, green and black colors. The anchor was structured with graphit poweder and colour, rust colour added, salt added, then grey painted. The wooden deck was weathered with oil colors. On the turret lot of etched parts were installed as well as turned brass parts before painting it. The railing is made of brass wires. The anti-ship gun is a resin kit with etched parts from Eduard's brassin line. The anti-aircraft gun is consting of etched- and turned brass parts only, made by RC Subs and Pontos. Finally, after corrections of the colours and weatherings the rigging was made with thin twine, the flag added and the boat fixed on the wooden base ..... A more detailed info about the construction of the ship you find on my website! The finished boat on is display: details Thank you very much for your interest in this project. I hope that you like the result! Cheers Micha6 points
-
Hi mates, This hasn't been a very productive thread so far. Sorry about that, but Mr. Mojo left the building for several days. When that happens, I can usually get him back by playing "L.A. Woman" very loudly through my headphones. But no luck! I had to revert to Plan B - build a model completely OOB, no aftermarket, no super detailing, no weathering, no panel line washes, no fancy metalizers, no floor wax baths. Just build it the way I would have 30 years ago, using only the parts in the kit. Build it quickly and most of all HAVE FUN! So that's what I did. I chose the Revell 1:72 Northrop F-89 Scorpion. Nice kit, I think it will look good with some extra...wait a minute! No extra anything. Just build it. So here it is, three days' worth of speed modelling mojo recovery. I think it's not half bad. I kinda like that fluorescent orange. Anyway, Mr. Mojo has returned! Now it's back to sanding the Sea Venom! Filler was necessary on the Sea Venom fuselage seam along the bottom and radome (my mistake), and where the booms attach. It's such a small model that it's not that easy to hold on to and sand. Plus, it's slippery! But there isn't that much to do, so maybe we'll be ready for primer/paint soon. Cheers, Bill6 points
-
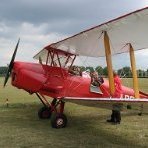
This one slipped the memory, but as I am currently reading X-Planes of Europe by Tony Buttler & Jean-Louis Deleze and got to the chapter on FD-2 today, I thought I'd mention it. On 10 March 1956 the Fairey Delta 2 broke the World Air Speed Record, raising it to 1,132 mph (1,811 km/h) or Mach 1.73, an increase of some 300 mph (480 km/h) over the previous record, and thus becoming the first aircraft to exceed 1,000 mph (1,600 km/h) in level flight. A 38% increase in the record.6 points
-
Cheers,....yes the nose glazing was joined together without frame lines but some people fall into the trap of painting these. Here are some pics of the real thing; and here are some of the RAF gunners serving with 13 (Hellenic) Sqn; All the best, Tony6 points
-
I removed the nose from the other half of the Sword kit. The next step will be to get the interior together so the halves can be mated and then the second Griffon half attached. PIC LOST TO PHOTOBUCKET I also did a little comparison between the Brigade/Sword fuselage and the CMR, for what it's worth. Then nose, firewall and rear cockpit bulkhead line up really well. The Sword cockpit opening is little longer - taking away from the panel over the fuel tank. But the CMR kit is quite a bit shorter than the Sword Mk V behind the cockpit. I was under the impression that the Sword and AZ Spitfires heavily influenced by the CMR. I don't know which is correct, but I think they both will end up looking like Spitfires, unlike the Special Hobby Mk 21 - more on that below. I set up a mass production paint line for the interiors. The Special Hobby Mk 21 is quite a bit shorter than the Airfix Mk 22, and it looks kind of 'tubby'. It reminds me of how the Academy P-40 just ends up looking kind of funny next other P-40's. Forgive me if it seems like I'm complaining, I'm glad Academy make a P-40, and I enjoyed building it, and the SH Mk 21 has really nice detail and I did buy it with eyes open - it's just that it's mostly going to be a donor kit for me. The first thing the SH kit is donating is its fuselage spine - here it is attached to the Airfix Mk 22. PIC LOST TO PHOTOBUCKET I used the spare Airfix Mk IX canopy to act as a guide for spacing the cuts and attachments. The SH kit is also donating its tail - too wide for the Airfix kit (a bit tubby alright), the halves had to be filed down to fit. PIC LOST TO PHOTOBUCKET I'm glad the SH kit pieces worked out, I had an Airfix Mk XIX ready to chop up just in case, and I do have an AZ Mk 21 that could be done OOB if worse comes to worse, but this is way more fun.6 points
-
"What a piece of junk!? She my not look like much, but she`s got it where it counts, kid!!" Millennium Falcon, Revell Easykit Pocket, scale 1:241.5 points
-
Ok fellas. I just completed the trailer to the 142H tractor unit I had built for the Steel Haul that I was supposed to use but did not. The boom is from a toy digger I bought at a cheap store. I had planned on using it as a load for my heavy hauler rig, but the amount of work I had to do on it to get it looking right, would have taken me ages. So I opted to salvage what I could and use the parts for something useful. So now I had a use for the boom. I added hydraulics using soldering iron wiring and styrene tubing. I wanted it to look alive. The trailer is the Italeri curtain trailer kit. I only used the chassi and bottom half of it. I then scratch built the extra floor and added tie-downs. So now this tractor has a trailer, I think, goes together pretty well. Hope you like the results. Thanks for looking. Lots of detail pics: -------------------------------- -------------------------------------- ------------------------------------------- ----------------------------------------------5 points
-
I don't often do vehicles, but I was given this kit, and it's a bit like an aeroplane because it's got a propellor. It's Trumpeter's 1:35 Aerosan RF-8. I don't know much about the subject, and the last Soviet armour I built was Airfix's JS 3 tank in the 1960s. A relative passed me the kit unstarted, but some bits were off the sprues, and there were no instructions. I managed to find a set on the internet, though, and it was an almost trouble-free build with great fit that's taken me about 5 days. Mainly OOB, but I did add a couple of dials (actually and ironically 1:32 Luftwaffe instruments) to dress up the dashboard. The only issue was breaking one of the prop-guard struts, I must get around to a more permanent repair, a butt-joint is not working! Anyway, here it is. A great mojo-restorer. There is another one in my future, I've also got its big brother, the NKL-16. Thanks for looking.5 points
-
Hi everybody, here is my recently finished Hurricane Mk.I in 306, Polish RAF squadron markings. Very pleasant kit to build. I added Eduards PE, exhaust, whells, Techmod decals and some scratch-building details (riveting, anti-glare plates etc). I used dedicated MrHobby paints of C-series. I hope you enjoy, Artur5 points
-
Thanks chaps, very kind Thanks Simon for the tip on Lilliput Quick post after I touched up the bottom (fnaar fnaar): The wheel doors don't look too bad if you squint: [/url] by Ced Bufton, on Flickr Mrs B is out tomorrow so I should be able to get this one done, fingers crossed.5 points
-
The Saab J-9 is the sweedish version of the Seversky P-35 It was not a great success plane and at start of the second world war, the plane was obsolet Special Hobby propose some box of the little fighter I chose the sweedish version for his art box My build start classically with the interior. For this plane I chose to make a “new plane” with no weathering. The interior is very well detailed. The seats have their seat belt. And the instrument panel is in photoetched I paint the interior with zynchromate green like all American plane. The engine is not in resine but is also well detailed. I have add only the pushrods. I painted it in black with a aluminium dry brush. I painted pushrods with clear grey to showthe details The interior Instruments panel Global view5 points
-
Thanxs PlaStix. Here are some pictures after painting the black underside. I first sprayed it black and then went over it with some NATO black from Tamiya. The underside. And two pictures of the complete look. I have also given it a klear coat. Cheers,5 points
-
At last I can start with this build! I started my build like I always do, by washing the sprues with dish washing liquid to remove any oiliness. Before I did that though, I snapped some bad quality pics of the sprues. My previous build was a Tamiya P-47D Razorback Thunderbolt and if feels like it had twice this amount of parts! Here are the kit decals, which I wont be using. I may use some of the stencils though. The sprues are currently drying, and I have plans for tonight, but I hope to make a start this weekend still. Cheers Jimmy5 points
-
Hi Folks,here's number four in the GB for me,Devastatin'Deb Revell kit and decals,this is the last one so thanks for all the interest and support!5 points
-
Finished this model day before Huddersfield show but finale photo just made now. Build topic is here http://www.britmodeller.com/forums/index.php?/topic/234992281-messerschmitt-bf-109e-1-airfix-148/ and here https://goo.gl/photos/DbfZAaTLBvqrL4pD7 Hope you enjoy it5 points
-
Thanks Nigel As it turned out the underside of the parts wasn't up to the job so it was plan B. Thanks Casey - "master craftsman" is very kind but too high an accolade for me IMHO; I just bash the things into submission (see hammer shot). "I am just wondering if my mental instability will allow me to build one?" - it's a pre-requisite Thanks Martin I need to be quick or my patience runs out... and the quickness of the hand (and sneaky camera angles) deceives the eye! So, Humbrol filler mashed crafted into the gaps: Untitled by Ced Bufton, on Flickr I like the Humbrol filler; as you're working it it starts to go off and you can mold it and then scrape away the excess (just don't try to use the bits that have hardened - I wipe them off my spatula thing onto a paper towel). Is Milliput like this? Never used it and I should probably stick to what I know! While I had the tube in my hand a put a dollop onto the bottom of the wheels and nestled them into place. Untitled by Ced Bufton, on Flickr I don't think they'll get in the way of my needle sanders and it's another part out of the way! Just the lights now...5 points
-
This was one of the projects that I wanted to use to re-jumpstart my modelling mojo in mid-2015, though it wasn't until early 2016 that I actually got it done. It was good for easy modelling; I didn't really know a thing about the type itself but just wanted to do an attack helicopter. Sometimes not knowing much about your subject can be very liberating! The Italeri kit went together well, though the decals were a little thick and cloudy. Bombing them with MicroSol helped. As usual my fist of thumbs managed to break off a couple of protuberances (some more than once) but it didn't come out too badly in the end. I haven't built a lot of helicopters, but I might pull out an AH-64 or Eurocopter Tiger to sit next to this one. The model shows the earlier variant, with 4 blade rotor and no front gun. This was the evaluation helicopter used by the Italian Air Force CAE, based at Viterbo in 1998. This is completed aircraft #447 (#11 for the year), finished in March of 2016.5 points
-
Since times immemorial I feel like I have been hacking away at this Classic Airframe kit. the interior and the resin for it fitted really well but the rest of the kit didn't. Anyway I'm off for some therapy and eyeing up my Classic Airframes Venom FB1 as the next challenge. The decals are a mix of Oldmodels and Ventura. Thanks for looking5 points
-
Assembling the fuselage. )))) Wing assembly so difficult!5 points
-
While waiting for the parts for my Vampire build to arrive I have started this kit. The Hannants web site states this is NOT Valom. Valom kits must be scary. I like Devastators. Some pics. I have made a start on the interior and have finished the torpedo. I will post some pictures tomorrow. Thanks for looking. Stephen4 points
-
Valom kits? Scary? Nah, Childs play! Just ask Ced, that's him quietly rocking in the corner banging his head against the wall... Good luck with this!4 points
-
Oh dear, I took too long to make this one known. I was supposed to do it a few days ago, anyway at least Homebee picked it up off Alec's Facebook page. Completed these masters about a week or so ago, working on quite a few other sets for Alley Cat, not all are for the Beaufighter so will not ruin this thread on Beaufighters, hopefully more news will be available soon. cheers Ali4 points
-
Over the last few weeks managed to get it masked and painted. Have been using Tamiya and Aqueous paints. Ready for a coat of Klear and then some decals. Will be using the kit ones but replace the roundels with aftermarket stuff.4 points
-
Today I have been mainly making holes and slots. There are also four pairs of handles up on the roof, I roughly marked their positions and also the correct position for the light beacon: While on the roof that dome thing in front of the existing light should be circular in section and somewhat bigger. I think I'll have a look in my spares box for a replacement. Here are the drilled handle holes and a big 1.8mm diameter one for the light, I blanked that off with a disc of tape to prevent dust ingress and also added a disc of plastic behind the hole that removing the light exposed (to back up some filler later): Then I got to work on the meshed holes of the RHS, first thinning the surrounding plastic with my motor tool: Mesh installed: From the outside: This emergency escape door handle is moulded in the wrong place and facing in the wrong direction, it should be where the dot is: I removed the moulded handle and drilled a hole for the replacement but won't fit that until after the glazing is in. These moulded handles also have to go, again the top one is slightly out of position and facing the wrong way: That's those done using some shaped 0.4mm rod: I also replaced the ones on these front side doors: There was then a pair of these slots to make on either side of the tail and also add a tiny 0.3mm drain tube: I remember there were some very similar slots to those on my Hormone, clearly a Kamov design feature. There should also be a light beacon identical to the one on the roof on the underside so I made a hole for that when I'd worked out its position. I have also drilled out holes for hydraulic and brake lines to the main undercarriage and a diagonal pair for electrical cables that will go to the ordinance: I have also drilled out this light on the front, one on the left for a probe and hydraulic lines to the front wheels: Finally I drilled a 0.5mm hole for another probe and started to open up these slots on the engine fronts that will later be backed up with some fine mesh: This gives an idea of what it should look like: Sorry that was a bit hole intensive but I trying to get all the drilling done before the fuselage is closed up to try to avoid any swarf getting trapped inside. Bye for now, Nigel4 points
-
Alley Cat Models is to release a 1/72nd Beaufighter Mk1/6 early conversion set Source: https://www.facebook.com/AlleyCatModels/photos/a.332251853642016.1073741828.330656630468205/477489225784944/?type=3&theater V.P.4 points
-
Hi - this is my first post of a Seahawk I finished last year - plenty of reworking of basic kit - nose wheel bay extended to nose, Wolfpack outer wing panels but scratch built inner wingfolds and Pavla cockpit amongst them - painted with Xtracrylics - decals cobbled up from kit and some home made done on a Cannon inkjet printer - photos are taken on an iPhone and the nose looks a bit more elongated in some of the photos than it actually is . Cheers CJP3 points
-
Just finished, no problems building the kit, but it is quite basic. So, I've also bought the Revell Gannet which has much more detail. Dave3 points
-
Hi Stephen, thank you. Yes they could well be. Well, unsurprisingly I did not get much back in the way of any concrete evidence of F-16's at Lakenheath. Still, undeterred and as I had a day off and the weather looked OK ish, and as I had been promising myself a trip to Lakenheath/Mildenhall for a while now, I decided it was as good an excuse as any to go. I had been there for about an hour, it was still rather misty with a low cloud, and not much going on. Then out of the gloom......... Belgian Air Force F-16B 'FB-20' trying to sneak in. No other info I'm afraid. A guy in the car park seemed to think it was going out again latter in the afternoon. Took a few more photos. Then things went a bit quiet so I popped over to Mildenhall for some heavy metal action. A couple of tankers were in the circuit: Then this turned up. Which was nice. A very nice day out. I will have to go back. Cheers for looking, hope you like the pictures.3 points
-
Almost there now.... I finished off the main gear today by adding some Mr Dissolved Putty to simulate the covered bungees, and a couple of pieces of 10 thou brass rod for the limit stops. The tail struts were added, then the final piece, the roll-over bars. These are 15 thou plastic rod. I bent them slightly before gluing the first one in place, then when that was secure I added the second one. When both were dry, I cut the second one and took a tiny slice out of the middle, then butted it up to the first one and glued it. When dry, more Mr Dissolved Putty was used for the top plate. That still needs a little fettling so I'll do that tomorrow, then she should be ready for another quick coat of primer just to make sure that everything is ok before she turns blue! Thanks for looking in! Ian3 points
-
small update I have started to add the fine rigging and using PVA glue to simulate the insulators. I have also started on the sea base and carved out the wave shapes not to sure if I need to get the aft down a bit more as I want to try and have the boat as just coming out from the water as an emergency surface so maybe the bow should point up more any advice or thoughts on this would be appreciated please Beefy3 points
-
It will affect every venue in one form or the other, including those under military jurisdiction. The MoD said at the start of this process that they will read across any recommendations adopted by the CAA. If this includes increasing the display line from the present 250m to the 450m suggested then this will affect Yeovilton (the village is under the new line) Culdrose (the cottage hospital and part of Helston is under the new line).3 points


.thumb.png.6e11fc11af5645499ae76cb59fcfb788.png)


This leaderboard is set to London/GMT+01:00