
Leaderboard


.thumb.jpg.d17ff607fc7e89ed057e63fcb6f2a888.jpg)

Popular Content
Showing content with the highest reputation on 08/03/16 in all areas
-
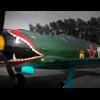
Hi everyone, Just thought I`d show some pic`s of Hasegawas 1/48 Kittyhawk that I`ve just completed for my Brother In Law Completed as the 2nd option in the box.... to represent Flying Officer Neville Dukes; Kittyhawk Mk I, of 112 Squadron, Libya 1942. Built almost completely from the box contents with just some seat belts, brake pipes, resin exhausts and aerial wires added Had a bit of trouble getting the Shark Mouth decals to fit, so there`s a bit of hand painting involved there. Hope you enjoy, thanks for looking Cheers Russ24 points
-
Hello, Just to complete what has been said here few months ago with, I hope, usefull captions... This model was first released in 1979. " Phyl Marie ", a Mk.Vb (KH-P, BM 344), was flown by the Squadron Leader Syd Ford, from the 403 Canadian Squadron based in Manston in August 1942. This plane provided air cover during the " Jubilee " Operation above Dieppe, France. Aeromaster sheet (48-682). Have a very nice day !23 points
-
Number 1 for 2016, a bit of a slow start so far to the year from me. This is Trumpeter's 1/72nd scale Mig-29 A 9-12 in Slovak Markings. A great little kit but lacking in detail in places. Painted with Akan Enamels and finished with Begemot decals. Thanks for looking Enjoy the pics Rick G15 points
-
Hello again, Another old model, built in 2004. New pictures... Bye for now15 points
-
Hi fellow modelers! Just finished this little polikarpov i 16 type 24. Its the icm 1/72 , a very good kit in general. Fire your opinions!!13 points
-
Here is my interpretation of Rechkalov`s P-39N-0 Airacobra, serial 428747, Spring 1944 (as I imagine it before tail exchange and "RGA" inscription on fuselage appearance). My assumptions for "how this aircraft should look like": - cannon and guns barrels in tubular covers, wing machine guns present! - no US radio, but antenna wires remain, - silver-grey propeller blades with Hamilton-Standard marks and inscriptions, - white dot on left doors (center of gravity mark), - white front wheel caps, - interior surfaces in "Bell Green" (cockpit, engine, gear covers and gear struts) and Zinc Chromate Yellow (flaps and gear bays), - red tail tip and spinner (standard in Rechkalov`s unit at this time), - "new" Soviet red stars with white-red borders, painted directly on original American stars. 1/72 Academy kit + Part PE set + Aires/Quickboost resin engine, exhaust and main wheels + AML decals. Painted with Lifecolor acrylics.10 points
-
Hi - this is my first post of a Seahawk I finished last year - plenty of reworking of basic kit - nose wheel bay extended to nose, Wolfpack outer wing panels but scratch built inner wingfolds and Pavla cockpit amongst them - painted with Xtracrylics - decals cobbled up from kit and some home made done on a Cannon inkjet printer - photos are taken on an iPhone and the nose looks a bit more elongated in some of the photos than it actually is . Cheers CJP8 points
-
I'm calling it finished.... it's an Academy B-29 painted as a Tu-4 Bull with a Modelsvit Tu-91 Boot attached as an engine testbed - it really did exist - as shown in this photo.... A lot of hacking, filling and sanding later...... Because I used Milliput to form the rear end of the cut-down Tu-91 fuselage, it is very tail heavy - so I had to fit a support prop under the Tu-4 tail. I reckon if they removed the turboprop engine and put a few seats in the Tu-91, they could have made a neat passenger version of the Tu-4 My attempt at repicating the photos of the real thing...... Comments welcome - more photos of the build are here I'm going for a lie down in a dark room now..... Ken8 points
-
OOB, Xtradecals.8 points
-
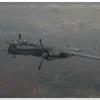
Hi, Here is my attempt at at the 1/72 Airfix Canberra E15, built in flight and representing 98 Squadron, serial WH957 during 1974 using the Modeldecal MD028 sheet. Although this is an old kit, it was great fun to build, with a reasonable amount of filling/sanding but spoilt a little by some silvering under the wings and not brilliant spraying. I love putting these old jets in the ‘in flight’ mode which means of course less faffing around with fiddly undercarriages. Although the kit was a lot of fun to build it is helpful to have a fettish for applying decals….there’s dozens of them!! I hope you like it, Russ8 points
-
This is my Eagle Transporter built from the Round 2 kit. I am a big Gerry Anderson fan, and though Space 1999 wasn't amongst my favourite of his productions, I have always liked the Eagle. The kit is virtually OOB. I added an LED to illuminate the cockpit, the power pack is in the passenger pod. I cut a small hole in the floor to access the on/off switch and the batteries can be changed as the pod was made removable as was the roof, thanks to the use of magnets. Tamiya matt white was used, and this was toned down with a very thin wash of Tamiya's Smoke. The panelling was done with paint, decals, and pencil lines. It has been mentioned that the sprung undercarriage makes the Eagle sit too high, so in an attempt to rectify this I cut a turn and a half from each of the springs. All the engine bells were painted with Alclad paints. free picture upload posted image screenshot program image hosting free no registration upload image free free upload image image hosting free photo host image hosting free no registration pic host image upload with preview upload image online uploading images screen shots image post forum image hosting upload images free Thanks for looking7 points
-
Hi all After 30 years I've decided to give model making another go. If I'm honest one of the reasons I've not done it before is the unbelievable standard that some people are capable of turning out ( like most of you on here!) however once I started looking into it I became aware of all the amazing products that are now available. So here's the result of 2 months of work, the main focus was to produce a heavily ( perhaps too heavily?) weathered aircraft and get used to using the various products. I used maskol for the paint chips, worn effects for the heavily worn areas on the wings, dark dirt wash, some weathering powders and oil paints. I did study a lot of photos and tried to recreate the wear in the right areas, such as the heavy wear on leading edges and the foot traffic over the wings by pilots and ground crew. Anyway here's the photos and be gentle with me..... For those with eagle eyes I've got an exhaust missing and Airfix don't know when they can supply one.7 points
-
7 points
-
Finally got there!!!! She is finished as a machine based in Afghanistan in the 1980s. See Work in Progress for more. Martin (not the best photo - will get a better one online soon)6 points
-
Kit manufacturer: Hobbyboss Scale: 1/48 Type: A-10 Thunderbolt II Extras used: Eduard canopy masks, Aftermarket decals, scratch built FOD covers Paints and colours used: Tamiya and Mr Hobby Finished today. Very much enjoyed this build, Finished in arctic aggressor camo, couldn't get the exact decals so its finished as a bit of a what if scheme. Slightly overdone the pre/post shading and the pva glue on the bomb lenses hadn't dried when i took the pictures. Anyway, here's the pics and thanks for looking6 points
-
Was a bit of a struggle at the very end but I'm calling it done. Build thread here: http://www.britmodeller.com/forums/index.php?/topic/234998472-mitsubishi-lancer-rs-1993-monte-carlo-rally/ Kits built oob apart from the addition of the spare wheel and the lowering of the ride height. Pics ahoy: Thanks to those that have followed the build and as always comments are welcome TTFN Ashley6 points
-
Hi All, Please find below my interpretation of Dragon's He 219. I chose to complete her 'in flight' as I love the shape of this aircraft. Completed oob with the exception of airfix aircrew. I based the scheme loosely on the one at NASM (http://www.warbirdsnews.com/uncategorized/nasms-heinkel-he-219-restoration-update.html) and some images from the internet. Weathering was kept to a minimum as they were still very new when the war ended. Paints are all Italeri Acrylics. Hope that you enjoy. And with a little photoshop (actually GIMP) magic.... Thanks for looking Shane6 points
-
This is the 1/144 Zvezda Boeing 777-300. I've been looking forward to getting my hands on it for over a year, since hearing it was going into production. So fair to say the day it came into the shop was the day I started it. I've masked the fern on the rear fuselage, and made my own decals for the rest of the model. It's a fantastic model. The engine construction is really clever. I don't think I appreciated the size difference between the 777 and the 767. Please excuse the photos- White is very hard to photograph. Enjoy the photos. Alan5 points
-
Kit manufacturer: Tamiya Scale: 1/24 Type: Castrol Supra JGTC Extras used: fabric Seatbelts Paints and colours used: Zero paints and Tamiya Finished this last month, Got some decent pictures at last. My favourite car of all time, biased a bit as up till a few years ago, i owned one for about 11 years! Certainly the hardest car kit ive done so far, actually without a doubt, the hardest decals ive encountered so far as they are quite thick and needed to conform to some tight places!5 points
-
A few extra pics of my Airfix Whirlwind helicopter as just finished over in the Helo GB.5 points
-
Hi all, Posted my Snowspeeder earlier and it was quite a painless experience so thought I would post this. I'm new to the hobby and still learning but this is probably my favourite build so far. It was painted with Vallejo paints and weathered with acrylics as the Bandai plastic does not like oils and enamels. However oils were used to create the rust stains. Hope you like! Thanks for the look, sorry about photo quality, they were taken on my phone!5 points
-
Hi Folks, Thanks for the clarification on the flare dispensers. The mounting for the main rotors was a simple piece of construction, I inserted some 1.25mm brass rod to ensure alignment while it dried though: These are the two options for the exhausts, although I don't have any reference pictures I am going for the ones with the vanes. My thinking is to remove the moulded vanes and replace with thinner plasticard ones which should look more realistic and make cleaning up the parts easier: By scratching the vanes I can also extend them further into the opening (this is also a reference for me so that I can position the replacements properly): Most of them were snipped off with cutters: Most of the rest was removed with a burr in my motor tool: Removing the vanes also made it easier to thin the edges to a more realistic thickness: The vanes took ages to make with repeated sand / check / sand a bit more and so on. Here are the first three done. I also had an idea to mount the exhausts on the other style but they needed reducing in size a bit so I cut them in half and then glued back together (the 0.5mm width of the saw cut was enough to reduce their size): Then I cut them in the other direction: After a bit of fettling that gave a nice snug fit: While the filler was hardening I thinned the plastic around the mesh holes, again mainly with my trusty motor tool: For the mesh I used some more of Keith's copper square mesh: I found the mesh could be deformed into a diamond pattern which better matches reality: Next for the pipes, I thinned down the walls of some 2.5mm plastic tube, finishing it off with a fine file: Here's how they look from the back: And here from the front: Back to the exhausts I found with just a small amount of filing the exhausts would slide into their apertures: At this point I abandoned the idea of using the other exhausts as they weren't really needed now. These rounded edges at the joints are best dealt with using some superglue and talc filler paste: Here they are sorted: With all the filler cleaned up I could now install the vanes: Here's how they look in situ: That's it for today, bye for now, Nigel5 points
-
I finally found some quiet time this afternoon, so managed to get the rigging etc finished , As usual, there will be a few more photographs in the Gallery. As I mentioned, the Moth is going into a diorama which, if things go to plan, will be on the Diaerama table at the Cosford show (Hangar 1). The theme this year is civil aviation, so please do swing by if you get a chance This will be my last build for this GB, but I'll continue to follow all your projects to their wonderful conclusions! Thanks again to Shermaniac and Col for hosting this fascinating GB and to all of you for your support. Cheers Cliff5 points
-
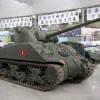
Following a bit of a challenge from an old friend who had built an Airfix Scammel tank transporter, I decided to look around and find something with which to 'reply'. I was fortunate to discover the M19 Matchbox kit (albeit the Revell version) and find one to purchase. Apart from building an Airfix Sherman and Bedford QLT for someone else this was my first venture into vehicle modelling since I was a teenager. I offer my interpretation of the M19 tractor and trailer complete with Crusader. It is also the first time I have tried my hand at figure painting!5 points
-
Since I'm retired I don't actually have a business card, but I can send you an old one. Will that work? As far as my business cards (and by extension therefore, me) being available for hire, well, I am retired. Meaning I'm always looking for new revenue streams! Cheers, Bill5 points
-
Here are some pics... Hope it's ok for you ! Anis.5 points
-
thanks guys.I'm pretty with how they're coming out myself Work continues along. I've added some missing wiring and piping onto the engine base/roof. There is more to add yet, but I need to wait until the engines are attached before I add the rest of it. There is also a boxlike thing up front next to the intakes which is missing. Its quite prominent and I am surprise Trumpeter missed it. I will live without it. And I have also started detailing the wheel wells. I know that Eduard provide a PE set for this kit and part of it includes some braces in the front bay area. Because I', cheap, I built my own and they look fine. I don't often turn my builds over once they're done, so I am not to concerned if there are mistakes. They look like the pictures I have, so that'll do I have also started putting together some of the smaller sub-assemblies but no photos of those yet as they are not the most exciting thing ever....yet As always, thanks for looking MH5 points
-
Hey everyone! So, following on from the weekend's shenanigans, I've spent a few hours this evening working on the cover template. Though I had this on my laptop, it was proving troublesome to export it onto my desktop, so I took the opportunity to completely rebuild the file, clean up the logo and all of the text. As before, the cover is simple and in-keeping with the looking of the contents. Once again, this is a practice run, but I'm happy with it - see what you think. Spence5 points
-
Well, thanks to Mike (@mitchem) I am able to crack open another kit (or 2) and eventually add them to the shelf of doom. I put out a request for a Singapore Airline B777 decal and he came to the rescue. I had an SIA kit but with 50th Anniversary decals. I wanted to do the standard scheme as in September we will have our first international flights into Canberra being serviced by SIA B777-200ERs. So why not build one? A few guys from our club got together for a Friday build night and I broke open the kit and go it started, trouble was there were 2 kits in there! Oh well, a double build was started The other B777 will be a British Airways aircraft, very smart scheme IMHO. After the fuselages were knocked together I got on with correcting the horrible shape of the flap track fairings, one wing down 4 to go! The other side awaiting attention and the engines were also knocked together ..with the result that some filling, filing, and sanding will be required. While the paint on the A350 is drying I will be attending to these.4 points
-
The new AMK Mig-31BM/BSM kit in 1:48 is an awesome testament to its designer's skill, and as well as fitting beautifully it captures the look of this mean-looking Cold War Warrior, and builds into a highly detailed and BIG model. I took this on as a review build at Martin from AMK's request, and I have thoroughly enjoyed the process. While it is an Out Of Box build with no extras other than a couple of AoA vanes added from scrap, I have tried to replicate the details in the painting, with lots of help from Gabor, for which thanks Painted with AKAN paints from Coastal Craft, weathered with Ultimate Dark Dirt Wash, and some AMMO streaking grime, it also marked a few new departures for me. First off was the foiling of a couple of parts on the R-33 missiles, plus the most interesting and useful addition to my arsenal, which are the new Vallejo Metal Color paints from Creative Models. I didn't get chance to use them until later in the build, but I used a number of shades on the exhaust cans, and their chrome is especially good Anyway - there's 28 pages of waffle if you're interested here, so without further ado, I give you... some pictures This one shows the static wicks installed, including a pair on the elevators, which aren't on the kit parts, so I couldn't knock them off during the build! You know what? I thoroughly enjoyed the build, and if that's not what modelling should be about then my name is Michael Caine I've just noticed that I forgot to unmask the landing lights4 points
-
This is the first model that I post on the Forum. Airfix's Hawker Hurricane Mk.I Fabric Wing in 1/72 scale. This model will be published in the first issue of the new digital magazine Apuntes de Modelismo, which explains the assembly, detailed and painting of this kit. Facebook page: https://www.facebook.com/Apuntes-de-Modelismo-550832738417473/ We have prepared the edition in spanish, and we're working in the english edition.4 points
-
Another Spitfire in my collection, this time Mk.IIA from 308th RAF Polish Squadron, Northolt, July 1941. I used Tamiya kit with small Eduard interior PE, resin propeller, QB exhausts and all markings are done with P-Mask.4 points
-
Hello All, First completed kit after roughly 15 years of "No modelling" time period... Hope you like it. All critics and improvement comments are welcome. Thanks Roland4 points
-
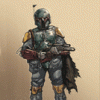
What started out as a distraction from the large Vader figure managed to turn into a minor obsession with colour variance, scale colour theory and highly magnified stills from the DVD’s (still not got them on Blu-ray). While I do want to get both the Bandai 1:144 and the Revell 1:72 I will be laying off of the ‘Falcon for a while (it helps I can’t afford either!) C&C’s are most appreciated but please be gentle :-) Paints used were space-fighters and star-defenders sci-fi colors from mig with vallejo top coat and ultimate weathering wash dark dirt Thank you Davros aka Mechanised Dwarf 3424 points
-
Hello everyone! Three years ago I created a couple of my own books and then two editions of an independent magazine that I designed and then had printed in town. The plan was always to try and release some more magazines, but time has never been on my side and though constantly asked when I would, only two issues have so far seen the light of day. So, as this is an itch that I can't seem to scratch, I've decided to work on a third edition of Cold War Aircraft Modeller and though I have no concrete plans regarding content, have spent a few days getting to grips with what I need to do, to reproduce the look and feel of issues 1 & 2. As before, I've gone for a really clean look, using non-modelling titles as my inspiration. These are not set in stone - nor are they representative of actual content - being simply my own practice pages to learn the program and are most likely to change - but at least I've made a start! As for when this will see the light of day, we'll have to wait and see... Spence4 points
-
Hello, I just finish the 1/48 AlleyCats, K-5054 http://www.britmodeller.com/forums/index.php?/topic/234976488-alleycats-k5054-spitfire-prototype/4 points
-
HI everyone Well she's finally finished (well I say finished she still needs the fin flash on the port rudder swapping over). My 1/72 Airfix Avro Shackleton MR2 WR966. I encountered most of the problems associated the kit and not others. I had real problems joining the fuselage together and a mis mould in the front fuselage which caused the area above the bomb aimers glass to splay out plus I had several broken parts that were replaced by Airfix, however the engine nacelles and wings were a breeze. I chose WR966 as my scheme and the decals from Airfix were beautiful I did however elect not to attempt to add the 146800cc (I cut that portion off) because I feared that with all the softener in the world the decal wouldn't conform cleanly and look rubbish. I chose to paint the propeller tips rather that use the decals as I felt that the finish would be better. The kit was built OOB apart from some seat belts that I added with blue masking tape and I used the Eduard masking set for the glass work. She was weathered in my usual way with Tamiya smoke for the exhaust stains and oils and pastels for everything else and the antenna wire was added using EZ line and with a spot of super glue to initially hold it followed by Gator grip to add more strength. Anyway here she is.......My Growler And now shes finished I can carry on with my Tamiya 1/32 Spitfire Mk XVIe.. Thanks to everyone that showed an interest and gave real encouragement to get her finished. Have a good one Iain.4 points
-
Thanks Simon Thanks Rob The clamps are those gentle grip things, not the click type, and with the BluTak they can be quite gentle(ish). I am disciplining myself not to clamp and glue so hopefully the clamps are just holding things in place. Honest. Well mostly. If it does explode I'll try to get a movie for you Thanks Michael I'm sure you're right but a ) I don't have any US Interior Green (I don't think) and b ) I've used Vallejo IG sprayed and H78 brush touch up so the whole thing's a mess, colourwise. No one will notice when it's on the ceiling, as long as you don't tell... Anyway, remember that dodgy wing profile? There's lots of bits of holes to fill and flash to sand off but the 'bad profile' worry was stopping me doing the filling and therefore the sanding so I pushed the wing onto its tiny locating shelves on the fuselage and, miracle of miracles, the bottom looked really good so using my 'if it fits, glue it' rule I ran some TET down the joint and rested it, carefully, on some Lego while it dried: Untitled by Ced Bufton, on Flickr Glueing the upper join required a bit more encouragement and, of course, clamping: Untitled by Ced Bufton, on Flickr I'm going to leave that to dry for a while, hoping that the TET will have formed a nice meld joint. Overnight should be enough. Or maybe a year or two. No, NO! I must finish, so close...4 points
-
In a rare moment of self-discipline I had done the 'hard' wing first so I was expecting this to go together more easily, and it did: Untitled by Ced Bufton, on Flickr Gaps all over the place but that's expected I guess; the main thing is that the roots are not (too) bad. I'll leave that to dry, then it's sand the wing edges, fill the gaps, a quick wipe down with some IPA and it's on with the NMF. Or perhaps I'll put the wings on first. I'll see how I feel (just for a bit of thread jeopardy!)4 points
-
Decals Ready ! Aircraft with weapons is more than 300 parts decal .. a few hours of hard work behind me.4 points
-
I said I'd add another image - from the port side. Martin4 points
-
A long time at the bench today for not much obvious progress... the first step was making and adding the small fairings for the aileron cable pulleys. Then I spent rather a long time measuring and marking out the undercarriage mounting points. The reason being, that although it measured out ok, they didn't look right. It turned out that the fuselage is a little too fat, so my measurements from the centre line left the mounts too far down on the side. A little adjustment to get it to look right and they were then drilled. After that, the tail surfaces...and then I found that I hadn't got the measurements right there either. When I attached the fin, the rudder didn't meet the bottom edge of the fuselage, so I had to break out the sanding stick and correct the depth at the rear end! Hopefully the primer hasn't peeled to the extent that it will be noticeable - I went around the edges of where I'd sanded with a fine sanding stick to try to blend them back in. All that sanding did have a positive side as it does mean that I now have bare plastic mating surfaces for the fin and horizontal stabilisers - I had to remove the wing struts to clean the paint off as they kept coming adrift! I definitely won't use that primer again.... Thanks for looking in! Ian4 points
-
Proceeding with the build I applied a Tamiya mix of 90% XF21 and 10%XF2 for RAF Sky as per the suggestion in Osprey Modelling Monual 18 Supermarine Spitfire. Followed by a freehand approximation of the Dark Earth Using the mix 70% XF52 + 25% XF62 + 5% XF58 from the same publication (page 31 if you have it. You might also notice that I applied a little masking fluid again to provide a chipping effect once all the layers were on. Masking with White Tack 'worms' Green bits done All masking except canopy removed Shiny Oh yes, I learned a significant lesson whilst gloss coating these babies. When using Tamiya TS-13 clear, do NOT repeatedly spray coat after coat without letting the first one fully dry. It ate through the sky colour on the underside, pooled and ran The following picture shows the result of my repair to this little disaster I had to use a needle in a pin vise to clean out the filled panel lines and, once the gloss coat was dry, carefully sanded away the horrible drips. Repaired with a light coat of sky and then a careful spray of the clear. So. many. stencils... Decaling proceeding apace. I'm glad I bought 2 packs of the stencils. several ended up firmly attached to me, the bench, the cat or broken into pieces. A little light weathering, exhaust stains, a matt coat, off with the canopy mask and on with the sticky outy bits. and that.. was... a brace... of... 609 Sqn Spitfires done. Except for the aerial wires. It was then on to the Dornier....4 points
-
Getting close to the finish. I spent the best part of a day adding decals, both the kit's and others for panel detailing. The major sub assemblies have all been brought together: free image hosting image uploading site Some close ups of the Beak, engine pod, & passenger pod: uploading images capture screen 20mb image hosting how to screenshot on windows image upload no compression Two head on shots, photoupload And again, following Kallisti's lead I added an LED to the inside of the beak: screen shot on pc Some final bits need adding and some more detail painting is required. Thanks for looking4 points
-
I've modified the leading edge of the fin the first photo is as it comes. it extends too far forward The second is after modifying, not a hard or long job, but just one more job that really shouldn't be necessary! John4 points
-
Continuing on, here are some RAF jets; 1/72nd Vampire F.5s, Frog & Heller; 1/48th Classic Airframes Meteor FR.9; 1/72nd Revell Hunters; 1/72nd Airfix Valiant; 1/72nd Airfix Buccaneer x 2; 1/48th Airfix Buccaneer; 1/48th Airfix Jaguar; 1/72nd Hasegawa Jaguar; 1/72nd Tamiya Phantom; 1/72nd Trumpeter Lightning; 1/48th Airfix Canberra PR.9; 1/72nd Airfix Nimrod; Thats it, I hope I`ve not bored you too much but see,......I do build pointy things too! Cheers Tony O4 points
-
You've had some fiendish clamping arrangements there Ced, well done for literally pulling it all together. It is actually looking like some sort of aircraft now even if a bit weird - which is of course good in my book. Who could forget that furry bikini!!3 points
-
Hi all, today I want to introduce eduards nice kit of the Bf-109 E-1. A model with history. Normally flown byWinfried Schmidt from 5./ JG77 Alfred Held from 2./ JG77 made the first shot down of a RAF bomber in the 2. WW, a Wellington over Brunsbüttelkoog on the 4th . Sept. 1939 at 0615 pm. Winfried Schmidt brought down his first plane , another RAF Wellington bomber, on the 18th Sep. 1939 over Langeoog. (Northsea) The model is built oob. The quality of the kit is awsome. I built this one 3 years ago. Andy3 points


.thumb.JPG.3498f40362ff13ebfc4b2e45abbd545e.JPG)


.thumb.jpg.158e2e086d45b8f96b7d93b8bee8dc21.jpg)


This leaderboard is set to London/GMT+01:00