
Leaderboard


Popular Content
Showing content with the highest reputation on 26/01/16 in all areas
-
As with my recent Airfix Whirlwind posting, a few more rediscovered models from the loft. These are ones that have survived, others need repair. Surprised that they've lasted as they must be more than ten years old now. Czech Master Nimrod, Aeroclub Flycatcher, Frog Siskin. The Siskin was a simple kit and an absolute joy to make. Hope you like them - this is a great period to model, and looking at them I fancy another go. Haris An older photo of the Siskin from the front - must take a few more25 points
-
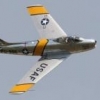
Hello, This is my 1/72 Hasegawa kit I built OOB for the local group-build themed Desert Storm. I used Gunze FS 36375 and FS 35237 for the camouflage and supplied decal for the marking. The kit is excellent and needed very little filler. Thanks for looking.24 points
-
Hi Guys, This is my latest completed model the excellent F-5F by AFV Club. This really is a fantastic kit and has lots of detail straight from the box and I only added a few extra bits in the cockpits and replaced the kit seats with resin Martin Baker seats as fitted to iranian F-5's and scratch built the extra canopy breakers which are fitted to the front seats. I really enjoyed building this kit with one exception, the decals! They are very good at shattering and that's about all they are good for. I built this as part on the ongoing F-5 Group Build and here is a link to my build thread:- http://www.britmodel...force-finished/ You really should pop along and have a look at the great builds on this iconic aircraft. Anyway here are the pictures.... Hope you like her. Craig.20 points
-
English Electric Canberra PR.9 No.39 Squadron - Royal Air Force - RAF Marham 2006 1/48 Airfix This is the result of a very long break from the hobby, around 2 years. This break was during my A-Levels and 1st year of University. Now in my second year of uni, I wanted to get back into the hobby. So with the money I earned working over the summer I finally purchased a respectable airbrush a H&S Evolution 2in1 and ditched the cheap Chinese imitation badger airbrush that looking back really gave me trouble! To get back into modelling I went for a relatively simple build the 1/48 Airfix EE Canberra PR.9 that I'd picked up very cheaply a few years back. I am aware of the long list of issues regarding accuracy of the kit but being a come back build it's all OOB, with the addition of my first ever stretch sprue antenna. The model was painted using predominately using Tamiya paints except the underside which made use of Humbrol's acrylic 166. The model was finished as XH135, in it's 2006 scheme prior to retirement. From references XH135 wasn't too grubby as had was repainted on return from it's final deployment to the Middle East earlier in the year, this colour remained behind the cockpit, something I've attempted to capture. Weathering was carried out using my own pastel washes. Onto the images; Thanks for looking, Nick16 points
-
Macchi C200 easy build kit from HobbyBoss. 362 Squadriglia, 22 Gruppo Russia 1941 This kit has pretty good shape, but skips many important details. I attempted to add the missing parts, and in the process picked up some ideas on how to build another one more efficiently, and with better detail. All out of box except the cockpit from a Hasagawa C202, with tape belts. Starboard wing cut and shortened to replicate asymmetrical design. Drop of canopy glue for rear navigation light. Styrene scratch built inner landing gear doors and (wire) retraction arms (none in kit). Styrene scratched top centre cowling piece (not in kit). Tyres flattened and bulged by heating. Machine guns (a bit too thick) made from steel wire (none in kit). Exhaust manifold (in behind cowling) made from bent stretched sprue. Air intake at bottom of cowling made from cut up Hasegawa C202 part and shaped sprue (not in kit). Wheel wells ground out to better represent the actual aircraft, a bit of detail added. Painted with Tamiya acrylic. Thanks for looking.15 points
-
G'day people, This is my Cypriot Mi-35P, using the Haseagwa Hind kit as a base. The major differences are the fixed undercarriage arrangement and the shorter stub wings. For those interested, the WIP can be found here, http://www.britmodeller.com/forums/index.php?/topic/234990449-172-cyprus-national-guard-mi-35p/ cheers, Pappy11 points
-
Out of box Italeri 1:72 scale kit. Hope you enjoy9 points
-
Hello all and Happy New Year (sorry, a bit late). This is the Revell boxed kit (but made by ICM) of the German truck used in the early years of the war, manufactured by Henschel. The kit itself is OK , there are some very fiddly bits and some parts which are so thin they are weak, but it goes together reasonably well. When you take into account how much the kit costs, then it represents very good value for money. I decided to make a small vignette with it, so the engine was lightly detailed and some figures and stores added to make it more visually interesting. The figures by the front of the truck are Tamiya, modified to suit the poses required. The sleeping drunk in the rear was from the spares box, but I think that was also Tamiya. Painted with Tamiya paints and weathered with Humbrol powders and washes.9 points
-
9 points
-
Rummaging through my spares box(es) I noticed that I had a nearly-complete Matchbox Lynx, missing only the three-windowed doors of the prototype/pre-production aircraft. I was wondering what to do with it, as all the pre-production aircraft with the original bullet-shaped tail fairing also had the three-window doors, when I was reminded of the Westland 606 - by finding a picture of the mock-up here on britmodeller. (For those who don't know, the Westland 606 was a proposed civilian variant of the Lynx, with a 12" longer cabin, combination of sliding and hinged cabin doors, and potentially a choice of Rolls-Royce Gem or Pratt&Witney PT-6 engines. One mock-up was made but with no commercial interest, the project got no further. Supposedly the lengthened cabin would seat 12 passengers, with one more up front. Which sounds like quite a load for the original Gem engines!). I didn't want to do the colour scheme of the mockup (XW836), not least because I could only find black-and-white contemporary photos of it, but then I found an attractive white over red scheme used in one of the few press adverts for it: http://www.adspast.com/store/skin1/images/pics9/westland742heli606.jpg so I decided to base my model on that. I stretched the cabin by a scale 12" (i.e. 4 and a bit mm), cut down some of the single-window doors to form the sliding doors, made the forward hinged doors from left-over cabin sides from an AW101, added cabin seats originally from an Airfix Skyvan and used a Hobbyboss cockpit interior as the Matchbox one was so rudimentary. I couldn't persuade 12 seats to fit in the cabin, so I went for three rows of three-across, which would have been a bit more comfortable for passengers. I used Airfix main and tail rotors as I had plenty of these spare, I quite like the detail on them, and they match the various Airfix-based Lynxes I have built. I painted it overall Halfords Fiat White 210 (which I prefer to Appliance Gloss White as it doesn't look as starkly white to me, if you see what I mean) and masked and painted the undersides in Halfords VW Mars Red (which I often use to approximate Signal Red). Then i added the black pin-stripe using some Microscale 1/64 black stripe decals, which conformed fairly easily to shape, added warning decals and the Rolls-Royce badge on the engines from the spares box, and custom-printed the Westland 606 and G-BWHL civil registrations (a fictitious but appropriate serial for a Westland Helicopters Limited product, which in real life was actually issued to an Enstrom Shark I think). I think of my model as a 'what-if' - what-if Westlands had built a flying example of the 606, and perhaps kept it as a 'company hack' in this colour scheme. So, here it is: (and more at: http://smg.photobucket.com/user/TimV69/library/Models/Matchbox%201-72%20Westland%20606?sort=9&page=1)8 points
-
So, back in post #664 I queried the audience with regard to the appropriate size of some photoetch pieces. I got these off of a NASCAR fret and the actual application for the little buggers are 1:24 scale windshield clips. As it turns out, I thought they would work well as part of a 1:72 scale Firefly wing fold mechanism. Let's have a look at a picture of the actual wing: On the inner face of the outer wing (the area painted interior grey-green in the photo) you can see what looks like four grommets or sleeves, mounted at an angle relative to the axis of the wing. My guess, and that's purely what it is at this point, is that when the wing deploys into flight position there are some pins or axles of some kind that slide into these sleeves to lock the wing in place. Steve, help me out here - am I even close in describing what these are used for? With respect to a Firefly model with the wings folded, these grommets or sleeves will be quite visible. I got the idea of using the NASCAR windshield clips since they're about the right size, but more importantly the right shape. On the fret, these clips were flat, so I bent the bottom portion into a square angle which not only gives the correct height but also a small flat surface that the CA adhesive can stick to. Here is what we have after attaching to the wings: What do you think? Is the ruse successful? I've also done some weathering to the wings, and I think they're ready for their final varnish. I used some small diameter copper wire to make the guards that attach to the outer ends of the tailplanes but I'm not going to add these to the model until the wings are attached. Otherwise I think I'll just knock them off. What else is left? The Black Patch™, various antennae...oh, yeah, a jig to hold the wings in position while the glue dries. Hmmm... Cheers, Bill8 points
-
Hello everyone. I was rummaging around the loft looking for a few things. My completed models, stored in boxes, are laid down in layers with the oldest on the bottom. So in something akin to an archaeological dig I removed a lower layer to reveal models I'd forgotten about. This comes from 10-15 years ago as part of a club Airfix model challenge, the older model the better. My painting style has changed a bit but I didn't do a lot of extra work to this kit (the second release version of the kit) apart from a few minor scratch built items. I remember really enjoying making this, and it reminds me of how complicated models can get now with aftermarket products, plus our demands for absolute quality. I reckon it's time I found another older kit to build. Haris http://harisali.co.uk/6 points
-
Hello! It has been a long time since i`ve posted some work! So, here is the Italery kit, with the adition of several items from the Big-Ed dedicated set plus several details fashioned out of copper and plastic surplus material. The paints used on this scheme were: Sky - Gunze H-74 Extra Dark Sea Grey - Gunze H-305 Dark Slate Grey - Tamiya XF-73 JGSDF Dark Green. All the building process plus a lot more of photos are present on the February edition of the Airfix Model World magazine (february) out now. I hope you enjoy it! With my best regards! José Pedro5 points
-
Hello Chaps, I'm back to share with you my final build of 2015, that I completed the morning of New Years Eve. This was a gift from a fellow YouTube modeler, who sent it to me because he knew that I was enjoying building Luftwaffe aircraft during the last 8 months, but hadn't yet built a bomber, and that the Heinkel He 111 was a plane that I really wanted to get my hands on. This is a discontinued kit from 1994, but has been re-released under the Revell banner. For a 22 yr old kit, it has some reasonable details, including recessed panel lines on the exterior surfaces and three figures: a officer, pilot and bombardier/front gunner.. I did have a couple of fit issues though: one of the wing root to fuselage joints had a gap of around 1.0mm that I had to fill, and, the profile of the greenhouse canopy was wider than the profile of the fuselage body on both sides. I therefore had to carefully file the clear part down without damaging the window areas. Also, the original decal sheet was yellowed and the moment I put decals into water, they disintegrated. My friend who sent me the kit had suspected this might happen, so he included a more up to date set of decals, although they had markings for two H-6 version Heinkel's that carried two torpedoes and also didn't have the fully enclosed dorsal gun turret, but the open style with the windshield facing forward to protect the gunner from airflow. This newer decal sheet didn't include decals for the V1 rocket, of which there were 24 stencils intended to go onto the rocket on the original sheet. I therefore decided that this was going to be a non-existent, what if, fun build. I mixed some of the fuselage side markings from the decal sheet to spell 1H+AM, which was associated to a Junkers Ju 88 and which I thought appropriate at the time of building, as it was Christmas, and most people like a good Spiral Ham! With this being a large model at 1/48 scale, I thought that the two tone splinter camo was just too much green, and therefore broke the monotony of it up with a white tail band, which would have indicated that it operated in North Africa....again...accuracy isn't playing into this build...it's just for fun at this point in time. I have to say though, it was a good kit besides the outlined issues and I had a lot of fun building it! Enough waffling and onto the photos, I hope you like them Well there she is, I hope you like her as much as I enjoyed building her. Again, just like my Fw 190F-8 build, I haven't had the time to post my build on here, but I do have a introduction to the build video and 4 "Build Update" videos on my YouTube Channel, along with my "Final Reveal" video that are available to watch, should you be interested in all the stages from start until end of this build. Here are the links for the 5 videos associated to this build: Introduction Video Link- https://youtu.be/BRDvVv0aAS8 Build Update #1 Video Link- https://youtu.be/VCvq7-FxUxU Build Update #2 Video Link- https://youtu.be/wolvHNA4rZQ Build Update #3 Video Link- https://youtu.be/WPJQIszbQIs Build Update #4 Video Link- https://youtu.be/gSrM2QytLYc Final Reveal Video Link- https://youtu.be/l2BoXSWtHcE Thanks in advance for taking a look at this posting, for leaving comments and for watching any of the videos, should you do so, much appreciated! Until my next build thread begins, happy modeling, have fun and Happy New Year! Cheers Martin5 points
-
The 1313 Mockingbird Lane (Munster House) diorama is all done. I finally started on the garden, with the green grass powder from the scenarama kit I bought. Having to resort to mixing Micro Crystal Clear with water, as the project glue had dried inside the bottle to a silicon sealant consistency & I couldnt get it to re-melt. Using the empty spray bottle that I got with the kit, I sprayed my solution onto the wooden base & sprinkled the grass powder on top with my fingers & thumb all over, then re-spraying the solution on top of the grass, I left it 24 hours to dry. Thinking it wouldnt work, the next day my fears had dissapated the grass had dried to a sandpaper like feel, so I started on the other side of the front garden & around the back. Once everything had dried, I removed the masking tape (for where I was going to place the trees & walls) & placed the completed trees & glued them into place with super glue. A couple of days before, I used some modelling putty & put some around the base of each tree & kneaded it into some grease-proof paper to create a flat-base root type shape. Leaving the putty to dry for 24 hours, the trees were now free-standing. Topping up around the roots of the trees with a little more grass powder, I started on the walls & metal fences. Humbrol 26 Brown & 9 Tan Brown for the walls & Revell 36190 Silver for the metal fences, I also glued those into place onto the wooden base. Also I had to cut the gate in half, but using a spare bit of another piece of the fencing, I clipped off one rod & glued it to repair the other half of the gate, to make it complete. Picking up a tip using Google, I used 4 different types of herbal tea leaves to re-create the fallen dead leaves from the tree around the base of the tree. Simply mixing Camomile, Lemon & Ginger, Blackcurrant, Raspberry (IIRC) & some normal tea leaves into a shot glass & scattering them around the base of each tree, using the clear solution, I think it has made a great effect with the various colors. Finishing off the base with some Revell 36179 Greyish Blue, to re-create a pavement, I started on the finishing touches of the house. I washed the hell out of the house with some Citadel Agrax Earthshade & glueing on the weather vane, TV aerial, chimney pot & spire top. Im really chuffed on how this has turned out, not bad for my first attempt at a diorama. Cheers, Wayne.5 points
-
The Alclad worked very nicely, caught just the effect I was hoping for: Got the first proper colours on the interior parts: There's a variety of greens for the different components and parts. These are base colours, and I still have a lot of detailing to add. Meanwhile, I started mucking about in the bomb bay with some yellow chromate primer: So far I really like the effect that makes. Here's the finished interior, it looks much more interesting than the usual monochrome. While that's drying, I started assembling the wings. These are huge and require a lot of cleanup. One thing I can unreservedly recommend on these old kits (especially if you use liquid cement) is to gently file down the mating surfaces of both wing halves. It saves lots of filling later! Here's a test fit - it doesn't look too bad: Unfortunately, I greatly underestimated the size of the finished product - this will be very difficult to display, or transport. I don't know how Tom Probert copes with his 1/32 versions! Al5 points
-
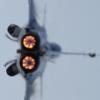
Sukhoi Su-33 Flanker D, Pics thanks to Ken Duffy.5 points
-
Tamiya 1:72 F-84G with some PE and home made improvements. The ventral airbrake was taken from Academy kit. Metal was drybrushed with MM metalizers. The rest are Vallejo acrylic paints. Decals were scrounged from LiftHere and Balkan Models. The model represents a freshly delivered airplane with hastily removed USAF markings. Josip5 points
-
Hi Sean. Brushes? Well, if I move the camera slightly to the left... Forceps??!! I have one pair of suture tweezers but I must look out for some of those, presumably good at getting into (gulp) awkward places? Thanks Col - I may give that a try if I remember while I'm doing the black undersides (makes note to self). Thanks Simon! As usual I had to fiddle with the internals - I can't seem to get the bits to line up, probably due to painted joins, and the pilot just made things worse. So I've dry fitted and then glued one side. Hopefully, when dry, I can squeeze the pilot in, but he's patiently waiting at the moment: Untitled by Ced Bufton, on Flickr5 points
-
Thanks Sean, vote 3 for 'ignore the roundels', perfect I haven't taken up dentistry... just my tweezer fetish. You can never have too many... Heard a great Roald Dahl quote on 'Quote Unquote' just now: "Fiona has the same glacial beauty as an iceberg, but unlike an iceberg she has absolutely nothing below the surface." Anyway, to delay my pleasure on the Spitfire I fiddled with the Hurri canopy (having painted the irritating panel behind the canopy DG) and roughed up the collector rings as is my wont: Canopy and cowlings by Ced Bufton, on Flickr I'd also masked the Blenheim turret and found a use for those squidgy foam bits you get in packaging to protect the inside when sprayed: Then, finally, I fiddled with the Spit internals. The headrest is drying: Ready by Ced Bufton, on Flickr Ready for assembly!5 points
-
Having just finished the Xtrakit Scimitar, here are some photos of it with my ancient Frog N.113 for company. My copy of the Xtrakit didn't have any of the reported mould problems, but was missing its canopy which was promptly replaced by Hannants. It's pretty basic but went together well for a limited run kit, much like their Swift. I left off the drop tanks as they took on a nose down attitude and looked wrong and anyway, I think it looks nice "clean". It's from the box apart from squaring off the bizarre Type 525 sloping base to the fin. The trailing edge of a Matchbox Meteor rudder from the spares box sorted that out with a little filler. The decals were the worst I've encountered in a modern kit as they were very thin and cracked very easily. I managed to save all except the Royal Navy legends on the fin and a few of the stencils. The Royal Navy legends came from the spares box and are a bit oversize - perhaps they were from a Matchbox Phantom? The N.113 came from Moore's Handicrafts in Rugby (anyone else remember the shop?) in the mid-60s when I spotted it high on their shelves. I had just discovered "paint" and coated it pretty liberally. It came off second best when my then young nephews played with it so I did a basic restoration, repainting it and using the canopy and decals from the appalling Merlin Scimitar (the only kit I have ever finally, terminally given up on and chucked in the bin). It's still missing the wing fences so maybe I'll have another go at it one day and refinish it as WT854, as the original markings. Both are brush painted with Humbrol enamels. Perhaps now history will repeat itself - not long after I finished the Xtrakit Swift, Airfix announced their version so maybe we can expect a Scimitar soon!4 points
-
Not as good a finish as Alesha's model - but I have finally finished.... my 1/72 scale Tu-22KD Blinder from the Ukrainian firm of Modelsvit. I've replaced the kit tail cannon with a tailcone mounting the SPS-100 'Reseda' active jamming system..... I also cut the bottom fuselage panel to show the three downward opening doors for the ejection seats (which are in the kit) I added straps and altered the footrests (the pilots and WSO seats are slightly different to the Navigators kit seat - thanks Gabor). The dragon decal is from Begemot (thanks Kotey!) - and I changed the bort number to 'Red 61' to reflect the tailcone changes and markings. The kit comes complete with a Kh-22 missile and its handling dolly..... The kit is a typical short-run kit and I had a few issues with the fully-detailed interior (which can't be seen on the finished model!) - but Modelsvit are to be commended for producing a scale model of such an important and iconic Soviet warplane. More photos and WIP pics here. WIP Thread is here Ken4 points
-
Latest model finished Tamiya spitfire mk.ixc Kit Manufacture: Tamiya Scale: 1/32 Type: SpitfireMk.IXc Extras used: - Paints used: Tamiya, Gunze Weathering:Oils4 points
-
Spent some time this afternoon sorting bits & pieces....... including rope work . I've seen several pics with the tow rope fixed with a shackle to the bow reinforcing plate, so................. Thought you might like to see how I make shackles (Good for you Tanky guys ) Start by annealing your brass rod so it can easily be bent to shape I clamp it in a vice so I can cut the two legs too the length I want Cut two small tubes by rolling knife on tube. Note clean the end square before cutting then you know the drill bit will slide in one end easily. These are held in position on the drill bit against the ' U '. Apply solder, in this case solder paint. Apply heat You should be left with this. By leaving the bit in whilst soldering you know the tubes are in a straight line and your closing rod will slide in easily. You can of course replace the rod with a bolt and with a suitable tap you can make a working shackle. I hold the shackle with the drill bit whilst filing back the tube to the right size The finished result When the rain stops I'll flatten the end to complete the pin I hope this is of some use to you out there and I'm not teaching you to suck eggs As always thanks for stopping by Kev4 points
-
This is my Matilda CDL, Italeri and resin turret from Lonewulf.4 points
-
OK, ok! So there have been quite a few times that I've not managed to get to the cutting mat in recent weeks but lots of little bits of progress when I could. I didn't want to post every 5 minutes as quite a lot of it has been detailed work that would have looked fairly uninteresting posted piecemeal. In fact, I can't guarantee you'll be any more interested now but hey ho...you pay your money, you take your choice! So the flaps had been attached to the runners last time I posted but the real ones clearly aren't just glued on; they have brackets at their inboard end which curve around the flap edge and contain a pin which runs along those channels. So the brackets were made (too long initially, then later trimmed) and holes drilled out for the pin, which was to be brass rod. One half of the bracket was glued to the rod and trimmed. Then a hole with similar diameter to the rod was drilled through the runner at the correct position. Once the assembly was inserted through the hole and attached, the other side was glued on and the rod again trimmed on that side, before excess material was cut away. Having repeated that several times (urgh!) that pretty much finished the flaps themselves off, with the actuators to be added later once final assembly is complete.4 points
-
Not having meant to test Andy and Rich's patience on purpose (or to put Rich's popcorn supply in danger) I suppose I had better post some pictures of the finished item, yes she is finally finished! As any of you who have stumbled across this build before will know I would not have been able to finish her without the extremely kind assistance of fellow Britmodellers Vesthepes, Mr. B and Diego who have all sent me replacement decals to get over the problem of AFV Clubs amazing self shattering examples that they provide in the kit, thanks guys I am in your debt. Anyway enough rambling here are the pictures.... And finally one of the tail area on the starboard side showing replacement decals supplied by Diego and Vesthepes. I will post some more pics in the Gallery. I would like to finish by thanking the organiser of this GB Trickyrich for his hard work and continued support of all of us and everyone who has looked in during the build process and passed on their tips and comments, its the input from all of you which makes these GB's as rewarding as they are. Thanks for looking in (and your patience!) and as usual all comments and criticisms are gratefully received. Craig.4 points
-
Running Gear (2), Upper Hull & Turret The Road-Wheels (tyre section) does need some sanding down on the inside. A change of direction and moving on to the turret with the detailed gun. Numbering some 21 parts, this is a very detailed unit which is largely unseen. (Apologies for the poor picture quality) The Hull top has been tightly taped down when adding detail due to the warped part. Front fittings being added with a decision on the Drivers compartment pending, the finer parts will come later. Stowage Bins and Engine Vents (work needed on raised injector marks on underside) added. At least the hull is sitting well and, in general, it is going together very well. Looks worse than it is! The Turret roof is incomplete and not yet glued. A Review so far...... The plastic is very soft. A lot of parts need cleaning up. Some of the 'fit' of parts is problematic, but not insurmountable Some use of filler is neccessary but not excessive Next Time: More fixtures and fittings and to start assembling part of the track4 points
-
Completely OOB model. Excellent quality.3 points
-
3 points
-
The wing folds look particularly effective. As to Moaning Dolphin's suggestion that we use blended whisky as fuel, is he trying to fly the aircraft or poison it? Martin3 points
-
The "grommets" are the wing fold latch pin fittings. Before the wing is spread the locking lever is moved to the unlock position as shown below When the wing is spread the lever is pushed back up into the "Locked" position which pushes the four latch pins through the corresponding holes in the latch pin fittings. The black patch on the port drop is indeed for the landing light. I fired up 388's electrics late last year and the landing light lights up the tank quite well. Video here for those with Farce burk https://www.facebook.com/1510750749175428/videos/1596344360616066/?video_source=pages_finch_thumbnail_video&theater3 points
-
Hello,Bonhoff - Good for you and go for it!! My build of this subject isn't very good but it was good fun and an enjoyable occasional 'change of subject' model.Good luck and enjoy! All the best,Paul.3 points
-
Cheers guys. Focus is now on bringing the bits to life. Here's some of the airfield stuff painted although still need a coat of matt varnish.3 points
-
Thanks Foxy glad you like it so far So another small update first layer of silicone on base sides primed and painted also gave the silicone a coat of black as an under coat then started with the colors various green, blue grey and white then set the ship into base at a slight list to Port side as not trawling any nets will leave to dry out now for a couple of days ans get back to starting on the other diorama my Vosper dockside Beefy3 points
-
Told you it would look good Al !...great stuff old fella... Not sure about the wheel well colour though I seem to remember being told that they were chromate green as protection but not 100% sure, have to ask around our sig chaps. but as no ones going to be stupid enough to try and pick it up and turn it over I don't suppose it really matters that much, (unless of course you plan on using a mirror base ).... By thunder how many times have I heard that !...sometimes she's referring to the models as well.... Al, hang it from the bedroom ceiling...only way to go, you could relive the good old days... Don't fancy going for this scheme do you ! http://cdn-www.airliners.net/aviation-photos/photos/6/0/3/0747306.jpg3 points
-
Thanks Jaime Crikey, these really fly together once you get going don't they? I had a bit of nostalgia painting the inside of the wings; why I bothered I don't know but the 'thought process' went something like: - Ooo, the wheel wells are Sky / H90. I haven't used that for ages. - Ah, the central strip is interior green. I wonder if I have a little pot of that as I'm too lazy to get the AB going just for that bit - I could brush paint Humbrol, just like I used to... and the result was this: Nostalgic by Ced Bufton, on Flickr Have a good look - that's the last time you'll see it! The H78 brushed / covered so well I've ordered some, along with some VMA 'Aged White'. I also got the chance to use the stand thingy I bought at Telford. I haven't done a single engined prop for a while so it's the first outing: First use of stand by Ced Bufton, on Flickr You have to be careful drilling out the prop hole or the fuselage will split (ask me how I know) but it does give you something obvious to hold onto and somewhere obvious to put the model while bits are drying. All ready for canopy masking now, then it's clean down and (dah dah dah) black / white / grey primer. I guess this is the bit you've all been waiting for - I know I have3 points
-
Released: http://www.trumpeter-china.com/index.php?g=home&m=product&a=show&id=2749&l=en V.P.3 points
-
Thanks for the well-wishes Andy, see what you think after this big update! Cockpit primed: Here's the 150g of lead I've managed to stash around the underside of it: (and it's still not enough!) I managed to get another 50g into the front end of the tunnel - a very convenient location for nose weight, top tip from me Here's all the rest of the interior parts primed and ready for some colour. After a lot of head scratching I decided that the Washington I'm building did have the twin exhaust pipes on all engines, so I adapted the kit single exhausts into twins. One of the units was lost somewhere along the line (the perils of second-hand kits!) so I managed to create one from one of the kit bomb halves. Bomb bay interior primed and ready for paint: This will be my first use of Alclad Honey Primer, I'm hoping the black areas will give a shinier finish compared to the grey areas when I spray the Polished Aluminium on it. Al3 points
-
I was away for quite a while and didn't have the time to post updates BUT,a lot of work has been done on the Phantom.Only a few bits are left (weapons and fuel tanks,underside decals and the final matt coat) This will be followed by one more post before I put it on RFI3 points
-
Morning folks,think I,ll call this one done here,s a taster I will do some decent shot's when the light is better which up here could be July! the RAF machine is also done so if I do get the light I will put in the gallery ASAP.Thank's for your interest,next one up the NMF "Ball's out"3 points
-
Hi everybody, I continue my series of modern armored. Here is a Revell M60 used by the Marines during the first Gulf War. Every comments welcome Joel3 points
-
Hi Pals, some pictures more, those without paint, are reflex camera, I include it look better details, and the other, with the coat of primer applied. Thank you for viewing and comment, greetings, mates3 points
-
"That's no ordinary rodent!"3 points
-
In the Elsan during turbulence?3 points
-
Ouch! That latter incident sounds particularly horrific and not unlike a former girlfiend.3 points
-
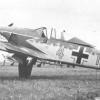
My Me 262 A, 1-b by Hobby Boss.......a nice kit Regards Klaus3 points
-
Excellent. I was at Dartmouth with Mike Cochrane. He is as posh as a very posh person on as especially posh day in Poshtown, but basically a nice guy. I had no idea he is descended from the Cochrane.3 points
-
Hi Giemme and thank you. Don't let on.............but the seat belts are actually the seat belts decal that comes with the kit. I didn't fancy spending time with masking tape and wire to make some so I decided to carefully cut out the decal and backing paper before giving it an all over thinned wash of Humbrol's matt varnish. The lighter, upper belts have subsequently been given a wash of another light colour to tone down the original very bright yellowy colouring. Unfortunately I cannot remember the colour I used for the toning down. I then glued them in place with CA glue. They arn't perfect but they should be okay once they are mostly hidden inside the aircraft. I think they work a lot better in this way than if I had used them as an actual decal. Kind regards, Stix3 points
-
According to the article Germany is holding talks with possible European partners about what they would want from the aeroplane.........Hmnnnn How about a German guarantee not to delay delivery by a decade or so for starters?!3 points


-1-1MINIATURA.thumb.jpg.bd7a7e672869500d45ee6e80478f6f25.jpg)


This leaderboard is set to London/GMT+01:00