
Leaderboard


Popular Content
Showing content with the highest reputation on 04/01/16 in all areas
-
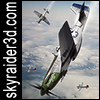
Here is my interpretation of F-111E serial 67-0120, 20th Fighter Wing USAF, Incirlik AB (Turkey), January 1991, Operation "Desert Storm". 1/48 Italeri kit (rebox of Academy); Eduard`s ZOOM PE set (for HobbyBoss kit) in cockpit; Master`s pitot tube; ALQ-131 ECM from Kinetic`s F-16 kit under fuselage. Lot of scratch work (esp. slats and flaps, canopy, changed gear bay cover etc.). Camo is painted with Lifecolors. Decals are from the box, but I`ve changed some things, because I wanted my "120" in "Desert Storm" scheme, without all those colorful additions that this aircraft usually had (and have now, because 67-0120 "The Chief" is preserved in Imperial War Museum, Duxford, UK). So here it is: Thanks for watching!35 points
-
Hello all, Here is my Swordfish MK-I from Tamiya it was build many years ago. I build straight from the box with the exception of seatbelts. I think that they are from Tekniks. I painted it with the Aeromaster acrylic paint. I hope that you will like it Rob28 points
-
Hi all, I finished my Hurricane last night and took some photos... The WIP thread is here: http://www.britmodeller.com/forums/index.php?/topic/234993484-airfix-148-hurricane-mki/ It's the new tool Airfix kit, with Brassin exhausts and wheels. I used the kit decals for the 501 Sqn. option. Airfix 1/48 Hurricane Mk.I by Phil Jones, on Flickr Airfix 1/48 Hurricane Mk.I by Phil Jones, on Flickr Airfix 1/48 Hurricane Mk.I by Phil Jones, on Flickr Airfix 1/48 Hurricane Mk.I by Phil Jones, on Flickr Airfix 1/48 Hurricane Mk.I by Phil Jones, on Flickr Airfix 1/48 Hurricane Mk.I by Phil Jones, on Flickr Cheers, Phil27 points
-
Hello everyone Here is my first post in the RFI gallery on this forum. It's Academy PBY-5A Catalina in 1/72 scale. A fine model, not too accurate though . Still, It's my favorite of the flying boats, and I always wanted one on the shelf. Now i find that one is not enough The colors are my mix, using the Mk 1. eyeball to determine the right shade from the available pictures, taking into account the scorching pacific sun. It represents one of the early airframes, so I wanted to give the impression that she was in theatre a long time. Thanks for looking18 points
-
My first completed build in 2016, another Focke Wulf Fw-190 from Eduard's Profi Pack. Added photo etch landing gear covers from Eduard Set and decals from Aeromaster (Butcher Birds #72001). Photo of the original aircraft here: http://www.jg300.de/fw-190a-gelbe-1-7-oder-17.html Gun barrels from Master Model. Painted with acrylics from Gunze/Mr.Hobby. Photographs: Wolfgang Rabel, IGM Cars & Bikes Cheers!15 points
-
This one nearly made it before the end of 2015 but real life got in the way. The Special Hobby kit is a bit of a nightmare, the fuselage is a couple of mm out in all dimensions and the wings lack aerofoil, there is none of the neccessary detail to allow for an open cockpit and the etched brass vortex generators are fiendish puzzle devised by a sadist but it is the only game in town. The Italain option on the nicely done decal sheet is for the perserved machine in the Italian Air Force Museum but I wanted to portray it as it might have looked in service. The 23o Gruppo was the longest serving unit on the 'Kappone' and was for a long time part of the 51o Stormo. I replaced the vortex generators with slivers of plastic card and as the AIM 9Bs lacked forward fins or at least anything that looked like the real thing I replaced them with ones from the spare box. Thanks for looking.13 points
-
As announced my Mike today in the Announcements section HERE I'm stepping down from moderating the Group Builds. Here, paraphrased is Mike's announcement I'll be around till Enzo has picked up all the skills of herding cats and I might even find time to build for a few GBs I would like to publicly thank all you GB'ers for your support, kindness and help over the past six, nearly seven years. I have made lots of friends, seen some great builds and enjoyed just about every minute of the job I have one request of Enzo, it's been a sort of tradition that I host the KUTA GB every year. I would love to continue to do so. Happy modelling all and thank you.12 points
-
Hello All, As part of my garage clearing and stash organising (260-odd, if you are wondering), I came across some old-old models of my Dad's, from WWII. Here's a "Grace Airplanes" kit, including "everything you need to build the model", including paint, bamboo, and pins: You even get spare wood! Here's a Hudson: I also have an "Airlines" kit. This seems to be a bit more basic, shown here next to the new Airfix Defiant to show that things have progressed a leetle bit: Not a scrap of balsa in sight! Presumably it was all going into 1:1 Mosquitoes at the time. Paint of the day was based on a cellulose dope formula: One of them was even liquid! The brown, after a lot of stirring, came out quite well: Although then, as now, nobody quite agreed about Sky: My Dad had got quite a long way through a Havoc build: So I thought I would continue it in keeping with the spirit of the build. It was going to need crew - these fellows are carved from a lollipop stick. Any similarity to Captain Pugwash characters is accidental! Although the plunge-formed canopies from the time (on the right) are still very usable, I made a new plug from balsa to fit the model better and vac-formed some new ones (on the left): Detail was limited to a pair of Brownings, from wood and pins: I painted the whole airframe black from a tube of acrylic and applied the decals. The fuselage decals went on perfectly! I knew I was going to have trouble when the wing and tail decals started drifting into pieces on the sheet. I applied them by placing my thumb on the decal and pulling the paper out from underneath. I teased the various broken bits back into position and touched up the missing bits. I am unable to say how well they conformed into panel lines... A coat of matt varnish and done! It was quite nostalgic to take part in a posthumous joint build, so here's to my Dad: Thanks for looking, Adrian12 points
-
Happy New Year all! Last year I completed the illustrations for Osprey's Aircraft of the Aces #114 on Ki-61 and Ki-100 Aces, written by Nicholas Millman of http://www.aviationofjapan.com. Since the book has meanwhile been published, I'd like to show you a few samples. Research by Nick and myself. All images © Osprey Publishing. Ki-61-I Otsu of the 78th Sentai: Ki-61-I Tei of the 244th Sentai Detail of the score board: This graphic gives you an idea of the amount of research that goes into each profile: Ki-61-I Hei of the 56th Sentai: Colourful Ki-100-I Otsu of Akeno's 111th Sentai: Ki-100-I Otsu of the 5th Sentai: A close-up of the tail unit and "Nine-headed Dragon" inscription: A Ki-100-I Ko of the 59th Sentai with P-51 victory marking under the cockpit and 3rd Chutai markings on both vertical and horizontal tail planes: Sample line drawing of a Ki-100-I Otsu: For those who are on Facebook, I have an artwork page at https://www.facebook.com/AviationArt.Aero and a group dedicated to the Ki-61/100 at https://www.facebook.com/groups/Ki61Tony/ Many thanks for looking! Ronnie Olsthoorn11 points
-
Hello friends Happy new 2016. I would like to thank you all that share your works here, thank you for your nice comments on my works, truly appreciate that :-) So this is the first post here in 2016, the first of many i hope. 2015 was a bad year for me so i really hope that 2016 can be much better. This is one of those kits to build... once, at least for me! I hope you like it kind regards Vitor Costa9 points
-
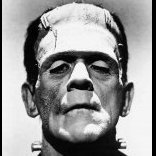
This is a Polar Lights 1/87 scale model of the Bates Mansion from the 1960 film Psycho. This was a good build and really enjoyed putting this one together. Si:)9 points
-
So, I finally got my Beau finished over the Christmas holidays. I'm quite pleased with how it came out. I now just need a white / EDSG / DSG / white camo'd one! regards, Martin9 points
-
Hi folk's second German utility vehicle finished,Revell,s quite new kit built along with Italeri's Kubelwagen,great fun build with no vices and some beautiful molding's.Background to the build's here. http://www.britmodeller.com/forums/index.php?/topic/234993049-wehrmacht-runnerounds-beetle-kubelwagen/ Thank's for looking in.9 points
-
Ah. Well I cheated actually Giorgio - Sorry.......... I got my Hawks when they were on a half price deal and so I bought a couple of extras. I used a scrap fuselage that I've been using as a test mule for things various - and simply cut a cross section out of it at the point I wanted the bulkhead. I then taped it to some 1mm plastic card (so it wouldn't move about) and use it as a template to scribe a perfect bulkhead profile: Very simple - but rather extravagant and wasteful use of a kit unless, like here, the fuselage is essentially already scrap. Now these sound like 'proper' techniques chaps and probably the best way of doing it. The Adour is of course only a modest little engine (I should know as the vast majority of my FJ time was spent with an Adour throttle parked virtually fully forward or in reheat ) and it's airflow needs correspondingly modest - thus the intakes have a really quite small cross section and the trunking is comparatively long and of course, in the Hawk, bifurcated. In 1/72 scale the intakes are a very small diameter and quite deep. It is therefore hard to see much when peeking down the intake - and the field of view is very restricted. In particular the compound curve is not really apparent and the bifurcated nature of the ducting is just not evident - or in any event even if the beady eyed US IPMS judges could see them - they are not obvious enough for me to worry about on this build That being the case I don't want to put the effort into making a master or moulding compound curved and/or bifurcated ducting. I'm content with a simple curved surface - representing only the outside of the ducting and leading from a point about 1 cm or so down the ducting direct to the compressor face. It won't be seamless as such anyway - as I plan to use the Airfix intake front which are supplied as separate parts - and so there will in any event be a circumferential join about 1 cm back into the duct. I hope that this will not be highly visible as i plan for the ducting beyond that point to be slightly larger in diameter - i.e. 'stepped' out of view. Some piccies of progress so far might (?) make this easier to follow. As I said my inspiration was Gene K's method used by Giorgio. Started by building up a template from paper. Simple rectangle to begin with and then taping on - and cutting to shape - more bits of paper: Very quickly (a matter of minutes) get to a shape like this: And a hopefully definitive template: Once I've transferred it to some 0.1mm plastic card I'll post a piccie of it in-situ so you can judge for yourselves whether it works or not Nah. It's taken longer to describe than to do - and it may not work - and the idea is pinched from Gene K.9 points
-
Hello all, I've been a member of Britmodeller for a while but haven't been very active, just an odd comment here and there, so I thought it was time I changed that and stepped things up a gear by offering up my first RFI for your perusal and comments?! I have been modelling for most of my 56 years and often thought of trying the now quite old method for achieving a more realistic NMF finish which is to use ordinary kitchen foil and adhesive as opposed to the more modern method of using Alclad type metallic paints? What you see below is my first attempt at the method and I found it great fun though very time consuming. I am not going to say too much about the finished model here, as I prefer to let the pictures do the talking except to say that it was built out of the box except for the use of a ‘Quickboost’ resin replacement seat and a few small scratchbuilt details. The following photo shoot is picture heavy and includes some black and white photos at the end just for a bit of nostalgic fun. In some of the photos you can see a few brushmarks beneath the foil where the glue was applied, and which makes it look a little rough but that is just the macro lens on my camera being a bit over zealous - please remember this is just 1:72 scale and in reality it looks much better and smoother using the human Mk.1 eyeball! Airfix 1:72 North American P-51D Mustang - Tuskegee Red Tails (Kit # A01004) Thanks for looking, all comments and criticisms welcomed. Kev8 points
-
Here is the MPM 1/72nd Gnat F1. This is the Finish version. I'll put the second in a separate post. These are very nice little kits, simple to build, but size makes it interesting :-) Tim8 points
-
What about a bit of colour to kick off 2016 in the manner I want to continue! Built over the Christmas break, this is Revell's rather simple Do228 kit, updated to reflect one of the Dutch Coastguard's current coastal patrol variant with added lumps, bumps and other antennae/sensors. The kit itself is a straightforward build with remarkably good fit, although Revell seem to have missed out some key features of the aircraft, like the prominent landing lights and inexplicably want you to stretch sprue for some important (and IMHO, entirely mouldable) key details like the Fowler Flap actuators. Out the box, the kit represents two very early aircraft without the current radar/optical sensor suite, but at least on the surface, the changes to the current aircraft are not too difficult to scratch. The Dutch colour scheme is a little more complex than average and did severely task my masking skills (there is a marginally simpler German Navy scheme provided too); to be fair though, I did diverge from the straightforward older scheme provided in the decals and was determined to add the complex black "Toucan" nose. I have added quite a few scratch details; the SLAR antennae, FLIR turret, modified cargo door, various aerials etc all from the spares box or bits of sprue. I also added some engine exhausts from plastic tube - a strange omission by Revell! FredT8 points
-
Ah. Well. You see trying to shape milliput would be problematical cos there's the wheel bays to cover/hide: I do believe however I have made my simple/compromise solution work. Here's the 0.2mm plastic card - cut to shape from the paper template - glued in place. I used cyano rather than Tamiya green cap or similar so as not to risk melting or distorting the thin plastic: It curved nicely (with modest persuasion) to fit the kit at the Airfix intake join: [/url] And it all fits ok over the wheel bays. Actually I had to cheat a bit to make it fit over the wheel bays by making the trunking a bit shorter (vertically) that it ought to be (more on this later): Here's one showing the other fuselage half attached and the kit front section of the intake dry fitted. It's the same shape for the trunking on t'other side - just in reverse. I don't need to join the two trunks together in the centre - because you can't see to the centre line when looking down the front of the intake: And, most importantly, one looking down the intake with the front section dry fitted. This is just about as much of the compressor face as can be seen from any sight line - so you can see that I don't need to bother extending the inner face of the trunking rearward: This is the effect of having to make the trunking shorter to fit over the wheel bays. I will have to use a tiny bit of milliput or do something else just to lose the bottom 1 or 2mm of the rear of the front section of the intake. Not a big price to pay and I don'y think that the comparative loss of height will be noticeable. Gotta do it 3 more times now...........8 points
-
This is a very late refugee from the long-finished What-If III Groupbuild, but only just finished today. The build and very long, but I hope entertaining, backstory thread is HERE It was built from the Heller 1/400 Richelieu kit with Atlantic Models photoetch for the Frog/Novo 1/415 HMS Tiger, plus lots of scrap PE, scrap parts, and scratchbuilding. It depicts the RN Battleship HMS Bellerophon in 1982, just before she led the Falklands task Force as flagship. All the best, Al7 points
-
I also have the old Heller 1/50th scale Gazelle. I must dig it out and see how it compares. Today the 0.5 and 0.7mm clear PETG arrived: With the protective film removed it is optically pretty perfect, I readied two discs of both thicknesses: However, after forming the canopies the 0.7mm was not great optically and the 0.5mm had this crease in it: I decided to concentrate on using just the 0.5mm as it was easier to work with but then got these bubbles: I won't, bore you with the subsequent attempts but twelve more later I got one that was free from gross defects but still not as good optically as the one I had with the slight crazed area (the one at the back): These are some of the ones made just before they head for the bin: I decided to proceed with my earlier effort and live with the crazing, I started to apply the glazing bars (using more Xtreme CautionTM): I used the greenish tape as both a placement guide and to protect the clear areas. Using a combination of liquid poly, Gator Grip and extra thin superglue I got them finished off like this: I will let that harden up overnight and let my jangled nerves recover. Bye for now, Nigel7 points
-
So it all ends well in the end I've done a little spot masking this avo and added a base for the streaking that is found underneath any in-service Foxhound that hasn't been cleaned or re-painted recently. The last panel line is always the most sooted up, and then underneath the muck diminishes as you get closer to the weapons stations. I always use Tamiya Smoke for this job, but find it works better with a dot of NATO black in to reduce the pureness of the grey. Thin it well with some Ultimate thinners, and off we go! After doing the aftmost one, I used bits of tape to draw back a bit of the same mixture after adding a drop of NATO brown, starting close to the model and drawing the brush back and increasing the distance from the model to fade it out a bit. Lots of passes with the brush as it's quite a subtle paint, and quite a bit of masking tape and post-it notes were harmed during the process. The topside looks a bit bland and stark at the moment, but I'll work on reducing the contrast a little with the next phase... oils! Once the smoke is dry, I'll metallise the tail panels, although I might do those at the same time as I do the exhaust cans, because they're roughly the same colour.7 points
-
Hi All, This one's been in the stash for around 30 years since, with the eternal optimism of youth, I purchased this from a local model railway shop thinking it'd be a nice project. It's the Wills Finecast (Now South Eastern Finecast) LNER A4 Locomotive. No.4468 "Mallard" still holds the world record as the fastest steam driven locomotive in the world at 126mph. I guess as it's still in ts box it turned out to be beyond my perceived abilities at the time. Here's the instructions... Now I'm not much of a railway modeller these days although my Dad makes up for that big time, being a scratchbuilder of all sorts of railway stuff, the more obscure the better, he doesn't know it yet but for the first time in 40 years I'll need adult supervision from him to sort the chassis. It's a body/tender kit - Designed for the Triang-Hornby Flying Scotsman chassis or Wills' own. The kit came with the Wills chassis, along with a set of Romford driving wheels and for the pony truck. The wheels for the leading bogie, although the correct diameter, have too few spokes and are for an external bogie frame. The tender wheels are spoked plastic ones so they'll need replacing with disc wheels. The valve gear included in the box comes from an old Triang-Hornby Britannia which is the right one according to the instructions but look a bit chunky. I also need a cylinder block to attach the front of the valve gear. And a motor. Quickly taped together to see what it looked like... Didn't require too much jiggling - As it's white metal you can bend things a little to make them fit but still a fair bit of cleaning up needed on the castings. Here's hoping it doesn't all go wrong like the 1/24th Hurricane I was working on for the BoB GB... IanJ6 points
-
Hello and welcome to 2016! My last build from 2015, the first to be presented in the new year. Sword 1/72 Spitfire XVIe with photo etch from Brengun, Vacu canopy from Squadron and Decals from Xtradecals. Represents SM309/AU-H, “Panama Bound” of 421(Royal Canadian Air Force) Squadron in 1945. Flown by Flt.Lt. Richard “Hap” Beal. Painted with acrylics from Gunze/Mr.Hobby. Main Inspiration for this build was the model by Mr. Jekl, as seen on Britmodeller: http://www.britmodeller.com/forums/index.php?/topic/234949348-supermarine-spitfire-mkxvi-172-sword/ Pictures by Wolfgang Rabel of IGM Cars & Bikes. Thanks for your interest, have a good start into the new year! Cheers from Vienna Roman6 points
-
Quite a few vac kits in the mix, I really enjoy those. Revell F-101B Airfix Tiger Moth Roseplane Spad A.2 Airfix Defiant Joystick Albatros C.1 Joystick Halberstadt CL. IV 12 Squared Loening Racer Italeri OH-58D Hobby Boss EZ Build F4F-3 (with Quickboost F4F-3 wings) Joystick Avro Bison Broplan Potez XXV Airfix A4B Skyhawk Heller Nieuport-Delage 622 Esoteric Nieuport 29 Thanks for looking! -Dan6 points
-
G'day David, I don't think you will regret getting one. Apart from the few quibbles already mentioned, it is a really nice kit which seems to fut together pretty nicely, and given all the stores options included, seems good value as well. I would have preferred a decent 1/72 kit myself, but apart from a very expensive limited run kit, there are few options. G'day people, I have been busy painting the stores today. Whilst all that lot is drying, I turned my attention to the forward missile troughs (or lack of them!) This is how SW would have you 'install' the forward missiles Rubbish!! I decided that the easiest solution was to simply cut a slot out of the existing panel equivalent to the diameter of the AIM-120 missile body. I then used a half round file to sand in a curved cut out in the upper fuselage half Now for the moment of truth, Result! cheers, Pappy6 points
-
It's a very soggy day in Aberdeenshire today and therefore one purpose made for model making indoors! It has taken me far too long to get around to having a more formalised presence here on Britmodeller and hope to share some of what we're doing both in the UK and internationally. 13 months ago I read on Facebook that White Ensign Models were to cease trading. This came as a shock and huge disappointment. I've been making models since I was a child with both my father and grandfather but had only fairly recently got back in to it properly after a break where starting careers and family got in the way. I'm quite clear on what happened after that Facebook announcement but how it all happened is a bit of a mystery and somehow I ended up owning my favourite paint brand. We started the new company immediately but it took us some time set up properly. I dislike chaos and wanted to do things properly. Colourcoats was relaunched at the Scottish Nationals model show in Perth in April 2015, the first commercial order was dispatch to the USA shortly after and our shiny new webstore opened for UK Mainland customers in June. I mostly model aeroplanes and ships myself, and soon after getting Colourcoats up and running again, I realised I could no longer obtain most of my favourite naval modelling products in particular, so we have thus far reinvested everything we've taken into improving that situation in the UK, and now offer White Ensign Models again (now imported from California), Pontos Models and new-start Infini Model both from South Korea. More is on the way this quarter. We're just rolling out colour boxsets at the moment which are proving popular already, happily. The Colourcoats paint range currently comprises: Colourcoats Sea. Modern Naval The Great War United States Navy Imperial Japanese Navy Royal Navy Kriegsmarine (German navy) Regia Marina (Italian navy) Colourcoats Land. Australian Army Imperial Japanese Army Army for Defence for Israel United States Army Red Army (Soviet) British Army Wehrmacht (German army) Regia Esercito (Italian army) Colourcoats Air. The Great War Armee de l'Air (French air force) US Army Air Corps / US Air Force / US Navy Imperial Japanese Army and Navy Royal Air Force / Fleet Air Arm Luftwaffe (German air force) Royal Australian Air Force Regia Aeronautica (Italian air force) Royal Netherlands Air Force5 points
-
Hi everybody, time for an update. Last couple of things added to the tub, also to hide a bit that huge gap remaining between the pilot's IP sides and the coaming: I've glued a styrene strip behind the IP, painted and weathered accordingly to the rest and used as a backing support for the arresting hook control handle (right) and the landing gear control handle (left): I've also glued in the control sticks: One more shot: I toned down the red knobs of the two control handles, as they seemed way too bright (I simply went over them with a dark wash) One of the last things to do before joining the fuselage halves: replacing the fin pitot and probe. I used a prescription needle for the latter, shaping it using my Dremel with a sanding disc, while for the top pitot tube I used a brass rod and the same technique I used for the AOA probe. Glued in place with CA, then a bit of dryfit I also did some more work on the boarding ladder: steps made from rigid copper wire, glued in with CA Anybody cares for an F-4 boarding ladder that can only be used starboard side? I don't think so So I had to strip all the steps off, swap the two side parts and re-glue: Adding few more details, again from rigid copper wire and glued with CA I've also prepared little Gene and the jet engine faces for priming, will probably post something about them tomorrow Comments welcome, as usual Ciao5 points
-
I have put this here, rather than in the what-if section, as it is more a what will be (probably) Kittyhawk 1/48 Lockheed F-35B Lightning II 809 Sqn FAA Lightning FRS.1. aboard HMS Queen Elizabeth Eduard colour cockpit etch panels. Decals from spares. All else as per kit. Unfortunately, the wash didn't go to plan, so it looks a bit "used". It's not completely finished yet, as I still have weapons to fit (when I get them) and a few odds and sods to do to it. 809 are slated to be the first operational FAA sqn to use F-35B5 points
-
Thanks Karl Hi Cookie. Ink? Thanks John! I've used the cut-off brush method before (see below) for the 'fuzzy edge' mottling and it's easier IMHO - this one's sort of blobs, hence the attempts at the 'new' method. Just in case you thought I was taking a distance shot to hide the mess, here's a close up (of the mess) just for you Untitled by Ced Bufton, on Flickr You probably need to squint a bit to get the full effect! Thanks Tony, very kind I already have their friends on the ceiling... got the step ladder out just for you (but had to take down the 163 to get a decent shot) Untitled by Ced Bufton, on Flickr Both were mottled using a cut-off brush and I'm fairly happy with that technique. Transfers next - I'm not going to do my 'usual' coat of Klear this time to see if it makes a difference. Fingers crossed.5 points
-
Another milestone reached today! I got the last two scratchbuilt parts done - the windscreen and bullet deflectors, and fitted the engine and wings. Tomorrow I'll get some rigging on them to give them a little much-needed support! Ian5 points
-
Wow, thanks for all the support and help so far folks. Cheers Stevehnz, very helpful. And Nigel, thanks again. I was going to ask you about this one as I knew you use to work at Landrover / Jaguar. Right; update. I was round and my parents house yesterday so took this, a few tools, some liquid cement and set to work. This continued this evening when I came back home. The wheel base has been cut (shortened) and glued back together. The panels, base have also seen some hacking/ cutting. Photos are poor as I was at the kitchen table rather than my modelling room, sorry about that. I also made a jig for making the grill. I tried using some brass tube but it looked far too thick. After further checks of some references I noted that the framing for the grill is not tubular so will try again with some thin strip of plastic card. I've also been working on the interior; footwells made and now working on the dashboard. Still plenty to do but thought it best to leave this to dry. I also couldn't resist dry fitting all the bits; just to see that it still looked like a land rover Thanks for looking Cheers Aaron5 points
-
I started today by gluing the glazing into the door frames using extra thin superglue and extreme caution: I did one side at a time, let that set and then finished off in the remainder, capillary action did most of the work and it went better than I expected. The glazing also seams to have added a lot of strength. Next I got some decals from the spares box on the missile tubes: They were then glued onto the side mountings, here they are compared to what's left of the kit originals: Now the doors were set I started masking the outer frame, the top has a slight curve and I using this glue applicator to cut that: Here's the masking finished: Now I could attach the external door handles which are one of the few parts on the Extratech set worth using. I left them attached to a section of fret for ease of handling: I got them bent up and at the last minute removed the surplus fret: Here they are in place using more extra thin CA: I have a nasty feeling some might have wicked under the masking despite my best efforts at burnishing it down. Then I masked the edges and rear with tape and sealed the two together with liquid masking: These are now ready for the paint shop and external colours: Not a bad day at the modelling bench, its back to work tomorrow so normal service will be resumed. Bye for now, Nigel5 points
-
I finally got around to taking some RFI pics of my long time project, a Wessex of 28 Sqn which I worked on back in the early 80's. The project isn't fully completed yet as I am also building a diorama for the Wessex which will eventually sit in a display case. The houchin and fire extinguisher trolley are currently underway. Scale is 1/48 I also realized after taking these photo's just how poor a photographer I am, but you'll just have to make do. The WIP thread can be found here... http://www.britmodeller.com/forums/index.php?/topic/234971153-wessex-hc2-a-dauphins-stablemate-nurse-the-operation-was-a-success-and-the-patient-is-expected-to-recover-fully/?p=1799520 .. but be warned if you want to read it - it will probably eat up a few hours of your life. (I chose Hotel as there is a back story to that, which you can find in the WIP thread) Anyway - relevant info: I started with the Italeri HU5 kit which of course was the wrong mark for the aircraft I wanted to model, so that dictated that I had to do some modifications... which turned into a much bigger project than I had ever imagined. If you ever want to build an HC2 - don't ever use the italeri kit! Be warned!!! I don't think there's a part of the kit left that hasn't been modified in some way or other. The main effort went into scratching things like the main rotor gearbox, the engines, the night sun, and pretty much every other lump, bump, and protuberance that gives the Wessex it's character. Enough of my ramblings - you can read the WIP if you are so inclined.... here's my attempt at a Wessex HC2, RAF Sek Kong circa 1982/3 that's all folks!4 points
-
I've been after one of these for ages and my wish finally came true when I saw Ali62 offering one for sale... a few days later the kit arrived beautifully packaged and ready for operations! I do have a couple of Sanger's vacs in this stash, but this one looks a little more straightforward so I'm going to get stuck in right away. I've heard, seen and read some real horror stories about this model but having tackled numerous 'challenging' kits (some not really worthy of the title 'kit'!) I'm quietly confident that this will be beaten into submission with no more than a whimper - famous last words which are ready to come back and haunt me I'm sure... I don't plan to go too mad with detailing but from an initial glance at the kit the bomb bay will need some work if I plan to display it open, and I may well open up and detail the bomb cells in the inner wing sections, too. The undercarriage bays bear little resemblance to the real thing, but with little being visible when the massive landing gear is installed I'm probably going to leave them 'as is'. Box top: It's got a little flash and a comprehensive clean up will be needed before construction can begin, but I'm impressed with the overall quality of the mouldings with finely engraved panel detail and nice smooth plastic: The interior detailing looks quite comprehensive for what will be seen in this scale, with a mixture of both white metal and resin providing the basics - I'm sure a little Evergreen strip will be needed here and there, though. The vacform canopies are a little disappointing though, being not too clear and needing a serious soak in some Future - I've got a few sets of Sanger's transparencies which may be used instead but time will tell: The decal sheet is really lovely though, providing the famous 'Friday the 13th' (which will need wing tip modifications) as well as another RAF aircraft plus a Free French Airforce example. Instructions are basic but perfectly adequate: With my first-born due in about 6 weeks time this build may take a little longer than usual (the wife has even commandeered the spare room where I usually model for a nursery - the cheek of it!) so progress might be slow, but it's sure to be fun! I plan to make a start this week, so hopefully an update in the not-too-distant future... Tom4 points
-
Hello Here are some pics of my last build: http://www.britmodeller.com/forums/index.php?/topic/234967490-b1-b-bone-lancer-148-revell-finish-line/ It was a very demanding build who last 7 months. I added scratched details in the bays and the engines. I also used Eduard PE, Cutting Edge exhausts and Fox One decals. Et voilà! Hope you like it ;^) Romain4 points
-
Here's my final model completion for 2015 - the new tool Airfix Shackleton finished as an AEW2. "Why not wait for the Revell kit?" I hear you cry... well I had a spare radome for a PB-1W (B-17) and impatience got the better of me so I decided to buy Xtradecal's Shackleton sheet and took the plunge. The conversion itself was very simple - the bomb bay was shortened and a new plastic card bulkhead added to the rear of the forward sealed section of the bomb bay. I then needed to adjust the shape of radome where it meets the fuselage slightly, stuck it on, and blended it all in with Milliput. When it was painted I used a mixture of the Airfix decals, the aforementioned Xtradecal sheet as well as some Xtradecal yellow stripes for the walkways etc which were very different on the AEW2 fleet in comparison to the MR2 aircraft. There were no specific AEW2 stencils supplied with the Xtradecal set so there's a few missing, but I'm not going to lose too much sleep over that. Although the conversion itself was simple, unfortunately my experience with the base kit was anything but. It looks lovely in the box, but was an absolute pig to get together. I'm more than open to the idea that it was me making a ham-fisted effort of it, but after reading various reviews in the mags and online I was expecting a straightforward build. However, mine was anything but: Nose area was mis-moulded and I had to build the area up around the nose gun aperture with plastic card and filler. The 'bomb-aimer's/gunner's' nose transparency didn't fit at all and needed much trimming and fettling to get it into its aperture. The wheel bays just didn't want to go together at all , and when I did finally get them in position they didn't fit into the wing correctly and much trimming/sanding was needed. The interior is beautiful, but means the fuselage won't fit together properly - despite much trimming and sanding of the interior bulkheads and floors. In the end the entire rear lower fuselage was shimmed with plastic card. Upper turret plug doesn't some close to fitting and needed a lot of filling. Cockpit glazing didn't fit and sat too low - the whole area had to be built up with filler. Joins of the upper nacelles to the wing was an appalling fit - again lots of filler needed. Now I'm one of Airfix's biggest fans and was very surprised to find these issues with a new-tool kit, especially after reading such rave reviews. As I said I'm more than happy to admit it may have been me having 'one of those builds', or even being unfortunate and getting a 'Friday afternoon' example - either way I'm afraid I won't be rushing to build another! Anyway, enough waffle from me and onto the pictures: Avro Shackleton AEW2, WL747 'Florence', 8 Squadron, RAF Lossiemouth. As usual, Xtracolour enamels were used throughout. All that's left is for me to wish all fellow Britmodellers and happy Christmas and a prosperous 2016. Tom4 points
-
Now that I've got your attention I'll explain what I intend to be building for this GB. I am going to attempt my first double build having seen it done on a few other GB's as it seems to make a lot of sense, they are both the same aircraft (more or less) with the same interior colours and the same overall colour scheme (probably). I lay most of the blame for this at David's (MirageIV's) feet for his continued prolific high quality builds of pairs (or more) of aircraft in the time it takes me to build one, so hopefully I can burn through the stash more quickly. Anyway onto the kits.... Any of you who have seen any of my builds in the past will know that I have an aversion to building aircraft in the usual colour schemes, so nothing American here! My P-47N will be built as an aircraft that was supplied to the Nationalist Chinese on Taiwan after they had fled there following losing the Chinese Civil War. here is a closer picture of the kit and extras.... I found a resin cockpit by HiTech in the box (amazing the things you forget you've got) which I may or may not use and the decals are by a Taiwanese company called Bestfong whose decals I have never used before so I will be interested to see how they perform. The aircraft I have chosen to build is shown below, but to be fair they all looked alike other than for unit markings. The second aircraft will be from the Hasegawa boxing which comes with all the bits to do any version of the bubbletop D variant and builds up very nicely (I did one a couple of years ago). This will be a Latin American one but I am not sure which country yet, I am torn between either Mexico or Cuba. Here is a picture of the bundle.... The picture below shows the Mexican aircraft I might build (probably the favourite at the moment) which is from a sheet by Aztec whose decals I have used before and whose research is very good. My other option is for a Cuban aircraft and I even have a choice to make as to which scheme I use as I can build one in either natural metal or one in a locally applied olive green colour. These decals are by Aeromaster whose decals we all know so they will work fine, their research however can be a little sketchy but they have this one done well. Here is a picture of their sheet. Anyway that's the plan. All comments and criticisms will be gratefully received, and any preference as to which scheme to use for my D will be helpful. Thanks for looking in. Craig.4 points
-
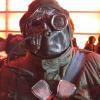
Hey guys, i would like to show you my first at 2016 and the very first figure I have always loved Warhammer (does not matter if "classic" or 40k) and these 28mm figures are quite cute little gems (the cast is amazingly well done by Citadel). And because i love wolves, my favourite unit are the Space Wolves Well, here is the first of them - i have not used any Warhammer rules for painting, just painted it as i like (speaking about colour scheme and weapon chose) So here is the grey hunter, armed with plasma pistol and bolt pistol. I have tried some new techniques to me and obviously have a lot to learn yet But i had A LOT of fun! And one for the size comparing Thanks for watching guys and hopefuly i ll add more figures in better quality over times4 points
-
I recently got one of these RetroSF kits of a Martian Tripod design from an old book (apparently quite close to Well's description ). These RetroSF kits are great, they're very detail for their size even more so than some in kits in larger scales. I'm also in the process of doing the Snowspeeder they do but I'll make another thread on that. Kit contents consist of resin and white metal parts. Well I wanted to make mine a bit different (as usual) So first thing I did was attack the "cabin" bit with the lathe.4 points
-
Hi all, I finally took some pictures of this thing, it's not straightforward as it's too big for my piece of paper and is very reflective. Instead of trying to document it like a model I've opted to make it look silly/pretty/instagrammy, with soft focus etc. It's Riff Raff's laser from the Rocky Horror Picture Show, as a full-size prop. I doubt very much that it's made the same way as the original but the shape and size feel about right. I put it together over a week of lunchtimes before we went to a screening last year. The main ingredient is two sets of 15mm knitting needles. I channelled our very own Nigel Heath and bent these using a heat gun and a bending spring. I don't have any bending springs so I made one by winding wire around a pen. It took a fair while, but not nearly as long as it would've done to go to the hardware shop and discover they didn't have the spring I wanted I used a pan to guide the curve and then cut the ends off square. The needles go into holes drilled in a broken turned boss salvaged from our sofa. Lots of epoxy keeps it all together, and I drilled all the way through the boss and each tube to pin it with more wire so there'd be some sort of mechanical joint. The not-authentic ribbed bit is part of a hose coupler, which hides a step between the boss and the rear part. That and the grip are made from pine dowel wrapped in thin styrene sheet. I cut the sheet slightly too long to leave recesses at the ends of the tube and expoxied ping-pong balls into them. The small ball is from a craft shop and has a plastic lightning bolt glued into a saw cut. I painted it all with some awesome shiny rattle can paint from the hardware store. I wouldn't recommend it for models though as it rubs off - maybe the pigment is graphite powder? It was great for this as it took no time and looked just fine on the night. It's probably obvious that I had a great time making the LASER. It's sometimes liberating to just get it done rather than fret about the finish or the details. Plus it helped us win the Best Couples' Costume prize at the screening which was awesesome. Not often that the Mrs. and I get to stand on stage while seven or eight hundred baying twenty-somethings raise the roof with applause! Cheers, Will4 points
-
Big thanks to Scott Hemsley for all his help with this one. It's the Italeri UH-1D kit converted to represent a CH-118 as assigned to the Base Rescue Flight, CFB Chatham in the early '80s. Modifications include the addition of the auxiliary fuel bladder in the cabin, stowage boxes, rescue hoist and "bear paws" on the skids. Main cabin doors are from Fireball Modelworks and the bubble windows were vac-formed by me. Hope you like it, I sure enjoyed every minute of it! -Dan4 points
-
Ta chaps, I've done the other half now and I'm quite pleased with the result: One thing tho'. I'm not sure what colour the trunking should be. I know there is a wrap around of the external colour - 6" or 12" (I've seen both quoted) but I'm not sure if the rest of the trunking is white or grey. One photo of a black Hawk I've seen suggests white - but elsewhere it's been said to be light grey. More googling required.....4 points
-
Beautiful build Mike. Just jaw dropping, we knew you would do it justice. May I just say this: We have updated the manual as I promised we would. Various changes have been made following on from feedback here. The new updated manual is available for download on our FaceBook site. Here is a link to page 4 which was the one I think you actually mentioned, changing parts G12 and G11 over. Thank you. 10402612_554916041339894_1727248188745468448_n.jpg4 points
-
Thanks for the compliments. Gloss coated with Testors Gloss Coat and decals applied. This is the first time I have used CE decals and they are very thin and somewhat fragile. This resulted in tearing the inner forward arm of the X on the underside. I will mask and touch up after another protective gloss coat: The rest turned out fine: Thanks for following and regards,4 points
-
I think AMK will squeeze in the blue painted 31 with the next release to add to its appeal. At last one aircraft which has some colour on it and not just the usual grey version. The response of the aftermarkets was interesting. I have been in contact with one major manufacture to do a detail photoetch set for the cockpit and the outside of the aircraft and there was a categorical No, saying that the subject is not so interesting. All this before the kit was released in December and so they did not see any sales figures then. On the other hand Begemote was out with a very comprehensive decal sheet in a week after the release of the MiG-31BM/BMS kit. The decal is excellent and as authentic as it can get, Kotey (of Begemote) has produced for the Russian AF all the real painting stencils with which the “named aircraft” were painted at the unit. . So he had a good access to the real thing to make his decal as perfect as possible. I think he has a plan for a second sheet for the B/BS kit. Best regards Gabor4 points
-
For better or worse, this was the final product. I think its looks more right. Steve.4 points
-
Hi Everyone, I've just completed the old Heller kit, using Print Scale decals to finish it as a Nord Pinguin for my project of German types in French Service. I chose to paint the rudder flashes and had to replace the serial on one side with a home made decal as I stuffed the original. I hope you like it. Cheers Tony4 points
-
Here ya are. Sold only at the Hogwarts Hobby Shop, along with Nigel's book Modelling for Muggles.4 points
-
Like lots of us, I am going back to work in the morning - in my case after almost a month, because I was ill for a while leading up to Xmas. So it seems a good time to put up a few pictures taking stock of where I have got to. Pure self-indulgence (but you can't really make whoosh and dakkadakka noises with a ship, so at least I don't feel like a 5-year-old). I have also removed the protective tape from the fo'c's'le, which has been there for what feels like a lifetime; I'd almost forgotten what its looked like underneath. So anyway, here we are as at 3 January 2016 (1022 radar and Sea Dart launcher just dry fitted). [Edit: I wasn't sure about the PE handrail around the top of the funnel - thanks, Eduard! - but when not seen in such close-up it looks pretty sound. It was more fiddly than an especially fiddly day with Mr Fiddly in Fiddlytown, but worth it... now I just have to match it with the one on the aft funnel...] More soon Crisp4 points
-
So a little progress today. Have found a lot of flash on the kit parts & as i bought the parts from ebay, some pieces have been removed from the sprue rather ruffly!! (Throw him to the floor Centurion, Ruffly!!)4 points


This leaderboard is set to London/GMT+01:00