
Leaderboard


Popular Content
Showing content with the highest reputation on 21/12/15 in all areas
-
I have been building this model for almost 4 months and this time it wasn't so nice and easy as usually. KH kit is really infelicitous, with bad fitting and many small disadvantages. But finally I finished it and you can see outcome of my efforts. I used: - Sepecat Jaguar Gr.1/Gr.3 kit - Aires wheel bays - Aires air brakes - Eduard PE sets (interior and exterior) - Eduard masks - North Star wheels - Wingman BL.755 bombs (I also ordered special decals for those bombs) - Eduard AIM-9L Sidewinders - FlightPath's AN/ALQ-101. Here you can see my Jaguar in arctic camouflage.38 points
-
Hi folks, got the new Trumpeter kit a while ago for a review and here is the result... Built with some older aftermarkets designed for older kits like Aires cockpit for Italeri or cast Pitot for Hasegawa; decals were taken from Airfix kit. See the build review here: http://www.valiantwingsmodelling.co.uk/mig-29a-izdelye-912-983-p.asp Cheers Libor19 points
-
Hi all, it took me a little while but with the help of one of my friends I finaly managed to post a few pictures of my 1/48 F-89 Scorpion from Monogram. It was build on commission and it was build straight out of the box with the exception of home made seatbelts and a aftermarket decals sheet. The metal effect was painted with a combination of Alcad II and the new Ak metal paint the other colors are from Gunze and a little wash from Mig products. I hope you like it.19 points
-
A few pics of my recent Italeri Hu5 Wessex with Eduard PE.. Regards John17 points
-
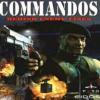
When jets started to go fast thoughts turned to ways of helping the pilot to withstand the more extreme ‘g’ loads when manoeuvring. One suggestion was to have the pilot lying down in a prone position and to this end, in 1955, a Meteor F8 was converted to have a cockpit with a prone pilot section grafted on to the nose. Some 55 hours and 99 flights later the idea was abandoned after it was found that whilst the position was very effective in reducing the effects of ‘g’ on the pilot every other aspect of piloting was much worse. The main problem was the pilot’s inability to see behind and also forward when in a steep turn. Other problems concerned the cockpit ergonomics. Quite why it needed an actual aircraft to find this out is not clear. One feels that the same information could have been derived from a mock-up. Even my wife, a renowned technophobe, commented 'How could he see behind?' when first told about it. This was built for the Meteor GB. WIP here http://www.britmodeller.com/forums/index.php?/topic/234993470-meteor-prone-pilot/ It seems to be MPM's F8 kit with added parts. The nose and tail sections have to be sawn off and replaced. The replacement sections don't quite fit, the nose being a trifle narrow and the tail cone a bit wide. The wings needed some thinning to fit the fuselage and could have done with a some more on the outer panels, Nose and tail parts of the nacelles are undersize and had to have filler to fair thenm in. The wing root fairings needed some sanding to fit neatly. I did this before glueing the wing in position, something I had not tried before, and found it much easier. Finish is Alclad aluminium for the main airframe, semi matt aluminium for the prone pilot section and dark aluminium for the nose. The decals separate from the backing sheet almost as soon as it is damp. Great care needs to be taken with them as they are very thin and are prone to wrapping themselves around the backing sheet as they are transferred to the model. A Meteor shower! A final thought. I was amazed to find recently that the Americans had an equivalent - a modified Shooting Star John17 points
-
Hi all here is my second attemt . This is my HS 126 from ICM in the markings of the Latvian Air force. It was alos build in commission and with the exception of added seat belts and some instruments and decals from Techmod it was build straight from the box. The kit builds like a dream and I reayly think that this kit is onder appreciated, because the cockpit interior and the fit is just fantastic. It was painted with Gunze paint and again a light wash with Mig products. I hope you like it Rob14 points
-
Hi This is my first finished model in at least 9 months. It was a 24-hour blitz-build, which presented no real construction challenges. The model has a wing span of 26cm. I spayed it with Alclad Dull Aluminium followed by a couple of coats of Alclad Gloss Klear Kote, prior to decalling. I had some frustrations with the walkway decals, but apart from that, a pleasurable weekend build to break my lengthy hiatus! One obviously can't describe it as a tail-sitter, so "wing-sitter" will have to suffice!! This is from Wikipedia: "The Northrop YB-49 was a prototype jet-powered heavy bomber aircraft developed by Northrop Corporation shortly after World War II for service with the U.S. Air Force. The YB-49 featured a flying wing design and was a jet-powered development of the earlier, piston-engined Northrop XB-35 and YB-35. The two YB-49s actually built were both converted YB-35 test aircraft. The YB-49 never entered production, being passed over in favor of the more conventional Convair B-36 piston-driven design. Design work performed in the development of the YB-35 and YB-49 nonetheless proved to be valuable to Northrop decades later in the eventual development of the B-2 stealth bomber, which entered service in the early 1990s." Photos of a not so distant relative taken by me at RIAT: And finally, a couple of shots with my only other 1:200 model, the same manufacturer's XB-70 Valkyrie: Thanks for looking.13 points
-
Hi all, Just managed to get this one finished before Christmas. This is the 1/144 Minicraft Boeing 777-200, complete with nose shape issues and overly prominent panel lines. However, it builds up easily and to my eye, it looks like a Boeing 777. This was a Delta Airlines boxing, which comes with decals for Delta 'wavy gravy' or 'beach towel' livery. However, my decals looked marginal and so I used a scaleliner decals sheet for the earlier livery. I made this as N860DA, the first Boeing 777-200 delivered to Delta in 1999 and which retained this livery for just over a year. I replaced the engine fan/forward nacelles with the BraZ resin replacements. These are sadly significantly undersize so what should be a drop-in replacement turned into a mammoth filling and sanding job. They do look the part when painted up, but that looks takes a lot of time. Scaleliner decals are hard to find these days, a shame, as they are thin, tough, conform to curved surfaces well, and respond Microscale Set and Sol. The only downside is that colours are printed separately to avoid registration issues, so, for example, each door decal is made up of five decals, yes, eight doors equals 40 decals! Having said they were good to apply, the edges have wrinkled slightly after an acrylic clear varnish, somewhat unusual, but you have to be inches from the model to notice this. Oh, I opened a new tin of Xtracolour Boeing Grey for this build and it's massively lighter in shade than previous tins and is taking a week to dry fully, so I think this is a dodgy tin. On with the photos and Seasons Greetings to you all. Regards, Darren11 points
-
Hello, this is the new release Kovozávody Preostejov Lavochkin La-5FN in markings of the Slovak Uprising, 1944. I had high expectations following the release of Kovozávody Preostejov's Mustang series, however, this kit looks as if it's been produced by a different manufacturer. There are no locating aids, some flesh present and heavy sprue gates. Having said that, the kit goes together without any major issues. Kovozávody Preostejov have done the 'open canopy' option in a very unusual way, providing both clear hoods (that slide over each other) as one massive piece. You will need to paint the underlying canopy rails from the inside - not an easy task. This is still a very welcome new release as it's the only modern, up-to-date tool of an La-5FN. Here's how mine turned out, built from the box: All photographs by Wolfgang Rabel, IGM Cars & Bikes. Thanks for looking!10 points
-
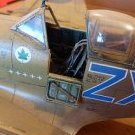
Just finished this lovely yellow Sea King from the now obsolete (well, they have just released the new moulding) kit. Finished as XZ593, one of the local birds that is/was based at RAF Wattisham. The registration number was printed onto Crafty decal paper, came out well. The air-filter box was scratch built as it's a different type to that provided in the kit. The upper panels in the canopy were sprayed with Tamiya clear green before installation, but don't show up that well - think I needed to put a bit more on. Oh well. Damn. I need a new shelf!9 points
-
Creeping forward I did manage to get Robin-42's technique of gently polishing back the grey coat on the PE to reveal the black primer to work on the side panels - using a little home made sanding gizmo rather than paper - some blue micro-mesh sheet (not sure what grade but very fine) stuck to a strip of plastic card: I only thought of the sanding gizmo idea after I'd tried to polish back the grey coat on the PE instrument panels on a flat sheet of micro mesh - that didn't work as I couldn't get enough control and polished off some of the primer coat in places as well. So for the instrument panels I had to carefully paint on some black - using yellow post-it notes as masks: I'm pretty pleased with the results so far. I've done a gentle dry-brush with light grey just to see if I can get the detail to pop out a bit. Oil work and more dry brushing still to do and the instrument decal to fit behind the instrument panel:9 points
-
Hello all. I have recently had a bit of a bee in my bonnet concerning the Twin Otter. I have had the good fortune to fly in them in Nepal on many occasions, and when I found that Paul at Parks682Decals was going to do a Yeti Airlines set of transfers, that set things in motion. A few mentions and suddenly there were Nepal Airlines and Royal Nepal Airlines too, and I had all three sets, along with a set for the Maldivian Air Taxi service. Oh yes, a write up also appeared in a recent SAMI too, so there were plenty of signs. Never having built this kit, I decided to use the Nepal Airlines transfers and this kit as a test build, to find out how things go together and how the transfers behaved. One problem I have always had is removing join lines, that is a skill I will really have to improve on, as there are plenty of joins that need cleaning up with this one! I apologise for the many that will appear in the pictures once I have finished rabbiting on. I have come up with many ways to improve the kit, so with luck I will be able to do a few of them, gradually building up to an ultimate version with the 4th that I have planned. I have done this one 'from the box'. In a post on another thread, one comment from Admiral Puff was that Matchbox made a bit of a mess of the cockpit windows - can someone enlighten me on that please? I was going to replace them with acetate anyway in future builds. Enough waffle, some pics. Sorry about then quality though, my camera and flash system were playing up a bit. Over all I was very happy with both the kit and the decals. The decals had an overall lacquer covering, they needed to be trimmed quite close to the image, but Paul warned me not to cut across the image as they could 'bleed'. So I was very careful and they worked a treat. I used Micro Set and Sol. The main ones I was worried about were the colour bars down the tail, as they had to go round the curve of the rear fuselage and over a number of small vortex generators under the tail planes, but they bedded down perfectly. They are translucent though, but that did not matter as the plane is overall white. All in all I am happy, but I know my skills could do with improving. We will see as I do more of these. Thanks for looking, and any advice will be really useful. Cheers, Ray8 points
-
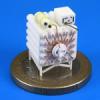
Hello all.. Went the see The Force Awakens with the wee man yesterday. He decided that he wanted a BB-8 all to himself. Threw this together as a bit of fun in an hour using 2 polystyrene spheres and sharpie permanent markers. Not my best piece of work but young lad is more than happy..7 points
-
Quickly, effortlessly, to rest, and basically out of the box. 10 days of fun, plus added eduard zoom, Master gun barrels and wheel CMK. Painted Alclad on matt and glossy black backing Gunze. The main color is beaker - Polished Alu and Alu - was an option that one runs out. Camo - Aeromaster Decals - kpt.Anatolij Karelin 351 Squadron - purebred Korean from near the Urals - 5 wins in the Korean War I invite7 points
-
1/72 Airfix Cessna O-1F Bird Dog 21st TASS Vietnam War Another model completed for the Vietnam II GB. http://www.britmodeller.com/forums/index.php?/forum/536-vietnam-ii-group-build/ Kept it OOB and a lot of sanding and filing was required. The result wasn't too bad for a vintage kit and the build can be described as very typical Airfix.7 points
-
Time to start painting on the markings. I have a few sets of Montex masks so will use the crosses from one of these as I don't have the correct size decals in my decal stock (mostly all 1/72). First step is to apply the outer masks, it's trickier than you might imagine as they appear to come off the backing paper with with a bit of a static charge and want to leap onto the plastic as they get close, true! The swastika is going to be interesting as the mask is positioned right across the rudder hinge line so doesn't completely conform to the surface, lots of room for overspray and softening of the edges if I'm not careful. Final step before painting is to make sure that the overspray won't get where it shouldn't, white will go everywhere it's not supposed to. So on with the white, in this case Mr Color flat white lacquer thinned with Mr Color self levelling thinners, sprayed on thinly and perpendicular to the mask to try to avoid pushing the paint into or under the edges of the mask. With the white paint on I now have a wait for that to harden off enough to get the inner masks on before applying the black paint. It's all nerve jangling stuff as I'll have no idea if it's mucked up until everything is finished and the masks are removed and there are lots of opportunities for it to go wrong too! Duncan B7 points
-
Sorry about all that nostalgia and lack of progress I've just been decaling the underside of the beast, and it went swimmingly. Have I mentioned I love the way the decals are laid out? I have? Oh.... I also unmasked the intakes, as there will be a couple of decals placed in there, and there are no more major paint jobs to do that would damage the finish. Forgot to mention that I spot painted a circular grey panel under the nose, and added a couple of discs of foil to some other panels that should be silver. It'll look a little flatter once the matt coat is on7 points
-
G'day Everyone, This is my attempt at the 1/48 Kinetic Mirage kit. It sure ain't my best effort but it looks like a Mirage to me......I dunno if it resembles the real A3-7 when it was with 2 OCU though. For some reason this kit fought me all the way and very nearly ended up thrown across the garage at a rapid rate of knots on several occasions, mainly due to troublesome fitting parts. Its also the first kit I have started AND finished this year.........FINALLY (I actually started about half a dozen kits this year,talk about the lack of modelling Mojo!) I used after market main wheels from High Planes, which are beefier than the kit parts and better detailed but they then foul the MLG oleo scissor links..but you get that. I just stuck them on the axles and didn't address the scissor links. The kit MB Mk 6 seat was jazzed up with some leftover Eduard etched belts and a paper RBF flag. I fitted the RPK-10 tanks supplied in the kit and two GBU-12's from a Hasegawa weapons set. The boarding ladder is from an AFV F-5 kit but hey...... it was close enough to a Mirage one for this little black duck. Brush painted with Humbrol paints and a rattle can semi-gloss on top. The decals come with the kit. Good, bad or indifferent comments welcome. Thanks for looking. Cheers for the Festive Season. Devo6 points
-
#39/2015 Although I already posted my dad´s 2015 output, yet another one made it to daylight He couldn´t resist to build the recently released new 1/48 Horch from Tamiya. As usual with these kits it was a straight forward, quick and trouble free build. The model shows a vehicle of the Fallschirm-Panzer-Regiment Hermann Göring on the Eastern Front. Gunze and Tamiya acrylics used for painting. To avoid another "boring" plain grey scheme my dad decided to add some yellow camo as it was common in the east. So, was it the last finished model before 2016? Can´t tell for sure but definitely the last before Christmas. Merry Christmas, Frohe Weihnachten, Joyeux Noel, Feliz Navidad, Buon Natale!!!! Your team from Austria, Franz and Reinhard6 points
-
Leaving your tools out in the rain? SWMBO needs a telling off... after you Mottling... hmmm... I DO need more practice at that Thanks Jaime The seams were great - just a little sanding and it was done (he said confidently, knowing full well that the paint would show up the faults...) So, engines and nacelles. i painted up the engines with 'Dark Star' tarnished steel and slopped some H33 on the inside of the nozzles. I purposely brushed randomly on the outside of the exhausts to see if this counted as 'pre-shading'. We shall see... Once that was dry I wiped some AK True Metal dark aluminium around the turbines. Engine bite by Ced Bufton, on Flickr I then gathered the bits for assembly and wiped them down with IPA on a paper towel. Wipe down by Ced Bufton, on Flickr Other builders have had problems with the nacelle fit and I can see why. The engines sit a little wobbly on ridges (there are 'slots' but the engines are too big - it sits ON the front ring and butts against the rear one. The instructions have you assemble the nacelles with the engine and the intake and then (over the page) fit the exhausts. I found that this was 'not optimal' as the exhausts show you whether you've got the engines in the middle. I found it a bit late and it was a grunt to move the engine into the centre. For the second one I assembled the exhaust first, making sure the engine was central and then put on the intake. The fit is OK but, like most 'open parts', one needs to take care that the nacelle halves are spread, front and back, to mate nicely with the other parts. They'll need a bit of attention when dry. Nacelles by Ced Bufton, on Flickr6 points
-
Hi Folks, The roof sight has this thing which looks like a screen but I think its supposed to be something the gunner looks through, anyway it looks too blank to leave as is so I hunted for some dark green decal material and found this to be the best option: Here it is in place along with a bit of detail painting: I then glued it into the roof with Gator Grip: It would probably have stayed in place without glue but I was just belt and bracing. Now I could close up the fuselage: After I got back from a very enjoyable lunchtime curry with Duncan B, I glued on the roof with a combination of Gator Grip and CA. There was a slight smear of glue on this window but fortunately it cleaned off completely with a cotton bud dipped in Acetone - this also seemed to indicate the windows were strongly held in place - good news: While that was hardening up I masked up the rotor head lifting eye: Now for the front canopy, the kit part stands off a good millimetre or so due to interference from the console: Obviously a vacformed canopy will help this but I decided to provision for a bit more material. I marked out some 1.5mm plasticard like so: Then with a burr thinned away the interfering material from the canopy: Now it fitted I could see there were a couple of areas where it was too wide: Those were marked up ready for removal: Placing it back on the card you can see how much had to be removed: I then glued it onto the card: After a bit of sanding stick action I had a nice extension the the canopy: Looking around for a mould, I found that the lid off a tin of Tamiya primer was just about ideal, I stuck it in there with double sided tape: Using the formula for the volume of a cylinder I worked out how much silicone rubber to mix up (10cc as it happens) and poured away: My estimation was pretty spot on and there was no wastage: The rubber should be set in the morning and we can see what I've got. I will then be able to cast a resin tool to use to vacform a new canopy, I expect it will take a couple of iterations to get it to fit properly. Bye for now, Nigel6 points
-
My thoughts entirely (except the cat)! Thanks Bish Thanks Jaime - and without much pain too Thanks bar side - they are weird aren't they? Thanks John. I won't spoil it for you but enjoy the contest! What's a few dum de dum dees between friends Thanks Tony, very kind It's been pretty easy going today. A quick shot of the wheel bay detail before it's closed up and a shot of another periscope: Nice detail by Ced Bufton, on Flickr Another periscope by Ced Bufton, on Flickr It must / would have been really hard targeting things through those things... a bit like reversing a car (if you remember trying to do that the first time). The gear doors are thankfully provided as one piece that has to be cut if you're building gear down; easy for me for a change. That said the location pins have to be filed off, including on the inside for the main doors (otherwise they won't settle). Once done though they can be pushed into place (front) and rested in place and extra thin run around the nice small gaps: Closed up by Ced Bufton, on Flickr Next are the wings... they fit well but do need a bit of clamping: Wings by Ced Bufton, on Flickr Drying now prior to fitting. I'll look at the engines and nacelles to see what needs painting before assembly.6 points
-
I had a slight hiccup while gluing the slats onto the wings. I somehow managed to drip Liquid Poly onto one of the wings, it didn't cause any damage to the plastic or even lift the paint but did leave a watermark which needed to be resprayed to cover. Luckily I always keep the mixed paints until the end of the build so it was only a five minute job to fix. I left the new paint to dry for 24 hours, maybe a bit excessive but worth the wait. Once I was happy it had hardened off I had to give the paint a polish with some 8000 micro mesh to take off some of the roughness caused by over spray and excess buildup in the wing roots. This has added to the distressed look of the paint which is a bonus. So it was time to decant some acrylic gloss from the rattle can..... .....this stuff is by far the best gloss goat I have ever used, sprayed on with Mr Color Self Levelling thinners although it is ready to go from out of the rattle can but I prefer to spray it on in really thin coats. I was a little concerned that there might be a reaction so did a quick test on my Dornier test mule (but if liquid poly doesn't lift the Colourcoats paint I doubt the acrylic gloss will) I'll leave this to harden off now and then give it a polish later as some dust has settled on it. Once I've polished it I'll give it another few coats of the gloss coat then I've some more painting with acrylics to do before the decal/weathering stage. That is me finished with the Colourcoat paints now and I have to say they have performed really well despite me intentionally being very slapdash with them. If Enamels are your paints of choice then give them a try. Duncan B6 points
-
Thanks for that Philp, I have now seen a few Iraqi machines with the green and sand camouflage and am quite happy with it. I started today with an airbrushing session, getting a second coat on this lot: Now there were all sorts of jobs I could be getting on with. First I got the belts installed on the front seats: Next I did some detail painting, installed the instrument fascias and gave all the interior parts a light wash of Flory Black to create some shadowing and a little bit of wear and tear on the floor areas. Here I haven't finished the roof as it needs the excess swabbing off with a damp cotton bud: Next in went the seats and wiring on the roof: Next the side glazing using a separate mix of five minute epoxy for each one: The glue will be hidden later with a coat or two of matt varnish. Unmasking the roof interior I found there was some over-spray due to the tape lifting: That was dealt with using a Tamiya cotton bud dipped in IPA: After varnishing round the windows I installed these little clear pieces and some decals from the spares box: This is what I was trying to recreate: Now I could glue the cockpit tub into the right hand fuselage. It needed some clamping at the front and I decided it was best to clamp with the other side in place, partially to make sure it all lined up and partially to protect the outboard cyclic control: While the photos were uploading I painted the handle on the fire extinguisher and installed a Mike Grant cockpit decal for the label: I think the next step is to close up the fuselage, but that can wait until tomorrow. Bye for now, Nigel6 points
-
Hello, I used to build some armor even if i'm mostly an aircraft modeller... This australian Matilda was done in 2007. Thanks for looking at !! Anis5 points
-
Ladies and gentlemen, Iet me present you my next model. Used some Eduard set. Navigation lights sawed from clear plastic. All edge was sharpened. Riveting, the gun in the wing from the needle. Paints - Mr.Color, Alclad, Tamiya. Primer - Alclad, varnish - Futura and Tamiya. All identification marks was painted. Washing - MIG, postshading X-19. Finally spread a little matt lacquer tamiyas "yellow sand" and walked a bit around the edges of the panels.5 points
-
Cheers guys Got the decals on now, although waiting for the fuselage roundels to come. Looking at photo's, the squadron codes are slightly oversize, but they'll have to do.5 points
-
Hi everybody; ready for Xmas? Here's WE progress report - actually is going to be two posts, one for the actual report and the other one is to show an issue/question to Phantom experts. Let's get started with the build report: port side sidewall completed Time to complete the tub; partially removed the shoulder straps from Jerry's seat and put some on Jerry himself, using wine bottle foil: Straps need to be adjusted a bit. Next I removed the seat belts from both Jerry's and Gene's seats, using some home made Dremel tools, a scraping gizmo and regular sandpaper Gene's seat received some PE belts from an old Eduard set I partially used on my F-4J build More detailing for the seats; to reproduce the side straps on top of them, I used tiny strips of wine bottle foil, and rolled them over with the knurled part of a blade handle Glued in place using CA Gene's seat: he's not going to be sitting in the cockpit, so I had to completely remove the shoulder harness added the PE ones and scratch built some details for the seat structure Jerry's got his right arm in place, now: Detailing in the cockpit is basically completed, so I decided to tackle the AOA probe; I used a brass rod, mounted it into an electric drill and used a Dremel sanding disk to shape it accordinlgy (double rotation ) Here it is, compared to the kit original which has been removed; I drilled a hole in the corresponding position and set the new AOA probe in place; the inside part has been secured with CA while outside I used a drop of Tamiya Green Cap That's it for this report, now next post will be about the "hump" ... Comments welcome Ciao5 points
-
I finally managed to get the structural rigging completed today. It took a lot longer than anticipated, mainly because I kept having completed lines pop out and would then have to remove them, redrill the holes, and refit them. Hopefully they are all now secure.... Now on to tidying up the upper surfaces, repainting as necessary, and adding the decals. Then it will be the floats, and aileron rigging to complete the wings.... Ian5 points
-
Hi Everyone This years projects, concentrated more on aircraft this year as opposed to vehicles, enjoyed the Apachie but took me a good six months, concentration levels where waning towards the end, don't know how you super detail guys do it, massive respect. Any way have a good Christmas and a happy new year to you all. Mick 1/48 Hasegawa Apachie, my attempt at the WAH 64 version. 1/72 Hasegawa F-4S Phantom 1/72 Italia F16 Falcon 1/72 Hobbyboss F-5E Tiger II 1/72 Revell NH1 NH90 FTH CEPA 1/72 Revell Morane-Saulnier N 1/32 Tamiya 25Pdr and Quad 1/32 Tamiya SAS Pinkie,(Crew RTU'd for leaving vehicle, kit and weapons unattended)4 points
-
some updates, undercarriage is on, de-icing areas, I've got to get the exhausts and front undercarriage doors on, then I'll be putting on the gloss, the kit looks very clean as the moment, and really needs to look a little dirtier I think.4 points
-
it's time to visit the dentist....4 points
-
Prone Pilot Meteor - flown in 19554 points
-
Thank you Steve. Let me know what you get! Thank you John. Hopefully you'll get two lengths of cord in your kit but, I think I've read somewhere, that they all only have the one. Mrs PlaStix's clothes came from a range at M&S but I'm sure other shops will use something similar. Yes I did have a good weekend, thank you, and I hope you did too. Yesterday afternoon I did do a bit more on this project, including adding the tow cables and fire extinguishers - and, because the light was quite nice, I ended up taking a few better photos of the Centurion on my Spitfire base with one of the grass mats underneath. It doesn't really look like it's in Vietnam but it's not finished yet so perhaps it was having trials in Britain at some point! I still need to add more weathering, including some Mig Mud and the machine gun for the top of the turret still needs fitting in place as do the aerials. I'm hoping I find some time to add some stowage as well!! So 6 days to go and possibly only three of those when I'll get chance to do anything on this - could be a bit of a close thing! Comments and suggestions welcome. Kind regards, Stix4 points
-
My wife told me something like that once, along the lines of "even though you're on a diet, you can still look at the menu." And I thought she was talking about food! Cheers, Bill4 points
-
Today's work - finishing off the engine, and mounting on the fuselage Peter4 points
-
Almost finished the head of the beast... Take a look4 points
-
T-70 X-Wing Fighter Ralph McQuarrie Concept Bandai 1/72 The T-70's done. A quick(ish) build painted in the colours from Ralph McQuarrie's concept artwork. Surprisingly, I didn't think it was quite up to the standards of Bandai's previous releases. Not a bad kit at all, just not quite as good as the others. Despite that, I'm sure I'll get another one to do in the movie scheme. The wip can be found here Thanks for looking Andy3 points
-
Hi guys. I have started building two F-16's over the Christmas period, both will be the very early block 1 version. One will be the first Norwegian F-16B delivered and modelled exactly as it appeared the display at Skrydstrup AB on January 17th, 1980, http://www.f-16.net/g3/f-16-photos/album37/album09/adr. Not sure if I'll add the crew yet but probably will. The second will be a Danish F-16A modelled in as a 'weapons display' at Karup soon after delivery touting a large load, much like this photograph, http://www.f-16.net/g3/f-16-photos/album37/album20/abd. I'll load it with either 4xMk.84 or 12xSnakeyes on TERs and 4xAim-9P, or just something really heavy that it never really would have flown with that just looks cool. So onto the models. The -A will be the Revell kit and the -B Hasegawa. I went for Hase for the B as the panels are much finer than the Revell to which I thought would look better on the brand new monotone camouflage of the RNoAF B, although some bits will be taken from a mothballed Revell B kit. Here is the cockpit of the B. The tubs are taken from a Revell kit and detailed with spare etch. The seats are Quikboost and are very very nice, some bits such as throttle, hud etc are still missing but I'll add them later on so I won't damage them. I added the prominent seal from spruce and detailed up the coamings a little. The Revell coaming for the rear seater looked more accurate so I replaced the Hase one, the front one is better on the Hase kit though oddly enough. And here loads more left to do but after main construction I'll comeback to it, The F-16A is just oob bar the seat taken from a Kinetic kit and some belts added, I might still use another quickboost seat in fact. The canopy will be closed on this jet and also tinted quite heavily after looking at photos of Danish jets so not much will be seen in the end. The LERX on the F-16 is really quite sharp in real life so I sharpened both of the kits and to me really makes quite a difference in this scale to the overall appearance. The Revell kit needed a lot more than the Hase, also the wing leading edge. Below is the sharpened compared to oob. The starboard one needs a little more work after looking at the photo. The B, I will drop the flaps on the Revell kit, it needed some plastic shims in various areas etc...due to how the kit tooled them. The fit is nearly spot on with a little more refinement. I had originally dropped the front ones too but realised they were never down unless in maintenance so filled back with superglue, I added a little more rise on them to make the -2 degrees incidence a little more obvious. And here they both sit atm, the fit on both is really quite good so I don't think construction will take too long, refreshing to make some well tooled kits after building a few more involved ones these past months . I have a few Aires exhausts but the Revell kit one looks good to have some detail added. I may save one for a Sufa later on. Thanks for looking and and any info on Block 1 F-16 differences will be great if anyone has any pointers Cheers, David.3 points
-
Troo enough... Primed with Alclad2 grey primer Outer wings added I have always thought that the version of 30219 Tan provided by most paint companies is far too bright so I mix my own. This is a 50/50 mix of Xtracrylix XA1102 Vietname Tan and Xtracrylix XA1002 Dark Earth. I have started to apply masking using blutak worms and copydex Leading to this. Starting to place the stickers. All markings come from general sheets.3 points
-
Hi Martin (Mr AMK). Is there any chance that, as a Christmas/New Years prezzy to Britmodellers, you could point your research and development team at a Blackburn Buccaneer. Pretty please. Sorry (not really) for any hijacking. Dave3 points
-
Hi guys, another Battlestar Galactica build again, this time its a sister ship of the Galactica, the Columbia. She differs in that she is fully armoured and was a ship that was destroyed in the Cylon War. I'll show a few pics here, there are loads more including the WIP ones on my page! Thanks! https://www.facebook.com/chriscardwellmodels/?fref=ts3 points
-
OK, so this should make up for yesterday's rather lame update. It'll also be the last one of this year, but when I get back, I will have the house to myself so hopefully, I'll be able to get some decent amount done The cab is all together now, but I forgot to take a shot of it weathered inside. Once it's all done, I'll open the doors up and you'll be able to see it anyway. I have base painted some of the body parts which will be hair sprayed and then the camo colours will go on. Speaking of which, I have decided on a scheme that I like and is do-able That bit of rubbish in the grill has since been removed This will be the scheme I'll go for: Don't worry about the dirt on the chassis - it'll be blended in a bit more later and not so obvious. So that's it for now. Any and all suggestions, critiques etc are always invited Have a great Christmas everyone MH3 points
-
If you are planning to offer up a critique of a build in here, please bear the following in mind: 'Critiquing' current, or completed builds The critiquing is limited to the build itself, not the accuracy of the kit or the subject matter. If the paint scheme is out, or the original kit/aftermarket accessory for example a cowling or spinner is the wrong shape, so be it, point it out politely but its not a big issue if the builder cannot get the right paint colour etc. The critiquing/advice is meant for the skill set of the builder, not the accuracy of the build and is meant to encourage development of those skill sets and the sharing of ideas. For those posting their builds. 1. Well done for posting your build here. 2. You have the right to expect fair and unbiased treatment, likewise if a fair piece of advice is given, please accept it. 3. The criticisms if any are not meant to personal attacks, if you think they are report the post. 4. If there are any specific points of the build that you require help with, highlight them and describe your issues, otherwise you might get something unexpected! 4. We'll be looking forward to seeing the next build! For those persons offering Constructive Criticism or build advice. Thank you for taking the time to encourage or offer advice to someone. If you are going to criticise someones build publicly the following guidelines will apply: 1. Be Fair. Is it the fault of the kit or the fault of the builder? 2. Be Constructive not Destructive of the builders skill, offer up the good points as well as the bad. Remember we all started out somewhere. 3. Give a solution to your perceived problem to how either you would do it with examples preferably from you or a link to another person who tackled the same problem. 4. You help one another as adults on an equal basis, no personal attacks will be tolerated. 5. If you critique someone, you are open yourself to prove you know what you are talking about . Armchair critics are not welcome!3 points
-
do an image search? this thread list some 109 G options. an eye catching 109 is the one stripped back to bare metal see http://falkeeins.blogspot.co.uk/2010/04/kurt-gablers-jg300-bf-109g-6-natural.html or finnish racer http://www.britmodeller.com/forums/index.php?/topic/234988000-a-poser-for-yall/#entry2091390 right hood/tail as well3 points
-
Ok, decals are on, exhausts are fitted. Really trying to finish this one as it is not my best work and I want to move onto something else. Next up is the undercarriage and associated bits and pieces.3 points
-
Thanks Kallisti. It is a beast alright....in a good way. I'm calling this done! Will take some all around clean photos tomorrow. Now, where did I stash my Panda M-ATV? 😀3 points
-
Well Dave, I haven't berated your build. I merely pointed out a pretty substantial error - having the barrel 90° out of alignment. Perfection might not be achievable, but following the instructions should be within your capabilities? As for the aerials, that was just a suggestion for a better way to do them,rather than rely on kit parts that are often not up to scratch. Clearly you're not one for constructive comment3 points
-
I kinda like both. I like the early look on the triple tail, something about it gives it that early war look, but the aesthetics of the twin tail are hard to be beaten. Got the black on last night. A few touch ups needed here and there, but happy with it. This is the nearest aircraft to L7381 that I can find pictures for, so I'm using it as the reference. I bought some roundels, but they are too small, these are larger than 54" looking at them, so need to see what I can do.3 points
-
Thanks for all the positive comments, they are much appreciated! I think there was some very restricted forward vision through the radiator as the cooling fins were arranged longitudinally...good job they didn't need a fixed runway to land on! I finished off the structural rigging today, including the much dreaded outer bay with its very unusual crossed-over rigging, and tied-up landing wires - Very pleased with the result! The landing wires were done by adding one line top-to-bottom at the outer struts, then tying another line around them at a measured distance from the bottom (fixed) point. A dot of ca to secure the knot in the correct place, then the wires were tensioned, held in place with my little dolls-house pegs, and secured with CA. Seems to have worked so I'll use a similar technique for the aileron rigging. Ian3 points


.thumb.jpg.ba34a9f6ddce411193946dbdcc7b5fe8.jpg)


This leaderboard is set to London/GMT+01:00