
Leaderboard


Popular Content
Showing content with the highest reputation on 19/12/15 in all areas
-
First time I've done an RFI so here goes! This is the Eduard Spit IXe, finished with the intention of looking like an aircraft that's just landed and is pending tlc before its next flight, light weathering to represent a working but well looked after period of its life. Firstly a quick starter post to see if I've correctly worked out this embedding images witchcraft... Boom! Now for the rest... Thanks for looking!!19 points
-
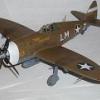
Finished today, Tamiya's brilliant P-51B in the markings of 315 (Polish) squadron. Excellent kit, awful decals so had to be a bit creative with whatever didn't break! Only lightly weathered as I'm not a big fan of NMF aircraft that have been weathered to within an inch of their life, I've never seen a real one like that so it always looks odd to me? AK Xtreme Metal paints and Alclad Aqua Gloss Varnish used.10 points
-
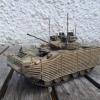
Hi everyone! This is my first show in BM. LAVIII is not so famous in Stryker family. Kit from Trumpeter, and In China,this kit is hot sell because of moderate price, easy for assembly and not bad detail. I love this pose badly because it's the best pose for all AFVs. Thanks for viewing.10 points
-
Revell 1:72 Heinkel He 111 H-3 (4335) A1+DA Stab/KG 53, Luftwaffe, Lille Air Base, France. Summer 1940 This is the final kit from the 2010 Icons of Aviation Battle of Britain Giftset (05711) which I started some 4 years ago and was a present from my eldest son. Its actually a re-boxing of the old FROG H-1/H-6 (F201) Brush painted with Humbrol enamels and a little remedial work was carried out, namely making some radiator blanks so you cant see through the fairing and reducing the oloe throw as it was moulded uncompressed. As an aside, all of the kits in this set are both well past their prime and are a product of their time (mainly early 1960s) so please bear this in mind if planning to buy it.9 points
-
Hi all, this model is made from the TAKOM building kit. Filled of tools from Plus Model company. Marking made from plotter pattern.9 points
-
Hi Here's a slightly grubby [and certainly imperfect] FGR4. The fit on the Revell kit left a little to be desired. The Enhanced Paveway bombs, Litening pod and mission decals are from an Olimp resin set (which was a bit rubbish to be honest). It was looking ok until I applied some Humbrol rattle can matt varnish which came out in blobs....Grrrrrr I then experimented with flattening the blobs and varnishing/weathering with a mixture of Pledge floor stuff, water and an old bottle of Citadel black ink (from about 25 years ago!). Rob9 points
-
Now complete, Tamiya 1/48 scale Flak Mobelwagon Enjoy!! ATB Sean9 points
-
A nice kit by HobbyBoss, it has accurate sharpe, contain engine and gearbox ,and this kit has lots of fun: engine hood can be opend, the tuck bed sides can be folder down, front wheels can be turned to different angle — though a small angle. In a word, in my opnion, it's a cool kit and better than RODEN's. Thanks for viewing.9 points
-
My second ever Armour kit just had to be the Tamiya LRDG command car. You get a lot of plastic for your money with a lot going on. It's more or less built out the box and took just 3 weeks to build. I didn't use all seven figures but then that's not really a practical option but I did use the "leaning guy" creatively and have him up on the rear gun. Just to say... as with all my builds, historical accuracy is not a big concern of mine. Great kit and despite being old still builds up well. A bit dull out for taking photos but I hope you Approve of the results, enjoy...8 points
-
I was late starting today but I have got a bit done but first, this morning I took delivery of these polishing swaps which I spotted and think could come in handy (probably not on the Gazelle but I certainly could have used them in past builds): Still working on the rear bulkhead, I started to make some customised decals by adding some black lettering onto these with a red border and then sealing with liquid decal film: Cut out and applied this is how they looked: I did clean off some of the shiny adhesive residue with a damp cotton bud as well. Next the seat belts starting with the grey coloured lead foil and the anchor links I painted silver a while ago: That was glued on with some extra thin CA (as was all that follows): My idea of pulling the wire loop tight after attaching the anchor link worked better than I expected, here before pulling: And here after: The silver buckles I am using are some surplus 1/48 scale ones I have but I think they look acceptable: The lower anchor point will go here somewhere and I will sort out the surplus belt when the bulkhead is attached to the floor: Here all three belts are done, I think it will be OK with a little wash and some matt varnish: That's a far as I've got today. My plan is to get some some airbrushing done tomorrow and crack on with cockpit assembly. Bye for now, Nigel8 points
-
Well, when I set the model on a mirror so that the black stripes can be seen, uh, everyone looks underneath! How about some progress photos? Getting ready to close up the canopies, I added the crash protector where the gunsight used to be. I followed the general idea shown in the photo Steve provided. As you can see, I've also added the front legs. Next, I found some styrene tubing to use for the drogue chute, sliced off a bit and formed it into what was a "D" shape. However, it seems to have gone back to be more of an oval. I guess styrene has some kind of elastic memory or something! I think it will still be OK. The canopies had a Future bath a few days ago. The control column was added to the front cockpit, followed by gluing on the front and rear greenhouses. I used a white PVA-type glue, which I also used on the FR.1. I then used the Montex masking set for the canopies and planned my method for painting the TT. I'll be using the method suggested by Martin with one exception - I'm going to use Alclad Grey primer as a base coat for the silver, and not black. Why? Because Alclad say so! You may recall that I plan on using their new RAF High Speed Silver product (yeah, I know this is an FAA aircraft) and Alclad specifically state on the label to use their grey primer. On-line, they state that the black primer was developed for the high shine and prismatic colours - in other words, for that highly polished natural metal look. But High Speed Silver is not natural metal - it was a lacquer paint. My guess is that Alclad recommend the grey primer to better replicate the actual High Speed Silver. We'll find out! The grey primer went on very nicely. In spite of Alclad's recommendation to spray the primer right out of the bottle, I always thin it with about 20% lacquer thinner. It gives a thinner coat that way, and is less likely to clog the tip of my ultra high-tech Paasche Model H. Hey, they look nice together! You can't see it so much in this photo, but I've also added some "chips" to the FR.1 with a silver pencil. Both props are assembled and painted flat black. Yellow blade tips will follow - four inches the right amount of yellow tip? I seem to remember reading that somewhere. Steve, speaking of prop blades, your TT has silver blades. Special Hobby say to paint them black. Another conundrum! Next, I'll Micro-Mesh the grey primer on the TT to make it nice and smooth, followed by painting the underside yellow. The plan is to then mask off the areas that will remain yellow (including the fuselage band) and touch up, with the grey primer, any yellow overspray in the areas that will be silver. A final Micro-Mesh to the touched up areas, and then I'll shoot the High Speed Silver. I hope to get all of that done this weekend. Once I know the actual width of the black stripes I can mask and paint those areas (including the wheel well if I have to!). In-between doing all of this stuff, I still need to add the landing and navigation lights to the wings. Pass me my fork! Cheers, Bill8 points
-
I have been away for a while but keeping busy. These are the 1/12 kits from Bandai. R2 looking a bit worse for wear and 3PO with only a light tarnish overall. The Y-Wing is next onto my bench... it looks a bit more complex that these two! Carpo7 points
-
Been a year of two halve. Finished a number of models in the first 6 months before suffering a mojo failure. P-40N. 1/48 Eduard Nieuport 17. 1/32 Academy Avrocar VZ-9. 1/72 Fly XP-79 Flying Ram. 1/72 RS Models. Bell X-1. 1/32 Revell Monogram M3 Gran. 1/35 Tamiya Following my mojo failure just completed one kit, Hobbyboss's easy kit of the Wildcat. Saw the decals on Ebay and I just thought they looked really attractive. Hope to add a couple of Meteors before years end. Grumman G-36A . 1/72 Hobbyboss7 points
-
Airfix 1/48 Spitfire Mk Vb Trop No 249 sqd Malta September 1942 Flown by Pilot Officer George 'Buzz' Beurling7 points
-
The new wingtip, with rear light fairing The needle in the nose faired in giving a nicesharp point. A bit of fine tuning here I think... And where we are currently, with tail on...primer on soon...7 points
-
Hi fellow modelers, This is my last work. A little diorama of a "Cold Retreat" of some german infantry. Its the Masterbox "Cold Wind" set. It was my first winter experience, and there where some things that could ve been better, but i m happy in the overall. The snow is a mix of white glue, water, scenic winter powder an baking powder...the tree is a small branch and sea foam...the snow could ve been more "icy" on the floor, but this was the best i could... "Fire" your critics and opinions ! João Mendes5 points
-
I got this part built model of a liner to redo but it was too far gone to get it back to its former glory. I ended up using it as a rusting techniques test piece. Si:)5 points
-
Hello all, Thought it was about time I signed up and posted up my WIP pics of my Halcyon 1:72 Aliens Dropship that I have been working on over the past few months. At the start of the year I was cleaning out an old cupboard at my folks where I came across my old Aliens Dropship from 1993, it was wedged for years (22 years to be precise) against the wall and a storage box, over the decades bits had fallen off and was looking pretty sorry for itself. After much searching for parts that had come adrift, I was only missing 2 minor components (will cover that later). So I decided to rescue it, strip it down and reassemble with a fresh paint job to become a display piece in my living room, seeing as i'm a massive Aliens fan, I thought it would be rude not to ( along with some other Halcyon kits I have). After browsing the web and seeing a few other Dropships (including one from here), it motivated me to take it to the next level, so I am planning on going full out with the hyper detail (so to speak) and realism. Not being a modeler, having only dabbled in the old Rogue Trader days of 40k/GW this should be a decent task, esp as there are no time deadlines to adhere to First of all let me apologise for the picture quality as they were taken on my 4 year old iphone for my own reference. So this is how she looked after 22 years of neglect January 2015 After collecting together all the piece, the time was now to see what parts of the plastic could be separated without damaging any of the parts and also to strip off any of the old paint, I remember I never undercoated this, just 2 base coats. Nail varnish remove (acetone) was used and did a pretty good job, including weakening the "most" of the glue in order to remove parts and to fill any gaps at a later stage. ..and all the parts stripped down and paint removed (majority of it anyway) you will notice the canopy has fogged, I made the mistake of using the acetone on it, my heart skipped a beat. ...HOWEVER all was not lost as I knew a trick to remove that (bottom right of pic). Everything in that pic was stuck, and couldn't come apart, so this build now will take place half assembled, as I would learn this had pro's and con's (but more pro's). After a check I was missing 3 missiles inc the panel, one of the 5x4 missile head panels that go in the from of the missile pylon and a wedged item that sits on the outer pylon to give it its angle when deployed. All these will be made up from plastic card and greenstuff. There was however collateral damage, one of the from landing gear panels had snapped, so plasticard will fix that. Next step was to tackle that hazed over canopy, so popped into the Garage for the trusty Megs headlight restorer, its basically a very mild cutting paste, rubbed this in with a lint free cloth, took about 20 min but came up a treat, so panic over and lesson learnt, Thanks for reading Sonny More updates to follow.5 points
-
Hi All. Going to be working on this: Above a couple sprue shots. Note a bit of flash on some parts and the very skinny looking prop. The many parts to the prop assembly. A couple views showing the fuselage side interior detail. The wing assembled. Clear parts and some flash to the windshield part. Final view of the various sub assemblies and bits so far. Not sure on the scheme yet, but I quite like the earlier RRAF one with the green upper wings and aluminium finish. But I may choose an RAF one who knows... More to come ....5 points
-
Hello everyone! Now I want to show you my model, which I gathered for 2 weeks. First I presented It on the exhibition Lviv Scale Model Fest 2014. Have a pleasant viewing experience! And some photos of this work in progress...5 points
-
I started masking up Tiny for his two blues. I taped over the outboard starboard gun port and shell ejector slot as the radar equipment necessitated its removal on the night fighter version of the Corsair. The Intermediate blue is on here, and I brushed a little Tamiya Dark Sea blue in front of the cockpit, then masked it to match my reference pic. I brought the Intermediate blue up over the wings a little, even though that doesn't seem to have been standard paractice. I can't tell from my black and white reference pic whether it's exhaust staining or if the Inter. blue goes up over the wing. Then I sprayed the NS Sea blue. Both blues are Lifecolor acrylics, and they had a tough time sticking to the semi-gloss white and metalizer, but settled down nicely in the end. LOTS of clean up to be done.5 points
-
I understand PP972 is owned by David Arnold, and operated by Air Leasing, who also own and operate the Grace Spitfire and Trig Team of Pitts Specials. All were based at Bentwaters, but I'm led to believe they are moving into a new hangar at Sywell, so hopefully a more central location might encourage more shows to book them- the Seafire/Spitfire finale at Cosby was a particular highlight of the year and needs to be seen more next season. Here's a shot I took of the Seafire in perfect conditions at Cosby, more can be found on my Fllickr if you're interested. Supermarine Seafire LF III PP972/G-BUAR Cosby 06/09/15 by Shaun Schofield, on Flickr What a beauty she is!5 points
-
First things first, VT127 isn't an ex RAN Machine. That serial doesnt come up in any of my RAN serial listings. I'll post pics of VX.388's gear wells and happy snaps of the painting schematic (soddin thing ripped when I took it out of storage) tomorrow I would like to get this up today but after a day of 36 degree C sunniness whilst pulling very large and filled with electric death transformers apart (who wrote this damn maintenance program? Oh it was me!) I've found some beer in my fridge now I'm no longer fit to use the scanner5 points
-
Thanks a lot guys. It's done 19/12/2015 Thanks for the encouragement and motivation. Really appreciated I might just build another f-5 for this g/b ..... Hope it meets with the approval of all Rgds n happy holidays Brian5 points
-
FlyHawk is famous as a PE producer in China. Now they develop a number of 1/72 AFV kits, with wonderful details and easy for assembly. Photos below makes it look like a 1/35 kit. A little cute! Thanks for viewing.4 points
-
Hi all, this is my last work. I would like to share it with you. The basic of the building kit from the Meng company. Thanks for your comments and advices.4 points
-
Hi all. Managed 26 this year and I have 6-7 on the bench which (realistically) will see the light just after New Year. Was an interesting year...having been a confirmed aircraft modeller in 2013...two years later and I've done 1 in the whole year! I'm really enjoying my subs and AFV's although I will continue to model winged things, they will take more of a back seat as time goes by...maybe some cars in 2016? On to the models...thanks for all the support and encouragement from various BMers (you know who you are!) and a happy Xmas and a great modelling 2016...in order of completion... 1. Hasegawa Egg A-6 2. Hasegawa Egg F-14 3. Hasegawa Egg Su-33 4. Hasegawa Egg F-22 5. Hasegawa Egg Harrier 6. 1/350 AFV Club USS Gato - great kit 7. 1/35 Italeri SLC "Maiale" 8. 1/35 Tamiya Pz.Kpfw. II Ausf G - Achtung Panzer GB 9. 1/144 Pegasus War Machines Attack - Sci-Fi GB 10. 1/35 Tamiya 11CV - French Fancy GB 11. 1/350 HobbyBoss Surcouf - French Fancy GB 12. 1/35 Academy M3 Stuart "Honey" - Achtung Panzer GB 13. 1/35 Trumpeter NKL-16 Aerosan 14. 1/350 AFV Club Guppy IB 15. 1/350 HobbyBoss Type XXI Elektroboote 16. 1/35 Trumpeter SA-2 Guideline 17. 1/35 Tamiya "Schwimmwagen" 18. 1/350 Parc Models "Shchuka" Type X 19. 1/48 AMC Resin 16Kh missile - Non-plastic GB 20. 1/72 Revell Tornado - Tornado III STGB 21. 1/35 Tamiya Sd.Kfz. 7/1 c/w Flakvierling 22. 1/35 Academy M50A1 Ontos - Vietnam GB 23. 1/35 Italeri Pz.Kpfw. 38(t) 24. 1/350 HobbyBoss Deutsche Marine Type 212 25. 1/35 Tamiya Sd.Kfz. 223 (Fu) 26. 1/35 Academy M551 Sheridan - Vietnam GB4 points
-
Hi guys.I got inspiration from Srike back season1 last episode. When Collinson go find and try to kill Porter, he drive a Land Rover Defender. So, I decide to build a Defender to salute the best season. Below is the defender, it's cool isn't it? I start this work in 2013, and get it done in last year.HobbyBoss' defender(No.82446) is base, I also choose TAMIYA alled vehicels accesorry set(No.35229) for upgrade. and try to built it as far as it in Strike Back. Final result is not a 100% copy, but may be 70% I think. Thanks for your viewing.4 points
-
Thanks Phil.... just a bit of an update....if photobucket will load that is..... First of all the flaps and associated fairing. The flap is the kit part, filled with Milliput, A lot of fettling both top and bottom to get a fit... The flap fitted. A bit of cleaning up to do. I've aded the rear hige panel door and removed the 5th vortex generator....a feature of the S2B4 points
-
Paint!!!! Gunze metallic Aluminium with some chrome silver makes for the intial coat of High Speed Silver. I'll let this harden fully for a day or two now. On a side note - is anyone else using a mac noticing just how crap Photobucket has become of late - slow, wont go to upload window unless ALL the adds are loaded etc etc. really going off it big time. Grrrrr. Jonners off to see Star Wars4 points
-
Managed to get 90 uninterrupted minutes in the 'man-cave' last night and this happened: Hopefully I can get more done very soon. Please stay tuned. Ian.4 points
-
Feb 2015 Air Brakes One of the main aims of this Dropship was to have everything on display and have the ability to open and close, such as the missile wings and pylons, however things like the ramp and landing gear will be fixed for obvious reasons. Things like the fuel flaps will be open, and the stairs deployed etc This come to the Exhaust/air brakes as I wanted these deployed, so it looked like its just landed (the thrust nozzles will also be pointing downwards). Pretty happy with that, simple but effective mod.4 points
-
My lad got some Neca figures and asked me to do some scenery for them...of course the answer was yes! I started off by redoing Hicks-his armour was weathered and I added a sweat sheen and moistened the eyes and mouth. Then I used an old file box and some old plastic wall pieces plus scraps to create a hallway. I also added some Led's, so that it looked spooky. Si:)3 points
-
Hi folk's here's my favourite 1/72 Aircraft builds,first four Airfix kit's from the P40 GB. Airfix Fairey Fulmar, Italeri Mustang. Revell Corsair A couple of Airfix 109's Academy Storch Airfix Defiant Hobbyboss "choktaw" Airfix Spitfire Mkix Tante Ju Italeri Stuka. Airfix Wildcat. Revell/Matchbox Swordfish A few I forgot about,my only whiffer,Royal Navy Kittywake Airfix kit and Hobbyboss easy kit Buffalo and Wildcat,thanks for looking in.3 points
-
Well here we are near the end of another year, (and so much better than last year that's for sure), and it's time to see how things went. Ahh....pretty much the same as last year, regarding the quantity of built kits. Some new things tried this year as regards the the final finish of the models, W&N Galleria Gloss, and Daler and Rowney Matt varnishes...shake well is the first lesson there... .and I finally bought my first Eduard kits, 3 so far, a Special Hobby, and a Trumpeter Su-15 and Zil 157 Refueller, which will do the Cold war GB very nicely. Plus, in a big move for me, I've bought some Gunze acrylics to try, just to see how they compare to Humbrol enamels. Enough chit chat....... Airfix F-86, Sabre M-4 of 4a Aerobrioata, Aeronautica Militere Hliiana from the Microscale sheet 72-425: Char Mitrailleur FT31-RPM Dragon Stug IV (late) Curtiss Helldiver SB2C-1 1/72 Revell Italeri AH-1W Super Cobra Airfix Typhoon + Bedford MWD-1/72 Advance through France- Plastic Soldier Company Sherman and Revell figures Hawker Hurricane P2923, VY-R No. 85 Squadron, Summer 1940 Hurricane Mk 1 L1764 US-P No 56 Sq, Hurricane I P3707/ NNoA, 310 Sq (Czech) RAF Duxford Hurricane 615 Sq. August 1940 Spitfire I K9899/LOoH 602 Sq RAF Drem July 1940 Spitfire I N3277/ AZoH, 234 Sq RAF Middle Wallop August 1940 Bf-109 Oblt Werner Machold-7/JG2 Oct 1940 Bf 109 as flown by Hauptmann Helmut Wick A couple of whifs What to do with a crap Mig-17? SAAB (FW)190 Italeri F-4S Phantom I must admit I fairly happy how most of these turned out, and I've enjoyed taking part in the GBs especially, although that little FT-31 nearly drove me nuts. Thanks to all who gave encouragement and the bits of advice given throughout the year ...God knows sometimes it's needed. There's a couple of kits on the go at the minute, although I'm struggling with a bit of mojolostitis, anything I go near seems to turn into a disaster area. There's a Airfix Vampire that's suffered the most....and I still can't get the Z to stick on that Typhoon If you've come this far, thanks for popping in and Merry Christmas, Kind Regards, Sean3 points
-
Hi there; Here is my latest kit build. It is my first 1:32 scale Wingnuts. I spent 6 months working in this project. Amazing kit!! Here are some pictures of the finished model. Cheers!3 points
-
Good late evening to everybody checking this topic , after a long break caused by totally flooded house, something new completed in my vitrine. So have a fun with this!3 points
-
Merry Christmas everybody. I've just finished up one of my Battle of Britain GB entries, just a hair past the deadline (OK, two months). Yes, it's another 1/72 Airfix Spitfire, which you may be sick of seeing, but no one should ever tire of building. It is one of the most enjoyable kits to build of any I've attempted. The plane represents a Spitfire I flown by Ralph 'Titch' Havercroft serving with 92 Sqn during the Battle of Britain. Most of the build thread is here, but there's a little more here. And because I always enjoy it when people put a bonus build at the end, here it is next to a 303 Sqn Mk II from the same kit.3 points
-
This is a 1/144 scale landing craft being buzzed by a Zero. Si:)3 points
-
I been working slowly on this engine build . I hope the end results come out good . Enjoy Rick3 points
-
Not read that, so will have to see if I can get a copy Here's the masking done...3 points
-
Hello, its my another model in "flight configuration". Greek freedom fighters are very attractive for me because their paint coatings were in very bad shape ,-)) And here with F-18:3 points
-
Hi, Christmas is calling and i just find some time to color the Porsche. After the gray filler was done i used Tamiya white fine primer to get a closed white surface. At the end i made one layer of Tamiya TS-26 pure white to get a smooth surface for the decals. The decals arrived just in time from www.scalemodeller.de and they look marvelous. Perfect print and sharp edges. After a coat of decal bonder i started with the decal job. They are easy to use and went together well. Maybe i find some time after this evening Christmas market to get it ready for the clear coat. all the best Christian3 points
-
Northrop F-5F Royal Malaysian Air Force 12 squadron - Butterworth Malaysia circa nineties Kit AFV 1/48 - Pilots Hasegawa Thanks and Regards Brian3 points
-
I really like this Seafire Mk.III myself but have not been lucky enough to see it yet, although I have seen the wonderful Mk.17 which has a a Griffon growl all of its own with that 4 bladed prop! The BPF scheme looks great on the Mk.III but as it is a combat veteran of WW2 and Indo China it is a shame that it isn`t wearing its wartime codes and markings with Eastern Fleet markings. Maybe these colours will be applied at the next repaint? However I`m just glad to see a complete and airworthy Seafire Mk.III,.....in my book it is one of the most interesting warbird fighters on the display circuit! Cheers Tony3 points
-
'Gulf Killer' Tornado GR.1 Tabuk (Saudi Arabia) January 1991 1/48 Italeri Tornado IDS3 points
-
This post is more about posting up photos after playing around with camera settings and see what happens. I think I am getting there, but still a lot to learn yet. Dot filter is now done, going to leave the thing alone now for a couple of days whilst it dries fully so I can start with the washes and chipping. Here is how we stand... More in a couple of days, Saturday is football day so it will give the paint a good chance to go off properly. Thanks for looking Steve3 points
-
Thanks for that I spent a little time decaling the topside of the Mig this avo, and as I mentioned earlier, all the decals are split into sections of the aircraft, which makes it so much easier than the almost random layout you get from some decal artists. You simply cut out the section you want to deal with, then cut the individual or group of decals you want to apply to whichever panel or section you're working on. The decals are very thin and conform nicely with minimum effort, and react well to Mr Mark Softer, settling into panel lines with just light pressure from a cotton bud. I did the stencils first, then added the stars on the upper wing, as I'm trying to keep it sensible to reduce the likelihood of accidentally removing decals whilst working on other areas. Which side shall I do next? Almost forgot - can you see the metallic leading edges of the stabs? They barely show up, but then so don't the real ones3 points
-
Thanks everybody! Thanks PC, now I won't be so scared to attempt my FAA Corsair. You have any links to your build? Hope you're getting a little sleep my friend. Giemme and Tomoshenko - thanks for the advice about using Future to seal up an acrylic layer. It looks like I'll have to put it to use, as my attempt to clean up the walkway lines ended up a little ragged. I got the parts where the masking stripped the paint redone OK, but the walkways will require masking in order to clean up, but the masking will then pull away paint and then I'm in a masking and painting infinite loop. Future to the rescue. On the bright side, I got Titch Havercroft's BoB Spitfire done. The RFI is here.3 points
-
Here is some more to look at!3 points


.thumb.jpg.3c5b41eb004e624ff9bdf837868ecbb6.jpg)


.thumb.JPG.3498f40362ff13ebfc4b2e45abbd545e.JPG)


This leaderboard is set to London/GMT+01:00