
Leaderboard


Popular Content
Showing content with the highest reputation on 15/12/15 in all areas
-
2015 nearly gone already.....time flies Well first up this year was the Eduard F6F-3K from the Eduard kit with AlleyCat decals in 1/48th scale - which BTW it all is. Then it was Spitfire time - Airfix's new Mk 1- Mmmmmm And a Hurricane - again Auntie Airfix's new kit Somewhere amidst all this I finished of a Meteor FR9 ( Aeroclub's F8 converted and rescued from a 20 year stasis) And then waded in with more Spit action for an SAAF Mk VIII ( really enjoyed this build) At some point this year I finished this one too - Hasegawa's old but very nice Ki-27 Nate using Lifelike's excellent decals And finally - Boom-sheshusty-boom - Pilot replicas SAAB J21 So its, "seVEN" as our Len would say - Hmmm not too bad This years non-runners were the Hellcat NFII, the La-11 and the FJ-3, and the Trumpeter DH Hornet - which shall all be finished......I promise Merry Christmas, and a very Happy New Year to all my fellow Britmodellers. You lot are great xxx Jonners15 points
-
Hi guys finished these for the F-5 GB currently on the go, go and join in if the little jet takes your fancy . Both Esci kits with some mods, more details in the WIP here; http://www.britmodeller.com/forums/index.php?/topic/234992216-euro-f-5-double-build-172/ RNoAF RF-5A, soon after repaint in the early seventies. Very little weathering done as I wanted a nice clean bird, I guess I'm that 1% of modellers that prefers only a little weathering . RNLAF NF-5A, live weapons demo, circa mid seventies. Please ignore the splodge of Tamiya red on the nose, only just seen it ! Great kits for their age and recommend them highly, trouble is they are harder to find presently. Hope you like them, way to many pictures I am sorry . Comments/ criticisms / pointers all very welcome and kindly received. Till the next RFI, David.15 points
-
Me again Few pictures of my Trumpeter Seafang. Decided to build it as a "What if Suez crisis with rockets" Rockets are from the Airfix Seafire 47. Drilled the exhaust stubs out other than that OOB. Accuracy wise in terms how the Seafang should look i'm not altogether sure its correct. The Canopy was slightly on the thick side too. Cheers13 points
-
Academy kit + Aires cockpit & wheel bays, Eduard Brassin wheels and bombs, Eduard photoetches. Regards, Alex.12 points
-
I've carried on working on the cockpit of one of the Hawks when time has permitted. Couldn't put off dealing with the eduard PE side panels any longer. They are oversize for my home-brew tubs and my concern was how to trim them neatly to fit. So. Bodged up jig from plastic card, blue tack and tamiya tape to locate the PE panel accurately - in this case the front cockpit left hand panel: Then fixed in place with thin cyano. Note the overhang - mostly at the back but a little on the outside of the tub as well: I then trimmed the PE panel closer with nail scissors and finished it off by filing the edges flush with the sided of the tube using my new Tamiya diamond file (which I only got because Ex-FAAWAFU recommended it. I figured if it was good enough for Crisp with all the PE work he's doing on the Ark Rpyal - it was good enough for me.) Repeat the trick three more times to complete the 4 PE side panels. In parallel - a simple task to fill the unwanted rear coaming location cutouts with plastic strip: And then a dry fit of the tub with trimmed and filed PE side panels into the fuselage: And balance the home-brew coamings and seats in place for a quick preview of how things'll look later on: And then back to populating the cockpit a bit more. This time with a simplistic representation of quite a prominent pipework/valve affair that is actually part of the anti-g system (the two white inverted 'T's on the back of the left hand side panels ) and some lead wire to represent some of the more obvious pipework at the back of the rear cockpit: Got the pipework in the front cockpit to do next - and then mock up some odds and sods such as the map cases that live at the back of the right hand side panels - and anything else that tasked my fancy - and then it'll be ready to be painted. Maybe. Steve11 points
-
Hi Haven't posted for some time so thought I'd better make a bit of an effort, one of this years projects, Tamiya's 25 Pdr and Quad, including PE kit. Not something I was looking forward to building but turned out quite enjoyable, hope you approve.10 points
-
Just some pics of my Airfix Seafire 17. I wouldnt say i'm a expert builder but trying to learn with each kit I build. Built OOB Cheers10 points
-
Painted by brush using acrlycs A 1/72 Master Box Master Box Female with Airfix Male and Female10 points
-
I gave her a protective coat of Klear this avo, and went on to mask the anti-glare panel and its oppo underneath off, using the panels & lines to get it as close as I could, with minimal tape adhesion, and lots of Post-It notes acting as baffles to reduce the chances of over-spray tripping me up. I sprayed them Panzer Grey, then added a few drops of black to the remains and sprayed the edges and panel lines, which has almost blended in totally, but gives the matt colour a kind of dusty look. Now it's been overcoated with Klear to protect it though, it all looks the same Someone wanted paint pots for scale, so I threw the ones I was using in there without dusting the lids off I've also been painting up the missiles and pylons, plus the bay doors, which I've preliminarily painted grey per Martin's suggestion, but they can always go silver if he comes back with anything else. The R-33s have their white and steel coats done, but need a nice shiny band of polished metal just behind the nose cone, so I'll be doing some more masking once the Klear has dried on the steel.9 points
-
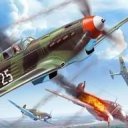
Afternoon everybody. Here RFI is only 2nd finished model this year. It's the revel rebox of the hasegawa He 111. This is a great kit for very little money and is highly recommended by me. This took me a while mainly due to getting freetime for modelling these days. The only area I had trouble with was the landing gear which for me was tricky. I had one disaster moment when I mistook liquid decal film for microset, it melts acrylic paint you know. After calming down for a week I managed a reasonable repaint of the damaged area. Anyways here are some pics. Cheers Allan9 points
-
Here is some more to look at!9 points
-
This is my 1/35 scale Maiale , Italeri kit No. 5605. It is turning into quite a fun build. First thing I did was remove the molded on plumbing and replaced most of it with styrene rod plus a bit of brass wire and hypo tubing the control cables aft. I chose to get rid of the ribbing and window on the forward shield per photos. Just looks cleaner to me. I also decided to scratch build the extra tank rack to add a little interest. I plan to finish this with Vallejo’s #866 Grey Green which according to cross references is very close to Marrone Verdastoro an Italian color used for submarines.8 points
-
Hello! Announced now for February 2016: Source: http://www.revell.de/en/products/model-building/aircraft/military-modern/id/04920.html8 points
-
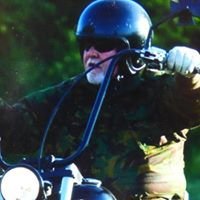
My first RFI for a while. I've not been about too much over the past year or so due to life, houses and kids getting in the way, but as its winter and I'm stuck inside a lot more, I've been modelling a fair bit. To get me back into the swing of things, I thought a nice large scale plane so I dont have to be too neat. I've not been true to any official colour scheme either, pretty much picking and choosing my favourite aspects to make, what I think is quite a nice looking Spit. And the pilot sat on the wing having a brew. One of my next models is a Stuka so the plan is to have the two aircraft parked up and the Spit pilot having a drink with the German pilot. So that's it really, any comments or criticism welcome. Thanks for looking!7 points
-
Ced, Simon (Beard), Rob(85), Bill, Blogs on, Cookie, Martin, Geoff, Jamie, Noah, Rob(G), John, Amblypygid and Simon (Spookytooth)... Thanks all for your good wishes and sympathy. The industrial-strength weapons-grade painkillers I was given at A&E wore off in the middle of the night and paracetamol have not proved adept at reproducing that feeling of faintly fuzzy wellbeing. I have already taken to sitting around with my trouser-fly undone to 'save time, effort and pain' when required but that will have to stop later when my mother - evidently angling for the honorary title 'my sainted mother' - and conveniently a former nurse, is coming down from Aberdeen to look after Jack and no doubt to make sure I do not starve to death due to the inability to dial out for a pizza or whatever grim scenario mothers envisage at times like this. once the loose ends are taken care of here we will be back up to the wilds of Aberdeenshire for Christmas; I'll still be looking in but will probably not post much unless the discomfort improves considerably - it has taken the greater part of half an hour to type this little bit up. Jamie I hope to see you while I am up there, I think I will need some early-war USAAF and some IJA colours, I'll make a list... It's frustrating to grind to a halt with both kits so near completion, I still hope to get them finished before the New Year but we'll have to see. Thanks again gentlemen, and if I don't have the opportunity to wish it to you individually, Merry Christmas all. Cheers, Stew7 points
-
I wanted to share with you all, pictures of my third consignment build to a gentleman living in the U.K. It is MPM's 1/48th Hi-Tech edition with resin. Enjoy!6 points
-
Well here we are near the end of another year, (and so much better than last year that's for sure), and it's time to see how things went. Ahh....pretty much the same as last year, regarding the quantity of built kits. Some new things tried this year as regards the the final finish of the models, W&N Galleria Gloss, and Daler and Rowney Matt varnishes...shake well is the first lesson there... .and I finally bought my first Eduard kits, 3 so far, a Special Hobby, and a Trumpeter Su-15 and Zil 157 Refueller, which will do the Cold war GB very nicely. Plus, in a big move for me, I've bought some Gunze acrylics to try, just to see how they compare to Humbrol enamels. Enough chit chat....... Airfix F-86, Sabre M-4 of 4a Aerobrioata, Aeronautica Militere Hliiana from the Microscale sheet 72-425: Char Mitrailleur FT31-RPM Dragon Stug IV (late) Curtiss Helldiver SB2C-1 1/72 Revell Italeri AH-1W Super Cobra Airfix Typhoon + Bedford MWD-1/72 Advance through France- Plastic Soldier Company Sherman and Revell figures Hawker Hurricane P2923, VY-R No. 85 Squadron, Summer 1940 Hurricane Mk 1 L1764 US-P No 56 Sq, Hurricane I P3707/ NNoA, 310 Sq (Czech) RAF Duxford Hurricane 615 Sq. August 1940 Spitfire I K9899/LOoH 602 Sq RAF Drem July 1940 Spitfire I N3277/ AZoH, 234 Sq RAF Middle Wallop August 1940 Bf-109 Oblt Werner Machold-7/JG2 Oct 1940 Bf 109 as flown by Hauptmann Helmut Wick A couple of whifs What to do with a crap Mig-17? SAAB (FW)190 Italeri F-4S Phantom I must admit I fairly happy how most of these turned out, and I've enjoyed taking part in the GBs especially, although that little FT-31 nearly drove me nuts. Thanks to all who gave encouragement and the bits of advice given throughout the year ...God knows sometimes it's needed. There's a couple of kits on the go at the minute, although I'm struggling with a bit of mojolostitis, anything I go near seems to turn into a disaster area. There's a Airfix Vampire that's suffered the most....and I still can't get the Z to stick on that Typhoon If you've come this far, thanks for popping in and Merry Christmas, Kind Regards, Sean6 points
-
A happy enough 2-week build despite my completion not meeting my pre-build vision (nothing new there!). The model is less shiny than it appears in the photos with just a light sheen. Build images can be found here on Work In Progress: http://www.britmodeller.com/forums/index.php?/topic/234993149-airfix-172-swift-fr5/6 points
-
This is my attempt at making the specially marked Typhoon in the Battle of Britain scheme using Flt Lt Nicholsons markings. I used the Revell Typhoon kit along with the markings coming from Caracal decals. This is also the first time that I have used spray cans to complete the camo scheme, and you maybe be able to see some patches that did not take and had to be touched up. Also some of the Ser No decals silvered slightly but that is probably down to me.6 points
-
I was just perusing through my Firefly photos, and this photo of WB518 (which I think I posted earlier in this thread) caught my eye again. It quite obviously has the same drogue chute that we've just identified as being required for my TT.4 model. I take it this means that WB518 (or at least the airframe that is currently painted to resemble WB518) was a target tug at some point in its career. Thoughts? I've read that this aircraft was damaged in a crash landing in 2012, but that it "wasn't a total loss." Does anyone know its current status? Cheers, Bill PS. Memsahib needs to have a fourth surgery on her eye. First, they had to repair a macular hole and the second was to repair a completely detached retina. The third was to remove a huge cataract that was caused by the first two surgeries. Now, she needs to have all of the scar tissue (caused by the first three surgeries) removed. After the first three surgeries, her eyesight in that eye was worse than before. Now the doctors think this fourth surgery will significantly improve her vision, and a new eyeglass prescription will help further. They scheduled the surgery for December 23. Happy Holidays! PPS. Huh, just realized from looking at that photo that I've also forgotten to do the wingtip lights on my TT (and the landing light). I hope I have some of that fork left.6 points
-
So I was making these three Shagwarrs see I thought, must get some detailing in so Steve is happy about them la la la la la dohhhh There is no way a 'normal' human bean can do THAT sort of stuff Then we get this I know Steve is of the human persuasion,I have had the pleasure of spending quality prime time with the man (and several others of the demigods that occupy places here we love to admire) He's a nice guy But there has to be something of the night, of the Dark Arts about the ability to do this stuff... Oh dammit I'll just sit yere and occasionally utter w o w I love that office Steve, wherever you were before you came here to give these FREE lessons your time was wasted mate ta6 points
-
Hi Pals, I recently tested a new product for me, specifically artificial snow, and I liked the finish, so I made new pictures with a SLR camera for clarity, I hope you like them, cheers mates Some shots on detail.... O L D S H O T S.......... Hi folks, here my kit completed, i like share with everyone. Cheers Added link to assembly post http://www.britmodeller.com/forums/index.php?/topic/234993366-m-24-chaffee-135-italeri/ Thx for watch and comment, cheers5 points
-
Good late evening to everybody checking this topic , after a long break caused by totally flooded house, something new completed in my vitrine. So have a fun with this!5 points
-
Hi folks, this is no.30 in my Spitfire collection and second Sword kit I built. I'm quite happy with their Mk.IX/XVI kits, although the fit is not perfect at places, especially around the wing root and bottom fuselage. But the shapes and sharp details are fine for my eyes. This is 421.squadron machine flown by P/O McIntosh in early 1945, the photographs can be found for instance in 2nd TAF book part 3, by Shores & Thomas. Cheers Libor5 points
-
All Here is my latest kit build.Last year i managed to get a base visit to Cherry point where i took a photo of the aircraft itself.When i got home i uploaded to airfighters .com not knowing i had a photo of a new squadron machine.A nice chap from Hasegawa got in touch asking to use the photo for their box art of the new kit.I first thought it was a wind but no it was for real.Anyway i was sent two kit's one i built the other not to be touched and saved plus some cash for my troubles.Nice to see my name on the box[top left]. Model air and flory wash used.The antenna's also needed tweaking. _MG_0336 by Glyn Fuller, on Flickr _MG_0334 by Glyn Fuller, on Flickr _MG_0337 by Glyn Fuller, on Flickr _MG_0338 by Glyn Fuller, on Flickr _MG_0339 by Glyn Fuller, on Flickr Still need to get slightly better photo's. Glyn5 points
-
Chap can't help it if messrs Martin & Baker had a cheek fetish whilst designing the early Mark 10 seat can he? Why do I hear the silent "Grommit" following that phrase. It'll be hendies' fault - grrrh. Cheque's in the post Bill Save em for the Phantom thread that some bloke is doing with a bit of input from an F4 driver Says the dudess scratching a herc cockpit. I'll stick to little jets with a maximum of two seats.............and no galley or elsan!5 points
-
Just to clarify the sympathy one can expect to receive from an ex-nurse mother... I broke a shoulder falling off a bicycle, it was that or fall in a canal and drown. After cycling home, in extreme discomfort, I suggested to my Mother that a trip to A&E was needed, to which she replied 'it's probably bruised'. Luckily, I was proved right.5 points
-
They are attractive aren't they? I think it was the cannons that attracted me to the kit and I think you're right about the probable noise... how the gunner was supposed to control that lot we will never know Thanks Jaime - you're proving my confidence in your builds all the time Thanks Simon Thanks Alex I did wake up this morning thinking about the cockpit assembly and painting so there are glimmers there... perhaps Alex's filters arrived overnight!5 points
-
thanks for all the comments folks - it makes a bloke feel rather humble. Well, I threatened this - you were all warned, so it's all on your own head. This thread is not over yet, not by a long shot I've got a houchin to build, a fire extinguisher, and probably the most challenging part - the safety raiser. Let's start with the easy bit.... the houchin.... I chickened out and got the Flightpath houchin (I may be stupid but not that stupid!) from BNA modelworld in Australia - surprisingly they seem to have good deals on Flightpath stuff and I got this for half the price I could find it anywhere else - including postage all the way from down under. I actually started this a long long time ago but once the Wessae got under steam, this sort of fell off the radar and rolled under the carpet, or it would have if I had any carpet down in the basement - well I do, but it's rolled up and in storage....well, you know what I mean. Anyways... here be the main body of the houchin. Looks simple dunnit ? ... and my patented folding system - 'cuz it wouldn't fit properly in the speshul folding tool I bought speshully for the job Well, my patented method seemed to work okay so far.... ... and then it lay for about a year... and got really cruddy! I forgot how hot and humid it gets down there in the summer - so the brass got a bit tarnished, with the occasional spot of Verdi-gris still, nothing a bit of wire wool won't sort out. Fast forward about twelve months or so and I picked it up again. Thankfully I actually read the instructions and noted that the bottom panel was supposed to be left open.... that was very, very close to being an "oh :poo-poo: :poo-poo:" moment. I also decided to stay away from the dreaded super glue, which very rarely works for me, and decided to go instead with soldering wherever I possibly can. Of course I completely forgot to take any photo's of the soldered lump before clean up. It's amazing how bad my soldering can be - but it cleans up real easy! (the main body is soldered, but the grill and badge are glued in place - my skills don't go that far!) ... and from t'other end.... This is the reason for leaving the bottom end open - you need to fit this microbe sized control panel in there before closing it up! This little blighter almost wore my eyes out (you can see some of the tarnishing on the panel, but paint should take care of that). and I've still got these two knobs/handles/levers to add to the control panel. - The wire is soldered into the brass, and I still have to do some clean up on these parts before they go into the panel. I have to say that I am really glad to have started soldering - it really makes some jobs much better, and stronger. After that I had to take a break as my eyes felt like they were skewered, so I opted to start on the cable tray. I've still not decided if it's going to be opened or closed - hence no soldering yet. and that's where I am on the houchin. I can't remember if decals came with the kit, but if they did, I have most certainly mislaid them in the safe place. Still, there wasn't much on a houchin apart form a couple of yellow stripes. I did some preliminary work on the safety raiser today - it's frightening - I never realized just how tiny it's going to be.... most of the framework is either 1mm or 2mm wide at most - that should be a challenging build. Okay - now for some questions.... What's the best color for ground equipment ? Is it the same dark green that's on the aircraft or a different color ? and does anyone have any photo's of safety raisers ? They are remarkably difficult to come by on t'interweb - I found about three after searching for a few months. and photo's of the fire extinguisher trolley ? ... and so it all begins again......5 points
-
Headlights adapted to take some 3mm MV lens. Enjoy Dan5 points
-
Hello everyone and also hello 2014. Quick update: 2013 was the year I started modeling again after a 30 year hiatus. I managed five builds last year when Real Life reasserted itself. So this one was started last year, but is my first finished build for 2014, and my 6th build in total. Ooh! All those maths classes weren't wasted! Sadly, during the last 5 months Real Life meant I didn't have much time for poking my nose in here. Slacker I am! So here we have a Jaguer GR1, Johnny Fartpants, in my very vague approximation of its Op Granby scheme. Artistic license applied by me as usual. It's mostly an OOB build of the Italeri 1/72 Jaguar GR1 with the decals from Modeldecal. I actually bought this kit and decals about 15 years ago. Yes! I was actually going to start building 15 years ago and bought this in preparation, but life took over and I had to wait another 15 years before starting again. I think it was worth the wait as I wouldn't have access to all the hints and tips I do today and I don't think it would look quite the same. Hopefully I'll have the time to bang out another couple of kits this year coz, well, I kind of enjoy this thing we do. In the meantime I hope you enjoy this one. Thank you again for your attention. JaguarGR1_180114_04 by IrritableRabbit, on Flickr JaguarGR1_180114_05 by IrritableRabbit, on Flickr JaguarGR1_180114_07 by IrritableRabbit, on Flickr JaguarGR1_180114_08 by IrritableRabbit, on Flickr JaguarGR1_180114_10 by IrritableRabbit, on Flickr JaguarGR1_180114_11 by IrritableRabbit, on Flickr JaguarGR1_180114_02 by IrritableRabbit, on Flickr JaguarGR1_180114_01 by IrritableRabbit, on Flickr JaguarGR1_180114_03 by IrritableRabbit, on Flickr4 points
-
It's been a busy time at my work bench. A nice mixture of subjects, including some work for the magazine. As usual loads of support and encouragement from family and BM. Thanks to all. Angelo images upload 20mb image hosting upload photo capture screen screen shot on pc adult photo sharing free image uploading image hosting without registration image post post a picture image hosting Armour wise: free image hosting upload images free image sharing images upload free upload pictures upload foto click image upload image uploader click image upload imageupload uploading pictures free image upload free image uploading Thanks again for all the support and encouragement throughout the year!4 points
-
Rightey-ho, I managed to complete as many models this year as I did in 2014, so here's my eight: January: Squadron Leader Scarf's Blenheim Mk I, new tool 1/72 Airfix kit.: March: Chinese Air Force Polikarpov I-153, new tool 1/72 ICM kit. DAK Kubelwagen, 1/35 Tamiya kit. July: IJA AA Transport Sado Maru, 1/700 Fujimi kit: October: IJN destroyer Yudachi, 1/700 Fujimi kit: Finnish Army StuG III, 1/35 Dragon kit+extras: November: FAA Eastern Fleet Corsair II, 1/72 Tamiya kit: December: Hungarian Fw 190F, new(ish) 1/72 Airfix kit: Mike.4 points
-
Well , I have had the most productive modelling year for quite some time. I think my efforts for the past 12 months has totaled my previous 3-4 years of builds. I might even squeeze 1 or 2 more in before the end of the year. In no particular order.... AZmodels 1/72 V.L. Pyry - Finnish Air Force Airfix 1/72 Folland Gnat - Red Arrows Airfix 1/72 Folland Gnat - RAAF Revell 1/144 A340-300 - Luftwaffe Airfix 1/144 A300F4 - FedEx Hasegawa 1/72 NP-3D EATS - USN Zvezda 1/144 Boeing B747-8f - QANTAS Airfix 1/72 Spitfire PRXIX - 81SQN RAF 1951 Airfix 1/72 Spitfire PRXIX - 543SQN 1944 HobbyBoss 1/72 F-86 Sabre - SAAF Pegasus 1/1400 NSEA Protector 1/72 Falcon 900 - 34SQN RAAF4 points
-
Hello everyone! Now I want to show you my model, which I gathered for 2 weeks. First I presented It on the exhibition Lviv Scale Model Fest 2014. Have a pleasant viewing experience! And some photos of this work in progress...4 points
-
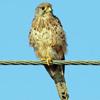
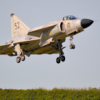
Spent a very pleasant day at Duxford today with a good buddy. Some new exhibits were on show, and it was wonderful to see the panels off so many of the airworthy warbirds for winter maintenance. Here are a few images taken with my Samsung point & shoot. Looks like someone is getting a Dodge ambulance for Christmas... Thanks for looking.4 points
-
Hi there. Although this model has been completed for a couple of months now, it's took me until now to get some photos taken and posted on the forum. This is the Kinetic 1/48 F-16A but in Belgian solo air display colours courtesy of the excellent Syhart decal production. I saw the real aircraft in action at RIAT 2014, inspiring me to make one for the display cabinet. I'm pleased with the result but the Kinetic kit is not without its problems, but nothing major. This is mostly OOB other than wheels and ejector seat as resin replacements. There are a couple of minor inaccuracies compared to the Belgian aircraft, but I'm not telling. Thanks for looking. " /> " /> " /> " />4 points
-
HMS Paintbitch successfully achieves her first mission; Tamiya X-22 Clear does not have any nasty interaction with Vallejo paints, so we now have a nice shiny flight deck: More of a point, it is now sealed, which means I can relax a little bit - the Vallejo paint sprays beautifully, but it is quite fragile until it has cured for a v-e-r-r-r-y long time, which means I have been paranoid about touching it, even accidentally, in case it scars the deck. Less of a problem now, at last. In my experience the Tamiya Clear dries to a really hard finish, and as it happens I am away tomorrow so this won't be touched for well over 24 hours. You can also see in the background that I have added a couple of random transfers; a deck spot (7 spot), Invincible's deck ID letter N and a red dotted line (which I screwed up; hence the visible white bit where the transfer turned over as I dried it, and muggins here didn't notice until after sealing it... Not that it matters for these purposes, but it emphasises how long it is since I did much work with transfers). These too have been sealed in place, in preparation for the weathering trials to come. They might even get a second coat of Clear first. The other pleasing thing is that the patches already look much better under a layer of sealant; if you look by the after lift, you can see the patches quite clearly now, and they look kind of deliberate (which of course they are) rather than just some sloppy painting. All in all, coming along happily. As I say, there is likely to be a gap tomorrow, so more on Thursday. Crisp4 points
-
nice try Quickboost, but way too thin! and the green should be blue.. variable duct plug rails.. will look like this after I attach the wings.. Aires wheel bay in white.. two wings complete.. nosejob in progress..4 points
-
Now for the part I was dreading - the clear glazing. The Tu-22 has some unusual anti-flash shutters on all the windows - those on the pilots glazing are semi-circular and are painted a sort of Sky colour. Modelsvit supply self-adhesive masks - for both the inside and outside of the cockpit - but there is no mention anywhere in the instructions about how to apply them, in fact the only place they are mentioned is on the parts diagram! The inside masks cover the whole clear window pane (for postioning purposes) and you then CAREFULLY remove the outer part - leaving the clear quadrant covered. Once the masks are in place, the INSIDE of the glazing is painted Sky.. Removing the masks reveals the inner shutters... Further masks are provided for the outer framing. I'm happy to reports that all the glazing is commendaby thin and fits beautifully. Phew! Ken4 points
-
OK, The model was actually finished a couple of days after my last post, but it turned out to be one of those unlucky models. Firstly, the Berna decals I used for the roundels were horrible- the printing overlapped red and blue inks which resulted in very fine purple borders to each decal. When I cut them to conform to the panel lines, the slightest handling peeled them all off again. Not recommended. The rest was all my own fault: First, I accidentally splattered the model in a black mist when priming another model. Initially it ended up in the bin, but I had a change of heart after a day or two, and repaired it. ... And then I lost the propeller spinner (robbed one from a Ki-55 kit) ...And the tail wheel (not found- spares box to the rescue) ...And the radio aerial (not found- but couldn't be bothered to add a replacement) I tried weathering it to look knackered, but I always find this difficult- representing a beaten-up airframe often just looks like bad modelling! I limited my efforts to tamiya smoke, very lightly sponged chips and a bit of weathering pigment. This cuerl close up gives an impression of what I went for. ...Oh, and just this last minute I've broken off the pitot whilst photographing it!!! Will4 points
-
Correct in everything you say. Annetra is our partner and we look forward to helping to bring the Mil-8/17 to market. You can be sure this is a super tool helicopter of the quality you will not have seen before. Annetra has the same passion for quality as we do so it’s a perfect partnership we think. Hind comes soon after.4 points
-
So this is what I have been doing. In the below images I will try to illustrate some more obvious shortcomings and my feeble attempt to fix it. As you can see below, there are absolutely zero sidewall details for the cockpit. I used thin plastic card (actually an old cellphone simcard "housing") and cut it into more-or-less size appropriate bits. The next issue I tried to correct is the unexplained gaps in the cockpit floor. I cannot see any functional reason for it, and it doesn't look right. Note that I should have fixed this before glueing the pilot seat and center section console. As for the narrow gap under the center section console I simply inserted plastic card after rounding the edge to fit. I also sanded off the portruding bit, and inserted an about 5mm extension backwards behind the pilot seat, to match just about any B-25 cockpit photo I have seen. Another thing you'll notice missing behind the pilot seat, just before the dorsal turret area, is a sort of inner fuselage rib (actually I have no idea what to call it). It really didn't look right without it, so I decided to add it. After measuring I cut out the shape, then marked and cut out the inner area, to be sanded (quite a bit) thinner. This here is pretty much the result. Not perfect (far from it), but I do think it looks a lot better than the spartan (and wrong) cockpit provided by Airfix. You can see the red arrows showing the fixed areas. There's some areas that need cleaning and wet just-painted areas which will be fixed. There was still quite a few details I wanted to add to the cockpit area, but after I did a dry-fit of the fuselage halves with the cockpit inside and the cockpit windscreen, and suprisingly little can be seen though the thick canopy. So it's debatable if all that time was wasted. Probably only one thing left to do in the cockpit area, is confirm whether there was a jump seat next to the pilot seat in the B-25H. After some searcing on the net I couldn't find definite proof of either posibility. Does anyone here know if the B-25H had a smaller jump seat next to the pilot?4 points
-
And the last 2 pics, now that is how she looks like at the moment. There is a lot to do (weapons, undercarriage, wheels etc.) until RFI but the result for me at the moment is quite ok. Oliver Please feel free for critism and excuse for the bad foto quality Cheers, Oliver4 points
-
Hi Martin, Consider one of the coolest F-14 schemes, VF-33 "Starfighters" on "USS America"4 points
-
Evening fellow plastic bashers Managed to make some small progress on the Stolly, albeit after a big step backwards! In one of the pics above you can see i was in the process of installing the 'torque tubes' (please correct me if I'm wrong) for the suspension. All was going well till I came back to it after a few days at work and on closer inspection the torque tubes were not in line, in fact they looked like a dogs hind leg! Well I wasn't too happy about this as I want to make a decent job of the model as it weren't cheap. Cue several hours spent trying to remove the already fitted suspension units/ wheel stations. The tubes came away easy enough but the suspension units were a bit of a struggle to remove, one got damaged in the process, along with several of the tie down rings on the lower hull. After finally removing the units I decided that whilst I was at it i would have a go at trying to alter the nose high stance. This entailed a bit more butchery to the hull, but I have managed to have it sitting level (near as damn it!) This also involved the removal of the dampers so they could be shortened and re-fitted as after the 'sit' adjustment they no longer fitted. Four days later, a few cold sweats and a couple of "why did i decide to alter it?"s later I finally have it back together again. When I came to reassemble it I had a brainwave to enable me to get the torque tubes to all be parallel. I drilled through each of the suspension units where the tubes fit, along with the small adjuster thingies and threaded them all onto one long length of rod. This meant that when it went back together everything lined up lovely, and not a dogs hind leg in sight! I really wish I'd had this idea right at the start, and would strongly recommend this method for anyone attempting this kit. Following this the next step was to wrap strips of Tamiya masking tape around the torque tubes to simulate the seals on the full size. which I think under a coat of paint and a bit of mud should look about right! The only thing left to do was to replace the broken tie downs, this was done with some 0.8mm copper wire bent around a 2mm drill bit and then threaded into holes pre drilled into the hull. I cut some plates from 20thou plasticard and drilled these using a jig before gluing them to the hull. once the glue had dried I then drilled through the hull using the plates as a guide, finally fitting the wire tie downs. I know it looks a bit messy, but there is still a bit of cleaning up and a spot of filler still to be applied, but were back to where we were last week! Thanks for looking Al4 points
-
...and while we are on the topic of test material, I present to you USS Norman Stanley, a Revell 1/700 Fletcher class destroyer chucked together in about 20 minutes. She is as finished as she is ever going to be, and is a deeply rubbish piece of modelling... ...but Norman Stanley will serve me well in acting as the vessel for test runs of my seascape, which is a technique I have never attempted before; once again, I don't want to be making & learning from hideous mistakes around Ark Royal after about 3 years of work (we are already over 2). Incidentally, even throwing together a cheapo kit (£2 at LMS) like this has convinced me that 1/700 is definitely not for me! [And no, despite her name she will no be floating on porridge].4 points
-
After the single seat variants (thread here: link) next Kinetic Mirage family will be the MIII two seats variants. First announced boxing: 1/48th Dassault Mirage IIID/DS - ref.48054 Other variants should follow like IIIB/BE, 5BD etc. Source: https://www.facebook.com/Kineticmodel/posts/530695333764249 3D renders V.P.3 points


-1-1MINIATURA.thumb.jpg.bd7a7e672869500d45ee6e80478f6f25.jpg)


This leaderboard is set to London/GMT+01:00