
Leaderboard


Popular Content
Showing content with the highest reputation on 25/11/15 in Posts
-
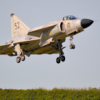
After seven long years, I'm calling this done. This Hasegawa 1/48 A-4E was assembled, painted with Gunze paints mixed to Gekko Graphics' recommendation, and had decals applied from Gekko's awesome sheet in about two weeks then left in a shoe box, minus landing gears and pylons for seven years. This year, I finally took it out of the box and decided to finish the model. I have added a seat from Quickboost and missiles from an Airfix Hawk. I decided to hang four missiles on it as I had lost its wing tanks some time ago. The model represents a pre-Kahu Skyhawk, which according to the decal sheet, had been newly repainted in the Euro-1ish as depicted on the sheet so it had a relatively clean finish. I think I have mistakenly painted stripes on the arresting hook, and have also made a number of other errors on this one but I'm not touching it any more. Hope you've enjoyed the pics! Aidy27 points
-
And all through the skies, Not a creature was stirring not even the flies. The ammo was stacked by the cannons with care, In hope that the Englanders soon would be there. Hey all After my brief bout of insanity, during which I constructed a car model (see http://www.britmodeller.com/forums/index.php?/topic/234991043-deuces-wild/) I have returned to the side of light and reason with yet another aircraft Today I present Revell's 1/48 Bf 110G-4 finished as the example flown by Obst. Hans-Joachim Jabs of NJG 1 in the spring of 1945. Enjoy... So the Revell/Promodeller Bf 110 gets a lot of criticism for supposedly inaccurate engine nacelles... I don't know about you but it still looks like a Bf 110 to me, so it can't be that bad. The kit went together quite well, with some, but not terrible seams to clean up, mostly at the unusual wing to fuselage join. The prop hubs required the most work as they were slightly mis-molded (is that a word?). This required plastic sheet and putty to fix. The cockpit is second to none and only requires careful painting and some harnesses. The radar array was scratch built, as the kit arrays are attached directly to the sides of the nose, whereas Jabs' plane carried the antennas as depicted. All markings were masked and painted with use of a Montex masking set which also supplied masks for the canopy. The camouflage was done freehand with custom mixed Tamiya colours adapted from those used by J.M. Villalba in his RLM Painting DVD, for the RLM 75 and 76. The exhausts were painted with Dark Iron lightly misted with Vallejo Rust and slathered with dark wash. Just realized I forgot to install the rear machine gun before pictures... it's err.. out for maintenance. Yeah, that's believable Regards19 points
-
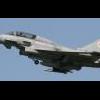
Finished this a few weeks ago but only just got arounbd to uploading pics. Not quite the correct grey (which was totally my fault) but still looks ok. An enjoyable build, so much so that i have also bought the F version.17 points
-
Good morning Britmodeller-land Here's another one that's taken the edge off my enforced leisure time. I bought this kit at the Tyneside show from models4sale at the knock-down price of £75. All OOB, no corrections, as I definitely can't afford the Zactomodels correction sets. . Painted in a mixture of Tamiya, Lifecolor and Vallejo paints, with a very dilute Humbrol wash to bring out the panel lines and grubby it up a bit. Trumpeter 1/32 Su-27 Flanker by simon_rw, on Flickr Nosewheel went a bit skew-whiff and I can't do a great deal about that as it's all epoxied together (I didn't think superglue would hold the weight of the model). Top view by simon_rw, on Flickr Decals were the ones that came with the kit. Engine view by simon_rw, on Flickr Engine heat staining was painted with a base of Tamiya gun metal, followed by tinting the paint with clear blue and clear orange. It doesn't really show up very well in the iPad pictures. I could have painted those access hatches a bit better. Thanks for looking17 points
-
I'm calling this done. The Hobby Boss F4F3 is a bit of an oddity: the F4F3 is supposed to have fixed wings and a four gun armament, but the kit has neither. Filling and re-scribing deals with these issues fairly easily. The biggest problem is that the panel lines don't match up (or didn't for me) on the upper and lower fuselage sections. This was a lot more work to remediate. I built a new cockpit, altered the nose and cowling, added intercooler inlets, brake pipes and exhausts and re-jigged the cooling flaps on the rear of the cowling. The tailwheel is a larger diameter version (for land use) and the aerial wire is EZ-Line. The colours are open to debate. These aircraft were originally ordered by the Greek government, but were taken over by the British after the fall of Greece. With fixed wings, they weren't really suitable for carrier work and so were operated as land-based fighters by the Fleet Air Arm. The aircraft were delivered in USN Light Gray all over, but there is some evidence that they later received a coat of Middle Stone on the upper surfaces. The evidence isn't unequivocal, but it's good enough for me. Colours are mixed by me using Tamiya acrylics and decals are from Xtradecal (roundels) and home-printed (all the rest). These aircraft flew from forward operating locations in the desert, where conditions would have been extraordinarily harsh for both them and all of the crews involved. I've never known a Tar who didn't like things clean, neat and "tiddly", but in a place where getting enough water to keep the men alive was a struggle, I don't think too much washing of airframes would have taken place. The projecting wing guns are hypodermic tube, and the pitot (different to most Martlets) is stretched sprue. This aircraft is intended to have just returned from a fighting mission. Hence, the dirt, smoke and scratches. These fighters would have been a nasty handful for the Regia Aeronautica, had the Greeks got hold of them. The Italians were roughly handled by the Greeks using obsolete PZL 24s and second-hand Gladiators. Even though the Greeks couldn't make use of them, the Fleet Air Arm were able to get good service out these aircraft, and provided valuable fighter strength in the desert war.14 points
-
Airfix Defiant, Drem. Forgot to put the stick in for the dog14 points
-
First off I must say that this was a truly excellent GB and a big thank you must go to the hosts and Mish for setting it all up and running it so smoothly - especially when there were so many participants and completed builds. From what I read earlier in this Chat section I understand that this GB had the most ever completed builds and I think that says a lot about how massively important we feel the contribution of 'The Few' was and how interested we still are in the Battle of Britain. Secondly I would like to thank everyone who contributed to my thread - my builds certainly wouldn't be what they are if it wasn't for the advice and support from fellow Britmodellers. So a huge thank you to: Ozzy, Cookenbacher, rob85, Antoine, nick32, franky boy, sean, stevej60, giemme, Greg Destec, BerndM, Fatboydim, sdk_uk, Biggles87, Wolwe82, wimbledon99, Eludia, AndyL, Hockyboy76, Gremlin56, UKguyinUSA, plasmahal, 72twink, theanorak73, Dan, Marty, Marek, Basilisk, Homerlovesbeer, Sidders, Mottlemaster, nmsekanik, Blitz23, modelling minion, Grey Beema, robvulcan, Stew Dapple and Troy Smith. (Hopefully I have included everyone.) Thirdly: Well done to everyone who got completed builds into the Gallery - what fantastic viewing they all make. Next I would like to thank everyone who voted for my builds in the first and final rounds. I am really amazed that they both did so well. I am well and truly chuffed! Thank you. And well done to Stew and Tony too - both great builds. As some may have noticed I really love making Spitfires so, finally, I would like to acknowledge the contribution made by Edgar Brooks to Spitfire modelling who sadly passed away last week. I never met or corresponded with him but I often read and learnt a lot from his posts. He will be sadly missed and I will certainly be building a Spitfire or two in his memory. Thank you all again. Kind regards, Stix12 points
-
Here's my latest, the Kittyhawk 1/48 UH-1Y Venom, coming soon to a SAMI near you!11 points
-
From this perspective my stash is quite reasonable...10 points
-
Kit: 1/72 Trumpeter F105G Thunderchief 'Wild Weasel' Subject: F105G Thunderchief 'Wild Weasel' XZ107 'H' (ex USAF S/N 63-8320, known as 'Bam Bam' with 3 MiG kills), 41Sqn, RAF, RAF Coltishall, Exercise Red Flag 77, during August, at Nellis AFB, Nevada USA. Details: Modelled as per phase II of its Exercise at at Nellis AFB, playing OPFOR. Misc: Mr Color and Humbrol Paints, Klear floor polish, Floreys dark dirt wash, Windsor and Newton artists oils, decals a mix of kit and spare decals from a Italeri Jaguar along with the AN/ALQ101 pod WIP Link: WIP Here10 points
-
7 points
-
Hi all, here's another one I built recently for Airfix Model World. The editor wanted it finished as a pretty clean machine as per the Doncaster museum example so weathering was kept to a minimum.This time it's a helio courtesy of David Evans at Whirlybird Models and is the resin kit of the HAR.10 XP329 of 'B' flight, 84 squadron which served with the United Nations whilst based out in Nicosia, Cyprus in 1981 flying resupply missions to DANCON posts in the buffer zone, (one of it's brethren, XP345 has been beautifully restored at Doncaster's Aeroventure museum). The model is nicely moulded with good surface detail though unfortunately it needed a fair bit of work to smooth one fuselage half as the surface was quite pitted and slightly out of shape. (A hairdryer and some Perfect Putty filler soon sorted that out). A couple of odd omissions surfaced though including the lack of any ribbing detail to the inner cabin side walls, quite obvious with the cargo door open, which was replicated using Evergreen strips, lead wire and some odd scrap pieces from the spares box, no cabin side windows, (these were fashioned from clear acetate) and the extra side wind shield framing of the H.55 which isn't a feature on the HAR.10 and had to be carefully sanded off and polished, (this being done since publishing the article, not easy as the windscreen is clear resin). The interior itself, troop seats, bulkheads and cockpit are well rendered with a nice PE set and pewter parts to enhance the details and some really nicely moulded main rotors that have the requisite droop built in to make them look that much more realistic plus a suitably intricate rotor head assembly. The decals worked well, (the thin yellow strips on the rotors came from the Xtradecals pack). I had a long chat with David at Telford and he went through a few of the things that I'd picked up with the kit, (he wasn't overjoyed that I had pointed out these omissions but it all ended amicably of course !) and he explained that to do everything was just beyond the scope of a small two or three man outfit........which is OK as long as people are aware of this before buying these relatively expensive kits...my job as a reviewer and contributor for AMW is to point out these things to people do that they know what they are getting in the box......both good and bad !)..... I have fond memories of the Whirlwind...as an air cadet in the mid seventies I managed to blag my way onto several rides whilst out at Bruggen on summer camp, strapped into the cabin, sitting next to the big open cargo door and watching the German countryside flash by at low level and hovering over thick forests made quite an impression on me, though I've flown in many helios since these flights will always be special, (mainly for the amazing noise level even wearing a bone dome)... Painted using Gunze acrylics, RAF Dark Green, Dark Sea Grey and Tamiya NATO black fired through my trust Iwata Micron, finished with light oil and pastel washes and Alclad semi-matte varnish. I painted the seats blue but having looked again inside '345 realise that they should actually be green but I'm not about to open it up now ... I have to thank Colin here, (heloman) for his invaluable help with this one, cheers mate, much appreciated Hope you like it, Cheers, General 'Rotorhead' Melchett.....6 points
-
Hi all Here's my latest completed build, and the second of my Royal Australian Air Force collection. Its the 1/48 Kitty Hawk F-35A built as A35-001, the first F-35 for the RAAF. It's in the markings of 2 OCU The kit was an real nightmare to build, poor fitting and required lots of filling, the paint ended up not coming out the way i was hoping hence the light areas that were supposed to show through the final finish aren't really visible (which isn't a bad thing as it's only really visible on the real thing in bright light). I started it easy back in January but it spent a few months on the shelf of doom. Now it's finished I'm fairly happy with it, and I've taken a pic with my RAAF F/A-18F I was planning on doing an RAF F35-B and a US Navy F-35C but after this one i might reconsider that idea ! Enjoy ScottC6 points
-
Kit: 1/72 Airfix RAF Red Arrows Gnat Subject: Gnat T1 'Aggressor' XR977 '51', 74 Sqn, RAF, RAF Alconbury, 1979 Details: Modelled as per initial stand up of the squadron Misc: Mr Color, Vallejo, Humbrol Paints, Klear floor polish, Floreys dark dirt wash, Windsor and Newton artists oils, decals a mix of kit and spare decals 1/144 MiG Eduard kits 1/72 Sword Lightning T5, and Revell 1/48 F4D (Mig Kills!) WIP Link: WIP Here6 points
-
Cheers guys, Been working on the it this morning, adding some of the missing details and refining others. The hull serial numbers, added from the Archer decals still wet at the moment. Missing weld beads added to the tow pintle and the suspension bump stops. And the lifting eyes Added the cupola lifting lugs from brass wire. Enjoy Dan6 points
-
Hi - it's finished! Kit decals used to model 21394 Red M of F12 wing Flyvapnet, Kalmar in the early 1950s. How long have I wanted a 1/48th model of this aircraft? Too long! The build log is here: http://www.britmodeller.com/forums/index.php?/topic/234987096-pilot-replicas-saab-j-21a-3-148th-scale-twin-boom-pusher/ Hope you like her, as usual all comments welcome. Cheers Jonners5 points
-
Hi again Folks, My latest offering is Airfix's new tool Mustang, lovely kit, no real fit issues. Finish is Alclad duralumin with the gun hatches in Alclad A/F Aluminium, which always comes out dark for me...gunmetally. Lost a part u/c strut but airfix sent me a new one out FOC which was brill of them. Interior is standard(Vallejo model air Zinc chromate) apart from some 'superfabric' belts by eduard. Wished I'd painted the behind spinner red instaed of decal as it looks a bit rough. I haven't really weathered it because I don't know where to stop and was fairly pleased with the NMF. Enjoy and comment please.5 points
-
Progress !!........following the mayhem that is Telford I thought it about time I got on with this one as it's been a while now.. I've managed to add tonal variation to various panels on the DSG so all panels are now both high and low lit, (by adding progressively more Gull Grey to each pass and EDSG to the panel outer edges). The Dark Green will be added next and the same thing applied to that. Once all thoroughly dry a filter will be added to blend everything together... The studio strobe flashes wash everything out of course and the effect is more subtle in natural light....but you get the idea.5 points
-
Well got the glazing done which on these things I normally make a right pigs ear of I think looks ok construction is nearly all done only the wheel house and mast to secure in place and then I can add rigging and weathering starting to get some were nearly done with this project now Beefy5 points
-
The loss of human lives is always a tragedy and we should be all sad for this. However..... I struggle to see the difference between pilots or helicopter crews and the people they are bombing. The same pilot that is now defenceless without his shiny fighter-bomber had been dropping weapons on other combatants that were defenceless against bombs and missiles. Same for a helicopter crew, they may be defenceless at one point but they had the upper hand against their enemies only a few minutes before. Why should pilots expect to be treated better than the targets of their bombs ? Particularly in a situation like this, where violence has always been present, why should we expect a pilot to be shown more mercy than the pilots show ? Regardless of the political situation, we have people who have been at war for years and have witnessed villages destroyed by bombing and thousands of civilians killed, can we really expect them to show mercy for a pilot, even more a foreigner coming to the help of the enemy? In a country where attack helicopters have been used to crush demonstrations by unarmed protesters, can we expect a helicopter crew to be treated with kindness ? But in general, how many people would offer a cup of tea to the same persons that only 5 minutes before were busy trying to kill them ? Expecially in a situation where no mercy is given to those bombed in case of capture. I may sound cynical, but folks, this is a war and wars involve killing and the risk of being killed. Humans may have tried to romanticize war but the essence is always the same, kill and destroy until the objectives are reached. We may take part and see one's actions as good while the actions from another part are bad, but the reality is that every part will do their best to kill those on the other side. This is a grim reality that people forget too often. As aviation/military enthusiasts we should know more than others what war is like, yet even we sometime forget the basics and only look at our beloved aircrafts like a modern version of the knights in their shiny armours with all their chivarlic code while kids see footage from acquisition systems and now think of war like a big videogame. Well, the truth is very different5 points
-
Greg, Gene, John and Rick: thanks everybody! I'm calling this completed (in a touch less than three months, so this still qualifies as a "quick build" for my standards, right Steve? ) But first a few pics about the open canopy and relative cable: Putting this in place turned out to be a lot fiddlier than I thought, so some approximation was needed I'll have to think about a way to reduce that hairy effect on the holding cable, although almost invisible "in flesh" The build was completed adding the Pitot tube, the antenna mast and the aerials; these were made using one of my eldest daughter hair. Insulators are tiny CA gel glue drops, put in place using a pointy toothpick and brush painted with Lifecolor Matt White. As anticipated in an earlier post, I've added some mud/earth effects on the main wheels Apologies for the number of photos, I know it's a bit of a show off Later in the week I'll post a proper RFI thread. Thanks everybody for following along, for the encouragement, the tips and the fun! Ciao5 points
-
Wessi don't appear to like to be displayed onnastick. Here's one onnastring though: Oh wait, this one's onnabunchastix:5 points
-
Every time I think I have broken the back of the PE for this build, the 1022 Radar (long range air search - the big scaffold thing on top of the bridge) reminds me that I have yet to start it. So today I did - firstly tackling the platform that sits beneath it (relatively simple, but hard to get neat): ...and then starting on the frame of the radar itself. This is hideously fiddly and small - though I think it will look amazing in the end, so will be worth the effort. There is no denying, however, that there is a lot of effort; this already contains 6 pieces, and I haven't finished the frame yet, let alone the dish or wave guides. [Hendie, no, the aft lighting gantry won't be soldered wire - too complex a structure for my first soldering effort, I think. I have, however, acquired a soldering iron and have been doing some tests, and I have a major soldering job in mind... watch this space when we get back to the hull.] More soon. Crisp5 points
-
Just finished this yesterday, 1/48 Tamiya F4U-1D with the Aires detail set. My most involved build to date, built over 2 years (stop/start). This machine was operated by VF-84, USS Bunker Hill 1945. The yellow nose was painted for ID purposes when operating over the Japanese home Islands. The Aires set is beautiful, best resin by far IMHO, but a bugger to fit- New wheel wells, engine areas, gun bays, cockpit etc, etc. Typically of course no painting guide, and my detail and scale book is mostly B+W! So rivet counters/Corsair experts please don't be too harsh. I had some nice colour shots of P-47 interiors and as there was a fair amount in common I used that as a rough guide. Painted with Xtracrylics, and I thought I would experiment with the weathering so I scratched up some of the high use areas to simulate wear and scratching, then evened it out a little with some highly thinned Matt varnish which helped bring it together a bit. I sharpened up some of the images a bit in photoshop (sorry, not photoshop, just my standard Nikon picture project software-I havn't "airbrushed" anything in a fashion mag sense)which I've noticed "grains" up the finish slightly here and there. The markings were all sprayed through vinyl cut masks. Wanted to take some better pics than previous builds (all part of the learning curve, and thanks to many here for sharing their tips-great thing about this site, very helpful folk). Set up outside, luckily a reasonably cloudy day, but I found this camo scheme favoured more light generally so there are some harsh shadows, but at least they show most of the weathering. Overall, an enjoyable build, but a big challenge. Constructive comments appreciated, 'tis the only way to learn! I may tweak a few things still, add a little staining on the ailerons etc, thought about adding an oily rag covered in Verlinden PE tools on on wing. But I've had enough for now. Next build will be a 1/32 RB-51 Mustang, the "Red Baron" of American air racing fame, and following on from Voodoo that I finished last year (want to build one Reno racer a year). Had to have a few spinning prop pics after seeing TangoIndiaMikes pics! Cheers all.4 points
-
Greetings, colleagues! I want to show you my new job. Hope enjoy it.4 points
-
This is a monster kit. Absolutely huge. I thought I'd do a really weather-beaten bird in OD. I spent hours fading various panels only to spray the beast with Humbrol matt varnish from a can and see it frost before my eyes. I'll probably respray with Future and then a semi-gloss finish. Hopefully he detail will come through. I must get a grip of my camera as these shots are pretty awful.4 points
-
Hello,Friends - My thanks to John(Canberra Kid) for originally posting this build on my behalf when I was even less competent with a computer than I am now.I've added some more photos and wish to share them with you.Hoping you enjoy viewing.All the very best,Paul.4 points
-
Hi, my first RFI here. I started Airfix's 1/72 Gnat kit about a year ago, and recently decided to finish it. It's OOB except for after market decals by BD.. I mean S&M productions, and Albion micro brass tubes for the pitot tube. It's not great, but it's what my skills can produce right now, and I'm happy the build is now over - so I'd like to share the result. I wish I could say it was an enjoyable build, but in all truth it wasn't - partly it's down to me because I tried all kinds of new techniques and paints on the model and some of those experiments didn't go as planned and needed arduous correcting. Then again the kit itself wasn't a big joy to build either, including the well-known gaps between fuselage and wing section possibly resulting from fiddly-doodly %##^ing with the intake walls aka cockpit side walls . Intake trunking was done with paper-thin evergreen plastic sheet and pva-glue, which actually kind of worked. The undersides of the intake splitter plates were sanded. I detailed the ejection seats with wire and Tamiya tape - the harness came from lead foil on top of a wine bottle. For the nose light to appear like one I stuck some aluminum tape behind the transparent piece before glueing it on. All paints are Gunze Mr Hobby. For the orange I painted first a layer of H11 flat white, followed by Lemon Yellow, followed by a H14 Orange with a dash of red in it. Post weathering done with pastels and cosmetic eye shadow from the drug store's make-up department. I'm almost thinking weathering is overdone, but then again it's supposed to depict a Gnat in the very last days of the colour scheme before the fleet switched to the red/ white affair. What do you think? DSC_0459 by J Goat, on Flickr DSC_0466 by J Goat, on Flickr DSC_0465 by J Goat, on Flickr DSC_0472 by J Goat, on Flickr DSC_0475 by J Goat, on Flickr DSC_0483 by J Goat, on Flickr DSC_0480 by J Goat, on Flickr DSC_0500 by J Goat, on Flickr Thanks for looking! Jay4 points
-
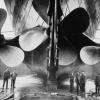
The gold pinstripe is proved in lengths of decal, but I didn't quite have enough to make it all the way around the hull - presumably because of the all raised detail that I might have been better off sanding down a little. As it happens there was only around 1.cm left without a stripe and that was easily enough fixed with some Tamiya gold leaf paint applied by brush, which was a good match for the colour of the decals. Running out of decal was not the only problem however - the angular curve of the overhanging stern 'shelf' is not an ideal shape for the way the decals are intended to be used. I advise starting from the bow area and working your way towards the stern on both sides until reaching the tricky section. The decals can either be applied in tiny increments, or replaced by freehand painting with a small brush; I was forced to do both. The good part is that any mistakes in this area will be mostly hidden! I also added the nameplates and draft line decals, before sealing the whole hull with Humbrol acrylic satin varnish. After everything was dry I glued the previously painted deck section into place. You can see in the picture below that the first layer of the 'three-deck sandwich' slots into the two upright hull spacers to help keep everything in place - more good thinking by Revell. First good news is the PE has arrived, but unfortunately I must cut back on the hobby work due to complications with my wrist injury, so progress on this one will likely grind to a halt until I can get an update in a few weeks time. Second good news is the upgrade sets by Toms Modelworks are definitely marked for use with both the Revell Olympic class ships by the manufacturer, so if you happen to be struggling to find any aftermarket sets for Revell Titanic then it might be worth searching under '1/700 RMS Olympic' as well. Cheers, Ross.4 points
-
Hi all, this is my first attempt at the Trumpy's Thud kit. I built the Wild Weasel first in order to gain some experiences before I'll get to the F-105D kit. The assembly was not difficult and I utilized couple of aftermarkets: Eduard Zoom etched for interior, Montex canopy masks ans etched RBF flags. Despite heavy rivet detail and few omissions that I believe the Thud fans could easily reveal, I'm happy with it. Cheers Libor4 points
-
As posted earlier, I mentioned about how I always thought I could 4r5e up winter camo, to me this just emphasizes the point. Italerie kit brush painted,shall have to try again know that I have graduated to an airbrush4 points
-
Thanks for that Kev. Will try a few experiments and see what I can come up with. A better picture of the tops. More to add to this once yards on. An overall picture of the ship. Once all the ratties are on its the sails/yards next. foxy4 points
-
Those Gnomes are fantastic - the wooden starter bullet on the near one is hopeless, though; way too long, wrong shape, wrong colour. I'm surprised at you.4 points
-
Thanks for the compliments, guys. The first round of oil washes have been applied.4 points
-
Hi there, I am slowly plowing through the instruction manual and am now at step 29 out of 122, everything seems to be set out in a logical sequence, but it is necessary to keep on jumping from the step photos which are not very clear to the middle of the book for the written instructions which to say the least can be a bit vague, and then to the back of the book to refer to the parts list. Arriving at this step I just didnt realise so much work would have to go into what looked like were just a couple of tiny bits of wood. First of all there were 34 balustrades for the top rails which needed a round tenon fashioning on the end. Afterwards the hull needed drilling with a 2mm bit to receive these, checking the right angle with a bevel., after carefully pricking out each placement. Then I had to fashion the 34 mooring bits, studying photos these seemed to be tapering into the middle, after a few unsuccessful attempts to replicate this with a chisel , I hit on the idea of turning a little pummel to give the same sort of effect, Thanks for looking, Mike4 points
-
I will have a guess waht to expect from them in 2016: 1:48 Spey Phantom in 1:52 scale 1:48 Hawker Hunter graced by the mad riveter 1:48 HP Hampden look-a-like OK - I am a bad boy and go to my room... ;-)4 points
-
I'm still pretty new to scale modeling. Well, that's sort of a lie. I built a lot of them as a kid. But as an adult I've only been doing this since June. This will therefor maybe not be the most incredible looking build you'll see this year. But, hey, it's about the process, not the result, right? On top of that I'm painting by hand and not using airbrush. My painting skills are not the greatest since I've been blessed with the gift of arthritis. That's enough with the excuses. Now to the build. I picked up this gem at a local store. I was originally planning to do a Spitfire build, but they were out. They're getting new stock next week, but I had to have my fix right away. Looking through the box it seems like a very good print, and I'm certainly looking forward to this project. For now there's not much to post. Just starting doing the cockpit. Pictures will be posted as soon as I have something interesting done. Please be kind to me. It's my first WIP.3 points
-
Going through my photo's. I realized that I had some good photo's of the Blenheim (and Lysander) Mercury engine installation and cowl bracing. These might help anyone doing Airfix's or Classic Airframe's Blenheim kits. The engine is a Mercury XX on a stand, and it was photographed at the Western Canada Aviation Museum in Winnipeg, Manitoba, Canada. I apologise for the quality, but they were taken with a cell-phone camera. Hope they help someone, Colin3 points
-
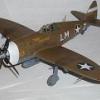
Revell 1/32 P-40E 'old exterinator' Flown by Col Robert Scott Burma 1942.3 points
-
The starter bullet on this one is a bit pointier.... this any better ?3 points
-
Update, The Sea Defiant has had priority recently, but there's not much further to go now - some gluing, some stencilling and some finishing and it's done. Dave.3 points
-
Cheers Darren :-) Soldered up the infantry phone bracket which lives on the rear mud guard, 5 parts of brass in total. Enjoy Dan3 points
-
Civilised, industrial nations (e.g. NATO member states) do intercept intruders who are not actively belligerent (Russians included). But then they are shadowed or escorted until clear of sensitive areas or territory. They do not just shoot them down, especially if they are no threat to the either the interceptors or their territorial interests.This is reminiscent of the little, gobby kid in the playground picking a fight with the bully cos he knows the teachers are watching. Unfortunately Ankara has picked the wrong fight, and NATO will not welcome the added tension. I wonder if this will affect the UK's decision to commit airstrikes to Syria. It would seem ill-advised until this is resolved.3 points
-
Hard to believe that Turkish jets were scrambled to intercept an intruding aircraft, intercepted it on a pursuit course, warned it several times and then shot it down in approximately 25 seconds. One can infer therefore that they were specifically tasked with threatening Russian aircraft cutting that particular corner of Turkish airspace (a seemingly very common occurrence which Turkey has protested already), and it has resulted in an extremely provocative action. Turkey is well known for macho, unilateral action while a NATO member. I'm personally disgusted that the US president has unequivocally backed the action, and personally dread the Russian response. This is the only aspect in this entire debacle that genuinely scares me - when political point-scoring and armchair machismo leads to direct confrontation in an instant of utter stupidity. I hope everyone manages to keep their heads and talk this one out, but I think Turkey just scored a massive own goal for NATO and its ambitions in the region.3 points
-
I'm in agreement. The moment you mention snap-fit a lot of people glaze over, expecting the kind of toy-like qualities of a Revell Easy Kit (Don't get me wrong, they're great for what they are). I think that if people that haven't tried one of these so-called "snap-fit" works of art, they should. They will not be disappointed, as the sheer injection-moulded wizardry that is displayed in some of the kits defies belief sometimes. I thought the Bandai Star Wars kits were good and innovative by having multiple colours of styrene (and flexible parts) on one sprue, but when I received my first Gundam - a Real-Grade (RG) Zaku II in 1:144, I was amazed that the skeleton parts were actually co-moulded to form one part on the sprue, but when released from the sprue that same part became a working arm or leg, complete with moving joints and ball-sockets, and all in a piece that is around 5cm long. My gob was well and truly smacked that day. I think we've been so used to standard injection moulding of one colour in one shot, to the extent that we're still amazed by slide-moulded parts (they are cool though), when we don't even know how far ahead the Japanese companies have gone in pushing the limits of injection moulding. Absolutely staggering... I just wish I had the time to build the kit now! Bandai kits ain't for kids. They're grown-up toys3 points
-
Hi Nigel and welcome Hi Jean and welcome It is indeed a reboxing of the 1976 Heller, according to scalemates.com. Hi Alex and welcome All suggestions welcome, don't hold back! Some basic progress: Easy by Ced Bufton, on Flickr The seats have ejector marks on BOTH sides (what the??!!) but I've only addressed the ones on the back. This is supposed to be an easy build, remember! So what colour do we think the internals should be? I guess they would have been RLM something? Walkarounds show black but I think that's restoration? If I get no comments I'll find an RLM internal colour. Steps 3 and 4 confused me a bit until I realised they were an option - 3 for the version with the gun, 4 without. Other options have arrows between them (see 6 and 7). Oops. Missing option by Ced Bufton, on Flickr Quick check on the reference shots showed HB's had the gun option though it wasn't mounted in the shots I've seen. I carefully removed the clear parts from the sprue and cleaned them up very carefully then dipped them in Klear ('cos everyone else does): Dipped by Ced Bufton, on Flickr I learn something new on all my builds. Lesson 1 on this one was that clear parts don't float in Klear and it takes ages to find them and fish them out. Very educational - certainly taught me a lesson I'll let that dry overnight and then I'm intending to mask the parts to prevent damage while I'm trying to work out how to fit them together3 points
-
Hi folks just a quickie,the Bedford has had it's cab tilt added and camo applied tonight I glossed her ready for a wash.3 points
-
Hockeyboy's Quickie. Disgusted by the F-22 being chosen, the lead designer & the Chief test pilot of the F-23 program "acquired an airframe & defected. They landed at BAE Warton & handed themselves to the British authorities. When asked the Brits denied all knowledge of this ever taking place & have always claimed they bought the rights to the aircraft. Displayed whilst trialing digital camo.3 points


This leaderboard is set to London/GMT+01:00