
Leaderboard


Popular Content
Showing content with the highest reputation on 22/11/15 in all areas
-
Those heavily weathered Danes from the mid-seventies are really hard to resist! There are a number of additions, see also the WIP-thread. But in short are they the following: Aires cockpit, Quickboost seat, Eduard photo-etch in the wheel wells, Aires air-brakes, Maestro ladder and fuel tanks and Master pitot tubes. The rest of the additions are scratch-built. Decals are from Stoppel and Maestro. The small practise bombs bombs are scratch-built, based on Atoll missiles from Eduard's 1/144 MiG-21. And scratch-build radar warning recievers: The fin numbers are from Hasegawa's RF-35 kit. The typeface is wrong for that individual, but almost spot on for this earlier style numbers. Thanks for watching!18 points
-
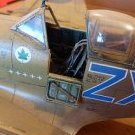
Hi all, Well after a great SMW its time to crack on with more builds, and another first to my list of never built before types. I started this Last Monday and got to this stage by Saturday, not quite done as I need to add seat belts. I wanted to post it before I leave home for the week with work. So here is number 13 of 2015 It is the splendid Tamiya 1/72nd scale A6M5 Zero. This has to be one of the best kits I have built to date in terms of fit, I barley needed to clean the seems up on this one. Alclad for the striped back bare metal finish to depict captured aircraft TAIC 11,RAF Seletar 1945 Decals are from Max (Rising Decals) sheet 720101. As always comments welcome Thanks for looking Rick G18 points
-
Hi, my first RFI here. I started Airfix's 1/72 Gnat kit about a year ago, and recently decided to finish it. It's OOB except for after market decals by BD.. I mean S&M productions, and Albion micro brass tubes for the pitot tube. It's not great, but it's what my skills can produce right now, and I'm happy the build is now over - so I'd like to share the result. I wish I could say it was an enjoyable build, but in all truth it wasn't - partly it's down to me because I tried all kinds of new techniques and paints on the model and some of those experiments didn't go as planned and needed arduous correcting. Then again the kit itself wasn't a big joy to build either, including the well-known gaps between fuselage and wing section possibly resulting from fiddly-doodly %##^ing with the intake walls aka cockpit side walls . Intake trunking was done with paper-thin evergreen plastic sheet and pva-glue, which actually kind of worked. The undersides of the intake splitter plates were sanded. I detailed the ejection seats with wire and Tamiya tape - the harness came from lead foil on top of a wine bottle. For the nose light to appear like one I stuck some aluminum tape behind the transparent piece before glueing it on. All paints are Gunze Mr Hobby. For the orange I painted first a layer of H11 flat white, followed by Lemon Yellow, followed by a H14 Orange with a dash of red in it. Post weathering done with pastels and cosmetic eye shadow from the drug store's make-up department. I'm almost thinking weathering is overdone, but then again it's supposed to depict a Gnat in the very last days of the colour scheme before the fleet switched to the red/ white affair. What do you think? DSC_0459 by J Goat, on Flickr DSC_0466 by J Goat, on Flickr DSC_0465 by J Goat, on Flickr DSC_0472 by J Goat, on Flickr DSC_0475 by J Goat, on Flickr DSC_0483 by J Goat, on Flickr DSC_0480 by J Goat, on Flickr DSC_0500 by J Goat, on Flickr Thanks for looking! Jay18 points
-
Hi all, this is my first attempt at the Trumpy's Thud kit. I built the Wild Weasel first in order to gain some experiences before I'll get to the F-105D kit. The assembly was not difficult and I utilized couple of aftermarkets: Eduard Zoom etched for interior, Montex canopy masks ans etched RBF flags. Despite heavy rivet detail and few omissions that I believe the Thud fans could easily reveal, I'm happy with it. Cheers Libor18 points
-
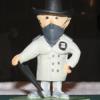
Wing Commander George Cecil Unwin DSO, DFM & Bar (18 January 1913–28 June 2006), born in the town of Bolton upon Dearne, near Barnsley, Yorkshire, England. He enlisted in the RAF in 1929 as an Administrative apprentice, and in 1935, was selected for pilot training. Upon completion of training he was posted to No. 19 Squadron RAF as a Sergeant Pilot. Spitfire trials No. 19 Squadron was the first unit to receive the Supermarine Spitfire in 1938, and Unwin was one of the first to fly the machine (K9792) on 16 August. Unwin carried out intensive trials in the type, flying 15 different Spitfires. During these trials, on 9 March 1939, Unwin deliberately crashed a Spitfire (K9797) following an engine failure to avoid a children's playground at Acton, Suffolk. Battle of France Unwin's first combat experience came during the final phase of the French Campaign during the Battle of Dunkirk. During a nine-day period of patrols between 26 May and 4 June Unwin claimed three kills and a probable during Operation Dynamo. Unwin described his first combat as stage fright: I could see this aircraft diving down in an arc towards me, with what looked sparks lighting up his wings - I then realised he was shooting at me, all I could was sit there in the cockpit and watch him. I was so fascinated! I was shaken from this stupor when two shells hit my aircraft behind the cockpit and I took evasive action. I survived this moment of stage fright and never hesitated again. The next day Unwin claimed his first kill, a Henschel Hs 126. The German pilot had used his slow speed and high manoeuvrability to evade the attacks of two fellow pilots, while retreating into Belgian airspace. The order was given to give up and the squadron turned away. As they did so Unwin saw the German straighten out. Feigning radio failure, Unwin dived on the Hs 126 and "pumped 240 rounds" into it before it burst into flames and crashed. On 1 June Unwin claimed a Messerschmitt Bf 110 and a second as a probable. Unwin then claimed a Heinkel He 111 as a probable. Battle of Britain During the Battle of Britain stationed in 12 Group he was credited with 14 enemy aircraft shot down by the end of 1940 and was awarded the DFM in October 1940 with a bar award in December. On 15 September Unwin claimed three Bf 109s destroyed (Luftwaffe records indicate they were Bf 109s from JG 77) . On 18 September Unwin added a Bf 110 to his score as his 11th victory. On 27 September Unwin destroyed a Bf 109- Wrk Nr 6162 of JG 52, and on 5 November scored a kill against a JG 51 Bf 109- Wrk Nr 4846. Unwin had now destroyed eight 109s. On 5 November Unwin shot down his final personal victory, a Bf 110 over the English Channel. Unwin was in turn attacked by Bf 109s and Hauptmann Gerhard Schöpfel of JG 26 claimed Unwin as one of two kills he claimed in that engagement, although Unwin was not shot down. At the end of 1940 he was rested and sent as an instructor to 2 CFS, Cranwell. In July 1941 Unwin was commissioned and then served with 16 EFTS and 2 CIS until October 1943. In April 1944 he began flying DeHavilland Mosquito fighter-bombers with No 613 Squadron, RAF Second Tactical Air Force until October 1944. He then served at the Central Gunnery School at RAF Catfoss, and subsequently RAF Leconfield until January 1946, when he became Chief Instructor at No 608 Squadron RAuxAF. Service after the war He remained in the RAF after the war and transitioned to Bristol Brigand aircraft in 1948. He flew this type during the Malaya conflict in 1952 and was awarded the DSO for his efforts. He retired from the RAF in 1961 as a Wing Commander. His service-wide nickname was "Grumpy"; supposedly after he complained about the noise squadron comrade F/O Douglas Bader made repairing one of his leg prostheses late at night in late 1939. It kept Unwin awake and he let everyone know about it. Another story relates that it was due to his reaction at being left out of the squadron's operations during the Battle of Dunkirk on 26 May 1940, due to a shortage of aircraft. In late May 2006 he was presented with a scale model of his Spitfire by Corgi Toys. George Unwin died of natural causes 28 June 2006 at the age of 93. This is the Revell 1/32 Mk II kit, and its a bloody good kit, if you don't want all the engine exposed, the only after market part is the pilot. paints are mainly Tamiya paints all applied with a badger 2020 star airbrush, also my signature scarf in the wind has been requested by the client,enjoy. This is the18 points
-
1:72 Airfix Tigermoth Finished as a Vichy French version serving in Indochina, decaled using Xtradecals17 points
-
Calling this done. 1/35 Trumpeter Strv-103B in winter camo. Lightly weathered, kit decal silvered all over the place. Hope you guys like it. Eric15 points
-
Hi, My effort with the new Airfix He-111. Something of a bodge in a few areas such as the camouflage. There are places when I zigged when I should have zagged. My rather feeble excuse is that I built this whilst recovering from a bit of day surgery and a tad zonked at times. I found it a largely trouble free build. The wheel wells are multipart and need a bit of care as they determine how well the engines fit, some fettling needed there. The fuselage windows were a bit of a pain and seemed to fit badly requiring a deal of sanding and polishing. That might well have been me though if I was doing another Id fit these first before doing anything else. Having done my own masking on the Do-17 decided to get some masks and got a set of Pmasks. These are vinyl and fit pretty well. I did find that they stuck like the proverbial and needed care when removing. Biggest problem was the adhesive the left on the glazing which was a pain to get off. A couple of pics to my usual dodgy quality (Santa, are you listening?) but I enjoyed this and it kept me occupied when I couldnt do much else. Cheers Stu Edited to sort out Photobucket.....13 points
-
Hi, I've bought this model only for practising various tehniques since this is a subject that you can weather a lot, and I did learn a lot. I did not bother very much with the realism, although I did take a look on some reference pictures regarding the stains and oil leaks etc.... Still to add some parts once I decide wheather to us some accesorries or not. I bought the base, not my work there. It is very nice. you can find it here: http://www.dioramania.com/ He also has an ebay store. hope you like it, regards12 points
-
My first topic on this forum Some pictures of my latest finished model, an Italeri B 57G. Overall, a very good kit, with a great building pleasure : all surfacer, no filler. Homewever, some issues remain on my model.12 points
-
The WIP was there: http://www.britmodeller.com/forums/index.php?/topic/234992395-tornado-ids-operazione-locusta/ Hope you like it... Cheers, S.11 points
-
Good evening everybody, Time for an old favourite,the good old 1/48 Revell B-17 'Memphis Belle'. Built totally out of the box and as usual totally brush painted with revell email paints. Quite pleased with kit and finish,let me know your thoughts good or bad.11 points
-
Hello, This Tamiya one just about to be completly finished. Just few little details and dirt to add, but it's more or less how i'm imagining it !!! Thanks for looking and for the Wembley support !!! AE10 points
-
#37/2015 The newest roll-out and one of my dad´s rare excursions to USN subjects. Used the classic Monogram kit, white box 1974 edition, mostly oob. Decals were taken from the GWH "Wake Island" kit. One of the "T"s was missing the horizontal bar, luckily my dad found a suiting decal piece in the spares box. Seatbelts added, aerials with EZ Line, Gunze and Tamiya acrylics. BTW, forgot to remove the masks on the little fuselage side windows...10 points
-
I thought I'd throw these at yer. All oob with a little homemade (buttery biscuit) base... Thanks for looking lads...10 points
-
This has turned out to be a very enjoyable build. When I first got the model kit and PE I didn't think I'd be able to complete it, some of the pieces are very small, but thanks to the excellent instructions that come with the PE and a large amount of patience I have managed to get it finished. Many thanks to Peter Hall at Atlantic Models for producing a great PE set and detailed instructions, to Paul E for sending me some parts to enable me to complete the Wasp Helicopter after I lost some of the under carriage, and to everyone else who have given me their "expert" advice on various parts of the ship9 points
-
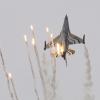
Hi - Why do I swear more when modelling in 1/72 than 1/48? - must be an age thing. I went into the red zone trying to fit the Bronco's canopy. The US Federal Bureau of Land Management operated seven OV 10s in the 1990s as firefighting lead aircraft and survey work. N646 started life with the USAF in 1969 and spent time in the US, Vietnam, Korea and Germany. It is now preserved at the Fort Worth Aviation Musem back in a grey military scheme. (registration and BLM decals drafted by my good wife!) JASDF F-104J 46 8539 is now preserved at Komatsu Airport in Japan.9 points
-
I've just recently finished this one, it's taken a while!! It has been posted on another forum but I thought you might like to see it? Two 1/144 scale classic Airfix kits, hostile environment research vessels called 'Discovery' Incredible to consider they are the same scale!! . . . Kes8 points
-
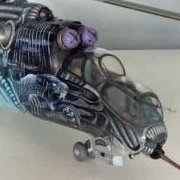
Hello there! it's been awhile since my last WIP here. I want now to share some pictures of my current build. A few weeks before AMK announced a new Mig-25 kit, I decided to start my Kitty hawk kit. And this, because of my friend Christophe who did a nice job on his own build: http://fighters.forumactif.com/t75195-mig-25-foxbat-kitty-hawk-1-48 I want to depict an Iraqi fighters from the first Gulf War: http://www.aviationgraphic.com/airplanes/335-mig-25pds-foxbat-25211-iraf-tc-206.html So, maybe you know that this kit is controversial because of its many flaws: http://www.britmodeller.com/forums/index.php?/topic/234950939-kitty-hawk-mig-25pdpds-detailing-corrections/ Some of them are not that serious and easily fixable, others won't be treated at all... But, to my eyes there are some points that need serious work in order to depict the correct rendering of this brutal plane. Radome and exhausts are the most critical to me. I will start with the radome. Kitty hawk totally botched this area. The radome section is weird shaped, with a "square rounded" cross section instead of a perfectly round one. Also, the cross section at its base is more wide than high. Moreover, the profile is not symmetrical, and the radome seems to be "down curved ". So, based on scale drawing, I CAD designed a nose cone. While being maybe not 100% accurate, it will be more convincing. And perfectly round :rolleyes:/>/>/> Then, thanks to "Shapeways" https://www.shapeways.com/I ordered a 3D printed sample: The surface is pretty rough, and need some Surfacer to get smooth: Because of the weird cross section of the kit, I had to add material on top of the fuselage in order to get a circle section. Sanding is also needed to smooth down some angles. After sanding and surfacing: Some work is also needed here, in order to get a good fit to the cockpit section: After more scribing and cleaning job, the parts are ready for casting: Et voilà! Thats all for now. The cockpit is finished, pictures soon. For now Im painting the wheel bays. Do not hesitate to leave comments and critiques. Always welcome. Cheers Romain7 points
-
Hi All This is my latest 1/72nd scale Hasegawa Phantom. First, a brief explanation of the aircraft. Shortly after the Yom Kippur war, the Israeli Defence Force was very short of reconnaisance assets. The IDF/AF had ordered 6 RF-4E's in but they were some time away from delivery, eventually they were delivered in 1970. As a stopgap measure, 3 F-4E Kurnass aircraft (117, 125 and 139) were converted to a temporary reconnaisance role by removing the 20mm Vulcan cannon, removing the gun door, installing a clear cover in it's place, and installing a camera in place of the cannon. This gave the IDF/AF a much needed reconnaisance asset until delivery of 2 RF-4C's that were loaned to the IDF/AF from the 10th TRW, which in their turn was returned when their own RF-4E's were delivered. These aircraft were operated by 119 (the Bats) squadron. These last two shots show the nose modifications to the aircraft. Thanks for looking in. Ted7 points
-
It's all done! I actually finished this one the last day of October and am only now getting around to posting the pics here. Here is my Polish 16! Pictures by Brewer.7 points
-
Bet that would look great, post some piccies if you have any Been doing some work on the interior this afternoon so thought I'd post a few pictures with the big bits dry fitted....7 points
-
Hydra triebflügel. 1/72nd huma kit. Custom decals, and oversize brass cannons. Build thread here..... http://www.britmodeller.com/forums/index.php?/topic/234987085-hydra-triebflugel/page-17 points
-
This is Zvezda's latest "ultimate kit" which was released earlier this year. It includes extra details such as options for open cabin doors, extended flaps/slats and even extended undercarriage oleos to represent a final approach mode. I've built this version in Thomas Cook's new "sunny heart" colour scheme with just flaps/slats extended into the landing position. Some say that this new livery is drab compared with Thomas Cook's previous two-tone blue scheme, but I think its actually quite striking. The kit goes together really well and was a delight to build, although some care is needed in assembling the extended flaps - the kit instructions need a bit of interpretation. Also the kit doesn't come with wingtip sharklets which are now fitted to most new A320 family aircraft, so these are add-ons from Braz which were easy to fit. The Thomas Cook decals are home made with the detail decals (windows, doors, etc) from Daco. Paints used for the Thomas Cook colours are Yellow Revell 310, Dark Grey Revell 378 and Mid Grey Humbrol 128. I think that Zvezda are definitely setting the standard for airliner models. Their next release will be a Boeing 777-300ER - bring it on! Thanks for looking. Tim6 points
-
First flown in 1945 powered by Rolls Royce Trent engines which were basically a Derwent engine fitted with a reducing gear which drove a propeller. After a dodgy first flight during which both engines attempted to lose all their oil the fault was corrected and it became a useful research tool contributing to the very successful Dart. Despite being much heavier than the Meteor F1, from which it was derived, the take-off distance was reduced, initial climb was improved and was faster than the earliest Meteors. The model went together quite well but there are some significant errors. The propellers seem to bear no resemblance to the actual thing and had to be slimmed down. There is some confusion in my mind about the props as they were initially 8ft in diameter but Eric Greenwoods description of the hairy first flight (Air Enthusiast March 72) states that the engines went back to Rolls Royce for modification and came back with 4ft 10” props. However later pictures appear to show it flying with the larger diameter versions. Can anybody clear this up? Anyone who wants to see what the props should look like have a look at this thread where there is a photo of the actual article http://www.britmodeller.com/forums/index.php?/topic/234947300-gloster-trent-meteor-prop-blade/ The kit would have you fit a new tail bullet which does not appear in any photo that I have found and neglects to have any provision for the anti-spin parachute housing fitted for the early flights despite it appearing on the box art. This version had a longer u/c than the jet because of the need to provide clearance for the props. MPM would have you fit longer legs but these would not fit the u/c bays. Some discussion about this in another thread came up with information that it had the same legs but the oleos were pumped up. If you compare photos of the two versions you can see that the trailing arm is angled more downwards so I kept the original leg and adjusted the trailing arm so that the wheel position matched that of the photo. The picture shows the difference between the two kit arms, Trent and original, and my modification. Incidentally this task was made a nightmare because the resin wheels are too narrow for the trailing arm and they kept falling out. Glueing did not seem to be an option as they are weighted and I couldn't guarantee that the flat bit would sit parallel to the ground until all wheels had been fitted. Eventually I got it together but it was suggested that a better idea would have been to drill out the wheel hubs and fit an axle. I wish I had thought of that. The kit nosewheel needed extending. I'm not entirely happy with what I have done. The top of the strut and retraction jack could do with improvement but getting at it now the props and aerial are on is a bit daunting. One item of contention was the colour of the forward panels on the nacelles. The kit says “Sky” but the consensus appears to be that they were unpainted primer so I used Tamiya XF4 yellow/green as my memory says that this matched the primer I saw used in my apprentice days. Built for the Meteor GB. WIP here http://www.britmodeller.com/forums/index.php?/topic/234990667-trent-meteor-mpm-172/ Any comments (critical or otherwise) and additional information welcome John PS. References Gloster Meteor by Butler and Buttler published by Aerofax Meteor - Aeroplane Icons series Air International March 72 Aeroplane Monthly July 75 contains a superb Charles Brown colour photo6 points
-
This NF-5 is displayed in the colors of 316 squadron, based at Eindhoven. In the 80's some of the NF-5's from 316 squadron, had a colorfull band on the top of the fuselage. The reason for this is to be recognised during dogfights. These NF-5's were used as an agressor. The K-3072 had and orange centertank as well. These tanks were not as common as the colorfull band. This Agressor is also equiped with dummy AIM-9 Sidewinders. I choosed the build the aircraft in this colorscheme because it breaks the usual camouflage paterns. The colors I used were Vallejo Model Air71017 Russian Green, Vallejo Model Air 052 German Grey, Vallejo Model Air 051 Barely Grey and Vallejo Model Color 70733 Orange Fluo. The decals are a mix from the ones that came with this kit and Dutch Decal DD48045. I made some seat belts from masking tape and fuse wire to get some detail in the cockpit. I will get some better photos and upload those. These were taken duting the spare moments we had some sunshine today. Thanks for looking. Jan Remco6 points
-
A few pics of a Blackhawk, a bit of artistic licence at play. Eduard Interior and Exterior PE used.6 points
-
Macchi C202 series III (Macchi built) of 84º Squadriglia,10º Gruppo, 4º Stormo. This was the personal aircraft of the unit commander Capt. Franco Lucchinii in October 1942. The aft engine cover was a replacement as was the starboard wing which was taken from a later production (Macchi built) machine. The kit was an easy build that I made more difficult by attempting to "improve" it. Decals are on the thick side. Scratch buit flaps in the radiator (fore and aft), butterfly in the supercharger intake, venturi in front of radiator, and clear navigation lens put into wing tips. Fuselage band and tail cross painted instead of using decals, along with wing tips and spinner. Tamiya flat white with very tiny amount of yellow and buff added to make off white to match nose decal. Pictures taken in less than ideal conditions on phone. Work in progress under Macchi Mayhem.6 points
-
Hello folks, My first ready for inspection post it's only taken a year... I'd like to present my 1/72 Airfix Gazelle. Built as part of a long term project in which I hope to recreate helicopters my dad has worked on throughout his career. Scratch built details in the cockpit, scratch built gearbox and engine and further details added throughout. Link to the WIP thread: http://www.britmodeller.com/forums/index.php?/topic/234942566-airfix-172-gazelle-finished/ Somehow it found its way to South East Asia? Thanks for looking Sorry if there's too many images; I'll delete if necessary.5 points
-
Yet another one off the bench.......... This time the AMK offering of the Aero L-29 Delfin in Indonesian Airforce markings. I have always liked the look of the Delfin and when I was able to get my hands on the AMK kit I was delighted to say the least. The kit is a shake and bake. Quality of the moldings up to the standard of Eduard. To be honest if I didn't know better I would have said it was an Eduard kit Would I make another............................. you bet !!!! Thanks for looking and please feel free to comment. Dick5 points
-
Thanks guys, comments much appreciated. Today I decided to do some work on the main rotor. The kit caps off the hub with this part with three bumps on it: That does not look right, instead it should be a triangular plate with a lifting eye: The PE swash plate that Extratech provide looks way over scale: This is caused by them trying to match the inaccurate blade horns which should not be perpendicular but angle back towards the centre: My solution to this was to locally heat them with my smallest soldering iron bit and bend them inwards: Next the inaccurate blade attachment needs sorting out, starting with some razor saw surgery: After some tidy up I added the upper part of the fork using some 1.2mm thick plasticard. The thinned down blade was 1mm thick, the same as my square so I used that to space off the gap: Here you can see how much I had to thin down the lower part of the fork: With the first mounting sorted I cracked on with the rest making sure the blades were consistently thinned to 1mm: While the hub was hardening up I made a start on the swash plate, first laying out my design on some 0.5mm plasticard: Next a 1.5mm hole for the shaft: I used my hand vice to avoid rubbing off the pencil design: Next I did an in situ check to make sure the proportions were OK: I think its still a tad oversize but it's way better than the Extratech part: It sort of has to be that size for the links to line up. Next I punched out a 4mm disc from 0.7mm card and drilled it out while still captive in the punch: That combined with a 3.5mm disc makes up the rubber gaiter: Finally a shot of how it's all coming together: There's still plenty to do on the hub - I never did get round to the lifting eye - but that it's from me for now. Bye, Nigel5 points
-
The rear part of the engine is a little spartan. I dressed it up according to my reference pics. Again, I only detailed the half that could be seen - the right side is mostly hidden in the cowling and again. Can’t remember what those pipes are called - the opposite to exhaust collectors. Someone help me out? The white pipe at top right is a piece of solid plastic rod buried inside the engine. This mounts directly through the cowling and is essentially a way of affixing it (I had to remove the moulded in mounting pegs for realism’ sake). Once everything is glued in place, sanded and painted, you won’t see it. Exhausts - pretty good! I dressed them up a little with some mounting plates, and one or two cosmetic details. The open exhaust itself benefitted from having a section of hollow tubing sandwiched in, so at least it looks hollow all the way up now. Again, once all these parts are glued together everything will be much more fluid Modification begins on this part of the cowling (Americans would call this part the speed ring). The kit part is about two meters thick, or so it seemed. Thinning down the edges to scale accuracy took a lot of time, and indeed I overdid it in places. An issue to be addressed at a later date… The SBD-5 had only one cowl flap on each side. I duly cut down / filled in the relevant areas. At the right time I will add the cowl flaps. Also you will note the white strip at the top - the SBD-3 depicted in the kit had a different air intake system, and this needed to be filled in. A final couple of shots show the state of play as of last night. Next up is the ignition harness and wiring. any comments or queries welcomed as usual Rich5 points
-
Hello Gents, As you can see below, I've glued all the subassemblies together and taken a couple of photos. I was hoping to take more photos today, but I've not had time to do so. The next opportunity will be Friday 27th (unless I get chance beforehand). Thank you all for your kind remarks during the build. Joe Thank you for looking, Joe5 points
-
Progress on PBR cake, not ready for the oven yet ...... I've built up the bare base with acrylic Paste & gel until I've got the form I want. Couple of extras added to make it more interesting The river colouring is getting to where I want it The 'palm' leaf was cut from foil Started weathering the hull and deck using a Burnt Sienna oil wash to pick up the staining from the local red soil. As I'd hoped the wash toned down the bare aluminium and an oil drum to brighten up the far corner Very much a work in progress, with more colours to be added to the river. Spray and foam to follow Thanks for looking in and hope you find it of interest Kev5 points
-
Well chaps. I've made it... Going to call this done, finally. Will post an RFI tomorrow, hopefully will get some better pictures in some natural light. Just give you this teaser pic. This kit seems to have fought me all the way, but I suppose this was to be expected given the age of the tooling. I now need to thank you all for following my trials and tribulations. Special thanks must go to philp (phil, for the decals, you're generosity it boundless ), Col. Raptormodeller, Nigel heath and yankeemodeller. Thanks for believing in me, my amateur skills, and having faith in me to help me reach the end of this build. Couldn't have done it without all of you behind me, prodding me to get it done. Believe it, or not, this is the first kit I've actually finished!!5 points
-
Here's my progress so although only started on Thursday last week. Nosewheel. Before the cut.. And after. A test fit. Should get a decent internal view. The nearside sponson top will be removable together with the outer engine fairing to allow removal of the side. I plan on using magnets for retention but I'll see how things shape up. I'll also put some LED lights inside to illuminate the interior. Regards John5 points
-
I have not got much done today but here is the small update. I thought I would finish off the door frames by adding the thick leather strap handles, this is what they should look like: Lead foil seemed to be the best way to go but as the leather is quite chunky I used some of this 0.2mm thick lead plate rather than my usual foil: I was thinking of soldering them on but up close to the job decided that CA would be a simpler option. I also realized that as they will be quite delicate I should probably make the glazing before fitting them. I first scribed round some clear packaging plastic using this arrangement: After much fettling I got what I thought was an acceptable fit on the first one: The other side was made and the strap handles fitted: Now the door frames could join my steadily growing collection of parts ready for some paint: That's it for today, maybe I will get more done tomorrow. Bye for now, Nigel5 points
-
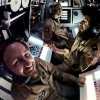
Hi Everyone! Haven’t been posting a lot this year but now I start to speed up Here is the AZ Models’ AH-1G Huey Cobra flown during Vietnam War. Originally, I planned to do “The Crystal Ship”, but changed my mind having read a thrilling story in Jonathan Bernstein’s book “US Army AH-1 Cobra Units in Vietnam” with the “Sound of Silence” Cobra starring. On the late evening of 21 January 1971 CW2 Jim Moran, who was expecting to go back to the US in just few days , was sitting in the club minding his own business, when battery commanding officer approached him and ordered to help rescuing reconnaissance patrol team that was trapped and surrounded by North Vietnamese units. Jim Moran accepted the mission, took WO1 Neil MacMillan as his front-seater and a wingman, at night and in bad weather found the way through the jungle and located surrounded troops. On the scene Cobras put the fire onto attacking NVA troops to hold them off , and maintained control of an increasingly dangerous situation until Slicks and Medevac choppers arrived to extract the LRRP team. Jim Moran stayed at the place to coordinate evacuation until everyone was safely lifted and returned to the landing zone "on fumes in the gas tank" This mission is believed to be one of the longest flown by Huey Cobra in Vietnam. After the mission, Jim Moran and Neil MacMillan were recommended for a Silver Star Now back to the model. AZ produced a very nice kit, sufficiently detailed, with thin and crisp panel lines, good fit for short-run mould. I used Brengun PE set to enhance details in some areas – mostly in cockpit, and in some places outside. I also added landing light on the bottom side. I got Pavla’s vacformed canopy as AZ’s one is fairly thick. But in the end I decided to go with original kit’s canopy and I'm fairly satisfied with how it went on. Model is painted with Gunze US Olive Drab, other paints are Vallejo. I used kit’s decals, that went quite ok. No stencils are provided by AZ. Another kit’s omission – just one weapons option. Jim Moran flew his Cobra with 4 XM-200 launchers but kit provides just two of them and 2 XM-18 miniguns. Enough words – on to photoes: Thanks for looking! Dennis4 points
-
Here is my latest build - the little 1/72 ESCI AV-8A Matador. Obviously this kit has now been superceded by the new Airfix offering, but I picked this up at the October Yeovilton show for very little money and decided to go straight in and build it. In the box it looks lovely, with very fine engraved lines on old fashioned silver-grey styrene. Putting it together is another matter however, and a fair bit of putty was needed due to the very poor fit of the major components. However, once it's together, the shape looks fine. The decals were really tricky with some silvering, and the roundels on the fuselage didn't want to go around the intake contour despite copious amounts of microsol. In the end I had to use a tiny bit of glue to the top and bottom to get them to stay. I built this OOB apart from adding some little seat belts out of paper and used Humbrol and Xtracolour enamels, with pastel weathering and staining.4 points
-
Here is a Meteor I’ve been building for the Meteor STGB. I chose the Israeli Air Force version because it had an interesting colour scheme and equally interesting history. Alas it was the colour scheme was what gave me the most grief in the end. This actual aircraft is in the Israeli Air Force museum (Hatzerium AirBase, Negev Desert), so photo’s of this aircraft and drawing s from IsraDecal’s Meteor decal set (photo/drawings were of A/C #52) were used for the colour scheme. However neither matched each other as #51 seem to have a unique colour pattern. I wasn’t able to tell when the pattern was changed as I was not able to find period photos of this aircraft. So I ended up sticking with the current pattern on #51……….and hope it’s not too inaccurate! The actual build wasn’t too bad for a Classic Airframe model, the only extras were a set of Barracuda Cast Large Bore Intakes and some Eduard Fabric Seat belts. The only modifications to the model were the replacement of the underside A/C intakes as they are completely wrong, too big and the wrong shape. Please enjoy, plus here is the build link; build link4 points
-
Here is where I ended up with the Crusader's weathering. Let me know what you think.. Cheers Plasto4 points
-
Greetings folks, Another one saved from the shelf of doom, however, I still wonder if it was worth saving - does it look like an MD-90 to you? This is the Welsh Models conversion for the Minicraft MD-80 kit. The conversion includes a replacement vacform fuselage and a pair of resin engines. The fuselage nose is a poor representation of an MD-80/90 and so as recommended by N5016R, I chopped the nose off and used the Minicraft kit nose. For all that effort, I might as well have just extended the kit fuselage, sigh. Then the resin engines, err, look nothing like IAE V2500 engines, sigh. I used milliput and plastic strip to add some girth to the engines, to correct the engines as best as possible, but the fan diameter is still too small. I wasn't prepared to commit to the BraZ engines at this late stage, but in hindsight I could have used the spare V2500 engines from the Zvezda A320 kit. The Delta decals came with the Welsh Model conversion and are laser decals so a bit soft, however they responded excellently to Microscale Set and Sol, and with the use of a hairdryer (first time attempted) conformed perfectly around all the raised and recessed detail on the tail fin. I will definitely be using the hairdryer for complex decals in future. Paints are Zero Paints white, Xtracolour Boeing Grey and Alclad aluminium, all sealed with Alclad Aqua Gloss. On with photos. Darren4 points
-
Time to wrap this one up and call it done. The last thing to do was add the dust effects, fit the antennas and bring hull and turret together. For the dust i used a mix of miG and AK pigments and the antenna are micro carbon rod. I had considered adding the commander figure and even started painting it. But when i test fitted, i realised he would not fit as is with the MG ammo box's in place, so that decided it for me. Closed down it is. First the turret. And the hull. I used some tamiya soot pigments around the exhausts. I also fitted it to the base so i could get it in the soft sand before it hardened. And then the two were brought together. And there you have it, my first 35th none WW2 German armour build in many years. I know i could have done more to make it more accurate and it could have more kit on it, but it was nice to be able to relax and not worry to much, i have enough German armour to pull my hair out over. A big thanks for Dan for some really useful tips and ideas which helped to add some nice detail I would not have even thought of.4 points
-
The undercarriage sans wheels. The construction is based on the available photos, rather than on the kit's instructions or scale drawings. The scratch-built ventral radiator is just dry fitted for the purpose of the photo. It will not be installed before the kit is fully painted.4 points
-
Thanks Julian, I'm happy with the progress of the Wildcat and impressed with the detail provided for that and the Kate's cockpits - I'll breathe a little easier once I have established that I can actually close up the fuselage around it though Bruce, nice to see you back, I was wondering just the other day where you had got to! Hope all is well with you? The crew figures are very nicely sculpted and that really does make all the difference, that stuff about silk purses and pigs' ears is true... Thanks Rob, it does make up into a busy looking cockpit, though I think the crew will hide most of it anyway... but at least there is photographic proof of the detail anyway - I will be making a couple more Japanese subjects at least, and if Airfix bring out some more and some more USN aircraft I will probably be forced to buy and build them... I'm still in Aberdeen - now with added snow - until Monday, so progress will be... well I was going to say 'limited' but in fact 'non-existent' is the word I was looking for. I had a very pleasant couple of hours with Jamie (who was kind enough to deliver my latest paint order to my parents' house, something I am sure he does not do for everybody) and Gill of Sovereign Hobbies a.k.a. Colourcoats paints - thank you both, that was most enjoyable and amusing Cheers, Stew4 points
-
I had a bit of fun with the gun pod, not sure how historically accurate this may be! Oh, and before I forget I made the seat belts from Masking tape.4 points
-
I managed already. Just not sureabout hwto post as it is 5 MB. Here is a public link to my Dropbox: https://dl.dropboxusercontent.com/u/1631577/Humbrol%20Colour%20Sys.pdf I hope it works.4 points
-
Thanks for the interest guys. Mr. B I have some colours that I used for my Iranian RF-4 that i built earlier this year for another GB, the sand colour I used was from Humbrol (237) but I have just bought a Revell Aquacolour Beige which may prove to be a better colour match, the Dark Green was Xtracrylix and the Red Brown was from a Lifecolour US Army Tank Brown. I know it's a bit of a hodge podge of manufacturers but it seems to work okay. Right then on with the update! I have assembled most of the parts for the rear fuselage and despite the many parts I have not had to use much filler at all, I have however needed to sand the area where the intakes are joined to the fuselage which has resulted in the loss of a small amount of surface detail which I will try to re-add later in the build. This is how the fuselage looks now.... A lot of my modelling time has been spent assembling the components for the cockpit and painting them in preparation for joining the sections of the front fuselage together. All of the cockpit parts were given a coat of Xtracrylix ADC Grey which seems to match the colour of the interior on a lot of the pictures I have looked at, I have then applied a wash to them and done the detail painting on them as well. The instrument panels were also painted and assembled (after removing the 4 strange lumps on each of the foot pedals which in no way resemble the Northrop logo which should be there). This is how things look now.... Here is a detail picture of the only addition I have made so far, some cabling which is visible on all the pictures I have seen. This was applied to both the front and rear cockpits. I have not added the ejector seats as they are still being painted and modified and will be added after the cockpit parts have been glued together. I will also be adding any further details at that point as it will be easier to route everything and make sure it will not get in the way of the cockpit parts from the kit. I have also had some extra research/inspiration material arrive in the shape of this book.... Full of lots of useful and new (to me at least!) information I think I will be referring to it throughout the whole of the build. It has some very nice and well detailed colour profiles drawn by a certain Tom Cooper (never heard of him ) who has also supplied some of the photo's used in the book, so you can be assured of the quality of the book. Thats it for now, off to continue work on assembling the cockpit. Thanks for looking and as usual all comments and criticisms are gratefully received. Craig.3 points
-
Well, since it's the Wessi's 1st birthday, I couldn't let the day go past without an update, even a very small one. I think this is what they call the point of no return! and this is what's left of the kit exhaust... round ? I think not! I've seen bad molds before but this is just atrocious. The apprentice must have cut the mold with his teeth. Now epoxy glued. I'll give it overnight to cure properly before I start to really butcher it any further. Even in this state it looks better than the kit attempt sorry... couldn't resist trying it up fro size and to try and get an idea of what it's going to look like..... so this is the remainder of the day's progress - I finally got a sliding window in place ! and also added the small Emergency release handle at the top of the window. let's see what tomorrow brings with my home rolled exhausts!3 points
-
Some part of interior detail ... To be continued ...3 points


This leaderboard is set to London/GMT+01:00