
Leaderboard


Popular Content
Showing content with the highest reputation on 18/11/15 in all areas
-
My Monogram B17G has been sitting in my stash for about ten years, but after getting Robert Stitt’s superb book on the Coastal Command B17 Fortress it inspired me to have a go at the conversion to a version as used in Britain. New props and nose glazing, surgery to the nose section as well as various scratch built radar aerials, plus other bits and pieces completed the change to a Fortress IIA. The Temperate Sea scheme finish on the upper surface was slightly faded and weathered because these aircraft were subject to severe weather conditions on ops over the North Sea. The model represents a 206 Sqn. machine with British-designed Yagi homing aerials in the nose and wings and American-designed search aerials on the rear fuselage. It was based at Benbecula, Outer Hebrides from late 1942. Cheers.39 points
-
Airfix Lysander Mk.II For some reason I never built a Lysander even though I always wanted one ever since I first saw it in the Airfix catalogue in the 1970'th. I finally bought an old Airfix kit thinking that I at last would build the "spy plane". After I had started on it I found a Frog kit as well. I heard that the they were different versions so I made a small research. The Frog is a Mk.I and the Airfix is a Mk.II so the Airfix kit was wrong for the Mk.IIISCW that was used in the "spy business". The main difference between the marks are the engines. Mk.I and III used a Bristol Mercury and the Mk.II a Bristol Perseus. As the Airfix kit was the wrong version for the "spy plane" I had to find another alternative. I like yellow aircraft's so a crop duster in yellow was the answer. The good thing is that it did really exist so it isn't a What If. Some were used in Canada. Home made decals but there is one line of text missing at the bottom of the fin as I don't know what it should read. The "dusting equipment" was scratch built from plastic rods. I wonder if this could be Dusty Crophopper Aunt Lizzie? Frog Lysander Mk.III SCW When the plans were changed, the Frog kit became the "Spy catcher" instead. When I started to build I found the engine to be missing. I didn't find a suitable in the spare boxes so I took one from a Marivox SAAB B17 kit. But I couldn't resist adding some details to it. I then turned to the Airfix engine. The cooling flaps are moulded with an engraved line separating them where a strip should cover this area. So I added some plastic strips to the cowl. The engine has push rods moulded to the front of the cylinder but the real engine had sleeve valve so there should be two holes on front of the cylinders instead. As the Frog kit now have a detailed engine I decided to experiment with the interior adding some plastic rods to the sides with the hope that a fuel tank will fit between them. I decided on an pilot in the cockpit so I replaced the seat and controls with a pilot from the Airfix kit instead. Perhaps I can use the part in a Matchbox kit later. The extra fuel tank was made with parts from some Spitfire canopy's and a seat was added at the rear. Then it was time to close up and start assembling the plane. Funny, I was going to build a black Airfix Lysander but ended up with a Frog kit instead. I decided to use the figures and the ladder from the Airfix kit as they looked better. I thought that it would look better with the rear canopy open with the figure attached so I had to vacform that part of the canopy. Well the home made seat is still visible. Over all I like the Airfix kit better for most parts. Frog has little more details in the interior and the wheels look better (What is visible of them) But the landing lights are missing and the canopy is wrong. With the rear part open it is less visible though. The Frog kit is harder to build. Part fits better in the Airfix kit. A couple of quick builds to get back the" modelling mood". Not much have been done in the modelling front this year. Bjorn B27 points
-
Hi More jets from my growing 56 Sqn collection. All thoughts, especially negative/constructive ones are much appreciated, fixes for them would be even better. Without criticism Ill never improve, so please, dont be shy, Im a big boy and I dont cry easily. Im aware of plenty of faults, I dont mind at all for more to be pointed out. Thanks for looking. Sweaty23 points
-
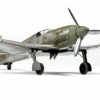
Here is my next venture into 1/48 scale, the Hasegawa Bf109F painted up as Eberhard von Boremski's F4. The kit was very easy to make, I added the external stiffeners to the rear fuselage as I was originally going to be making another aircraft but had a paint issue so changed my plans quite late on. The photos I saw of this aircraft indicate that it might not have had the external stiffeners but they are there now. Painted with my usual Mr Hobby paints. I used decals by EagleCals and Montex masks for the Balkan crosses. I used the photos in the Luftwaffe Colours Vol. 3 Sec. 4 for inspiration although I didn't follow them exactly as the demarcation between colours should have had a slightly softer edge to them in reality. Only light weathering (except for the prop as I got a bit carried away with that!) as the photos were taken while the Unit was re-equiping onto these aircraft although the wing roots did have a lot of mud and dust visible. Duncan B16 points
-
Hello again, This is my second post for today, So here it is a (straight OOB build) new Revell Jas-39C Gripen. (Note all the clear parts were just placed for the photo shoot, they are not-glued, including hud and wind shield - I will add a pilot in the future...) If You like to see video build here is the link: Thanks for looking! All the best! Dusan.16 points
-
After what seems like a long time (because it has been) I've completed my ICM Bf109 F4 as a Jabo of JG53 using Montex Masks and decals, painted using Mr Hobby acrylics. The kit includes an engine however I didn't have a lot of luck getting it to all line up so made it closed up. I used a colour profile in Kagero's Monograph Series Bf109F Vol 2 as the basis for the paint job. My first attempt at using Montex masks for the Balkan crosses, I didn't fancy using the supplied Swastikas though. I'm not sure I'd bother with the masks if I was to do it again. I replaced the kit's wheels with spares from an Eduard bf109 and that supplied the bomb and rack too. I hope you like it. Duncan B14 points
-
Hello friends, This is a great kit from Revell. Great details, build was straight oob. If You like to see video build here is the link: Thanks for looking! All the best! Dusan.12 points
-
The Me 209 is one of those projects I thought about for a longer time but didn't build it. Allways an other excuse came into my mind why I pushed it away every time I saw it in the stash. Not enough information, no clues how to build this 80th years kit up to a recent standard and some more. But in the last years I changed my view on how to build models. Less research, less self inflicted pressure to get the maximum out of a kit and as we say here (dont know if there is a similar english expression) "to let 5 a even number" And having more relaxing fun instead. With this approach I started the 209. I deceided to build her ot in the ususal dark blue scheme. To my knowledge the 209 was unpainted at the time she broke the world speed record. And I feel this is an attractive alternative to the painted variant and brings out the pure plane. The Huma kit is from the early times of short run models. According to this is the quality, it needed a lot of dry fitting, sanding and a lot of putty. I replaced the kits wheels, struts and exhausts with pieces from the spare box. I vacu formed a new cockpit hood to give a better view in the partialy scratch build cockpit and scratch built a new tail skid. I primed the model with Alclad grey primer, sanded an polished it and then apllied sveral shades of Alclad II paints. At least it got a coat of Aclad semi gloss clear.12 points
-
With apologies for the finger trouble which caused the post to go up half-cocked, here's the lovely little Airfix Spitfire 22, almost out of the box, but with the following tweaks for a 24: starboard rear fuselage hatch moved forward as for a Mk 24 rear fuselage fuel filler added shortened gun barrels for a late 24 undercarriage doors changed to Seafire type for a late 24 (I think this is correct for this aircraft - VN496, the last Spitfire, had them but it's not an exact science for earlier airframes) bomb racks and rocket rails adapted from Special Hobby items drilled out exhaust pipes added separation hooks for fuselage sipper tank decals from the spares box This great photo (found at http://www.talkmorga...n_veteran_air_)was the inspiration: And here's the model:11 points
-
Hi there I've been building this for the last couple of months it's a Revell British Airways kit, to which I've added Nazca Retro SAS decals, with some of the BA decals. I hope you like it. Cheers David11 points
-
A full build article is to be featured in the next Airfix Model World, which will be out in a couple weeks, but in the mean time, here's a sneak peak at my Pilot Replicas J21. After the issue hits the stands, I'll be happy to answer any questions and post additional photos. Cheers, Eric10 points
-
Start new project ... Fantastic Ultra Newest KIT !! Excellent surface material, a lot of good detail - very sharp and clear. Riveting whole surface of the model. Complete engine with many details. From Special Hobby Pe-2 kit I say Goodbye !!9 points
-
Hi Folks, I'm Peter and I'm from Germany and like to show you my model of a Dutch Two-Decker from 1665. It made completely from wood, oak to be precise and it is in 1/22nd scale. The hull is about 7 feet Long (2.1m). I've been working on it for two years now, and I hope you like it. Peter ]8 points
-
Hello .... Here's my first finished model since I was a child. I had always wanted to complete a model using all the correct paints and to try to get as much detail in there as possible. I've learned a few things along the way though ... 1. Filler for the gaps would be a good option 2. Shake that paint like it's a a badly behaved <insert object/person of choice here> 3. Dust and wet paint don't mix 4. A good quality brush helps 5. Should probably laquer / varnish to protect the finish 6. Paint the whole body before glueing on the glass bits 7. Patience with a stanley knife is advised 8. Not every moulding is 100% perfect so be patient when cleaning up edges 9. Paint costs a fortune 10. Modelling is fun 11. Hairclips are both a great way of securing glued parts but also a pain when they don't sit still 12. Landing gear is fiddly 13. I really like my magnifying LED Lamp 14. I should take photos in a more appropriate location 15. I can't paint straight lines 16. I'm itching to start another model8 points
-
Hello everyone! This is my first post on Britmodeller after a long time lurking. I just finished my my first model in ten or so years, feels good to be back with the paint and glue! So, the model. I made _a lot_ of rookie mistakes, especially which the paint (did not stir the matte coat, and had to redo it several times before I understand what was wrong…) But I am pretty pleased with the result anyway. It is an Airfix 1/72 Hawker Hurricane Mk.1. Not a lot of details, but the fit was OK. Brush painted with Humbrol Enamels. The antenna that’s way too thick is stretched sprue. Base made from scratch with a flowerpot saucer and putty. Thank you for looking! Regards, Johan8 points
-
Wow !!! thanks for all the high praise and for the glowing comments folks. At the end of the day I'm not really doing anything that different from what most of you folks are already doing... and some of you are doing it in 1/72 ! Pretty much all of you are doing some kind of modifications to kits or adding a few scratch built items - which is all I have really done.... I just went a bit... well.. overboard that's all. It's just one piece at a time (... and a long tortuous path to insanity ) and as (I think it was) Fritag mentioned in one of his threads somewhere - for every "good" part you see here, there's a dozen messed up and useless parts discarded and filed under B 1 N (or in my case, several dozen!) .... but experience gained to some degree with every part. I really never intended to go this far - I knew I wanted a more accurate Wessex then italeri churned out but I didn't realize just how far off the mark it was when I began this build. One thing led to another and the more I looked at photo's for research, the more issues I spotted. Once I had made the first few corrections there was no stopping me (apparently!). It was always a case of "what's the worst that can happen" ? If I really screw it up, I'll just use the kit part. Then it was, well... I already made one of those, so one of these shouldn't be too difficult" There were really only a few hairy moments for me during this build - cutting out the fuselage sides for the HC2 conversion really had me shaking, but taking it very, VERY slowly, with lots of stops and deep breaths got me there in the end. I'd encourage everyone to try a bit of scratch building and/or modification - you never know what you're capable of until you try - if you don't like it - try again, and keep trying until you get a part you are happy with... and if it really goes south - you can always buy another kit!8 points
-
Even though I end up with a nice result I wouldn't recommend this Corsair to you. I'd suggest to pay double or even three times and go with a Tamiya kit. It is definitely not a bad kit, nicely detailed but suffering with over engineered part brake downs, poor fitting problems and thin, missing, incorrect panel lines and white plastic injection... It turned out a nice kit at the end but takes a lot of effort and time... Surprisingly decals were extraordinary, perfectly printed, well searched and works great on surface without any solvent.7 points
-
I've just finished my latest model of a P-51D of the 359th FG. I have seen hardly any 1/72 (or any scale for that matter) depictions of Ray S. Wetmore's "Daddy's Girl" Mustang, depite being the aircraft of the leading ace of the 359th FG, as well as one of the highest scoring American aces in Europe! It also wears some pleasing colours on the nose and rudder. This is the best picture I have of the subject, and I found 3 more b&w pictures, as well as a WWII colour photo of the plane before bearing the "Daddy's Girl" writing. To build the model I have used the new tool Airfix kit, with decals from the old tool P-51D Daddy's Girl Mustang starter set. I've used the cockpit, seatbelts and part of the landing gear suspension mechanism of a Smer P-51 kit and then I scratch built the rear view mirror. So...not really an OOB build. I've appropriately filled the panel lines on the upper and lower surfaces of the main wings, which I think gives it a more realistic look, although the other panel lines are very deep, as I am sure many a modeller have complained about before me. Another thing about the Airfix new tool kit that is pretty annoying is the aerial mast. It's not clean at all and covered in flash and very flimsy. I broke one in the process of seperating it from the sprue. I had a spare, but this one also broke - even though I was super careful - when I slipped while sanding it smooth. I ended up using the mast from the old tool Airfix kit. Although I don't think this plane was ever very dirty (maybe after a sortie, but kept pretty clean otherwise), I have made use of dry pastels, oils and dry brushing to emulate a plane that isn't super clean. Initially I thought I overdid it, but I think the end result is acceptable. Something I only realised when I was almost finished is the kill markings decal for the port side of the canopy is marked with crosses, and not swastikas like the real subject! I really hope this does not detract too much off the end result... Anyway, enough talk. Please look at the pictures below, and I hope you can enjoy it. Cheers J7 points
-
Morning folk's a little update as I,m now at the "adding all the fiddly bit;s" stage. Before the canopy goes on I've added the framework Tony has reminded us to put in place due to Revell missing it on the kit's sprues,and mixed a dark gray wash to bring out the recessed detail,s I will go a shade or two lighter on the white area;s.Thank's for popping in.7 points
-
Hello modelers, Finally managed to take nice photos of my recently completed Panther. Best Omer ERKMEN7 points
-
Just finished another project. Polikarpov I-152 (I-15bis) from Special Hobby in 1/48 scale. Building process and more pictures you can see here: https://goo.gl/photos/EWb28Anj2Hx8CUZ77 The model is not for beginners. There were some difficulties, but overall positive experience. The result - one box became less Hope you like it Regards Ivan.6 points
-
Hello everyone, my name is Oliver, 35 years old and this is my first post here on BM. May i present you my Revell 1:32 RAF-Typhoon. Build with Eduard Interior, Eduard Exterior, RBF and Seatbelts. Colors with Revell spraycans (i have no airbrush) After long time studing the walkways i build the Eurofighter in about 3 months hard work. This is my first build after a break of nearly 20 years, please go easy There where lots of problems with this kit (intake, apu, speedbreak...) But finally, i managed it. Now, its almost done (APU, cleaning and a glasbox for the aircraft) and my next build i started yesterday will be a Revell 1:32 BAe Hawk. Please feel free to critise as everyone learns from there mistakes. Enjoy the pics. Oliver6 points
-
When I started this kit with the intention of building an E model many years ago I realized it is not possible to end up with a correct F-15E. So I left the half project along with my many others for many years. I was always fascinated with this unique Ferris Scheme. They look very attractive especially on Eagles. The only problem was the tiny tail numbers and very few stencils that bearly can be seen even on the actual aircraft photos. Finally custom decal print solved my problem:-) If you start the Academy kit to make an A or a B model, you will enjoy it and will be happy with the results, but if you try to come up with an C or a D model, that is another story... Best Omer ERKMEN5 points
-
Hello and thanks for your interest! This is my latest model, the 1/72 Airfix Hawker Typhoon, dressed as "F-3A 'Diane'", serial number MN716, flown by Pilot Officer R.G. Fox in November 1944. The model was built from the box, the only addition was photo-etch seatbelts from CMK. Decals are from the Aviaeology sheet "RCAF Hawker Typhoon Mk.IB 1944 to Bodenplatte" (https://www.hannants.co.uk/product/AOD72008). The Squadrons covered are No 438, 439 and 440 Sqns during 1944 through to operation Bodenplatte. The series covers nine different subject aircraft including one car door version and eight bubble canopy versions. Aviaeology include an exclusive on the two sizes of the early “type B” upper wing roundels. Aviaelogy supply far more than your average aftermarket decal sheet, in fact it is a multi-page b/w booklet with background info and b/w pictures of some of the aircraft featured. A colour PDF version of the colour scheme is available for free though registering on the Aviaeology Web Site. The decals are of highest quality and perform flawlessly. However I did manage to break up the correct "F3" codes for this particular machine by mishandling them; I had to fall back to another "F3" code that has a slightly different font. I guess you would not have noticed unless you're an expert on 2.TAF aircraft (or you work for Aviaeology). Former squadron codes ("5V") were overpainted; I copied this by spraying the "5V" codes with dark grey through a paper mask before applying the "F3" codes over it. If you look closely, you will notice that the "F3" codes look brighter then the code letter "A" - this is intentional as I believe only the "5V/F3" code was changed. I tried to replicate the tatty appearance of the invasion stripes on the lower fuselage. The model was painted with Gunze acrylics. Photographs by Wolfgang Rabel, IGM Cars & Bikes.5 points
-
Well new to me Constructed this one for the What If G/B from the old Trimaster 262a Nachtjager kit which gave me no problems as the Revell kit was recomended . Build thred http://www.britmodeller.com/forums/index.php?/topic/234989335-trimaster-me-262-hg-111-nachtjager/5 points
-
Hope you like, open to comments. Mark5 points
-
Hi ! Some days ago, Mixup_1 asked a tutorial about "How to photograph a model on a diorama". In spite of my poor English (sorry) I will try to answer to Mixup_1. Warning : This is my personal method - It's certainly not the best ever and i'm sure that there is a lot of other way to do... (if you have a different procedure, feel free to share it with us !) Well... Let's go... : Step 1 : The ground : My parking area is made from 6 sheets of paper on which I printed an image of concrete runway. These 6 sheets of paper are simply stuck on a correx pannel cut at the good size (Correx is a polypropylene "double wall" sheet used for packaging, you can also find it with printed commercial advertisements and hung at the ceilings in many supermakets - Correx is also know as : Akylux) This is the result : Step 2 : The landscape My landscape is also printed on a couple of sheets of paper. I used some screenshots taken from the mission editor of a combat flight simulator, but if you have the chance to have a lovely real landscape near you, you can use some pictures of it, it will look much more real The two sheets of paper are stuck on a simple foam piece that must be thick enough to be stable once put "on the ground" (i used a 50 mm thick styrofoam bar and i stuck the landscape with adhesive tape) The important thing is that the bottom part of printed landscape must overtake the styrofoam just like this : and allows the background to be slightly bent Why ? That's rather simple : I want the junction between the runway and the landscape to be as least visible as possible so i will "bend" the bottom of the lanscape and put the overtaking part under the correx sheet and it will allows you to set the horizon line's height just by moving the foam block back and forth. A smooth transition between the background ant the runway is also created by the bent background and allows it to become invisible Step 3 : The model and the photographer a - Put the model near the back ground but not to close (try to avoid any visible drop shadows of the model on the landscape.) b - Always put your camera on a tripod if the shutter speed decrease under 1/60 second Step 4 : The camera settings a - Except in a few rare cases, i never use the embeded camera's flash light - i better use a high ISO value - Caution : i recommand to perform some tests to see how your camera is able to handle the "high iso". Most of the standard camera don't like iso value higher than 800. Keep in mind that the most the ISO value will be high, the most your picture will be covered with film grain. b - Because all the wide angle lens deform the image, I always try to use the camera zoom to frame the picture (For those who use a reflex camera : I often set my zoom from 50mm to 170mm and even, when needed, i increase the zoom up to 250mm) c - I want a sharp focused image from the foreground to the background (i.e. a long Depth of field) so i set my camera on the "aperture mode" (A Mode) and i set the value on the higher number available. (The more this value is high, the longer will be the depth of field, the longer will be the exposure time - That's why the use of a tripod is compulsory.) For example : Here, the zoom is set on 44mm, iso is set on : 2500, Aperture is set at the max allowed value : F22 and the camera processor calculated an exposure time of : 2 seconds This is the result - picture taken indoor with incandecent light. Not very good, a bit blurry, not so realistic colors... The same subject but this picture was taken outdoor (in the garden) under a late afternoon warm sun light : i managed to use a bigger zoom value, The light is better as the picture's sharpness Keep in mind few things : - The most you will zoom, the most you will loose light and so the longer will be the exposure time - The light quality or setting are very important : * Always try to shoot picture under the sun light * Always take your pictures with the sun in your back or on your side * Choose the hours that will allow the smaller droped shadows * Try to frame your picture to simulate a realistic point of view on the model * Practice, practice, practice.... I hope that can help some of you and that my explanations was understandable.... Best regards D.C.4 points
-
Hiya Folks, The Battle of Arnhem which was portrayed by the films `A Bridge Too Far' and `Theirs is the Glory' began 70 years ago today on Sunday 17th September 1944. Under the codename Operation Market Garden, it was part of the infamous attempt by 2nd British Army to cross the Rhine via a number of bridges captured behind enemy lines in Holland by the US 101st and 82nd and the British 1st Airborne Divisions that would then allow the Allies to advance on Germany`s industrial Ruhr Valley and effectively end the war by Christmas. As we all know Monty`s great plan didn`t work out like that as there just happened to be two SS Panzer Divisions resting in the Arnhem area and unfortunately XXX Corps were unable to advance as quickly as planned leaving the lightly equipped British 1st Airborne Division with the attached Polish Ind. Para Bde stranded and fighting for their lives around Arnhem against superior odds with armour. The strong resistance in and around Arnhem ensued that only 740 or so men from the 2nd Parachute Battalion and various attached arms managed to reach the main divisional objective at Arnhem bridge while the remainder fought fiercely in and around the outskirts in a valiant attempt to reach them. Although a further 50 or so men managed to break through in dribs and drabs the bitter street fighting to reinforce the troops at the bridge stopped the main force and reduced the 1st Parachute Battalion to only 39 men and the 3rd Parachute Battalion to 50 men while the 11th Parachute Battalion and 2nd Battalion South Staffords which arrived with the 2nd lift on 18th September were each reduced to half of their original strength before they all withdrew to join the remainder of the division forming a perimeter around the village of Osterbeek. The resistance at the bridge finally ended at first light on Thursday 21st September after almost 4 days of fighting when the 70 remaining fighting troops ran out of ammunition ,....a fantastic effort considering that the entire division was only expected to hold out for 2 to 3 days! The remainder of the 1st Airborne Division along with some Poles and men of the 4th Bn the Dorset regiment who had managed to cross the Rhine by boat fought on until Monday 25th September 1944 when the remnants were withdrawn by boat across the river that night under heavy fire. Out out of over 10,000 men who had arrived by air, only 1,741 men were brought out, the remainder being killed, wounded or taken POW. I have met many of these survivors and they are very special men indeed! The RAF also played a heroic role during the battle and apart from the 186 pathfinders from the 21st Independant Parachute Company who parachuted in advance of the main landings from Stirlings drawn from 190 & 620 Sqn`s at RAF Fairford,...the remainder of the troops conveyed to Arnhem by RAF Dakota`s, Stirling`s, Albemarle`s and Halifax`s from 38 & 46 Groups were towed in Horsa, Hamilcar and a few Waco gliders, while USAAF C-47`s carried all of the remaining paratroopers. However the RAF were solely responsible for all resupply operations and these were heavily contested by concentrated flak and fighter opposition, not helped by the fact that a copy of the operations plan fell into enemy hands. Unbeknown by fliers at first due to faulty radios on the ground, all of the resupply DZ`s had fallen into enemy hands so despite heroically facing such opposition the majority of supplies fell into enemy hands! During the entire operation 152 RAF and 27 USAAF aircrew along with 127 RASC despatchers lost their lives in support of the troops at Arnhem, and 219 glider pilots were also lost, mostly during the fighting on the ground. A number of Victoria Crosses were awarded during the battle and one of these went to one of the supply droppers Flt. Lt. David Lord who made repeated runs over the DZ despite the wing of his Dakota being in flames and when it finally failed he and all but one of his crew who managed to jump at the last minute were killed. Following the withdrawal, Arnhem remained in enemy hands until it was finally liberated by men from the 49th( West Riding) Division serving with the Canadian 1st Army in April 1945. and the vital road bridge was bombed and sent crashing into the Rhine by Martin B26 Marauders of the 344th Bomb Group on the 7th October 1944. It is impossible to even scratch the surface of the battle here but hopefully I`ve enlightened a few people and helped to commemorate the brave men of Arnhem? The Model; The Italeri Stirling is a great model and this one was built to replicate LK171 `Shooting Stars' which was the personal aircraft of the Station Commander of RAF Rivenhall, Group Captain William E Surplice and it carried his initials `WES' on the fuselage with a Group Captains pennant on the nose. On the 19th September 1944 Surplice led 101 Stirling`s and 63 Dakota`s to drop supplies on DZ V (fllying in LK171 with 24 containers and 4 internal panniers on board) which were carrying a total of 500 tons but only a small amount reached the British troops and 12% of the aircraft consisting of 11 Stirling`s and 8 Dakota`s were shot down by heavy flak, one of which was the 271 Sqn Dakota flown by David Lord VC. This was the first major resupply operation to Arnhem and losses continued to rise with the 21st Sept being especially costly when German fighters got amongst the transports and among the losses this day were 7 out of 10 Stirlings despatched by 190 Sqn were shot down by ten FW 190`s which also claimed 6 Dakota`s from 48 Sqn and amongst the airmen shot down this day was Jimmy Edwards of large moustache fame who was a Dakota pilot flying with 271 Sqn and suffered burns in the resulting crash landing with three of his RASC despatchers wounded by gunfire. I`ve gone on enough already and it would take a huge volume to fully record the Battle of Arnhem and the air campaign which sustained it but I hope I`ve provided a taster and helped to commemorate the effort and sacrifice which took place in, around and over this Dutch town 70 years ago today? Here is the model; As a sad epitaph,.....LK171 was lost with its brave pilot Gp.Capt. Surplice on the night of 2nd November 1944 over Norway while attempting to drop supplies to the Norwegian resistance on the bleak Telemark Plateau. That night LK171 encountered severe icing which meant that the crew were forced to bail out before reaching their DZ but while holding the aircraft steady as his crew jumped William Surplice finally lost control and he failed to get out before it crashed. A cairn incorporating parts of LK171 now stands at the crash site and 32 year old Gp.Capt. Surplice DSO DFC* is now buried in the Oslo War Cemetery. , As a note- the kit codes were too large and in the wrong place - at least compared to photos that I could find of the real aircraft so replacements were found on a Modelcal sheet and the same photos showed the full D-Day striping on the decal sheet to be incorrect too although these may have been worn earlier? The model was hand painted (hairy stick!) on top with Tamiya rattle can spray for the black and the exhaust staining was applied using the dry brush technique,.....the full build thread can be seen here ; http://www.britmodeller.com/forums/index.php?/topic/234965749-stirling-x-2-recycling-an-old-airfix-cmkv-conversion-the-new-italeri-amkiv/page-4 This model is dedicated to everybody who fought at Arnhem and in Operation Market Garden as a whole. All the best Tony4 points
-
I have just completed my second entry in the Vietnam GB.The kit is a US M113 from Tamiya in 1/35. This is my second armour build since I began the hobby about a year and a half ago. I went in with bit of trepidation and unsure of how to get the best results. Thanks to all the guys in the GB though who offered much advice and support to help me fumble through. I really enjoyed the build, doing something which I usually wouldn't. The kit itself was great. Its fairly old but it went together well with good detail and a very nice interior. I had to buy some AM tracks. Also a special shout out to Dads203 for the replacement decals. Thanks for looking. Please leave comments, further advice or any questions you may have.4 points
-
Good day, gentlemen! Let me present you my next model. But first of all - little story) One of the very few fighter pilots in World War II to achieve the “ace” status in both the Pacific and European Theatres, Colonel John Landers is remembered as a skilled pilot and capable combat commander. Landers served with the 49th Fighter Group, in the Pacific Theatre flying P40’s and achieving 6 victories against the Japanese. In 1944, he was sent to Europe, where he joined the 55th Fighter Group (38th Fighter Squadron) based in Duxford, England. Five more victories were credited to him during this tour, bringing his total to 11. John Landers would later become Commanding Officer of the 38th Squadron in mid 1944. Being posted to the 8th Air Force in Europe, he flew in several units including 78th, 357th and 361st flying P-38’s and P-51’s, all of which were named “Big Beautiful Doll”. Colonel John Landers ended his flying career with 14.5 victories, 4.5 of these and an additional 20 ground victories were achieved in P-51’s. His impressive scoreboard and nose art adorned many airframes during his career. His P-51 “Big Beautiful Doll” was one of the most colorfully painted Mustangs of that era.4 points
-
Hi all, this is my first RFI in this forum. About the kit, it was quite good besides a few bad joins and the vinyl tracks may disappoint some, but very good otherwise. Airbrushed with Tamiya acrylics, and details with Humbrol paints. The base was made out of gyp-rock, and the walls of cardboard. Any more info on asking It is meant to look quite heavily weathered btw. Full WIP here: http://www.britmodeller.com/forums/index.php?/topic/234990517-revell-135-t-3476-model-1943/ Anyway some photos! Any criticisms, advice, and tips are welcome4 points
-
This is the rebox of the moebius kit I used some black oil paint to create some shadow so I could bring the detail out4 points
-
Hi all, was going through some old photo's earlier and found these, a model I have actually finished! This was a birthday present from my brother a couple of years ago... Enjoy! Al4 points
-
Thanks for your replies everbody, you're making me feel very welcome here. Here are some pictures of the original model which was built to the same scale. It was most likely built around 1660-1665 and doesn't represent a specific ship, rather a type of ship. Though the dimensions match the "Hollandia" of 1665 the coat of arms at the stern is very different. This is the coat of arms of Prins Willem III who later became King William of England thus some scholars believe the model represents the "De Jonge Prins" which was in reality a much smaller ship with less cannon. Apparently the comtemporary model found ist way to Berlin shortly after it was built but was sadly destroyed in an air-raid in WWII. However the model was very well recorded by a private enthusiast before the war who measured it and took numerous pictures. His drawings were put together to produce a set of plans which was published in a book in the 1960s. Though the plans aren't top-notch they serve well as a basis to produce an accurate replica. @seadog, yes I'm planning to fully rig her just like the original model. Fully rigged she will be 2.75m high which means she'll be displayed on the floor! I'm planning to make the topmasts to be lowered, just like on the original ships which will make moving here around (a bit) easier. @MikeyJ, no, with bowsprit she'll be 2,67m which is roughly 8 feet. I'll keep you posted. Thanks for checking in. Peter4 points
-
Hello! So after some time I show you my JU 88 G6 from Dragon/Cyber Hobby- Orange Box in 1/48. Pretty old kit and because of the many re-edtions the moulding suffered from that. The construction was a real challenge. I've tried to avoid filler. So dry fitting is a "must do". I have replaced all MG 151 with brass rods. The FUGs are from Mastermodel. Another challenge, because I tried the solder them. In the end it wasn't that hard, as I've thought. I made a template that helped me a lot.The rear antenna holder is also a brass construction soldered togehter. I've rescribed the fuel hatches on the top of the fuseage. Soon as the construction was finished, the painting started using Vallejo RLM 76 and Gunze RLM75. I really liked the paint scheme done by Chris Wauchop from Hyperscale. That black tail fin really got me! After all I'm happy this project is done. Greetings4 points
-
Well thats the weapons on and I am calling her done! Outdoor Pics Indoor pics under lights: Will take a picture once it joins other models on my sons ceiling! I will then post in the gallery Enjoyable build, thanks for looking!4 points
-
Right...on to the cockpit. Starting from the navigator's office, you may recall that I had, unnecessarily, actually, removed the navigators left hand consul ....and here it is, removed in all of its glory As I had decided that the whole of the navigator's station could do with being raised, I separated the pilot's office and the rear bulkhead.. so this all had to be re-built...with the floor and consuls raised by approx 4mm, more-or-less the height of the plinth. the seat is being used to check clearances I've added plastic card overlay floor and rear bulkhead... ..and have test fitted the rear pit into the upper fuselage shell. Also added are side walls. These hide the gaping chasm where the intakes are...i'll add detail later And the seat added for clearance/heights etc.,4 points
-
I wonder where this "Airfix will ONLY be producing models they can use LIDAR on" came from From the reading I've done they are using the old familiar drawings technique as well as CAD and LIDAR in future production If they only intend to use LIDAR the future of modelling is utterly dependant upon preservation societies, not a healthy move And if they want to make ME happy a nice accurate Apache please Matt, UK version thank ye very muchly And a nice accurate set of Westland helicopters, Whirlwind and some Wessexes Then maybe a nice new Belvedere and Sycamore If you think there's a trend here, well you could be on the money4 points
-
Yes, here are a few: For some reason the top of the front seat was painted black green - all other Draken seats were natural metal. Also note that Danish Drakens had white landing gear legs while the Swedish Drakens had green. I will also soon post pictures of the finished F-35.4 points
-
Finally arrived, paint Mr.Paint for Swedish Air Force and masks from Maestro Models ... Now I can continue the project. To be continued ...4 points
-
Thanks John! Oil washes: I use a Future coat to protect my paint job, but any acrylic gloss clear coat would do (I use almost only acrylics for painting). I normally rub off the excess oil using a paper towel (not the kitchen one) going along the air flow; if it's not enough, I slightly damp it into odorless oil thinner (same I use to thin down my washes) and redo it. Key here is to not rub off too hard; just be patient and you can get pretty nice modulation of the washes. As for pre-shading: it's really a matter of practice and getting the hang of it. You want to use a thinner mix of paint to go over the pre-shaded lines, so that you can better control your final result; and don't be afraid about leaving it show through too much, because the gloss clear coats are cutting back the effect quite significantly, and the more colorful decals you have, the more the pre-shade is going to attenuate. For very dark colors, pre-shading might be pointless, but you can reach the same effect with post-shading. HTH Ciao4 points
-
Hi John, thanks for joining! Here's a quick update on the weathering stage: I did a first round of pin wash on the panel lines, using oils For the RLM76 I used a Payne Grey wash; Payne Grey is actyually a sort of blue, I didn't want a too stark of a contrast. On the yellow areas, I used a very dark brown wash. Top side, again only RLM76 area have been "washed" here Second round: I added a dark brown wash only around the movable surfaces and the small hatches, to give more depth For top camo colors, I used a pure black wash A few other details that have been weathered with a combination of the above mentioned washes: wheel legs drop tank drop tank holding plate spinner/propeller Next step is going to be some additional selective washes, to give more depth to some of the details. Comments welcome, as usual Ciao4 points
-
I built this one a few years ago.....probably ten years or more actually............I should have used Light Stone rather than Mid-stone...oops! By all accounts the temporary paint baked onto the planes under the hot Nevada sun, and was quite difficult to remove...4 points
-
Just a thought............... It was not that long ago that we modellers waited with baited breath for the latest Tamiya release. In fact they were the byword for quality. Roll on a few years. We are now all talking about Airfix..... a home grown product, with a standard to compete with the Japanese big boys.... how things have changed. I don't remember anyone moaning about what Tamiya produced at the time. Airfix are on their game ....long may it last. As for the price........hey who pays full price for anything these days..... look around find the discounts...wait a little while until it becomes a price you want to pay. Now stop moaning and go and make something.......... it will make space for your next purchase.4 points
-
Well I for one am quite pleased with Airfix's plans, the Meteor F.8 is a stroke of genius although I can't help but thinking it would sell more in 1/72nd (I live in hope, I'll buy a few in 1/48th but a bucket load in 1/72nd, oh well, fingers crossed)! I'm looking forward to the JP and I'm impressed with the Victor. I'm also pleased to see the WW.I kits, hopefully they'll sell well and encourage them to do more - like the Sopwith Pup for instance! I'm also looking forward to the P-40B and the Ju-87. I think the revised toolings are good too, I'll be getting the Beau Mk.10, Queenie and the B5N1 Kate are shrewd moves (especially the Beau'). I can't agree with all you misery guts who're whingeing on but then, you can't please everyone. Wez - who'll be spending money on Airfix next year.4 points
-
HMS Upton Atlantic Models 1:350 The Ton class were coastal minesweepers built in the 1950s for the Royal Navy, but also used by other navies such as the South African Navy and the Royal Australian Navy. They were intended to meet the threat of seabed mines laid in shallow coastal waters, rivers, ports and harbours, a task for which the existing ocean-going minesweepers of the Algerine-class were not suited. The design of the class was led by the shipyard John I. Thornycroft & Company, and drew on lessons learnt in the Korean War, and numbered 119 vessels. They were diesel powered vessels of 440 tons displacement fully laden, constructed of wood and other non-ferromagnetic materials. Their small displacement and shallow draft gave them some protection against pressure and contact mines, and allowed them to navigate in shallow inshore waters. Primary armament was one Bofors 40 mm gun, although the South African variants also had an Oerlikon 20 mm cannon behind the funnel. RN vessels also had the same but they were gradually removed and an M2 Browning machine gun mounted midships. Sweeping equipment was provided for moored mines and magnetic mines. Many of the class were converted to minehunters by the incorporation of active rudders and the installation of the Type 193 minehunting sonar and associated equipment, including a very welcome enclosed bridge (the exception being HMS Highburton who retained her open bridge until de-commissioning in the 1970s, this actually becoming a source of manliness to her crew when meeting other Ton crews). These vessels only retained mechanical "Oropesa" sweep capability. The class served as patrol vessels in Borneo, Malaysia, Northern Ireland and Hong Kong. The minehunters played a significant role in the Suez Canal clearance after the Yom Kippur war. They also provided the backbone of the UK's Fishery Protection Squadron (4th MCM). Five of the class in Royal Navy Service were permanently converted to patrol craft for service policing Hong Kong's territorial waters in 1971. These vessels, comprising HM Ships Beachampton, Monkton, Wasperton, Wolverton and Yarnton had their minesweeping gear removed and were fitted with a second Bofors 40 mm gun aft of the funnel. They also received new pennant numbers: Beachampton P1007, Monkton P1055, Wasperton P1089, Wolverton P1093 and Yarnton P1096. It was originally planned to name the ships after insects, with names like Red Ant, Green Cockchafer and so on, but this plan was abandoned and the Royal Navy ships of the class were given names of British towns and villages ending in "-ton", hence the name of the class. With the rundown of the Royal Navy fleet in the 1960s, many were sent to become base ships for the Royal Naval Reserve allowing reserve crews to get to sea for short periods without a lot of effort to organise a crew of significant size. Some of these had their names changed to reflect the RNR Division they were attached to. The RNR vessels lasted until the introduction of the River-class minesweepers in 1984. The remainder of the RN ships paid off in the 1990s. The Model As with all the other Atlantic Model kits this one comes in a sturdy cardboard box, although admittedly somewhat smaller than normal in this case. Inside you are met with a box full of polystyrene chips, amongst which you will find a bubble-wrapped two piece hull, a bag of resin and metal parts, a sheet of etched brass, a CD containing the instructions and a small, but well filled decal sheet. As usual Peter has cast his magic and produced another superb resin model. The two piece hull is free from blemishes, pin holes or other imperfections other than the moulding pips on the mating surfaces of the hull sections. The detail included on the upper hull section is superb, with some of the finest bulkheads that can possibly be moulded. The detail continues on the small bridge and funnel sections of the superstructure, with only the small pour marks on the underside of each that requires any work, take care not to remove the locating pips though. The other parts made from resin are the buoy storage rack, complete with six buoys, two Gemini boats and the main sweep winch. The white metal parts include the 40mm mount, 40mm barrel, four sweep paravanes, or Oropesa as they are known, the hawser reel, the stern frame and towing bit, the anchor windlass, three liferaft canisters, and the propeller A frames. Some of the metal parts will require a bit of clean-up to remove the small amounts of flash attached to them. There are three short lengths of styrene rod provided, the two round section rods for the propeller shafts and a square section for the interior of the boat crane. The rest of the detail is provided on the etched brass sheet and includes funnel badges for the Hong Kong Squadron, a full set of railings, the anchors, jack and ensign staffs, boat deck, radar reflector fins, stern gear, buoy rack frame, sweep winch frame, boat derrick, propellers, funnel badges for the 1st MCM Squadron, mast, yardarms, mast platforms and their braces, sweep crane jibs and hand wheels, sensor cross, rudders, Oropesa cradles, radar mounting frame, radar antenna, stern sweep cradle guides, lifering ejector racks, signal lamps, DF antenna, plus vertical ladder stock and anchor chain. Construction begins with the modeller deciding how he would like to show the model off, either full hull or waterline. If full hull then the lower hull is joined to the upper hull and the joint filled and sanded as required. The 40mm gun is assembled from the white metal mount and barrel, whilst the life ring ejector racks, life raft racks and navigation radar mounting are folded to shape with the navigation radar antenna then fitted to the mounting. The 40mm gun, bridge section and funnel section are glued to the upper hull, along with the main sweep winch. The bridge section is then detailed with the various railings, DF antenna, vertical ladder, and fitted with the navigation radar and life raft ejector rack. The foredeck is fitted with the appropriate lengths of railing and further detailed with the anchors, their chains, the jack staff, two liferaft racks, which are fitted with two of the metal liferaft parts and the etched crane, complete with hand wheel. The mast is made up of two halves, which, when joined together are fitted with the three mast supports, and the various yardarms, platforms, braces, sensor cross array and the sensor panel, which is fitted to the base of the mast. The complete mast assembly is then glued into position behind the bridge. The Oropesa are paired up and fitted into the etched stowage racks, whilst the buoy rack is fitted with the etched frame, which contains the buoy arms which are in turn fitted with the radar reflector plates. The whole buoy rack assembly is glued into position over the main sweep winch, with the Oropesa racks just aft, two per side and the stern gear fitted to the transom. The quarterdeck is then fitted out with four cranes, each with separate hand wheels, the stern mounted towing bit frame and the two lower hawser guides fitted to the transom. The etched boat deck is fitted to the funnel section of the superstructure and fitted with the appropriate railings. The boat cranes is assembled and glued into position, with one of the Gemini boats fitted to the boat deck. If the model is being built in full hull configuration the propeller shafts, A frames, propellers and rudders are attached to the lower hull. Decals The smallish decal sheet contains complete pennant numbers for HMS Upton, M1187, P10, for the Hong Kong Squadron period, plus part pennant numbers M11, and M12 to which the individual numbers provided can be added, to make any of the class. There aren’t any nameplates, which is pretty understandable, considering how big this class was. The sheet also contains the bridge windows, for those who won’t like painting them in a large and small ensign and a large Union Jack. The printing is pretty good all told, although the flags are quite out of register, and a little bit thicker than the original decals Peter used in his Leopard class kits, so they should be easy to use. Conclusion Well, Peter does it again, with this release of another important class within the RN cold war fleet. With the exceptional moulding and etch we’ve come to expect from Atlantic models it would make a good kit to start with if you wish to build these multi-media style models. It is quite a bit smaller than the previous releases too, so would make for a nice centrepiece to a seascape that will be easy to transport and store. Very highly recommended Review sample courtesy of Peter Hall of3 points
-
Hi everyone I know it's a bit of a 'what if' really, but it was very ,very nearly built, in fact I spoke to a chap who worked for EE under Petter and his team ( I move in exalted circles don't you know ) and he told me it was a lot nearer being built than has previously been mentioned !! .Sorry 'bout this , but it's going to be a long one , here's my first attempt at a full blown scratch-build using only a toilet roll, brown paper , sticky back plastic, some beads and a bottle of Copydex !!. Actually this is hopefully the first of many experimental aircraft that I hope to build over the coming year representing types that only got as far as the planning stage.This first one is the English Electric study EAG.3280 , known as the P42. The idea was for a hypersonic aircraft capable of flying at around Mach 4.5 using conventional engines , Spey RB 168's in fact and employing compression lift as a means of attaining these speeds for short periods of time. No ramjets for this little baby ! (bear in mind this was the mid 50's a good 10 years before the XB-70 flew !!). The main problem was obviously one of kinetic heating so some pretty exotic materials were to be used in it's construction , including gold , titanium and a special thermally enhanced magnesium, all of which had to be developed at enormous cost to the British taxpayer. Due to cost and much other work going on at EE ( Lightning mostly), the idea was shelved , though it did appear once again in the early 60's , this time as the basis of a low orbit satellite launcher (with a widened fuselage to take the new payload). Onto the model then, I based it on drawings found in Tony Buttlers fantastic' British Secret Projects' , Hypersonics book. These were scaled up to 72nd and transferred to litho for use as templates. I also used the fantastic art work of Josef Gatial as inspiration and have based it mainly on his interpretation of this awesome if somewhat ungainly monster. The model is built mainly of the following , Body and engines and tail, 5 sizes of Evergreen Plasticard, plastic rod, brass rod and white metal, Cockpit , ICM MIG 31 foxhound , cockpit area Revell X15, Undercarriage , white metal TSR 2, Wheels True Detail 1/48th P80 ( nose) and 1/48th Skyraider ( main), and the afterburners also come from the ICM MIG 31 Foxhound. Cockpit glazing courtesy of Humbrol Clear fix. Construction started with the wings which were built up from 2 ply of Plasticard with a strengthening triangle section inside , then sanded to shape and scribed ( as was the whole airframe ,this was a royal pain in the ar #$ !!!!). Next came the fuselage /engine sides ,same again only this time one layer of card leading edges were all shaped. Room had to be made for the engine bays and U/C and variable air inlet ramps constructed. Engine turbine faces were used from a spare Academy SU27 ( though you can hardly see these !!).the pictures show it better than I can explain so I'll cut the waffle . The cockpit was tricky but in the end I opted for the ICM MIG 31 as the profile fitted perfectly and as luck would have it I had one knocking around , so I butchered it .!!.After filling the top side I needed a whole new cockpit , looking at the pics myself and Geoff B ( Thorvic ) decided that the Revell X-15 kit would be a suitable dionor , and guess what , I happened to have an old one in the loft !!. After quite bit of fiddling I got it to fit , all I had to do now was add new side windows with my Dremel. The undercarriage was also a bit of a poser , in the end the obvious choice was TSR-2 but I couldn't bring myself to use the Airfix ones , fortune smiled on me and Chris ( Falcon) kindly gave me a set of white metal ones he had at the Coventry show .I didn't use much filler as I knew it would have a NMF so I kept that down to a minimum ( thus doubling the build time !!!) The wheels were courtesy of Hannants (True Detail sets for P80 shooting star and Skyraider, low pressure filled with nitrogen was envisaged). The whole thing was primed in Alclad gloss black and airbrushed with EVERY shade of Alcad 2 I had ( which was pretty much the whole range !!!). The decals were from a number of sources , mainly Modeldecal , Xtradecal, and silver, dark grey stripes and solid block. The serial XJ220 was chosen from a cancelled Swift order , the date being correct for the estimated time frame Hopefully the model will have an appropriate diorama base ready for Telford Anyway if you've stayed with me this far , and have not yet lost the will to live and you're eyes haven't glazed over , I thank you and hope you like it , it was fun ( in a sort of put your hand in a Bunson burner kind of way !!).!!!! Thanks again to Thorvic and Falcon for their invaluable help. .................. .Right Matron's coming with a nice cup of steaming hot cocoa, a gag and a bullwhip ,!! off to the front ....Tallyho............................... The pictures ( finally ), This was the inspiration, the plans The build. cockpit took some work The final product , took a bit of work but I got there , what's next ??!!3 points
-
Thanks guys, appreciate the comments. Lighting time is some way off (might try and get the wired at the weekend), been busy with work etc., but managed to get the base roughed out and just about started on the type 23 escort (separate WIP). Cheers Nick3 points
-
I'm possibly being a bit picky with this build, but the Hunter is so aesthetically pleasing, that it seems criminal ( to me) to try and not get the shape right. There's so little to distract on the airframe with early Hunters, that anything that doesn't look right will throw the shape. Its a challenge!! I like those Jonners3 points
-
And more shots.. those from aircraft section knows me, i make tons of shots and then i cant decide which one to use.. so i use most of them here.. The water jerry can Thanks a lot guys for taking your time and watching the build I know there are imperfections, caused by both lack of skill and lack of researching of the real subject done. But i believe i did learn a lot by building this KT and i m pretty sure this is not my last AFV subject Have a great day guys3 points


This leaderboard is set to London/GMT+01:00