
Leaderboard


Popular Content
Showing content with the highest reputation on 11/11/15 in all areas
-
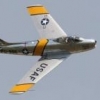
Kit: Airfix A01004 1/72 For work in progress of this kit, click here See ya soon!23 points
-
Hi folks, something different from my usual liking, a snap together Zvezda kit. My build observations were just posted on VW website: http://www.valiantwingsmodelling.co.uk/junkers-ju-87b-2-794-p.asp Cheers Libor20 points
-
Airfix 1/72 Bristol Blenheim Mk.IVf. OOB build, hand brushed with Revell Aquacolours and finished with a spray of Humbrol Mattcote (y)12 points
-
Hi All Finished this a couple of days ago. Some small modifications: added some wiring to the engine, loop antenna in the cockpit and hydraulic hoses to the undercarriage. Very lightly weathered. Best wishes, Danyel12 points
-
The Peewit masks arrived: ... and with some nervousness I attached the masks to the underside windows, but I needn't have worried, I didn't poke the windows in for a second time : ... and I fitted the canopy and applied the masks to that: I've got the day off today (by way of recompense for having to work this Saturday) so hopefully I can spray a layer of Bronze Green on the canopy, attach the pitot tube and wireless mast and get a coat of primer on the model before the day is out... Cheers, Stew9 points
-
Hi all As the Monty Python group used to say ... "And now for something completely different!" I don't always like doing fully detailed models (as in the Triumph TR6 I posted recently) so when I can find some really nice wood I like to hack out some of my favourite older cars that are appreciated for their flowing lines and hack out a bit of a show model. Here are 3 that are done in different woods with a varnished finish. Hope you don't mind this sort of stuff showing up on BM. First is an XK120 a car that has wonderful flowing lines. I used a tropical hardwood called cocobolo for it and cut and glued many strips together (8 or 9 in the boot/trunk lid alone) to get the grain flowing where I wanted it. Awful stuff to work with and the dust tastes awful. Metalwork all filed out of scraps of aluminum. Next is my all time favourite car ... the 250 GTO. I bought a block of padauk many years ago and just knew I wanted to do something special with it. This was my first ever scratch build ... long before the internet and plans. It sat for mnay years without wheels till I started making my own wire wheels ... still needs knock-offs in this pic. I like to build up many coats of lacquer and when it's dry, wet sand it absolutely flat till there are no hollows in the finish, then wax it. I've since made tiny metal door openers for it. Ah ... knock offs done. Next is a Ferrari 375MM that I'd never seen before and I just loved the shape. I carved it from some mahogany I salvaged from an abandoned boat. Starts off pretty crudely ... After much chiseling and sanding ... it starts to resemble the photo. Someone asked me "How do you do that?" and I said "I just take away all the bits that don't look like a Ferrari". Months later ... The lacquer makes for a beautiful finish on all woods. Actually I do this on all my painted models too ... paint, apply several coats of lacquer , lots of drying time in between, rub down with 1000 grit wet paper, apply wax. Hope you don't mind this departure from the norm. We now return to the standard program! Frank8 points
-
I made this a bit earlier in the year, but have only just got around to taking some decent photos. As usual Kinetic offer an amazingly detailed kit but true to form over complicate the build. I added a resin cockpit but everything else was OOTB. A 1st for me using Mig Jimenez acrylic paints, which I think were spot on for the right coloring's for this IDF bird.8 points
-
Ah, I wasn't expecting anyone to pull me up on it, to be honest I really have no idea how many ways there might be, I just liked the masculine certainty of the statement... Thanks John, the strawberry is a versatile fruit and should not be limited purely to dessert or jam-making. I did the pre-shading - messily for sure, but it is one of those rare things in which you can claim untidiness to be a virtue, since staining does not usually build up neatly... That's my feeble excuse anyway and I'm sticking to it. However two things did occur to me mid-way through doing it, namely: Pre-shading is immensely boring, whilst at the same time requiring the sort of levels of concentration normally reserved for painting delicate details, and it takes bloody ages; I think the F4F-4 as depicted might have made it's debut at Midway which sort of implies it wouldn't have been very worn-looking... but still, the likelihood is that I will apply too much topcoat and render all that sloppy work invisible anyway so I will not lose any sleep over it. Cheers, Stew8 points
-
For those who haven’t seen it elsewhere, I herewith present my latest completed project, a conversion of the Rareplanes 1/144 Swearingen Metro II. Some years ago I received this kit as a freebie with a large online auction purchase. The kit was missing its landing gear parts, and the decals were brown with age, but I’m a fan of less-common projects, so I was quite glad to have it. And the decals weren’t an issue, since I had an alternate scheme in mind. Of course, it took a few years to get around to it…. The scheme I had in mind was the Tp88c (militarized Swearingen/Fairchild Metro III) used by the Swedish Air Force for tests of the Ericsson Erieye side-looking airborne radar (SLAR) AEW system in the ‘80s and ‘90s. This version had a “canoe” containing the radar mounted atop the a/c fuselage, and an auxiliary power unit mounted in a pod on the centerline beneath. Best of all, it had the beautiful Swedish AF “crazy quilt” camouflage, always an eye-catcher. I knew I’d need to scratchbuild the missing landing gear, the radar fairing/mounting struts, and the APU pod. This bird also had a set of small secondary fins added to the stabilizers. But to modify the Rareliners Metro II kit to Metro III standard, I’d also have to stretch the wings, add wing fences at the extension point, and modify the props from the kit’s 3-blade version to the proper 4-blade type. (To be completely accurate, I’d also have to re-contour the engine nacelles slightly, but I decided that in this scale, that would be so subtle as to be nearly invisible.) I copied an online plan view (from the RVHP resin 1/72 kit of the same a/c), and adjusted it to 1/144 to use as a guide for the mods. All additions were from styrene sheet and strip stock, shaped as closely as possible to the variety of online photos available. Scheme was masked & painted w/ Tamiya tape and Tamiya acrylics, mixed by eye. (Quite a few brush touch-ups needed, I confess.) Decals were from Flying Colors Aerodecals Swedish number and roundel sheets, with the “Swedish Air Force” on each side made up from a Microscale Railroad decal letter sheet. I made up the Ericsson logo for the radar fairing on my PC and printed it out on my printer. The kit’s black window decals sort of got lost against the camouflage, so I overpainted them with metallic blue. Not a contest-winner, but a nice addition to my 1/144 flight-line. Hope you enjoy the pics.8 points
-
Here's my completed build of the Imperial Gallery 90mm 11th Hussar Officer done as Harry Flashman as a gift for a friend of mine. Altered the trousers a little but other than that built OOB. Painted with acrylics and oils. The base has a dome that goes over it but took that off for the photos. Cheers Segan7 points
-
Hi Everyone, just finished my latest French aircraft build to go with my Invader and Kingcobra, Hellers F4U-7 Corsair Went for the heavy weathered look on this one as photo`s of these aircraft from Indochina and Algeria show Built mostly as Mr Heller intended with just some seat straps, plastic sheet and wire embellishments here and there I don`t know what vintage this kit is but I was a bit surprised when I opened the box.. as the kit was very basic, in greasy lurid blue plastic and the largest location pins I`ve seen outside of a snap-together kit but I thought I`d build it, seeing as I`d paid for it, and see if I could hide it`s short comings Hope you enjoy looking at.. Cheers Russ7 points
-
Result! This was posted today by the admin on the forum on Airfix's website in response to my initial post about the Wildcat/Martlet problem: "Many thanks for the summary VMA131Marine - this is really useful. We have seen the discussion here, and on other forums, and the Development team are looking into it. At this stage I can't go into any details but I felt it was important to let you all know that we're aware of the discussion and will be checking the points raised." http://www.airfix.com/uk-en/forum/airfix-martlet-iv-errors/?p=2/#post-1440117 points
-
Here it is finished at long blinking last, my Battle TT from the I might say, rudimentary Airfix 1/72 jobbie with Xtradecal extra decals, as already described in my Work in Progress entry... final finish is Xtracrylix matt varnish (black stripes were hand painted!) Wings, rudder and nose all modified to make it just look like a Battle, let alone the one that tugged targets in Canada (least popular job in the RCAF). Interestingly this one lacks the usual TT appendages of "windmill" and banner housing - possibly it was a demonstration aircraft or used in exercises that didn't involve towing anything. Now for a model far less of a pain in the housings... (apologies for the yellowy colour balance in the photos, it's an old camera and its memory isn't what it used to be...)6 points
-
Hi all, Hasegawas ageing CF-18 sitting alongside the CF-5. Built out of the box and painted with enamels.6 points
-
As the title says here's my latest build,the Fw190 in 1/72 by Revell ! Great little kit! Hope you like it The last one is blurry sorry about that :/6 points
-
I added the wireless mast and pitot tube, then cut a piece off an old washing-up sponge with scissors to make a little mask for the engine: I then sprayed the canopy Bronze Green and then overall with Alclad Grey Primer: As this is another monocolour scheme - well, one for the upperside and one for the underside - I think I might have another go at pre-shading it, as I did like the effect on the Beaufighters, hopefully it won't look overdone on a single-engined aircraft in this scale but there's only one way to find out... (no, not a fight)... Cheers, Stew6 points
-
Seconded; on Sunday I suspended my son's first plane from his bedroom ceiling (made in part by us both, painted by him in exciting colours that might pass for camouflage were it to fly inverted over Mars, and of course with shark-mouth applied). The look of unadulterated joy on his face was wonderful to behold.6 points
-
Done! I'm taking the official photos tonight and post it shortly, meanwhile I have this: Cheers!6 points
-
I saw this on the Revell stand at Telford and couldn't resist it....... A so called friend has already called it a soap dish Need to finish the PBR but I had to put together the hull. Great fit I hope its an indicator of the rest of the kit. Gotta love that ugly duckling shape.......... Kev Kit review here http://www.britmodeller.com/forums/index.php?/topic/234967912-harbour-tug-boat-fairplay-1144-revell/?hl=%2Brevell+%2Bfairplay5 points
-
During the night of September 6th/7th 1940 Heinkel 111H-5 1H+EM of 4.KG26 took off from its base of Gilze-Rijen in the southern part of The Netherlands for a long range bombing mission to Derby. The crew consisted of Oberleutnant Werner Kuckelt; unteroffizier Ernst Studt (pilot); obergefreiter Walter Hubricht; gefreiter T Schneider; and gefreiter Rieling. The aircraft never reached its destination. "Vom Feindflug nach Derby nicht Zurückgekehrt" ("failed to return from attack flight to Derby") the record of KG26 states. A week and a half later, on September 17th, 1940, Ernst Studt's body was washed ashore near Stavoren in the north part of The Netherlands; Walter Hubrecht's body was found somewhere near Amsterdam and was buried there, originally. Werner Kuckelt's body was found over a month after the crash, on October 20th 1940, also again near Stavoren. The locations are marked on the map below: Gilze-Rijen is roughly between Rotterdam and Eindhoven; Derby is near Nottingham and Stavoren is on the IJsselmeer coast in the North of The Netherlands. Nobody knows what happened to the aircraft. Apparently, the loss is mentioned in Francis Mason's book about the Battle of Britain, but according to that source, the aircraft was shot down and crashed in Lincolnshire. However, the bodies were found in the IJsselmeer - which is odd, given the direction of the aircraft's likely planned flightpath. While the remains of 3 of the 5 crewmen were found, the actual aircraft was officially missing for decades. However, fishermen from Stavoren knew of a wreck about 5 miles north of Stavoren harbour; fish tend to gather around wrecks and it was a known location. Bits and pieces would sometimes get caught in the nets. In the late 70s, a piece was found with the name ARGUS stamped into it. Authorities realized it was a Heinkel 111, Argus being a subcontractor. During the subsequent inspection and recovery of the wreck the researchers also came across the remnants of a large bomb made of concrete; an SC2000. This type of bomb was carried by Werner Kuckelt's crew on their mission to Derby and the wreck was identified as "Weisse Emma", the aircraft that had been missing since 1940, and had apparently crashed on its way to the target, for unknown reasons. The two crew members gefreiter T Schneider and gefreiter Rieling were not found and remain missing in action. For this project I'm using Revell's H-6 kit Weisse Emma was an H-5 however, which is a relatively rare subvariant. Its main distinguishing feature from other He 111Hs is that it had the internal bomb racks replaced with fuel cells, giving it a very long range. It certainly did not have the broad propeller blades as featured on the H-6, so I'll be using parts from the Revell P-1 kit to backdate it. I did buy the two kits, for this conversion. I might have been able to use resin H-type engines on a P-1 kit, but not having to use resin on the outside is worth the investment. Speaking of the H-5, I wonder if anyone has any detailed reference regarding the fuel tanks in the fuselage. Photos are hard to come by; I believe the photo below might be the wreck of an H-5. From photos I gather that the front windows were deleted, but I wonder if anyone knows how the fuel cells would have been accessed. Anyone any ideas? Anyway, thanks for looking!5 points
-
Good afternoon. I want to present their models for discussion and evaluation of the work done. 1/72 Airfix Spitfire Mk.I R6981 "Kiwi III" P/O Al Deere 15.08.1940. 1/72 TAMIYA Bf-109E-4/B Oberleutnant Heinz Ebeling Bf-109E W.Nr. 3740 “Yellow 3” 05.11.19405 points
-
I am having to declare this one finished even though there are still a few bits to complete (framing on glazing, H2S housing, matt varnish etc) as I have a new commission to finish before Christmas! It is Revell's latest mould Lancaster in 1/72 scale but I have added two 7.5W LED strip lights into the bomb bay, powered by a mains-12v transformer to turn it into a light over my desk... Apologies for the picture quality but I can't get a decent picture that shows the effectiveness of the lights 😞5 points
-
Finally got around to studio shots. Bandai 1/48, OOB.5 points
-
Just got a coat of Tamiya TS-80 clear flat on then used some mig pigments and went over all the camo panel lines lightly with a propelling pencil. Nearly there now I can't understand how I thought I had time to do this now my perception of time is clearly flawed !!5 points
-
Thanks guy's. The next job is the ratlines with the stay ropes done. I started by rapping them around the shroud ropes but found this to thick. It was not only easier but looks better by just gluing the ratlines to the shrouds from the out side. By doing all three lower and upper lines, this becomes much faster. This is time consuming but I cannot think of a better way to do this. Make two or three lengths and then leave to dry on each shroud, cut off the excess. But its working!!!!!. I also removed the Anchor rests and moved in between the first two chains. foxy5 points
-
Ive been continuing work on this today. Ive masked the Rear turret with the Eduard masks would have been hell had done it on my own. I must say that now as an adult working on 1/72 Heavies they are damn small compared to what I remember them being as a kid ! I can well understand why so many cry out for 48th scale much as I love 72nd, more and more the presence of 48th captivates you models in this scale seeming to have more heft. (Easier to mask too ) ....<<<<<<< All that from someone who loves 1/200 and 1/144. I have been toning down the engines with lashings of Nuln Oil and sepia shade filters from citadel. Looks like the engines got a battering and later I'll have ago with chalks and pigments. It's getting there now.5 points
-
Morning folk,s a little more progress,off camera some of the turret assemblies have been started I hope to photo update tomorrow and some glossing and a decal or two added just to get the effect of what she,ll look like finished,thanks for popping in.5 points
-
Hello, It is not nice to present model with some missing detail but I have promised to Tango 1 that I will post my just finished Revell Hurricane 1/32 in desert camo. Unfortunately weather here in Slovakia is not giving me chance to take some nice daylight pictures of the completed model so I have used some older pictures when the sun was shining but some details are missing and of course I added some with the finished Hurricane but they were taken inside so they are bit dark. So it is old but gold Revell kit on which I left all panel lines and the rivets raised and tried to make some weathering on them. Only rescribed panel lines area is around gun bay where Revell left it from Mk1 version. Desert filter was not included in the kit so I made my own from balsa wood. I used pilot figure from the box, I think it is nice to have tropical Hurricane with its hero inside....so here are the pictures Martin5 points
-
Pssst, want some props? I'll have some more in the new year. John5 points
-
Hey guys, i would like to show you my last finished kit. It is the very first armour kit since i came back to the modelling 2 years ago (hell the time flies fast!). One would say it does not matter, planes or tanks.. and bigger scale should be easier to make, right? Well, from my view, there are differences and bigger scales does not mean it ll be easier to make details.. Anyway, the build was a lot of fun to me, so i think soon i ll have a look on the 1/72 tanks in my stash The Tiger II was built for my friend to celebrate his fresh new engineering degree - ordered by his wife to surprise him, so i hope he ll be surprised in good You can find the WIP thread h with aftermarket parts used ere http://www.britmodeller.com/forums/index.php?/topic/234990910-tiger-ii-april-1945-weathering-stage-dragon-135/, but because i had only month for the build (working on it on the few free days during the month), i did not have time to take shots of every little progress there Anyway, part of the gift was some wooden base (supplied by my friend´s wife) - and it was quite huge.. So i decided to build two little grass "isles" on it, with some ammo boxes and other stuff, to fill the empty areas. Now to the tank itself At the beginning we said there wont be any interior (because of the limited time), so everything is closed. Also i did show some camo schemes to my friend´s wife and she chosed the late war scheme as the nicest to her. I did some researching around and like 30 King Tigers were finished in this scheme - sadly i did not find any photo of any of these, so the camouflage is kind of what-if (used Rom1´s E-75 as an inspiration, thanks! ). Everything of the weathering stage (or well, the very most of it) was new to me and i was also experimenting a bit with artistic stuff.. Well, here is the result more to come..4 points
-
Greetings all, Finally got this off the shelf of doom after languishing for a couple of years. I had lost interest in finishing it as it wasn’t turning out as good as I hoped, however it doesn’t look too bad in the photos so now more pleased than I expected I would be. This is the first in what I naively aspire to be a build series of almost the entire Delta Airlines fleet. This is the 1/144 Welsh Models vacform Lockheed TriStar 385-200, originally with Saudia Airlines decals, for which I substituted the excellent TwoSix Decals Delta Airlines decals. In fact the kit was originally eBayed by Ray of Twosix Decals. As a vacform, everything seemed to take forever. The nose gear bay needs to be cut out and built from scratch, pleased I got aircraft level! Painted with Zero Paints white and Alclad Aluminium/Steel/Jet Exhaust. Varnished with Alclad Aqua Gloss. Darren4 points
-
Had my internet and then my PC not crashed at the weekend wiping out an 80pc completed post then this would have been up earlier. Following my post report on a visit to Graf Ignatievo I thought I’d post some pictures from our COAP visit to the BAF museum at Kromovo which is adjacent to the helicopter base which in turn shares a runway with Plovdiv Airport. There are direct flights on Ryanair from Stansted. The museum houses an interesting collection of mainly Soviet built aircraft although an Arado 196 and a Turkish F104G are also present. The modest museum building has a display of uniforms, photos and model kits which are presented as a timeline from the air force’s beginning through to the modern day. Captions are Bulgarian (obviously!) and English. There are also some exhibits relating to Bulgaria’s participation in the Soviet space programme. Entry fee was 5 Levs which is approximately £1.85 and is a bargain. Unfortunately, in the way that money is tight for running the air force so it is for the museum and this is reflected in the condition of some of the exhibits. The weather was grey and wet. The following day we were inside the wire so to speak on the helicopter base and I will post images from the visit later. The SU 22 Fitter images are all those that I took: Skids – I hope they are helpful. On with the pictures. 1. Overview of the Museum's exhibits. 2. An imaginative mural. MiG 17 PF in the foreground. 3. Yak 23. Many of the aircraft are laid out on brick plinths such as this one. 4. Overview of the museum. The twin in the foreground is a TU2 T. 5. The wrecks are behind a wire fence with the SA2's standing guard. 6. 7. It helps if you can get some height. The museum staff were very helpful! No.6 above was taken from this rather shaky platform. 8. Outside the museum building. 9. The helicopter base is next door. 10. The museum director (standing at the top of the ladder) is a former MiG 23 pilot with 2,000 hours on type. He doesn't speak English but our Bulgarian colleague sorted this out for us. The cockpit feels a long way off the ground and is a quite a tight fit. What a treat to be able to do this. 11. A TU2 T. It joined the museum in 1993 12. 13. 14. Il 28 R Beagle. 15. A couple of MiG 21s 16. Mi 14 Haze anti-submarine helicopter. 17. Mi 4M Hound anti-submarine helicopter. 18. 19. MiG 21 bis Fishbed N 20. SU22 UM4. 21. Something called an SL 90 22. These vehicles sat opposite the SA2 Guidelines. 23. Another view of the Beagle. 24. SU 22 UM4. 25. Plovdiv Airport/Kromovo helicopter base is just behind the fence. 26. IL2 M3. 27. Arado 196 A3 28. KA 26 Hoodlum. 29. Yak 11 trainer. 30. Mi 24 Hind D. 31. SU22. 32. To the left of the grey hangar in the background are a number of Mi24 Hinds that are now out of service. 33. A grand morning out. Thanks for looking.4 points
-
Hi all my missus has bought me Hellers 1/100 Soliel Royal for my Christmas present and she ordered it last night with strict instructions not to be even looked at till Christmas, we'll see4 points
-
Hello, this is an old but nice Italeri kit, 1/35, Pz.IV Ausf.H, with many changes like: track links, tools, gun barrel and metal cable from Tamiya, drive sprocket and rear idler wheel from Academy and some scratchs build pars. Heavy weathering. That´s all...4 points
-
Hi all, Hasegawas little Sea Harrier with ModelDecal Set no. 65. Brian.4 points
-
Not sure if I could post it here-but I would like to present finished MINIKITS 1:100 released by AIRFIX some time ago but still possible to buy. Each kit is pre painted model (including markings) which requires only cement. It was great relax and no fit issues at all (no filler in the small gaps as it will damage pre painted surface) ...and my wife happy because there was no smell of enamels in our house:) I was suprised how nice these kits looks when are finished-I think this is very good option for beginners - to built nice kit without too much troubles. Martin4 points
-
OK...at long last back to the gunboat... Comes with a perfectly acceptable mast...but hey, where's the fun in that? I've been working on it in between taking a sort of break with a couple of Airfix newish releases - Spitfire XIX and a Gnat. nice kits and I thinkthey've come out OK. So....Now the MGB is nearly done, much in need of tidying from all the inevitable handling etc. I've changed my mind about the dio. I'm thinking of maybe making it a double along with my scratch Vosper....Dunno. Anyway here it is as of this evening. One big problem I've had is the nearly totallack of photos of these beauties. Iw as fortunate enough to pick up a copy of MTBs and MGBs at War Home WAters, bit of a rare book these days. and it has a few good shots. What one craves, of course, is a walk round of a 1944 boat....ha...ha... Ta for looking4 points
-
Cheers for that comparison Peter, to be honest I cannot decide between them! In this latest update I`ve applied the matt varnish and done some slight weathering using Mig pigments for the oil and exhaust staining with some chipped paint represented using silver enamel; So just the turrets, glazing and antennae etc to add and the model should soon be finished, Cheers Tony PS- Oh yeah,......I also need to paint and polish up the exhausts and exhaust collector ring,....I`ll probably use Humbrol polished steel with some other colours dry brushed over to replicate heat staining.4 points
-
A few pics on the fitter update...slow progress I've glued on the vertical stabilizer, .., quikboost air scoops - nice improvement over the kit ones. Fitting of the plastic is less than good, but since I was already aware of that, I won't complain too much. Lots of putty and sanding still needed. cheers4 points
-
Having been set aside to allow another project to be completed, the Bv 141 is now back on my workbench. Here the "office" has been installed in the starboard wing. I have Montex and Eduard mask sets - both worth every penny for a greenhouse like this. Montex provides both interior and exterior masks while Eduard has only the exterior but I found theirs fit and stick better than Montex's so will use them on the exterior. Here you see the interior Montex masks being applied to the main gondola's transparency. Jumping forward in time, the gondola has been attached and seams cleaned up. The exterior has not yet been painted so what you see is the RLM02 showing through from the inside. Moving on to the fuselage and cowling, the kit had too many exhaust stubs (17 when there should be only 14), they were too long, and were incorrectly positioned. After scrutinizing photos in the Valiant Wings Bv 141 book I came up with a best-guess as to the correct configuration. Rather than re-positioning the rather crude kit stubs I decided to replace them using chunks of Evergreen strips. While not perfect, I feel they're an improvement over the original units. Another thing to note - thinning the inside back edge of the armor ring gave a better fit when attached to the cowling. Lastly, prior to attaching the landing light lens, just for fun, I installed a small MV Products light lens. The cover was then attached and the edges sealed with super glue. When hardened, it was sanded flush with the wing leading edge and polished. That's where things stand as of last night. Cheers, Eric4 points
-
Hi all....here you are an old and venerable Airfix's Stuka, with some minor mods to represent a Legion Condor's B-1. Minor work involved a new propeller, new exhausts, reshaping chin radiator, etc....I also detailed the cockpit interior with some copper wire, lead foil, etc...Decals came from an old Hobbycalcas sheet. I painted it with Gunze Sangyo acrylics and slightly weathered the ugly lady with pastel chalks. I hope you'll like it and, as usual, any comment will be welcome.... Best regards from Tenerife...4 points
-
Hi again, I've been slowly progressing on Wick's Bf 109. After glueing the fuselage halves and the wing parts together, I glued the closed fuselage to the wings. To ensure to correct dihedral, I applied masking tape bands between the fuselage and the wing tips: I let the glue cure for 24h and then sanded and polished the joins. This is the result: I had to rescribe the longitudinal panel lines along the spine and the lower aft fuselage, which were a characteristic of the Bf 109. As a guide I used labelling tape: This is the result on the spine: And this is the result on the lower aft fuselage: I really don't like rescribing... Next, I had to remove some raised detail on the lower area of the tail, which represents the rudder control cables. These will be replaced by PE parts. Here's the original raised detail (left) and the result of the removal (right): The next step will be deciding whether to paint the engine upper and lower covers separately from the fuselage or glueing them first and painting them using masking. That's all for now. Thanks for looking, Jaime4 points
-
No that's boring, instead lets all get excited about a kit that might not even be coming, and if it is, probably not for ages, and will have accuracy issues, poor fit, be in the wrong scale and too expensive!! On a personal level I really hope there is one coming and it's a 1/144 tanker version!!4 points
-
Hi Guys Thank you Luís. Another update on the Super Tucano! Finally looks like something, underneath light grey already applied, time to paint the medium grey on top! Feel free to comment Best Regards Filipe4 points
-
Truer words were seldom spoken: net photo4 points
-
Still having a pop at the RAF then Tony? It's getting a tad boring. It was the MOD that insisted that 30 C130J could do the work of 60+ C130K. As someone who has flown in both the Maritime and Transport roles and as someone who has done Maritime in both C130 and Nimrod I can tell you that C130 is not the panacea that you might think. A dedicated MPA is required. However, in my view P8 is a bucket of compromise; indeed an expensive compromise with a series of severe limitations. While it might make a good MMA, as a MPA it has several problems.4 points
-
Hi everyone. She is finished, and what a kit she was. Kit is completely OOB as we have no aftermarket available yet, I plan to build more shacks, as I have 2 more of these and a Revell one due soon. I used Tamiya XF-2 for the white and a 50/50 mix of XF-82 ocean gray and XF-77 IJN gray with a couple of drops of X-4 blue to give it a hint of blue. I'm not a fan of using enamels and could not get hold of 44 pastel blue for the prop spinners so I mixed Tamiya X-14 sky blue with some white and used that as a substitute. Glossed in Tamiya X-22 clear and sealed in with X-35 semi gloss. I pretty much followed the build in the recent Airfix model magazine build of the kit. My grandfather spent 25+ years in the Raf as a trained pilot, but due to there being to many pilots in the 50s, he found himself as a signaler, he spent 10 of those years on Shackletons, and this aircraft I build here, WR966 he few on many times. His log book is linked below. WIP here http://www.britmodeller.com/forums/index.php?/topic/234990355-airfix-172-avro-shackleton-wip-finished/page-4 I finished this at midnight and took some snaps in the study, but the light doesn't give it much justice, I'll try and add some more photos in natural light in the morning, but these still look good. Hope you like it Added some more snaps today, brought a good size mirror to use as a display base and taking some photos.3 points
-
So you're saying there's two ways.3 points
-
Armée de l'Air Hellcat Eduard 1/72 Built OOB except for decals from Berna, bombs from spares bin, rockets stubs and wingtip lights from scratch Cheers Segan3 points
-
Col. if I do go Mk 1 then yes - the overall HSS of WT555 would seem apt. But Im still leaning on a Mk 2 ( Oi you - stop slouching against that Hunter you 'orrid little man!) Anyhow- wings. Hopefully these pics are self explanatory.... Jonners...a la Harold Lloyd3 points


.thumb.jpg.d17ff607fc7e89ed057e63fcb6f2a888.jpg)


This leaderboard is set to London/GMT+01:00