
Leaderboard


Popular Content
Showing content with the highest reputation on 23/10/15 in all areas
-
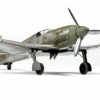
All, Some pictures of my completed 1/72 Matchbox Armstrong Whitworth Siskin between the wars fighter. Built mostly OOB with some very minor detail work creating basic cockpit, separating the control surfaces and reducing landing gear struts to make it appear more weighted down when on the ground. Rigged with very fine sewing mending thread (monofilament) and brush painted as always. Constructive comments welcome Regards Dave32 points
-
Hi everybody, The goal was to finish in early November and for 30 min and the bonding of the antenna is good. Here is the Stirling Italeri in its version of para / glider tug. I just have to find him a place in the house now because it does not fit in my showcase Hope you like Joel15 points
-
Nowadays with the upcomming AZ-Model, we will have an easy way to build a Bf 109 G-6/AS. But a while ago there was no AS Version available and so I did a kitbash, using the fuselage of Revells G-10 and the wings of Academys G-6 togehter with PE cooler-flaps from Eduard. Additionally I repositioned the landing flaps and the elevator. Revells G-10 was partialy rescribed, it got a new propeller from quickboost, and I reworked the oilcooler, the MG openings, the supercharger inlet and gave her a CMK Resin Cockpit The 109 is painted with Gunze Acrylics in RLM 75/83/73. Weathering was done with several airbrushed shadings and oil colors. It shows a JG 4 plane from the 4. Gruppe/ 13. Staffel flown by Uffz Friedrich Zenk.14 points
-
Hi everybody, as said my first RFI and first time using a few new techniques (varnishes for decals, washes) so be gentle! I am also well aware of a MAJOR gaffe I made on the tail.... Have done many RAF planes but I was so focused on positioning I put them on the wrong way round . Aside from that I'm very pleased with myself and the finish, my best ever I think. I opted for the RAF Valley based squadron as I was on annual camp there twice with the ATC. Also painted the wings in Hu 166 as I have seen pictures of them like this, and it is a sexy grey... Though I haven't a clue if this is accurate. Perhaps someone could enlighten me. Also apologies for the poor quality smartphone pictures and lack decent setting, the bathroom just happens to have nice bright lights!13 points
-
Airfix Boulton Paul Defiant. Here is the link to the WIP Thank you for looking. Joe.12 points
-
Well, I made it back from the windswept shores of Lake Erie and what's more.. I passed my exam!!! Now I'm back I have another 10 weeks of weekly assessments then straight into exam number 2! Oh goody... NOT! Life kinda got in my way upon my return but I have finally managed to snag a few moments dans la basement. I am desperately trying to get to the point where I can get the last coat of semi-gloss on but I keep finding things that need done first. As I left my last post I had managed to make one o' them thar sticky-outy sharp thingies. That is now fixed in place, painted, and pointing backwards as per my reference photo's. As a slight diversion I decided to tackle the winch hook. Italeri have molded it as a sold disc, and just for a change, *cough* I didn't like it. After some mulling over the issue I decided the best option was to carve out the existing disc to make three spars - that allowed me to make a small brass ring that was the ca'd in place around aforementioned spars. Then when it's all painted up and glued into the winch I think it looks a bit over-scale but I'm drawing a line at this one. Since the trans deck door will be down, very little of it will be seen, so in this instance I think it will suffice. Moving along, it was time for more aerials, this time the towel rail hanging off the port side. I don't believe there's anything supplied in the kit for this one (though I may have cut it up for something else) so I had to roll my own (again). As you can see here, I had loads of fun making aerials then deciding it wasn't good enough - I'm going with the one at the bottom. The top one was made from some solid brass and some wire - took me ages to file down the pins - then I decided it was way too big. That led me onto version number two - this time I used some small diameter brass tube squeezed in the vise - and then I couldn't figure out how to attach it securely... which brought me to version number three - this time I didn't squeeze the brass tube quite so hard, which left a small gap between the walls (see below). I then clamped some brass wire in the vise to flatten the end down - then the flattened end of the wire slid nicely into the almost flat tube, and a touch of solder was flung on to keep everything in place. Then followed a quick run over with the file to clean things up and I added some styrene at the bottom end to create the bracket mounting. In the photo above you can see that I made two plates to mount the aerial on - I spent ages looking at photo's before I spotted the "plates" then took ages to make them, get them in the right place and drill the mounting holes..... wait for it.... Then I realized that the "plates" were not in fact plates at all, merely a small lip above and below the aerial - thankfully this was spotted before I slapped any glue on the beast. Today I must have spent at least an hour and a half trying to finish the aerial off - the 1:1 is chrome with aluminum (I think) mounting brackets. I tried using BMF but when I finally got the darn stuff on (took forever!) I thought it looked to chintzy. The I tried painting it, then I painted it again, then I stripped the paint off and then I painted it again... which is where I am at now. The brackets will get a smattering of some kind of aluminum paint and that should be it ready to fit. And didn't I mention somewhere that the rotor head was now finished ???? Yeah, I was wrong again... I forgot that I still had to make the droop stops. I had made one a as test a while back, just to see if I could do it - now i had to make the remaining three, well four actually - when I test fitted the old oner I discovered it was too long so I had the make the new ones a good deal shorter.. this is about the limits of my skill shown here. Yup, there's brass rod top and bottom, with three uprights - and yes I was stupid enough to fit a "spring" around the center post. All four are now painted and should be fitted to the rotor head tomorrow. ... and I still haven't got the darn thing sprayed with the semi-gloss yet!11 points
-
IPMS Portugal launched the challenge to its members: build a T-6 at 1:100 scale to be displayed in Telford next November.10 points
-
Good day, jentlemen! This is my next model.10 points
-
Hi Guys for the BC display at Telford this year we have the Stirling on show as it'll be 75th anniversary of their introduction into service. With this in mind I decided to build N3640 as it was the first one issued to a Sqd, in August 1940, for evaluation purposes. There were some notable differences which I had to get in so here goes. The mid upper turret needed deleting, there is some evidence that the early ones had the mid under turret but I couldn't see any evidence from the piccies I had so I went without, probably be proven wrong soon. The two masts under the nose needed to be deleted, fairly easy. I fertled about with the wing leading edge intakes. Having gained two spinners from a friends Wellington kit I had some job searching for another Wellington kit but at Newark I found one and finally had 4 spinners I could cut down for the props, as this a/c had them. I had to drill extra windows to both port and starboard sides but can't remember how many without having another kit to hand so I can compare. By the way, I used Humbrol clearfix to glaze them and they look great but how is it best to use this stuff, it strings like mad and leaves a residue on the paint job, wouldn't have been a prob but I had matted the paint down and it spoiled the finish a bit. I sanded down all the rivet detail and scribed some panels back on. All the exhausts on this a/c were outboard on the engines. I deleted the hedgehog bits and had to shorten two of them so I had a complete set. The blurb I read said they were high up on the cowlings but I think I went too high. Painting was done using Xtracrylics but I'm not happy with the yellow. Decals were from the spares box and the landing light cover, which has been fitted since I took the pictures, was fashioned from sellotape. The wheels were from Scale Resin bought from the big H, I thought the rear wheels would be a bit weak but they've stood up to my moving the kit around. For now at least. Regards Paul10 points
-
Hi all, here are some pictures of my last completed build. It is the very nice Zvezda BF 109 kit (F4 version) finished as a plane from JG 77, flown by Heinrich Setz, in Crimea 1942. The decals are from an Authentic Decals sheet. Paints are Gunze acrylics. I hope you will like it, best, Christian.9 points
-
HI all! Today the Russian whiz. A quite good kit, wich made a lot of fun. Also finally something else than our evergreens 109, Spit and all these things. Best regards Andy8 points
-
First posting of a model on this forum (sorry, no WIP). Completed using Vallejo Acrylics, Panel washed using Windsor and Newton inks. First time doing pre-shading, but I'm very happy with how it came out. Dave7 points
-
After registering and introducing myself in the "New member" section, http://www.britmodeller.com/forums/index.php?/topic/234990577-hello-from-cologne-germany/ I would like to show some of my models. I hope it is ok to show some work that has been posted somewhere else before. I would like to start with this Junkers Ju 88. It was done mainly OOB. I painted the A-5 with Gunze Acrylics (my favorite brand), gave it a wash with oil colors and finaly weathered it with Tamiyas Weathering Sets. This plane flew with the KG 30 in Finnland 1941/42. The Kit-decals are rather simple (only crosses and and unit markings), so I added some stencils from the Revell kit. Comments and criticsm are welcome.7 points
-
After placing yet another ill fitting jet on the shelf of doom, I thought I'd try a new direction and decided on WW2 single engined fighters. This is the Tamiya kit and what a great little kit! No hassles putting it together at all. I didn't pay too much attention to accuracy, I just went back to basics. A week to build instead of a two month jet slog has given my mojo a lovely little boost! I used Xtradecals and painted with a mix of Humbrol, Revell, Mr hobby and Tamiya paints. Anyway, the pics (not the best quality as I have to rely on the sun and it aint around.. Excuse the broken cannon which I snapped off during manoeuvres ) : Thanks for looking!7 points
-
I got two coats of matt varnish on this yesterday and added the final details this morning so I am calling the aircraft part of this build done. I still need to do some work to organise displaying it, but because the 109 is now going to feature alongside it I need to crack on with that build. Hopefully going to make it. I would just like to add my thanks to those of you who have stayed with this build and for all the help and support given.7 points
-
Hello modellers, just finished my first seaplane. Mostly OOB with just few additions in the cockpit and cut of tail control surfaces. The hasegawa kit is not the newest but definitively great quality and really enjoyable. just the decals were a bit out of register but nothing dramatic to adjust. Painting has been done with airbrush using Tamiya Acrylics and Tamiya spray for finishing. Comments and suggestions are always welcome. Enjoy the pictures and thanks for looking. Cheers Andy6 points
-
On another note, any Father who reads Kipling to his offspring is an absolute hero in my book.6 points
-
Hello to all. My latest finished model. AV-8A from Airfix in 1/72, completely out of the box, just added harnesses to the ejection seat and a few buttons to the side consoles. Great kit, great fit, just a little issue with the intakes (inside) but everything went fine at the end.6 points
-
On a model railway forum I visit (don't tell anyone I said that...!!) they have a number of these 'buttons'. When first introduced, replacing the single like button, everyone poo-poohed the idea saying they'd never use them, what a wastte of time, etc etc. Now I think everyone thinks they're a great idea! You have the usual like, together with agree, thanks, funny, clever/craftsmanship, informative useful, & friendly/supportive.... Keith6 points
-
Cheers fella nice of you to say so Got the masks on and was somewhat unsure about them at first, mainly due to the various sections not meeting perfectly across the fuselage halves or between fuselage and wing, although a little extra work with scissors and some masking fluid sorted that issue out. Really should have taken a photo at that point but... I got carried away With all the masking off I'm really pleased with the results. Only the wavy wing leading edge will need more work;6 points
-
Thank you very much, Gentlemen. I appreciate your interest and kind words. Thanks particularly to Sergey for an very interesting and useful photograph. I had some false starts on this over the past couple of weeks, as I had no choice but to guess regarding the manner in which the motor was mounted. I had seen two methods on Farmans, one a sort of four-point star, and one a truncated pyramid. I tried both, and in doing so realized I had botched the motor, which to engage any mounting would need more crankcase behind the cylinder bank. Then I got lucky. I had put up an inquiry on a small forum dedicated to the South African Air Force, and a fellow there came up trumps, providing pictures which not only showed the manner in which the machines operating in German Southwest Africa were marked, but showing the motor clearly from the port quarter, up pretty close. Wife put the old picture through Photoshop, cleaning it up to show even more detail in the shadows, and so I was finally able to make the mounting work, and o so with some confidence I was being at least reasonably accurate. It was necessary to reconfigure the rear of the nacelle a bit, but nothing too major; a couple of cross-pieces had to come out, and a few other bits and bibs. And while ll of this was going on I got the interior painted, partially rigged, and made the nose 'cap'. At any rate, here are some pictures of the new engine in its early stages, fit into its mounting on the partially re-configured nacelle rear,,,, The nose 'cap' is just resting in place. This was made from a block of two rectangles of 2mm sheet laminated together, after which everything no the desired part was cut and sanded away. A bit of extension was added in the rear on each side, but these may be cut off, as they do not seem to be evident in the S.A. pictures. Wife has previously remarked on seeing items like this that they resemble the 'stick on' nails girls use nowadays, buyable by the pack in the beauty section, and she may have a good point.... Here is a look at the nacelle rear in final form, ready for the motor to be attached.... Here is the new engine, painted, about mid-way through, front and back... Copper tone is a wash of brown over sprayed silver, topped with clear orange (washable marker picked up with Future). Finally, here is the motor attached to its mountings at the rear of the nacelle. I can now proceed to the relatively straightforward business of furnishing the 'office' for the crew, after which I will do the fuel tank, finish the exhaust arrangements and fuel feeds, PAINT the thing, and then do the radiators and water-feeds. I feel reasonably sure I can get that done over the coming weekend....6 points
-
With my latest build very close to completion it's on to the next build, Kopro's boxing of the Sukhoi Su-25 Frogfoot to be built as Ukrainian machine in the latest camo scheme. And the extras............................... I'm planning on using some of the panels from the MIG-21 set on the same shaped/sized panels on this kit, mostly consisting of the round ones on the engine pods. And finally, what I hope will be a cracking set of decals.........5 points
-
I hope as a newcomer I've posted this in the most appropriate place. It was posted by Al Bowie on HyperScale, but I thought some may enjoy it here too if it has not been posted before: This Fantasy Kit site with really well done mock-ups of box-art. Mainly Airfix, but a large number of Matchbox and others. https://www.facebook.com/fantasykitworld5 points
-
Airfix new models, a 1/48 model I didnt like it too much. Some problems at construction and the body doesnt fit so good Never mind, try the quality of plastic and details. An English Land Rover in Bosnia, just in the middle of a Serb protest and got some damage All made by brush and vallejo acylics, oils and pigments.5 points
-
I can only applaud Martin's grown-up attitude to the situation, and would advise anyone to assume that the person they are discussing is able to read this (it is an open forum as far as reading goes), so not to use derogatory wording about a company's business decision, just because it doesn't meet with your approval. More power to your elbow Martin & Sio5 points
-
Here’s my rendition of the Arii (originally produced by Otaki?) 1:48 scale F4U-1A Corsair. Even though it was first issued in 1972, the Arii kit builds into a nice Corsair. The good points are very accurate outline and shapes, finely recessed panel lines, and great parts fit. Drawbacks are a simple and inacurate cockpit and wheels, and an engine that doesen’t remotely resemble any engine used in any aircraft. Here’s how I upgraded the kit: I replaced the cartoonish engine with with a resin R-2800, updated the cockpit with Eduard photoetched insturment panel, seat and sidewall details, and used seatbelts and wheels from True Details. I replaced ther kit tail wheel with a more accurate-looking one from the spares box, and attached it at an angle for a more candid appearance. I also cut away the flaps and dropped them, added exhaust stacks made from drilled-out styrene rod, and added a small whip antenna to the fuselage spine. I couldn’t determine if this plane had the tail hook removed or not, so I left it on. VF-17’s Corsairs didn’t have the usual antenna mast, and some had unusual field-modified antennas. Based on photos, I built an antenna that runs fron the top if the vertical fin down to the tip of the right horizontal stabilizer. From there, it runs into the usual antenna lead-in on the right side of the fuselage, behind the cockpit. I don’t know for certain if it’s accurate, but that’s how I interpreted the antenna arrangment in photos. I used a Pasche VL airbrush to apply the three-toned camouflage scheme, though most photos of the actual aircraft indicate it was very weathered, with almost no distiction between the non-specular sea blue upper surfaces and the intermidiate blue sides. For markings, I used an old SuperScale sheet to portray “White 29”, the plane flown by Lt. Ira Kepford of VF-17 while based at Ondonga, New Georgia, in the Solomon Islands in late 1943. I made a mistake in not placing the kill markings at the correct angle to the tape covering the seams of the forward fuselage cell. VF-17 was the first navy squadron to be equipped with the Corsair. Assigned briefly to USS Bunker Hill, the squadron was soon transferred to the Solomon Islands to serve as a land-based squadron. In its two tours of duty in the Solomons, VF-17 was credited 156 aerial victories and produced 12 aces, the most of any squadron in the Navy. Kepford was the U.S. Navy’s 6th highest ranking ace with 16 victories and 8 probables.5 points
-
Hobbyboss kit with resin Aires ejection seats, main wheel bay and weapons from Eduard Brassin series ( AIM-9, GBU-10 and Mk.82 bombs on MER's ). I used Xtradecal sheet for the markings.4 points
-
I'm happy today.... seven years after my previous finished work (Sh60B 1/72) I can call another one a finished one.... Very happy indeed... There are things that could be improved, of course, but i'm very happy with the results... Mostly having in count that is my first civil vehicle and my first 1/32 model... This model is dedicated to all of you that posted in my WIP thread. Thanks a lot4 points
-
Hi folks, Here are some glamour shots of my completed Beaufighter. Apart from tape seat belts, it's completely oob. I wanted to get the 'vibe' of the kit, before building the others (4) in my stash more seriously. Scheme is brush painted with Xtracrylix. I am seriously impressed by the kit. The vast majority of the build sequence is sensible, parts fit where they should and overall assembly is pretty simple. Two things I will mention though: 1) Engine cowlings: Suggest you glue the cowling pieces together to form the complete cowling, let dry, then add the engine, rather than assemble the cowling around the engine as the instructions suggest; 2) Undercarriage leg supports. Ensure these are trimmed to fit neatly in the slots provided. The fit is tight and it's a somewhat awkward squeeze to install them. Anyway, here are the shots: RFI thread here: http://www.britmodeller.com/forums/index.php?/topic/234989610-airfix-172-beaufighter/ regards, Martin4 points
-
You know Martin, I'm looking forward to saying hello in person one day. Your attitude and approach is first class.4 points
-
Airfix Boulton Paul Defiant Finished. Thank you all for looking and your post during my WIP. I've put some photos in the Gallery Joe4 points
-
Thanks Beard Big day today... Masked by Ced Bufton, on Flickr DG on by Ced Bufton, on Flickr Make sure you move other parts out of the spray booth - rats. Had to do these again: Oops by Ced Bufton, on Flickr Mask off by Ced Bufton, on Flickr Out to dinner tonight and Yeovilton show tomorrow so probably doing a bear impression (big paws) Thanks for looking!4 points
-
I have been shamed by my lack of industry. Somewhere Lord Tebbit frowns disapprovingly and knows not why. (I always wondered if anyone ever made decals for his Vampire from his RAF days -- one could do a dogfight double with it and whatever Tony Benn flew.)4 points
-
Keeping us all in suspense until Telford when they announce their new Victor, Blue Steel version. Well, I can hope, can't I?4 points
-
here are pics of my Ventura Spit 'XIV. I built it many years ago around the 80s or earlier not sure now. Any how, they illustrate the look of the kit and I have also included a couple shots of the Fujimi 'bubble top' XIV for comparison. In the original issue as this one was, the cannon,prop blades, exhaust stubs, u/c legs, control column were in white metal and a piece of fine gauze was also included to fit in the underwing rads. Later issues by Ventura did not have these metal parts so much due to 'elf n' safety' regs or something like that. I know the tailwheel is AWOl on the silver one and am looking in my Spitfire spares to see if I have one there. I'll do pics of my unbuilt Ventura kit next so you can see what the is like for those that don't know it.4 points
-
Tail Fix started, the pictures say it all I think...4 points
-
I really shouldn't drop these into a thread about Stirlings, and that kit DOES look fun but... I sold a few of these over the years, it looked after me better than the Hurricane book has! A few from years ago. This lot is comfortably into 7 and possibly 8 figures now when added up and , perhaps, the reason I have been looking back today was (and you read it here first) today I ceased to be the owner of this lady. A hard and upsetting day4 points
-
Thanks CedB, sometimes we have to make it easy for ourselves... I saw the 'hole' on the sheet and thought... recycle! @ArmouredSprue: thank you very much for following this thread! 221. The lower wings are fixed, glued with Gator Glue (which, as I've explained before, is totally different from Gator's Grip glue, often wrongly referred to as Gator Glue). 222. After 45 minutes of drying time I started sanding the fuselage. 223. The gaps near the wing roots and the wing parts are filled with thick CA + accelerator, thereafter filed. 224. CA glue in this spot may look risky... 225. ... but is smooth within short time. The clue is to first use the file, then sanding paper coarse, then sanding paper medium. 226. Layer of silver, after which deficiencies still appear present. Those get CA again (see picture hereunder). File and sand again, CA again, then it's flat. 227. Quite a bit of work, but the result is satisfactory. Port side (picture: right area) is finished. Compare left with right. 228. Don't forget to sand off the silver afterwards... Total spent time: 85 hours.4 points
-
Its getting there. Main camo pattern done. Needs some touch ups and the underneath to get another coat of light grey. Then to make it all very shiney for the decals.4 points
-
C-54D Skymaster Revell 1:72 The Skymaster from Douglas was a four engine transport aircraft developed for the USAAF during WWII. Like its predecessor the C-47 its was also developed from an a civilian airliner; in this case the DC-4. The DC-4 started life back in 1935 from a requirement of United Air Lines for a larger and more sophisticated replacement for the DC-3. The DC-4 had a planned capacity of 42 passengers and would be the first large aircraft to feature a nosewheel. Other new features would be boosted flight controls, and air-conditioning. The prototype would fly in 1938 with airline certification following in 1939. The prototype aircraft was changed significantly to what would become the DC-4 with a lot of complex systems being removed to make the aircraft less complex. Before the DC-4 could really be put into production for the airlines all of the US production capacity would switch to war production. The DC-4 was taken on by the then USAAF and USN. The USAAF would designate the DC-4 the C-54, and the USN the R5D. The C-54 would go through a few design changes, the D model would feature an increased fuel capacity in the wings along with R-2000-11 Engines. A total of 380 would be built. The aircraft would carry out long range transport in WWII seating upto 50 troops. They would go onto feature heavily in the post war Berlin Airlift, and constitute a major contribution to the Korean Airlift. The aircraft began to be phased out of the new USAF in 1948 by the arrival of the C-124 Globemaster. The last C-54 in US service would be used until 1974 by the US Navy test pilots school. As well as the US many overseas military Air Forces would use the aircraft including the UK, France, Portugal, and Canada. The civilian DC-4 would also be built in large numbers following WWII and serve with a vast array of airlines around the world. Several are still flying today, most with the now famous Buffalo Airway in Canada. Though it should be noted that many more DC-3's still fly than the aircraft which was designed to replace it! The Kit The announcement of this kit by Revell was welcome news to both modellers of large military transports and airliner modellers. The kit is upto the standard we now expect from Revell. Like other large aircraft they have brought us such as the Transall the C-54D features a full interior which builds up and goes into the main fuselage. The kit arrives on 13 suitably large sprues of grey plastic and one clear sprue. The parts are well moulded with engraved panel lines. It is noted that provision has been made for the large rear bubble windows which featured on some aircraft for these to be installed. Construction starts in the conventional way with the cockpit section. The front wheel well is built up on the underside of the cockpit floor. This is followed above by the forward cockpit bulkhead which is backed up with the instrument panel. The coaming for this is fitted along with the centre console. Control yokes are added (rudder pedals are moulded into the floor) along with multi part seats for the pilots. The engineers/radio ops station behind the cockpit is then added to the main long floor along with equipment racks. Following behind this a crew rest area with two bunks if fitted. The bulkhead to the rear compartment is then added and a roof panel inserted. The seats for the load area are added along both sides. When this is done the interior sides are then added. The last stage to construct the interior is to add the cockpit section to the front of the main cabin section. The complex front landing gear can then be assembled. This contains seven parts to assemble and add to the front wheel well. All of the cabin glazing is now added to the outer fuselage halves. There are some different options for this so care is needed to select the right ones. The next major step is to add the completed interior into the main fuselage. Revel recommend adding 50 grams of weight to the front of the aircraft to avoid a tail sitter. The cargo door needs adding to the left half of the fuselage before closing them up. Underneath two spacers have to be added also at this time. Once these are done the main fuselage can be closed up around the interior. Construction now moves to the aircraft's wings. For the lower wing various parts are added into each engine nacelle along with an engine front and fire wall (for the two inboard engines). The rear of the firewall becomes the inside front of the main gear well. Rear bulkheads for the gears wells are also added. There is the option for raised or lower flaps in the kit and these need to be selected at this stage as some of the parts need to be fitted into the wing before it is closed up. It looks like some cutting of parts is required for the flaps up option. Once the flaps are out of the way the upper wings can be fitted. The tops of the nacelles and intakes are also added here. The wing is now joined to the fuselage. Outer parts of the engine cowlings are now added. It is also at this stage that more parts for the lowered flaps are added (skip this if going for flaps up). Following this the next major stage in construction is to make up and add the rudder, tailpanes and their control surfaces. These are all two half conventional parts. Attention is now drawn to the engines on the wings. The engines feature two banks of cylinders with exhausts and intakes on either side. All of these parts are separate and with careful assembly and painting should turn out to be good looking examples of the real thing. The completed engines are fitted into their cowlings and these then attached to the wings. The exhausts can then be added. The correct nose (a choice of two) is then added to the front of the fuselage. Again it is recommended 10 grams of weight be added in here. Construction then moves to the landing gear. The front wheel is constructed and added to the gear leg. The front gear doors are supplied as one part and will need to be cut if displaying the model with the gear down. The main gear legs and their retraction struts are added at this time. The inner hubs, scissors and brake lines are also added to the legs, along with main wheels. These are followed by the outer hubs. Retraction struts are added for the complex main gear doors. Again these will need to be split down if doing a gear down model. Following the earlier decision as to the flap state the relevant parts are now added at this stage. Separate ailerons are also added to the outer wings. The canopy is then fitted. The large clear part fits back to become part of the fuselage and the windows masked on it. The overhead instrument panel must be fitted before this part is installed.To finish of the rear cargo door is added. This is one part but can be cut if the modeller wishes it open (it would be a shame to waste that interior?). The propellers are added, along with landing lights, aerials, some antenna cable (not included) needs to be added to the top and undersides. Finally if you have miscalculated the weight a tail stand is provided, however like other aircraft of this period the Skymaster is often seen on the ground with this fitted. Decals The decal sheet provides two marking options for the USAF. The decal sheet is fairly small in the box and features the blue band around the windows for option 1, and the orange flash for option 2. All walkway markings for the wings are included. The decal sheet is fairly matt in finish, well printed and colour dense. There is minimal carrier film present around the decals, but it is present in the USAF markings and other titles. C-54 Skymaster 0-17218 - 1949. C-54 Skymaster 317227 - Berlin Airlift 1948-49. Conclusion This is an impressive kit from Revell and follows on from their other 1:72 scale transports by giving the modeller a full interior. Very Highly Recommended. Revell model kits are available from all good toy and model retailers. For further information visit3 points
-
1/72 scale Plastic Soldier Company Lloyd Carriers for Crew and Ammo plus 6 Pounder Anti-Tank Gun Scale Pics...... ATB Sean3 points
-
Yes I know that you have all seen 1 or 50 of these before but this is my first EVER Lightning build....!!! Really enjoyed this kit and will plan on doing many more. Sprayed using Vallejo Model Air paints, Flory Wash, sealed with Vallejo Matt. Wire for the pitot probe. Cheers all, Phil Thanks for looking.3 points
-
Wait until he takes it off. It looks like the kind of slug that'll stop you from leaving the house.Edit: to correct spelling.3 points
-
thanks Ian! this week I got the 11-member carrier deck crew delivered, in 4 different scales. the largest is printed in Nylon, the rest in transparent resin. The detailing of the figure in 1:144 is the same as the one in 1:32! I modelled them with a piece of tube on 1 of the shoes so that they are easier to paint. This will be a big convenience since each figure is just 12 mm's tall! the next step is to clean them in IPA and to give them a basecoat of paint. This will also make the details stand out more than when looking at the transparent resin. I now also have the tie downs for the elevator deck so I can finish the glueing work on the deck section soon and start scribing the catapult and other features.3 points
-
This morning's fun: Masked up by Ced Bufton, on Flickr Um??!! by Ced Bufton, on Flickr I left this on while I had some lunch, fully expecting this weird stuff to eat the model while I was away, but no... Masks off by Ced Bufton, on Flickr Out to dinner tonight and Yeovilton show tomorrow so probably doing a bear impression (big paws) (cut and pasting jokes now, groan) Thanks for looking!3 points
-
Hannants have updated the links with the price plus the usual pre-order 10% off offer. So the RRP appears to be £45, although that price may be less at the show. To me I class that as affordable for a limited run injection kit of that size of a subject unlikely to be covered by a mainstream supplier and half the price of a resin equivalent, so I'll still be buying one if not two as some interesting projects now possible using this as a base kit.3 points
-
G'day people, Thanks very much for all your comments, they are much appreciated. I have manged to squeeze everything into the fuselage and glued the two fuselage halves together. While that is drying, I turned my attention to the whirly bits. Hasegawa included a small PE fret in my boxing. One of the intended areas for the PE is the tail rotor. In addition to the "Y" shaped PE, I added some wire solder. Next up, The main rotor. The kit rotor hub is very plain, and in comparison to the Zvesda kits, this area is much more simplified. The individual blades attach the the lower via a pin system. This would leave ugly circular marks that need filling, however I use my punch sets to simultaneously hide the seams and add detail. Additional PE was used to add the pitch linkages and some more wire solder was added to busy up the hub, cheers, Pappy3 points
-
If I never see another F-16 again in my entire life, it will be too soon! Martin3 points
-
G'day people, I spent today painting the cockpit and cabin. These are just a single colour, black and light blue respectively, so this was a pretty straightforward affair. The PE set supplied replacement cabin doors in the form of built up laminated sections. The lower sections were assembled completely, but for ease of painting, the upper section containing the windows have been painted separately. The cabin was initially devoid of all detail, not even the bench seat was supplied by Hasegawa, which was a little surprising considering the fact that the kit has the option for open cabin doors. The front end involved a little more work pick out the details and interest. Time spent here is worthwhile given the large transparency that encloses these cockpits. The PE set allows for the rear cabin windows to be depicted open. Acetate film is supplied that is added to the delicate PE frames that have been bent to the open position. cheers, Pappy3 points
-
They also do Peter Caygill's excellent Javelin tome Keef, great but frightening stuff, (for Vixen and Scimitar, Tony Buttlers books make good reading)......... Excellent choice Edward, I've also got a 10 squadron B.1 on the go at the mo for our Bomber Command sig courtesy of FP ......60% Matchbox/40% resin, (new tailplane, ailerons, tail-cone and rudder courtesy of my old friend Terry Grey).......weighs a ton.. (Hope you don't mind me plonking a piccy of it on here),3 points


.thumb.jpg.76f12b87ce9ca9929c9aabdcf8f9d2dd.jpg)


.thumb.JPG.3498f40362ff13ebfc4b2e45abbd545e.JPG)


.thumb.jpg.3c5b41eb004e624ff9bdf837868ecbb6.jpg)


This leaderboard is set to London/GMT+01:00