
Leaderboard


Popular Content
Showing content with the highest reputation on 22/10/15 in all areas
-
Hi everybody, The goal was to finish in early November and for 30 min and the bonding of the antenna is good. Here is the Stirling Italeri in its version of para / glider tug. I just have to find him a place in the house now because it does not fit in my showcase Hope you like Joel31 points
-
Here’s my rendition of the Arii (originally produced by Otaki?) 1:48 scale F4U-1A Corsair. Even though it was first issued in 1972, the Arii kit builds into a nice Corsair. The good points are very accurate outline and shapes, finely recessed panel lines, and great parts fit. Drawbacks are a simple and inacurate cockpit and wheels, and an engine that doesen’t remotely resemble any engine used in any aircraft. Here’s how I upgraded the kit: I replaced the cartoonish engine with with a resin R-2800, updated the cockpit with Eduard photoetched insturment panel, seat and sidewall details, and used seatbelts and wheels from True Details. I replaced ther kit tail wheel with a more accurate-looking one from the spares box, and attached it at an angle for a more candid appearance. I also cut away the flaps and dropped them, added exhaust stacks made from drilled-out styrene rod, and added a small whip antenna to the fuselage spine. I couldn’t determine if this plane had the tail hook removed or not, so I left it on. VF-17’s Corsairs didn’t have the usual antenna mast, and some had unusual field-modified antennas. Based on photos, I built an antenna that runs fron the top if the vertical fin down to the tip of the right horizontal stabilizer. From there, it runs into the usual antenna lead-in on the right side of the fuselage, behind the cockpit. I don’t know for certain if it’s accurate, but that’s how I interpreted the antenna arrangment in photos. I used a Pasche VL airbrush to apply the three-toned camouflage scheme, though most photos of the actual aircraft indicate it was very weathered, with almost no distiction between the non-specular sea blue upper surfaces and the intermidiate blue sides. For markings, I used an old SuperScale sheet to portray “White 29”, the plane flown by Lt. Ira Kepford of VF-17 while based at Ondonga, New Georgia, in the Solomon Islands in late 1943. I made a mistake in not placing the kill markings at the correct angle to the tape covering the seams of the forward fuselage cell. VF-17 was the first navy squadron to be equipped with the Corsair. Assigned briefly to USS Bunker Hill, the squadron was soon transferred to the Solomon Islands to serve as a land-based squadron. In its two tours of duty in the Solomons, VF-17 was credited 156 aerial victories and produced 12 aces, the most of any squadron in the Navy. Kepford was the U.S. Navy’s 6th highest ranking ace with 16 victories and 8 probables.15 points
-
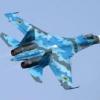
One of my latest builds, having had this in the stash for several years. I've heard a fair few horror stories about the fit, but it wasn't too bad. The front gear looked very weak, so I used the SAC front gear strut to provide a bit more support. Its a shame Revell didn't supply enough pylons/missiles to do an accurate UK air interception load out. Thanks for looking Ian14 points
-
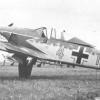
Hi, here some pictures of my new P-47 D...... Regards Klaus13 points
-
Good day, jentlemen! This is my next model.11 points
-
Hi Guys for the BC display at Telford this year we have the Stirling on show as it'll be 75th anniversary of their introduction into service. With this in mind I decided to build N3640 as it was the first one issued to a Sqd, in August 1940, for evaluation purposes. There were some notable differences which I had to get in so here goes. The mid upper turret needed deleting, there is some evidence that the early ones had the mid under turret but I couldn't see any evidence from the piccies I had so I went without, probably be proven wrong soon. The two masts under the nose needed to be deleted, fairly easy. I fertled about with the wing leading edge intakes. Having gained two spinners from a friends Wellington kit I had some job searching for another Wellington kit but at Newark I found one and finally had 4 spinners I could cut down for the props, as this a/c had them. I had to drill extra windows to both port and starboard sides but can't remember how many without having another kit to hand so I can compare. By the way, I used Humbrol clearfix to glaze them and they look great but how is it best to use this stuff, it strings like mad and leaves a residue on the paint job, wouldn't have been a prob but I had matted the paint down and it spoiled the finish a bit. I sanded down all the rivet detail and scribed some panels back on. All the exhausts on this a/c were outboard on the engines. I deleted the hedgehog bits and had to shorten two of them so I had a complete set. The blurb I read said they were high up on the cowlings but I think I went too high. Painting was done using Xtracrylics but I'm not happy with the yellow. Decals were from the spares box and the landing light cover, which has been fitted since I took the pictures, was fashioned from sellotape. The wheels were from Scale Resin bought from the big H, I thought the rear wheels would be a bit weak but they've stood up to my moving the kit around. For now at least. Regards Paul10 points
-
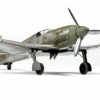
After placing yet another ill fitting jet on the shelf of doom, I thought I'd try a new direction and decided on WW2 single engined fighters. This is the Tamiya kit and what a great little kit! No hassles putting it together at all. I didn't pay too much attention to accuracy, I just went back to basics. A week to build instead of a two month jet slog has given my mojo a lovely little boost! I used Xtradecals and painted with a mix of Humbrol, Revell, Mr hobby and Tamiya paints. Anyway, the pics (not the best quality as I have to rely on the sun and it aint around.. Excuse the broken cannon which I snapped off during manoeuvres ) : Thanks for looking!10 points
-
other photos here Thanks for coming.10 points
-
Hello everyone , I present my latest work : Spitfire MK.IXc belonging to145 SQUADRON RAF on the Tunisian Goubrine airbase during April 1943 , piloted from Ace Polish Stanislaw Skalski . The kit is Tamiya 60319 , " seasoned" with aftermarket various resins Barracuda cast for tires and various parts of the cabin , and Eduard photoetched. The coloring was done by free hand with acrylics Xtracrylics , as my habit I tried to minimize the use of decals , replacing them , where possible , with masking . For the weathering I tried different filters of the True Earth. Here are the pictures:9 points
-
Is there a recommended purveyor of these books? Also: Strike up the band! One of my favourite films ever. What does it say about me that I preferred Michael Caine to Stanley Baker? Nothing good, I'm sure. Speaking of the era, Winston got a present today: No, not the hedgepig socks, he's had those for ages, subjective time. Kipling! I read him "How the Elephant got his trunk", because one ought to start on a high note, though my favourites by ol' Rudyard are The Convoy Escort from "Epitaphs of the War" or his wrathful "The Children" -- had he not hated Churchill, they could have been powerful allies against appeasement in the thirties. The kit, anyhoo, is not slotting together so well now that it's crammed with noseweight -- I think the superglue subtly deforms the shape and robs the plastic of elasticity. I'm sure there'll be sanding and filing ahead. Lots of it. My Aerofax Valiant book arrived today, however, and cleared up a few minor mysteries. One that persists is the sort of long ropey blister along the port side of the cockpit, seen here: Was it present on all production aircraft or added later? Sorry about the lack of bants, I only have a little time in the evenings now, and Winston's mum likes to watch Criminal Minds (the true crime, against humanity, is the dialogue) and speak to a nominal adult before collapsing. Very glad you survived, Fritag, it would have been a horrible, senseless loss -- though I think the cause of deterrence a worthy one -- as were the losses of so many dedicated young men and women during the long cold war, before the great qualities that had already taken them so far had time to fully mature.9 points
-
evening folks thank you so much for the commiserations and encouragement - I was kinda hoping I would get some positivity in response as I was pretty beaten up about it yesterday and you all truly delivered ..I now consider it a VERY lucky escape as all manner of horrible things could have happened - as it is, I have fixed the trailing edges, the leading edge hole will get a patch over it, (after a very lifelike birdstrike by a vulture carrying an anvil..) and the wrinkled wing will get a new leading edge at some point (the main top wing panel I may just leave - afterall it was a Firebomber so it got as stressed as I was last night...).. ..it also ended up a bit cathartic as I actually tidied my bench.. .. so here we go.. normal service to be resumed shortly.. ..and the shelf itself has industrial bracing & supports now and will be here long after this house falls down... thanks again all Peter9 points
-
Hi folks, Here are some glamour shots of my completed Beaufighter. Apart from tape seat belts, it's completely oob. I wanted to get the 'vibe' of the kit, before building the others (4) in my stash more seriously. Scheme is brush painted with Xtracrylix. I am seriously impressed by the kit. The vast majority of the build sequence is sensible, parts fit where they should and overall assembly is pretty simple. Two things I will mention though: 1) Engine cowlings: Suggest you glue the cowling pieces together to form the complete cowling, let dry, then add the engine, rather than assemble the cowling around the engine as the instructions suggest; 2) Undercarriage leg supports. Ensure these are trimmed to fit neatly in the slots provided. The fit is tight and it's a somewhat awkward squeeze to install them. Anyway, here are the shots: RFI thread here: http://www.britmodeller.com/forums/index.php?/topic/234989610-airfix-172-beaufighter/ regards, Martin8 points
-
Hi Guys, Here are some Whiffies that I have made in the last 15 years. There are some more, but they aren't on my Photobucket so I can't show them. But there was a Do635 and a few Me-262 schnellbombers etc. I hope it is tou your taste. Cheers,7 points
-
A recent build from my 'attempt to thin the stash'. Had this kit for many years, just because Argos were flogging it off cheap. Embarrassingly, aside from a Seafire, its genuinely the first Spitfire I have ever build.. Thanks for looking. Ian7 points
-
Hi All, Following on in quick succession from my Airfix Wildcat posted last week, I would like to present another navel aircraft to make number 12 for the year to date. Its the much maligned Trumpeter Sea Hornet.( well some one had to build it!) Built out of the box with kit decals, all things considered an easy built with good fit experienced through out the build, Finished with Humbrol 123 for the upper surface grey and Hataka sky (went on really well, when well shaken and thinned with their own brand thinners) and a little weathering to finish. It makes a good companion for the Attacker I made a while back. Enjoy the pics As always comments welcome, Rick G.7 points
-
This is one of the last builds by my friend Jjumback. The excelent Trumpeter’s F-105G Thunderchie on 1/32 scale is a high detailed model. The interior parts and exterior details looks great. The kit have a easy build and is a great pleasure building this one. for more pic's and images, see here. hope you enjoy cheers7 points
-
After registering and introducing myself in the "New member" section, http://www.britmodeller.com/forums/index.php?/topic/234990577-hello-from-cologne-germany/ I would like to show some of my models. I hope it is ok to show some work that has been posted somewhere else before. I would like to start with this Junkers Ju 88. It was done mainly OOB. I painted the A-5 with Gunze Acrylics (my favorite brand), gave it a wash with oil colors and finaly weathered it with Tamiyas Weathering Sets. This plane flew with the KG 30 in Finnland 1941/42. The Kit-decals are rather simple (only crosses and and unit markings), so I added some stencils from the Revell kit. Comments and criticsm are welcome.6 points
-
Decals sealed with Tamiya Gloss And now a couple of coats of flat plus more weathering with the airbrush6 points
-
Hi folks, have just completed this Fleet Air Arm corsair MkII, as flown by Lt. N Hanson of 1833 Sqn. This aircraft took part in several of the East Indies Fleet raids against the Japanese and is shown in a series of photographs having returned from attacking Port Blair in 1944. Lt. Hanson named his first 3 mounts 'Kathleen' after his wife. So this one is Kathleen III. I made a few changes to the kit, I used MDC conversion kit for British corsairs, added the underside scoop, placed the fuel filler caps in the correct place, added the whip aerials from stretched sprue, put the flaps up and cut out the rudder to reposition it. It was painted all with Xtracrylix and some enamel washes. The base I got off of Ebay, it's supposed to be portion of a British carrier deck. Thanks very much to David and Tony for their help. The Wip cane be found here: http://www.britmodeller.com/forums/index.php?/topic/234988298-148-tamiya-corsair-mkii-1833-sqn-hms-illustrious/5 points
-
After slogging away at an AML Fiat G.50 I opted fro a simple and almost OOB build by joining in a Fast Jets Group Build on HyperScale's Airfix kits forum (Fast jets and a Javelin seems a bit like an oxymoron, but never mind!). I thought I might as well share progress over here on Britmodeller too. I've made some small progress dealing with seams and blemishes etc. I've decided to document these steps to identify in advance for others what I found to be needed with building this kit. I apologise if I'm recording the blindingly obvious. One other thing, the silver plastic makes things harder because you are always left with a visible mark wherever a blemish is removed, this sometimes makes it hard to gauge progress (on the other hand it leaves a record of removed raised detail).5 points
-
This is Tamiya's beautiful 1/32nd scale Mosquito. It is built OOB, except for the main wheels which are resin replacements. What can I say? It is an awesome kit with loads of detail just out of the box. image hosting without registration img hosting posted image photo hosting sites image sharing sites free image host click image upload image upload no size limit The kit comes with some nice looking crew figures: upload pictures online And the interior is packed with detail: free image host post a picture Thanks for looking5 points
-
The ammo bins below the guns looked a bit empty so.......... Filled in the void and added some PE ammo Feed chutes added and guns Proved that the gun flash eliminator can be produced in paper, just need to increase the angle Thanks for stopping by Kev5 points
-
These two were started some time ago, but were put aside for other, more exciting kits. I've dug them out and forced myself to finish them - they aren't the best models I have ever made....... a bit of a challenge to build. Typical limited-run injection moulded kits from the Ukrainian firm of Modelsvit First the I-3U....... The 'stovepipe' E-150.... Ken5 points
-
Thanks Cookie - I hope you're back in the swing soon Thanks Rob, I'm feeling a lot more confident now that the priming's sorted (famous last words) Hi Karl - please don't rush your Blenheim on my account; I have much more time on my hands and I'm trying to finish this before next week - it's school half term here so Mrs B and Sophie are off and Lottie is taking time off too so we're hoping to have a family week I've squashed a Beard-Provided pilot in the turret. Took a bit of trimming on the upright and, because he wouldn't move them apart, a little off the inside of his legs. That'll teach him! Manning the rear turret by Ced Bufton, on Flickr To add a little jeopardy and to give me something to worry about I fitted the aerial. Not easy to get this straight on the little dent in the fuselage - future builders might want to deepen the dent a bit so the part fits snugly. I only knocked it twice during the masking (rats): Half way by Ced Bufton, on Flickr You can see that I've masked the demarkation lines with Tamiya tape, burnished down, and then filled in the rest with cheap masking tape. I try to make sure I don't leave ANY gaps in this as it's surprising where the spray gets to. Drying now, just the masks to do later: DE on by Ced Bufton, on Flickr5 points
-
So true Steve, along that vein my cousin Vaughn lost several friends during his stint flying the Harrier GR.1 at Wittering ..they accepted that it was a newly developed concept and all the inherent dangers that came with it. Thankfully he never had any serious incidents with the aircraft himself but saw several that got into real trouble in those early days. On a personal level I'm just thankful that I swopped shifts with a colleague the day poor Sean Cunningham was ejected from his RA Hawk on the flightline at Scampton, I was rostered to standby there that day...just glad I didn't, the whole thing sounded quite horrific !) PC, This ancient magazine scan shows the very Heath Robinson IFR gubbins, the aircraft was the second trials tanker WZ390...still in HSS.5 points
-
5 points
-
I've got this thing I hang my steel rule off And before anybody gets excited I was measuring the blade for an entirely different purpose.5 points
-
Anyone seen Woody ?.............psssst, Neil, it's safe to come out now.5 points
-
1/72 scale Plastic Soldier Company Lloyd Carriers for Crew and Ammo plus 6 Pounder Anti-Tank Gun Scale Pics...... ATB Sean4 points
-
Hi everybody, as said my first RFI and first time using a few new techniques (varnishes for decals, washes) so be gentle! I am also well aware of a MAJOR gaffe I made on the tail.... Have done many RAF planes but I was so focused on positioning I put them on the wrong way round . Aside from that I'm very pleased with myself and the finish, my best ever I think. I opted for the RAF Valley based squadron as I was on annual camp there twice with the ATC. Also painted the wings in Hu 166 as I have seen pictures of them like this, and it is a sexy grey... Though I haven't a clue if this is accurate. Perhaps someone could enlighten me. Also apologies for the poor quality smartphone pictures and lack decent setting, the bathroom just happens to have nice bright lights!4 points
-
Hello everyone, here I leave my last job photos, model a little difficult for a beginner like me but which I learned a lot.I used Eduard´s masks. Painted with Gunze and details with Vallejo acrylic, varnished finish in matt lacquer Marabu. Sorry, forget to put the .30 in machine gun in front fuselage for the pics I hope you like it. Best regards. Óscar4 points
-
Thank you Rob. Airfix are coming out with some great kits. I'm looking forward to the Sea King HC4 Thanks Rob, I would have been too embarrassed if I shelved it after all the positive remarks I've had from modellers like your good self Hi Stix, thank you. It's still not perfect, but a lot better. Hello Jaime, thank you. I hope to get it finished by the week end. Cheers Greg. Thank you very much Rick Hello Bernd, thank you. Almost there. I've finished the main components and hope to get them glued together by the weekend. There are some things I'm not happy with. They are my fault, and nothing to do with the excellent Airfix Defiant. Thank you all for looking, Joe.4 points
-
McDonnell Douglas/BAe Yellowjacket FA.2 Revell F/A-18E 1/144 kit with extra decals. Build thread here http://www.britmodel...-18c-e-in-1144/4 points
-
Good to see the Valiant progressing undeterred by the free-improv that PC's thread has engendered I envy Winston his first exposure to Kipling (et al.) I reckon Dad needs to start reading him 'Kim' asap (with all due post-modern acknowledgement of the unaccaptableness of imperial ambition). Actually it's time for a re-read myself (with all due post-modern acknowledgment etc. - but it's still a cracking read). I was gonna guess (in that "me, me sir" sort of way) that the long ropey thing was to do with the inflight refuelling. But I knew we was really just waiting for the General to opine definitively on the matter I was mulling over your ditching episode as I wrote that post actually Crisp; thinking on whether the fact that you were flying (fighting!) the aircraft throughout would have distracted the mind somewhat from the potential disaster of it? I think it might have done but I speculate only....... Tis true I wos lightly toasted sitting in the over-illuminated cockpit mulling over the flying characteristics of the bits of the jag-wire that remained attached to the seat. But only lightly so and only the skin that weren't covered by the gear. So the wrists, face not covered by the O2 mask and neck. Surprisingly superficial tho'. The back of my neck caught it the worse and so I was grounded for about a month - cos I couldn't turn my head properly to the left and right till the scabs fell orf. All-in-all got off exceptionally lightly. Sort of mid 80's version of a facial chemical peel? Be kind cool if I could say that it finally sorted out the residual teenage acne............Hmmm. Might add that to the oral history (unless it was already part of the tale I told you Andy). Dunno about senseless PC - and not sure about dedicated either . I always thought that just doing it made sense (on an individual basis) in it's own terms - irrespective of the military or political aims (speaking personally of course). Wot I mean is that it's young folks being allowed (nay - being paid!) to do what they love. I wos never very military minded and just wanted to fly. End-of motivation really. The Cold War was simply the temporal context for me. Don't envy you that in the slightest Andy.4 points
-
Let's have similar Folding wing options as with the recent Airfix Wildcat - one folded set and one unfolded. That'll do nicely thanks Mr. A.. Cheers .. Dave (isn't it almost two weeks since the JP annoucement?)4 points
-
Are you sure it's not a Sea King?4 points
-
Hi! Here's my MiG finished. Lovely kit. The model depicts White 57, bases at Vayenga, North Russia in 1942 Extras used: Resin seat, Eduard photoetch Paints and colours used: Tamiya Nato Black, Ginze H303, Own mix of Tamiya XF-23 Light Blue/XF-8 Flat Blue. Any comments appreciated Best regards Rune Haugen Norway4 points
-
Hey All, A check in for this week. The first of the finished Gear Case build is rolling off the assembly line. This seemed to take FOREVER!!, and I still have a considerable ways to go with totally finishing the rest of the cases, but I'm very much closer to the end now. Once all the cases are finished, next comes the painting. I'll be back with more photos of the assembly line. Bye for now.4 points
-
I bought a couple of these when the good folks at Creative Models released them as I have long yearned to spray metallic finishes but I didn't want to try Alclad and these seemed like a good option as they are water based. http://www.britmodeller.com/forums/index.php?/topic/234985344-new-water-based-aluminium-colours-by-vallejo-coming-soon/ I bought the Jet Exhaust and Aluminium as well as the black primer and last night I got around to trying them out. I tried the Jet Exhaust first of all on the nozzles of a Revell 1/48 Eurofighter Typhoon , I wiped the plastic down with some Surgical Spirit (from Boots) and then sprayed it unthinned on to the bare plastic. I normally spray 20-30 psi and this was nearer 30, I built up the coats gradually and it went down very well with no clogging of the airbrush. it dried quite quickly and here is a pic of the result. For the Aluminium option , I used part of a to-be -junked MiG-25 which was again given a wipe down with surgical spirit. I decided to try primed and unprimed so the primer went down first, this sprayed quite well but took a little while to dry definitely slower than Halfords primer. While I was waiting I sprayed one side of the part with the Aluminium on bare plastic and this went down as well as the Jet Exhaust giving a very smooth finish. I then sprayed on to the primer. The result are below , U refers to the unprimed side and P to the primed side. There appears to be very little difference to the finish with an almost uniform appearance. The finish is quite resistant to finger prints and I put down a strip of Tamiya masking tape and it didn't lift any of the paint. I haven't tried spraying Klear or any varnish over it yet. I cleaned the airbrush with Vallejo Airbrush Cleaner followed by some surgical spirit and it shifted the paint quite easily. In conclusion I have to say that this appears pretty good stuff to me and I'm looking forward to trying some other of the shades.3 points
-
M60A2 Patton "Starship" 1:35 Academy The M60A2 was named the "Starship" due to the then modern technology fitted to the tank. It was designed as a force multiplier to operate alongside M60A1 tanks. Development began in the 1960s with them entering service in 1972. The Starship featured a new different turret from other tanks of the time. The main turret had quite a low profile which was offset somewhat by a large commanders copula on top. This featured a sighting system and a co-axial 50 cal machine gun. The idea was for the commander to find the target and lock on the main armament and then be searching for the next target while the gunner engaged the current one. The turret was fitted with M48 152mm gun / launcher. This was the same gun fitted to the M551 Sheridan. This could fire conventional ammunition to a range of 1.5km and the MGM-51 Shillelagh anti-tank guided missile with an effective range of 3km. A groove as cut into the barrel to allow the missile to fire. The US Army at this time had spent a considerable amount of money on the MGM-51 system. One of the major problems with the missile for its time was its technological advancements which made it unreliable. The missile did not come into sight of the gunner until it was over 700m from the tank and with an effective range of 2km (later extended to 3km) it had a limited envelop of operations. Over 88000 missiles were purchased with the only reported use being a dozen or so fired at bunkers by Sheridans in the Gulf war of 1991. In the end the Starship proved to be a bit of a disaster. The main gun range had already been exceeded by other tanks and the missile system was unreliable. In addition a closed breech scavenger system), which used pressurised air to clear the breech after each shot lead to a slow rate of fire. It was also found that the missile was not as good at penetrating armour as was required. The Starships were phased out by the early 1980s with the hulls being converted to M60A3 tanks, or in some cases armoured bridge layers. If anyone is interested in seeing the Starship in operation there is a training film available here on YouTube. The Kit This is a not a new kit per se from Academy, some of the main parts are from other kits; however the parts for the Starship, and the tracks are new to this boxing. It should be noted that as the main hull is from a kit which features added reactive armour there are some markings on the front of the kit scored in for placement of this armour. The modeller will need to remove them for this kit, which should not be difficult. The addition of photo etched parts for the turret stowage bins, and other small fittings is a nice touch. Construction starts with the lower hull. Fittings for the rear drive and front idler sprockets are added along with suspension components. These are followed by upper parts of the lower hull which house the idler wheels. The main torsion bar suspension parts are then added along with the two part idler wheels, followed by the 3 part main wheels, and five part drive sprockets (these all feature central poly caps so the can be pushed on at any stage of construction). Construction then moves onto the upper hull. The first item to be installed is the drivers hatch, this is installed from underneath. On the top the various stowage bins are added to both sides along with various hull fittings such as light, lifting eyes and protective bars. A few small photo etched parts are used at this stage. Construction then moves to the turret. The first item to be made up is the side mounted searchlight. This a complex affair with 10 smallish parts, some photo etch and a clear plastic cover which the modeller has to cut to size from a small sheet of acetate supplied. The main gun parts are then added along with the barrel, this in one part but there will be the mould line to remove. The commanders copula (a main part of this build) is then built up and added to the turret. Various hull fittings are added along with the turret bins. The mesh for the bis is supplied as photo-etched parts. The last parts to be added are the tracks. These are not rubber band, or individual links. They are short lengths of moulded track which are connected by individual links where they go around the sprockets and bend at the bottom Though better than the rubber band type they will still not sit correctly where they run over the idler wheels so I suspect they will be replaced by many modellers. Luckily they are standard M60 tracks so replacements are readily available. Decals There is a small decal sheet with markings for one tank from the US Army. Conclusion This is an unusual and short lived Main Battle tank, and part of the M60 Patton MBT line. It should make a great addition to a collection of cold war Armour. It is good to see companies bringing us this type of kit. Highly Recommended. Review sample courtesy of UK Distributors for3 points
-
Good evening all Have seen some of the amazing things people can do on this site, it's with some trepidation that I post the pictures below....but you’ve got to start somewhere.... I made a few models (badly) in my youth when war-gaming and then nothing for a long time but got back into it last year after 20+ years, when my young son decided he wanted a model tank that he could play battles with. Below is a selection of some of the betters ones but I’ve still got a way to go especially when it comes to weathering and stowage. At the moment my aim is to get them looking reasonably like they're supposed to, which I think I've managed. Better historical accuracy will hopefully come with time. Thanks for your time and please be gentle..... Andrew PS you'll also probably notice I'm not a great photographer. ------------------------------------------------------------------------------------------- Armourfast Cromwells with some very basic stowage Plastic Soldier Company Churchills One has some extra stowage from S and S Models http://www.sandsmodels.com/ Armourfast Achilles x4 Again these have some additional stowage from S and S models. At some point I'll look at putting a couple of crew in. Also I know the weight should be 29 tons but I don't have any 29 ton signs. I also know the camo is not right but there are reasons (to do with my son) as to why I went with it. The bottom two are the first two models I finished after coming back to the hobby. I overdid the matt varnish on one of the but managed to rescue it (just). Plastic Soldier Company M5A1 Half track I have a total of three of these, of which this is probably the best. One thing that does annoy me slightly with PSC is some of the odd and inconsistent scaling. The 0.50 calibre MG on this model is WAY oversize but the ones on their Shermans are pretty close. Plastic Soldier Company M4A4 A couple of these have stowage/tarpaulin made of sprue off cuts covered in tissue paper, which is covered in PVA glue. I got the idea from someone on the Armourfast forum before it went offline (Dave if you ever see this - thanks for the idea). I also has to replace the .30 caliber bow MGs as they were as wide as the main gun!! I used short section of the same plastic I use for the aerials.3 points
-
My guess.. 1/72 metal wing Hurricane and 1/48 Spitfire Vc. Low key announcements but eagerly awaited. Cheers.. Dave3 points
-
Evening all I've made a little progress with my Shackleton the interior is almost finished (well painting anyway). Unlike WV908 I'm building mine OOB with the only addition being some seat belts made out of blue tape.... Not very exciting I know but it is getting there slowly. Cheers Iain3 points
-
I can't wait!! Martin, your product line so far has some of the best quality mouldings of jet aircraft around. I have the Delfin and Magister kits that are awaiting my attention.3 points
-
Morning folks,will be popping into LMS on my way to work for paint for the Halifax I got a little more of the Lancaster done the main changes were the many windows that needed filling for this airframe,I got the kit given off my eldest as he had done two Airfix Lanc's and could'nt face a third build so the kit came with the remnant's of the "ton up" decal sheet so hoping to finish her as the Spirit of Russia so here she is as of now.3 points
-
Hi everybody; here we go, painting started! I went to my LMS yesterday to source some Tamiya XF2 Flat White, came out with an Academy P47N in 1/48 stuck underneath the color jar ... .... bargain price, couldn't resist Anyway, back on topic: I sprayed my mix of Tamiya Flat White, Sky Blue and Sky Grey - RLM76 supposedly - on the drop tank on the main wheel legs and on the AC: bottom Top As you can see in the last photo (on which I played a bit with contrast and light) on the top side I also did some post-shading, by which I mean that I sprayed a lighter mix of the base color (just adding some Flat White) in the middle of the panels. For some reason, this turned out to be slightly darker ( ) and more blueish ... Looks more like a Tiger Meet rather than German Camouflage, but I decided to leave it as it is; it's probably going to look interesting, after mottling and weathering being applied. Here's another pic of the bottom side (this time from my messy workbench ) again with light and contrast adjusted, to emphasize the preshading showing through the base color Most of this is going to tone down a lot, after having airbrushed some Future on; this is probably the trickiest part, as I need to lay down enough Future to have a consistent protective coat, but not too much as to risking totally annihilating the preshading effect. No more modelling for at least five days now, as I'll be off to an important exhibition in Milan, so next update will be around middle of next week. Comments welcome, as usual Ciao3 points
-
This has to take the honour of being the most diverse thread I've come across yet .....where to begin ? PC, you'll find that you need to 'adjust' the fuselage braces to get everything to line up properly as the fit isn't the greatest, though I suspect this news be too late in coming. As for the nose, how much CA did you use ? Too much will certainly tighten up the area and cause the whole thing to go rigid. I place all the lead into a small plastic tub and fit that rather than glue it directly onto the plastic. As Christian of the dark side says the 'long ropey thing' is the external plumbing course for the IFR and was very much a bolt on accessory being retrofitted from 1959, your aircraft doesn't need it. Eric Morgan's Aerofax book is a great reference tome with everything you need. As for the perils of aviation I think yesterday's sad event in Suffolk highlights just what a dangerous game flying can be....as a RRU paramedic I've been to more than my fair share of serious military aircraft incidents and dealt with the horrendous aftermath. I try to avoid TV (especially the 'news') much preferring to listen to music when whiling away the hours and select my entertainment from on-line sources, (no not that !), though I rather enjoyed Sherlock when it was aired. The Mem feels at home with Downton Abbey as she says it takes her back to the glory days of exploitation and relaxes her after a hard days knitting. Zulu...great film..3 points
-
If that's the case, Alex, start cracking on your kit! Regards, Jason3 points
-
Very nice build sir. This is the first one of the NF.21 mark I have seen built. I look forward to seeing more of these at Telford. Yes, there are dimensional errors, but you can't fault the moulding quality and fit/finish of this kit. I have measured the 1/48 scale Trumpeter Hornet F1 kit and the following are true: Fuselage is 2.6mm too wide. Fuselage length is 6mm too short. Cockpit and canopy would need moving 5mm forward to put it in the correct position. The undercarriage legs and bays are ~5mm too far forward. That said, this NF.21 kit disguises these issues with the light/dark paint scheme very well. Sadly, the plainer schemes on the F1/F3 accentuate these points, especially the width of the fuselage.3 points
-
Hello People I finally finished the camouflage, and given a coat of glossy paint The real rlm 71 with reflex and not cell phone See you soon ! Ettore3 points


.thumb.jpg.3c5b41eb004e624ff9bdf837868ecbb6.jpg)


This leaderboard is set to London/GMT+01:00