
Leaderboard


Popular Content
Showing content with the highest reputation on 07/10/15 in all areas
-
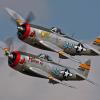
Here it is. Much harder to build it than it looks. Somehow decals have shrunk a bit (probably the clear coat has done that to them), but I am not touching it anymore...18 points
-
Hello! This my attemp to built an hasegawa's 1/48 F-4J with a little bit movement sensation.I hope you like it and of course all kind of critics are wellcome...Best regards from Santiago de Compostela, Spain The first picture is my inspiration17 points
-
Hi all, here some pictures of my latest build: Mirage 5BR by Wingman Models in early Belgian Air Force Markings.13 points
-
Hello, I got this finished the other day, WIP here: http://www.britmodeller.com/forums/index.php?/topic/234989224-lightning-t4-xl628/ In summary a restored Sword kit with some modification around the nose area including canopy sweep and intake. It is a nice kit with good surface detail. This particular jet was the first produced T.4 and had some differing features to the production jets, I just looked at some photos and did what was needed. Final finish is Alclad which gave the high shine this jet had at the Farnborough 1959 airshow, in this youtube clip you can see it (15.30) https://www.youtube.com/watch?v=AsIZ1tfEw9w. It looks pretty metallic, but crikey it is delicate, it just rubs off! Not sure if it was a dodgy batch of Airframe Aluminium but next time a may try foil for a super shiny jet for the sake of durability. I don't want to be 'that guy' but OOB the kit's front fuselage area is definitely off. I tried to hide it a little with the mods and some careful canopy masking, not perfect by a long way but a little more convincing for me. Airfix, please make a twin seater!!! After doing this I may redo some more of my old builds, at least all the boring filler stuff is done already, only a quick strip then paint Cheers, David.12 points
-
Evening all, here we have my Mk9 Spitfire, its 1/6th scale It as a 4 stroke engine, retractable undercarriage, full RC kit and yes it will fly but don't have the guts to fly her. Total build cost is around £700.00 Built around 9yrs ago Pilot is 1/5th scale as a 1/6 would not fit as there is all the rc gear under From this To this Last one so you get an idea of size10 points
-
My latest project - Millennium Falcon from Star Wars. All lighting was done from scratch, as some additions to the model.9 points
-
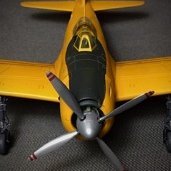
I finished my first plane .Took me four weekends .. Came out good . My only problem was the canopy . i used tamiya tape , but I had some paint leak under .. Maybe I should used liq. mask . Not sure .. Paint I used Tamiya . Clear Alclad Aqua Gloss . Last stage clear Alclad Matt Weathering Mig oils Enjoy Rick Small Build http://www.britmodeller.com/forums/index.php?/topic/234988850-ricks-p-40e-fighter-plane-weekned-build/9 points
-
Nice kit!9 points
-
Our Phantom who art in Hannants Airfix be thou name Thy stash be done Thy will be done in cammo as it is in heaven Give us this year our annual demand and forgive us our rantings As we forgive you for not doing one before and lead us not unto ebay but deliver us from bidding For thine is the FGR2 the Spey, the Alcock and Brown Forever the best Airfix9 points
-
Hi all, in June I was asked by AMW to build the latest re-issue of the ancient Airfix Halifax B.III and bring it kicking and screaming into the nineteenth century as well as upgrading it to current Airfix standards, (huge hint to Airfix there). Not a terribly easy task in the time allotted, (4 weeks) but one I was only too happy to have a bash at. Funnily enough it was the first heavy bomber model I built as a nipper so it also has a nostalgic connection for me. The old Airfix kit is of course, like me totally ancient, both of us born in the same year, 1958 and though a decent enough representation for its time it is in desperate need of updating. The kit has several faults, (besides the obvious rivet festoonfest and toy like moving parts), such as lacking a bomb bay, very little by way of interior detail, nose slightly undersized, engine nacelle 'intakes' too wide and awful Select-a-glaze semi-opaque glazing to name a few...so my work was cut out. The finished model appeared in the July issue of AMW and I outlined there most of the things that were necessary to bring it up to snuff. List for anyone interested included.... Totally scratch-built cockpit and forward fuselage nav/ wireless operators stations. Scratch-built turrets and interiors Squadron replacement vac canopies and turret glazing Total surface rescribe Dropped flaps Scratch-built ailerons and elevators Wingtip position lights and under-wing landing lights Quickboost gun barrels Scratch-built bomb bay and doors Scratch-built main wheel bays and spar detail Resin replacement wheels Scratch-built main undercarriage legs and retraction struts reversed as they are the wrong way around on the kit to facilitate the 'retraction' gimmick. Acetate upper hatches and nav/wireless oppos windows Nose reshaped with Milliput as per drawings and re-profiled Engine intakes lined with 1.5 mm Evergreen strips to reduce diameters 4 scratch-built resin carbs to top of engines Scratch-built Hercules engine facings with lead wire detail Inspection hatches added to the wings. I'm sure there are a few other things but I'm losing the will to live ! The decals that come with the newly re issued kit are superb and adhered well to the kit without resorting to any fixing solutions. Finished using my Iwata Micron CM-C plus along with the usual Gunze, Lifecolor and Tamiya acrylic paints, weathering with oil and white spirit washes, MIG weathering pastels and Paneliner washes along with AK Interactive enamel Green/ Brown camo filters. The airframe isn't heavily weathered as per a request from AMW. The aerial wires are from Uschi elastic thread...the fine variety. All in all good fun but quite time consuming...almost certainly guaranteed to force Airfix into producing a new kit , (I know Revell has theirs coming and though I've had a look at the test shot it'll be interesting to see what they finally come up with). I bought it along to the Sutton show and many thanks to all of you who were so complimentary about it. All good practice for my 1/48th FM B.III I have waiting patiently in the wings... Cheers all, Melchie... A couple of images taken during the build...... The new cockpit, part finished with the instrument panel, overhead bracing, wiring and seat yet to be fitted And bomb bay...more plumbing to go in along with all the doors and their actuators. Wing bomb doors needed to be scribed too... Finally we get to the model....about flippin time I hear you scream !7 points
-
Hi, Here is my Airfix Spitfire 1a from the starter boxing. Thank you for looking Cheers Plasto7 points
-
I dint know why I'm getting excited I don't do planes !!!!!!!7 points
-
Or a Hangar?7 points
-
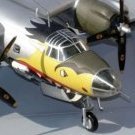
Finally finished third piece of this Revell gift set. I think now i will take a break from airplanes for a few years, and focus on ships, haha. I won't write much about this model because I really debated with myself should I put pictures of it, because it is very bad with a lot of mistakes. I studied some real photos of this plane, but at the end i decided not to follow color scheme and made it by my taste Thank you, and until my next model6 points
-
Giving my age away here, but this model was built many years ago, before the Hasegawa kit existed. It is based on the Revell kit from the 1960's, and represents an early Grumman Martlet Mk II with odd upper-wing pitot and extended landing gear fairing. The kit was an F4F-4, so required conversion work was minimal, mostly focused on re-working cowl details to eliminate the upper lip intake and add the proper cooling flap configuration. The surface detail was sanded off and scribed, with some raised panels done with .003" brass shim stock. The various bumps and bulges underneath for the gun breeches and flap hinge fairings were made by rounding the end of a plastic rod, then slicing it off at an angle. It was difficult to control their exact size that way, so I ended up making many dozens of them and picking matched pairs to go on opposite sides! The catapult spools, aerial masts, pitot, and various other small bits were mostly made from sprue, etc. The landing gear was completely scratchbuilt with plastic rod and stretched sprue. IIRC the engine was liberated from an Italeri bomber of some sort and wired; the prop uses a Monogram P-36 hub with blades and root cuffs cut from scrap-box props. The cockpit was scratchbuilt, and the canopy vacuformed using the vintage Airfix Wildcat VI as a form. Have always loved this unusual-looking aircraft, and it looks particularly fetching in FAA markings!6 points
-
Inspired by SU77rules build of the Revell Pocket Easy Kit, I decided to give one a go. Built in 20 minutes. It was primed in Tamiya Spray white primer, repainted and weathered with Humbrol weathering powders. Very pleased with how it came out. This is the first X-Wing I've built since the MPC one when I was 10, some 39 years ago. I have the Bandai 1/72 and Fine Molds 1/48 to do yet. This was a good way to test the waters.6 points
-
7/10 update: Props have been cleaned and repainted, they still need an oil wash but this gives an idea of how different things can look with less contrast and a different paint combination. The bomb rack sway braces have been fitted correctly, take a peek at the Revell instruction sheet and beware6 points
-
Today I have finished off constructing the missile rails: Here is how they look in situ: Those can now be mounted up ready for some paint. Next I wanted to finish off the skids which meant adding the short length of tube where wheels can be attached. For my first attempt (for there will be several) I cut off a 1mm length of 0.5mm tube: This was my set up for soldering: The main problem was the proximity of the leg joint, I prevented it from melting with heat sink pliers and lashings of damp tissue but that created a big heat sink effect. I also found that my reamer got firmly soldered into the tube so it was time for plan B. I managed to insert some 0.3mm aluminium tube into a second piece of brass tube and got it soldered on like this: Unfortunately it was a failure as the solder had not flowed properly due to the heat sink effect. I also tried it with some nickel silver rod in the tube but discovered that soldered itself into the tube as well - new metallurgical knowledge was being gained at least. This was my fourth attempt - leaving the tube whole and stopping solder going inside it with the aluminium tube: The soldering was a bit blobby but at least it was sound: After razor sawing off the tube and some cleaning up it looked like this: It really should be nearer the leg but I think any closer would be pushing it. Now I just after make the other side. Bye for now, Nigel6 points
-
no wrong scale any more. We need jets in 1/726 points
-
my contribution to this GB. the new Airfix 1/48 Hurricane and Albion Refueller from the ready for battle set. this was hand painted with humbrol acrylics, and put on a cork base which was covered in static grass and bushes.6 points
-
As you all know, I like a challenge, and I can buy three of these for the cost of one of the new Airfix offerings. I've checked it against the drawings I have (from D&S #65), and dimensionally it's about +/- the thickness of the printed lines, so it's certainly close. Close enough for me, anyway. Of course, you start to hit issues. The kit doesn't have all the details to actually make it an F4F3. The F4F3 had a four, rather than a six-gun armament, so the outer access panel needs to be filled, along with the gun port itself. The little "knuckle" near the inner access panel needs to be removed. The major difference is that these aircraft had fixed wings, so the fold line needs to be filled. This is going to be easier that adding lines that aren't there! Similarly on the underside. Fold lines, the ammunition access doors and ejector ports for the outer guns need to be filled, the oil coolers detailed and beautified a bit, and the flap lines extended past the fold line. The hinge units need to be altered and repositioned as a result of this change to the flaps. The cowling's just about right shape/size wise. The cowling flaps need to be altered: the F4F3 had two large flaps on the upper sides of the cowling so the rest need to be removed, and the remaining ones combined and detailed up. I might add some push rods to the front, along with the intercooler inlets, one either side on the inner face of the cowling. Theaircraft has absolutely no semblance of exhausts, so I'll have to add these from scratch. The supercharger inlet can be improved with a little fettling. The propellor isn't bad at all, shape and size wise. It's got a bit bent out of shape in the box, but that's no problem. The cockpit's very ordinary, but I can fix this! The wing/fuselage joint is pretty good, and it looks like a Wildcat to me! The Marlet III's of 805 Sqn that flew out of desert airfields were part of an order placed by the Greek government that were taken over by the Royal Navy. I'm fully aware that the subject of the colours of these aircraft are a subject of much vexed discussion. I've read a lot of it, and there seems to be an element that there's a great deal we are never going to know with absolute certainty. Therefore, I'm going to build mine in non-specular Light Gray undersides and mid-stone above, fully accepting that this might not be fully verifiable.5 points
-
Hi! Built this OOB for a friend that turns 40 this weekend. Bought a display case for the model ( http://www.model-making.eu/catalog/Display-cases.html ) Best regards Rune Haugen Norway5 points
-
I've been working on this project on and off for the last year or so, and finally applied the finishing touches this weekend. The HK Models kit needs no introduction and was for the second time, a joy to build. Having seen a few of these kits made up as war-beaten WWII aircraft, I wanted to do something a little different, and thus decided to build this version as a modern day warbird. Most preserved Forts in natural metal gleam like a mirror - something that terrified me, so I went instead for the Experimental Aircraft Association's 'Aluminum Overcast' which is operated from Oshkosh, Wisconsin, which is actually painted silver rather than being in NMF. Being a Vega block 105 aircraft, she never saw combat, as it was actually built too late to see service in WWII, and instead went straight to the boneyard as 'surplus' before being bought in 1946 by Universal Aviation for aerial mapping purposes. It was sold again in 1947, this time as a cargo hauler which required numerous modifications, before once again taking on the role of aerial mapping platform in 1949, spending 12 years in the Middle East. By 1966 another sale ensued and the B-17 was used as a chemical sprayer back in the US, before its final role which began in 1966 as an aerial tanker and fire bomber. After retirement from this role in 1988, she was purchased by the 'B-17s around the World Foundation' and subsequently donated to the EAA, where a thorough restoration to WWII configuration began. She's been touring the US since 1994, and proudly wears the colours of 398th BG which flew from Nuthampstead during the war. Although she's 95% authentic in comparison to her WWII counterparts, she does carry a full, modern avionics suite, as well as extra passenger seats in the rear fuselage, radio room and flightdeck for those lucky enough to enjoy a flight in her. The upper turret is just a dome with dummy barrels fitted to improve access to the flightdeck, but the ball turret is fully operational. I carried out the simple modifications to the HK kit to bring it up to 'warbird' status by scratch-building the passenger seats, removing and filling the radome on the top of the nose compartment, adding the modern aerials seen on the aircraft and leaving out the top turret mechanism. Armour plate was removed from the pilots' seats, and the flightdeck oxygen system was also removed. I painted the interior olive green as the original, as unlike her wartime sisters she's painted internally. Wooden floors and ammo boxes were recreated using the superb HGW decals, and a final touch was a scratch-built rear access door and entry step as well as a ladder stored in the bomb-bay as often seen when these Forts are on tour. Decals came from KitsWorld, and paints were automotive acrylics. Boeing B-17G-105-VE s/n 44-85740, civil reg. N5017N 'Aluminum Overcast' DSC_0058 by Thomas Probert, on Flickr DSC_0065 by Thomas Probert, on Flickr Removing the nose radome: S1030377 by Thomas Probert, on Flickr Interior progressing with scratch-built passenger seats etc: DSC_0008 by Thomas Probert, on Flickr DSC_0082 by Thomas Probert, on Flickr DSC_0087 by Thomas Probert, on Flickr DSC_0092 by Thomas Probert, on Flickr DSC_0094 by Thomas Probert, on Flickr DSC_0101 by Thomas Probert, on Flickr DSC_0108 by Thomas Probert, on Flickr DSC_0117 by Thomas Probert, on Flickr DSC_0120 by Thomas Probert, on Flickr DSC_0136 by Thomas Probert, on Flickr DSC_0147 by Thomas Probert, on Flickr DSC_0154 by Thomas Probert, on Flickr DSC_0157 by Thomas Probert, on Flickr DSC_0160 by Thomas Probert, on Flickr And the picture that inspired it all: Srenco-B17 by Thomas Probert, on Flickr Thanks for stopping by, Tom5 points
-
I do, but will accept donations in the meantime.5 points
-
Here is my effort on the Heller Connie, just rescribed and prop widths thinned is this good enough? Yours MODeller5 points
-
Exactly what I was thinking Pete. I've added some pencil outlines to some of the panels and done some basic weathering with the airbrush and an oil wash. When it's all dry it'll have a matt coat, then I'll paint the frame and add the rest of the details And I've finally managed to get some paint on the speeder. It's only the back panel, but at least it's a start. I had to paint this first to avoid having to mask the rest of the fuselage if it was already attached. The detail on this is beautifully done which is a shame as it's then all covered by the big fins at the back. It had a base coat of dark grey followed by a light dry brush of dark silver then an overall coat of Citadel Agrax Earthshade to give it a bit of richness. The grill's yet to have the Agrax wash which is why it's got a slightly different tone in the photo. Before it's attached to the fuselage it'll get some more discolouration with pigments Andy5 points
-
Here we go Gents, as promised.....first the Firefly. Note on the back reads: "This picture was taken onboard the British aircraft carrier Indefatigable, which took part in the attack. Picture shows the first Firefly, with rockets attached, taking off from Indefatigable's flight deck." The attack referred to was a raid on an oil refinery at Pagkalan Brandan, Sumatra on Jan 4th 1945. Details also on the rear of the photo. and the Barracuda. Note on back reads: (Picture issued Jan 1945) "Pictures of scenes during a winter patrol, taken on board the escort carrier HMS Trumpeter. Picture shows rocket-assisted take-off by a Barracuda of the Trumpeter" This would imply that there are further pics taken during this patrol.... I hope they come in useful at some point! Now back to the build.... Ian5 points
-
Makes a nice model.5 points
-
Seen on the Airfix Facebook page, they're out and about with Lidar again. "We've been out and about today. Very important research and playing with our 3D scanner again..." Looking at the roof, is this the same building? Whole topic and discussion here https://www.facebook.com/officialairfix/photos/a.80699376270.112940.65102591270/10153597752531271/?type=34 points
-
Hi Is this bit of the forum new ? I've only just noticed it and are having a great time sifting through all the great work you guys have come up with - I couldn't resist joining in, so here's a few of my oldies from over the years. 1 - Airfix Sunderland - Costal Command Rescue 2 - Minicraft Boeing 777 approaching Bermuda 3 - Airfix 737-200 Leaving Gibraltar 4 - Revell A380 - Over the M4 in Berkshire 5 - Hasegawa Sea King over the cliff on a RAF Rescue mission 6 - Revell Concorde - Leaving 7 - Revell Concorde - Arriving 8 - Bump... 1/144 TriStar touching Down 9 - My absolute favourite - BA S61nm - Off to the Scilly Isles for the day 10 - Airfix VC-10 - ready to suckle That lot took al lot of work believe it or not... Thanks for looking in John4 points
-
Here's another 2 builds that managed to finish just last week, had these on the go for a while but kept get putting to the side but managed to get them done and to be honest would/will do some more but next time will try get a am cockpit as that I feel is a let down on the build. I did use some pavla seats in both which are a big improvement on the kit ones, otherwise build went pretty mush straight forward. did have to do a bit sanding and filling around the jet intakes and on the wings. was going to get some am decals but the kit ones went done better than expected and happy with the end results... plan to try pick up some more and do some other schemes in the future... first up is the bog standard hawk from no 76 squadron RAAF. heres the display aircraft from 76 RAAF squadron in 2003.4 points
-
Although I am a huge Matchbox fan this kit was never one of my favorites, having said that I absolutely consider Dooleybird to be a massive must for any Matchbox collection. Matchbox always had a knack for picking colorful schemes and I think Dooleybird to be a perfect example of this policy and one that is well remembered by those who started making models as kids back in the 1970's and 80's. Incidentally my first Dooleybird was painted in brilliant white Dulux high gloss on a wet saturday afternoon sometime in 1978 with World of Sport blaring away on the tele in the background. I tried to enhance this kit as much as possible without taking away it's original Matchbox character. The kit fitted together with a bit more trouble than I am used to from the usual excellent Matchbox fit and even after all this time the transfers were still in first class condition! I am aware that there is some disagreement over whether the fuselage stripe was blue or yellow but as this was just a fun build for the Matchbox collection I chose to keep to the original painting instructions. For me it is just a shame that Dooleybird was a post-war aircraft.4 points
-
Hi Mates, inspiered by pictures i found here, i `ve done some research and found several civilian planes, modified by the southafrican airforce for bombing service, but only one original Bomber Ju 86-K was delivered before September 39. I took the Conersation-Kit by Kora, i used and the old Italeri Kit, Paint Agama as allways by brush. I hope you like the result...4 points
-
By careful photo analysis, and almost Holmesian deduction :-) Looking at the shot of the LIDAR Dalek/ Robot sentry thingy- It would appear to be, (referring now to the very nice picture of the Phantom), positioned directly aft of the MiG-21, Under the beam that is to the left of the beam with the Light under it. (i.e 4th beam from the hangar doors) Around 3 metres from the wall, pointing at the Port side of the Phantom. Unless of course it's actually in another hangar. Or the hangar is perfectly symmetrical in construction, in which case whats in the opposite corner to the tomb? I draw these conclusions due to the relative positions of the Hangar Wall Light, / the Truss/ Beam geometry, the metal conduit for one of the main down lamps running across the rectangular wooden plate in the pic of the Dalek which is also visible in the Phantom shot. Just be thankful I didn't draw any red lines on the pic. Airfix Phantom?- It had better be 1/48.4 points
-
Thanks John - the left hand one will be gloved soon to prevent further, er, bad behaviour. I can do nothing about the other one but in Stew's build thread he was accused of all sorts! Hi Mike The Xuron sprue cutters are worth it I think as they cut really well without crimping (if you make sure the jaws are along the edge of the part). I bought these from Modelling Tools for £13 after trying some cheaper ones. They should last me out! I think I'm ready, almost, for spraying. I've pooled some Liquid Green Stuff in the ejector marks: Liquid Green Stuff by Ced Bufton, on Flickr Put together some assemblies and broken (or at least cracked) one of the C6 cowlings during sanding (watch out others): IG with broken C6 by Ced Bufton, on Flickr glued those irritating stubby bits on the front of the props (hopefully the right way around) and gathered other bits ready for a spraying session: Ready for spraying by Ced Bufton, on Flickr Food soon and then hopefully the green stuff might be dry enough to sand... or perhaps I should leave it until after tonight's 'final episodes' fest. Probably best. I'll fiddle with the Defiant then.4 points
-
Or a detailed weapons set? I note that there is no Scimitar in that list, why oh why Airfix, don't bother with all this Crab and foreign muck. Complete the Fleet Air Arm collection! Oh unless you are going to do an RN Phantom, that will do for the time being.4 points
-
1:1 scale Pigeon, with bonus spider & fly A new range of wildlife models to add to the old ones currently stalled on Kickstarter4 points
-
RAF Phantom would be nice in 1/724 points
-
I think I better do a little update before I get overloaded with pictures to post up, things are coming along at quite a pace on David's model. The cowl panel thinning went well, below is a comparison photo with the thinned one on the left. The eduard sets come with plenty of to go on the otherwise completely bare inside. As it's going to be a bit of a pain to paint up the cowl sections he's decided to modify things a bit so that he can slide the engine on later, he did this by removing one of the two tabs that hold it in on each part. The exhausts proved tricky as he has some resin parts to fit on the end, here he is in a moment of great tension checking the alignment as the araldite is drying! Here they are off the engine, they're getting a coat of milliput on the join lines. I think they look a bit like some kind of deep sea creature. In the background are his resin body parts for his figures. He also test fitted his Alleycat resin cockpit, it seems to fit very well and is a great improvement over the rather oddly constructed kit part. The engine recieved a bit of attention this morning with a little weathering wash.4 points
-
Rats... page 2 and still no photos... here you go: Untitled by Ced Bufton, on Flickr Partly Painted Crew by Ced Bufton, on Flickr 'Partly Painted Crew'? Sounds like a new boy band... I still can't believe that guy on the right... from a 'new tool'? Really? No comments on the paint job (yet) please - they're waiting for some more colours and some touching up (aren't we all? Fnaar fnaar!)4 points
-
Just finished her Great Kit very accurate and detailed and a breeze to build, only a couple of minor problems full build review on http://leicestermodellers.weebly.com/ Im pleased with how it turned out.3 points
-
Here my build of the Venom... A nice kit overall. Shame that the delicate parts aren't protect properly with few broken bits as consequence. And, to be picky, one of the troop seat is bad moulded... I will probably build another one in the future as I'm sorting out few problems that are affecting my painting process... I hope you like and any comment/criticism are welcome Thanks for watching!3 points
-
Thanks for your help guys. It's now primed up.3 points
-
Pictures as promised (sorry Chris! ). So here's the cover made from lead foil, lovely stuff to work with, soft and easy to cut yet holds its shape so well: and here it is in situ: The first of the Tiggies after a coat of Tamiya fine white primer. When it's thoroughly dry I'll be going over it all with a very fine sanding stick followed by micro-mesh polish: Working on the nose of the other: I've added some plug leads but don't intend detailing any further. The engine cover and side panel again are lead foil with a brass rod hinge holding it all together. The inside of this has now been primed so I'll be spraying the whole lot with interior green shortly. More tomorrow I hope....cracking on now! Max3 points
-
I hope its the Phantom that really needs tooling up and I am sure it will be popular. I know I have plenty of decals I would love to put to good use in the stash.3 points
-
Thanks for the heads up Spad. I have gone with painting up the US Navy figures from Trumpy, into RN colours.... I am considering buying an Eduard set to intersperse with the others, providing the colours match! The two guys shown below are the very best of the bunch! (oh dear)... Cheers, Pete.3 points
-
Hi everybody, quick update; gunsight is painted (and yes, the reflector did fall off once more, so I reattached it only after having completed the painting process) And I have also glued in the windshield (PVA plus some CA glue to secure it) Let's say that this windshield is ... part of the learning curve about vac-forming There are a few big gaps along the contact areas with the fuselage, and I already went over them with two layers of PPP, still it's not looking quite right. I didn't take pictures of that, but will post some tomorrow. I'm going to live with that, anyway; lesson learnt for next time: you need a good master for vacforming! Comments welcome Ciao3 points
-
Hi everyone, Just finished these two newish kits from Airfix, both very nice and quick to build up. I wanted the Hurricane to look particuarly worn and faded, the Spitfire a little less so! Built out of the box, just added some Eduard seatbelts and a little lycra thread for the aerials... plus the missing rear view mirror on the Hurricane. Painted with Xtracolor enamels and weathered with oils and pastels and finished in Alclad matt cote. All comments welcomed. Thanks for looking, gazza l3 points
-
I've been building models for my son's room over the last 3-4 years this is his collection. Still a lot more to go up there.3 points
-
Hi all well this is going to be a challenge to paint, to say the least, but I've made a start.3 points


This leaderboard is set to London/GMT+01:00