
Leaderboard


Popular Content
Showing content with the highest reputation on 01/10/15 in all areas
-
G'day people, Here are the pics of my completed Zero. I bought this one for just $10 Aussie from Aldi when they had a few of these on spesh recently. This is one of Airfix's recent newly tooled kits and it went together in just a few evenings. The fit was great, the instructions were very clear and the decals were great. I kept it mostly unmodified, however I replaced the driver with a better resin item (not that he is all that visible) and displaced the elevators to give a little life. I would have liked to have the ailerons displaced as well but that would have required a great deal more surgery so I left it alone. The kit pitot probe was also replaced with a new item fashioned from brass tube and hypo tube. Finally the base consists if a plastic disc with some ally tubing for the stand. A brief WIP can be found here http://www.britmodeller.com/forums/index.php?/topic/234989304-mitsubishi-a6m2b-zero/ cheers, Pappy25 points
-
Hi All, Here is something a bit different, a conversion of the DH Dreams (Canada) snapfit Beaver Floatplane a project I have wanted to make since seeing the advert in Fine Scale Modeller many years ago. The kit has solid windows and needs an interior but I found pics on the net which helped a lot, and further mods made specific to a British Army version. Windows were cut out and replaced from a Ferrera Roche Xmas box lid as the edges of it are curved which gives you a fighting chance. I have made the wings removable for easy transportation.All decals scourced from the spares box and model painted in Xtracrylics.20 points
-
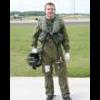
Hello to All This is my latest completion and something different for me. Eduard 1/48 Hellcat Mk II from the Dual Combo Profipack release. The additions were a resin seat from Ultracast with moulded on belts and Resin wheels from Eduards Brassin range. Otherwise she is as it comes including etch, decals and masks from the kit. The aircraft is from 1844 Sqn FAA aboard HMS Indomitable, Pacific 1945. Painted with Testors Modelmaster enamels. I hope you like her. Constructive feedback is always welcome. Cheers Andrew.16 points
-
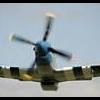
Hallo Ladies and Gentlemen, today my last built of the P-47 Razorback in 1/72. It is finished with Alclad 2 . Decals came from Rising Decals. A nice kit wich is easy to build and made a lot of fun. Unfortunatly I have no figures for a little diorama. Have fun! Best regards Andy8 points
-
Right, here she is. I started this kit 2 years ago, and she ended up on the shelf of doom . No real reason, just other builds came along. So with the Ferrari done, it was back to the shelf, thr good lady had told me, no more fresh builds until you get some finished. Any how, the kit went together well but the decals..... another matter. I got some True Details decals they were OK. Painted with Tamiya and Alcad, varnished with Vallejo. This has been a test bed for me, on various levels. And I have learned a few good lessons . So apologies for all the mistakes, I left them there as a reminder to me in the future. The markings are for the ANG 182nd FBS, 136 FBW , 5th AF Taegu AB Korea January 1952. All comments welcome. Simon.8 points
-
Hey guys, i would like to show you my last build, Tamiya P-51D Mustang. It was just a quick build, originaly planed as OOB.. in the end i did a few additions: - puttied wing - riveted fuselage - cockpit detailing (scratch + some PE + aires seat) - scratched mirror - quickboost flaps, main gear legs covers, tail wheel well, propeller blades - re-shaped main gear legs + added some details to these - added details to drop tank racks - added details to drop tanks (scratches, pipes) - drilled exhausts pipes - new MG barrels made from needles/brass tubes - formation lights drilled out and made new from clear plastic sheet quick WIP thread here for anyone interested http://www.britmodeller.com/forums/index.php?/topic/234988612-p-51d-quick-build/ Now i made a lot of shots of the mustang, so i ll try to show you few of them6 points
-
Hi everyone and as promised here are some pics from this finished build. I've included a link to the WIP thread if you hadn't seen it before and to recap, this all started with me asking fellow modeller and all-round good bloke Chief Wiggum if he considered building his Trumpeter TU-95 Bear as an in-flight intercept diorama. After almost 10 months and a lot of modelling heartache later (99% for Chief), here it is. We were absolutely thrilled and stunned to win Silver in the Diorama class at the IPMS Ireland Nationals with it as well as the 'People's Choice' Award as voted for by the public at the show... Honestly, we were deligthed! (I'm the one not smiling) While neither of us can make Telford this year, we're hoping to get the diorama there somehow for the IPMS Ireland Club table.....gonna need a big roof box Thanks for looking and any questions, will try to answer them! Cheers, Dermot and Barry (aka Chief Wiggum)6 points
-
Here is another of my British models for you. As per usual, I have posted this model on other sites, so it may have been seen already. This is Trumpeters much criticized F. Mk1a/F3 kit with a few things done to it. Modifications to back date the kit to a Mk1: Removal of the wiring conduit running 3/4 of the length of the fuselage Scratchbuilt Instrument panel. Corrections and additions to the kit: Reshaping of the fuselage area underneath the windshield Removal of most of the canopy and windshield frames and then re-modelling them to make them fatter Reshaping of the spine Additional 3mm added to the length of the kit in the form of a plug immediately forward of the exhaust pipes. Reshaping of the fuselage in between the exhaust pipes All NACA vents carved into the fuselage Reshaped tip of the vertical stabilizer Reshaped tips of the elevators Moved wings approx 4mm rearward Moved tail back approx 3mm Main undercarriage legs shortened by 5mm and made thicker Reshaped ventral fuel tank New ventral fin Corrected seamless intake Scratchbuilt APU exhaust Modified main undercarriage doors Added brake lines Added inner canopy frames and details underneath the canopy. Scratchbuilt vaious vents and scoops. Aftermarket: Master pitot tube AMS resin Ejection seat (With modified pull handle) Aires cockpit (with modified instrument panel and Power levers) Aires Exhausts Aires Wheel bays Mastercasters Wheels Finish: Alclad paints for the Natural metal finish Extradecal markings with masked roundels and serial numbers/letters. Extradecal stencil data Detail photos: In its new home: The photo that inspired me along the way: Black and white pic of my model to compare.6 points
-
Ukraine's potentially new SU-27 replacement - the T-50 Kit: Revell 1/72 Paints: AKAN, Tamiya, Alclad Decals: Begemot and kit WIP thread Thanks for looking MH6 points
-
After three months of occasional evenings.... Here is a Classic Airframes 1/48 Sea Hornet NF.21. This has had selected areas fully detailed that are not usually covered. Also, this has had a number of modifications that are necessary to correct the basic shape: +6.5mm insert in the rear fuselage ahead of the tailplane/fin. Full depth undercarriage bays. Complete undercarriage leg, bays, and doors moved rearward by 6.5mm Filled unnecessary panel lines on fuselage and wings Added correct panel lines on wings. This was all detailed in a WIP thread here: http://www.britmodeller.com/forums/index.php?/topic/234983720-classic-airframes-dh-sea-hornet-nf21/ . by hornet project, on Flickr A brief history to be found in Lewis Cooper's Hornet File book: Sea Hornet NF.21 VW957 was built by the de Havilland Aircraft Company and first flew in 1949. It was delivered to ARDU Culham on 20th June 1949. Entering first line use on the 17th January 1951 with 809 Naval Air Squadron at Culdrose, initially coded as 484/Q. By May 1951 it joined HMS Vengeance. August 1951 saw brief stays at RAF Coltishall, Hal Far, and Gibraltar. By February 1952 it was back at Hal Far, Malta. In June 1952 VW957 was on-board HMS Indomitable for just one month until returning to Culdrose by July 1952. Here it stayed until flying into Leuchars in September 1952. In January 1953 it was onboard HMS Eagle until March where VW957 ended its first stint with 809 NAS. Between March and August it received refurbishment at Lossimouth and Culdrose, coded CW/481. On the 2nd September 1953 it re-joined 809 NAS on HMS Eagle for the final time, coded J/481. On the 28th September VW957 was used to trial the "Evaluation of using a whistle for emergency stops." It was reported as having had a hydraulic failure on the 19th January 1954 onboard HMS Eagle. HMS Eagle said goodbye to 809 NAS in February 1954 when the Squadron was sent ashore at Gibralta. By 28th March 1954 the Squadron returned to Culdrose. With 809 NAS giving up its Sea Hornets in favour of the new Sea Venom, their Squadron Commanding Officer Lt Cdr Henley flew his last aerobatics (in a Sea Hornet) in VW957 on 7th April 1954. Two months later after a period of storage, VW957 was transferred to Airwork FRU at St.Davids in Pembrokeshire coded as BQ/415. It was used here for Radar interception training. On the 19th December 1956 its useful life had come to an end, and it was sold for scrap. Evidently, remains of six of the last Sea Hornets scrapped at St.Davids were to be found on the airfield dump for at least the next 10 years. Photo's show remains of mid-rear fuselages of these up until around 1970. VW957 was one of these recovered, the other being VX250 now on display in the DH Museum. . by hornet project, on Flickr . by hornet project, on Flickr . by hornet project, on Flickr . by hornet project, on Flickr . by hornet project, on Flickr . by hornet project, on Flickr5 points
-
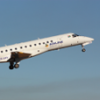
So I have finally managed to complete my A300 in the old SAA colours. This was probably one of the most pleasant Airfix kits I've built to date despite its age. As with most Airfix kits I still had to do quite a bit of work to correct some problems, especially the shape of the nose and I had to scratch build some parts that Airfix forgot to add. Painting was done using Revell Acrylics, finished off with two coats of future floor. Because no decals exist for this scheme I had to airbrush the cheatline on. This was a first for me as most sets include the cheatline. The rest of the decals were a combination from authentic Airliners, MAV and Draw decals. The engines were covered with bare metal aluminium foil and alclad II. All in all this was a very enjoyable kit. Its a real shame they are so hard to find these days.... As always, any comments and critics are welcome5 points
-
I recently had a couple of Mr. Color acrylic paints sent to me as samples from the new UK distributor for the range: RAF dark earth and RAF dark green. Hmm, I thought, scratching my head and taking a look at my stash. What can I use these on? My eyes fell on a little red box, and everything fell into place -or fell out with it- as I pulled out Airfix's new(ish) Spitfire Mk.I/Mk.II, with the two bladed prop and flat canopy for the pre-war option. Tucked in the box along the kit was a decal sheet from Xtradecal with very early 19 Squadron markings, and I wasted no time in cracking on. Remarkably -for me- I had the model completed within three weeks, which is a stunningly quick build by my usual standards. It helps of course that the kit is straightforward, a joy to build and has very few issues. I was very impressed with the Mr. Color acrylics, which left a lovely thin coat, though I did not realise at first that they dried to a semi-gloss finish. The underside was Vallejo Model Air and it was finished with Humbrol Clear and Alclad Klear Kote flat. Decals were a mix of the aforementioned Xtradecal sheet and the kit's own stencils. As a new aircraft with only a few months in service weathering was limited to some exhaust staining. [url=https://flic.kr/p/zfYnZJ'>5 points
-
Quick build of the Fujimi kit....Slightly sloppy paint-job, left-over decals...nuff said!5 points
-
Hi all, I'm never sure where to post figures - I've had a thread in the Figures subforum but it looks like finished ones should be here? Anyway, I've been painting a bunch of figures from the recent Games Workshop Age of Sigmar box. As usual the starter set is quite keenly priced for what you get, the individual figures and squads are eye-wateringly expensive though. In reverse order of completion, here are: Khorgos Khul, Mighty Lord of Khorne (chief bad guy) Stormcast Eternal Prosecutor (flying hammer-chucking goodie) Five Bloodreavers (junior bad guys) Stormcast Eternal Liberator (basic goodie grunt) I also did a couple of posed shots with things I painted last year, I want to do another soon with all the Chaos chaps together. It's been a fun way to spend winter but I need a break from all the squinting now! Cheers, Will4 points
-
Hi This is my first gallery in this forum, so maybe few words about me. I'm from Poland and I'm mainly building americans planes. I like putty for plastic and send paper , so my last model is Northrop BT-1, which released VALOM. The build thread can be found here. Bye for now, Jaro4 points
-
Here is my latest aerobatic kit, a Cougar Blue Angels. It was abandoned by a friend who gave it to me (half built). The kit is really sharp in the edges and with recesive panel. No coments about decals... they were destroyed at water contact.. so i had to use the Panther Blue angels Revell decals from my next proyect (now naked), and the "Blue Angels" from an old hasegawa kit (f-18 i think).. It was painted with modelmaster Blue angel Blue (1772), and Alclad II. Now my aerobatic collection rose to 10. Cheers! Orlando.4 points
-
Evening all, seems to be a russian invasion on the shelf at the moment after the recent MIG 27 build i just got hooked … so i dusted off another great MIG aircraft , The kit itself is very well presented and moulded in white plastic. one decal option is with the kit again very good detail if not a little tricky ….. To build its a straight forward kit nothing to challenging , wings are not a great fit but with the usual work you can get around it , otherwise ok. built as the box comes with and added resin seat , thanks for looking !4 points
-
Ok! Radios & radar built and placed in position and I'm happy with the result so now I can start going forward in my OOB build LOL Kev4 points
-
Bandai's peach of a kit. I used an off the shelf LED flasher board, that worked swimmingly. Six 3mm LEDs were used total. All fit under the base I expanded from the kit base, with plastic card.Yes, the lens flare is a bit much, but what the hell?4 points
-
Hi all more progress this morning,I,ve glossed the airframe added a couple of the decals and dropped a wash in the few recessed panel lines on the kit also the upper wing is painted and glossed,wheels on with just another touch up on the hubs to do.next step is to rig the inside of the wing struts before the top wing is fixed.Thank's for looking in.4 points
-
Now after a few nights definitely starting to look distinctly beaufighter shaped! Though a bit peeved I think the all too important 'flat' tailplane has dried a little wonky....😢4 points
-
Yellow came out alright, as did the white. But wasn't happy with the blue. Finish looked average and it ws still tacky after 24 hours (I've always had issues with Xtracolour and WEM doing that, hence I usually avoid them). Nothing wrong with Humbrol for enamels IMHO But the advantage of using Enamels over Acrylics is that it's easy to remove. 15 mins later and it's back to the beginning Going to try the decals.4 points
-
It's quite simple. Casual buyers, which still account for a huge proportion of kit sales in the UK, will look at something which says Airfix on the box before anything else. This is why Airfix probably sell more models in this country than most other brands put together, and why model shops stock a proportionally higher amount of Airfix products. This, I suspect, is why Airfix have put money and time into producing a B-17, and why they will doubtless continue to release more well known subjects.4 points
-
So, here is what the other end of the wing looks like (thanks to Lightningboy2000). I flipped the photo horizontally so it would look like the starboard wing: And here is my half-baked attempt at reproducing it (I really don't like these macro images of 1:72 scale model parts, things look so much better in real life): At least I found a way to use more white plastic! Here is a comparison with the other wing that I haven't done yet: I think it will be OK. There are some additional details yet to be added, but this will be a good foundation. You can almost tell from that last photo that I reworked the inboard section of the lower wing that is meant to be the Fairey-Youngman flap. It now has a sharper trailing edge, and a cross-sectional profile that, while not a bonafide airfoil, would be better at flying than a brick. Cheers, Bill PS. Oh yeah, I forgot all about that Airwaves PE set. I wonder if any of it would fit...4 points
-
Just completed the new Mark ! models Beaufighter VI. She;s tiny but she's a BEAUtiful kit!4 points
-
How pathetic I have become...trolling around these pages hoping to catch a glimpse at the next instalment when it comes out! Given that Pete must have a day job and or a life outside of entertaining the likes of me; I decided to do some trolling around in my stash for anything I may have on N7654C. I could have sworn that I have a VERY old magazine from the 70's on the topic of these firebombers -- but alas, I cannot find it. A quick check online did come up with a couple of neat hits though: 1. http://hsfeatures.com/features04/f7f3dwa_1.htm 2. http://www.airliners.net/photo/Grumman-F7F-3-Tigercat/1305685/&sid=198f9742007c6958ec91c2f4729ab473(Photo shown above) Hopefully Airliners.net doesn't spam you too badly if you visit there. I believe they recently sold to a new company -- and have since gone bonkers on providing every manner of advertisement to bugger-up your browser. I thought the HS feature was a good one! An interesting fact on this airframe -- N7654C / E63 (cn C.115) Ex BuNo 80373 now in the National Museum of Naval Aviation, NAS Pensacola, Florida. That's just a 6-hour drive for me and a place I have been wanting to visit! (Wonder if I can talk the Mrs. into a trip to the beach?!) Will keep an eye out for details that may help with forthcoming parts of your build Pete... Cheers! PR4 points
-
Hi again, This is an update with last night's work. Most of the work I did was painting the canopies of my other builds for this GB (the Do 17z and the Bf 109 E4). However, I decided to remove some masking I had applied to the cockpit parts. I started by removing the masking from the following part, which goes behind the instrument panel and has an area that should be natural metal instead of cockpit green. I used Alclad White Aluminium for the metal area: IMAG2770 Then, I removed the masking from the circular black spot on the top of the bulkhead and from the pre-coloured PE areas of the part on the left side of the pilot's seat: IMAG2773 This part had been masked on the front tip and on the back where it joins the bulkhead. Unfortunately, when I removed the tape on the back, the pre-painted black was partially removed. I'll have to paint this area myself. To finish with, I removed the masking from the small quadrant on the inner port cockpit wall. This time I didn't cause any damage: IMAG2774 I still have to paint some black parts before finishing building the cockpit. Thanks for looking Jaime4 points
-
Left click on picture to see at it's best3 points
-
What do you need the lepus flare for? surely you would get enough light from the WE177? Selwyn (Ducks for cover chuckling!)3 points
-
Small update for this evening. Progress slowed down a little bit due to some career courses in Portsmouth and SWMBO not being entirely happy with me airbrushing at the kitchen worktop while I wait on the desk arriving at my new flat. The only positive to the desk situation is I've got permission (kind of...) to turn the spare room into a modelling room/man cave. So its not all bad news! Anyway, bit more progress on the decals, all of which are now on. The stencils are a combination of the Berna Decals sheet and the Dynavector decals themselves. Both types have thick carrier film which didn't respond too well to my usual Micro Set & Sol combination, so I ordered some Mr Mark Softer and Setter which are a bit stronger and seem to have done the job rather well. Unfortunately the underwing serials are a bit oversized, this appears to be a common theme with the Berna Decals sheet, but since it'll only really be me that has to look at it and its on the underside anyway, I think I can live with it. The most pleasing aspect of decalling was that the Dynavector decals which looked like they had silvered badly when they were first applied have blended in perfectly under another coat of gloss and then a matt coat, which bodes well for using the decals supplied in the other Dynavector vacs I've got stashed away (Scimitars, more Wyverns and a Sea Hornet). The last picture above shows it as it stands at close of play today. In between the final gloss coat to seal the decals and the matt coat, I gave it a panel line wash with some thinned black and raw umber oil paints, to bring out a little more of the detail. I know this isn't always to everyone's tastes, but as I've said its only going to be me that ever really looks at it and I'm happy with it! Canopy was unmasked and after a quick buff with some micromesh to remove a little bit of paint seepage and a brush over with some Alclad Aqua Gloss it looks lovely and clear! Next on the hit list will be painting on the black non slip area on the port wing which I forgot to do previously, and then the small details such as undercarriage doors and drop tanks and hopefully unless I spot anything else too glaring that I've missed I should hopefully be able to get this one finally finished! Thanks for looking folks! Nik3 points
-
More updates for the Javelin, progressing very quickly, tail already has gloss cote ready for decals and will be glossing down the fuselage tonight, leaving it to dry for a decaling session on Saturday. Really fun and quick build this is turning out to be.3 points
-
Picked this up last year at Telford. Almost missed it as it was tucked away in the corner. Dug out an old Hasegawa kit I'd finished years ago that was sat in the loft. No real issues other than finding a couple of pics on line that seem to indicate that the wings and elevators were finished in a camouflage pattern, not the RLM02 as advertised. Still, fun to build.3 points
-
@Jaime: sorry for that @Josip: you're right, although it is understandable that Airfix made them that thick. When I picked up Eduard's barrels for a picture, one of them broke. Probably because I picked it up wrong. So, they are very delicate and I can understand that Airfix chose not to do that (also because then the plastic might get bent very easily). 90. RLM66 was added. I used Vallejo Air 71.055 (RLM66), 71.001 (white), Vallejo thinner and Vallejo flow improver. If used in the right ratio's, airbrushing will go flawlessly. I added 20% white for scale effect. Best possible explanation: see here. The ratio's: - 10 drops of 71.055. - 2 drops of 71.001. - 6 drops of thinner. - 2 drops of flow improver. Mixing well, spraying goes perfectly. This is one of Vallejo Air's main advantages: you always know the correct mix ratio for each color. Without scale effect taken into account, the ratio I use is 10:5:2 paint:thinner:flow improver, whereby the flow improver goes into the cup first. Both cockpit halves and 10 other parts such as seats, got two layers of RLM66. I used the above cocktail formula twice, so 40 drops in total. The color deviates from that on the instrument-PE as given by Eduard. This will always be an issue, of course also the structure of the metal parts is different. But in reality, too, the color of the instruments was usually different from the color of the surrounding metal, as I understand; and with fighters before the end of 1941 the interior color was RLM02 whereas the instruments had a RLM66-ish color. So I can live with this color differentiation, not in the least place because this is a quick build for me. Totaal bestede tijd: 46 uur.3 points
-
How well I know you - when I was writing the post and I got to this bit: (but no I'm not going to attempt to cut out masks and paint the letters and roundels!) and I knew what you'd say in reply and I seriously almost wrote (but no Giemme I'm not going to attempt to cut out masks and paint the letters and roundels!) .....or something.......... Hi Nick. It's not my idea - I 'borrowed' it off someone else here on Britmodeller! It is a bit tricky to do in places - internal round corners, etc. but with a bit of practice it does help reduce the amount of silvering. Not at all!! I keep enviously looking at the work you and everyone else is doing here on Britmodeller! Hi Rob. You were quite correct!! And you can see from my reply to Giemme - I almost put his name in that bit - I knew that's what he'd say. He's quite correct of course but don't let on or it'll go to his head! He did an absolutely fantastic job with his painting of the code letters and roundels - maybe if I had an airbrush it might be something I would try. Kind regards, Stix3 points
-
Thanks Stew See below - I'm not sure it's done the job but it does look better with the matt coat on. Thanks Jaime Wait no longer - see below. Thanks Chris Indeed I can now breathe again... after fitting the windscreens of course. I'm calling this done and I've posted in the gallery (number 6!) As promised some shots on the problems... Silvering pre Matt coat by Ced Bufton, on Flickr Not entirely gone but good enough for the ceiling. As is the (I'm not happy but my eyes can't cope) rough finish around the demarkation line and the lumpy finish (in some places) from the rattle can: A shot of where the runny CA caused the EZ Line to have a bendy end, and/or my hands/eyes stuck them down too far - use CA Gel!! Dodgy rigging by Ced Bufton, on Flickr I have a picture in my album of this with the Magister but I won't post it here in case Max bans me!! I think you can see it if you're interested. Thanks as always for your help, support and companionship on this. It was another tiny model and I'm not sure I can cope with many more of this size. A good practice for the Rapide rigging though (that has double lines for goodness sake!). Right! Back to the BoB GB - I have the rest of the month to build my Blenheim IF and Defiant.3 points
-
Thanks Steve (and Rob, Ozzy and philp). I made a start on the Albion, an hours graft and i had this - Very nice fit on this on far (Like the Bedford), a joy to build. Hopefully more progress tonight! Thanks for looking, Nick3 points
-
Hello Everyone, This is my third build for Karen at work. This time I have gone for the "enemy" and provided the BF110, before anyone asks or notices, I am not allowed to put any swastikas on the aircraft. Complete crock I think but I can live with it. I used an Eduard Zoom set for the interior and mask for the canopy, both I will be using again, but not relying on them. Oh I also had an Eduard Brassin MG15, which I also like as well and I will be using the other one that I have. I'm not too sure on the colours, but this is what Vallejo suggest and I am aware of the cock up on the right engine with the wash. I am going with an oil leak for that one Well here are the pictures of said aircraft. For some weird reason, Flory Washes do not like Vallejo RLM66 (or 65 I can not remember).. it's had 4 coats of gloss over it and it still sticks and refuses to budge. Could of done better with the join line and the wash. But more things I will take with me to the next model. That 3 I've done... wow I am in danger of clearing a whole shelf of models in my man cave Comments welcome Kind Regards, Dazz3 points
-
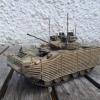
A full sprue of M48A3 parts has arrived at Squarehead Towers, having travelled all the way from Italy, courtesy of Tommaso over on ML Braile.....We're back on track!3 points
-
I received the lighting system in the mail today and immediately set about testing if the idea that I had with it works. I think it has been successful but I still have a fair way to go before I am happy with it. Here is the system that I got. It is a Turnigy Simulated LED system from Hobby King. It is designed for RC aircraft and as such is being modified to fit the Concorde. I am keen to avoid making the model `toy like' so I am devising this system without any external switches or any other indication that I have just thrown a few LEDs around the model. I am also aiming to have the model look totally stock when the lights are turned off. The lighting system has provision for flashing lights, nav lights, strobes etc depending on how each LED is hooked up to the controller. I will be just hooking up four LEDs to act as `reheat' (one for each exhaust) and possibly two white LED for each side of the fuselage under the cockpit as most photos of the aircraft in the takeoff pose show those lit. I have already removed the battery connector in this photo hence the bare wires. Here is an LED drilled into one of the exhausts compared to a stock exhaust on the right. Notice how apart from the clear LED, there is pretty well no change to the shape of the part. It fits into the limited space inside the nacelle quite nicely. My plan will be to be able to pull out an exhaust pipe to allow access to a switch and to allow the batteries to be pulled out and changed. I have used 3 x 1.5 Volt AAA batteries at this stage, with the system allowing a maximum of 6 Volts. The challenge will be to see how long the batteries will power the system for vs how bright they are. Lots of tinkering left! Here is the idea. Bear in mind that I will be changing the Red LED to an Amber one (the kit only comes with White, Red and green) But at this stage at least my concept is well on the way to working I have packed the exhaust with clear plastic to diffuse the light.3 points
-
Hi again, Update with last night's work. With the transparent parts masked I was ready to start painting the interior RLM02 colour. First I stuck the transparent parts on toothpicks with blobs of blu-tack on the tip: IMAG2764 After painting, this was the result: IMAG2769 Thanks for looking Jaime3 points
-
I think their next big bomber would be a B-24, they have one in their range and it's VERY old so due for a replacement.3 points
-
Hi folk,s just a quickie,got the first couple of coats of gray/green camo on and top and bottom of the upper wing colours on and popped on but not yet glued for another dry run.Started a bit of painting and dry brush of the engine.Thanks for looking in.3 points
-
Thanks for that, Steve. So, without any "modesty panel" covering up the wing fold jack, that means I will have to scratch some details to put in that spot! Whose idea was it to fold the wings on this model again? I'm not too worried about making a wing fold jack, as it's a pretty basic shape. Here is my concern though - it seems to me that this is a hydraulic ram of some sort. There is a larger diameter than is attached to the fuselage, and a smaller diameter, movable shaft that protrudes out and connects to the wing. At this stage in the build, I don't have a good sense of how long the smaller diameter shaft needs to be (since I don't know where the wing will be just yet). So what I'd like to do is make the smaller shaft adjustable so it can set its length later on when the wing is attached. (Granted, the length of the smaller diameter shaft is quite small, going by the photo in Steve's preceding post. But a small error down here will make a much bigger shift in the position of the wingtip.) So here is the idea. I'll use two different diameter hypo needles, carefully chosen so that the smaller will slide inside the larger. And, of course, because they're the only two sizes I have. What's shown in the photo is way more than is necessary - the actual pieces will be very short. Just the larger diameter will be mounted for now. When I'm ready to mount the wings, then I can add the smaller shaft and adjust as necessary. I think I'll need to make a jig of sorts to hold the wing in the proper folded position, which I can use for measurements like this but also to hold it while the glue sets. I blended the carburettor intake into the fuselage with my standard red putty. We'll see how good this is once there is some primer or paint on this beastie. I managed to lose the cooling louvers that are on the bottom of the nose, but these were very weakly engraved to begin with. Some of them would have disappeared under the first coat of paint. These will need to be recreated somehow, they're very obvious under the nose. I also heard the pleas for more white plastic. Well, I was able to add some more, but it wasn't much! Maybe there will be a need for more when I get to the wings. In the meantime, I used 0.5mm strips to add some structural members that kinda sorta follow the pattern in the photos. Then, I used some 0.3mm solder to make some small cables (wires?) followed by 2.6mm solder to form the most obvious detail here which is a large hose or conduit of some kind. Next up I'll add the top of the wing roots, and take care of the filler that will be necessary around the radiator intakes. Speaking of which, I need to add the two vanes in each radiator that didn't survive the process up to this point. I think that needs to be done before the top of the wing roots goes on. Now let's see, what else am I forgetting? Cheers, Bill3 points
-
Hiya Folks, I managed to get the decals on today and cut up the Eagle Editions decals to make the outlined style codes sported by JT160.; So at least it looks like Sub. Lt. Raymond Knott`s JT160 now, Cheers Tony PS- Meant to say that the real JT160 appears to have those blue coloured tapes around the furward fuselage so I`ve applied white ones from the decals to act as a guide for the blue ones which I`ll paint on. Also the white square on the wing will be a yellow/mustard anti gas patch.3 points
-
While I'm waiting for the harness to turn up to complete the cockpit, I've been thinking about the base and the undercarriage for the speeder. I'd originally intended to scratch build some landing gear but that would have meant cutting apertures in the underside and building up some kind of gear bays along with making the gear itself and, frankly, I couldn't be bothered to put that much work into it, especially when you'd hardly see it. Thinking about it for a while, I decided that, since I'll be leaving some of the side panels off, a maintenance platform might work better. That way it'll look like it's undergoing an overhaul. So yesterday was spent hacking plasticard up, and I've come up with this little, wheeled cradle. It's pretty basic so I might add some more detail to it but once it's painted up (in yellow, I think) and given some paint chipping and weathering , it should look OK I might make an inspection platform as well but I don't want to crowd the base too much so I'll get the Speeder and base finished and see how it looks then. Andy3 points
-
Wonderland saying Revell AEW2 available 15th Dec. I think it is clear what is going on here. Would not be surpised if Airfix AEW2 release date is also revealed before Revells model hits the street.2 points
-
Standard Airfix OOB with the (gulp) 'advanced modeller' instructions for rigging as promised. Thanks to all for the 'encouragement' and to Adrian for the step-by-step. WiP here.2 points
-
I re-did the blood a bit (another couple of layers of Clear Red + Blue with some GW Blue Glaze in to cool it further) and I like it now. I also blended the skulls into the base properly and added a bit of blood splatter to the axe and surrounds. So he's done! Bit of a struggle, but here we are. I'm going to have a break from the figures for a while so I can concentrate on my Crusader for the Vietnam GB, I will probably come crying back when it gets hard though I've posted some more pictures in the RFI forum here: http://www.britmodeller.com/forums/index.php?/topic/234989516-angels-versus-crazed-barbarians/ Cheers, Will2 points
-
Thanks for the nice comments guys. Triumph, thank you for the constructive criticism. Looking at the model now, it does appear a little too heavy for my own taste as well as I like to have things toned down and I really dislike the heavy grid like shading of models these days. Not sure how I ended up doing that! When I have the alclad out next time I will tone it down a bit. Eric.2 points
-
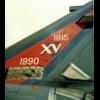
Okay, now I've found my records here goes: Site 1, Snoopy Airways (old RAF Muharraq site) ZA790 'D' Debbie ZA471 'E' Emma ZA396 'F' 'GE' shot down 20/01/91, crew taken POW ZD892 'H' Helen ZA491 'N' Nikki/Nora Batty replaced ZA396 'F' The pictures below show 'N' Nora Batty/Nikki Also here is a picture of ZD791 'B (BG) on No 2 site (Gulf Air hangar) shortly before her first JP233 mission. The aircraft was shot down on the 17th January 1991 XVTonker2 points


This leaderboard is set to London/GMT+01:00