
Leaderboard


Popular Content
Showing content with the highest reputation on 30/08/15 in all areas
-
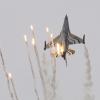
Hi all, A few photos of my latest project. I used the Monogram F-8E as the basis of this conversion into a 'Charlie'. The only aftermarket items were the seat (Aires), decals (Furball), 'Remove Before Flight' tags and a couple of AIM-9Ds from the Academy F-4B. regards Andrew21 points
-
Because of the Eduard’s Spitfire Mk.IX in the pipeline I decided to finish my last Hasegawa. I used Quickboost Prop and exhausts, Eduard Zoom and Tamiya and Gunze paints. The decals are from the new Airfix Spitfire IX boxing (I don’t like the kit but the decals are fantastic). Anyway here she is: A GC I/7 "Provence" machine, Dijon, September 1944.21 points
-
Hello, here are some pictures of my newest "roll out". It s Eduards very nice F6F-3 Hellcat in 1:48 scale, it s the Profi Pack kit and build right out of the box. Started two months ago, with the intention to have a relaxing and fast build, the progress was straight forward, until i started to fight myself. The solve the home made problems took the most of the time. But it s done and i am quite satisfied with the result. The kit decals were used for the Hellcat from the U.S.N fighter ace, Alexander Vraicu, BuNo 40467, VF-6 from the USS Intrepid. The blue in the national insignias are quite light, so i had to alter the sea blue color to get the contrast right. Hope you like it Best Regards Bernd17 points
-
17 points
-
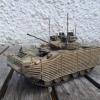
Hello, Once upon nothing published online, so this time Leopard 2A5 in the colors of Polish, from 34 Armoured Cavalry Brigade from Żagań. Tamiya model is the catalog number is the 35242 model is applied camouflage in new colors used in the Polish Army. Maciej17 points
-
Here are my last builts with these 1/72 Azur/FRROM & Special Hobby of the Vildebeest / Vincent. Published in Wingmasters. 1 - Vickers Vildebeest Mk III No 36 Squadron RAF Singapore late 1930s. The most controversial camo... 2 - Vickers Vildebeest Mk IV No 7 Squadron RNZAF Waipapakauri 1942/43 3 - Vickers Vincent Mk I No 244 Squadron RAF Sharjah Persain Gulf 1942 4 - Vickers / CASA Vildebeest Spanish Repulic San Javier 1936 5 - Vickers / CASA Vildebeest Spanish Republic Los Alcaceres 1938 Coments, though too late, are welcome. Never again five biplanes at the same time. Patrick15 points
-
Hi Guys, Here is my latest model for your inspection. It's not part of the B of B group build, but it's my tribute to the "Few " It depicts Flt. Lt. nicolson's VC - winning P3576 : I know there's been lots of discussion about the exact appearance of this machine, but this is my version of the aircraft. I used the excellent Precision Paints for the upper surface colours, and my own mix of Humbrol colours to represent the early Sky substitute " Eau - Di - Nil " Everything was brush painted with a spray finish of satin / matt varnish, and the decals were from Aviaeology's Hurricane set. As usual, all comments, good or bad are welcome.14 points
-
Geedubelyer, your observation came in a little too late I'm afraid as I had already applied the matt varnish and didn't dare go near it with a wash again but I did push the decal back with a blade and I think it looks a bit better: But we are getting ahead of events, last night I straightened and touched up the static dischargers: I was about to start spraying the matt varnish but then remembered these things: I cut one off and did a fit check. It was going to be almost completely hidden in the front U/C well so decided not to use them. These were all ready then for a coat of matt varnish: I tried to keep the coat as light as possible, just enough to hide the glue and slightly dull down the finish. I was particularly careful with the tails as black soon becomes grey, this is how they looked after: Then I applied some semi-matt varnish on the props to even out the finish, here the one on the right has been done with the other yet to be done (note the matt black spinner): Next I started unmasking the glazing, I had been worried about the liquid masking on the canopy as it has been on there for months but I gave no trouble whatsoever: I was quite pleased how it came out, then I hooked out the side window masking: So that's all the masking off: I started to fit the side glazing starting with the triangular ones at the front. I was having doubts about how good an idea it was to fit the glazing so late, especially with the PE surrounds in place. My thinking was that the windows could always be sanded to get them to fit. One fell through into the cockpit and I had a right time getting it out, then it pinged out of my pliers. After a protracted search and starting to think I was going to have to make one from scratch I did eventually find it: I took this shot to show how far the little blighter had bounced (tip of scalpel): Anyway, I got them all in, the round ones were much less trouble. I'm still not sure I'd do it that way again. They do have a nice neat finish though. After tidying the canopy I added the wipers using Gator glue: Next I added some oil streaks to the engines using the box photo as a guide: Next I added some brown pastel streaks I thought I was nearly finished but then remembered the lights. I already had a red navigation light left over from my last build so I got ready to make a green one to match: Here it is done and painted first with clear blue and then green: I did this because my references showed a bluey green colour: Next the lights on the tail fin and underside. I decided the best way to tackle these angular lights was to make a rectangular punch tool from brass sheet, first drilled out with my motor tool and a 0.8mm drill: After a bit of chiseling and filing here is the finished tool: From the mould taken from the kit original I decided my first efforts were a tad undersize: So I elongated the slot and made a few more. The sloped profile was added with a file and clear red was applied. Here is the first one on the tail: The next best went on the underside, placed using the splash moulding as a guide: Finally it was the downlighters at the front: Eagle eyed viewers may have spotted that one of the static dischargers had broken off: I found a nice thick bristle from my dusting brush and drilled out a 0.4mm hole: That added I think I can call this build as complete: Its too late for an RFI today, I will try to get it done tomorrow, weather permitting. Its been quite a build with its share of ups and downs, I think it's the most challenging kit I have ever taken on. Thanks for watching and I hope you enjoyed. Bye for now, Nigel12 points
-
Airfix BAC 1-11 500ED. Two-Six British Airways 'Landor' decals. Ok, so if you want a beautiful, accurate 1-11 500 then you need to get hold of the Authentic Airliners resin kit. But I got this out of the stash and thought I'd have a bit of fun improving it and converting it from a short bodied 200 series 1-11 into the stretched 500 series. I've thouroghly enjoyed it from start ti finish, and have a second 500 under construction as well now. Lots of work with sheet plasticard undertaken, full build log Here The main changes were extended fuselage, extended wingtips, new wing fences & flap tracks, engine pylons, engine hushkits, and a reshaped nose. The decals from Two-Six were superb and a delight to use. A plus is that the sheet covers all BA Landor 1-11's incluing the short bodied 200's, so if you don't want to do all the extending work, you can just do the wing fences, flap tracks, and nose. I chose to do G-AVMO which was preserved at Cosford for many years and is now at east Fortune in Scotland, very fitting really as it was named 'Lothian Region'. Enough words, here is the completed conversion. And 'with something else' - another 1-11 500, this one a Welsh Models Vac with Two-Six BEA decals. Thanks for looking. On with the second conversion now, which will be in BEA Red Square finish, to show the BEA/BA 1-11 500 in its first and last schemes. John11 points
-
Hi all and just finished this one for the Tornado Tribute GB in memory of Merv (Spike7451). Aside from the white which is from a rattle can, she's brush painted with the black lines from a permanent ink marker. Built totally OOB and more pics and WIP thread over in the GB. Thanks for looking. Dermot11 points
-
Ok, so with what access of pictures I could get and looking at other brands of decal sheets I've decided to go with this below. What do you think guys? needs a little tidying up in a couple of spots, but I'm happy at least and the two aircraft together11 points
-
This is my build for the Tornado STGB in memory of Merv (Spike7451), more pics in the gallery section of the group build.10 points
-
As with a lot of other people I've been eagerly awaiting the release of the Airfix Bristol Beaufighter TF.X since it was announced last year and when it arrived I couldn't wait to start it so thought I would do a WIP like I did with the Defiant. (I still need to take some more photos of this one!) Airfix 1:72 Bristol Beaufighter by Mark Maclean, on Flickr I was surprised that Eduard managed to release aftermarket before the kit was available and after looking at the instructions on the Eduard Website I decided that it was worth purchasing. While I'm building the model I'll try and take pics of the parts before and after the etch is added to show the difference it makes. I was initially tempted to do my Beaufighter as an operation Firedog aircraft and buying the necessary conversion parts to portray this scheme but as the molds indicate that the parts I need may feature in a future boxing I decided to go for a Wartime Coastal Command aircraft. There is nothing wrong with the kit decals or marking options but I had been inspired by the Article in the May 2015 Issue of Airfix Model World along with the built up Airfix kit and decided to go with the Aviaeology decal sheets. Airfix 1:72 Bristol Beaufighter by Mark Maclean, on Flickr Although I've never used Aviaeology decals before I can highly recommend these decal sheet on the research and the supporting material alone. They have photos of the chosen aircraft and a lot of notes regarding Armament, colour schemes and how they were weathered and retouched along with lists of the different modifications represented on the aircraft chosen in the sheet. It's almost complete package of research material and decals. The Above mentioned issue of Airfix Model World has an excellent article on the variations found on the Beaufighter TF.X and compliments these decal sheets nicely. I think I'm probably going to make this model to represent LZ451 of 404 Squadron Late on in it's career when the invasion stripes have been partly painted out and the fuselage codes have been moved to above the wing so there is a good opportunity to do a scheme with a bit of a patchwork paint finish with over painted markings etc. I made a start on assembling the interior. and made a few deviations from the instructions. There are a few ejector pin markings on the inside of the fuselage. I'll doubt you'll see any of them on the finished model but I was still compelled to fill them all! Airfix 1:72 Bristol Beaufighter by Mark Maclean, on Flickr I then filled in the forward area of the wing root while I was filling the ejector pin marks and at the time didn't realise that the consoles covered this gap and the filling I had done meant I now had to modify the parts to get them to fit. Not a problem but a bit of extra work that I didn't need to do. As I had done this I decided to fix the consolses to the cockpit floor as opposed to the fuselage as stated in the instructions. Airfix 1:72 Bristol Beaufighter by Mark Maclean, on Flickr As you can see from the above photo of the fuselage the interior has the vertical frames moulded onto the inside of the fuselage but no horizontal ones. As you can see I've had a go at reproducing these and think it has made a big improvement to the inside of the fuselage. To be honest I didn't really need to do the whole interior I could have just done the bits around the openings but htought it was a good opportunity to practice the technique and I'm glad I did because I got quicker and more consistent as I went on. Just got the other side to do now.... Thanks for looking, Mark9 points
-
Hi folk's the first of my QLD/T build is finished and here it is,lovely detailed kit to build only added a driver's mirror and the small white disk on the rear chassis which I believe is a convoy marker for night driving, thanks for looking and if you are interested this and a few other vehicle build's are here; http://www.britmodeller.com/forums/index.php?/topic/234985287-tiny-terrors-airfix-tilly-and-bedford-trio/9 points
-
Today Martin, our club chairman, dropped round to see me to pass over some modelling items and instructions for the next club meeting. He also brought along a housewarming gift: Old style Klear from his precious stash to replace my depleted store - thanks Martin! Lawns of the Heath estate mowed, I set about attaching the lower side door, starting with this clamping arrangement to get gravity on my side: I made this little card and Blu Tack support: After a bit of adjustment I got the angle of the steps right: I glued on the door with a mix of Gorilla and normal super glue to hopefully give it extra instant grab and strength then I painted the ends of the stays with interior grey: Here is the first one installed: Some of the pale burnt metal came off in the struggle which I touched up later. Then I did the other side as well as fitting the PE retractor arm thingie: I removed and reattached the pitot tubes on this side as I wasn't happy with their positions as well as painting the sticky out bits with tyre black: I straightened and touched up the static discharges, hopefully for the last time: Finally, to protect the glazing in the upper door from varnish I put in a foam block: I will go over it again in the morning and make sure I have done everything but I think this is now ready for a final dusting of matt varnish. My model is now festooned with delicate parts and I am having to handle it very carefully, using only a few safe areas. Hopefully things will go well with the varnishing and then it's just the side windows, wipers and lights to add, plus a final bit of weathering. Bye for now, Nigel9 points
-
Aftermarket on this is restricted to a Pavla windscreen, Pavla wheels, Red Roo external tanks, and a Heller canopy. Repositioned the wing fences and fashioned them from brass sheet. Decals are from the abysmal PM F-86E kit and the old Aerodecal sheet. Paint is Testors square bottle Aluminum. Cheers, Tony8 points
-
dedicated to Merv and the good causes, souls and spirit of this GB! enjoyed it a lot! Tornado F.3 56 (R ) Squadron Firebirds RAF display aircraft 2000 1/48 Airfix ingredients: Airfix retooled F3 (EF.3) kit Aires wheel bays (for Hobbyboss) SAC metallanding gear (for Hobbyboss) Quickboost undercarriage covers (for Hobbyboss - main ones do not fit perfectly ) Eduard resin wheels Master pitot Paragon exhausts Aires ejection seats Eduard interior PE (for Hobbyboss) Modell Alliance, Airfix decals build thread: http://www.britmodeller.com/forums/index.php?/topic/234983511-tornado-f3-56r-sqn-firebirds-2000-display-scheme-148-airfix/ in strangely sunny British skys: caught in some low flying area8 points
-
30/8 update: This is the version I will be building: Photo from the Kagero Topdrawings No. 16. The aircraft of 2./LG1 operated from North Africa and Sicily in 19428 points
-
Indeed the Almighty had something to say on that subject8 points
-
Anyone who was unable to attend the Airfix presentation at Hendon (or presumably Cosford) missed a fascinating insight into the pre-release workings of Airfix, in particular: - They won’t add new parts to old kits (specifically new transparencies for the Halifax) - No kit will be produced unless either: There’s an extant example that can be accurately measured or LIDAR scanned, and not all can. For example, if it can move (because it’s hanging from wires) it can’t be scanned. Or There are quality engineering drawings with profiles and sections: look at the Workbench article on the B-17 for examples of what’s required. GA drawings, even of ‘Bentley Standard’ just don’t have the right information. So alas, no reissue of the Stirling (drawings destroyed) nor the latest stealth plane even if already seen at airshows. They admitted (no names) to several subjects that they would like to produce but could never get the data and some ‘on hold’ in case further research does turn up missing information. Other manufactures may not be so constrained, but in predicting, pleading, lobbying Airfix, these should be borne in mind. As an aside, in the dark of the lecture theatre, I could see neither any member of the fair sex, nor anybody not yet drawing (or about to draw) their pension. Fortunately Telford gives a better outlook!7 points
-
Hello BM'ers. Latest off the bench is the Kinetic 1/48 Sea Harrier FA2, ZD579 from 899 SQN Royal Navy - 2005 ish. I must admit to this build languishing un-finished for a few months because I had lost that loving feeling towards it. A burst of energy and pow she was finished. The Kinetic kit is not an easy build and I had more than a few issues with it. The Ejector seat is resin from Airwaves, the FOD covers are made from Milliput and the pitot on the fin is a metal pin. The seeker cover on the AIM-9L is from Aerobonus. Decals are from the kit and were quite ok albeit a little stiff. The blow in intake doors were modified and the canopy Det Cord is painted not decal. Thank you for looking and feel free to comment if you like. Cheers Andrew.7 points
-
Finished today, the Kfir C2. The Kinetic kit was reboxed by Wingman Models. They added a few bits of resin and left out the bombs and ejector pins for the bombracks needed for a C2. A silly decision in my opinion. As the provide the kit with all the possible C2 or C7's flown in the Israeli Airforce. So I picked a couple of Mk82's from other Kinetic kits. The sidewinders are from Eduard (because no provided by Wingman) and the wingtanks are from Wingman. The base was done with Vallejo IDF Sand 71141, the masking was done with a variant of blue tack. Than I made a mistake the next layers were sprayed too tick and I had to clean up "rolls" of paint near the blue tack. The other colors Vallejo 71126 IDF Green FS34227and 71125 USAF Brown. The underside is Vallejo 70907 Pale grey blue diluted with water. For the panels lines I used Ecoline brown (416) and grey (718). Some shots together with the Italeri Mirage III and the Wingman Reece Kfir. Thanks for looking. Jan Remco7 points
-
Still practicing my hand brushing techniques. I bought the Revell Bf109 to practice with and the P40. These are cheap kits with a 40 percent off coupon at Hobby Lobby and Michaels. I am also able to buy my paints and building supplies there dirt cheap. I am enjoying the brush painting, though it is tough and I have along way to go. I am keeping my builds simple since I have other hobbies that keep me busy and I have a lot builds in the que. I am using Testors enamel paints except for the P40, I was practicing with Testors acrylics. They work pretty good but require primer and numerous coats so the jury is still out. The Bf109 was build in 2 days, normally I would not build this fast allowing the paint to dry. My work keeps me away from home so keeping my builds simple will allow me to build my plastic models away at work and build my rockets and freeflight planes at home. I am going to by building my stash of 70s models that I am collecting to build. I remember my uncle living in Vietnam back in the late 60s early 70s and he used to build plastic models and they looked good. He used Testors paints with the cheap brushes, I figure if he could do it so can I. Still need more practice. Will clear coat and add decals. I build the P40 to try Testors acrylics. They work good but I like enamels better, less coats and I love the smell. Old Monogram Snap Tite model from the 70s built out of the box brushed with Testors olive enamel and cheap Testors nylon brush. Minicraft Reno Air build, hand brushed after spraying Testors flat white. Here is the cheap paints I bought, also had to custom mix the paints for a better color. My build que is adding up fast, models from the 70s I have to keep my plastic builds simple since I have other hobbies that keep me busy when I am home.7 points
-
Kit: 1/48 Italeri Tornado IDS Subject: Tornado GR1 ZD851 'Amanda Jane/AJ' of 9 Sqn, Tabuk Tornado Detachment, Saudi Arabia, 1991. Details: Modelled towards the end of Operation Granby, Amanda Jane was converted to fire ALARM missiles Misc: Humbrol, Tamiya, Mr Color Paints, Pledge Klear floor wax, artists oils, Tamiya Smoke, 'Big Jug' tanks and ALARM missiles from Airfix Tornado F3/EF3, decals a mix of kit and Xtradecal 011-48 WIP Link: WIP HERE7 points
-
Had seven on the bench over the past few months. Posted three a couple weeks back, so here are the final four. All are 1/144 scale. The Airfix Boeing 737-200, with decals from Thunderbird Models in the U.K. Nordair no longer around, but a great little carrier - although once on a Pittsburgh to Montreal flight did not get the duty free order done, leaving me to face Canadian retail prices on a bottle of Scotch - them's fighting words! The Minicraft Lockheed Electra. Decals from Classic-Airlines This Air Rhodesia Viscount is from F-RSIN, decals from Classic-Airlines, and props from AeroClub And finally, a build I had two 'firsts' on, although one definitely not planned. This is the S&M kit with decals from Classic-Airlines. The kit has a very blunt nose which just looks very wrong, so I went in to rebuild / modify it. First time I have done that, although it is now too pointed I think. My second first, was applying all the decals in one three minute rush. I had them all cut out, and ready to start working, but I knocked over the bowl of warm water right over them all, so it was a "now or never" scenario. Thanks for taking a look. Cheers, Mike6 points
-
#29/2015 Zvezda kit with decals from LF Models, painted with Gunze and Tamiya acrylics, antenna wires with EZ Line. In 1943 the Spanish Airforce received about a dozen F-4s which were stationed partly in France and Spain. Not much info about these, seems a few were painted in single RLM79. According to the old, non available anymore French book "AVIONS Hors Série No. 5 Les Messerschmitt Espagnols" some were painted in a 3-tone camo similiar to the Spanish He112, to say colors close to the early Luftwaffe ones. You find profiles on the web that show a green-green-grey camo, also LF Models manual shows that scheme but my dad kept to the "Luftwaffe" grey-green-brown color scheme.6 points
-
Hi This kit was fairly simple to build, but I managed to completely wreck the cockpit glass - I sprayed it with Humbrol gloss varnish pre-building and it ruined the clear plastic. Nevermind, I'll deploy the Flash/Klear next time! So let's just pretend it's just been in a sandstorm in Iraq/Afghanistan?6 points
-
Well they have just produced a Whitley so not sure if this policy is set in stone! Cheers, Paul6 points
-
1/72 Revell Tornado ECR Tiger Meet 2011/12. Finished as 46+33. Painted in Xtracrylix, Tamiya and Revell paints and those eye-straining Syhart-designed decals. Lovely kit and an enjoyable build Build thread:http://www.britmodeller.com/forums/index.php?/topic/234983460-172-revell-tornado-ecr-tigermeet-finished/6 points
-
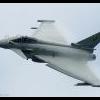
So the Typhoon is finally done. Finally got to meet up with Chief Wiggum and started our planning on how we'll display them together.. I know, the separation between them isn't exactly safe...but we'ld need a bigger display board and we're already at 5 sq feet! More as we go along. Cheers, Dermot6 points
-
Thanks for all your comments guys I was concerned that some of you thought it wasn't painted, so I've taken some pics in better light with the armoured shields in place. Martin, Julian and Dan. In an ideal world I probably wouldn't have portrayed so much wear, that's down to my ineptitude. Defending my decision to leave it I will point out the following for those not in the know. The boats were in use 24/7 day & night. Two boats three crews. The two central deck lockers were ammunition lockers plus the area between shields would have been a natural path, These boats were subject to the monsoon for 3/4 months at a time if you think it rains in the UK trust me you really have no idea. I rest my case for the defence m'lord Before some one else puts it on Right I'm going back to my OOB build See you soon Kev6 points
-
Chompbot #5 Kit and scale: Industria Mechancika Resin Kit Paint: Gunze Aqueous & Tamiya Acrylics, Model Master Enamels, Model Master Metalizer Lacquers. Extra stuff: Lighting Kit Build thread: build link6 points
-
calling this done! my absolute first ever group build participation ("together with the Non Injected Moulded GB" !!) and finished in time... just in time! tomorrow lets hope for good photos as well! Just in case, 2 fast photos from 10 min ago, and to finish as I have started, with the Airfix boxing as a background! never would have thought it was going to be that easy! swing wings still function! -->happy6 points
-
Revell French Rafale M with GBU racks. Added Eduard small PE.5 points
-
Okay I will try and build one of these: Using the Wofpack 72-046 Guarding the Skies decal set and completing it 61491 from 64FIS based at Danang AB in May 19685 points
-
This is the 1/48 resin kit by AJP Maquettes. The resin in this kit is gorgeous. The wing is three solid resin pieces. The fuselage consists of two sides, full bottom, rear cabin top, cockpit top and nose piece. The parts go together very well. You get a basic passenger cabin and cockpit. I added a wood panel interior and repurposed some HO scale bells as cabin lights. The biggest issue for this kit it the various struts that go into the engine pods as well as the landing gear. The main gear support that comes down from the engine pods are the only ones included. The rest must be made of brass rod (included). The kit instructions give you the measurements to cut the stabilizer supports but that is it!!! The rest must be measured and trial and error fitted. I used 1mm brass rod to form the main gear and then covered this with a piece of aluminum tubing then used a marble rolling pin to create an airfoil shape. I scratch built the support that goes from the top of the engine pods to the bottom of the wings. The rest of the struts are contrail strut material. These were measured and cut and place with the Mk.I eyeball based on pictures I had. The external control parts were made from plastic and the smallest straight pins I could find. EZ line was used to replicate the control wires. The decals in this kit SUCK!!! Fortunately fellow Hyperscaler Slawomir Przymusiak was kind enough to redo and make them look really good, Thank you again sir! After 2 ½ months she is done!!! If you want a 1/48 trimotor this is your only option. It is a great kit but the simple instructions with the measurement omissions and bad decals put this squarely in the very experienced modeler category. I am pleased with the end results . Hope you like it. 5 points
-
Built as part of the Non Injected Moulded Group Build and a complete nightmare build - build thread here I've put more photos in the Group Build Gallery Thanks for looking. Steve5 points
-
Evening all, finally finished this from the Phantom GB earlier this Summer. It's the Revell Monogram kit, with Xtracrylix AD Grey, a mix of Expert's Choice and Caracal decals. I have also added Quickboost intake blanks, an ACMI pod from a Tamiya F-16 and Master pitots. Thoroughly enjoyed this project - one of my favourite Phantom schemes. Have been suitably motivated to get an Academy F-4 with Speedhunter marks for a Euro 1 F-4D in Ohio ANG marks! If I have my facts straight, this represents an airframe around the early 80s. The Expert's Choice decals disintegrated on me, so I used the nose art (intake art in this case) and Caracal Decals for the rest. WIP here.5 points
-
Had a bit of time when I got in from work today, so I thought I'd kill a bit of time whilst I put dinner in the oven. Dinner was going to take 30 mins so I thought I might get some decals on one of the planes. Much fiddling, profanity and a burnt dinner later, here we are. This one is Lovell-Greggs machine P3215. I aimed just to get the main decal on so I could get them settled with MicroSol before all the fiddly stencils... Well, I got there, but the serial number caused me loads of grief, it just wouldn't line up. Now currently marinading in Sol, ready for tomorrow when I'll see how they have settled. Thanks for looking, more soon. Steve5 points
-
Latest finish for the Tornado GB. Great little kit (3rd version I've done) and a cinch top put together. Finished as 46+33 at the NATO Tigermeet 2011/2012. Finshed with Xtracrylix, Tamiya and Revell paints and a magnificent Syhart-designed decal sheet included in the box. Thanks for looking and all comments welcome4 points
-
Very, very fresh. I just finished a model RG-31 Mk III in the livery of Canadian Paratroopers from operations in Afghanistan from the year 2009. The model is a set of KINETIC's. Has made to model a pair of elements: Backpacks, chain, the headlights of a set of the company's BRONCO. A set of recommended all modelers who like MRAP-type vehicles. However, it is not set for beginner modelers. Many items is wrong, which folded you need to spend a lot of time to build this model. With greetings Maciej4 points
-
4 points
-
I'm a little concerned about this policy. There are enough popular subjects around that could and certainly should benefit from this treatment, enough to keep Airfix busy for a few years at least, but an awful lot that can't and therefore won't. It appears to be a policy for the familiar rather than the exciting. However, is it fully in place yet? Clearly it wasn't in place even a few years ago. Did they really have LIDAR or a quality set of engineering drawings for the Whitley, Do17 or the Kate? Certainly not the LIDAR - the recovered example of the Dornier no doubt helped but is not intact nor in its original state. Can we expect (or at least hope for) a small number of interesting and exotic subjects to appear before we see the results of this rather blinkered viewpoint? (At least as exotic as the Kate, anyway.) And before ignoring the reference books in aid of the metal - remember the Bolingbroke that wasn't a true Blenheim. Or that engineering drawings can and do go through a number of issues and one set may not be enough to describe the subject you want. That's if the particular feature ever made it onto the manufacturer's master drawings - variable pitch blade propellers on Gladiators being a likely example. Or was it just PR talk? Assuming that an IPMS audience would be full of "rivet counters", did they just set out to describe the ultimate rivet counting machine? Time will tell. I must agree that they were right not to produce just a new set of transparencies for the Halifax - not without fixing the fuselage shape first, And the cowlings.4 points
-
Quite an amazing bird the Ju-88. An all round workhorse for the Luftwaffe. 30/8 update: The gondola has been fitted. Masks haven't been fitted yet.4 points
-
I also have a B2 converted to the original style with the later type early cone and narrow intakes this will likely be XH537 as she was in original fit I have a photo of her like this pre ECM. Here seeing with the B1 I have made from alternate drawings with the earlier type tail cone. Rob4 points
-
Well, had a very satisfying session of applying the decals, and am now done. Quick coat of Xtracrylix matt varnish, some light oil weathering around the exhausts and off with the masking. Oh, also added the quickboost exhausts which are a subtle but distinct improvement over the kit parts. Thoroughly enjoyed this kit and subject; will be doing another (not in this GB though!) to model one the fighter bomber option off the Xtradecal sheet. Will post in the gallery section later on tonight.4 points
-
Well today is technically the last day of this memorial GB, however this will be a GB that will never end. Although it might move to the completed section it will remain open and an ongoing memorial to Merv.4 points
-
I think that they should do a British Flying Boat Support Set next with refuelling and bombing vessels, working trestle framework around the edges and a new Sunderland and Catalina,......but that isn`t going to happen is it? Tony4 points
-
Just to place this in one kind of proportion: we wouldn't have many kits to make if we insisted on them all fitting perfectly out of the box without any fettling. Oh, and accurate in outline too, properly to scale, and without over-exaggerated details. Not too many small fiddly parts. While we're at it, accurate colour paints and correct markings on the transfers. And cheap. Made with just the right kind of plastic. Just like they were when we were kids, no? If it doesn't fit, tell the manufacturer. Don't just get upset and throw it at the wall. It's only a few lumps of plastic and you're a modeller. Take a knife, a file, a sanding block, and make the (flipping) thing fit. Then tell us what you had to do, so that we are pre-warned, prepared, and pumped up ready to go. I'll get my coat.4 points
-
Here's my Revell 1/48 GR1A finished with Xtradecal 2 Sqn markings, circa 1991, I hope Merv would approve.4 points


This leaderboard is set to London/GMT+01:00