
Leaderboard


Popular Content
Showing content with the highest reputation on 29/08/15 in all areas
-
This is my build for the Tornado STGB in memory of Merv (Spike7451), more pics in the gallery section of the group build.20 points
-
Hello BM'ers. Latest off the bench is the Kinetic 1/48 Sea Harrier FA2, ZD579 from 899 SQN Royal Navy - 2005 ish. I must admit to this build languishing un-finished for a few months because I had lost that loving feeling towards it. A burst of energy and pow she was finished. The Kinetic kit is not an easy build and I had more than a few issues with it. The Ejector seat is resin from Airwaves, the FOD covers are made from Milliput and the pitot on the fin is a metal pin. The seeker cover on the AIM-9L is from Aerobonus. Decals are from the kit and were quite ok albeit a little stiff. The blow in intake doors were modified and the canopy Det Cord is painted not decal. Thank you for looking and feel free to comment if you like. Cheers Andrew.16 points
-
#29/2015 Zvezda kit with decals from LF Models, painted with Gunze and Tamiya acrylics, antenna wires with EZ Line. In 1943 the Spanish Airforce received about a dozen F-4s which were stationed partly in France and Spain. Not much info about these, seems a few were painted in single RLM79. According to the old, non available anymore French book "AVIONS Hors Série No. 5 Les Messerschmitt Espagnols" some were painted in a 3-tone camo similiar to the Spanish He112, to say colors close to the early Luftwaffe ones. You find profiles on the web that show a green-green-grey camo, also LF Models manual shows that scheme but my dad kept to the "Luftwaffe" grey-green-brown color scheme.16 points
-
I built these two tiny jets, early this year, as part of my aerobatic teams collection in 1/72. Both are painted with Humbrol enamel and finished with a coat of Humbrol Clear Gloss Varnish. Note: Now that I am almost completing the collection of Red Arrows and Yellowjacks, i noticed that there has appeared a new scheme of Red Arrows 2015, so I'll be happy to assemble the new scheme in the near future. (c'mon! Airfix we need the 2015 decals )14 points
-
13 points
-
First, huge thanks to Piero and pacificmustang for sent decals and assistance in choosing weapons for TELIC. Model as a topic, Hasegawa - Revell edition with extras: cockpit Aires, zoom Eduard, Wheel wells Aires, exhausts QB, Maverick Eduard, RBL-577 Wingman. Decals from Roma and Melbourne oryginal ModelAlliance Model painting and configuration of operation Telic weapons - (Afghanistan Kandahar airport 2003/2004 - sorry wrong) - Ahmed Al Jaber Kuwait12 points
-
Hello all, I have just finished this in the Non-Injected Moulded Group Build here on BM, a full build log is here http://www.britmodeller.com/forums/index.php?/topic/234980926-short-singapore-iii-completed/ This Short Singapore represents an aircraft from 203 Sqn based at Basra, Iraq during 1938/9, in Light Earth, Mid Stone and Light Grey camo colours. The kit was an old Vacform by Contrail, exhausts and props came from Aeroclub, and the scarff rings and guns were from a Supermarine Stranraer I have civilianised (we were allowed to used some minor injection moulded stuff).I had great fun with this, and had plenty of great help and advice form fellow builders, to whom 'Thank You'. I learnt a lot, and it was my first vacform for an awfully long time. Thanks for looking, Ray12 points
-
Had seven on the bench over the past few months. Posted three a couple weeks back, so here are the final four. All are 1/144 scale. The Airfix Boeing 737-200, with decals from Thunderbird Models in the U.K. Nordair no longer around, but a great little carrier - although once on a Pittsburgh to Montreal flight did not get the duty free order done, leaving me to face Canadian retail prices on a bottle of Scotch - them's fighting words! The Minicraft Lockheed Electra. Decals from Classic-Airlines This Air Rhodesia Viscount is from F-RSIN, decals from Classic-Airlines, and props from AeroClub And finally, a build I had two 'firsts' on, although one definitely not planned. This is the S&M kit with decals from Classic-Airlines. The kit has a very blunt nose which just looks very wrong, so I went in to rebuild / modify it. First time I have done that, although it is now too pointed I think. My second first, was applying all the decals in one three minute rush. I had them all cut out, and ready to start working, but I knocked over the bowl of warm water right over them all, so it was a "now or never" scenario. Thanks for taking a look. Cheers, Mike10 points
-
So, it looks a bit like the F-8 are a bit en vogue these days. Well, I just finished mine, and would like to show it. The build was very straightforward, except of the flaps, which needed some sanding to fit beside the fuselage. Apparently, it's a common problem with this kit. And on the approach for landing, with the backgound my daughter painted... Thanks for watching, if there are any questions, I'm happy to answer! Alex10 points
-
Just to place this in one kind of proportion: we wouldn't have many kits to make if we insisted on them all fitting perfectly out of the box without any fettling. Oh, and accurate in outline too, properly to scale, and without over-exaggerated details. Not too many small fiddly parts. While we're at it, accurate colour paints and correct markings on the transfers. And cheap. Made with just the right kind of plastic. Just like they were when we were kids, no? If it doesn't fit, tell the manufacturer. Don't just get upset and throw it at the wall. It's only a few lumps of plastic and you're a modeller. Take a knife, a file, a sanding block, and make the (flipping) thing fit. Then tell us what you had to do, so that we are pre-warned, prepared, and pumped up ready to go. I'll get my coat.10 points
-
Here's my Revell 1/48 GR1A finished with Xtradecal 2 Sqn markings, circa 1991, I hope Merv would approve.10 points
-
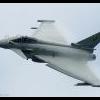
Revell French Rafale M with GBU racks. Added Eduard small PE.9 points
-
Hi Guys, Here is my latest model for your inspection. It's not part of the B of B group build, but it's my tribute to the "Few " It depicts Flt. Lt. nicolson's VC - winning P3576 : I know there's been lots of discussion about the exact appearance of this machine, but this is my version of the aircraft. I used the excellent Precision Paints for the upper surface colours, and my own mix of Humbrol colours to represent the early Sky substitute " Eau - Di - Nil " Everything was brush painted with a spray finish of satin / matt varnish, and the decals were from Aviaeology's Hurricane set. As usual, all comments, good or bad are welcome.9 points
-
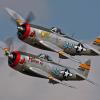
I always felt torn when trying to choose between Matchbox and Airfix model aircraft kits in the 70's and early 80's and so have gone back in time to compare two kits of the same aircraft from these manufacturers , well almost the same aircraft. First up is the old Airfix Corsair first released in the mid 1960's. As a youngster I remember building the Matchbox and Revell Corsairs but up until now had never experienced the Airfix offering. I have to admit that when I first bought this kit a few years ago and opened up the box I was rather disappointed at what I saw and straight away put it in the stash and tried to forget about it. My first intention was to do quick a straight out of the box build, but decided against that as the riveting gave the kit the texture of a cheese grater. As a lot of the rivets would have been removed when sanding and filling I then decided to sand the whole thing down and re-scribe it. After the sanding was complete I then remembered that I also had a Academy Corsair in my stash which I could use as a guide, when I compared the two kits I quickly decided that I was wasting my time. There are just so many things wrong with the old Airfix Corsair kit, the cowling, canopy, radiators, wheels, wings, in fact just about everything, so I decided to quickly scratch a few panel lines on and do a botch job. I am happy to spend time on these old kits when my options are limited but with so many decent alternatives on the market I couldn't see the point with the Corsair. As the decals are very nice I kept them for use on other better kits and used ones from my spares box for this model. The Matchbox Corsair. All I wanted from this kit was a nice clean build for my Matchbox collection, even though the kit was first released in 1973 it went together perfectly, I don't think it even required any filling. My only modification was to replace the canon with machine guns. As the panel lines were a little extravagant I toned them down by undercoating with numerous layers of the paint used in spraying the Airfix Corsair, the decals went on well enough and I finished the whole thing off with a fine spray of Humbrol Satin Cote. When comparing the two kits Matchbox is the certain winner, for me it is just a shame that it is with post war version. Having discovered that I had a nice Academy Corsair kit, nice Fleet Air Arm decals depicting Hammy Hampton's Corsair and a potential airbrush loaded with gloss blue paint I decided to put all three together. The result was the model I had originally hoped to produce using the old Airfix kit, ding dong. I expect Corsair experts will be able to point out all the things that are wrong with the Academy Corsair kit, but for me it looks very much like a Corsair and was fun to build.9 points
-
Today Martin, our club chairman, dropped round to see me to pass over some modelling items and instructions for the next club meeting. He also brought along a housewarming gift: Old style Klear from his precious stash to replace my depleted store - thanks Martin! Lawns of the Heath estate mowed, I set about attaching the lower side door, starting with this clamping arrangement to get gravity on my side: I made this little card and Blu Tack support: After a bit of adjustment I got the angle of the steps right: I glued on the door with a mix of Gorilla and normal super glue to hopefully give it extra instant grab and strength then I painted the ends of the stays with interior grey: Here is the first one installed: Some of the pale burnt metal came off in the struggle which I touched up later. Then I did the other side as well as fitting the PE retractor arm thingie: I removed and reattached the pitot tubes on this side as I wasn't happy with their positions as well as painting the sticky out bits with tyre black: I straightened and touched up the static discharges, hopefully for the last time: Finally, to protect the glazing in the upper door from varnish I put in a foam block: I will go over it again in the morning and make sure I have done everything but I think this is now ready for a final dusting of matt varnish. My model is now festooned with delicate parts and I am having to handle it very carefully, using only a few safe areas. Hopefully things will go well with the varnishing and then it's just the side windows, wipers and lights to add, plus a final bit of weathering. Bye for now, Nigel9 points
-
This is the 1/48 resin kit by AJP Maquettes. The resin in this kit is gorgeous. The wing is three solid resin pieces. The fuselage consists of two sides, full bottom, rear cabin top, cockpit top and nose piece. The parts go together very well. You get a basic passenger cabin and cockpit. I added a wood panel interior and repurposed some HO scale bells as cabin lights. The biggest issue for this kit it the various struts that go into the engine pods as well as the landing gear. The main gear support that comes down from the engine pods are the only ones included. The rest must be made of brass rod (included). The kit instructions give you the measurements to cut the stabilizer supports but that is it!!! The rest must be measured and trial and error fitted. I used 1mm brass rod to form the main gear and then covered this with a piece of aluminum tubing then used a marble rolling pin to create an airfoil shape. I scratch built the support that goes from the top of the engine pods to the bottom of the wings. The rest of the struts are contrail strut material. These were measured and cut and place with the Mk.I eyeball based on pictures I had. The external control parts were made from plastic and the smallest straight pins I could find. EZ line was used to replicate the control wires. The decals in this kit SUCK!!! Fortunately fellow Hyperscaler Slawomir Przymusiak was kind enough to redo and make them look really good, Thank you again sir! After 2 ½ months she is done!!! If you want a 1/48 trimotor this is your only option. It is a great kit but the simple instructions with the measurement omissions and bad decals put this squarely in the very experienced modeler category. I am pleased with the end results . Hope you like it. 8 points
-
These are my Airfix 1/48 Lynx's. The Ah7 is recently completed and is out of the box. The HMA.8 was built a year or so ago but I never got round to having it photographed. The Ah7 was a breeze to build out of the box but on the HMA.8 I crammed it so full of Eduard photo-etch I had major problems closing up the fuselage halves! Pictured together, it is hard to believe they are essentially the same aircraft! Many thanks to Alan Sannazzaro for the photographs as he is much better with a camera than me.8 points
-
At the request of the 48th FW Commander, Vulcan XH558 in company with up to 3 F-15 Eagles, made several flypasts of RAF Lakenheath while en-route to the Clacton airshow on 27 Aug 15. It is thought that this was the first time the Vulcan has been accompanied by F-15s, and it certainly made for a fantastic spectacle. I just wish the sun had shone! Thanks for looking. Mark7 points
-
True story -- one of my coworkers when I was in a call center had been a travel agent whose job had disappeared post-9/11. The poor woman (her dad, incidentally, was Dutch and had spent WWII in a Japanese internment camp in the DEI) invariably got all of our obscene callers, to the point where we strongly suspected it was a menu option. (As I think I've mentioned, ten years ago, I worked as a dispatcher for a same-day shipping firm, and once almost single-handedly delayed production of the Hummer 2.) JUDSON: One day there will be more machines like this, thinking machines. MILLINGTON: Yes, but whose thoughts will they think? In any case. big day today.I began Operation MOOB OSCILLATOR, my first exercise since the surgery, with three miles in a depressing thirty-six minutes on the elliptical machine, wearing what my coworkers call my "sissy fists" (thanks, guys), two five-pound wrist weights. This is all part of my grand plan to not be the size of a house when I leave for England in two weeks(!!!), as it will be harder to hide from the authorities long enough to claim residency if I'm too big to conceal myself behind common household objects. My 1/72 Academy F-4J arrived at my office, and it looks a cracking kit, and I'm very excited. I suspect a few may be built by father and son in the next decade, regardless of the actual interest or participation level of the son: Oh right, the Spitfires. I applied some Tamiya putty to the seams -- I don't know why I always try and get cute and use something else -- and sanded them down. Bammo. I think Anil is right in his thread: trim down the IP, and the fuselage will close up with far fewer seam issues. Almost ready to prime anew, and then: paint! I have a wedding tomorrow for my cousin, who I love dearly, but he is increasingly becoming a caricature of all of the negative stereotypes people have about my erstwhile countrymen, and I fear if the conversation turns to Donald Trump, one of the other guests will beat me up. Perhaps I shall bring my sissy fists.7 points
-
Hi I made a last-minute decision to attend this show, and despite a promising start to the day, it clouded over before the flying display started and then the drizzle started just before the Vulcan appeared! Just a few pictures from me: Thanks for looking,6 points
-
Kit is from MK Model 72-003, it is resin in 1/72. The plane: https://en.wikipedia.org/wiki/P.Z.L._P.8 The pilot: https://en.wikipedia.org/wiki/Bolesław_Orliński The painting is a disaster, I have some problems with because I haven´t the Model Master metalizer and used som other product.6 points
-
Kit: 1/72 Revell Tornado GR1 RAF Subject: Tornado GR1A ZG729 'M' of 13 Sqn,RAF Honnington 1983. Details: Modelled at the end of its Exercise at Bardufoss, Norway in the winter of late 1992/early 1993. Misc: Mr Color Paints, Humbrol Clear, artists oils, decals a mix of kit and those kindly donated by felow Britmodellers, again extra fuel tanks again from great guys on the forum. WIP Link: WIP HERE6 points
-
Here's my Revell 1/72 Tornado in the 50th Anniversary markings of 31 Fighter Bomber Squadron. I hope Merv would enjoy it. Here's a link to the WIP build but to recap: Kit: Revell 1/72 Tornado 'Pride Of Boelcke' 04288 Build: 100% OOB Paint: Halfords rattle can for the white, all others Revell Acrylics brush painted. Klear, Flory Models wash, W&N Matt varnish Decals: From kit Extras: None. Thanks for looking and enjoy your modelling. All the best, Dermot5 points
-
OK, so some work to update. Painting on the main body of the hurricane is all done. I have the medium sea gray and the dark earth on the Beaufighter and just about to start masking for the dark green. Still some work to do on the Beaufighter, mainly the engines and undercarriage. going very well at the moment5 points
-
29/8 update: Working on the gondola at the moment, frame, gunners knee-rest and the forward bulkhead. The tail wheel has been fitted at a "jaunty, Russian grass strip, tight circle to dispersal angle". The nose piece has been sanded smooth and the forward canopy part fits like a glove. Enough is enough for today5 points
-
Holy buckets, Ced! Italy doesn't get half hot. It's as bad as here in late July. Did you know that Perugia's sister city is Grand Rapids, Michigan? Did you know that when it comes to swapping delegations on taxpayer-funded friendship missions, Grand Rapids is coming out way ahead? (Grand Rapids is one of those parts of the USA that looks post-apocalyptic without the inconvenience of an actual apocalypse, sort of like Brixton in the 1980s as seen in Death Wish III, but with less greenery.)5 points
-
Hello, today i finish my newest model, MiG-29. I use some extras here is list of them: Eduard PE set (interrior) Eduard Exhaust for MiG-29 Pitot Tube from Master Correct Nose from Quickboost Masks from Eduard Some of my scratch (cables inside wheel bay, hand-made antenna IFF) Some parts from Eduard MiG-21PFM Decals from CaracalDecals. And publication: "Polish Wings MiG-29 Part 1" I know, this model has got some mistakes but it looks very nice for me. I hope you will enjoy.4 points
-
There is a bit of a story to these so bear with. I retired a few years ago and as the NZ dollar was strong I decided to splash out on my one and only AA resin kit. The Conqueror Mk2 was chosen because it is a favourite of mine, and also because it, AA and I all originate from Glasgae. I made the mistake of not checking the box when it was delivered, and over the next couple of years it sat in the cupboard while I was preoccupied with house sale and a move to a different part of the country. When I did crack it open with the intention of it being my winter build a couple of years back I was a bit shocked to find that my Mk2 had a Mk1 upper hull. I contacted AA and Derek offered to send me a Mk2 upper but ominously suggested I do a careful parts count. Sure enough there were missing and duplicate parts which AA also put right. Upon starting the build I found that there was worse to come. The castings were of very poor quality, the resin contained about 50% air, having the consistency of an Aero bar, and many parts were unusable. I did some basic assembly then gave up in disgust, only to revisit it ever few months in the forlorn hope that it was not in fact as bad as I thought. I eventually got this far;- Apart from the lack of enthusiasm engendered by the overall poor quality of the kit, there was also the major problem of the tracks which were useless, and not something I fancied scratchbuilding. The announcement of the Black Label Conqueror gave me hope that there would be some styrene tracks becoming available, but of course Dragon used their tacky DS tracks so that hope evaporated. Then I found a Cromwell Models Conqueror Mk2 on our local auction site and snapped that up in the hopes that it would provide some tracks. I was very relieved when I unpacked it and found it not only had a set of really nice tracks but that there was enough lengths and links to cover both models if I deleted the top runs, which you dont see with the bazooka plates in place. Then I got to thinking! I did not want two Mk2 models, but the Cromwell kit is of such good quality it seemed a shame to just rob it of its tracks. So I decided to use the redundant AA Mk1 upper hull, scratch a lower hull, and then use the Cromwell parts and some scratching to create a Mk1. So out with the .040" white styrene then! The lower hull was fitted to the Mk1 upper with epoxy adhesive and the Cromwell suspension components prepared. http://i.imgur.com/Tmo9hWS.jpg Then the suspension and the front idler mounts were added to the hull. The Cromwell turret ring is larger than the AA one so an adaptor was made. And it started to look like a Conqueror. So now I have two half built Conquerors, and a raft of technical issues to overcome!4 points
-
My very first 1/32 and I'm going to build straight from the box... Cockpit, primer TAMIYA FINE and Gunze H416 (RLM66)... Engine Junkers Jumo213E, real beauty... Of course, work in progres on cockpit and engine...4 points
-
Evening all, finally finished this from the Phantom GB earlier this Summer. It's the Revell Monogram kit, with Xtracrylix AD Grey, a mix of Expert's Choice and Caracal decals. I have also added Quickboost intake blanks, an ACMI pod from a Tamiya F-16 and Master pitots. Thoroughly enjoyed this project - one of my favourite Phantom schemes. Have been suitably motivated to get an Academy F-4 with Speedhunter marks for a Euro 1 F-4D in Ohio ANG marks! If I have my facts straight, this represents an airframe around the early 80s. The Expert's Choice decals disintegrated on me, so I used the nose art (intake art in this case) and Caracal Decals for the rest. WIP here.4 points
-
Now a BIG thank you to a very good friend KAYELL who has just been on his Jolly,s to Jersey and look what he found and thought of me think I have another project in the ideas draw here with this one Now that is an eye catching project to think about Beefy4 points
-
Thank you PlaStix. Just a shame that most of it won't be visible in the finished model. I got a bit further this week, but my Spitfire build had priority as I had some catching up to do. When gluing the fuselage together, I added these two shims to assist alignment with underside of the wing, eliminating lots of filler and sanding. There is now a smooth transition into the underside of the wing. I also added a pneumatic pipe to the undercarriage bay before gluing the cockpit to the wing as it will be difficult doing this later. As mentioned earlier, little will be seen with the fuselage in place. Slowly starting to look like an aircraft! I mentioned in my first post that I thinned the wing trailing edges as they are way too thick. This unfortunately still leaves the ailerons being too thick. Sawing them in half removed the correct amount and kept the lovely external detail in place. A bit messy, but done in 5 minutes. Shims needed to be added on the wing side edge as the width only needs to be reduced along the trailing edge. And here back together with the outer surfaces still in pristine condition. Is it worth it? I think so if you look at the real deal here http://data3.primeportal.net/hangar/mark_hayward/hurricane_iia/images/hurricane_iia_10_of_31.jpg Here a comparison of the thinned wing and ailerons above and the wing Airfix is giving you below. Sure, a small detail, but one which bothers me. Hope to have more in a week. Thanks for watching. Cheers, Peter4 points
-
Aquaphibian Terror Fish from Stingray Resin kit by Warp Build thread here4 points
-
Don't forget, most of the crew were 19 year old beanpoles with a 28 inch waist. We are made of 'stouter' stuff.4 points
-
Dear oh dear, no one seems terribly interested in my little spit... never mind I still like it! Tried my hand at this amazing little Quickboost gunsight Great fun dry brushing brass on something a couple of mil in size. Need to practice on trimming the reflector glass though. A new thing tried was this for attaching etch and this miniscule wee beastie Works like a dream and no, its not the same as Poundstore PVA thinned with water before the Monty Python "Pure luxury" brigade chime in; This stuff actually works, grips instantly and doesn't let go. Anil The Adhered To4 points
-
Panavia MRCA Prototypes. Italeri kit for P-01/08, Revell refurbished for P-04, all 1/72. P-01 P-04 P-08 Cheers, David.4 points
-
Hi all, Not sure where to post this really but here seems as good as any. I was recently invited by our own John Lathwell, (12jaguar) to visit the old Alconbury airfield facility that is home to the Stirling Aircraft Project. John and his team have done an amazing job on reconstructing the front end of a Short Stirling, the ultimate aim being to complete the forward fuselage from the nose including bomb aimers station, front turret and cockpit 'canopy' (coupe) to just behind the wing leading edge, frame 20 if memory serves along with full camo paintwork and personal nose-art, (possibly McRoberts Reply). I only had to mention it to the rest of our merry gang at the Bomber Command sig and there was no shortage of folks wanting a visit and to see how things were progressing. Co-ordinating time off for everyone was a bit awkward and as such there will be other visits planned for next year for those that couldn't make it this time and so on this initial outing only five of us were to attend, (one chap went AWOL, missing in action, still don't know where he is, possibly fallen into enemy hands !). Myself and Neil Woodhall (woody37), Paul Hughes (Honeybee) and Richard Farrar (Hurrinut) made the trip and had a thoroughly enjoyable and informed time of it. Here are a few photos of the day..... Firstly the unit at Alconbury being used by the group at the present time...they've moved around the airfield a bit in the past but now have (almost) everything they need to crack on with the project, All manner of bits and pieces of Stirling were laying around in various areas all grouped according to their position on the airframe. These will be spacers for the main bomb bay...there are an awful lot of them needed and will be formed using a laser cutting facility with the assistance of Marshalls ADG which will cut the manufacturing time down significantly. Here's the second pilots seat and carrier frame along with floor sections, all accurately built up from patterns...the thing that looks like a handbrake is actually the seat height adjuster. And here is the whole unit complete with yokes, linkages and floor formers... And here's Paul...wondering how he can get it in the back of his Mondeo without anyone noticing ! John on the right and Cliff with the unit, progress on the first pilots seat is well underway. And all of us looking suitably gormless as required in a group photograph !, (looks like a day release outing from an episode of Derek !)...woody to the left, then Richard, Paul, yours truly (for some inexplicable reason performing a 'superhero stance' impression...most likely a call of nature !) and John....the only one with a sense of normality about him. This is quite something, the central throttle box...a work of art, still to be finished but certainly looking the part...Cliff is working on the other pilots seat. And here it is in its proper place. This gives you some idea of the size of the Stirlings cockpit......looks big until you start filling it up with equipment. These are the original pieces of the throttle box side walls in all their war torn glory..heavily damaged following a crash...it's amazing what the lads have achieved by studying these remains... Inside there are bits of Stirling everywhere...parts have been donated from various sources including crash sites in Europe. These are wing bomb bay doors..notice the remains of the night black paint... Here are the main gear legs clearly demonstrating the weak link which often tore during heavy and cross-wind landings....there are enough parts for a complete working undercarriage. Twin tail wheel unit.. A section of the upper wing complete with visible camo paint and outline of one of the upper wing fuel tank panels.....no deep trenches anywhere Italeri ! And of course a nearly complete pilots instrument panel. John's knowledge of the aircraft and its systems is remarkable... Racks of instrumentation adorned the side walls of the building, mostly radio and nav equipment...here for instance is a bomb sight. Sections like this may just look like so much scrap but they are extremely useful in determining the positioning of components and the paint colours used in specific parts of the aircraft. This section comes from the front port side of the cockpit illustrating the RAF grey/green paintwork. If the aircraft serial is known then it appears on a small tag attached to the parts. There is a wealth of supporting documentation and photographs at hand too many appearing on the wall for quick reference..here a Mk.IV cockpit layout.. And pilots seat harness arrangement...a dream for us BC modellers ! And finally John's lovely Italeri model...plenty of inspiration here There were two other 1/1 projects on the go in the building at the time too...a Sea Hornet and Chipmunk..both in early stages but with great potential ahead. All in all a great day out and if anyone else is interested in a visit then let me know and I'm sure something can be arranged...my sincere thanks to John and the team at the Stirling Aircraft Project for a great day out. Here's a link to the project.....well worth checking out. http://stirlingproject.co.uk/ Hope you found it of interest... Cheers all, Melchie...3 points
-
Hello Everyone, This is my third build for Karen at work. This time I have gone for the "enemy" and provided the BF110, before anyone asks or notices, I am not allowed to put any swastikas on the aircraft. Complete crock I think but I can live with it. I used an Eduard Zoom set for the interior and mask for the canopy, both I will be using again, but not relying on them. Oh I also had an Eduard Brassin MG15, which I also like as well and I will be using the other one that I have. I'm not too sure on the colours, but this is what Vallejo suggest and I am aware of the cock up on the right engine with the wash. I am going with an oil leak for that one Well here are the pictures of said aircraft. For some weird reason, Flory Washes do not like Vallejo RLM66 (or 65 I can not remember).. it's had 4 coats of gloss over it and it still sticks and refuses to budge. Could of done better with the join line and the wash. But more things I will take with me to the next model. That 3 I've done... wow I am in danger of clearing a whole shelf of models in my man cave Comments welcome Kind Regards, Dazz3 points
-
Hiya Folks, This model was built on the B-24 Liberator Group Build and the in progress thread can be seen here;http://www.britmodel...s-on/?p=2056748 As I say in the thread I`ve had an early RAF Liberator planned for a while and this Group Build plus the release of the recent DK Decal sheet for Commonwealth operated Liberator`s which has so many decal options that I`ve wanted to use for years,...has provided the impetus for me to grab the various bits from the loft and get on with it. The early Libs had circular shaped cowlings rather than the oval shape which became standard on later versions so for this I grabbed the Magna resin conversion for the transport Mk.II which provides new wings and engines for the Academy B-24D kit. It also provides the faired in nose and tail positions which I`ll be using on another Academy kit and the Curtiss Electric propellers are from the old Aeroclub range. Here is the finished model; I`m really pleased with it and finally have a Liberator Mk.II for my collection,......now where to put it? Cheers Tony Edit- Now that I`ve finished it I have a feeling that the code `M' on the right hand side should be in front of the roundel,....oh well! PS- When parked on the ground the mid upper turret was usually pointed forwards as this made the exit and entry of the gunner easier, but having tried this it just looked better pointing backwards!3 points
-
Hi I really enjoyed today's show, but this was the undisputed highlight for me.... Thanks for looking.3 points
-
Having pencilled in the camo pattern onto the airframe I mixed a batch of Tamiya Flat Earth and started to apply thin coats over the pre-shade until it was just visible. Despite carefully pencilling in the camo scheme, and marking it up B and G for the respective colours, I still managed to spray the brown where the green was supposed to go. Hence the all brown starboard wing. Next up was a post shade of lightened Flat Earth applied to the panels which saw high traffic and wear in a random manner. You can see it on the panels around the engine nacelles and cowlings. This always looks a bit stark and unnatural, so I then apply a highly thinned mix of the base colour to soften the effect. I'll let that lot harden off overnight then apply a coat of clear before masking up for the Dark Green. Karl3 points
-
I think that this is the end! Hope you like it ! P8290278 by Dionyssis Vacalas, on Flickr P8290279 by Dionyssis Vacalas, on Flickr P8290282 by Dionyssis Vacalas, on Flickr P8290283 by Dionyssis Vacalas, on Flickr P8290284 by Dionyssis Vacalas, on Flickr P8290285 by Dionyssis Vacalas, on Flickr P8290286 by Dionyssis Vacalas, on Flickr P8290287 by Dionyssis Vacalas, on Flickr P8290288 by Dionyssis Vacalas, on Flickr P8290289 by Dionyssis Vacalas, on Flickr P8290290 by Dionyssis Vacalas, on Flickr P8290291 by Dionyssis Vacalas, on Flickr P8290293 by Dionyssis Vacalas, on Flickr P8290294 by Dionyssis Vacalas, on Flickr P8290295 by Dionyssis Vacalas, on Flickr P8290296 by Dionyssis Vacalas, on Flickr P8290297 by Dionyssis Vacalas, on Flickr3 points
-
I'm not going to get my builds finished by tomorrow night just too much outstanding to finish them off, but I should hopefully wrap most of them up in the next week or so. I have started to add the decals to this one and have completed the main ones on the tail. I have noticed that the kit decals have a red outline to the code letters and according to the reference photos I have found they should be white the code is also wrong (ZE338) so I wil have to have a rummage through my spares. Anyway here is a photo of where I am up to. Have to finish the other side, add the roundels and stencils then some small details like aerials and strobe lights.3 points
-
here some photos from the start some years ago that i post in a model forum, until now i have made also some home made photoetched details for the cockpit, used the seats from another kit and also used the whirlybird canopy.3 points
-
My Swift is in the paint shop. No real issues once I sorted out the nose gear bay and IP and cockpit. In fact it's been a delight to build - out of the box. I've even used the kits seat! I will replace the pitot tube though........ However, Saying that, I do have some five or six decades of modelling experience.....I think that some of these Airfix Series 1 or 2 kits, the 'pocket money' kits, are over engineered for the beginners end of the market. Mind you parts not fitting never put me off building kits in the 1960's!3 points
-
Just about got this one finished tonight. The decals I used (of which I have another set to actually use on a Macchi MB326H (if I can find the kit)) Just need to make a stand, fix a broken antenna and give it a final gloss coat.3 points
-
I always start my bare metal finishes with Alclad Gloss Black Primer, followed by Polished Aluminium. That is the base that I use , followed by various shades as you see fit for the discolouration around the 'hot' section of the engine, from the afterburners rearwards. I use some Pale Gold, Dark Aluminium, Burnt Iron, Exhaust Manifold and some clear red / yellow and blue add tone without detracting from the metallic effect. It's fair deal of work, but slowly does it and you will get a good result. Here's one I did earlier, I'm happy with it, but there are some seriously excellent F100s on line if you search. Anyway, this was done as described earlier:3 points
-
28/8 update: Lots of odds and ends added to the Ju. Securing points near the tail wheel, a large lump under the tail containing some PE boxes, (got me stumped here, really can't figure out what this is), Also added the perspex antenna entry points on the fuselage along with the direction finder.The instrument panel and master compass have also been added. The master compass photo is rather fuzzy but was the best I could manage: Cheers,3 points
-
Short Singapore III K6912 No 203 Sqn Basra (Iraq) 1938-39 Contrail 1/72 Vacform Build thread here http://www.britmodeller.com/forums/index.php?/topic/234980926-short-singapore-iii-completed/ Cheers, Ray3 points
-
Panavia Tornado F3 RAF 11 Squadron June 1985 1/48 Airfix building tread: http://www.britmodeller.com/forums/index.php?/topic/234983159-tornado-f3-148-airfix-finished-31-7-2015/ Cheers,3 points


.thumb.jpg.ba34a9f6ddce411193946dbdcc7b5fe8.jpg)


This leaderboard is set to London/GMT+01:00