
Leaderboard


Popular Content
Showing content with the highest reputation on 23/08/15 in all areas
-
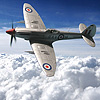
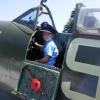
Attached are photos of my just completed Vixen! Built with the addition of Eduard seat belts and shortly some Model Master Pitots (When they arrive). Painted with Tamiya and Mr Hobby. Lovely model to build, only a couple of areas that need attention the upper Ailerons, the lower side of the booms where the flaps join and the air intakes. One thing I'm not happy with is the paint around the canopies but I can't do anything about it now, not the best brush painter! Kept the weathering to a minimum, tried to keep it as true to a duty Vixen as I could! Thank you to the Gents who kept my motivation going and kept me informed during the WIP! The WIP can be found here - http://www.britmodeller.com/forums/index.php?/topic/234984638-148-airfix-deh-sea-vixen-finished-2208/page-1 And a couple with the competition...!34 points
-
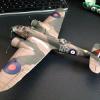
I have just completed the Airfix Engligh Electric Lightning F6. I made this on the back of my recent Lightning F2.A, which I thoroughly enjoyed. The F6 build was fairly similar to my previous build, however there were a few issues. The parts were covered with flash, there were a lot of huge ejection pin marks and some of the parts had sink marks where the plastic hadn't flowed into the mold correctly. You would like to think that some basic quality control measures would have spotted this and rejected the kit, it really was not up to the standard that anyone would expect of a modern kit. When I compared it to the F2.A kit the difference was like night and day. Having said that I still enjoyed the kit. The level of detail is great for my kind of modelling so I went straight OOB. The decals were superb. I have two Airfix Lightnings, and F6 and F2.A in the stash, so as my skills are progressing I think I will try some proper metalliser paints and an aftermarket cockpit on my future builds. Thanks for looking. I have a few photos of the two models together at the bottom. Any comments or questions will be warmly received.19 points
-
A superb piece of writing. Just a shame that the media is not taking the same line: James is a professional writer and reporter on global vintage aviation, and has been writing for over a quarter-century. Well done that man.17 points
-
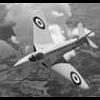
PS888 - the aircraft who had flown the last operational of a RAF Spitfire on April 1, 1954. 81 Sqn, RAF Seletar, Singapore. Pilot: S/Ldr W. P. Swaby. After the last flight the aircraft was decorated with famous "The Last!". Later on the PS888 was transfered to Royal Thai Air Force. Nowadays PS915 can be seen flying with camouflage and markings (except for serial number) of "The Last!". Kit: Airfix (1/72). Exhaust tubes and upper roundels from Spitfire F.22 (Airfix). The model is made by my 8-years old son Gustaw with my little assistance.16 points
-
Here we have Airfix's 1/48 Supermarine Seafire F.XVII. It's my first time building a Spitfire or seafire. I chose the No. 800 Naval Air Squadron, HMS Triumph, 1947 scheme as i liked the full upper surface as the Extra Dark Sea Grey. Kit Manufacture: Airfix (A06102). Scale: 1/48. Type: Supermarine Seafire F.XVII. Extras used: OOB + scratch seat belts. Paints and colours used: Upper surface is My Hobby Aqueous H333, Extra Dark sea Grey. Lower is Tamiya XF-21 Sky. Cockpit was 50/50 of Tamiya XF-69 Nato Black and XF-71 Cockpit Green. The exhausts stacks were Tamiya XF-84 dark Iron and dry brushed with Mr Hobby Iron metalizer. Primer was the the Badger Stynlrez grey. Weathering: Flory models dark dirt wash and tamiya weathering sets. Other info: Full build is here : http://www.britmodeller.com/forums/index.php?/topic/234986236-148-airfix-supermarine-seafire-fxvii-no-800-naval-air-squadron-hms-triumph-1947/15 points
-
Hello,Friends - The Canberra Kid and I have donated a number of scale models to the Warton Aviation Heritage Group for their future display.These photos show mine and I plan on replacing them with 1/48 builds for my own collection.('POISED TO STRIKE - KING COBRA!') being the first.I wanted to share these photos with you and thank you for viewing.All the best,Paul. The TSR2 and Canberra are Airfix.56 Sqn.and 19 Sqn.Lightnings are Trumpeter.The 111 Sqn.Lightning is Hasegawa and I built this well over twenty years ago.12 points
-
Hi All, This is number 9 so far this year, it's the New 1/72nd scale Academy F-4J "Showtime 100". Built from the box the only addition being the ejector seat face curtain handles made from wire (a little thick), took a bit longer than I would have expected. Just a couple of teaser shots as this is to appear in a future issue of SAM. Comments welcome as always Thanks for looking Rick G12 points
-
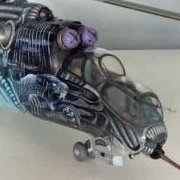
Probably one the best helicopter kit out there. Great fit, nice details, impressive once build, Eduard Big Ed set is great and adds a lot of nice details on the inside and on the outside, a lot can be add with a bit of scratch build... The only downside it's the lack of rivets on the fuselage...none! And the real machine is covered in rivets...I found out about aftermarket rivets only after I finished the build... I have decided to go for the folded rotor option as the kit is already big. And with the blades open is something like 50cm diameter! I used some wire to reinforce where the blade are attached to the mast as they are quiet big and heavy, something that I suggest to anyone that would like to build this kit in the same position... P.s.: don't mind the crew chief heaving a break...12 points
-
Tim's Airfix 1/72 Boulton Paul Defiant (new release). Build thread http://www.britmodeller.com/forums/index.php?/topic/234985667-tims-defiant/12 points
-
Never a truer word spoken. And when the hysterical, hand wringing "airshows should banned because of the danger to public safety" brigade start their usual media ranting, I would just like to mention four words to them - Ibrox, Heysel, Bradford, Sheffield. With numbers of dead and injured well into the hundreds at these four events, I wonder if the "ban them" brigade would be equally eager to ban all outdoor football and other sporting events on "public safety" grounds? No, I am not even trying to make light of the accident. I just hope (possibly in vain?) that a sense of perspective prevails.11 points
-
This is my first attempt at helicopter. It is Wessex HU-5 No 847 Squadron Royal Nvy Malaysia 1896. Built oob, no extras and brush painted. All comments good and bad welcome, but hope you all like.10 points
-
Hi, everyone! You can not always be serious))). This is my next model.10 points
-
The AFV AH-1W is basically the re-boxed Academy AH-1W NTS Update with a resin and metal turret gun. Excellent kit but is coming with Taiwanese Army decals was the only one that I found at the time. It's a really rare kit, a bit like the Dragon AH-6J... For this build I have used the TwoBobs decal set. They are really good but the instruction are so small that I scanned them and then try to zoom as much as possible to read something... Not my best build. The colour is too dark and, even if the marking don't have to come out to much, are kind of disappearing (live looks better tough...). The exhaust are a bit to gold-ish as well... But it's an impressive and cool looking model. I will try in a future to build another one as I still have the Werner's Wings exhaust update as well...10 points
-
Another great kit to build. Full of details, perfect fit...the only problem that I had was the terrible decals. The orange bits are been painted as the decals just disintegrated... Hope you like10 points
-
Hi everyone, Thought I`d show some photo`s of my just completed Eduard, Weekend Edition 1/48 Spitfire Mk IX Completed to represent a French Airforce Mk IX of: GC 1/4 `Dauphine`, Nha Trang, Indochina, 1947 Not quite OOB this time as after some research it became apparent that most French Spitfires in the theatre..... had `E` wings fitted and not `C`s as the decal instructions suggested. So had to modify the wings to suit which was a pain as I`d already 3/4 built the kit. The decals were from Berna Decals Sheet, BD 48-18 Otherwise just added seat belts and had to remove the aerial wires I fitted as I noticed at last minute they didn`t appear to have them. Hope you enjoy, thanks for looking Cheers Russ9 points
-
Here are some photographs of the completed MKI Hurricane by Airfix in 1/72nd Scale. First of all I need to thank Mitch K for sending me a spare canopy after mine met with disaster through my own stupidity, so once again thank you kindly. I know the Brown colour is incorrect but I liked how it looked when it had dried so I left it instead of re-painting, I did have a couple of issues during the build (other than me being stupid) but I am happy enough with the end result. Painted using a mix of Tamiya and Revell Acrylics and Varnished with Windsor and Newton Matt on the top side of the aircraft. I hope you like it and if you have any suggestions for improvements theyll be greatfully received. Oh and I tried out a different paint chip/wear method out just behind the gun access panels on each of the wings to see which method looked the best just incase you wonder why they look different. Bit of a WIP can be found on my blog here if that kind of thing floats you boat: http://kitsandbits.tumblr.com/tagged/kitsandbits-Airfix%20Hurricane%20MK1/chrono Here's the photos and once again thanks Mitch!!9 points
-
Hi everyone, Here is my latest attempt at the very old Airfix Vulcan. This particular aircraft is now residing at the IWM Duxford, just up the road from me. Build thread should be here if anyones interested: http://www.britmodeller.com/forums/index.php?/topic/234975800-airfix-172-vulcan/ I wanted to build one with it's bomb bay open so the only option was to scratch build it which was a first for me at this level of complexity but I'm happy with the outcome. I also sanded off all the raised panel lines and rescribed... a very laborious job! I used the Freightdog 202 jet pipes and Fundekal decals set (beware, nose roundels provided in the set are to small in diameter). Painted with Xtracolor enamels and various bits of brass microtube, plasticard, lead wire, mv lenses and turned brass bits. Once again many thanks for all the technical help provided by various members, particularly that of Robvulcan's. Cheers gazza l Next to one I made many years ago.8 points
-
Good one Rob Here's some pics of the mottling now they're on their feet: Wick's 109 Machold's 109 I'll go over the cowling on this one with a bit of blue. The brush slipped a bit.. There's a bit of touching up to do on the wing/fuselage join, and then decals. Sean8 points
-
Hi Everyone, I have rethought my post and have limited it to just the picture of XH558 that I took yesterday. I have deleted the Facebook album from my profile and will be deleting the photos with the exception of the one below from my photobucket account as well. This photo shows the last time I will ever see Vulcan XH558 flying where she belongs : IN THE AIR. I asked the staff at the Vulcan Village to pass along my thanks to the crew for doing this flypast. I will miss the sight of this aircraft flying and will never forget her. All the best, Rick7 points
-
Airfix 1/72 Spitfire Mk1a 603 squadron August 1940, Basil Stapleton Build thread: http://www.britmodeller.com/forums/index.php?/topic/234987026-spitfire-mk1a-l-xt/7 points
-
First... the Avon oil drains (or whatever they are) with their aerodynamic end bits fitted: And then a moment that I have been working towards for a very long time... Yes! The first coat of primer:7 points
-
Here are my crab cakes: It was a small portion, more of a starter really. I had a cream cake on standby. I wanted to add some red stripes inside the nose gear doors, I found this in the spares box and trimmed it narrower: Here they are in place along with a label on the gear leg taken from the ever useful Mike Grant cockpit instruments sheet: As a reminder, this is what I was trying to reproduce: I masked up the lower door ready for some 308 grey which I am getting very low on: This is the last job for it so there should be enough. Then I noticed this strange white bloom on the tail decals (same on both sides): I've never seen anything like that before. I had a go at swabbing it off with a cotton bud dipped in water: That seemed to get rid of some of it, I also swabbed it with Micro Set and that seems to have fully sorted it. By the way, I am resisting the temptation to keep straightening the static dischargers of likely they will break off. I should have used stiff, black bristles like milktrip showed me a while ago, ah well live and learn. Here is how the door came out: Here it is after a dark wash: Then I gave all the undercarriage parts a smutty black Flory wash: Not forgetting the nose well: Now I could assemble the undercarriage, starting with the nose doors and leg: I glued the wheels onto the leg before inserting that as its all nice and vertical. Next the main gear: Next the wheels and main doors: Those two little struts proved a bit of a nightmare to fit, at one point I thought one had permanently glued itself somewhere inaccessible inside the wheel well but eventually I got it out. Here it is fitted: They do add a useful bit of strength to the doors at least. Here she is standing on her shiny new legs: Next I'm going to spray the interior grey on the step parts. By for now, Nigel7 points
-
Here she is hot of the production line, Airfix 1/48 Lightning F.1 "Demonstrator" WG331 Strait out of the box except the home made markings and resin seat. I hope you like her. Thanks for looking John6 points
-
To be featured in the October Airfix Model World (out two weeks from today), my recently completed Trumpeter Delta Dart with a few aftermarket upgrades - Caracal decals, True Details seat, Master Model pitot, and Royale Resin wheels. The latter were intended for the Monogram kit but with minor modifications fit Trumpeter's just fine. Cheers, Eriic6 points
-
Hi All, Been a while since I have posted, but I am still practising skills for my first ever group build, which is Eastern Front - so I had better do something Russian I suppose to practice their colour schemes, lol. Anyway here are some photos of the Spitfire MkIIa I have just finished, I am aware the Revell kit is not 100% accurate, but I am not much of a rivet counter so that doesn't bother me too much. Kit build oob apart from Eduard Brassin wheels, Barracuda corrected seat and Eduard photo etch in the cockpit. Appreciate any and all comments and tips to help me improve, now I just have to figure out where to put it.... Anyway - this is what I have been up to over the summer. Kept it pretty clean, not too much chipping and weathering - but it has seen some action 6 points
-
Finished in one of the French schemes supplied, and given, what I hope, is a wash and dry brush to make it look like a machine used in Algeria Thanks for looking. Nigel6 points
-
Here are some of my recent builds. I just recently got back into scale models after a long break. In the 70s and 80s I hand brushed all my builds until I bought an airbrush, my results were better but set up, clean up and masking turned me off after a few years and a pile of unfinished builds. Over the years I have collected numerous aircrafts from the 70s and 80s I'll like to build. I am now back to hand brushing and having fun. Out of all the forums I like this one the most because there is a lot of quality hand brushers here. My builds are simple OOB minimal details and keep it simple. I use Testors paints here in the U.S. Because they are easier to get. I have brushed with their enamels and acrylics, but the jury is still out on the acrylics. They brush nice but even with a primer coat they sometimes chip or lift with masking. The enamels are very durable but a little harder to brush so any insite on hand brushing with Testors will be helpful. I am painting out of the jar with no thinning. I'm using Testors brushes.6 points
-
I erased that horrible photo (that came from the telegraph article) from my post, it wasn't my intention to hurt anyone. My apology6 points
-
Just finished, yesterday; this is the rather elderly Tamiya F-15J kit which I have built as a JASDF 60th anniversary aircraft (72-8960, 306sqn) from 2014. It is built OOB apart from Aries resin jet nozzles and Hasegawa after-market decals. I prefer the Hasegawa and Fujimi 1/48 F-15's to this Tamiya one in terms of build, but it looks pretty good built up. The aftermarket decals were superb - easy to use and bed into the model really well without any setting solution. Anyway; here's the model. Hope you approve.6 points
-
Please can I say how strongly I object to the use of the picture showing the flames and cars at the actual crash site on the A27. I was at the airshow very close to the crash site and saw it all happen. That pictures shows the death throes of 7 individuals that’s not something to be “gawked” at or speculated over. Sorry that’s just how I feel and I suspect many locals share my reservations (Yes I know it’s all over the news and I hope the sod that sold it to them burns in hell!!)6 points
-
Spot on Chris, The media are in a frenzy about it and it brings out the very worst in a flawed industry in my opinion, all major online news services have featured this downunder and if you think the bloke who got a suntan riled you well your lucky you didnt see our hopeless morons giving expert opinions, I turned my t.v off or it would not be in one piece at the moment, a very sad and tragic day that deserves respect and compassion something the media in general lack, it makes me feel so sad for the families and friends and those that witnessed it, God Bless all the emergency services involved they deserve our praise and respect, if you have ever ben near a tragic event and seen them work with speed, cool heads and compassion you know what i mean and hats off to the organisors who by accounts did a great job under the worst of conditions, The U.K has such a huge aviation heritage its part of everyday life , let us hope it is permitted to celebrate this in the future.6 points
-
Here is a What-if model I have been working on for a while. Still not completely done but wanted to basically test out a homebullt light box I built. So here are some shots of how it turned out after several editing in Infranview photo editor. Still not perfect but better than anything I have done. Again, the inspiration for this model was put into reality after seeing Igor Sobolevsky wonderful 3D art station work called 'Axiom Racing'. His 3d version is to 'die for'. Still need some touch ups in some areas and needs a stand, on a wooden base, when done. Hope you all like this build. ---------------------------------------------- The Seat before placement in cockpit. I could not take a decent enough photo of the display panel but will try later. Instead of a steering wheel, I made two sets of joysticks.5 points
-
I'm glad he's still alive, but I guess that he'll have burns and other injuries to cope with, as well as survivor's guilt, so he's got a long haul ahead of him. Here's hoping he pulls through. (I'm not a religious man, but you get my drift).5 points
-
RAF 99 Squadron VTOL Transport aircraft, 2066 Imai Thunderbird 2 kit, RAF Hercules decals from Airdecal RAF Transport is Go! Build thread here5 points
-
I would have posted this earlier, but I had to temper my feelings otherwise I think I would have been asked to leave BM. I made the mistake of switching on the BBC breakfast news this morning. At around 07:10 they introduced their "aviation expert", a Mr Hair, who writes for one of the airliner magazines and who happened to be at the event when the accident happened. During his five minutes of fame, he offered his "expertise" on the crowds at displays wanting to see "stunts and barrel rolls" at air displays. However the part of his interview that I found really offensive was when they were discussing the enforced road closures at the time. His comment was "Well I got a nice sun tan while I was waiting to get out". Please accept my apologies for this rant, but he really did make my water boil this morning.5 points
-
Nothing comes to mind. While if I could go to any time, it would have to be 1940, I would choose the 1980s if I had to live day to day in an era other than my own. What an amazing, uncertain time, I feel that living as an adult in the 1980s would be the closest one could get to the delicious uncertainty and hope of adolescence. Got a little more done. Now it's mostly on to filling and sanding until the canopies and other bits go on. Also, I may have a small Vietnam problem:5 points
-
Not a problem, glad they arrived safely and looking forward to what you do with the kit - hint hint Anyway the big news today - apart from the amazing mini-heatwave (and other sadder events ) is that the RAF has now acquired a new transport vehicle... RAF Transport is Go! (Note the serial number )5 points
-
Ok - those involved in that little spat need to wind their necks in now. Any continuation of this behaviour will result in suspensions. Show some respect for those affected!5 points
-
Completed...4 points
-
Well fellow modellers, it is with great pleasure I present to you my finished F-15A Streak Eagle, it has been a challenging build in a lot of ways with a fair amount of research to try and get the right result. I am sure there is still further detail to find but this is the best I could do with the information I have to hand, overall I am pretty pleased that is for sure. I have attached my modification list at the bottom of the post, I am sure in time this will be further added to. I have tried to capture the change in shades and the composite features as well as give a realistic metallic effect at the same time. I have only applied decals I could see and confirm, I believe that most of the markings applied were burnt of due to friction anyway. The airframe has also only been decaled to represent the aircraft during the record attempts, the large tail decals etc were added after that for press and photo opportunity's. For those of you have been following my WIP many thanks and for those who helped out with various details and parts you have my sincere thanks as well. Here she is. Modification List. 1. Burners are fully feathered and we have this nicely covered with the GT resin set and kit parts. (info) 2. The cockpit will utilise the Early F-15C Aires resin tub using an Aires ESCAPAC seat. 3. The rear avionics bay has the TAC/TEWS/ECM boxes removed in the actual Streak Eagle, other specific parts for recording telemetry were added back in including video recording equipment but without reference material it’s hard to know exactly. 4. The Ejection seat needs to be changed to an Escapac IC-7 version without the canopy breakers, from the information I have the Escapac for the A-4 will be the best/nearest option, top ejection hoop needs to be removed/not fitted. 5. Airbrake, the one fitted on the Streak is much shorter and more rectangular, this is highlighted in the 1/48 Hasegawa kit and in other sources, brake fairing also needs to be checked, modify as required. 6. Gun Port, this needs to be covered up as obviously the Streak had no armament, this is basically nothing more than a plate patch. 7. Wheels, early F-15A wheels are required, I have ordered a set from Bruce http://partsrparts.homestead.com/F15parts.html and I have also got a set coming from Sierra Hotel which are made for the Tamiya Kit. 8. There is no HUD fitted to the Streak.(info) 9. The Pitot tube will need to be modified as again the one fitted to the Streak is different, again that should not be an issue, copy the Hasegawa example. 10. The arrestor hook is completely removed and the associated recess covered. 11. Duraluminum nose cone 12. Sealed gun bay vents for cooling air and gas ventilation 13. Sealed round vent on the starboard side near the rear canopy rail 14. Eliminate UHF/VHF radio antenna blade on upper fuselage spine 15. Sealed forward Sparrow missile attachment point, close all openings 16. Retain rear sparrow launch fairing, fill all holehttp://www.cybermodeler.com/aircraft/f-15/pages/13304.shtml 17. No pylons on wings or fuselage, fill holes. 18. Outer wing flaps permanently up (actuators were eliminated to save weight) 19. All formation and navigation lights sealed on wings (including low intensity panels on wingtips) 20. Remove the starboard side lower aft avionics heat exchanger exhaust duct and intake door 21. Reduce the thickness of kit parts for the low intensity navigation light panels fitted on the sides of aft fuselage. The slime lights were not used and were filled in but the frame outline still remains. 22. Vertical stabs with EWWS (or similar) antenna housings on both tails (pre-record attempt with tail patch marking, info only, not required. 23. Vertical stabs with small shortened mass balance’s on both tails instead of EWWS housings fitted during record attempts, not decals on tails at this point. 24. Coloured navigation lights on upper trailing edge of both tails sealed 25. Eliminate taxi and landing lights from nose gear 26. Forward nose gear door closed while on the ground (prior to record attempts, info only) 27. Forward nose gear door open while on the ground (for record attempts) 28. Forward main gear doors closed while on ground (prior to record attempts, info only) 29. Forward main gear doors open while on the ground (for record attempts) 30. Add Scratch built camera mount to port side of seat, orange bracket with black camera, top of bracket pivots up. 31. Add large white UHF blade antenna on rear canopy deck 32. Fill Kit Chaff and Flare Dispensers 33. Fill Holes for C/Line Pylon 34. Access hatches on top of the engine humps and the JFS starter intake and exhaust. 35. Remove bulges on the vertical tails for the rudder actuators as they are late model configuration and too exaggerated. 36. Remove the Stiffener panels on the horizontal stabs. 37. Front landing gear below shock absorber need to be rounded not square. 38. Port side tail spine ECM pod not required, both should be the pointed tails. 39. Angle of main landing gear, stance is more pronounced angling outward, see lihttp://partsrparts.homestead.com/F15photos.html 40. Reduce/remove the outer wing elevator actuator fairing top and bottom side, remove the small bumps as well. 41. Remove small rectangular raised detail on the exterior of port intake port side. 42. Fill two small holes above rear sparrow launch fairing, holes are for a strengthening/reinforcing plate not used on the Streak. 43. Fill the hole for the TACAN antenna directly behind nose landing gear. 44. Fill 2 small holes for the ECM antennae between the UHF Aerials. 45. Remove the antenna from the nose gear door. 46. Nose Gear wheel to be painted black, rear gear wheels are black as well with the small hub in the middle being white, anti-rotation markers on rear tyre. 47. Add the missing rhomboid vents on the outside of each moveable intake section, mask in or cut out hole. 48. Front instrument panel displays/panels removed:- HUD Control panel, TEWs display, Radar scope, Armament Control Panel, Standard G-Meter. 49. Port Console panels removed, All Navigation related panels, IFF and TEWs panels, Radar Panel. 50. Starboard Console panels removed, All TEWS, Navigation , and Compass related panels Points 48-50 will be virtually impossible to remove neatly, I have some good cockpit layout drawings so I know where they are, I suspect these will be best left alone. WIP http://www.britmodeller.com/forums/index.php?/topic/234985055-132-f-15a-streak-eagle-wip/ Thanks for looking. Danny.4 points
-
Hi, Promised few days ago and just finished - second one radial Audax, this time with 9-cylinder Bristol, next of my "Hawker Hart Family mass production" - the Hawker Persian Audax. Model was scratch converted and detailed from AZ Hart B4 kit. Markings are following the Profile Publication scheme with small differences based on speculations or photos In Interwar section I tried to discuss confusion I have with details http://www.britmodeller.com/forums/index.php?/topic/234986512-persian-audax-1941-confusion/ - many thanks for most of all John Aero for his comments, which encourages me with finish. This machine is in markings of 4th regiment based in Abadan. However - the numberals on cowlings and upper wing are Perisan "2" - why not "4"?. The individual number is 253 (read from right to left). She is suppoused to take part in few days war against British-Soviet invasion of Iran in 1941. Since it was short war and before it machine was exploited in peacefull time and was repainted shortly before the war - I made very delicate weathering despite desert condisions there. Here she is: Comments welcome and thanks for watching Regards Jerzy-Wojtek4 points
-
This is the one that Classic Airframes released few years ago. The only 1/48 kit available of this not-so-common medium bomber. After being operated by RAF, as one could see by the Dark Earth/Middle Stone/Azure camouflage, a number of Baltimores (with some Spitfires MkIV and P-39 Airacobras) were passed to ICAF (Italian Cobelligerant Air Force) to be operated mainly on the Balkan front. This happened after the armistice signed between Italy and Allies on September 8th 1943 and subsequent declaration of war against Germany (more a surrending rather than an armistice...).4 points
-
Finally got something to post after a long time. A brief interlude before my Tirpitz build resumes shortly.Took advantage of a window of blue sky today for the outside shots but yes it's raining again. Not show stoppers but I quite liked the builds. Just used various grey paints and washes and pastels. Tried a bit of a camo scheme on the Seehund for a bit of variation. Anyway, here they are, like 'em or loathe 'em I'm not fussed I'm going to play convoys and wolf packs on my bedroom floor4 points
-
These parts received the interior grey: Apart from the final coat of varnish I think that is the last of the airbrushing for this model. I placed some masking tape in my flat jawed pliers in an attempt to protect the paint finish while scraping off the superglue residue from the blade aerials: I glued all four of them on, this was probably the one that came out best: Next on went the pitot tubes: Now the door was dry I set about painting the handle yellow and adding some decals from the spares box as well as giving it a light wash: For reference, this is what it should look like: I did look for a suitable curved yellow arrow but there was nothing in my (fairly extensive) spares box. I applied what I thought was going to be the last decal but looking closely at the instructions I discovered there was this decal for the upper door which extended onto the lower one: It actually overlaps the other decal which is a bit weird but there you go: The main bit of construction left is getting the side door attached but I think I am going to call it a night here. Bye for now, Nigel4 points
-
Thanks for your help snapper, slowly coming together in my head Not had a lot of time of late due to work but slowly prep/painting parts & experimenting with ideas for non slip finish. Had a look at the figures and I've got to say I'm well impressed with the Bravo 6 figures Couple of shots in primer. The figure on the left is Tamiya, good enough considering how much will be visible. The right hand figure is playing a mouth organ, Thanks for looking in Kev4 points
-
Take a deep breath Andy, and go and make a Mach 2 Valiant instead. The Swift will be a doddle after that.4 points
-
Well....my new Hurricane turned up yesterday, and I thought I'd get a start on the old girl today, but.. I was working yesterday, and then out last night playing pool with my brother in law, and quite a bit of Harp Ice was consumed. So the worst for wear most of the day, I finally came around this afternoon and took a look at the kit. This one is from 1979, and has a fair amount of rivets, especially on the wings, and this boxing being from 1990 has a small amount of flash, although nothing major. So while it was out I got a sprue shot: I think I last made this about 15 years ago. Since it was out I compared the fit to what the new Hurricane was like, oh dear........: What about the wing to fuselage join? Oh dear again. Never mind, I have this: Homemade filler I made for my Meteor vac-form, using Airfix's new blue sprue and tubes of glue from the gift sets. I had seen it on Rick's BoB threads http://www.britmodeller.com/forums/index.php?/topic/234984990-old-school-spitfire/ (post 11) , works a treat. Sure while it was out, a quick paint inside the cockpit, (there's no detail, just a board for the seat and Johnny Pilot ), a bit of glue...hey presto: So, that's me off again.... Sean4 points
-
Work continues apace. I forgot to sand down the gear wells of the AZ Spitfire, so the wing needed some encouragement to go on: Both wings needed a little help, in the end. I also managed to get some liquid cement to pool around the claw holding the wing to the fuselage on one of the Airfix Spitfires, a new variant on the classic glue fingerprint. Mr Surfacer 1000 is coming to my aid.4 points
-
I saw it happen right in front of me. We were at the very far end of the airfield and it landed about 100 yards or so from us. It looked to me as if it stalled in the loop - strangely there was no roar of an engine from a pilot in trouble and it actually struck the ground in the field adjacent to the road slightly tail first, before careering over the A27 and into the scrub on the airfield boundary. As you can imagine I was terribly shaken by the whole thing - you just don't expect that sort of thing to happen. I can't begin to imagine the pain of the families who've lost loved ones today. Many of the cars appeared stationary as they were queuing to get into the airshow. It's just gone 8pm and we are still waiting on the airfield. There's a real air of calm amongst the many thousands of people still here. I think all are mindful of the terrible events we'd witnessed today and the tragic loss of life. Being delayed for a few hours suddenly seems rather insignificant. I have numerous pictures of the loop and crash which I will be passing on to the AAIB, and out of respect will naturally not be posting here. Quite a tragic day, and I just want to get home now! Tom4 points
-
I started today by getting the last remaining parts ready for an airbrushing session: The PE parts first with some grey primer: That allowed me to check them over and do some tidying up (mainly picking off bits of fluff). Next the parts for 308 grey and matt black: Here are the black parts done (the loose blade ariel is one of the first ones I made and I painted it up as a spare): Next I got some pale burnt metal Alclad on the pitot tubes and side door stays. The idea behind the latter is that the real parts are wire rope with what looks like a yellow zinc chromate finish which I thought could be simulated with this metallic. The end fixings I will paint interior grey later: The camouflage demarcation line on the lower side door runs at a distinct angle which I laid out from the model with tape. During this one of the hinges started to detach as you can see so I glued that and put it to one side to set: Now I could get on with some detail painting, first the hydraulic jacks on the U/C legs: Next some 337 grey on the base of these mushroom aerials: I had also realised that the main wheel dust caps should be yellow so I did those: Those and a number of other undercarriage parts need a wash and they can then be fitted. Finally I painted the actual pitot tubes with burnt iron Alclad and then used some diluted clear blue and orange to try to create the prismatic burnt metal look: Now for some assembly, I snipped these parts off their painting holders: This is where they go, many months ago I recorded the length of the rod on the instructions: Here they are fitted, I smoothed off the cut end of the rod and will touch it up later: I also glued these blade aerials on: The PE one lasted about five minutes, the black finish allowed me to find it easily enough - I think I'll leave it off until after the undercarriage is fitted now. I glued on the mushrooms: Finally the retracted upper side door: That was tricky to photograph but hopefully you get the idea. That's it for now. Bye for now, Nigel4 points


.thumb.jpg.d17ff607fc7e89ed057e63fcb6f2a888.jpg)


.thumb.jpg.158e2e086d45b8f96b7d93b8bee8dc21.jpg)


This leaderboard is set to London/GMT+01:00