
Leaderboard


Popular Content
Showing content with the highest reputation on 30/07/15 in all areas
-
Not a 100% accurate, as the experts will see, but I enjoyed the conversion. Thanks for dropping in, Marc20 points
-
Made this one a couple of weeks ago for a Battle of Britain groupbuild on a Dutch forum. It's the Tamiya E-4 kit OOB except some seatbelts and the decals. Hope you like it Erik18 points
-
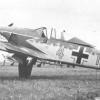
Hi all - here's the latest off the bench: Spitfire VIII JF406 of No 1 squadron SAAF, based at Trigno, Italy 1944. Flown by Flight Lieutenant Hinton Brown... .... "Hinton joined the SAAF in 1940 at the age of 18. He did the usual ground and flight training to be qualified as a pilot in August 1940. After being involved in flying training units in the Union, he was sent to North Africa as stand-by pilot for the combat fighter squadrons during the last phase of the war in Africa. By this time the Desert Air Force had the upper hand over the Luftwaffe and fortunately the SAAF pilot casualties became less with subsequent few replacement opportunities. While not being placed in a fighter squadron, Hinton was chosen to perform flight testing on a modified Curtiss P-40 Mohawk fighter plane whereafter he was posted to various units for non-combat duties. Eventually he was transferred to 1 squadron and finished his 200 operational hours tour, flying Spitfires in mainly ground bombing and -strafing missions. During this time he was shot down and spent one month behind enemy lines whereafter he returned back to the squadron on foot. He was awarded a Mention in Dispatches for his combat service in 1 squadron. After the war Hinton left the SAAF and had a successful career in the construction industry." taken from http://biltongbru.wix.com/ww2-saaf-heritage#!tribute-pages/c1ddt Tinus LeRoux's excellent website of you have an interest in WW2 SAAF. Airbrushed in Xtracrylix and Gunze with some post shading and pastel weathering. Decals from Xtradecal but modified as this crate isn't on their sheet. "Dil Emma was brush painted onto clear decal sheet, and is a tad oversize as its as small as i could do without enrolling in the "Helen Keller school of miniatures"!! As usual - all comments welcome. Hope you like her! Jonners17 points
-
Hi, this is my second of JG 54.....i like this Eduard kit..... Regards Klaus16 points
-
Evening all... Here's my contribution to 92sqn strength. Airfix's F.2A is a fantastic kit, and builds up into a nice looking Lightning. A very enjoyable build overall- though I nearly came unstuck with some of the decals on the nose.... I'd actually like to try another of these, but I'm trying to clear the decks so I can start my Airfix 1/48 Spitfire Vb.. (yesss !) Thanks for looking, c&c always welcome. Cheers, Dave14 points
-
Hi all, this is my latest completion, the 2013 release 1/72 Airfix Typhoon, which is on a different planet to the 1960 mould it replaced. Aside from adding some masking tape straps to the cockpit this is completely out of the box, and depicts a 439 Sqn RCAF Typhoon in early 1945. It's not perfect but I'm happy with it Prop blur acheived with a hairdryer on "cool" and a two or three second exposure. With the 1960 original that I built in the 1980's alongside:13 points
-
Hi Here's my finished lightly weathered Lightning. I hope you enjoy WIP thread here: http://www.britmodeller.com/forums/index.php?/topic/234980669-airfix-172-english-electric-lightning/ Thanks for looking10 points
-
Thanks Simon! Love the pun, score 1 for the Dbl-E, fnaar fnaar Cutting off the lugs done - the clear part is half window, half panel, so sanding would have lost that detail. It can be seen in these pictures: Yes he's in! I'm not convinced he'll stay put as the only thing holding him in is Gator grip thin (you can see it in the window - it dries clear, I hope). His helmet has also had some of the paint rubbed off* so that'll need touching up*. And yes, I have checked that the dome will fit over his head. Several times. And just checked again. Remember the final bit of PE that needs fixing over the i/p? No, neither did I. So I have a cunning plan to make sure I don't forget to fit it before I fit the canopy: So when I ask you "Why did I write 'panel' on the canopy" please remind me... it's me age! * No! Even I think that's going too far!!10 points
-
Hi, here are some pictures of my "Winter Bf 109".....I hope you like it.... Regards Klaus9 points
-
Hi everyone, this is my latest aircraft diorama. I had an old Academys F-84 thunderjet kit and I didn't want it to throw away and so I decided to make small vignette with it. I was inspired by the new Star wars: The force awakens teaser trailer when I saw the x-wing and the star destroyer in the sand. I started digging into reference if any thunderjet crashed in the desert, pilot was killed in the crash, so that is my interpretation of this event. I hope you guys like it!9 points
-
Hi, i want to show you my last built aircraft........a very good kit by Eduard..... Regards Klaus9 points
-
Hi, here some pictures of my first Spitfire....more to come Regards Klaus8 points
-
Hi folk,s an off camera build over the last few week's has been Airfix's new tool Hurricane finished in the colour's of 17 Squadron flown by P/O Steven's during the Battle of Britain.The kit has been well covered here with one or two superb example's already posted,I added a break pipe;s to the u/c doors which I noted on the wealth of information available here on BM mainly down to Troy, also a mirror on the Glazing and weathered using Maskol then promptly missed off the characteristic staining underneath and on the u/c door's,Ah well! Hope you like. Very much a practice piece for another entry in the BoB GB.8 points
-
This is a long time resident of the shelf of doom, Revell's SSP reissue of thier venerable kit of the Boeing SST proposal, a sort of retro modern civil WHIF. The PanAm decals really suited the aircraft, a shame that neither are in the air today. Thanks for looking, Stuart7 points
-
The answer is: no! (to me, at least ) Few words on the kit: it's well known, and as Troy Smith pointed out in my WIP thread (see here if you're interested), has some shape issues, concerning mainly wings and fuselage shape. I didn't feel like I was able to fix them, though, so I decided to build this kit as an experiment for various techniques such as, for instance, salt chipping (first time ever for me), an doing my own mask for roundels. No aftermarkets used, but definitely some scratch - building involved: - cables and wires and few other details inside the cockpit - radio switches box (cockpit again) - brake lines on undercarriages - pitot tube (using a prescription needle) - back canopy thermoformed, as the kit one is too wide and tends to break at the minimum pressure - IFF aerials, using hair probably something else, but I don't remember now. Roundels, fin flag and code letters were airbrushed, using self made masks. The only kit decals I've used are the serial numbers and the stencils. The AC I intended to reproduce is this: A quite battered one, indeed. Here are the pics: Weathering details Bottom view r More detail pics to follow7 points
-
Me again.... I decided to take a rest from the the wings before the next task, as I feel it will need some time and focus which I currently don't have. So I decided to paint the DG (hu30) on DZ-Z, two quick coats thinned with water as apposed to flow improver as i had issues with my tiffie and thought I would try something different. And as the petulant child that I am I had to take off the maskol! Hmmmm bit heavy but can be worked with, I will give it a polish with 8000 micro mesh then tone it down ... I like the effect on the wing root, I will layer on steve's cunning trick from the reference thread for the black patch, a great tip so have a butchers. Hopefully get a bit more time at the weekend. Cheers Rob7 points
-
My first completed work this year. This is Monogram's B-52. It started life as a 'D' model in SEA markings. Since then it has undergone a major rebuild for suspended 'in flight' display at the Bentwaters museum. I split the belly, removed the MLG and the bomb bay, split the t/e and took the flaps out to make life easier. as it's NMF, I spent a lot of time getting the seams right, then hours masking and spraying the beast. Paint is courtesy of Halfords rattle cans for the white belly and 2 shades of silver, and Plasticote for the polished areas. Decals are Warbird, adapted as necessary, and a few from the spares box. The Hound Dogs were cast by a local Club member from an MAI master, as I could only find one, via a nice gentleman from Florida. Biggest problem, apart from the masking, is the size of the beast when handling it. Anyway, it's done now, and off to the Club tonight as part of our 'Fugly' theme. Enjoy.6 points
-
Hi all, Completed some weeks ago my latest model : an Academy "Lightning", I added an Aires resin cockpit and eduard photoetched both designed for the Hasegawa model, so it took me lot of time to adjust them. A Falcon canopy and Ultracast wheels are also added. Paints are from Alclad and Gunze, and I used an mix of Montex masks, Hobbydecals dry tranferts and the gorgeous Bombshell decals sheet. One of main challenge for me was to do the rivets on the whole aircraft, It's very(very) long to do... Pictures are from Dom Friard. Hope you enjoy. Alain6 points
-
Small update, I have attached the nose of the VC10 onto the main fuselage and added strengthening struts from old sprue to give it some support, I will have to work out how much weight it will need to stop it from being a tail sitter. Once the interior is painted I can then close the 2 halves up, the windows will be cut out at a later date, it's just proving to me how big this aircraft is Tail section temporarily fitted6 points
-
Having finally completed the Academy 1/32nd Hornet and the Trumpeter 1/48th F-106 Delta Dart I decided to start 2 of the CMR Buccaneers (to be exact a few weeks ago). As some of you know I am the very privileged owner of XX894 which was painted for retirement as 020 on Ark Royal. I have therefore decided to build one of the Buccaneers as the real 020 on the deck waiting to go on the cat and the second one on the cat of Ark Royal. Major aspirations indeed! I originally bought the CMR RN Buccaneers when they first launched so these must have been gathering dust for around 6 years. I also had the Neomega wheel well and Cockpit set for the Airfix 1/72nd Buccaneer. These are better detailed and more accurate than what CMR provided IMO so I cut them up and used them with additional scratch details for the cockpits. Please note this cockpits are not finished as there is still quite a lot more detailing to do. They are not absolutely accurate as I am basing them on pictures of XX894 a late mod RAF Buccaneer versus an aircraft that was in fact 20+ years younger in avionics fit. I do have photos of an early S2 Buccaneer cockpit and luckily the differences in 1/72nd scale are not overly massive. The addition of a small panel with the "cheeses".\ And the two together. Next update in a couple of weeks as I am off to Japan on business for 1.5 weeks but I am hoping to have half a day to visit the modelling mecca and get the new Tamiya Mossies and the Fine Molds 1/72nd Tomcat. Anyone tell me how to move this topic to work in progress?5 points
-
So, the pegs etc are off, and i've taken some pics with the Hurri on the pole (temporarily). Theres still a bit of final filling to complete but the main airfame is complete, and once i've cleaned it up a bit more i'll be ready to paint. The clear plastic pole/rod is from Nest Plastics and i've cut it to about 6 inches long. Once the opposite end is secured in an appropriate base, i'll be able to select an angel to set it at. Here's the pics....5 points
-
So I did a bit of work this morning, I think there is some tidying up needed really but it's getting there.... fine from a foot or so! I sanded the chipping and then painted over some of it e.g. The massive chips on the door panel (?) It wasn't even metal. I then made a lighter shade of brown and painted the odd engine panel and some little squares to look like patches. If you look at pictures of squadrons at the hight of the BofB then there are a number that look like they could do with some tlc, so just trying to represent this... let's call it artist licence as there is no known pictures of this AC in service. Also see a few pics of the process steve put on the reference thread (Just masked off with tamiya tape) So that's where we are at. Any thoughts on the effects? Do we think they are convincing? Cheers all. I would like to get this one pretty much read for transfers then I will focus on DZ-C. Once she is in a good place with paint on i will hit DZ-W.... I will also be looking at how I make my own masks for the letter codes. Cheers all Rob5 points
-
Thanks bbudde and Martin. He won't have a hand-made bombsight because, luckily for me, Johnny says in his book (bottom of the post) that it wasn't needed for the Sorpe attack and he forgot to take it with him. Thanks Julian for the concern but I've checked it lots of times (and then more times again) but I don't want you to worry so stuck it on with a bit of tak: I need to mask it before fixing properly and I'm off for a weekend away tomorrow so I don't think this will be until next week, unless I can squeeze in a few minutes...5 points
-
I think you're right - and they were only £2.50. Rubbed down the Mister S and given the Ram Air Intake/Exhaust decking a squirt of Tamiya Primer as a check. The primer will need micromeshing in due time. Here's an Airfix original to compare with the scratchbuilt exhaust/Qickboost intake version: Perhaps not much to show for a few sessions work - but it looks more refined and with finer and more defined detail - which is what I was after. Ok. now what? - I need to move the nose wheel U/C bay back about 1mm - and box in the U/C bay. Might start that.......or I might do something else.5 points
-
Another liberated resident of the shelf of doom, renown as being slightly less than accurate, Revell's kit is the only 32nd Gripen and it's good enough for me. Thanks for looking. Cheers, Stuart5 points
-
Due to technical difficulties at my end - laptop not wanting to read/upload pics from the camera - i have a couple of pics i took yesterday after i fitted the wings to the fuselage. Despite rigorous sanding and dry fitting theres still gaps to fill. You can see from the pics that holding it all together needed use of pegs and a good old rubber band. I am unsure whether i have sorted the dihedral but its the best i could do in the circumstances. Last night out internet went down hence the delay in posting, and since then i have filled the joints and sanded them down along with the nav lights on the wing tips. I'll try to post update pics later today, as long as our laptop plays ball! More later.....!5 points
-
Thanks for your words of encouragement guys Small update on the radio cabin Made a wood duckboard from coffee stirrers and fitted the shelf for the radios Entrance still to be cleaned up and rolled canvas fitted. Scratch build a couple of radios next I do like 1/35th Kev5 points
-
Hi all heres an update on the build, crew finished, giant squid arrived from Germany, as already new its the wrong colour, needs a paint job. Assembly and painting progressing, see photos. Hoping to have this ready for IPMS Avon show on 9th, fingers and toes crossed LOL. Good old light refraction, youd be forgiven if you thought theres a gap between the two halves at the top as appears in this photo, there isnt, ive got a nice tight join that i cant even get a knife to pick up on the join line. Nicely done Aoshima5 points
-
Thanks Ozzy, it's starting to get a bit crowded on the modelling table now Thanks Joe; one of the great regrets of my life so far is that I have never had a proper Cornish Pasty; if you have the time and the energy, please down one for me too Thanks Rob - you know not long after that picture I had to paint those earphones don't you? Thanks Ced, for some reason I wasn't really that happy with them myself but they will do As for Jack's eyes, they won't get better as such, he has 'Dry Eye' - I strongly suggest you do not google it, especially not google images as they show some pretty extreme cases which are quite unpleasant to see. However the ointment works, the condition is stable and Jack is fine, but I do have to keep a stock of the ointment as it has to be applied daily. Not bothered. I did a quick test fit of one of the Stuka canopies... not too good, surprisingly un-good in fact given the fit of everything else so far, hopefully it will be better when I try it in earnest later... Cheers, Stew5 points
-
This was definitely a A-team effort. Went together well. Shape and accuracy were very good. 4-star kit.4 points
-
1st Krechowce Uhlan Regiment The Battle of Bologna 21 April 19454 points
-
This is actually two kits the 251/1 and the Pak 35/36 set but the figures for the Pak are awful so I decided to put it on the hanomag and do something different The extra equipment , tarps,bags,weapons are from my bits box4 points
-
Hi, here some pictures of my "Winter Bf109"....I hope you like it.... Regards Klaus4 points
-
Following my dipping of toes in the posting pond with some RIAT images recently I thought I'd put a up a few Yeovilton shots that I hope will add to those posted by members. This was my first ever visit to the Air Day and I was shocked that the depth of the crowd which resulted in my being about 150 yards back from the crowd line. Looking at the aerial shot of a previous Air Day in the complimentary programme I could see why; the crowd line itself is incredibly short hence lots of people crowded into a small space. That being said it was a terrific show and it won't be my last visit to the Air Day. I've put the shots in with the crowd featured as I thought it added a bit of perspective to just how close the helicopters were (or at least felt anyway). Many thanks to Troy for advice regarding posting.4 points
-
I saw the Viggen fly last year at RAF Waddington and I was very impressed. I like building the old Airfix kits I thought I would give it a go. I re-scribed the raised panel lines, scratch built a cockpit (all you get is a seat), vacuum formed a new canopy form the old one and did a bit of rubbing down. It was great fun and I loved the lot. Here is the build thread http://www.britmodeller.com/forums/index.php?/topic/234983864-172-airfix-saab-37-viggen/ Anyway here are a few photo's and I hope you like them?4 points
-
Stew, thanks for that reality check - I needed it I've been sploshing paint around: If I'm going for a green/silver interior, I suspect I need to advance the silver by one bay Slightly unusual here, one seat will be green, the other aluminium. So far as I can tell, the brown plstic seats didn't start to come on line until May 1940, long after these aircraft were built (see this thread http://www.britmodeller.com/forums/index.php?/topic/234925276-spitfire-bakelite-seat-question/, Edgar's reply is most informative). OK, I don't know when LO-P was built, but I suspect it's the older of the two machines, and LO-H (K9899) first flew in March '39. Don't you hate close up photography? I do, it shows all the ommissions and splots in my paint work.4 points
-
The first paint has been applied to the cockpit . i first gave a spray of Army painters black primer from a rattle can to give some depth to a top coat of Lifecolor 02 . As i have used the Weekend version of this kit i dont have the coloured photo etch so the instrument panels i used the Eduard parts that hve the instruments molded on . with lots of the strongest decal softning solution they have sunk on to the dials well I have painted the panels RLM 02 ,not 66 (very dark grey ) As i have seen many photos showing the lighter paint on the early 109's and i think the decals look better on a light colour. The seat cushion is made from milliput and the belts are the fabric ones that come with the kit . I found these a lot easier to use and position than the pre painted metal ones which i find to springy and often endup with pthe ends floating in mid air , fighting gravity., also the paint can peel off if bent to severly.4 points
-
Tool at the Ready ! , About time I updated this project. I have been absent for a while now as I get settled into my new Job playing Guitar for Sister Shotgun which is Awsome. Ive not had chance to update some of the work that had been goin on in the past so here we are Yet more things to delete from the B2 to make it into a B1. When you look closely it's scary how vastly Different they was. I decided to start building another one too as a silver Straight wing B1 and also started to throw together a Pit Road TSR-2. Here im making a template for the spliter plates as the kit ones are way to big I can sand them nav to this shape. Here I have masked off the under wing kink area to thin them out and reduce the forward dropped angle that the B2 had and again B1 did not have. I have filled in the engine tunnel mounts for the two pipes on the B2 and removed all the various boxes and fitings again the B1 never had anyof these either. A different subject but im quite happy with this Canopy I tried to tint the windows by brushing on the inside some revell Aqua Brass heavily thined with Underwoods Floor Polish from Lakeland looks pretty cool to me Here I have reshaped the B1 splitter plate and blended the resin intakes with milliput and also scratched the nose mounted Intake thing out of sprue. This was unique to Vulcan B1s. I will update more in a bit cheers Rob4 points
-
And an important part of the weapons delivery system on a Jag. Need to accurately know (basic) stuff such as height speed and flightpath (plus other more subtle stuff which we don't need to trouble ourselves about here ) to accurately predict where a dumb weapon will hit the ground. The kit used the Radalt to accurately measure the height above the ground to feed into the calculation of where a given bomb would impact. Here's still from the a HUD wet film recording (hey - that counted as cutting edge tech when the poor old jag was built). It's colour film - as befits the special occasion of being taken at Red Flag. The Radalt's on and working - cos there's an R in front of the height reading (in feet agl) and the horizontal CCIP line (Continuously Computed Impact Point) on the bomb fall line is the predicted impact point of the bomb(s). Speed is in Knots. Wind and flightpath have been taken into account. Actually - I may have been misled by the dust/smoke cos it looks like I'm gonna miss just to the left of the tgt (never was any cop at this flying lark). Note also that I'm being a good boy and making sure I'm not busting the 100' authorised minimum separation distance (filmed target runs were always looked at in the debrief) - that said I am descending so I was probably thinking that 125' was a bit on the high side to retain credibility. The problem with the Radalt in weaponeering is that it measures distance directly below the aircraft - so the prediction is only accurate if the ground is flat. If the ground is sloping then the predicted impact point will be wrong. And that is why the Jag had a laser in the nose - to accurately measure slant range to a target/impact point........ Ain't gonna have anything interesting (or not) left to say by the time I build a Jag. Have to either fall back on just building a model (heaven help us) or do as I've done so far and just repeat myself........ The Hawk T1/T1A had no radalt or inertial platform and so the (basic) sighting system relied on the pilot flying at a predetermined speed and height above the target - which had to be judged by mark one eyeball. Excellent practice for training studes - not so good if you want to reliably splat a target. In the Hawk we generally did shallow dive attacks (5 or 10 degree - can't remember which) I think because it tended to allow a more accurately reproducible approach and reduced the margin of error.4 points
-
Finally back at the bench after a busy period at work, stuff on the allotment, and a week away in South Devon. I also have three builds scheduled for the BoB GB. At my current pace humans will have colonised distant planets let alone sent probes to Pluto by the time I get them done, so I will need to pull my finger out and get cracking! I applied a coat of Klear: And then made up a wash using turps and Paynes Grey acrylic oil. Now for some reason I’ve had no trouble with non-metallic paint, but it did not take kindly to the metalcote: I thought this may happen, so fortunately I tested it on the airbrake first. Yes a pain to have to re-paint, but not as much a pain, and very trying it would be on my tenuous sanity, if I’d gone whole hog on the underside. So Plan B was put into action. This involves making a wash using ground soft pastels, some good old H2O, and a tiny tiny amount of washing up liquid to break down the surface tension of the water. The greyish sludge was applied in earnest. I find it takes several coats to equal what you’d get using the Mig washes, or the conventional old school stuff from oil paint and solvents etc. It is not as viscose either. It is also a dreadful tease: on first application it gives a wonderfully defined panel line, only to fade when dry. So several applications are necessary followed by an overall sludge wash: It does have its advantages though. It can be cleaned up, or off completely using only humble water; and the chances of it reacting with your paint, or whatever exotic Klear this, or cote that, kind of varnish you’ve used are virtually nil. Okay, it’s a bit risky if you use it on top of unvarnished watercolours… Also it contains no harmful solvents…well not the rapacious ones we modellers are used to…and smells nice too – this particular wash was lemon, but you can get apple, orange and even tropical! And I like the irony and paradox of using a solvent designed for cleaning to dirty something up! In the end I got a reasonable result, even though the particular brand I used claims “up to 50% more grease cutting power”! I’ve since added more wash to the wheel wells: The topside in progress – It’s a bit too rough here and I cleaned it up a little more afterwards: It was quite time consuming, but once done I added another coat of klear and got the decals (transfers) on. This involved a little makeshift splicing of spares for a thin black band across the aerial: And a thin band around the tail light which needed to be a radius to fit around the compound curve (US viewers note the template). shots of the decal in place later as I’ve just masked it ready for the final coat and forgot to take a piccie. The kit provides decals for the yellow dashes (okay I don’t know their proper term) for around the hood, but they are a bit clunky so I utilised some spares from the Trumpeter Lightning – I’m sure the Lightning would approve they have gone to a good home! Darned fiddly to say the least. That said there are very few decals and virtually no stencils. I’m not joking, there are more stencils on the decal sheet for the Airfix 1:72 Messerschmitt Bf109E…that can’t be right surely. Seriously though, I’m not a fan of the fiddly things but a few more for 1:72 wouldn’t go amiss. Anyroad they went on well, as did the 65 Sqr Xtradecal markings Col provided me with. A bit thin though, and I had to be careful with the squadron emblem – couldn’t risk tearing that, the shame of it!! As usual with modelling, there is always a sting in the tail, Homer Simpson’s “woohoo” is often followed by a “doh”, and this was the case when I came to apply the XE 627s across the wheelbay flaps and apertures. Yes what a blinkin’ faff. I suppose the best way to do it is to approach it technically and make cutting templates; but of course I chose the route of maximum stress and resistance and cut, measured, eyed up and generally faffed about with little bits of 1mm decal stripes. Why oh why do they insist on placing the serial numbers across the wheelbays? No consideration for modellers I say. Well I got them done in the end. I must say I was not impressed with the roundels though, as there is a slight slivering and a white edge to the blue circle. I have since applied a final coat of klear, which succeeded on gunking up my airbrush and was a real pain to clean out – I suppose it’s not intended to spray floor varnish! You will note that after my efforts to get XE 627 nicely aligned, on the separate flaps they merely look like abstract stripes! The Klear has had the effect of saturating the panel lines, and to be honest they are a little too dark for my tastes. I don’t think the artificial lighting helps too – they are grey honest, not black. I will add some pastels to give it a more worn and faded look, and then finish off with a coat of Alclad semi-matt. This should tone things down a little. Then on to finish off the cockpit bulkhead and final assembly of the undercarriage and fiddly bits. So I’m on the home run, and with the decals on, especially the roundels and squadron markings, my Hunter at last has its own identity.4 points
-
As has all too often been the case throughout history it was a political issue which became the deciding factor in a military matter. When many Western European nations began to look for a new fighter type during the late 50s and early 60s it seemed a good opportunity for introducing a measure of standardisation across various air arms within the region. Thus the competition to find the next generation of NATO Fighter began. Early front runners included the Grumman F-11 Super Tiger, Lockheed F-104 Starfighter, and English Electric Lightning but the Grumman entry soon fell by the wayside after the US Navy rejected the type to leave the Lightning and Starfighter vying for selection as already proven designs in front-line use with their home nations. The Starfighter was finding favour in several countries including Spain, West Germany, The Netherlands, Italy, Belgium and Denmark when a political scandal that had been brewing almost un-noticed in the Dutch press suddenly became front page news with the publication of a memo that gave evidence of corruption across the highest echelons of government and rapidly led to further allegations, principally centring on so-called "facilitation payments" made by Lockheed to several leading members of the Dutch government and military, that threatened to destabilise the ruling party close to forthcoming elections. The intimidate effect was force a suspension of the selection process while everyone suddenly became armchair experts on the relative merits and performance characteristics of the Starfighter and Lightning. Over the next few months a wave of rumour and speculation spread throughout Europe that did nothing to simplify the selection process for those trying to decide upon the new fighter type with allegations and opinions becoming international currency. With the Starfighter rapidly becoming a symbol for everything that was considered wrong within politics across post-war western society all it took for the Lightning to find favour with the public throughout those nations was a spirited performance by John Howe from 74 Sqn. at the Paris Air Salon. As the sleek silver shape started down the runway all eyes of the crowd that were not already focused upon it became forced to watch as the craft went from rotation into a near vertical climb with a deafening immediacy that abated moments later as the announcer could then be heard to tell everyone that the small dot rapidly disappearing had climbed beyond 50,000ft and was still going higher. As attention slowly waned off to more visible attractions the announcer was finally able to tell the audience to look out for the same aircraft silently approaching the main runway at low level. Seconds later most of Paris shook to the sound of a sonic boom as sound trailed in behind the passing silver arrow that then went into a crowd-pleasing series of maneouvers which finally put another aircraft on the front page of newspapers the next day. Within two weeks the Belgian Air Force became first export customer of many for English Electric's new interceptor. Right, that'll do for now, I'll get into the more technical aspects of this story later but basically I want to thank my co-conspirator, oops I mean co-host, Enzo Matrix for providing me with a 72nd scale Trumpeter Lightning kit to make this daft idea happen. Cheers fella.3 points
-
Hi all, Is it really five years since we last did this? Wow! Hopefully there will be time and energy for at least a couple of builds, but this one was my birthday present back in February that was bought by my wife specifically for this GB. We live quite near the southernmost areas of the Battle, and the Solent is quite a key part of family life, so when Airfix came out with its recent Dogfight Double of the new tool Spit Mk.Ia and Bf109e in the markings of the ill-fated combatants John Dundas and Helmut Wick, it seemed like the right thing to get it. Of course the fatal encounter between the two took place after the end of the Battle, but both aircraft depicted saw service throughout so I hope I'm safe on that front! Here is the box and sprues: The one thing I will be adding is Propblur propeller blades - the rest will be my attempt at making them to an acceptable standard!3 points
-
3 points
-
Another well known Emil scheme. Hasegawa kit, code decals from the sparebox because the Hasegawa provided "J" hadn´t the correct shape. Model shows an a/c of III./NJG1 in December 19403 points
-
I picked up one of these last week for less than twenty pounds, should I worry that I wasted my money or gloat at my financial acumen? I have seen references to intake dimensions and other comments about the upper engine and wing root detail, I'm wondering if I've landed myself with a huge problem or just a reasonable bit of Milliputtery to engage myself when I finally get round to it Advice and comment would be very welcome folks, thanks I'm aware that the decal sheet is a little 'unusual', dealing with which isn't a worry to me I have a huge stash of Almarks roundels And a printer beside me3 points
-
Hello Guys, Below are the images of my "Final Reveal" for the Tamiya 1/48 Douglas A-1J Skyraider. After the images, I will include some notes regarding this build; my opinions of the kit in terms of quality, cost, value for money etc and any points to look out for if you decide to buy and build this kit. I hope you like the following views, and, forgive me for all the photos, but I always have a problem trying to decide what to show! I bought this kit for $32.00 from Hobbylinc.com last year, but it is now for sale from their website at $33.29: http://www.hobbylinc.com/tamiya-douglas-a-1j-skyraider-usaf-attack-aircraft-plastic-model-airplane-kit-1:48-scale-61073 Quality of molded product: The parts are molded well, zero flash on the majority of parts and if there was flash, it was very little. There were no warped parts and ejector pins were away from seen surfaces. The parts are molded with finely recessed panel lines to aid highlighting them when painting, and every parts details are crisp and faultless. The clear parts were very clear, not thick and there were no blemishes or distortions to disrupt the visual transparency. I give the Quality of molded product a score of 10/10 Quality of Engineering/Fits: This kit literally falls together, and without a shadow of a doubt, this has to be the best kit that I have had the pleasure to put together, out of the 15 I have built to date since starting modeling in January of 2014. The molded parts come loaded with nice details within the cockpit, on the undercarriage and the exterior surfaces. I give the Quality of Engineering/Fits a score of 10/10 Assembly and Painting Instructions: The assembly instructions come in black and white and they are clear, concise and easy to follow with each part clearly numbered along with the Tamiya color code for that part to be painted in. There is a separate sheet for painting guides for two Squadron markings. A full size view sheet is included that can be used as a paper mask for when painting your model. I always take a few photo-copies of this sheet and use the copies for this task. I give the instructions a score of 10/10 Decals: There is one sheet of decals that do not include the smaller stencils such as "Danger", "No Step" "Caution" etc and therefore, there are only 28 decals to put onto this model. That includes the 4 decals that go onto the propeller- one on each blade. The decals are thicker than normal, take a long time to release from the backing paper and some are delicate when applying to the plane. I had one tear on me, but I managed to position the two torn parts together to hide the tear. Be careful and patient when using these decals. I give the decals a score of 6 out of 10. Packaging: There are four bags of light grey/beige sprues and a bag with a clear sprue inside. These are within a card exterior box base and lid which is pretty sturdy, has great artwork and some images of the finished model in the two different color/marking schemes on two opposite sides of the box. I give the packaging 9/10 Value for money: 10/10! Would I recommend this kit...a resounding YES, ABSOLUTELY!! It offers a great looking build with two full sprues of weapons/ordnance and options for layout of those weapons. It includes a nicely detailed cockpit that looks great built OOB! There are options to have the rear canopy open or closed, the two fuselage and one ventral air-brake doors open or closed, the ailerons posed up or down, a detailed radial engine and a Pilot figure to finish it off. There are after-market extras that can be purchased for enhancing this kit, such as resin cockpit tub and ejector seats, PE parts and resin bombs and undercarriage, should you feel the need to "enhance" this kit further, although in my opinion it looks great built OOB. My only two "issues" with this kit are; 1) The decals; if Tamiya were to include Cartograf decals into this kit, it would have a perfect score of 10 out of 10. 2) The artwork on the box illustrates a "Whip Antenna" on the port-side of the fuselage next to the rear sliding canopy, but this isn't included in the kit. I therefore scratch built the Whip Antenna" mounting block by carving/sanding the end of a piece of sprue and cutting it off. I then stuck this to the end of a cocktail stick and painted it black. I then made the Antenna by using the "Stretched Sprue" method and cut a piece to length, stuck it to the mounting block and painted that black. When it was dry, I mounted it to the plane. If you're thinking of buying this kit, think no more, go ahead, make your day, you won't be disappointed!! Below is my "Final Reveal" YouTube video link for this build: https://www.youtube.com/edit?o=U&video_id=hzqeA71uvB4 Thanks in advance for taking a look and commenting, much appreciated! Cheers, Martin3 points
-
I have nearly finished all the windows except for the one of the two in the cabin roof. The one I have done in the roof was not as straight forward as the others as the fuselage isn't stuck together yet. So I taped the fuselage together and used a tape template of the kit windows as a reference to mark the location where to cut. I just drilled as the other windows and filed down to get the right shape. Next I decided to do so work on the seats. As I didn't have any reference photo's some artistic licence kicked in. Also because you will be able to see the bottom of the seats I added some legs made from copper wire and glued in place with CA glue, to make it look more interesting. The seat belts are made from rolled lead wire and the buckle was made from a strip of aluminium cut from a coke can and just bent over itself. I again used CA glue to attach them. The seats and pilot are just test fitted at the minute as I have to do a few more things. One of them was the control yoke. The kit one wasn't that inspiring and gave me no way of adjusting the reach to the pilot, so a few changes were required. To start with I cut off the stem leaving me just the handle. Then I drilled a hole in the back for the new stem ensuring that the drill didn't go straight through. For the new stem I used a syringe needle cut to size and glued in place. The housing in the instrument panel for the new stem was again a syringe needle but this one was a larger one cut to size and glued in place. But first I test fitted to see if it would work. I was happy with this so I glued the housing in place leaving the stem, which will be done later when the pilot is in place.3 points
-
Finished a few things and ready to get back to work. All the work in the main gear wells done in vain. Fencers on the apron only have one narrow gear door open (At least most pictures show this). Glossed up and many markings to apply. Tedious work ahead. John3 points
-
Hi all didn't like the oar handle, too irregular, so browsing the net I found these, they are OO gauge steps (1/87) so near enough. But as you can see they are too wide so with my guage I whittled them down a bit cut to length split and with a little bit of fettling they will all look the same now3 points
-
A small update. Have started and near finished the netting for the Hammocks. Space for the Bower Anchor to rest. A picture of one Iron with hammock and one without. I must admit I like the one without best, but more fragile, so will have H in all of the nets with exception of the two bow HNs. foxy3 points


This leaderboard is set to London/GMT+01:00