
Leaderboard


Popular Content
Showing content with the highest reputation on 15/07/15 in all areas
-
Hi all, I am new on this forum and this diorama is my biggest work, so far. The basic kits were the Hasegawa's old bf 109E and the Tamiya reissued Opel Blitz. During the building I used a lot of PE and detail sets, such as Eduard, Part, Hauler, SBS Model! Hope you like it! Thanks or watching! Cheers, Matyi from Hungary32 points
-
Well, not 100% finished as I have a few fiddly details and touch ups still to get to (e.g. the tail wheel broke off), but for all intents and purposes it's complete. I've gotta say, this is one of the best value-for-dollar kits I've ever made. The detail is excellent and the fit and engineering is outstanding, all for less than $20. My only criticism would be the decals which, while beautifully printed, were quite thick and didn't respond to setting solutions. Given that the only decals I used were the wing walks, this wasn't a big issue. I did add a few scratch built details, including the plumbing from the upper wing fuel tank, the glass fuel gauge tube, engine wiring, and the doodads aft of the engine on the port side. Rigging is ceramic "Wonder Wire", which doesn't add any strength to the structure, but that's OK since the fit and engineering of the kit is plenty strong enough on its own. The orange-yellow is Gunze H24 with some Tamiya yellow mixed in, while the grey is a mix of Tamiya Neutral Grey and white. All of the markings including the insignia and tail stripes were masked and painted using stencils cut with my Silhouette Portrait cutter. As always, any questions or constructive criticisms are greatly appreciated Cheers, Tony28 points
-
Hi All, This is my first post of recent completed builds of my favorite era of aircraft. All in 1/72 Scale. Hawker High Speed Fury, Tombo Kit Gloster Grebe, 19 Squadron, Aeroclub Models kit Fairey Fox 2M prototype, Omega Models conversion. Pegasus Models Fairey Fox 1 Fairey Firefly 3M, conversion from the Aero72 kit14 points
-
This is the 1/48th scale Tamiya P47-D Thunderbolt Razorback. The model was painted with Aeromaster acrylics with the exception of the canopy frame, which was painted with Xtracolor enamel. Artist gouache was used for weathering and to highlight the panel lines. The seat belts are from Eduard. The decals are Eagle Strike set number 48054. American Jabos. The markings are for Yankee Tarheel. Flown by Lt. H. I. Price. 510 F.S. 405 F.G. Thanks for looking, Joe11 points
-
Hi all, I'd like to present the second of in a set of RAAF WWII aircraft I've built, this time a lesser know one. It is quite strange that they RAAF only operated 3 P-38 Lightnings during the war and they were of the Photo Recon variety (operated by 1PRU), they were loaned a few more by the USAAF. There is a bit of conjecture over whether the original 3 were Photo Recon F-4s or started life as P-38E’s which were modified either in the US or here in Australia. They operated from Mid 42 to late 44, with all 3 eventual being written off with one incident unfortunately resulting in the lost of the pilot. I built the last of the 3, A55-3, she started off life as a P-38E with the serial number 41-2144 (there was even for a while some conjecture as to if this serial number was actually correct), she was converted to F-4-1-LO either here in Australia or in the US. She served with 1PRU from 27Feb42 till she crashed due to undercarriage failure on the 10Dec43, the wreckage is now in the Darwin Aviation Museum. This build was part of the P-38 STGB, to which I was host. I was meant to have finished this in time, but as some people know I have a crazy work schedule and am away from home for long periods, so I missed my own deadline. The base for the build is a Academy 1/48th P-38F (which is not a nice kit at all as there are lots of errors), with a Red Roo resin PR conversion kit. Thrown into this mix are a new resin cockpit, wheels, turbo bits, and some PE. The paints are LifeColor acrylics from their RAAF WWII series...just love these paints. Please enjoy, included is a link to the build. http://www.britmodeller.com/forums/index.php?/topic/234980483-raaf-f-4-1-lo-a55-3-1pru-1943-completed/10 points
-
Humber MkIV 1st Polish Armoured Division Bronco 1/3510 points
-
This was built for the Phantom STGB. The markings were a combination of the kit decals and a set of Xtradecal decals. Build thread here: http://www.britmodeller.com/forums/index.php?/topic/234981288-mozzys-interpretation-of-black-mike-is-complete/ And a shot with another black aircraft. Sean10 points
-
This is my latest work, that was made straight out of the box for a GB on a Russian modelling site. Model was built and painted in two weeks. No additions were made, except for the metal grid and a wire for towing cable.8 points
-
Short Sperrin - First Prototype Farnborough Airshow 1951 1/72 Magna resin Link to build thread Steve8 points
-
Hello! Here is my Oscar EW5894 from the movie Hot Shots! Jay Chladek sent me his custom decals. it worked great! Some screenshot: [bMy build[/b] I had a lot of fun building this tiny plane ;D Hope you had too seeing it ^^ Cheers! rom7 points
-
Just in time, I hope... Talbot Lago Record Heller 1/24 Build described here : http://www.britmodeller.com/forums/index.php?/topic/234978832-talbot-lago-record/7 points
-
The sea-worn four-masted barque Lawhill.6 points
-
All completed ready for inspection Thanks for taking time to look at my builds and commenting on my builds. Any comments or question welcomed6 points
-
Couzinet 'Arc en Ciel' 1/144 F-RSIN resin kit, finished with Alclad. The build thread is here Cheers Cliff6 points
-
Caudron Renault CR 714 C1 "Cyclone" 2ème escadrille GC I/145 Pilot Cal Andrjez Niewiara 1/72 RS Models Build thread : http://www.britmodeller.com/forums/index.php?/topic/234984512-172-rs-models-caudron-renault-cr-714-c1/ Patrick6 points
-
Kit: Academy F-4D Aftermarket: Eduard: Brassin weapons set (Sparrow, Sidewinders and bombs), Brassin exhaust, Brassin wheels, fabric harnesses. DEF Models FOD Covers Steel Beach Slime Lights Aires Seats (the cockpit tub didn't fit) Microscale Decals for OY 463 (kit stencils)6 points
-
Hello guys.There may seems strange but last week I was making a ceck of all the models that I have to make and I was surprised to see a Tamiya box of a P 51D 1/48 scale..........I said to my self: thise is a kit forgotten by time (think 3 years!!!.....). I open the box and the Mustang appeared almost finished...... Why I left this kit incomplete?I armed with patience and I took the situation in hands. After a fast ceck I realized that the thing to do to finish it were very few. Well in two day I finished. The bird rapresent a P 51D named Moonbeam McSwane flown by Capt. William T.Whisner of 487th FS, 352nd FG. He racked up 11.5 victoris until '45. He returned to Fly in Korea with F-86 shootin down 5.5 Mig-15 for a total of 21 air victories. The kit is from Tamiya, it self a guarantee and I used Eduard photoetched parts for the interior, Eduard Mask to paint frames on clear parts and quickboost exhausts. The alluminium finish and his shades were entirely brushed with Alclad II colors. For the wethering I used normal Gunze acrilic colors very diluted . The decals come from Kagero book, in particular from Topcolors series n.13. The decals are thin and beautifull, care is needed to apply.5 points
-
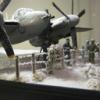
Not sure why I'm really posting here to be honest. If its unappropriated please delete. I know technically some of these are Armour, but aircraft are in every scene, just haven't taken any pics from further back at this stage. Anyways,... here are some of my efforts. I have posted them before, but having been inspired by some of your work, I decided to scrape and rebuild them to what I hope was a slightly better standard. I have 6 in total, all built on plinths at 210 x 297mm When I get a chance, I will post some better photos,.. so I guess you could call these teaser pictures unill them. Updated pics:5 points
-
Good evening First of all, a little word of warning: if you're much concerned about accuracy in form, colour, scale, amount of detail and things like that, maybe this is not the model for you =) This is something I made out of pieces of scrap wood, at the soon about to collapse warehouse at the back of our yard, for my son's first birthday. I used mainly hand tools, saw, plane, file, sand paper etc and a cheap dremel rip-off of chinese make =) The fuselage is made of pine, spine, tail and wings of black alder, intake cone of birch, main gear "bumps" on the sides of milliput. All parts are solid. Milliput was also used to blend the parts in, because there is no way my woodworking skills are anywhere near to have them blend without filler. The stand is made of oak. The R-3S missiles are made of coctail sticks and plastic card. I later found out that the standard load might've been one R-3S IR and one R-3R radar missile, but I didn't bother to make a new one for this purpose. I also made a drop tank but didnt't mount it. In the end I ran out of time, so the lynx emblem of "HävLLv 31" and the reg number were made mostly freehand and look like they've been made by someone about 5 years old, sorry for that . Roundels are from Kuivalainen's finnish roundel sheet. Mainly this was built out of memory and the kind of "feel" I had of the MiG-21bis, looking at pictures (Jyrki Laukkanen's excellent "MiG-21 in Finnish Air Force"), and for some parts I used Eduards 21PFM for the rough shape. Everyhting is simplified and most bumps&scoops are not there, there are no panel lines raised or engraved etc. I was never aiming for real accuracy and sought keep a certain "toylike" feel to it. So here it is, MiG-21bis "MG-136" (birthday is 13 june, hence the registration number chosen) in 1/48ish scale: BTW the colours look really freaky in the pics, everything is greenish although the dark areas are a mix of Gunze dark earth and flat black. -Jaakko5 points
-
I've been playing away with this one for a while now. It was meant to be a quick build but I have managed to drag it out somehow. It is Great Wall Hobbies 1/144 TSR 2. It's quite a nice kit, the parts were all well fitting and nicely molded. The decals seemed slightly thick, I think that was more due to the scale of the model though, it's really quite small. I had planned on doing the model "Gear Down" so I could have it sitting on a shelf with all my other builds. However the undercarriage was quite delicate and I just couldn't get it to sit right. As you can see now its "In-Flight". I didn't have a clue what to do so I used an idea I seen from Johnny Akes' Lightning that he posted on here. I found the nicest rock in the garden and attached it to my model! Its certainly not my greatest model and it has nit turned out quite how I wanted. Hopefully it won't offend anyone though! As always comments or questions are very welcome! Thanks for looking!5 points
-
underway painting it as per the instructions for A02069, though with revell 08 matt black in place of humbrol 85 coal black, and using revells aluminium5 points
-
Totally disagree with the first part of that statement Bob, and totally agree with the second ! Scratch-built models are the high end of modelling skills as they require so much more than just assembling and a half decent paint job. Being a scratch-builder myself I know just what goes into the work required, the research, data and time invested and that feeling of satisfaction when completed. Your ships are masterpieces each having a bit of soul invested which is mostly absent from commercially built kits. I'm just getting back into maritime subjects myself, (I've been asked by Airfix Model World magazine to provide some highly detailed 1/700th battleship subjects) and now appreciate the amount of work needed. Presentation is superb too, though I agree that for some reason merchant shipping isn't as popular as it should be.......thank goodness for chaps like you to redress that. Cheers, Melchie...5 points
-
Now the Yaks Hasegawa Yak-3 1/72 (1) Capt Rene Challe, (5) Lt Roger Sauvage, (00) Col Louis Delfino5 points
-
Spitfire Mk IXc PT467 GC 1/7 Provence 1st TAF based in the Vosges mountains in Eastern France, winter 1944/45. Eduard MkIXc Profi Pack All markings painted using masks except for stencils. Thanks for looking James5 points
-
Ok I’m the first to admit I am totally mad and this build will prove it! My work pattern has changed so I will have more time for models!!! So rather than signing up for more GB’s…or actually completing the ones I’ve signed up for on time I decided I needed a new long-term project. The Heinkel He-177Z was a long term project which I loved so instead of building the bigger one I have gone for this project which I had mentioned a few times. I love the look and it’s super cool, plus a nightfighter as well! I had received all the bits sometime ago but after a quick look at them I got very scared!! The reason for this is the add on bits from Unicraft!!! The parts may be a little bit basic which is to say they are basically lumps of resin and not much else! So the basis for the build will be Hasegawa’s 1/48th Arado Ar-234C-3 which will provide the body, interior and undercarriage, though it will probably end up providing a of other bits as well! The wings from Antares are nice and need little work to fit my build. The engines or turbo-props are barely recognisable as engine parts and as can be seen I have had to add sheet plastic to help build them up so they at least may be round in shape! They even come with an internal engine sections if I wanted to leave the engine covers open…or should I say a blob to match the rest of the engine blob! The new nose is….well more or less useless, as can be seen from the photo is much smaller than the canopy section. The mod kit is for the Hobby Craft Arado Ar-234 which is completely the wrong in the nose section compared to the Hasegawa model, it’s way too narrow! So I can either modify the clear section which is pretty well impossible or completely build a new nose section! Plus all the other bits in this mod kit are pretty well useless as well, I will have to use most of the kit parts for this build! I will either have to modify the resin bits I have or make a completely nose section, which at the moment looks to be the easiest path! So I have pretty well given myself a not so easy task for this build. Whether I complete this build or if it is destine for the box of doom is something to be decided as the build progresses. For a start I need to get these engines at least round in profile, hence the addition of card to the engine bodies and spinners. If I can get these sorted there may be a possibility this project will get going. Once the main bodies are round in profile I can work on the nose cones and props. Once these are done I can then start to work on how they will mount to the swept back wings, custom mounts will be needed for this. So this is going to be a crazily big project, nothing that will be completed in a couple of months for sure! Again I must be completely crazy to attempt this build, I had planned it for the WhatIf III GB, but given the work required it’s not possible in the time given. So this Christmas or next I’m not sure when it will be finished so welcome aboard on this crazy adventure. So welcome along for the ride, it will be bumpy and the driver will curse at regular intervals....oh and regular updates are not included!4 points
-
Newest roll-out from my dad´s factory. Eduard kit with decals from Kagero miniTopcolors #30 (Luftwaffe´s Baptism of Fire) Painted with acrylics, Gunze H70 mixed with Tamiya XF-19 for RLM63. Model shows the a/c of Hauptmann Siebelt Reents who commanded 1.J/88 from early September 1938 to the end of the Spanish Civil War. During this time he achieved one victory over a Republican Polikarpov I-15.4 points
-
Hi folk's,picture the scene,warm sunny day,early seventies and the Saturday afternoon dog-fight's have started with our paper round money spent and latest kit built and painted (even in some case's still wet) I join the swirling Spitfire,s and 109's five feet above the corner of a lawn that is forever England to howl's of laughter" what,s that"? shouts one of my friend's."they were'nt in the Battle of Britain" shout's the kid with a Phantom,it was me with Revell,s PZ 11.A few month's ago I got a hankering to build another but with only Heller's and Revell's kit,s out there at silly prices I decided to forget it so at the Northern show last month browsing the trader's stand I saw these at £2:95 each and despite Knowing that some of the kit;s contained in this companies boxes would win a prize at cruft's I took a punt. What you get is a nice Italerish box Some really well printed decal's Instruction,s and colour call out's that put most other's to shame.And OK a very basic kit with decent engraved lines in places but very delicate raised detail and effect's Only a couple of session's and you are here,so quite a quick build! and to be honest probably better than Revell,s offering at least,4 points
-
Evening all,this was my first Eduard kit and what a superb kit to start with,it's the Weekend boxing finished in the colour's of 2/JG27 based in Libya in 1941,to be honest it owes a lot of thank's to a lot of people on here for the inspiration to weather, wash and pre-shade which are thing's I've only tinkered with on the odd build,hell I've even stuck in a close up shot so new territory all round!WIP can be found here http://www.britmodeller.com/forums/index.php?/topic/234983565-fast-eddy-me109-trop/page-1Many thank's for looking.4 points
-
thought id share my latest build and is the first dio I have done, and the first time done figures in this way and any in cam uniform... I did push me well out of my comfort zone but did enjoy it and I am happy with the results. the kit was the cyberhobby orange box reboxing of the dragon kits. and went together without any issues...4 points
-
From a year or two ago, but not posted here.... The beloved "Vera Lynn," an ex-C-47A gone civil in Roy Marsden's series "Airline." It's the old Minicraft 1/144 kit, with a few corrections, and decals made up on the PC, and printed on my trusty inkjet. I was only able to see a few episodes online, but I fell in love with the series, and knew right away I'd have to give "Vera" a go (so to speak). Hope you enjoy.4 points
-
Hi, Just finished the Magna 1/72 Short Sperrin as part of the Non Injected Moulded Group Build More photos in the Group Build Gallery and the build is here. Thanks for looking. Steve4 points
-
hi, Thanks for the feedback! somehow i have already finished the Hurricane! (don't leave just yet, I've still got to build the refuelled and the bedford MWD!) the kit went together really well (apart from the wing not going onto the fuselage correctly) and was great value. unfortunately the camera disappeared shortly before i started painting so i only have photos of the finished model and the model before decalling.here it is: Pre decals:4 points
-
Some more pictures of progress in detailing of the forward superstructure, progress I’m afraid is still slow. A “highlight” though in what is turning out to be a not very exciting build has been the realisation that the forward 911 tracker radar is not in the correct position. The tracker radar does not sit on the centreline but is actually offset to starboard. This means that the moulding that Trumpeter has helpfully provided to locate the radar base on the bridge top needs to be adjusted. The easy answer would be to file the moulded hump off however this would leave a hole, so I carefully hacked the moulding back with a sharp craft knife. and the forward 911 tracker is now sited more correctly.4 points
-
Hi, Long time since I posted anything so here is the latest, Airfix A-4B converted to the prototype. Changes involved were filling in the rudder and smoothing it out removing the 'sugar scoop' on the exhaust replacing the windscreen with the sliding part from a DH Vampire kit suitably modified changing the nose to add test boom removing arrestor hook and all vortices on wing and fuselage. Painted with Vallejo Aluminium and white undersurface. Took a long time to finish this but glad it is done. Robert4 points
-
Thanks. It is a great pity that miniature models of merchant ships are so unpopular with ship model builders. A very common comment is “I could never do that!” Sadly, it is true the moment that thoughts like that enter your head. The few who have decided to try it have discovered to their amazement that it is a lot easier than they think. This type of ship modelling is really only for those who haven’t the money, space, time or patience to go along the path of kits. Models like this will never be as magnificent or impressive as a well-assembled top-range kit, but what they lose in looks, they gain in rarity value! Bob4 points
-
He's in a flipping high hover, that bloke. Bloody uncomfortable up there... Let's face it, no-one's going to give a toss about the box art provided the kit itself is good.4 points
-
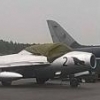
Hobbyboss 1/72 Jaguar A, 11-YC EC 4/11 Jura, 19934 points
-
Hello, after a break of 2 year and a half, here she is. Trumpeter kit in 32nd scale with a lot of custom made parts, resin bits from Flightpath PE from Eduard and decal from Airframe and Zotz. Airbrshed acrylics colours are Gunze and Tamiya, Vallejo for details with brush. And now enjoy the pictures. CIAO! Piero3 points
-
sacre bleu, I 'ave been posezzed by ze spirit of Gaston Marty.... ze 'fatal flawz' are all around me!.... I am once again 'Joyless Hurricane Nazi' I finally bothered to clip the main parts of the new Airfix Hurricane from their sprues and stuck them over the plans of Arthur Bentley... Oh dear I said. I wiggled the bits about but it looks like Airfix, or their CAD chaps have stretched the first fabric access panel a bit, note pencil lines and full panel shown bottom right... My camera does funny stuff to angles, but the nose is all lined up, and i checked the access panel and that's too long. same problem on the other side, on the same panel, which is different shape though (check pic below for the shape) This could be a problem inherited from their old 1/48th Hurricane, which is also a little bit too long in the rear fuselage. in the real world I think it's not going to notice but the more obsessive amongst us (who me?) could do some careful surgery to correct this, as cuts could be done on panel lines and the smooth 'doghouse' area and canopy rails to disguise cuts needed. The other pencil line on the cowling is where you would put in a splice if you wanted a Mk II if anyone is curious. To forestall questions as to the provenance of the plans... .this is the background to them http://www.britmodeller.com/forums/index.php?/topic/234954758-hawker-hurricane-scale-plans/ Before anyone bleats on about Hasegawa, their kit has overdone fabric and some totally spurious 'bands' on the edges of the fabric panels, like this, plus fantasy panel line behind the cockpit and no shaped edge to the canopy opening. compare, note the Hase kit has 'bands' at the edges of the panel and where it joins the rear fuselage. The real thing does not, the line of the stringers are unbroken. Also gives you a good idea about the Hase fabric representation. And there should not be a panel line behind the cockpit, this is a strip of fabric reinforcement, where the fabric covered plywood 'dog kennel' ends and the stringers begin. Annoyingly Classic Airframes also copies this error[as do Pegasus and AZ...]. Not an easy fix. accurate restoration. I have a Hase fuselage I've been trying to sand in the correct shape. Made more tricky by butting up against a metal panel. I'm not sure how best to correct this. As can also be seen the fabric effect is not great, a bit 'skinny cow' the real thing has fabric taught between the stringers. and the other side, which well shows how the fabric should look, in particular look at the '7' and the highlights. look carefully at the yellow in the roundel, and you can just make out the tapes applied over each stringer. Now you know what too look for, here's a restoration, and you can see this clearly. Also note the spurious panel line on the Hase at rear of doghouse. from http://www.britmodeller.com/forums/index.php?/topic/234967342-best-148-hurricane-kit/ The above show what a good job Airfix have done on representing the fabric though. more checking and looks like there is a problem with the DH spinner...right shape but too long, but looks fixable... more later... PS - the 'other' new 1/48 kit was the Italeri one, which is an exercise in spot the amount of errors we can make. http://www.britmodeller.com/forums/index.php?/topic/234935596-sea-hurricane-148-italeri/#entry13902133 points
-
the model is the old promodeller updated with the kit verlindeen, I homebuilt all accessories, ladders and sawhorses, the model is represented in alignment weapons and maintenance3 points
-
Following Hughes OH-6A presented here on April, a new Vietnam aeroscout is coming from my bench. This mid ‘80s 1/48 scale model by Esci is pretty good although its age. I got a lot of work inside the cockpit, none the less outside, with an Allison engine taken from the CMK resin set and modified for a Bell machine. I used Testors enamel colors with artistic oils and chalks as weathering. As reported in Print Scale decals sheet, the example 68-16761 (callsign 'Inferno 761') of Casper Platoon is taken in 1970, just few months after delivery, so that I chose a semi-matt finishing. Following Casper Platoon official website, I got a small diorama according the Landing Zone (LZ) English homebase during Vietnam war. Pilot from Plus Model. Enjoy, Alessandro Rome3 points
-
Wait you will have to Daniel. Have to tidy up the paint work and put back the Gun hatch's. Will not need them extra's I have been pestering you for lol. Some pictures however of the block & tackle for the boom. These blocks are from Syren models,' they work to with care'. Can adjust when all is in place. foxy3 points
-
Thanks, guys, for the positive comments. Up 'till now I've been using my old Blackberry Playbook to log on to BM and Photobucket, etc. But, as posting photos could be problematic, my wife has offered me the use of her laptop and, wow!, the photos I've posted so far look huge. Logging on to Photobucket in a minute to see how I get on with posting using this laptop. (pause) Ok, then, much easier than using the Playbook. Photo is of strips of veneer glued together for trying my hand at a little prop carving. Not really trying for the striated dark, light, dark effect as of the many contemporary photos of the Camel I've looked at none had that sort of prop. Different shades should help in achieving a symmetrical carve, however. Cheers, DMC3 points
-
Thanks! It took several sessions over several days, but mostly to allow for the setting solutions to do their work. There are not a lot of decals to put on, it's just a lot of time fettling with them for final position, etc. For example, the blue areas consist of just five decals (not counting the splitters which are painted). I started with the two around the cockpit, in order to make sure the cockpit outline aligned properly. I was concerned that the spine decal would be an issue, since it had to align with the two decals on the front and the base of the vertical tail on the aft end. I shouldn't have worried, the spine decal fit perfect! Thanks! I think it will turn out OK. I'm always going to think it isn't finished without those stencils - I'm fighting the urge to find an aftermarket sheet and put them on anyway! Yeah, I hate thick stickers like T-Rex hates doing push-ups. Cheers, Bill PS. I'm not sure I'll have enough time to finish this before the deadline, but I'll do my best!3 points
-
Heller 1/72 F.1C 33-TM 3/33 'Mochelle' 1991 Op Daguet, Carpena Decals Both Together.3 points
-
Aaaaaaand: My second build is also complete: Caudron C 460 from JMGT in 1:48. Build thread: http://www.britmodeller.com/forums/index.php?/topic/234980222-148-caudron-c-460-air-racer-jmgt-resin-kit/ As it started to rain this morning I just took the three pictures above... Rene3 points
-
Potzez 53 from JMGT (resin kit in 1:48). Build is here: http://www.britmodeller.com/forums/index.php?/topic/234978587-148-potez-53-air-racer-jmgt-resin-kit/ Pictures were taken outside this morning in a hurry. So sorry for the quality of the pictures - though it helps to hide flaws ;-) René3 points
-
This is Hasegawa's 1/48 FG.1 in the Black Mike scheme using a combination of the kit decals and an Xtradecal sheet. Build thread here: http://www.britmodeller.com/forums/index.php?/topic/234981288-mozzys-interpretation-of-black-mike-is-complete/ Sean3 points
-
thank you all I laid down some Mig oil this morning . this evening I cleaned up little bit . I will let this set for day or two . Then spray some matt clear .. Enjoy Rick this morning This evening .3 points
-
Airfix 54mm (1/32) French Legionnarie 1908 - OOB Build thread HERE3 points


This leaderboard is set to London/GMT+01:00