
Leaderboard


Popular Content
Showing content with the highest reputation on 07/07/15 in all areas
-
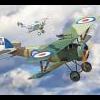
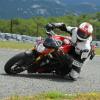
Because of the heat (and lack of time first of all) I will be not able to finish my Blenheim in time. So I took my long-time project and I managed to finish my Gladiateur. Xtradecal decals, Tamiya TS-30 applied with my trusty airbrush. Thank you for looking.23 points
-
Hi Folks This has to be one of the easiest kits I have ever built,the engineering of this is brilliant. i had laid a few of these in for the wings to use on the Academy F86 kits but thought it was time I built one just for a change. The decals are from Eagle Strike,painted with a mix of silvers,most of the pictures of F86D's show a very bright finish but the photo's I have of this aircraft show it to be somewhat more subdued. Ian21 points
-
Quick build almost OOB, only for my own pleasure... WIP (If interested), you can see here : http://www.greenmats.club/topic/553-cessna-a-37a-dragonfly-trumpeter-148/?page=1 Thank's for your attention, Sergiy (48).16 points
-
Hi everyone! This is my MIG-29 (9-12) Fulcrum of Italeri in 1/72. This was a beautiful kit to build, good fit, overall very accurate and detailed. I added some detail to it, Pavla resin interior, Eduard PE, and Authentic Decals sheet. I also added some cables to the landing gear. The scheme belongs to an "agressor" soviet squadron. I coudn´t find any information or photos of these airplanes except for one, and another model built in the ARC forums. i have to say that to be correct to this scheme, it should be a MIG-29 9-13, but I realized after finished, because the decals didn´t say anything about how to paint it or to what model belonged. I hope you like it! Every critics or comments are welcomed. Best regards! Ignacio from Uruguay16 points
-
Here's ZD-A, P9317, of 222 Squadron, finished. On 1st June 1940, the pilot, P/O H.E.L. Falkus took off in pursuit of German bombers. He pursued them aggresively, but in so doing he went too far and went from hunter to hunted. He was engaged by Bf109s of I./JG26 and Bf110s of I./ZG1 and forced-landed at Le Touquet in northern France. Falkus was captured. He claimed to have damaged two bombers in the pursuit, but the claims were never substantiated. Falkus spent the rest of the war in POW camps, including Stalag Luft III. He did support work on a large number of breakouts but didn't go through the wire himself. One particular highlight of his time as a POW was baiting his captors by killing the commandant's cat and cooking it in a stew... After the war, Falkus worked as a screenwriter and producer for the BBC's "The World About Us" natural history programme, collaborated with the Nobel prize-winning biologist Niko Tinbergen, and wrote many books on fishing, including the indispensible "Sea Trout Fishing", for my money THE greatest book on angling, ever. This is the Airfix 1/72 new tool offering, built more or less out of the box with a couple of embellishments. I did the nose band in ident red. This matches the tone in the B&W shots of the captured aircraft, but of course this cannot be said to be definitive. The aerial is brown EZ-Line, coloured with an artists' pen. Seerials are home-made and the codes are from Xtradecal. I went with essentially no weathering, just a light shading of the panel lines with oils. Even after a fight and a forced landing, Falkus's aircraft looked to be in very good trim. Black/white undersides with silver painted fuselage and tail as per the photo. The only build additions to the kit are a Sutton harness and head armour in the cockpit. The dates are such that Falkus was shot down before the introduction of the seat armour. Effort at a wartime-looking shot:15 points
-
Hi all, here is another of my older builds, Airfix's Curtis Hawk from the "Under the Red Banner" Club set. The model represents a lend lease P-40 originally intended for RAF use, flown by Hero of the Soviet Union recipient who's name escapes me. The Airfix kit is a well detailed easy build OOB. I applied winter whitewash camo from a rattle can over brush painted basic camo colours. Internet sources show different degrees of white coverage so i used "artistic license" with my interpretation. All comments welcome.14 points
-
Hi Folks, this time I introduce you my F/A-18C Hasegawa 1/72. I read several reviews of this kit and were all positive, at least the in-box reviews. When I started it was a very promising kit, althought I saw the assembly problems on the fuselage joints and the vertical fins. There was a gap of about 1 mm all along the lower join in one of the wings, the intakes had terrible fit and the quality of the main undercarraige is very poor. I actually don´t mind this too much as long as I can build it with some pleasure, but there was none... When I wet the eagle decals, these cracked in microscopic pieces.... I´ve should choose the Marines version... Anyway, this is the finished model. I used Eduard PE for the canopy and made the intake covers. The HARM missile comes from the Academy F-16C. The pre and post-shading almost went gone when matt varnished. I hope you like it and every critics/comments are welcomed. Best regards. Ignacio from Uruguay13 points
-
Hi All, Revells 1/72 F-101 "Voodoo" built straight from the box and painted with Xtracolor Enamels. Cheers Brian13 points
-
Hi everyone, as I explained I am a newbie to this site, but have been model making for a long time. I normally make military vehicles, but now and again I have a brain storm and make an aircraft. I fancied doing a Buccaneer in Gulf war colours, as they got really dirty and weathered in service. I have never weathered an aircraft before, nor have I done the pre-shading bit before either, so thought I would have a go. Of course we all know that the Airfix kit is pretty bad, it takes a lot of filler, rubbing down, patience and perseverance, but we got there in the end. It is sprayed with Humbrol 250 desert sand (or desert pink as it is sometimes known as). The weathering was carried out by using Humbrol washes, weathering powder and some artists oils. The panel lines were done with a pencil. Cheers, Laurence Member of IPMS Abingdon.12 points
-
Thanks Julian, I've never heard of the Talens stuff but will definitely give the Vallejo a miss (if I should ever use up this bottle of masking fluid) Thanks Bruce, I just find it easier to apply the Dark Earth first and get a nice layer as a base for the Dark Green; the Dark Green I brush-paint because I am lazy and it avoids having to do a complicated masking job for the disruptive pattern, and because I find it strangely absorbing and therapeutic I think so Sarge, thank you, I hope I won't be delayed for the BoB GB start by more than a couple of days... Thanks Tom, really it is not false modesty when I say that good quality paint, adequately thinned is my secret, I really don't have any special talent for brush-painting; I use dirt cheap nylon brushes and thin the paint with the same white spirit I use to clean my brushes in... so it must be good paint because everything else ought to give me a poor result Speaking of which (paint I mean, not poor results I hope) I applied the second coat of Dark Green: I think I'll have a look when the light is better to see if I can get away with that or if it needs a third coat... so later it will be either a coat of Dark Green or a coat of Klear to prepare the surfaces for the transfers... Cheers, Stew9 points
-
Hello all, It's been about a year since I last posted an RFI, as I have been chipping away at Hobby Boss' magnificent P-61 Black Widow, augmented by... * Avionix resin cockpit and gunner's station set, and radar operator's compartment * Eduard photo-etch interior and exterior * Radu Brinzan seat belts * Miracle Mask custom serials, and stars and bars So, having done all that, what was it like? The cockpit was a real trial, trying to combine the best elements of each of the resin, photoetch and OOB features, as they all have their strong and weak points. Strongest point for me turned out to be the opportunity to make errors... cock it up with resin and it's OK because you can fall back to photoetch. And if you haven't sanded away the plastic, you might yet be able to revert to OOB. Go on, ask me how how I came to this conclusion? It was hard work getting the fuselage to close up with the resin onboard, in the end I had to install a shim of plasticard and fair it in, but having the gun access and undercarriage doors open means you can't tell it is ever so slightly podgy. After humming and hawing awhile, I decided *not* to go for broke and weather it heavily. Instead, I just relied on the effect you get when brushing Klear over extremely matt Tamiya NATO black paint to give it a semi used look. I didmake liberal use of Citadel washes around the interior bays and the engine, though. So, on with the show. 3 overviews... A couple of views into the cockpit. The 'H' shaped radar aerials on each side had the original plastic mouldings replaced with straightened out rioja-bottle wire - it's the gift that just keeps on giving! Drilling holes through the two 0.5mm diameter horizontal arms gave my pin vice and me a slight work-out, I don't usually get that precise! The radar operator's position. Sadly, not much to see for quite a lot of mucking about with very fine tipped brushes and washes, but (all together now) "I know it's in there..." The eagle eyed might have spotted the nose cone isn't a great fit. That's because I thought I would have a go at making up some *entirely ficticious* wiring around the dish, courtesy of more rioja wire, then leave the nose detachable. Same bottle? Who can tell... It took *a lot* of grinding with the Dremel to thin down the interior of the nose cone to allow it to fit, and even now, if you look at it sideways it drops off without a moment's hesitation. I also dressed up the undercarriage with a bit of fuse wire. I originally started with the Eduard PE, but didn't like the two-dimensional effect it gave so replaced it with fuse wire (Rioja wire just doesn't seem to have the strength to carry brake fluid!) One of the engines (they can both be exposed), showing further liberal application of Rioja wire. Yes, I know Hobby Boss neglected to supply exhaust stacks but I couldn't work out how I would plumb them in so did the sensible thing and turned a blind eye! Hobby Boss leave large voids in the leading edges where I suspect lights are supposed to go, so I plugged them. Also, for the first time ever, I acquired some Micro Mesh which allowed me to boldly sand the transparencies flush, and then restore clarity through polishing. Result! Phwoar! Waddaya think of them guns, then? And here she is, parked up with the Luftwaffe's contemporary solution to the same problem. Hope you like... Mike8 points
-
Another golden oldie that some of you may be familiar with... Heller's classic 1/72 Lioré et Olivier 451 French WW2 bomber. A good level of detail for a 50 year old kit, but suffering from badly aligned parts, particularly wing and fuselage halves. She needed quite a bit of teasing into her original shape, and I think she deserved a rescribe and rivet. There's a fairly accurate scratchbuilt cockpit and wheel wells in there, but no photo etch additions, simply because not much exists for this old kit when it comes to aftermarket detailing! Anyway - as always, any feedback and your positive constructive criticism is much appreciated. Cheers, Andy7 points
-
As my first entry for the GB I plan to build R6800 which was the aircraft flown by Squadron Leader Rupert Leigh. No special reason for this other than the fact that Leigh is my family name - no immediate relation. Anyway here is a shot of the kit box and decal sheet I will post sprue shots when I eventually make a start. I am going to be a couple of weeks late starting because I have to wrap some other builds up first, but I think there is enough time to complete it.7 points
-
Having great difficulty in typing this as I'm now cross eyed ! I have this morning managed to complete most of the rigging with the exception of the aerials. I doff my cap to you guys building fully rigged ships, do they allow sharp tools in the institute? The only saving grace was the Uschi thread, easy to work with. Except when you glue you super glue applicator mid way up a halyard or snip the wrong bit The proof as they say is in the pictures Even managed to make some turnbuckles Thanks for looking in............. I'm now off to lie down in a dark place I lied, I'm going to sit in the garden in the sun with a large (very) gin & tonic Kev7 points
-
Q: How do you eat an elephant? A: One spoonful at a time. Okily dokily, lets pick a spoonful: This marking option stood out: unusually small under wing roundels and an accomplished pilot with 4 kills during the Battle of Britain. He survived and rose to Wing Commander no less. Nothing added except belts and I have to scrounge an instrument panel which was sacrificed pointlessly to the 'orrble Airfix 1/72 IX many moons ago. (Edit) Found this reference shot of the actual plane courtesy of the interweb (public domain picture). Now I know which aerial mast and canopy to use, wonder if thats Sgt Jennings in the cockpit? Anil6 points
-
Marmon-Herrington Mk II 1/35 IBG Models6 points
-
Hier guys, I am sure you agree when I say that Reinhards and his fathers builds Reini presented over the Last weeks are an enrichment to this forum. Although not all builds shown have been built lately, their output is impressive. Kudos to Reini and his father! It's a good thing to see when father and son are both enjoying this hobby. Keep 'em coming guys. Cheers, Michael6 points
-
Yesterday i finished my first ship It is Academy's USS Indianapolis in 1:350 scale. I don't have enough expirience to say is this good model, or not, are details correct and that stuff, but it's my first and I am happy. The stand under the ship is home made with help from family and friends. The pictures are here so please leave comments no matter are they good or bad Thank you.6 points
-
Hasegawa kit with Aires resin cockpit, exhausts nozzles, Montex masking masks and Italian decals but I don't remember the producer's name...5 points
-
Hello everyone, revisting my chidhood memories of the Matchbox boxtop beauty "Dooleybird". She was the very first Mustang I ever built. 40 years later, I decided to do an up-to-date rendition of that colorful plane, flown by Flt.Lt. A.S. Doley from 19th Sq., Peterhead, April 1945. The kit is Airfix' P-51D converted to Mustang IV using the Freightdog resin set. The decals come from LPS Hobby Brazil (LPM72-09) and are of terrible quality. The roundels would not confirm to the surface structure by any means, not even with setting solution, and when I tried to gently push them into the recessed panel lines they simply broke up. In the end I replaced all roundels and the tail flash with items from an Xtradecal sheet and used only the nose art, squadron codes, serial number and the checkboard. Painted with Alclad II and Gunze/Mr.Hobby acrylics. Additional refinements by CMK. The Freightdog conversion is easy: just cut off the lower cowling and insert the resin piece. Some interior shots of the CMK cockpit: Thanks for looking! Have a great day! Cheers from Vienna5 points
-
For my second entry I will be using the Airfix E-4 kit and decals from Hannants 70th Anniversary sheet. As per my Spitfire post I will be late starting but will post sprue shots before I do. Box and decal shots, the option I plan to build is at the bottom of the sheet.5 points
-
My entry into the battle of Britain G/B is my second attempt to build a diorama showing a crashed luftwaffe aircraft from a picture found in the superb Luftwaffe crash Archive series by Nigel Parker and published by Red Kite. I did a crashed 1/48 eduard Bf 110 for the Bf110 single type G/B earlier this year and found it to be very rewarding and even my Wife ,Jenny took an intrest in it . I have chosen the Eduard 1/48 kit as it will fit in with my first diorama but would have liked to have a go at one ofthese in 1/32 . I now know that 1/32 scale sheep are alot easier to find and also cheaper !!! Here is the main photo i will be useing for refrance with the objectve to create the diorama to be as close to the photo as skill and affordability alowe. I have chosen this aircraft as it has some intresting damage and i think has been staged by the Airministry or RAF for propaganda purposes . I will explain my reasons in a later post. Some useful info like the number of .303 strikes will help (15 ) as its easy to go over board on battle damage . though i can find no pictures of the other side of this aircraft. Another inportant thing for me is the pilot Ff. Ltn Heinz Schnabel was only slightly wonded as i wouldnt enjoy the project if it involved a dead airman. I hope the sheep will help tell the story and also provide some humer. I know i could have used the Eduard 109 E-4 but ipicked up this E-7 trop from MJW models for little over £10.00 posted and i'm pretty sure i can get an E-4 out of itfrom all the parts. Chose the w/end version as i dont like Eduard colourd etched seatbelts . Bit of a suprise to find some little fabric belts so hope they work well. Now im thinking this isnt working out too expensive untill i realised that life would be so much easier if i got the two Eduard resin sets for engine and cowling guns as this area will be centre of attension for the project. think the two together came to arond £ 30.00 inc postage , dwalfing the price of the main kit . I think the cowling parts will be worth the money alone. nice and thin so easy to bend and shred. Costs started to sky rocket when i whent to market to buy the sheep 10 sheep and 4 lambs cost £24.00 Ok from the photo's i can see around 30 sheep so i have had to make a compromise These are not toy sheep but serious sheep for serious modellers Hang on iv got a sheep stuck up my nose !!!!!!!!! May use these two home guard left over from first crash Now need to find two 1/48 sheep dogs , a farmer and some white 6 decals with the correct shaped 6. These are my reading materials for the next few months Roll on the 10th Alistair5 points
-
I too am building Witold Urbanowicz's aircraft, using a rag-wing Airfix, some TechMod decals and loads of filler! This shot clearly shows I haven't stolen a sneaky march by applying a layer of filler over the raggy bits! I've got some plans printed out ready to do the rescribe that will be necessary post-filling, and to allowme to resite the landing lights. If anyone wants the relevant bits from the TechMod sheet that will do Flt Lt Kent's RF-J for the this group build (obviously less anything I need off the sheet), drop me a PM.5 points
-
Hello friends, This is a great kit from Revell. Very nice details, build was straight oob, excellent fit... Pictures: If You like, the rest of the details from the w.i.p. You can see in this video build on YT from start to finish: Thanks for looking! All the best! Dusan.5 points
-
Just finished this simple build - HMS Meteorite was a captured Type XVIIB U-boat (U-1407) - used by the Royal Navy to test the Walter High Test Peroxide closed-cycle engine that required no external air.... This is the Mikro-Mir box art.... The kit is the same as the existing MM Type XVIIB - with the addition of a new sprue for the revised conning tower and a set of RN decals...... The build is very simple....... here's the finished model ...... all of 12 cm long! I put a crew member on deck for size comparison.... It isn't the best 1/350 scale sub I have ever made - but it fills a gap in the collection. Ken5 points
-
Thank you guys. This one maybe:5 points
-
Thanks Nigel - great tip Arrived after an uneventful flight yesterday watching BoB 'the movie' on the way - great stuff! You know I don't like the heat? Here's the back display in the taxi: What the...! I will not be going out of the hotel! I'm in Madrid by the way. Well, at a conference centre near Madrid airport - I doubt we'll see much of the 'outside'. Madrid airport is a bit odd - we landed in formation with another aircraft. Initial thoughts of 'well, one of us must have it wrong' were replaced with relief when I realised there are two parallel runways - phew!5 points
-
Good moaning everybiddy. I will continue work on my big German bummer.................................5 points
-
Here is the first of my two entries to the Group Build. 1/48 Airfix Bf 109 in the markings of Gerhard Schopfel Caffiers August 1940. I'll be using the Altmark AM decal set, and a canopy masking set but other than that it will be straight out of the box. 9 Staffel wore the "Hollenhund" badge beneath the cockpit, which translates to the Hound from Hell, which is quite apt for the 109 I think. I chose these markings as it doesn't have mottle or the all yellow nose, and consequently looks quite clean for a change. Anyway, there it is, i'm ready for the off..."Horrido" as the Luftwaffe chaps might say!!4 points
-
my new model without landing gear ,-)) I invite you to comment ,-))4 points
-
Finally finished 9 years after I bought the model and at least 6 years after I started it! Academy Hornet Blackbox cockpit Aires front U/C bay Airs GBU bombs Zacto sidewinders Lots of Eduard etch SAC metal U/C Aires exhausts (undersized) Gunze Sangyo for all airbrushed paint, vallejo for cockpit and detail, MIG oils for weathering 2H Pencil for panel lines I made a LOT of mistakes but also learnt a lot on my first 1/32nd jet. I will pin all weapons next time for a start and do the windscreen and canopy ASAP. Many of the problems where just due to my inability to focus and complete the model. Therefore it lay around and got knocked around. Here is the WIP http://www.britmodeller.com/forums/index.php?/topic/234980177-132nd-academy-fa-18d-hornet-3715-calling-time-on-this-one/ This is my second completion this years (after a Trumpeter F-106) and I would not let myself move on until I had finished these 2 models. Next stop 1/72nd CMR Buccaneer (I am a huge Buccaneer fan and as some of you may know the lucky, privileging owner of Buccaneer XX894 as well as a member of the amazing Buccaneer Aviation Group). For this kick in the bottom and change in focus I must thank Steve (FRITAG), Neil (WOODY37), Bill (NAVYBIRD) and Andy (MELCHETT) as big inspirations on how it should be done!4 points
-
Good morning to all, I want to participate in this group with a 87 Squadron RAF Hurricane Mk.I, piloted by ace Ian R. Gleed. The plane shows the personal mark of Gleed, a cat named Figaro that appears in the Disney film Pinocchio, and that was his personal emblem on all planes in which he flew to his disappearance The kit is the Mk.I 1/48 Hasegawa Nightfighter, although I build day fighter. Like almost all models of this brand the level of detail is very high and the quality of finish is remarkable. I put the ceremonial pictures of the box and some content here. I will use some aftermarket as Eduard's RAF seatbelts WWII and a paint mask of the same brand that has not yet arrived. I hope to do a good job because both the event and the site deserve. Thank you very much to all and welcome.4 points
-
Due to the 100 years, a lot of new 1/35 WW1 stuff was and still is released. Here´s one of the old kits. Emhar kit built years ago. Was one of my dad´s first weathering attempts.4 points
-
This aircraft was reportedly seen in a derelict condition at Phenian (Pyongyang) airfield by Soviet ground crew around 1950. The story is certainly not beyond possibility as there were many Japanese aircraft left in Korea at wars end, with photographic evidence some being pressed into service with the North and South. I based the colour scheme on the North Korean Tachikawa Ki-54 that was captured probably at Pyongyang. The kit itself is showing it's age, although it's not that bad. I only had trouble with the fit of the windscreen which too some mucking about. The mix of raised and engraved surface detail is accurate and quite nice. Humbrol Matt 27 steel and Tamiya Khaki drab are the main colours, sealed with some future with an oil filter of white and yellow applied. I added to that with different coloured pastels, MiG pigment and a black chalk wash for the under surface. I yellowed out the canopy with a make up brush and Tamiya weathering pigments. Decals came from some MiG 15 decal sheets. The base is the case of an old clock, glued together and painted with a cheapie rattle can of black. The dirt is grout left over from bathroom repairs, spread around over the base then flooded with water from an eyedropper and left to harden. I added some MiniNature grass tufts and couple things from the spare box to fill a hole.4 points
-
Hi all,not a lot of time at the bench today but got the undersides decalled and bits and pieces added so she,s ready for matt coating.4 points
-
I can remember building the AMT XB-70 - it was finished and I had to touch up a small black area around the cockpit - so I was holding it delicately across my chest as I painted the black area. It was like holding and playing a balalaika.......... ..... Ken4 points
-
Would you believe my local K- market shopkeeper here in Lieto, Finland, has this beer in his stock and it´s not a large supermarket? Would you believe it´s not just because of me and my beer buying habits? Which reminds me of the need to resupply my, eh, essential Battle of Britain Group Build supplies before friday. Regards, V-P EDIT: I changed the pic to one of my own. I´ve had that Spitfire KIT intact for more than three years. The beer bottle, oh let´s not get into that...4 points
-
So, the $60K question.... what to do while I am waiting on more supplies arriving ?? Well, after a little bit of looking around, it was clear that I still have plenty to do before applying the decals. An easy spot was the handles on the sliding windows, well, at least the ones on the outside for the time being. Stretched styrene, and some brass rod came into play. You may also have spotted that I have butchered the nose intake guard.... the kit part had a round profile but the actual guard is flat on the front face, hence the butchery. More on that at a later date, once I've figured out what I'm doing! Then dark green was applied to the windows. I can't remember if the handle portion themselves were a different color or not... any ideas ? I still have to add the emergency release at the top, but I think that will come after the windows have been fitted. If you remember a while back, I made these two doobries... Well, they fit in here quite nicely. I also added the large duct in the rear bay. There's still a bit more to do in here but it's looking nice and busy if I may say so myself. I also added these two electronicky bits in the front end - again, a bit more to do in here but it's all taking shape now. I then repaired the tail hinge bracket which had broken off yesterday, adding the hinge rod, and also the "help the tail is open" warning flag The last two photo's are a bit gratuitous but I couldn't help myself..... First, the tail rotor (dry fitted!). there's a lot of touching up to do on this little beast, not least of which is the white section between the two reds on the silver blade. Yes, the main reference photo I am using for "H" (taken in 1982) does actually have three green blades and one silver - I thought it would be a nice touch to replicate that particular oddity. The mechanical gubbinsy stuff has been painted marine corps green - which is darker than the dark green, and added a touch of contrast. As mentioned though - there is still a lot of tidying up to do on these - I can't believe how fiddly the blades were to paint. And lastly, I threw on an oleo to see what it looked like..... Once again, I was very pleased with today's progress. Every little addition makes it look more and more like a Wessex - hopefully an HC2. The black on the underside is posing me some thoughtful problems just now - mainly, how to get the nice fuzzy edge, but in a perfectly straight line from tail to nose ??? I'm not sure blu-tack will be up to the job - I'd need to get a pretty even sausage about 200mm or so long. I have an idea involving tamiya tape and folding it back on itself - I may have to try a few things to see what works best. If I get time (and I remember) I'll try and get a couple of outdoor shots to see if the colors come up better - they always seem a bit lighter in the photo's - but definitely not pastels Bill !4 points
-
It was to be fast ...3 points
-
Hi Guys, there are some fantastic figure painters around, on these boards and in show competitions. After being inspired by some of your work and that of one of our club members, Mr Peter Watson, I have invested in some figures. But before I let myself loose on some of the resin in my stash, I choose an inexpensive but still one with great detail for the price plastic kit to break my duck in figure painting. I have to say I have really enjoyed myself with this subject and hope you think I have given it a reasonable bash - please be gentle:3 points
-
My second entry in the BoB GB. Old tool Airfix Hurricane 1. I have the new tooling but thought i'd do the oldie first to see how it stands up to all the new versions of the kit that are being modeled. I have a falcon vac canopy, and some AM decals for this one, other than that it will be oot the box! I am toying with the idea of modeling it on a clear plastic rod with the prop spinning and the wheels going up.... but i'll see how it goes. Markings are from Aces of the Empire sheet with one option of an unknown Polish pilot, which appeals to me as mostly folk model the aces aircraft. Anyway, heres some pics of the box n' bits!!3 points
-
The Hasegawa 1/72 F9F-2 Panther to be used in my 'November 9th' diorama is ready for inspection. I found the Hasegawa Panther better than the newer Hobby Boss offering, not to mention that we still don't have a decent -5 in the scale. The finished diorama will follow soon... The rest of the diorama will have a carrier deck with JBD and a NC-1 starter unit. Cheers! Rato Marczak www.ratomodeling.com3 points
-
Fujimi Enthusiast 911 Turbo. Paint is Glasurit Nougat Brown Metallic with Testor's Wet Look Clear. Rims are from Scale Productions. Hosted on Fotki Hosted on Fotki Hosted on Fotki Hosted on Fotki Hosted on Fotki Hosted on Fotki3 points
-
I found this by accident. Lots of good stuff. http://kiantecksan.wix.com/rafinsingapore#!images/ckiy David3 points
-
Here's a few pictures of R6800 which might come in handy: The last two are new to me. I only found them a couple of days ago! Cheers, Mark.3 points
-
It's the big cockpit windows on the P-1 - you imagine it to be a lot smaller than it is. A bit like that Brazillian transport3 points
-
Thanks John - yes I'm staying inside with the air conditioning! Thanks Crisp - you're probably right but even I think some things are a bit too much Day one is over and I have a little time before the 'networking reception' - free beer!! I personally think I deserve it after listening to some of the Americans murdering our language... I AM officially an old f*rt now. A client of mine refused to sign off a case study because he denied 'leveraging' anything. Then they started 'monetizing' things (I think it means trying to make money from something) but today they've gone to far. What exactly does it mean when you 'operationalize' something??!! Oh, I'm sorry, that's out of context, I should have typed 'they want to operationalize it, right?'. Makes me shudder... On a nicer note, I've ordered some Gator Grip (bottle of each) from Paul at Modelling Tools - had to email him but (as usual) he responded straight away - he has stock and it comes up if you search the site for 'Gator Grip' even though it's not in the glue section when you use the menus. Added two bottles of VMA DE and a 'duck egg' / Sky / bluey colour (71.009) ready for the BoB GB - I'd hate to run out!!3 points
-
ok folks, here´s a teaser what´s up to come in the near future...3 points
-
Hi, This is my latest work - Eduard's Spad XIII late in 1/48th scale. Very nice kit while still in the box, but once assembly has started... Let's just say I haven't build a model kit that's as complicated and demanding as this one. Profipack box, PE and some masks included. Gaspatch spanners were used as well as EZ Line for rigging. Rudder and roundels were masked and painted to match. Few pic while in progress... And few pics when it's done... All comments and critiques are wellcome. It'll be helpful on my next project - WNW Felixstowe in 1/32. Regards, Kristijan3 points
-
Welcome back, It has been a while, as I have been sorting out some personal matters after my father passed away in late May. I also haven't really felt the urge to build or record the build, but he was my inspiration into starting the hobby, so time to get back on the horse! The main construction is finished with the cockpit installed, wing uppers, lower fuselage, tail assembly and lower engine cover all in place: The horizontal stabilisers required a little bit of "Perfect Plastic Putty": As did the lower fuselage insert at the front. The retracted wheel covers have been stuck in place with some blue tac as a mask: The wing root joins are almost flawless. The starboard seam needed a little bit of sanding at both forward and rear lower ends as it sat a bit high. But after a few swipes and dry fits it came together nicely. The port seam had a slight step where the forward lower cowling joins but I fashioned a spacer from some sprue, inserted it through the lower nose cavity whilst it was still open and it ended up great so it leads me to believe it was ham fistedness that was the issue: There is still a bit of work to do at the forward wing join: These shots are to show you how delicate the ribbing is on the fuselage, much lessdefined as the trough and valleys of other manufacturers: I have also completed the prop and spinner, filled some minor seams in the spinner joins, white undercoat, then MM Insignia yellow and masked in preparation of the black: Then popped on the prop and a quick sortie to the sounds of "takka, takka, takka"! Thanks for looking3 points


This leaderboard is set to London/GMT+01:00