
Leaderboard


Popular Content
Showing content with the highest reputation on 02/06/15 in all areas
-
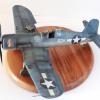
G'day people, I have just finished this little guy. I built it for my club's F-16 build challenge. The turned brass pitot and alpha probes are aftermarket as well. The kit includes a pair of AIM-9's but the details were a little chunky so I swapped the kit supplied one for a better item from Hasegawa's weapon sets, which also supplied the TACTS pod. The driver received some seat harnesses but apart from a re-positioned head was otherwise stock. I kept the weathering pretty light as these birds looked pretty well maintained. Most of the grime was limited to the lower fuselage aft of the main wheel bay enjoy, Pappy16 points
-
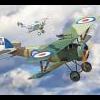
Hi guys, heres my first RFI on Britmodeller which I finished a few months ago.Its the old 1/72nd KP Models kit depicting a Polish Air Force machine I saw outside the "car park" area of the Polish Aviation Museum in Krakow a couple of years ago.Raised panel lines were removed & rescribed,riveted in parts.Airbrakes cut out & replaced by scratch thin metal/plastic/Milliput & Albian Alloys tube.Cockpit detailed a bit with scratch bits & canopy fogged by accident but restored to reasonable visability for the scene & inside has a thin coat of Tamiya Smoke.All gear doors replaced by scratched plastic sheet & nosedoors by thin metal sheet.Doors detailed with copper wire & a tyre punctured & shaped with Mr. Surfacer.Droptanks modified with milliput & reshaped a little.Canon made from Milliput worm.Pitot tube replaced by brass tube.Painted using Tamiya acrylics except for a little Humbrol Metalcote on a bit of the canon.I tried a few new techniques to me like salt weathering on the tops of wings & tailplanes (a little overdone) & hairspray technique on the fuselage,fin & droptanks.Insignia & codes were painted & hairspray tech. used again. The base was scratchbuilt using plastic sheet.Halfords grey undercoat spray & pastels.Weeds are made with static grass,paper & real moss.Chock made from paper. Cheers for looking, Jimbob.15 points
-
Finished ready for Model Expo 2015. 1/72 Airfix B.III Lancaster finished as a B.I 'G' for George of 460 Squadron RAAF with RAF Resupply Kit for bombs and tolleys. Type: AVRO Lancaster B.I Serial: W4783 AR-'G' for George Based: 460 Squadron RAAF, U.K. - Various bases. Scheme: Standard British Lancaster scheme. History: Built in 1942, 'George' completed over 90 missions with great success whilst with 460 (RAAF) Squadron based in the UK and is distinguished as returning every person who served on him 'home'. He was later donated to Australia as a War Tours aircraft before being retired to the AWM. The variation in scheme of this model is how he was restored after being withdrawn from display in 1999 and stripped back and now on display at the AWM today. Kit: Airfix Lancaster B.III 'Dambuster' (OOB) back dated to B.I from kit parts. Decals generously supplied by Airfix. References: ADF Serials, Internet, Peter Maloney and personal images12 points
-
This is a nice little kit, which builds well. Compared to the drawings and photos I have, it seems very accurate. It suffers from very deep panel lines, heavy trailing edges and no cockpit detail. I sorted those out, and here's the result. The D520 was the best of the French fighter designs of he early war. Had more been available, the Luftwaffe might have found life substantially more difficult in the battles of 1939-40. After the fall of France, D520's served with both Vichy and Free French units, and were used by the Germans in the training role. Numbers of completed aircraft were sold to Italy and Bulgaria. The Royal Bulgarian Air Force received around 100 examples (sources vary) in 1943, first flying in combat in November of that year. By this time, the D520 was largely outclassed but the Bulgarians enjoyed some success against P38's and B24's. The D520 seems to have been respected, but not really liked, by its users. The Italians regarded it as a "good, but not great" fighter, liking the cannon armament but considering that it handled poorly compared to domestic designs. German reports noted that it needed a "very light touch" on the controls to avoid dangerous loss of control. The great Eric Brown was more forthright, describing the type as "a nasty little brute". The colours are RLM 74/75/76, mixed from Tamiya acrylics, while the markings are spares box and home prints, depicting an aircraft of the 6th Fighter Group. I've gone with minimal wear and weathering, just a little to try to give a sense that the aircraft were actually used pretty hard, but well-maintained. The smoke around guns and exhausts is what might be seen just after a couple of closely-spaced sorties, whereby the ground crew didn't get the opportunity to clean her up in between. These last three are an effort to try to recreate wartime photos:11 points
-
Kinetic kit, Xtradecals. I had a lot of fit issues with this one..10 points
-
All done. Excuse the quality of the photos. Bugger! I forgot to paint the crown!! Where DO those pieces of fluff come from? Thats it. Definitely the best way to find faults with your builds is to take pictures with a macro zoom camera! Cheers until next time Bye for now.9 points
-
Hi! Here is my latest build completed in just two months. It is the Hobbyboss 1/48th offering. Despite shape inaccuracies, the kit is still enjoyable to build. Few parts, good fit. I reworked some points: - File down bumps forward the engine fairing on the upper side - rescribe the too thin panel line - add riveting Paints are Gunze and varnishes are Microscale. Decals from Caracal to depict the real PAV2 prototype, while kit decals are "what if". Some pics: Hope you will like it! Cheers Romain8 points
-
This is The Savoia S.21 Seaplane from the cartoon film Porco Rosso. The kit is 1/48th scale made by FineMolds. The WIP link is here. http://www.britmodeller.com/forums/index.php?/topic/234979607-porco-rossos-savoia-s21-seaplane/ Thank you for looking, Joe8 points
-
May I present my rendition of the Eduard Me110C-6 (1/48) of 1./Erpr. Gr. 210 August/September 1940. I view the Eduard 1/48 series of Me110s as the best value around. Yes they have problems i.e. the awful wheels and the slightly narrow rear fuselage but compared to the cost of their rival Dragon kit win outright!! My model used Mastercast wheels, Quickboost exhausts, Master metal gun barrels and Eduard Me110C photo etch sheets. I widened the rear fuselage, cut out the slats, removed the glass panel from the rear of the gunners canopy (as per the actual machines). I also added extra detail with some lead wire. I decided to show the MG101 cannon uncowled and swung down for maintainance, to hide it would be an injustice to detail it has. Aiso I left the gun cowling off, one day I might construct a diorama round the model. I painted the model with Hakata paints RLM70/71 and Pollyscale mix for RLM 65. I am not at all certain of the end results to my eye it looks as though it is painted 81/82 I thus reserve judgement on Hakata paints!!!!! I also finished the machine as blue N as far as I can make out there are no photos of this particular machine, so the possible 'odd' 70/71 finish can't be disproved (I'm sure someone will though). So there you have it my 3rd Eduard Me110 built and 3 more to go. Andy8 points
-
Most recent build, and my God what a pain this one was!!! Redux Models rebox of the Trumpy 1/32 P-47D. Helluva lot of poor fit issues with this kit. In the end, I kinda rushed it through to get it out of the way! White is Halfords Primer, underside sprayed with Humbrol 165, topside camo hand brushed with Revell Aquacolours.8 points
-
Four more days until retirement...woo hoo! Cheers, Bill8 points
-
Not the best kit in the world and not the best build but it is a good size and at current prices it had to be done. Airbrushed with Humbrol Enamels, looks OK but my satin cote is coming out too glossy for some reason ?? took under a month to build, hope you like, enjoy...7 points
-
I've always fancied the look of Germany's 8 wheeled armoured cars. The Sd.Kfz.263 is so ugly its appealing AFV Club's is a bit of a strange kit. It has great detail. The suspension and steering is designed to work, until the steering rods are fitted then it becomes fixed! The plans are confusing, with parts being mis-numbered, and even call outs for parts that don't exist. But it goes together well, and has the scope for loads of extra detail. I painted it as a DAK vehicle so I could give it a battered finish. The early DAK vehicles arrived in Libya still painted Panzer grey and were painted a sand colour by field maintenance units. Sometimes, if paint was unavailable, sand was mixed with water and plastered over the grey, as can be imagined, this did last too well. My model represents a vehicle painted locally which has worn away from wear and tear and crew movements. I used Humbrol enamels, painting the model Panzer Grey first then applying patches of liquid mask before spraying on the desert yellow. Once all dry the liquid mask was scraped away to start the weathering process. Various washes were applied on top of this to apply further wear and tear. Not too happy with how the tyres turned out. They are vinyl items and they seem to have reacted with the varnish and wont dry matt. Might have to give them a dusting with pigments. The figure is a Dragon item, and the air recognition flag is made from paper and decals. click image upload imagen image ru how to use print screen free photo hosting windows screen capture adult photo sharing image hosting no account screen shot on windows image sharing img Thanks for looking7 points
-
One of my least favourite jobs, namely reinstating lost panel lines. My usual technique is to draw them in pencil first (thus giving room for errors without having to refill bodged lines and start again), so some of these are just pencil, some re-scribed: There is still some filling and sanding to be done around the joins of the booms, but I generally find it easier to reinstate lines every so often throughout a build, rather than wait until right at the end. It may not look like it, but the upper part of this aircraft is making great strides towards getting a complete layer of primer - always a great moment. It looks really messy, but that is partly because this is a mixture of plastic and resin, with a fair amount of PPP and Mr Surfacer to tidy up the joins, and partly because of some earlier experimentation with colours. Once I have got the major bits done, a full-on session with micromesh will unify the whole surface, ready for primer. More soon. Crisp7 points
-
Thanks Van. I know what you mean but then this is still delicious, even if it is a trois feuille really Found some masking mojo tonight: Tamiya tape for the demarcation lines, Blu Tack for the bendy bits then fill in the gaps with cheap masking tape. I still have the engines to do and I'm tending towards templates as, once I've got the shape right, I can cut four at once... bending tack is driving me mad!!7 points
-
6 points
-
Hi All, After quite a battle (mainly with the gun covers - anyone building this will know what I mean!) that left me with a mojo shortfall I took advantage of my wife being away for a few days to finally get to grips with it. It's a pretty challenging build but I think the outcome is something that looks like a Dora. The Eduard kit I chose had markings for quite a few aircraft and I chose this one as it was based near Celle - a special place for me as that's where I did my PO's visit so many years ago. All OOB (it was the Profi kit so it came with some nice PE anyway) and finished with a variety of paints - Tamiya, Humbrol and Vallejo Model Air. I couldn't find an explanation of the patches of underwing NMF anywhere. I read plausible explanations of full wing or half wing NMF but the colour call-out for this particular aircraft had this strange scheme that doesn't even follow panel lines. By this time I was happy to throw in the towel and hope that Eduard's researchers could be trusted! Weathering was with a selection of washes, silver pencil, Tamiya Smoke and pastels. I'm still not totally convinced about the RLM 81 on this model (I used Humbrol 251) but, again, I was happy to have the mojo sparking from my fingertips at this point in the build! I used Winsor & Newton's matt varnish for the first time and love it. I find it gives a nice control of the depth of matt-ness all the way from quite a shiny satin through to proper, powdery matt. Enough chat and on to the pictures. I hope you enjoy them and please do feel free to pass comment and constructive criticism. Up next - a break with Dragon's 1/144 X-15. Something that small has to be easy, right?! Cheers all, Roger6 points
-
Hi folks, this is Special Hobby kit built with CMK resin sets as 800.squadron's machine that took part in aerial operations during Korean war. The full build report will appear in coming Valiant Wings Airframe Extra publication. Cheers Libor6 points
-
Not really got back to them Guy They've been mostly losing the competition for leisure time with other things at the mo'. We've been trying to get out into the Dales or the Moors on the bikes as much as possible when the weather's been fine - what's the point of living in 'God's own Country' unless you make the most of it? Also I've been trying to brush up the rusty skiing skills at snozone in Castelford (30 years rusty!) - hoping to go skiing in the New Year with some old RAF chums and its V V important not to be too embarrassingly awful....... So - one way or t'other the poor old boy's been a bit kn*ckered in the evenings...... I have been fingering the plastic a little tho'. Enough to find the surface detail on the Hawks rather disappointing. After the old chippie and JP5 mouldings I was hoping that the much more recent Hawk tooling wouldn't need much work on stuff like panel lines and moulded detail. Wrong..... There are some pretty awful trenches moulded in, and some curious recessed sections on the spin and underneath of the fuselage (possibly due to wear on the moulds?): So I've put some thought in to what to do. Keen to avoid 2 x rescribes if at all possible I'm using one of the 2 Hawks as a test bed. I've filled the curious and inaccurate recessed details on top and bottom with sprue dissolved in liquid poly (as recently discussed on Tom's Hunter thread IIRC) - the aim being to leave a consistent surface for any scribing that I need to do later: Sanded down and polished up OK And I'm trying to reduce the trench like panel lines - without filling and rescribing them - by masking and spraying with Halfords Filler Primer and cutting it back. Hear after one coat: And here a second coat before cutting back: If I don't get nice neat panel lines I may have to revert to the dissolved sprue - which I've just discovered with testing on a scrap fuselage can quite neatly be applied along panel lines with a hypodermic needle Sorry for the lack of progress chaps.....6 points
-
Hi, Almost 10 years ago (in past dark times ) only Airfix and Matchbox/Revell (old) models of Halifax were on the market in 1/72 scale. Both were far from perfectly of shape, what one can learn from this forum as well. Airfix kit has for example wings shifted for about 6 mm. But it has more or less correct shape of assymetry in front fuselage and canopy. The Matchbox (old Revell) has to small assymetry of front of fuselage and canopy). There are problems with position of hatch, size of engines, etc... I wanted to do two Halifax models (with Bristol and RR engines) with improved shapes. After study of plans and models I decided to do both models... from Airfix kits! I have to shift wings and do a lot of conversion with radial machine (I have used some resin copies of Matchbox parts as basis for improvmets). I made such decission because I wanted them to be different only as orginal machines were, not be affected by mistakes in kitl shapes. Since I wanted to make models of as different as possible I decided to do as RR driven one as the AMkV, serial DG396, QQ of 295 Sq RAF, Holmsley in June-September 1943. This machine was attacked by a group of Ju88C over Bay of Biscay while it was transporting Horsa glider to Africa. The Horsa released herself and set on Ocean (people survived) but Halifax was fighting with Junkerses and aurvived, shoting down one of Ju-88. It has striking feature - the outer engines are with four blades propellers. And it has dowty u/c. The second is BMkVii, with rounded-ends wings (larger wing span), This is PN230 EQ.V, "Vicky, the Vicious Virgin" from 408 Sq RCAF Linton-on-Ouse. The nose-art decals are hand painted by myself. Sorry for one mistake I know and I did not corrected yet - i think that the u/c doors should be black (night) from inside... I hope you enjoy them Regards Jerzy-Wojtek AMk V And BMkVii Edit - I mixed up photos with bulb light and with sun light during Edit in 1Aug 2017.5 points
-
Nice, no fuss, quickie little build. Cracking little kit, hand brushed with Revell Aquacolours, and HB pencil used for all those wee squiggles! Oh, And I haven't gone goth. That's just primer on me thumb nail!5 points
-
If I posted this before my apologies. This was the last car I drove before retiring in 2007. Naturally I had been given a brand new car the day before I turned in my retirement paperwork. This is the Revell Snap Kit painted and marked like the one I drove. Decals are a combination of Chimneyville and homemade. I used parts from the kit and my spares box to replicate the laptop and radio/siren boxes. G5 points
-
I've finally finished a model of my own for the year, although I could have picked a better kit to start with. I bought this for about 9 bucks years ago when it was about the only Mirage III you could buy in the scale. I had visions of converting it into a Mirage V Dagger, but with the coming of the new Kinetic kits, I don't need to do that anymore. There isn't much to say about the plastic, apart from; it's a poorly detailed, ill-fitting, obsolete relic. A Britmodeller member was kind enough to send me his leftover decals from the Eduard kit and these were really nice to use. If you have this in the stash, just buy the Eduard kit. I did get the pink a little dark, but it'll do.5 points
-
Pushing forward today, I'm gonna keep putting small updates on as I go! Firestreaks are done. Thin wash with a black and I sprayed the seeker heads with tamiya smoke over and over again to get the dark but still transparent look that I've seen on some of the photos. This would of been easier if I'd painted the mating face between the clear part and the body black first. and attached. Nosewheel is now on as well so it's sitting on it's own gear! Bit of a height difference between the two sides, guessing I haven't aligned the slight flats on the wheels correctly as once matt black, its fairly hard to see them.5 points
-
I was lucky enough to have befriended Merv for the last few years of his life. I knew of him on here but first met him at the animal sanctuary he was volunteering at. He had a soft spot for the feral cats, whom the centre manager didn't have much time for, and he got me and the wife involved too in the ferals, just to pee the manager off! He treated them like his own though, he had a very loving heart for cats. I was also with him the day he was diagnosed with leukaemia. The wife sorted him out with his benefits, as he had been living in near poverty when we met him. The extra money at least gave him a bit of comfort towards the end of his life as it meant he could feed and heat Daisy without worry. One thing I am particularly glad to have done though is help him find his Mum's grave. We used to drive a van loaded with dogs from NI to Kenilworth in Warwickshire to the Dogs Trust there. These were dogs who would have been destroyed here but fulfilled the demand for pets in England. Merv made many of these trips, and with a vanload of 20 dogs on average, he saved hundreds of dogs in his time. Anyway, on one of these trips he said he wanted to try to find his Mum's grave in a cemetry in Solihul, where he was originally from. Armed only with a 20 year old photo, I managed to work out where it was for him. I'm good like that I'm just glad he found it, it was his last trip with the dogs, just before the leukaemia. The wife and I drove him to and from hospital and looked after Daisy when he had to stay in. To show how big hearted he was, he even cried in front of us when he thought of leaving Daisy for a few days in hospital. He beat the leukaemia the first time, but unfortunately it came back stronger. I'm just happy to have been a friend even for such a short period. He was one of the good guys, the type who dies far too young. RIP mate.5 points
-
Hi mates, lets now facing part two of my "Meatball Series" Today you will get an captured B-339D, ex Netherland Airforce. This plane was tested by the japanese in 1942 at Java. The Kit is Hasegawa, the new sternpart and tailwheel is quickboost, Decals are "Flying Papa". Hope you like it.4 points
-
Just a little late for the Seaking group build, but here is my model of an Indian Navy Mk.42A - The Indian Navy has been a prolific user of arguably the most versatile naval helicopter ever - the Seaking. The Navy started operating Seakings just before war broke out in late 1971. Over the years, it acquired several different types to fulfill a range of roles from ASW to Special Ops. The model I built is of the rather unique Mk.42A variant that IN acquired in the late 1970s to complement the ASW capabilities of the last two 'Leander'-class frigates then being built locally. These were analogs of Royal Navy's HAS.Mk.2s with six-bladed tail rotors unlike all the other variants we have had. The Seaking Alphas were specially equipped with RAST (Recovery Assist, Secure and Traverse) systems for easier shipboard handling. The base kit for the build is Revell AG's superb Seaking Mk.41 in 1/72. This is by most accounts the best rendition of a British Seaking you can buy in this scale, though it look a bit of work to be made relevant as a 42A. The changes needed were - Back-dating the composite rotor blades to be the older metal type, sanding off chaff/flare dispensers in the rear without hurting the rivetted surface, sanding down fairings on the nose panel, re-arranging antennae placement and then scratch building some and plugging some windows to match pictures. The instructions are almost pointless beyond the first few steps. In addition to the changes required, I made some fairly drastic (for me!) modifications to stow away the rotor blades. The model has some additional surface details added in terms of cables and external wiring. The model is finished in the dark sea blue and gloss white finish of the original Seakings. The biggest challenge was getting the (white) decals right, most of which are home-made. All in all, a fun but challenging build. Hope to see more Indian Seakings follow this one.4 points
-
Hi, So I thought I'd just post up a couple of quick snaps of the first Gnat now I've finished the Decals over the weekend. I can't decide on if I should weather her or not as they're so tiny in this scale. The canopy isn't actually fixed in place at the moment as I still need to pop a couple coats of Klear on to seal the decals, which is why theres a bit of a gap. It's a pity the orange bleeds through the roundels a bit and theres one or two other things I'm not happy with but on the whole it came out ok. Still at least I should be able to fix the things bugging me on the 2nd one's build! Any advise on weathering would be greatly appreciated Edit: I just noticed I haven't fitted the aerials on the spine LoL - oh well I will get that done tonight I suppose! Edit Edited: Antenna fitted, photos switched to new ones LoL Thanks for looking! Mark4 points
-
Hi folks I didn" t have time to post any news for a couple of months because ........ the F4U-1 birdcage Tamiya 1/32 scale OBB ........now finish paint , gunze and tamiya , AK interactive wash , pigment AK interactive and tamiya , watercolor pencils , resin parachute true details , decals barracuda "MARINES DREAM" Bougainville 1943 First , I didn't plan on punting the shark mouth , actually half of it, as I didnt know anything about this half noz art on VMF 214 and VMF 222 Corsair. Second, I wasnt able to see any picture that could have prooved it, but the other side. At the end, I ordered the two volumes of Aircraft Picturial, based on Corsair. Volume 1 page 27, you can find a Marines Dream's picture with the wanted side , of the shark, on which you can clearly see the eye and the inscription, placed under the cockpit. At that time I could have it fixed in adding the noz art. I hope you like it .. Best regards Pascal4 points
-
How do chaps. Due to the fact that my Panzer GB build ground to an absolute halt I needed to seriously get my mojo back. I got this for Christmas last year and thought why not. This is the first time I've ever done a kit of this type and is a total change from my usual fare. Just a few snaps of the finished kit. Main base colours were applied with an airbrush. Everything else was than done by brush. The the painting was done with Games Workshop paints. The plan is to incorporate this into a diorama with some of these. Plan to make a start on the figures tomorrow. Regards, Steve4 points
-
I had long wanted an Air Rhodesia Boeing 720 in my collection, and was inspired by Mitchem here ( thank you Mike ) but was not going to take on another vacuform, and neither could I make my own decals. Enter Roden, with their 1/144 720, and F-Rsin with their beautifully performing, whisper thin, decals, and off I went. The Air Rhodesia Boeing story is straight out of the pages of "Boys Own World", depicting the derring-do of the Empire-Building type chaps. With U.N. sanctions prohibiting the purchase of aircraft, three crews go through the United Airlines Boeing 720 conversion course in Denver CO - saying they are part of a new low cost South African airline that is being formed. A Front Co. in Paraguay, an unlisted Liechtenstein finance company, fake flight plans to South America, and in 1973, the triplets, three Booeing 720's arrive in Rhodesia. All jolly exciting stuff! Sadly, my modelling, and photogarphy, skills still need some honing, so YP-YNL Matabeleland is not quite the tribute I was going for - but here she is. Cheers, Mike4 points
-
Here's my latest. Rather new Modelsvit's Su-17M in 72 scale. The model went together rather pleasantly, and apart from some headscratching moments with the landing gear the build was trouble free. No filler was used all along. The model was painted in tamiya acrylics, the gun plates were created from precut aluminium foil, and glued using future. Decals from the kit, and behaved impeccably, just a touch of Mr.Setter to get them all snuggly in the shallow panel lines. Weaponry in the kit was rather bad, so replaced the weapon load with the Ash.32 missiles from the Jak-38 Revell kit, with scratch built pylon. Pitot had some vanes added from scraps of PE. All in all enjoyable build. Thanks for looking. Cheers,4 points
-
The phinal of my three 1/48th McDonnell-Douglas Phantom builds, this is the ubiquitous Revell F-4C/D kit built as F-4C serial 64-0776 operated by the 142nd FIG out of Portland, OR by the Oregon Air National Guard in June 1989. she was named 'Miss Piggy' and was a triple Mig killer. This is the fifth 'Revellogram' 1/48th F-4 that I have built and I still love this kit. On the downside it has raised panel lines and a couple of small issues but in general the kit goes together really well and the end result has that essential 'Phantomness' that I have loved since I saw my first Phantom air display at RNAS Yeovilton in 1970. This is my first Hill Gray painted Phantom. The paints are standard Humbrol enamels with Metal Cote applied to the jet exhaust areas. I have finally lost patience with my Harder & Steenbeck Ultra airbrush - it is almost totally bunged up and I can't unbung it - so I reverted to my ancient Badger 200 airbrush and it gave me really good results. The masking went well too and the result is a very clean looking Hill Gray Phantom The decals are from Speed Hunter Graphics 'USAF Phantom MiG Killers - Part 1'. Speed Hunter Graphics is a offshoot of Reid Air Publishing and is run by one Jake Melampy who is a superb aviation photographer and has published several books for military jet modellers in the USA. Hopefully the photos give an idea of the quality of these decals, they apply very easily and they are very detailed. The Oregon eagle on the tail fin below is a three part decal: Even the plain side looks good: 64-0776 is quite unique in that she is the only Phantom to have used each of its three weapons systems to destroy a Mig. I was keen to reflect this in the weapons loaded and I raided the new Academy F-4B kit which contains sprues with multiple versions of Sidewinders, Sparrows and a gun pod. This ANG F-4C carries 4 x AIM-4J Sidewinders, 4 x AIM-7F Sparrows and an SUU-23A 20mm gun pod. The decals and paints were sealed with a spray of Humbrol enamel matt varnish. I decided not to add weathering to this Phantom, the majority of ANG Phantoms of this time period were kept in very clean condition and from photos I have seen posted elsewhere 'Miss Piggy' was no exception. What would I do better next time? I lost patience with the gap behind the rear cockpit canopy, next time I will use filler here (as another Phantom modeller has shown here recently). i also didn't really pay full attention to the application of the decals and a couple of them have silvered. So that is the last of my three Phantoms, I really enjoyed building this one. Think I need to take a break from Phantoms for a while now! Comments and critiques very welcome Michael4 points
-
Accuracy, yes, if you know your subject. I knew the Airfix 1/72 Sea Harriers were borked the minute I saw a picture of the first test shot. The question of the nose is one of perception - if you are used to seeing the Sea Harrier nose with a black radome seeing one without that can affect what you perceive you see. (the nose looks longer, or maybe the black one looks shorter - it's an optical illusion). Like Stephen, I remain sure this will be a good kit.4 points
-
Continuing to make tiny steps forward. . . . . . Starting to think about rigging, guess what? The Airfix deck ring bolts are like beer barrels sooooooo a bit .2mm brass wire gently annealled with a lighter and twisted up around a piece of 0.3mm wire Deck plate and a touch of solder paste. soldered with a lighter Epoxy glue into a hole in the deck Liferings painted up, probably should be painted to match the bulkhead behind but I like a touch of colour (Citadel colour 'Vomit Brown') and in place along with flag locker and fire extinguisher Fire extinguishers replaced with 'Friendship Models' WWII tank jobs General view showing stbd torpedo tubes etc fitted Ever closer, thanks for looking in Kev4 points
-
4 points
-
Thanks chaps! Schwatzgrau is on, although in reality it seems more of a very dark blue-black,check these photos, http://www.airfighters.com/photo_43235.jpg http://www.airfighters.com/photo/56499/M/Germany-Air-Force/McDonnell-Douglas-RF-4E-Phantom-II/35-25/ I am happy with it, though the camera isn't quite capturing the hue. There were 2 versions of the camo scheme, Norm 83.A and 83.B. I chose A which has more of this darker colour, looks more mean i think . Although the schemes were meant to be standard they do vary between jets so I had to look at a lot of photos to correct the pattern. Hasegawa colour plans were not accurate and seemed to be a mix of both schemes. Thanks for any comments or advice, David.4 points
-
Hi all This is my recently completed Academy 1/48 P-47D. I've used a Mustang model cockpit (which came with the kit) and engine from Quickboost. Finished with Bare Metal Foil Matt Aluminium and SuperScale decals depicting a 353rd FG Jug from the 350th FS, piloted by Lt. Col. Ken Gallup.4 points
-
Here is the same tire painted and with a little weathering. NOTE. I did NOT FILL any gaps in order to show the result. I think the fit could be improved by: (a) cleaning up the seam on the "Core" - not filling but just ensuring there are no high spots or ( filling with Mr Surfacer or an acrylic putty and cleaning the excess with rubbing alcohol. I will be stripping this wheel down , filling and repainting (later) And for those of you who want to know how "Flat"... Also note that the hubs are seperate making the painting much easier.4 points
-
@Infofrog: it's a lot of work indeed and I enjoy it Thanks for taking the time to comment in this topic, it's much appreciated. That goes for alle commenters, I know that it's much easier to just watch and read. Which is perfectly okay, of course, but it's even nicer to see reactions @Jockster: thanks for participating in the experienced pain. Ah well now I got the time to do something else... anyway thanks for following this thread. Detailing a 12 pounder gun 154. Indeed being patient with the hull progress, I decided to give myself a bit of a present: fast-forwarding to a 12 pounder gun. In 1907 the ship carried 24 of these units, supporting the Dreadnought-famous 10x 12 inch guns. In 1916 two 12 pounders were removed, one year later another four. I'm building the 1907 version so I'll have a lot of fun. I like detailing and on the 12 pounder I could safely do so. Pontos provides a nice brass barrel, which of course I used. It doesn't provide any photo etch. WEM does, but most of it I didn't use. Each gun is supplied by WEM with 3 photo etched parts: one starboard, one port, one top. I only use part of the top. Before I decided on that, of course first the parts had to be cut out. 155. These are the etched parts, the barrel and the plastic original. The two O-shapes on the photo etch parts for the sides aspire to depict wiring, which would be way oversized. 156. Plastic barrel has to be cut off. Mind the recoil spring box, situated directly underneath the barrel. It should stay there. 157. The photo etch part for the top is flat, as photo etch is. That's great for the longitudinal V-shaped thingy up front, but the sighting gear should be cylindrically shaped. So I cut off those bits of a new part (after the first part had left earth). 158. In order to handle the tiny bits more self-assuredly and easier, I made this little jig with an old drill bit. 159. To make the wheel for the sighting gear, which needs to be 0,97mm., I simply punched a 1mm. disk from some .005mm. brass sheet. 160. I think it makes a difference for those who are interested in that kind of stuff. 161. Meanwhile I decided to sand the repaired hull. According to the instructions it should have fully cured. Indeed it was rock hard, seemingly. Still according to the instructions, no less than 300 KG's of brute force would be required to break it. Guess I'm that strong. Either that or my (intendedly careful) sanding activities are more fierce than I would have reckoned. 162. So why not use good old liquid poly! With a little help from Evergreen (U-rod) everything now seems nice and strong. 163. The layer (or trainer), being the guy who aimed and shot the gun, was protected from gun recoil by two shields. First I made a rectangle from .005mm brass sheet, then I curved it using this apparatus: 164. (so, first this rectangle would be cut and bent) : 165. Then the rectangle, having a slight curve already, would be bent further around a needle. I used fingers and tweezers for that. 166. ... to generate something like this. 167. The aft part of the gun was made cylindrical (sanding stick, sanding paper, knife). 168. Port side, a Z-shape was to be made to hold the elevation hand wheel. Using this wheel, the layer would raise and lower the gun. 169. The elevation hand wheel I had originally planned to use was the one from the WEM set. Later on I thought 'why not use polystyrene with stretched sprue, they'll get a stronger bond (liquid poly) than brass and any other material. So that's what I did. Here my first attempt, using liquid poly to soften the plastic and attach it to the brass (who said liquid poly can't glue polystyrene to brass? ). Unfortunately I lost this combo, hence the plastic substitute. 170. Liquid poly doing its work. 171. Elevation wheel in situ. 172. The layer wheel support for the starboard side, bent. 173. This was my first try with Gator Grip glue (had to order some specific modelling materials and decided to give Gator Grip a try, having used Gator Glue before - which is actually a good glue for modelling!) and I'm not too convinced about its qualities in these tiny situations. Tried a couple of things, such as applying on one joint, applying on both joints, waiting a couple of minutes etc. For me it just doesn't do it - yet. Maybe I'll have better luck on larger surfaces. Anyway I solved the issue by letting some thin CA glue flow along the joints and immediately applying accelerator. Works great now. 174. The final result: a walkaround along the newly made part as well as Zvezda's original. 175. On the next pic one can also see the firing circuit wiring. For that, .003 line (Uschi 'rig that thing' fine size) was used. 176. And a short video, to get a better 3D-impression: https://flic.kr/p/tZw24M. Perhaps I should consider purchasing a macro lens for our camera. Now every picture (and the vid above) is made with my iPhone 5S. It has a nice camera but unfortunately doesn't do justice to the details. 177. This 12 pound gun consists of the following 19 parts which I added in this order: 1) Plastic Zvezda original (modified). 2) Pontos barrel. 3) Recoil protector (port). 4) Recoil protector (starboard). Extension has to be bent to the side. 5) Training rack (made using 'eyebrow method'). 6) Z-structure (port). 7) Elevator wheel (port). 8 ) Elevator wheel rod (port). 9) U-structure (starboard). 10) Layer wheel (starboard). 11) Layer's shoulder rest (port). 12) Trainer's shoulder rest (starboard). 13) Rod (starboard). 14) and 15) Wiring (2 parts). 16) WEM photo etched part for top (modified). 17) and 18 ) Sighting gear (2 parts). 19) Sighting gear wheel. For those who want to also modify their 12 pounders (to a greater or lesser extent), see hereunder the data I used. They were calculated from drawings as featured in the Roberts' book. Spent time thus far: 130 h.4 points
-
For those of you that are concerned about the time frame for the GB. There will be no closing on the gallery, no poll just a lasting memorial and tribute to Merv. You can carry on updating your build thread and posting to the Gallery past the end date, but in fairness to all the other GBs I can only keep this STGB pinned as current for a period of time. I hope that helps everyone.4 points
-
No no. I'm using the Mr. Color which is lacquer. The Hobby Color is the acrylic line by Gunze. It's been several years now since we've stopped being able to get Hobby Color domestically in the US...I believe it is a labeling issue... Lacquer is a lot like acrylics in their drying time. They are dry to the touch in moments after spraying unless you use something with retarder in it like Mr. Leveling Thinner....even then it's touch ready in a few minutes. I use Model Master enamels too. I thin them with lacquer thinner as well. That cuts the drying time some, but you still need to be careful with handling. That being said. I usually will do all three steps at once: base, shade, blend. It may be best to wait it out...but..."ain't nobody got time for that." So I worked on getting the green bands on and some other detail painting. The bands are bordered by white. I figured it'd be easier to lay the green down and then mask for the white. I'm still on the fence as to whether I think the green is too bright. It's dang close to the Collings Foundation Phantom, but you know what they say about restorations. The Collings Phantom also doesn't have the full canopy frames painted...which can clearly be seen on the real OY463 period photos. I think maybe the high gloss finish of the enamel paint is making it worse, so when I get it toned down if it's too bright I'll use some filter magic to tone it down. Did the red areas along the flaps with some Vallejo red and a brush. Got the nose dolled up Tanks and pylons were done with the body, but I got some gloss on those so here they are.4 points
-
Thanks All, The first stairway is installed! This is a small attempt at first. To install this little stairway was very stressful. I had to custom fit the handrail riser and custom cut the handrails to fit between the installed walkways. trying to do this while the walkways are hanging there and not messing any previous work already accomplished was very tricky. It took about 1.5 hours to get all just right for fitting. Around the corner and the next set of walkways and stairways are next. Be back shortly. Thanks All.4 points
-
Su-25, Peruvian Air Force 2005, no. 071 in 1/48. Made from an old OEZ Letohrad (Czechoslovakia) kit. I used photoetched parts from Eduard and Part. The rest is self-made (for example flaps, slots, airbrakes etc.). Decals are from Authentic Decals 4847 set. Miss of stencils is not a mistake in this case.3 points
-
I'm hoping to do a quick build on this, with the Airfix1/72 kit providing the basis. This is a tribute to a something of a hero of mine, the late Hugh Falkus. I first came across him through his work as a writer and producer on theBBC's natural history progamme, "The World About Us". Later, I read his books on fishing, those authored alone and with other such greats as Dick Walker, Fred Taylor and Fred Buller. Finally I was exposed to the work he did with the Nobel prize-winning biologist Niko Tinbergen. If I could only have or recommend a single book on fishing, Falkus's work "Sea Trout Fishing" is the one I would chose. Although it might appear to be narrow, it is a superb volume explaining how despite having all the tackle and technique in the world, you will cast vastly more fish by understanding watercraft and biology. Long before any of this, Falkus was a fighter pilot. He flew Gloster Gladiators, which he described as the "last of the gentleman's aeroplanes" before transitioning to Spitfires. Whilst part of 222 Squadron, he took off on 1 June 1940, in pursuit of German raiders. He chased the Germans too far, and went from hunter to hunted, finding himself tangling with Bf109's of I/JG26 and Bf110s of I/ZG1. His aircraft was damaged (possibly the hydraulics, as the flaps are hanging loose in photos) and he was forced down, landing at Le Toquet. Falkus claimed to have damaged two of his attackers, but no records exist to support this. He spent the rest of the war in POW camps, including Stalag Luft III. Although he didn't go through the wire, he was involved in work on thirteen breakouts! Head armour added to the kit part. The timeline doesn't support the aircraft having back armour, which was added as an emergency item during June 1940. Apart from the armour, all I added to the cockpit was the seat harness, made from foil-backed paper (off the top of a coffee jar) and wire for the buckles. The bit sticking out to one side is the anchor cable for the Sutton harness, to be stuck inside the fuselage.3 points
-
Whew! The new Twin Otter decals art has gone off to the printer, and am I glad that's over with! When I started the Twotter art I thought I knew the aircraft as well as anyone, having poked around and photographed them often enough, but it turns out I was wrong. First I gathered some really neat schemes, but once I got into the artwork I discovered that not all Twin Otters are equal. For example, there are three different window configurations for the aircraft. There's a passenger version, a cargo version, and something called the VistaLiner with huge picture windows intended for sightseeing. Unfortunately, some of the schemes I had wanted to do were in the non-kit configuration. As I didn't want anyone to have to convert the kit to use the decals I had to re-think the list of schemes. Then I had to make sure that none of them were sporting high-flotation tires or other weirdness. Another annoyance was the fact that no two of the subjects had the same antenna configuration! OK… so we add a 4th page of instructions showing the antenna arrangement for each of the aircraft. I wanted modellers to be able to build more-or-less OOB, with schemes that were interesting but relatively simple (aside from one camouflaged aircraft). After many iterations of artwork, and lots of test fitting, these are what we ended up with. My printer - David Winter at Canuck Model Products - is very busy right now, so it will probably be July before these will be finished. We're aiming for the US IPMS Nats in July. I'll keep you posted. Is this a neat scheme or what! Unfortunately the window configuration would have necessitated moving two windows and adding two new ones to the kit. Page one - the schemes. Page four of the instructions showing the different antenna configurations.3 points
-
I've been able to get a coat of primer on this today in between the showers, I'm pleased with the wing join there was just a smear of PPP needed. A couple of areas still to clean up (cockpit vents and the heat shield area) and some bits of rescribing across the spine and I should be able to get some paint on it. I've forgotten to photograph the lower wing/fuse joins will take some later and edit the post. Edited to include photo of underside 03/06/2015 A little remedial work to do underneath too, I've only just noticed the pinhole behind the nosecone..3 points
-
Next I built one of the wheels from the Top Studio PE wheel set, I would suggest to anyone building this kit to invest in these wheels, they really look nice and will set off the model perfectly: At this point I mocked it all up to test fitment and get a general idea of wiring and plumbing, etc3 points
-
Another recent build. The Airfix Bf109E-3 Club Edition. Went together very nicely, this one. Much fun. Hand brushed with Revell Aquacolours (y)3 points
-
Thanks for all the kind words everyone, it's much appreciated. Now, for the long overdue update. As was inevitable, after doing the basic cutting, layout and initial fitting real life got in the way and progress has slowed significantly. Most of the work since then has been the little fiddly stuff for all the detail parts. Here's what's been done so far: The resin nose has been glued first using thick superglue then, after adding a couple of plasticard strips, some epoxy adhesive to overcoat the joint: The fairings over the forward Sparrow wells were added, these still need to be faired in with filller The cockpit: I did paint the etched instrument panel faces but wasn't happy with the result so was stripped back ready for another go. This is the front IP as it is now: Here's the work that's gone into the jet pipes. Instead of painting them black inside I thought I'd have a go at recreating a more representative look. The J79 had a coating on the exhaust liner which gave it a green colour, so I airbrushed some Humbrol 120 on the inside. The turbine was sprayed with some Alclad Burnt Iron and after this was dry some red-brown acrylic was dry-brushed on. The etched flame holder was sprayed black. Finally the cans were sprayed with a combination of Alclad Stainless Steel and Jet Exhaust with a very dark grey interior. The turbine and flameholder One of the jet pipes : The cockpit is now fully glued into the fuselage and I've added some strips on the lower section to support the upper fuselage and the inevitable filler once the two are joined. That's it for now. Hopefully now that I've got past the big hurdle of the cockpit the build will pick up speed. I just have to decide when to install the intakes in order to best tackle cleaning up the various seams. Jonathan3 points


This leaderboard is set to London/GMT+01:00